
GnuCash is a simple-to-use accounting program. It has several advantages over a spreadsheet, such as reconciliation and check printing. Also, one of its chief advantages is that it is simple and easy to use.
In this chapter, you will learn the following:
How to create a checking account
How to enter checks
How to create a memo line
How to print checks
How to create a savings account
How to reconcile your bank statement
How to schedule payments
You can download GnuCash from http://gnucash.org . Follow the usual installation instructions: download the file, run it, and accept all the defaults.
Creating a Checking Account
Let’s start by creating a new checking account. When you first start GnuCash, it displays a GnuCash Tip Of The Day dialog, as shown in Figure 11-1. Like most tips, it’s not that useful, so click Close.

Figure 11-1 Tip Of The Day dialog
You’ll also notice the first time you start the program, it starts slowly. It has a lot of initialization to do. The next time you start the program, it will be much faster.
You need to create a new account. If you are running GnuCash for the first time, it will automatically start the New Account Wizard. If not, from the main window , select File ➤ New File, as shown in Figure 11-2.

Figure 11-2 Main window
The New Account Wizard starts and displays the information screen shown in Figure 11-3. Click Forward to continue.

Figure 11-3 New Account Wizard, first screen
Next the system wants to know what currency you use. Since we are in the United States, we’re going to use the United States dollar , as shown in Figure 11-4. Again, click Forward to continue.

Figure 11-4 Currency type
The next screen, as shown in Figure 11-5, allows you to set options for your set of accounts (called a book in GnuCash terms). In this example, you are not doing anything fancy, so leave the defaults alone and click Forward .

Figure 11-5 Book options
Now you need to select what type of accounts you are creating, as shown in Figure 11-6. At the top of the list is Simple Checkbook. Select that and click Forward . (You are permitted at this point to wonder how many steps are left in this wizard! Don’t worry, you’re almost there.)

Figure 11-6 Selecting account types
Now you come to the screen where you get a list of accounts and can set the initial value of your checking account, as shown in Figure 11-7. In this case, let’s say you have $3,000 in the bank, so click next to the Checking Account entry and enter 3000. Then click Forward.

Figure 11-7 Account setup
Finally, you reach the Finish Account Setup screen , as shown in Figure 11-8. Rejoice and click Apply .

Figure 11-8 The end of the wizard
One more screen appears so that you can save your work, as shown in Figure 11-9. Enter a file name and click Save As.

Figure 11-9 Saving the file
Finally, after much effort and lots of wizard work, you have reached the Accounts screen, as shown in Figure 11-10. Initially you won’t see your checking account, but by clicking the triangles next to Assets and then Current Assents, you can expand the hierarchy and see your new checking account.

Figure 11-10 Accounts screen
Click Checking Account to select it, as shown in Figure 11-11, and then click the Open button to open the account .
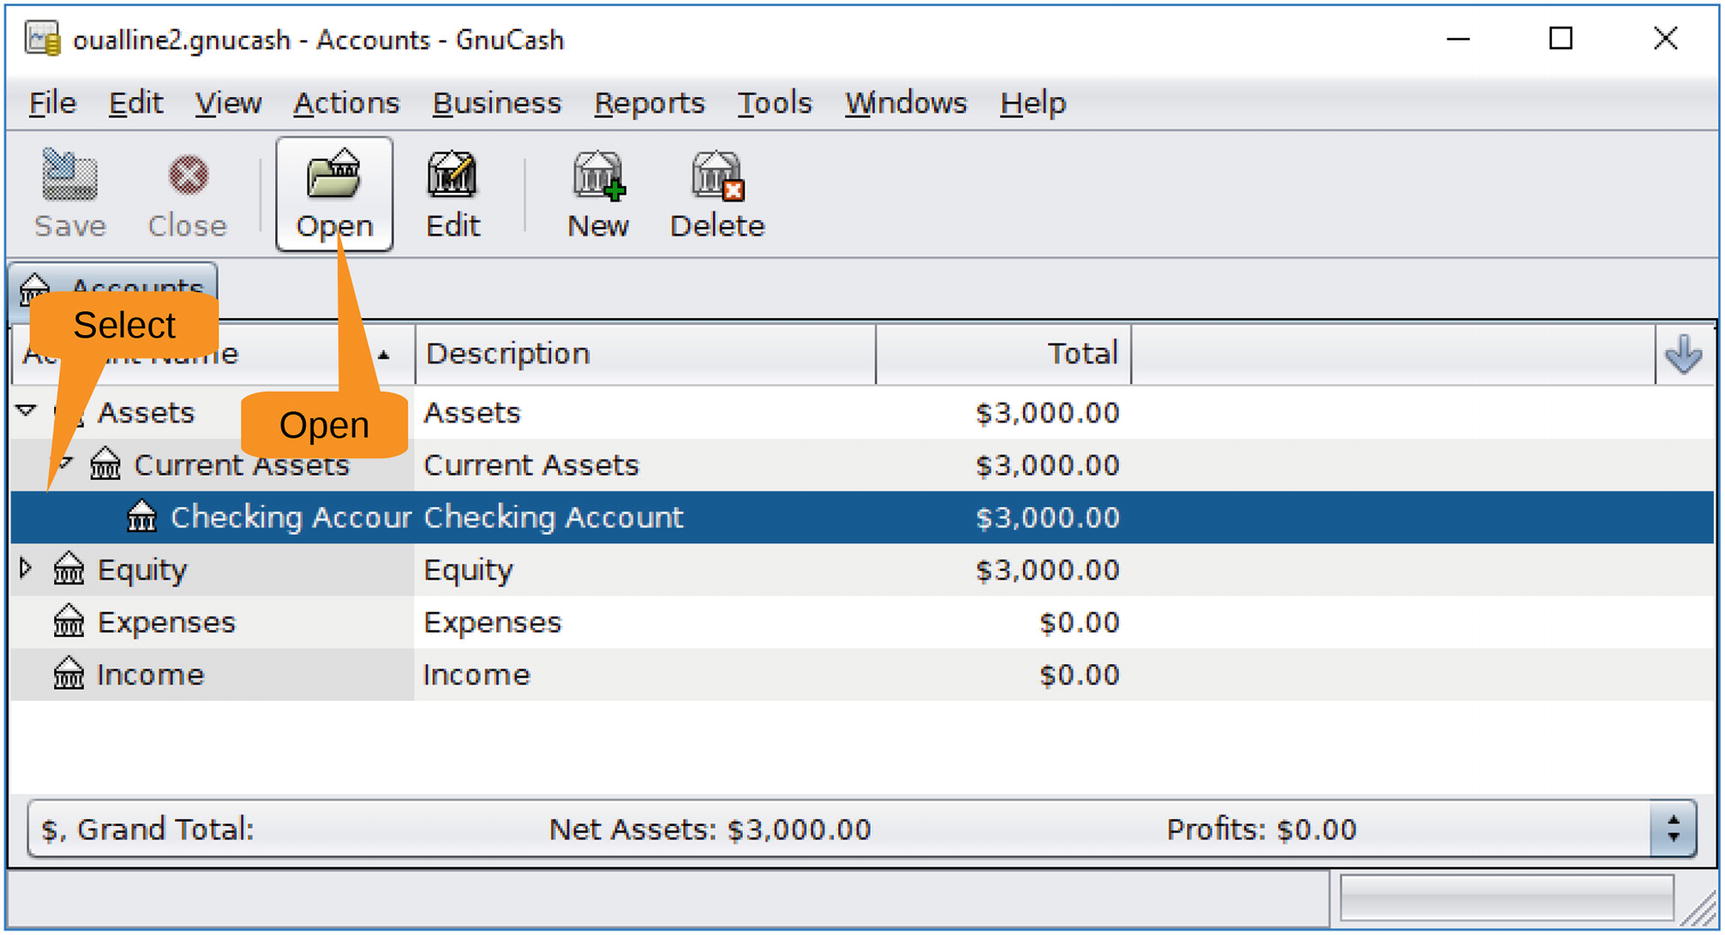
Figure 11-11 Opening an account
The ledger appears, as shown in Figure 11-12.

Figure 11-12 Ledger window
Writing Checks
Now let’s write a check for your monthly rent. There’s already a blank entry at the bottom of the ledger, so click in the Date field to select the date. Set the date of the check in the calendar that appears.
The Num field is next. Press Tab to go to it and enter the check number, 100. Press Tab to go to the next field, Description . Enter the name of the payee. Go to Transfer by pressing Tab. Leave the default here and press Tab. This is not a deposit, so press Tab to go to Withdrawal and enter the amount, 1000.
Press Tab again, and the balance is computed. Press it once more and a new line opens so you can start the process all over again. Figure 11-13 shows the result.

Figure 11-13 New check
Now let’s add a few more checks, as shown in Figure 11-14.

Figure 11-14 Checkbook with a few checks written
Working with a Memo Line
By default your ledger displays information in a compact format. This leaves you no room for a “memo” line . Say you want to put something like “April Rent” on your rent check for April. To do this, select View ➤ Double Line, as shown in Figure 11-15.
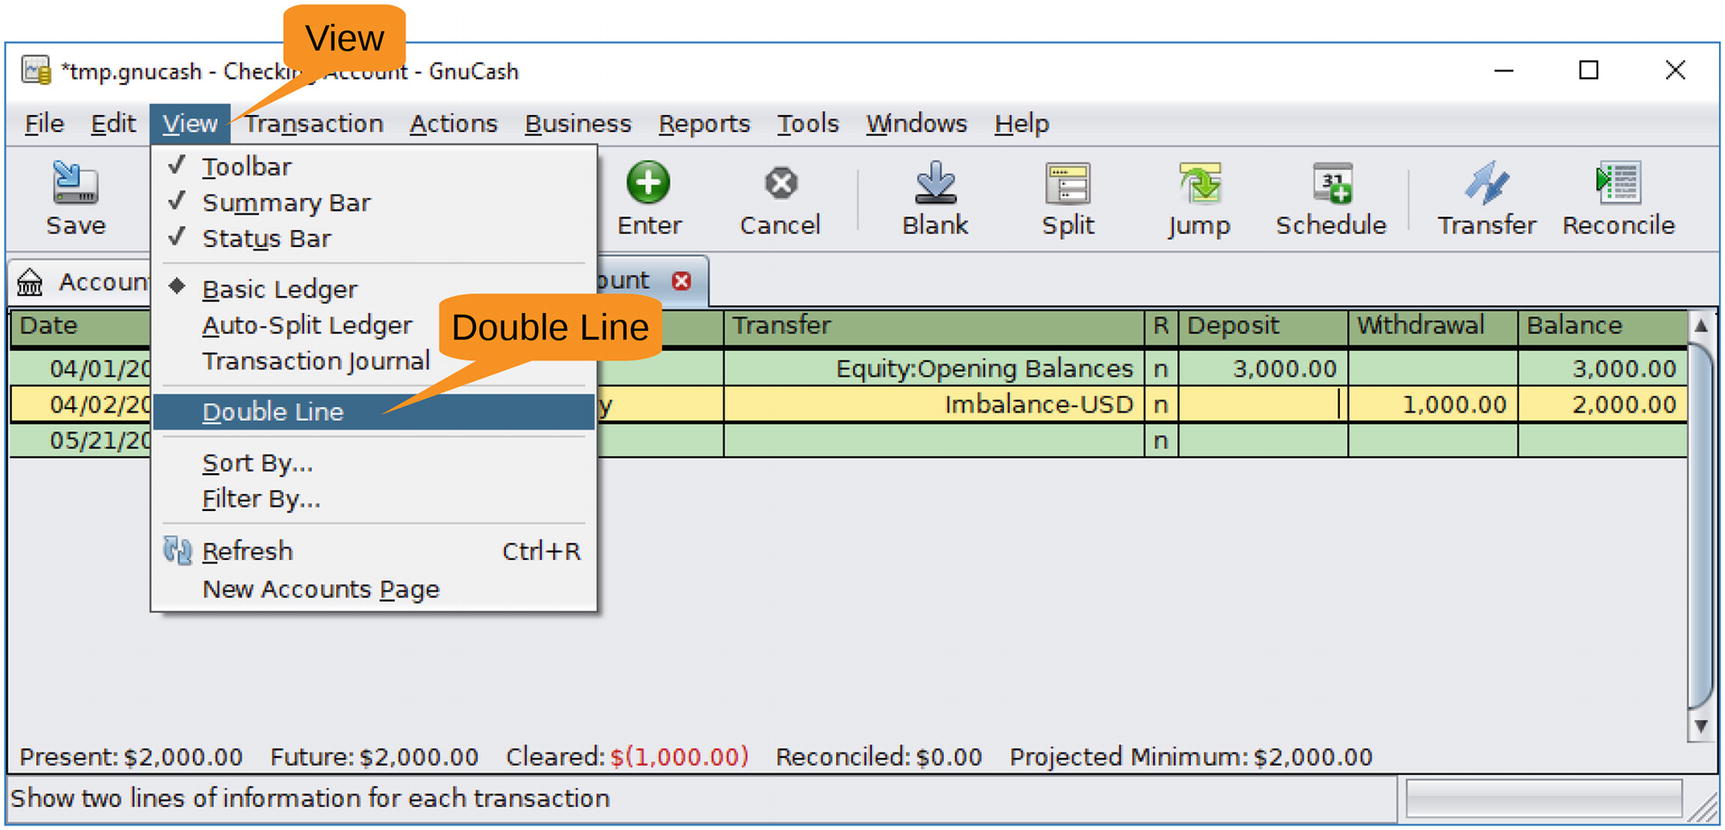
Figure 11-15 Selecting Double Line
This gives you the expanded ledger shown in Figure 11-16 and allows you a place to enter the memo .

Figure 11-16 Double lines for each entry
To turn it off, simply select View ➤ Double Line again.
Printing Checks
Adding checks to the ledger is only half the battle. You need to print them as well. One way is to hand-write them, but if you have a computer, why not let the computer do it? To print a check, click the check in the ledger and select File ➤ Print Checks , as demonstrated in Figure 11-17.

Figure 11-17 Printing a check
The Print Check dialog appears, as shown in Figure 11-17. At the top there is a “Check format” pull-down that allows you to select from several different types of standard laser printer check formats. For example, in Figure 11-18, we have selected Dulex(tm) Personal Checks US Letter.

Figure 11-18 Selecting a check format
The dialog also lets you choose whether the check is on the top, middle, or bottom of the paper. Click Print to print the check .
Note
If you are printing checks for the first time, we suggest you make several copies of a blank check to practice on before using the real thing. Sometimes the positioning of the various fields is off.
Creating a Savings Account
Let’s say you have a savings account as well. Because this is not part of the simple checking account setup, you need to add it. In the main window, click the Accounts tab and then the New icon on the toolbar, as shown in Figure 11-19.

Figure 11-19 Creating an account
The New Account dialog appears, as shown in Figure 11-20. For the account name, enter Savings. For Parent Account, select Current Assets . Click the Opening Balance tab to go to the next screen.

Figure 11-20 New Account dialog
After clicking Opening Balance , you will see the screen shown in Figure 11-21 where you can enter this information and then click OK. Don’t worry if you forget the opening balance; you can always add a ledger entry for the opening amount .

Figure 11-21 Opening Balance setting
Now you will see the familiar Accounts screen (Figure 11-22). Select Savings and then click Open to get to the ledger for your new account .

Figure 11-22 Account list with savings account
Now let’s add an entry to indicate a savings-to-checking transfer , as shown in Figure 11-23. Set the field values as follows:
Date: Leave the default for today.
Num: Leave this blank.
Description: Enter Savings ➤ Checking.
Transfer: Click the pull-down and select Current Assets: Checking Account.
Increase: Leave this blank.
Decrease: Enter 3000.

Figure 11-23 Savings ledger
Now let’s go back to the Accounts tab and open your checking account . Figure 11-24 shows you that a new entry has been added for the transfer you just made.

Figure 11-24 Checking account with transfer
Reconciling Checks
Every month you get a statement from the bank indicating how much money they think you have in the bank . Sometimes it’s the same amount as you think you have in the bank. So, every month you need to go through the process of reconciliation to correct any errors you’ve made in your ledger. (The bank never makes an error.)
To start the reconciliation process , click the Reconcile icon, as shown in Figure 11-25.

Figure 11-25 Starting the reconciliation process
A Reconcile dialog appears (Figure 11-26.) This gives you a chance to enter the date of the statement as well as the ending balance. It also gives you an excellent example of what happens when you try to put a long title in a small dialog.

Figure 11-26 Reconcile dialog
Another dialog appears also titled Reconcile . (We’ll call the one in Figure 11-26 the “big” Reconcile dialog.) It lists the unreconciled transactions and gives you a chance to add them to the statement by checking them off.
If you check off the correct items, the Ending Balance and Reconcile Balance values should be the same. If they aren’t, you can go back into the ledger and fix any mistake you made and try again.
Scheduling Checks
Unfortunately, paying rent is not a one-time occurrence. You need to do it every month. Let’s tell GnuCash about this so it can schedule a payment every month. Click in the rent entry and then click the Schedule tool. Figure 11-27 illustrates this process.

Figure 11-27 Starting the scheduling process
The Make Scheduled Transaction dialog, as shown in Figure 11-28, appears. Initially it will try to schedule the transaction as Daily. Your landlord is greedy but not that greedy. He wants his rent monthly. So, change Frequency to Monthly. Also, you want checks to be written on the first of the month, so start the series on May 1 (5/1/2017) by changing Start Date. The schedule on the right side will change to reflect your new schedule. Clicking OK stores the schedule.

Figure 11-28 Making a scheduled transaction
Now let’s wait until May 1 passes. Let’s see whether any scheduled transactions are pending by selecting Actions ➤ Scheduled Transactions ➤ Since Last Run, as shown in Figure 11-29.
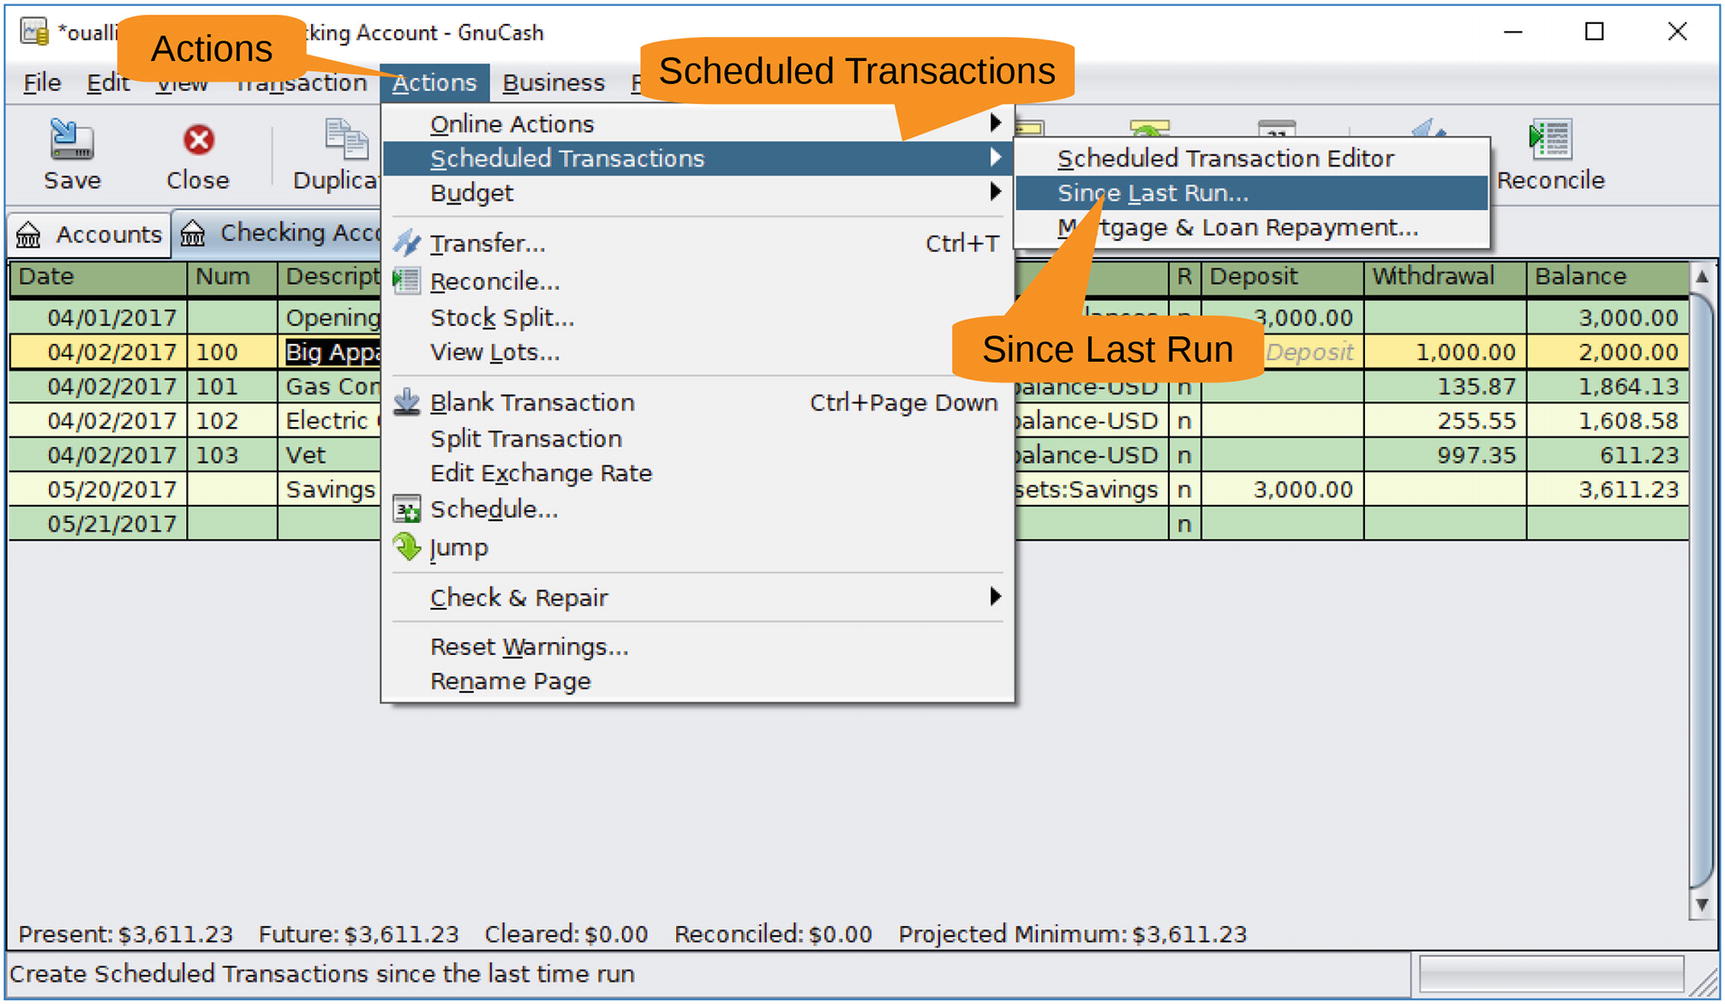
Figure 11-29 Checking for scheduled transactions
The Since Last Run dialog appears, as shown in Figure 11-30. Your rent check is marked To-Create. Let’s create all the pending transactions by clicking OK.

Figure 11-30 Since Last Run dialog
The dialog disappears, and you now have a rent transaction in the ledger (Figure 11-31). All you have to do is change the check number and print it.

Figure 11-31 Ledger with scheduled transaction
Summary
GnuCash is actually a pretty good basic accounting program, which means that it has tons more features than covered here. It can handle not only basic accounts such as checking and savings but also investments, loans, and many other types of items.
It also has a reporting system so you can generate a variety of reports, such as tracking income and expenses. If you have the accounting knowledge to use it, this program is more than enough for home use.