Chapter 7. Deployment
One of the biggest selling points of static sites is that their production requirements are essentially nil. But even with the minimal requirements for supporting a static site, there are still multiple options for developers to choose from.
In this chapter, we’ll discuss the various ways you can take those simple, static files from your development machine and make them available to the world at large. Which you use depends entirely on your needs.
Plain Old Web Servers
Probably the simplest and most familiar solution is to make use of the same old web servers we’ve been using for the past 20 or so years. The two most popular options are the HTTP server from Apache and IIS from Microsoft. Apache is available on multiple platforms, while IIS is only available on Windows.
In both cases, if you have the server set up, “deployment” is simply a matter of copying the output from your static site generator into the web root (or a relevant subdirectory) for your server.
It is likely that you don’t want to manually copy files every time, so you could look into tools that make that process easier, like Grunt and Gulp. Or you can simply use an old-school shell script or BAT file.
There’s nothing special about this setup and nothing else really to say, and that’s a good thing!
Cloud File Storage Providers
Most developers are probably aware of cloud services provided by Amazon, Google, Microsoft, and others, that provide basic file storage. The idea is that you can provision space and then load as many files as you would like. You don’t have to worry about the size of the disk; you essentially treat it as an infinite hard drive to use as you see fit. (With costs, of course.)
What you may not know is that many of these services also provide a way to turn their file storage system into a simple web server. In this section, we’ll take a look at how this is done with both Amazon’s S3 service and Google’s Cloud Storage service. Let’s start with Amazon.
Hosting a Site on Amazon S3
Hosting with Amazon S3 requires you to have an AWS Account. You will need to provide a credit card during setup, but Amazon includes a large amount of disk space in their free tier. Obviously, you should double-check to ensure that the price is something you can afford, but in general, S3 storage is incredibly cheap. You can begin the sign-up process at https://aws.amazon.com/s3.
A Real Example
To give you a real example, I use S3 to host the media assets for my blog at https://www.raymondcamden.com. (The actual written content is stored in Netlify, which we’ll discuss later in the chapter.) I also host a few other small static sites there. My monthly bills over the past year have hovered around 10 to 15 cents.
After signing up, you go into the Amazon Web Services dashboard (Figure 7-1), which can be a bit overwhelming.

Figure 7-1. The Amazon Web Services dashboard
Under Storage and Content Delivery, find S3. S3 groups content into buckets. You can think of them as directories, and generally you’ll want a specific bucket for one specific website. Any bucket can become a website, but if you want to use a specific domain, like www.foo.com, then you must name the bucket that domain. In case you’re curious, to support both foo.com and www.foo.com, you would create a bucket for foo.com that redirects to the www bucket. Redirects are supported by S3 but won’t be covered here. Simply check the documentation for an example.
To begin, create a new bucket (Figure 7-2). You can name it what you will, but for the book we’ll use orabook.raymondcamden.com. You won’t be able to use the same name, so try using something that includes your own name, or if you have a domain at foo.com, try something like orabook.foo.com. For the region, just use US Standard. Depending on your location and your site visitors’ location, you may want to select a region that is more specific.

Figure 7-2. Creating a bucket for your site
Immediately you’ll see a properties panel open and Static Website Hosting is one of the options. Click to open it (Figure 7-3), and you’ll see how easy it is to enable website hosting.

Figure 7-3. Enabling static site hosting
You will need to select an index document. This is simply the document that should be loaded when the site is requested. While you can enter anything here, it is customary to use index.html. You can enter an error document as well to be used when a page that doesn’t exist is requested (Figure 7-4).
Once you click save, you can try hitting your site using the endpoint that S3 set up for you. In case you missed it, it is in the Static Website Hosting section in Figure 7-3.

Figure 7-4. Your new site, broken
Almost there! You still need to add content to your bucket in order for the site to be displayed. How you get files into S3 is up to you. Most FTP clients support connecting to S3 buckets and that’s probably the way you’ll want to go, but you can also upload via the S3 web console. Simply use the Upload button and drag and drop files and folders directly into the web page itself. For this demo, I’ve used the output from the Camden Grounds site created in Chapter 2. You can use any output from the earlier chapters, or simply create a new index.html file with some temporary content.
Before you hit upload, you need to modify permissions for the new assets so they are public. Click the Set Details button at the bottom, then click Set Permissions. On that page, check “Make everything public” (Figure 7-5).

Figure 7-5. Making the assets public
Finally, click Start Upload and the process will begin. Depending on the number and size of the files, it may take a few minutes. The website does a great job of providing feedback as assets are uploaded (Figure 7-6).

Figure 7-6. Upload progress
When done, simply reload the browser with the endpoint URL and you will see your site (Figure 7-7)!

Figure 7-7. Your site is now live!
And that’s basically it. The last step is to update the DNS for your domain to point to Amazon. Specifics on that can be found on the Amazon site. Amazon also supports basic redirects. If you migrated from a dynamic site using PHP, for example, you could tell Amazon how to handle requests for those old .php URLs so that visitors don’t get errors requesting old URLs.
Hosting a Site on Google Cloud Storage
Working with Google’s Cloud Storage system entails a similar process to Amazon. As before, you’ll have to sign up at the product page (https://cloud.google.com/storage) and provide credit card information. As with S3, prices are very cheap, but I’ll repeat the warning. Check the prices carefully so you don’t get a surprise at the end of the first billing period. And again, just like S3, Google offers a generous free tier (currently 300 USD for 60 days).
After creating your account, the first thing you need to do (assuming you aren’t a Google user already with existing services) is to create a project. You can open up the Project dashboard (https://console.cloud.google.com/project) and name it whatever you want. After creating the project, you choose your billing plan. Don’t forget you’ve got $300 of free service for two months, but also don’t forget to close the account later if you change your mind.
After you’ve done this initial work, you can simply open the storage browser (https://console.cloud.google.com/storage/browser) to create your bucket. (If this all seems familiar, that’s good. It makes moving from S3 to Google, or vice versa, that much easier.)
Go ahead and click “Create a bucket,” and give it the same name that we did for Amazon (Figure 7-8). Like with S3, you want your bucket name to match the domain you plan on using, and like S3, it has to be unique. Since we’re creating this bucket in the book, you need to pick a different name.
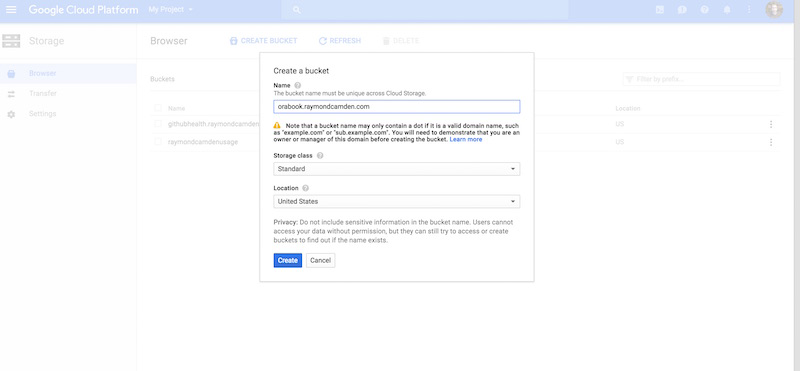
Figure 7-8. Creating the bucket on Google Cloud Storage
Once again, there are multiple ways to upload your files. You can use the web client, but Google also provides a command-line program so let’s try that. Go to the Google Cloud SDK page (Figure 7-9) and select the Install link.

Figure 7-9. The Google Cloud SDK
The SDK Uses
The SDK provides a rich set of tools related to the entirety of Google’s Cloud Platform. Everything we’ve done so far (making a project, creating a bucket) could have been done via the SDK as well. We’ll start off by setting permissions for the bucket. We want them to be viewable by the internet as a whole, so we’ll use the command line to assign everyone read permission to the bucket.
gsutil defacl ch -u AllUsers:R gs://orabook.raymondcamden.com
Let’s explain what this did.
defacl chspecifies a change to the default ACL (ACL stands for “access control list” and is a basic way of looking at security for resources).-u AllUsers:Rspecifies everyone (“AllUsers”) and the read permission.- Finally we specify the bucket. Again, you must change this.
To upload our site, we’ll use gsutil and the rsync command. This will copy everything in one folder up to the bucket. Assuming you’re in the folder containing your site, use the following command:
gsutil -m rsync -R . gs://orabook.raymondcamden.com
Let’s break that down argument by argument.
-mTells the command line to use multiple processes. This is especially handy for an operation that moves a lot of files.
rsyncThe actual command we are using in the SDK.
-RMeans to recursively sync all files and folders.
- The period
Simply means the current directory.
gs://orabook.raymondcamden.comThe name of the bucket. You must change this because your bucket will have a different name.
If you refresh the web client, you’ll see your files. What you see here is—obviously—based on what you used for testing. As before, I used the output from the Camden Grounds website (Figure 7-10).

Figure 7-10. The files now show up in the bucket
To test your site, you can use the following URL, with the bucket name in the middle changed of course: https://storage.googleapis.com/orabook.raymondcamden.com/index.html.
There’s one really important difference between S3 and Google. The S3 “temp/testing” URL was a root URL. The Google one is a subdirectory under the root domain storage.googleapis.com. If your static site uses root URLs, such as href="/foo.html", then it will work on S3 but not on Google. This isn’t a bug per se, and when you have a real domain pointed to the bucket, it won’t matter.
Finally, if you want to get rid of the index.html in the URL, go to your bucket and click the little dots at the end to bring up the menu (Figure 7-11):

Figure 7-11. The Buckets menu
Click “Edit website configuration” and in the window that appears (Figure 7-12), enter the main page value. Note you can also specify an error page.

Figure 7-12. Setting website configuration values for the bucket
Deploying with Surge
Cloud-based file storage systems like those from Google and Amazon work great for static websites, but several products now offer tools specifically tailored for static websites and hosting. The list of such products is growing rapidly and in this chapter we’ll look at two of them. The first is Surge (Figure 7-13).

Figure 7-13. The Surge website
Surge is a command-line-only tool for deploying static websites. It offers a free tier that is great for testing and a paid tier that offers additional features. At the time this book was written, the paid tier was $13 a month and included custom SSL and redirects as part of the feature set. You can see more features and pricing on their pricing page.
Installing Surge is easy. If you have npm installed, simply run this in your terminal:
npm install -g surge
Once installed, you can use the surge command to deploy a static site. Change directories to any of the outputs from previous chapters, or simply make a new folder with an index.html file in it, and then type surge. On your first usage of Surge, it will prompt you to log in or create an account (Figure 7-14).

Figure 7-14. The Surge login/registration
After that, it will prompt you for the directory to deploy (Figure 7-15). It defaults to the current directory.

Figure 7-15. The Surge command line
Simply press the Enter key to accept the default. Next, it will prompt for a domain (Figure 7-16). Notice that it gives you a random domain by default. This is great for testing as you don’t have to worry about DNS settings. You can use a real domain name, but for now just accept the temporary domain provided by the command line.

Figure 7-16. The Surge command line
Press the Enter key again, and Surge will begin deploying your site. The command line will provide a simple progress report, and lets you know if it succeeded (Figure 7-17).

Figure 7-17. Surge has deployed your site
And that’s it! Literally seconds after installing Surge, you can have your site up and running for testing purposes. Open your browser to the domain used in the command line and your site will be there. For updates, you’ll want to use the same domain name as before. You can either specify the domain at the command line with the -d flag, or provide the directory to deploy the domain as arguments, like so:
surge ./ earthy-room.surge.sh
Yet another option is to create a file called CNAME that contains the domain name. This file should be in the same directory as your site and will not be deployed. Be sure to use only the domain name, like earthy-room.surge.sh, and not the URL. In other words, don’t include http://.
Another cool feature of Surge is that it automatically supports “clean” URLs. Any URL that ends in HTML can have the extension left off. For testing, we used the Camden Grounds site from Chapter 2. One of the URLs is the menu. You can see it at http://earthy-room.surge.sh/menu.html. But you can also view it at http://earthy-room.surge.sh/menu. You’ll want to update the links in your HTML, of course, to leave off the HTML.
Surge provides support for custom 404 files by simply looking for a file called 404.html. If you don’t provide one and a visitor requests a file that doesn’t exist, you’ll get a Surge-branded 404 page (Figure 7-18).

Figure 7-18. The default 404 page
Once you’ve built and deployed a file called 404.html like the one in Figure 7-19, Surge will automatically use it when it can’t find a requested file.

Figure 7-19. A custom 404 page
As you can probably tell, the entirety of Surge is run at the command line. So, for example, if you’ve forgotten what you’ve deployed, you can use surge list to see your current sites (Figure 7-20).

Figure 7-20. Your current list of Surge sites
As another example, if you need to delete a site, you can use the teardown command:
surge teardown earthy-room.surge.sh
So how do premium features work? One of the features you have to pay for is custom URL redirects. Custom redirects allow you to define rules for mapping one URL to another. For example, imagine that you deployed a file called menyou.html. Now imagine that you miss this error for months. If you just rename it, then people who bookmarked the old URL will get the 404 page instead. With custom redirects, you can make it so that any request for the old URL is automatically sent to the new one.
Surge supports this by using a special file called ROUTER. (Note that it is all caps like the special CNAME file.) Within this file, every line represents one mapping. A mapping is defined with a status code, an old URL pattern, and a new URL. Status codes can be either 301 (“Moved Permanently”) or 307 (“Moved Temporarily”). The following is an example that would fix the problem described above.
301 /menyou.html /menu.html
Note that you only supply the portion of the URL after the domain name. You can also match a “general” format. Let’s say that your site has a subdirectory called blog with URLs like so:
http://mysite.com/blog/welcome-to-our-blog.html
You’ve decided you want to rename the directory from blog to news. In order for the old URLs to work, you could either create one entry in ROUTER for every single blog entry, or use a generic pattern like the following:
301 /blog/:title /news/:title
In this example, :title will match any string and be used in the new URL as well.
Once you add a ROUTER file to your project, Surge will recognize this as a premium feature and prompt you to upgrade when you deploy (Figure 7-21).
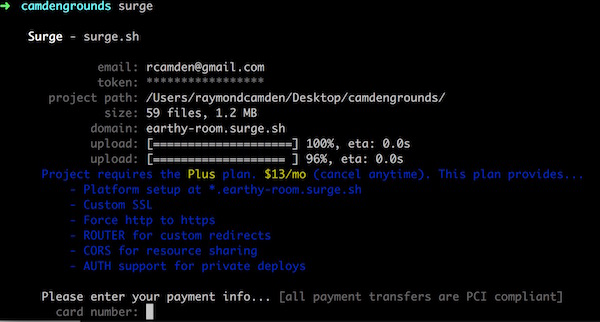
Figure 7-21. Upgrading your Surge site
This is a one-time process. After entering this information, Surge will remember it and won’t prompt you again.
Surge is a great, and simple to use, deployment tool for static sites. Be sure to check the Surge website for a complete list of premium features.
Deploying with Netlify
For our next static site publishing and hosting service, we’ll take a look at Netlify (Figure 7-22). Netlify is my favorite static site hosting service and powers my own blog (which has almost 6,000 blog posts).

Figure 7-22. The Netlify website
Like Surge, Netlify is command-line driven but comes with a web-based dashboard. Currently, Netlify comes with five pricing levels. The lowest level is free and should be more than adequate for testing. The “Pro” level (currently $49) is free for open source projects.
Netlify really shines in terms of performance. They use a CDN with multiple endpoints around the planet as well as a speedy DNS and heavy caching. You can also easily add (free) SSL to your site. Netlify has many other features, but my favorite is probably one of the simplest, form handling. We covered this in Chapter 5 using external services, but Netlify has a generic forms-handler built into the service itself. We’ll see an example of this later in the chapter.
For a full list of features, see the website, but for now, begin by installing the command line:
npm install -g netlify-cli
This will install the netlify command-line program. Go into your static site (for this example, we’ll use The Cat Blog from Chapter 4) and run:
netlify deploy
Authenticating with Your Browser
The first time you do this, you’ll be prompted to authenticate with your browser. This is a one-time process and you can even manage multiple logins if you have to work with different Netlify accounts.
The command line will notice that the site is unknown to the platform and will prompt you to create a new one (Figure 7-23):

Figure 7-23. Deploying a new site
It will then prompt for the directory to deploy (and, as it defaults to the current directory, you can just press the Enter key).
Netlify will then do its thing (with a nice little progress bar) and, when complete, will give you the URL for your new site (Figure 7-24). Like Surge, it defaults to selecting a random domain for you; obviously, you can use a real domain before going live.

Figure 7-24. The site is now deployed
Notice right away something incredibly cool with Netlify. It deployed your site as well as a unique one just for this particular version of the site. Netlify automatically gives you a historical list of views for your content. That means if something goes wrong, you can examine the previous versions to try to nail down when things went haywire. You can even roll back (via the web admin) to quickly correct the issue. To see that web administrator in action, simply run netlify open (Figure 7-25).

Figure 7-25. Netlify’s administrator for your site
Right away, you can see that there’s quite a bit of information here. Many of the options will require you to upgrade, but you can at least see what’s available and decide if they are worth the price. You can see the version history by clicking Deploys. Figure 7-26 shows what it looks like after a second run of the command line.

Figure 7-26. Version history for the site
One feature available in the free plans is hooks and notifications. It would be nice if your client could know everytime the site was updated. Click on Notifications → Add Notification → Email notification (see Figure 7-27).

Figure 7-27. Adding a notification
On the next screen, select “Deploy succeeded” for the “Event to listen for” and then enter your email address (Figure 7-28).

Figure 7-28. Setting up the “Deploy succeeded” notification
Click Save and the notification will be created. Back at the command line, run netlify deploy again. When the deploy is complete, you’ll get an email notification that includes both the main domain as well as the versioned URL (Figure 7-29).

Figure 7-29. The email notification from Netlify
Another free-tier feature, redirects, is done by using a particularly named file in the root of your site: _redirects.
The file should contain one line per redirect with the format being:
old path new path
So a real example could look like so:
/kats /cats
Your file can also include comments by using a hash sign as the first character:
#We thought this spelling would be cute. It wasn't.
/kats		/cats
The default HTTP status code is 301, but you can specify another one by adding it to the end of the line.
#We thought this spelling would be cute. It wasn't.
/kats		/cats		302
And then finally, you can also use “slugs” in the URLs to match specific patterns of URLs.
#Old URL for cat adoptions
/adoptions/:year/:breed		/catsneedinghomes/:year/:breed
Now that we’ve looked at some of the free features, let’s look at a few of the features available on the paid tier. The easiest one to demonstrate, and one of the most useful features, is automatic form processing. Let’s begin by adding a simple contact form to the cat blog we uploaded earlier. The cat blog was created in Chapter 3, and makes use of the Jekyll static site generator. If you skipped that chapter, you may want to quickly read it to get an idea of how it works.
The cat blog used a template (“Clean Blog”) that already had a contact form. I literally just took their form and added it to our local Jekyll blog. See Example 7-1.
Example 7-1. The Cat Blog contact form
--- layout: page title: "Contact" description: "Contact page." header-img: "img/about-bg.jpg" ---<p>Please send us your feedback. We care a lot.</p><formmethod="post"><divclass="row control-group"><divclass="form-group col-xs-12 floating-label-form-group controls"><label>Name</label><inputtype="text"class="form-control"placeholder="Name"id="name"requireddata-validation-required-message="Please enter your name."><pclass="help-block text-danger"></p></div></div><divclass="row control-group"><divclass="form-group col-xs-12 floating-label-form-group controls"><label>Email Address</label><inputtype="email"class="form-control"placeholder="Email Address"id="email"requireddata-validation-required-message="Please enter your email address."><pclass="help-block text-danger"></p></div></div><!-- parts deleted --><br><divid="success"></div><divclass="row"><divclass="form-group col-xs-12"><buttontype="submit"class="btn btn-default">Send</button></div></div></form>
To keep the code listing a bit shorter, a few fields were removed. You can find the complete source code in the book’s GitHub repository. Note that the form has no action. After generating the static version and deploying to Netlify, you can see the form in action.
If you submit the form, however, you’ll get an error (Figure 7-30).

Figure 7-30. The form doesn’t work quite well yet
Correcting this is incredibly easy. First, add a netlify attribute to your form tag:
<form method="post" netlify>
Then add a proper action to the tag. In this case, we’re going to point to a new “thank you” page. (Again, the source of this page may be found on GitHub, but it’s just a quick “thank you” message.)
<form method="post" action="thankyou" netlify>
Don’t forget to redeploy the site. Now when you submit the form, you’ll be automatically redirected to the “thank you” page. So how do you see your submissions? You’ve got a couple of options. On the Netlify dashboard for your site, click the Forms tab to see Netilfy’s Forms dashboard (Figure 7-31).

Figure 7-31. Netlify’s Forms dashboard
Notice how Netlify refers to the form as “form 1”? You can correct this by adding a name attribute to the form tag:
<form method="post" name="Contact Form" action="thankyou" netlify>
Now submissions will be labeled correctly (Figure 7-32).

Figure 7-32. How Netlify identifies your form submissions
You can view your form submissions by clicking the Details link in the dashboard, and Netlify provides an API to fetch form results as well, but most likely you simply want to have the submissions sent to you. In your dashboard, go to Notifications and click to add a new Email notification. For the “Event to listen for,” select New Form Submission. Notice how the dashboard recognizes the forms you’ve used. Simply add your email address and save the notification (Figure 7-33).

Figure 7-33. Setting up email notifications for your form
Submit your form again, and in a few moments you’ll get an email with the contents of your form (Figure 7-34).

Figure 7-34. Form submissions are now emailed to your account
Finally, let’s look at one of the most impressive features of Netlify, automatic processing. On your dashboard, you may have noticed a “Post Processing” section, shown in Figure 7-35. If you’ve upgraded to a paid plan, you can enable multiple processing options for your site:

Figure 7-35. Setting up post processing for your site
Netlify can automatically perform multiple optimizations for your site’s CSS, JavaScript, and images. To be clear, these optimizations are 100% automatic. You literally click a checkbox and, when you deploy, Netlify will optimize what you’ve asked it to optimize and your users immediately get the benefit. While these are all things you could do yourself, let’s be honest—having it done by Netlify while keeping your own code nice and simple is an incredible feature.
How well this works will depend on a few things, of course. In my case, the template used by The Cat Blog had optimized images and mostly optimized CSS and JavaScript already. In my testing, I saw a savings of about 18 KB. This was approximately 5% of the total page load for the home page. Not a huge savings, but for 20 seconds of work on my part, that’s a big win. Going forward, as new images and content are added, I can rest assured that Netlify will handle the optimizations for me.
There’s quite a bit more to Netlify than we covered here and I encourage you to peruse the docs for a full list of features. One feature in particular will be of interest to sites with a large or complex review process—deploy contexts. This allows you to deploy different versions of your site with unique settings to allow for previews, QA, and reviews before updating your main site. By connecting your Netlify site to a Git repository, the entire publication process can be easily tied to your source control for completely automated updates.