Throughout the book, I have used document libraries in various examples and worked with some of the functionality. However, we have not yet investigated documents, forms, records, and libraries in detail. In this chapter, we will take a detailed look at the functionality in SharePoint for managing documents, forms, and records. After reading this chapter, you should have a strong understanding of the complete document life cycle from creation through archival and some good ideas for customizing the capabilities to meet your own needs.
Several times throughout the book, I have mentioned and used site content types. In the previous chapter, for example, you used them extensively to create page layouts for a site. By now, you probably think of a content type as a reusable document definition; however, content types can also define list items and folders. Furthermore, content types can be based on other content types to form an inheritance tree, and when the parent is updated the changes can be pushed down to the child. As you learn more, you'll see that a content type is a lot like a programming class that defines the information structure for a SharePoint site.
Both WSS and MOSS ship with a base set of content types that are listed in the Content Types Gallery, which is accessible from the Site Settings page. As you might expect, however, MOSS has more defined content types than WSS. This is because many MOSS features, such as the publishing feature discussed in the previous chapter, require additional content types such as the Page Layout. Table 6-1 lists the base content types that are common to both WSS and MOSS, their parent content type, a description, and whether the content type is visible in the Content Types Gallery. Content types that are not visible are typically for system use only.
Table 6.1. Base Content Types
Content Type | Parent Content Type | Description | Visible |
|---|---|---|---|
System | The root of the content type tree | No | |
Item | System | Represents any item in a list or library | Yes |
Document | Item | Represents any type of document | Yes |
Form | Document | Represents an InfoPath form | No |
Picture | Document | Represents an image file | Yes |
UntypedDocument | Document | Represents any generic file type | Yes |
MasterPage | Document | Represents a master page | Yes |
WikiDocument | Document | Represents a page in a wiki | Yes |
BasicPage | Document | Represents a basic web page | Yes |
WebPartPage | BasicPage | Represents a web part page | Yes |
LinkToDocument | Document | Represents a link to a document in a different location | Yes |
DublinCoreName | Document | Represents the Dublin Core metadata set, which is an open standard for metadata (see | Yes |
Event | Item | Represents an event item in a list | Yes |
Issues | Item | Represents an issue item in a list | Yes |
Announcement | Item | Represents an announcement item in a list | Yes |
Link | Item | Represents a link item in a list | Yes |
Contact | Item | Represents a contact item in a list | Yes |
Message | Item | Represents a message item in a list | |
Task | Item | Represents a task item in a list | Yes |
WorkflowTask | Task | Represents a task assigned by a workflow | Noprocess |
AdminTask | Task | Represents an administrative task | Noassigned to an administrator |
WorkflowHistory | Item | Represents a historical entry recording a workflow milestone | No |
BlogPost | Item | Represents a blog post | Yes |
BlogComment | Item | Represents a blog comment | Yes |
FarEastContact | Item | Represents a personal or business contact in the Far East | Yes |
Folder | Item | Represents a folder in a list | Yes |
RootOfList | Folder | Represents the root folder of a list | Yes |
Discussion | Folder | Represents a topic in a discussion list | Yes |
When starting any new SharePoint project, it is important to decide what new content types you must create in order to support your information structure. While all content types ultimately inherit from the System content type, typically your content types will inherit from one of the lower-level content types listed in Table 6-1. You might, for example, define content types for common documents such as expense reports or vacation requests and base them on the Document content type.
Designing content types can be a significant effort because they can contain definitions for many different elements. Content types can contain defined metadata fields, document templates, workflows, and custom Document Information Panels (DIP). I cover metadata and templates in this section. I cover workflows in Chapter 7 and custom DIPs in Chapter 9.
Before you define any new content type, it is a good idea to determine all of the elements that it will contain; however, nothing stops you from updating a content type after it is defined. For this chapter, I'll create a content type to represent a software specification document and then modify it to contain additional elements.
Follow these steps to create a new content type:
Log in to the home page of the intranet site you created in Chapter 2 (e.g.,
http://vsmoss/sites/intranet/Pages/default.aspx).Select Site Settings

On the Site Settings page, select Site Content Types from under the Galleries section.
On the Site Content Type Gallery page, click the Create button.
On the New Site Content Type page, enter Software Specification in the Name field.
Select Document Content Types from the drop-down list labeled Select Parent Content Type From.
Select Dublin Core Columns from the drop-down list labeled Parent Content Type. This will give you a nice set of document-centric columns.
Under the Group section, select the New Group option and enter Custom Software Documents in the text field.
Click the OK button.
The metadata for a content type can consist of either site columns or list columns. Site columns are reusable columns that are defined at the site level and may be used by any list in a child site. List columns are defined at the list level and may only be used by the list where they are defined. When you create a new content type, it will inherit the site and list column definitions from its parent. You can also add any of the previously defined site columns that are available. Finally, you can define your own new columns and add them to the content type. As you can see, it is important to determine what metadata fields you will need to properly support your information structure before you begin creating content types.
When you create a new column, you assign it a name and select a data type. SharePoint offers you many different types, from simple text and lists to full HTML. Depending on the type, you may also have to specify additional information to complete the column definition. When you create new columns, they may also be grouped together under a custom heading so that they are easier to find later. As an example, I'll create some site columns to use with the software specification document.
Follow these steps to define the site columns:
Log in to the home page of the intranet site you created in Chapter 2 (e.g.,
http://vsmoss/sites/intranet/Pages/default.aspx).Select Site Settings
On the Site Settings page, select Site Columns from under the Galleries section.
On the Site Column Gallery page, click the Create link.
On the New Site Column page, enter Application in the Column Name field and leave the column type as Single Line of Text.
Under the group section, select the New Group option and enter Software Specification Columns in the text field. This new group will contain the new site columns and make them easier to find.
Select the option to require that the column contain information.
Click the OK button.
On the Site Column Gallery page, click the Create link.
On the New Site Column page, enter Developer in the Column Name field.
Select the Person or Group type for this column definition.
Select the option to put the site column into the existing Software Specification Columns group.
Click the OK button.
On the Site Column Gallery page, drop the Show Group list and select Software Specification Columns. You should only see your new columns now.
Select Site Settings
On the Site Settings page, select Site Content Types from under the Galleries section.
On the Site Content Type Gallery page, drop the Show Group list and select Custom Software Documents.
Click the Software Specification content type link.
On the Site Content Type page, click the link titled Add from Existing Site Columns.
On the Add Columns to Site Content Type page, select Software Specification Columns from the drop-down list labeled Select Columns From.
Select all of the available columns and click the Add button.
Click the OK button.
Site and list columns play a critical role in SharePoint. Not only are they used to classify information, but they can also be used to create views that sort and filter lists. Additionally, they can be indexed to speed the display of lists within the browser. Creating a view of a list is done in this version of SharePoint in much the same way as in the previous version. The existing views are listed on the Customize page, which is accessible from the list by selecting Settings
Creating a Standard View of a list results in a columnar display of the list that may be sorted, filtered, and grouped. Creating a Datasheet View of a list results in a tabular display that allows editing of all data in a single web page and includes a fly-out task pane that provides quick links to editing tools. Calendar Views require that one column in the list be a date/time dimension so that a calendar can be created using the list data. Gantt Views of a list create a Gantt chart view, but they require a list to have columns that can be mapped to Title, Start Date, and Due Date fields. An Access View is used to link a SharePoint list with a Microsoft Access 2007 database, which allows you to use Access to create reports and views.
Using List Data in Microsoft Access
SharePoint lists can be used in Microsoft Access 2007 in two key ways: list data can be imported into Access databases or lists can be linked to an Access database. Selecting Actions
Linking a SharePoint list to an Access database is similar to creating a new Access View for a list. The difference is that creating an Access View will automatically prompt you to create a new view for the list, whereas simply linking the list just creates a new database and you have to create any new views manually. In both cases, the term view really refers to either a form or a report created in the Access database.
After you create forms and reports in the new database, you may publish the database to a SharePoint library so the forms and reports can be viewed by end users. This is accomplished by clicking the Publish to SharePoint Site button inside of Microsoft Access. Figure 6-1 shows the button as it appears in the Document Action Panel of Access.
Once published, users can open the Access database directly from the document library. Once opened, they may use the forms and reports as they would for any Access application. They may even take the entire database offline and synchronize their changes later. Figure 6-2 shows the SharePoint Lists group and the Work Offline button.

Using List Data in Microsoft Excel
SharePoint lists are used in Excel spreadsheets by exporting the list. Selecting Actions
You should note, however, that the data connection operates in only one direction. This means that you can refresh your workbook data from the list by clicking the Refresh button in the Workbook Connections dialog. However, you cannot push the changes you made in the spreadsheet back to the SharePoint list. While this was possible under Excel 2003 and SharePoint 2003, it is not possible in the 2007 versions. This behavior is potentially dangerous because changes made to the spreadsheet data manually can easily be overwritten by refreshing the data connection. To avoid this, you may want to remove the data connection from the workbook.
All document libraries and lists in SharePoint utilize content types. The content types help determine the columns that appear in the library, the types of new items you can create in a list, and the workflows associated with the list. When you are creating a list or a library, however, you are not given the opportunity to associate content types with it. Instead, you are either given a default content type (for lists) or asked to select a document template (for libraries). In order to change the content types associated with a list or a library, you must explicitly enable management of content types.
Enabling content type management for any list or library is done from the Customize page. On the Customize page, click the Advanced Settings link where you can select the option to allow management of content types. Figure 6-3 shows the option.

Once you enable content type management, you can add new content types to the list. When a new content type is added to the list, all of the columns defined in the content type are copied to the list. Note that lists and libraries never use site columns directly. Instead, the site columns associated with the content type are copied as list columns. Any changes made to a list column will not be reflected upward into the site column. In fact, you can never push changes up from any child content type or column to a parent. However, you can push changes down. Whenever you make a change to a site content type or site column, you can select an option to update all of the associated children.
Adding content types to a list or a library is also done through the Customize page. Once content type management is enabled, you will see the default content type on this page. For document libraries, it will be the Document content type. For other lists, it will be the content type for the default list item such as Event or Task. On this page, you can add new content types from the gallery and change the order in which they appear on the New button in the list toolbar.
Follow these steps to add a content type:
On the Customize page, click the link titled Add from Existing Site Content Types.
On the Add Content Types page, select Custom Software Documents from the drop-down list labeled Select Site Content Types From.
In the Available Site Content Types list, select Software Specification and click the Add button.
Click the OK button. Figure 6-4 shows the Customize page with the Software Specification content type added to a library.

Once you add a content type to a library, you will be able to make new documents based on that type. Therefore, you'll want to define a document template that users will see when they create a new document of that type. Adding a document template to the content type is done by accessing the content type through the Content Types Gallery. When you are viewing the content type definition, click the Advanced Settings link and you will be able to upload a new document template to associate with the content type. Figure 6-5 shows the upload function.

Document libraries in SharePoint 2007 have some nice improvements over earlier versions. Some of these improvements, such as the recycle bin, I have mentioned previously. In this section, I review the new capabilities in more detail. These capabilities include new versioning settings, document policy settings, the recycle bin, item-level security, and item-level audience targeting.
Configuring Versioning Settings
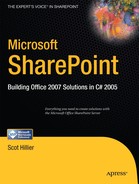
As with any document management system, you would expect SharePoint libraries to have check-in, checkout, and version control capabilities. In this version, however, these capabilities are improved. From the Customize page, you can configure these functions by clicking the Versioning Settings link. On the Versioning Settings page, you can turn on versioning for a list or a library. You can also specify whether to version only major versions or both major and minor versions. Creating minor versions allows you to have draft versions that are only visible to selected individuals. These options give you a rudimentary process for creating, reviewing, and approving documents without the use of a workflow. Figure 6-6 shows the versioning settings.
Configuring Policy Settings
Document policies allow you to configure document labels, auditing, expiration dates, and bar codes for each content type used by the library. Document labels define text that will appear when the document is printed to help track its source and key information. Auditing allows you to track key documents events and changes along with the identity of the person who initiated the event. Expiration dates allow you to delete a document or initiate a workflow after a given period of time. Bar codes allow you to generate a bar code for the document for tracking.
Take these steps to configure policies:
Browse to any document library you have created.
On the toolbar, select Settings
On the Customize page, click the link titled Information Management Policy Settings.
On the Information Policy Settings page, click the content type to manage.
Select the option to Define a Policy and click the OK button.
In the Administrative Description field, type A test of all policies.
In the Policy Statement field, type Important document must be tracked and preserved.
Check the Enable Labels box.
Check the box labeled Prompt Users to Insert a Label Before Saving or Printing.
In the Label Format field, enter {Title} is Important to label the document with its title and a message.
Check the Enable Auditing box.
Check all of the available auditing options.
Check the Enable Expiration box.
Enter 5 years in the time period field to set an expiration period.
Select the option to Perform This Action and select Delete from the drop-down list.
Check the Enable Bar Codes option.
Check the box labeled Prompt Users to Insert a Bar Code Before Saving or Printing.
Click the OK button.
Now you can return to the document library and create a new document. Enter some text in the document and then save it. When you try to save it, you should be prompted to add a label to the document and a bar code. Additionally, you should see the policy statement appear within Word to let you know that policies have been defined for the document. Your policy should also be auditing your actions as you work with the document, and you can run a report.
Follow these steps to run an audit report:
Go to the Site Settings page for the top-level site in the collection.
Click the Audit Log Reports link.
On the View Auditing Reports page, click the Content Modifications link.
In the File Download dialog, click the Open button. A new report should be generated for you in Excel.
Managing the Recycle Bin
Adding a recycle bin for SharePoint libraries was perhaps the most requested enhancement from the previous version. That's because there was no simple way to recover a deleted file in the previous version of SharePoint. Instead, administrators would have to completely recover a site from backup and retrieve the lost file by hand. With the recycle bin, users can recover their own files.
The recycle bin is actually a two-stage bin. This means that even if a user deletes the file from the library and the recycle bin, it will still be available in an administrator recycle bin. The end user recycle bin is located at the site level. The administrator's recycle bin is at the site collection level. At this level, administrators have a special view that shows the items that were deleted from other bins.
Administrators can set the time that a deleted file will remain in the recycle bin and the storage quota of the second stage bin so that old files do not take up space unnecessarily. This allows you to set a policy for users that deleted files can't be recovered after a given period.
Follow these steps to configure the recycle bin:
Log in to the Central Administration web site.
Click the Application Management tab.
Under the SharePoint Web Application Management section, click the link titled Web Application General Settings.
On the Web Application General Settings page, set the time period for automatic deletion of items in the recycle bin and the quota for the second-stage bin.
Click the OK button.
Managing Item-Level Security and Audiences
Along with the recycle bin, item-level security was another high-priority request from SharePoint users. In the previous version of SharePoint, security could only be set at the library level. In this version, you may use the drop-down menu for an item and select Manage Permissions to set the security just for that item.
Along with permissions, you can also manage the visibility of an item through audiences. In order to associate a document with an audience, you must first enable audiences for the library as a whole, which is done from the Customize page by clicking the Audience Targeting Settings link. Once audiences are enabled for the library, each individual item will have a Target Audiences property that you can set.
Configuring Column Indexing
Indexing a column is intended to improve the performance when displaying a view. You can index any column in the list directly from the Customize page by clicking the Indexed Column link. However, you should note that indexing a column will not remove the soft 2,000-item limit for a view. Indexing only increases the speed at which those items are displayed. Therefore, while a list or library may contain a virtually unlimited number of items, you should only create views that return 2,000 items or less.
Note
Quite often a large part of a SharePoint 2007 project involves the migration of documents and content from previous versions of SharePoint or other document management systems such as Documentum and Livelink. Moving tens or hundreds of thousands of documents into SharePoint is impossible without some kind of automated tool set. My favorite tool for this job is the Tzunami Deployer. For more information, visit http://www.tzunami.com.
In Chapter 3, I introduced you to the concept of a form library. Form libraries are special libraries designed to store Microsoft InfoPath forms. These forms can be used for any business function that is forms-based, from reserving a conference room to requesting travel. InfoPath 2007 has several improvements that make it an even better fit with this version of SharePoint. These enhancements include support for template parts that let you create reusable sections, template importing for converting Word and Excel documents into forms, and a managed code development environment. Additionally, if you deploy MOSS, you no longer need Microsoft InfoPath on your desktop because MOSS contains a forms server for delivering highly functional InfoPath forms as HTML. Because there is a lot to cover in this section, I will assume that you already have some familiarity with InfoPath so that I can focus just on new capabilities. However, I have included Exercise 6.1 at the end of the chapter so you can see in detail how an InfoPath application works within SharePoint.
Creating a template part is a new capability of InfoPath 2007 that lets you build reusable sections for forms. With this capability, you can create a library of template parts for use in form design. This makes it easier to create new forms using the template parts as a starting point. As a best practice, you should start by creating a content type to represent template parts within SharePoint. After you create a content type, you can create a library to store them.
Follow these steps to create a content type:
Log in to VSCLIENT as a SharePoint administrator.
Log in to the home page of the intranet site you created in Chapter 2 (e.g.,
http://vsmoss/sites/intranet/Pages/default.aspx).Select Site Settings
On the Site Settings page, select Site Content Types from under the Galleries section.
On the Site Content Type Gallery page, click the Create button.
On the New Site Content Type page, enter Template Part in the Name field.
Select Document Content Types from the drop-down list labeled Select Parent Content Type From.
Select Form from the drop-down list labeled Parent Content Type.
Under the Group section, select the Existing Group option and select Document Content Types.
Click the OK button.
Select Start
In the Getting Started dialog, click Design a Form Template.
In the Design a Form Template dialog, select the Template Part option.
Select Blank from the List View labeled Based On.
Click the OK button.
Select File
Save the blank template part to your desktop as
BlankPart.xtp. You are going to use this as the template for the content type you created earlier.Return to the home page of the intranet site.
Select Site Settings
On the Site Settings page, select Site Content Types from under the Galleries section.
Click the link for the Template Part content type.
On the Site Content Type page, click the Advanced Settings link.
On the Advanced Settings page, select the option to Upload a New Document Template.
Click the Browse button.
In the Choose File dialog, select the
BlankPart.xtpfile and click the Open button.On the Site Content Type page, click the OK button.
Once you have created a new content type with a blank template part, you can use it in a library. Creating a template parts library is a good idea because it allows template parts to be accessed by form designers throughout the enterprise. This approach saves a lot of time and ensures consistency across all forms.
Follow these steps to create a template parts library:
Click the Document Center tab.
Click the link titled View All Site Content in the Quick Launch area of the Document Center.
On the All Site Content page, click the Create link.
On the Create page, click the Form Library link.
On the New page, type Template Parts in the Name field.
Click the Create button.
In the Template Parts library, select Settings
On the Customize page, click the Advanced Settings link.
On the Form Library Advanced Settings page, select the Yes option to allow management of content types.
Click the OK button.
On the Customize page, click the link titled Add From Existing Content Types.
On the Add Content Types page, select the Template Part content type from the list labeled Available Site Content Types and click the Add button.
Click the OK button.
After you have created a library to store template parts, you can create new template parts from Microsoft InfoPath. Using this approach, you can build up a library of reusable parts. As an example, I'll build a reusable part that contains basic customer information.
Follow these steps to create a template part:
Log in to VSCLIENT.
Select Start
In the Getting Started dialog, click Design a Form Template.
In the Design a Form Template dialog, select the Template Part option.
Select Blank from the List View labeled Based On.
Click the OK button.
In the Design Tasks pane, click the Layout link.
Drag the Table with Title layout from the Layout Pane to the form surface.
Click in the cell labeled Click to Add a Title and enter Customer Information.
Click in the cell labeled Click to add Form Content.
Select Table
In the Insert Table dialog, set the number of columns to 2 and the number of rows to 3.
Click the OK button.
In the Layout pane, click the Design Tasks link.
In the Design Tasks pane, click the Controls link.
Drag Text Box controls to each of the three cells in the right-hand column of the layout table.
In the left-hand column, type Name in the first row.
Type Address in the second row.
Type City, State, Zip in the third row.
Select File
In the Save As dialog, enter CustomerInformation.xtp and save it to the Template Parts library you created earlier.
Select File
In the Design a Form Template dialog, select blank from the List View labeled Based On and click the OK button.
In the Design Tasks pane, click the Controls link.
In the Controls Pane, click the link titled Add or Remove Custom Controls.
In the Add or Remove Custom Controls dialog, click the Add button.
In the Add Custom Control Wizard, select Template Part and click the Next button.
On the next screen, click the Browse button.
In the Browse dialog, browse to the Template Parts library you created earlier.
Select the CustomerInformation Template Part and click the Open button.
In the Add Custom Control Wizard, click the Finish button.
When the template part is added, close the wizard.
In the Add or Remove Custom Controls dialog, click the OK button to close it.
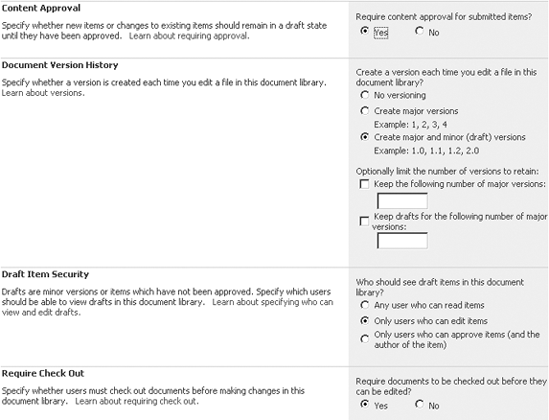
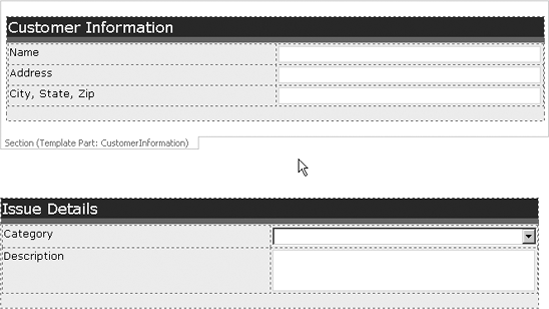
Locate the CustomerInformation Template Part in the Controls Pane and drag it onto the new blank form. Figure 6-7 shows the final template part.
While creating template parts is a good way to build up a library of components for form development, they do have limitations. Template parts do not have all of the functionality of an InfoPath form, and that can be a bit frustrating. For example, you can't write any script or managed code behind a template part. The following is a complete list of functionality not available to template parts:
Template parts cannot use ActiveX controls.
Template parts cannot use background images.
Template parts cannot use color schemes.
Template parts cannot use data connections for submitting data, but receiving data is supported.
Template parts cannot use Information Rights Management (IRM) restrictions.
Template parts cannot use script and managed code. I cover managed code development later in this section.
Template parts cannot be published.
Template parts cannot be exported.
Template parts cannot have multiple views, read-only views, default views, or print views.
Template parts cannot have digital signatures, custom task panes, security levels, or custom save/open behaviors.
Many organizations have moved away from paper-based forms and made a significant investment in electronic forms. These electronic forms may be Word documents, Excel spreadsheets, Adobe forms, or other formats. Because of this investment, it has not been a simple matter for them to implement InfoPath forms. InfoPath 2007, however, includes a template import feature specifically designed to migrate electronic forms to InfoPath.
Out of the box, InfoPath 2007's import feature can handle Word and Excel forms. For other form types, InfoPath provides a set of interfaces for creating your own importer. Creating your own importer is beyond the scope of this book; interested readers should check out the InfoPath 2007 SDK.
Follow these steps to import a Word document:
Log in to VSCLIENT.
Select Start
Click the Office Button in the upper left-hand corner of Word and select New from the menu.
In the New Document dialog, select Forms from the Templates list under the Microsoft Office Online category.
When the forms categories appear, click Business.
Select any of the available business forms. I selected Petty Cash Reimbursement Request.
Click the Download button.
When the new form appears, click the disk icon on the top toolbar in Word to save the file.
In the Save As dialog, navigate to your desktop.
Enter FormTemplate.docx in the File Name field and click the Save button.
If Word displays a compatibility warning regarding the new file format, simply click the OK button. I cover the new Office file formats in detail in Chapter 9.
Exit Word.
Select Start
In the Getting Started dialog, click the link titled Import a Form.
In the Import Wizard, select InfoPath Importer for Word Documents and click the Next button.
On the next screen, click the Browse button.
In the Import form dialog, navigate to your desktop.
Select the
FormTemplate.docxfile and click the Open button.In the Import Wizard, click the Finish button.
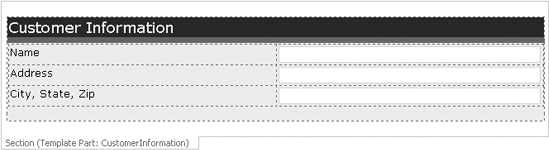
After the form is imported, the Import Wizard will notify you if there were any issues converting the form. When it discovers issues, the wizard will refer you to the Design Checker to investigate the issues. The Design Checker is a new feature of InfoPath 2007 that assists you in not only importing forms but also making forms that are compatible for different deployment scenarios. I discuss using the Design Checker for deployment scenarios a little later in this section, but for now you can review any issues with the import using the Design Checker, which will appear after you close the Import Wizard. Figure 6-8 shows the Design Checker in my environment after the import.
InfoPath forms often use data connections to databases, web services, and other sources to retrieve information such as lookup lists. In the past, these connections were always defined as part of the InfoPath form. In InfoPath 2007, however, you can use a SharePoint data connection library to store connection information that may be used across the entire organization. These are the same data connection libraries that I discuss in Chapter 4 in relation to Excel Services, except the file format is different. Excel Services utilizes Office Data Connection (ODC) files, whereas InfoPath utilizes Universal Data Connection (UDC) files.
Selecting Tools
If you created the data connection library in Chapter 4, you can follow these steps to create a UDC file in InfoPath:
Log in to VSCLIENT.
Select Start
In the Getting Started dialog, click the Design a Form Template link.
In the Design a Form template dialog, select the Blank form and click the OK button.
Select Tools
In the Data Connections dialog, click the Add button.
In the data connection wizard, select to Create a New Connection to Receive Data and click the Next button.
On the next screen, select to Receive Data from a SharePoint Library or List and click the Next button.
On the next screen, enter the address for your Document Center (e.g.,
http://vsmoss/sites/intranet/docs) and click the Next button.On the next screen, select the Documents library and click the Next button.
On the next screen, select just the Title field and click the Next button.
On the next screen, click the Next button.
On the last screen, click the Finish button.
In the Data Connections dialog, click the Convert button to convert the data connection to a UDC file.
In the Convert Data Connections dialog, click the Browse button.
In the Browse dialog, navigate to the data connection library you created in Chapter 4 (e.g.,
http://vsmoss/sites/intranet/docs/Data%20Connections) and click the Save button.In the Convert Data Connections dialog, click the OK button.
In the Data Connections dialog, click the Close button. The new UDC file is now saved to the data connection library.
Over the past nine years or so, Microsoft has supported Office developers with a built-in development environment known as Visual Basic for Applications (VBA). VBA was intended to be a simplified development environment for creating macro functionality within Office products. Typically, developers would detect events such as document creation and then exercise the Word or Excel object model to provide customized functionality such as data imports.
While VBA applications worked fine for a number of applications, VBA was created when the component object model (COM) standard was the prevailing technology for Microsoft development. As we all know COM has been steadily replaced by the .NET standard for development, but Microsoft Office continues to lag behind. Unfortunately for Word and Excel, this will remain the case in Office 2007; however, InfoPath has a new development environment known as Visual Studio Tools for Applications (VSTA) that finally brings managed code development to the Office suite.
Note
For those familiar with managed code development in Office using Visual Studio Tools for Office (VSTO), VSTA is not a replacement. VSTA is really intended to become the next generation of macro development environments within Office products. I cover VSTO development in Chapter 9. (As an interesting sidebar, how exactly do you pronounce VSTA? It can't possibly be "Vista"!)
VSTA is not installed by default when you install Microsoft Office 2007; it is an advanced installation option. To install VSTA, launch the Office 2007 installation disk and select to Add or Remove Features. You'll then be able to locate the VSTA installation under the Microsoft InfoPath options. Figure 6-9 shows the VSTA installation location.

Once you have VSTA installed, you'll want to set your programming language in InfoPath to use C#. This is done by selecting Tools
Writing VSTA code in InfoPath is a familiar experience for anyone who has used Visual Studio before. You can set references to .NET assemblies and utilize any of the classes contained in the .NET Framework. However, there are a couple of areas where development is unique to InfoPath. These areas concern accessing elements in the InfoPath form and managing trust levels.
Accessing Form Elements
Whenever you write VSTA code, you will almost always want to manipulate the field values in the form. Field values are accessed through the XPathNavigator class, which is used to reference the form's data source. The following code shows how to reference the form's data with the XPathNavigator class:
XPathNavigator data = this.MainDataSource.CreateNavigator();
Once you have a reference to the form's data source, you can use XPath to access any individual element on the form. This is accomplished by using the SelectSingleNode method of the XPathNavigator. The SelectSingleNode method takes as an argument the XPath that references the target element. Figuring out the correct XPath string necessary to access a given element can be tricky. Fortunately, you can retrieve the XPath for an element directly from the Data Source pane in InfoPath. Figure 6-10 shows the Copy XPath menu item in the Data Source pane.

Once you have the XPath for a target element, you can paste it in to the code and use it to retrieve the target element as an XPathNavigator object. Using this object, you can read the element through the Value property or set its value through the SetValue method. Listing 6-1 shows a simple example of setting the username element in a form to the username of the person filling out the form.
Note
Accessing the WindowsIdentity object requires that the InfoPath form operate with full trust. I discuss managing trust in the next section.
Example 6.1. Setting Element Values in VSTA
using Microsoft.Office.InfoPath;
using System;
using System.Xml;
using System.Xml.XPath;
using System.Security.Principal;

namespace Travel
{
    public partial class FormCode
    {

        public void InternalStartup()
        {
            EventManager.FormEvents.Loading +=
              new LoadingEventHandler(FormEvents_Loading);
        }

        public void FormEvents_Loading(object sender, LoadingEventArgs e)
        {
            //Get a reference to the User Name element
            XPathNavigator data = this.MainDataSource.CreateNavigator();
            XPathNavigator element =
              data.SelectSingleNode(
              "/my:travelRequest/my:username", this.NamespaceManager);

            //Show user name
            WindowsIdentity identity = WindowsIdentity.GetCurrent();
            element.SetValue(identity.Name);

        }
    }
}
Tip
While the previous code is a simple example to use here, InfoPath 2007 now has a new userName() function to retrieve the current username.
The best thing about VSTA is that all of the code is part of the InfoPath form. This means that you do not have to deal with separate assemblies that must be distributed to clients. You also do not have to configure client-side code access security (CAS) settings as was necessary in previous versions of InfoPath. You do, however, have to manage the trust level of the form.
Managing Form Trust
InfoPath forms can operate at three different trust levels: Restricted, Domain, and Full Trust. Restricted forms are not allowed to access any data that resides outside the form itself. Domain forms can access data that comes from within the same domain as the form. Full Trust forms have no restrictions on the operations that they can perform.
By default, InfoPath is set to automatically select the appropriate security level for your forms. This typically means that forms operate with Domain trust. Domain trust is appropriate for most of the operations you will perform in a form. Some forms, however, may need an increased trust level to function correctly. Such is the case for the code in Listing 6-1, which tries to use the WindowsIdentity class to access information about the current user. If you want the form to operate with a different trust level, you must set it manually.
You can change the trust level of a form by selecting Tools
In order to change the form's trust level, you must not only select the Full Trust security level, but you must also sign the form template with a digital certificate. If you have an appropriate digital certificate available, you simply check the box labeled Sign This Form Template, click the Select Certificate button, and pick a certificate. If you do not have a certificate available, you can make one by clicking the Create Certificate button.
If you deploy a form that performs operations that require full trust and you do not properly modify the form's trust level, you will receive typical security error messages from the .NET Framework. If, on the other hand, you sign the form with a certificate you created yourself, the end user will receive a message indicating that the certificate is not from a trusted source. In this case, the user can choose to trust the form, but you had better make this clear to end users before they receive the message shown in Figure 6-12.
After you finish creating your forms, you will want to publish them using the Publishing Wizard so they can be used by others. In Chapter 3, I showed you how to create a form library in SharePoint and publish a form to it. Beyond simply publishing a form, however, you can also use the Publishing Wizard to deploy your form and associate it with a new content type. You can then use the content type in multiple libraries throughout a site.


Follow these steps to create a new content type:
Log in to VSCLIENT as a SharePoint administrator.
Select Start
In the Getting Started dialog, double-click Sample - Expense Report.
In the Design Tasks pane, click the link titled Publish Form Template.
In the Save As dialog, select an appropriate place to save the form and click the Save button.
In the Publishing Wizard, select to publish the form to a SharePoint server and click the Next button.
In the next screen, enter the address of the SharePoint server,
http://vsmoss, and click the Next button.In the next screen, uncheck the box labeled Enabled This Form to Be Filled Out by Using a Browser.
Select the option labeled Site Content Type and click the Next button.
On the Next screen, select Create a New Content Type and click the Next button.
On the next screen, name the new content type Expense Report and click the Next button.
On the next screen, click the Browse button.
In the Browse dialog, locate the Form Server Templates folder at
http://vsmoss. This is a special folder for storing form templates. I discuss it in more detail later in this section.Name the new form ExpenseReport.xsn and click the Save button.
In the wizard, click the Next button.
On the next screen, click the Next button.
On the next screen, click the Publish button.
While InfoPath is a good tool for creating forms, almost the instant it was released, customers began to request a way to fill out forms without having the InfoPath client installed. There are many scenarios, such as personnel on the road, or clients without access to InfoPath, where a zero-footprint form is useful. Microsoft's response to this need was to create InfoPath Forms Services.
InfoPath Forms Services allows you to take InfoPath forms and render them as HTML in a browser. InfoPath Forms Services is technically a separate product from SharePoint, however, MOSS ships with it. The server is set up automatically for you during the MOSS installation process.
Before you can begin using forms in the browser, you must make sure that InfoPath Forms Services is enabled at the farm and site level. You can access the configuration settings for InfoPath Forms Services from the Central Administration site. On the Application tab, you will find a section dedicated to InfoPath Forms Services. Here you can click the link titled Configure InfoPath Forms Services. This link will open a configuration page where you can enable services for the farm.
After you have enabled services for the farm, you must activate the Office SharePoint Server Enterprise Site Collection Features for each site collection where you want to use InfoPath Forms Services. Additionally, you must activate the Office SharePoint Server Enterprise Site Features for each site where you want to use InfoPath Forms Services. Note that there are features at both the site collection and the site level that must be activated for InfoPath Forms Services to work correctly.
Designing for InfoPath Forms Services
Most of what you know about creating forms in InfoPath also applies to forms that target InfoPath Forms Services. However, there are many InfoPath features that can't be duplicated in a browser, such as master-detail views. Therefore, when you create a form for use with InfoPath Forms Services, it will always be limited to a subset of features that are available to InfoPath as a whole. As of this writing there is not a definitive list of lost InfoPath functionality; however, you can use the Design Checker to help ensure compatibility.
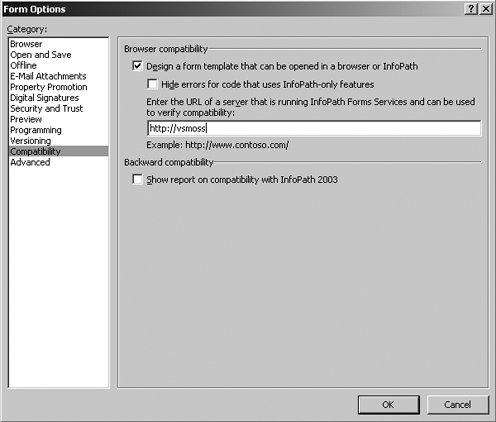
The Design Checker is available as a link in the Design Tasks pane in InfoPath. Clicking this link opens the Design Checker task pane, which shows errors and messages for the current form. Before you can get any meaningful information, however, you must change the compatibility settings for the form to indicate that you are targeting InfoPath Forms Services. Clicking the link titled Change Compatibility Settings opens the Form Options dialog where you can check a box to indicate the form should be browser-enabled. You should also provide the path to VSMOSS so that InfoPath Forms Services can verify compatibility. Figure 6-13 shows the browser compatibility options.
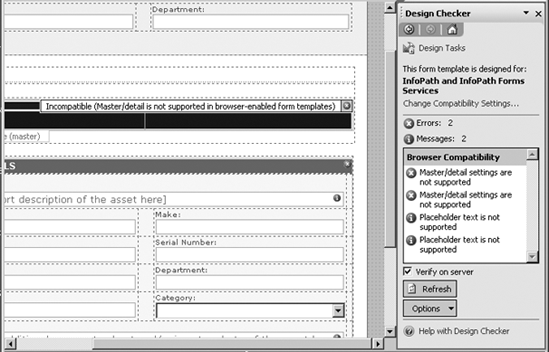
Once you have changed the compatibility settings, the Design Checker will begin to display errors and messages regarding your form. Each error or message will show not only in the Design Checker task pane, but also in the form or dialog box where the issue can be addressed. Furthermore, the Design Checker provides hyperlinks that will take you to each issue so that you can fix them. Figure 6-14 shows the Design Checker with an error message in the task pane and the same error flagged on the form.
After you have created a browser-compatible form, you will be able to publish the form to a form library in SharePoint. Here again, you can publish the form directly to a library or as a content type. If you publish the form directly to a library, it will be available immediately. If you publish the form as a content type, you'll need to create a library and associate the content type with the library so it can be used.
After you have created a form library with your new form available, you can create a new form using the toolbar and fill it out. However, you'll notice that the form does not initially open in the browser as you would expect. This is because the library has an option you can set to specify the preferred client for the form. The default is to always open the form in InfoPath if it is available. This setting is accessible from the Customize page for the form library by clicking the Advanced Settings link. On the Advanced Settings page, you can change the Browser-Enabled Documents setting for the library to always display the document as a web page. Because the setting never mentions forms, it's easy to miss. Figure 6-15 shows the correct configuration to display forms in the browser by default.

Deploying Centrally Managed Forms
When forms require full trust, they may not be published directly from InfoPath to a form library. Instead, fully trusted forms must first be uploaded into a central management store where they can be reviewed by a SharePoint farm administrator. Once reviewed, these forms are deployed from a central store to selected web applications where they can be made available to libraries or act as templates for content types.
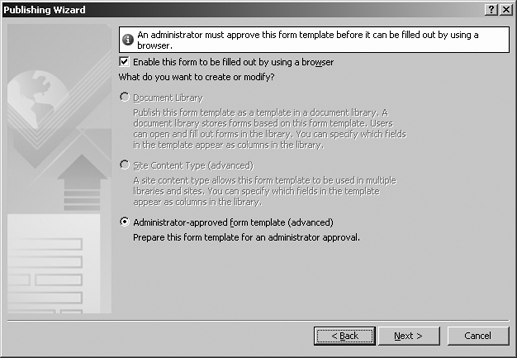
In order to deploy a fully trusted form, you must first use the Publishing Wizard to prepare the form. As part of preparing the form, InfoPath publishes it to a network location of your choosing so that it can be accessed by the SharePoint administrator. Figure 6-16 shows the Publishing Wizard set to prepare a form for administrator approval.
Once the form is prepared, it may be uploaded to the central repository. This is accomplished through the Central Administration web site. On the Application Management tab, under the InfoPath Forms Services section, click the link titled Manage Form Templates. This will display the forms stored in the central repository and allow you to upload new forms. During the upload process, you can even have the form validated for errors before it is added to the repository.
After the form is added to the central repository, you may use the drop-down menu associated with the form to make it available to a site collection on the farm. Selecting Activate to a Site Collection from the menu will bring up a page where you can select the site collection where the form will be deployed. Clicking the OK button deploys the form into a library named FormServer Templates. This library is not visible from within SharePoint, but you can see it if you open the site in the SharePoint Designer. The point, however, is that once it's deployed, you can reference it as a template for a content type within the site collection.
The Document Conversions Service in MOSS allows you to convert between different types of documents within a library. For example, you can easily convert from a Word document to a web page using the out-of-the-box capabilities. Initially, this service is disabled on the farm because it is potentially an expensive operation, depending upon what documents are being converted. Therefore, you'll have to do a little configuration to get it running.
Follow these steps to configure the Document Conversions Service:
Log in to the Central Administration site as a farm administrator.
In the Central Administration site, click the Operations tab.
On the Operations tab, click the link titled Services on Server under the Topology and Services section.
On the Services on Server page, click the Start link next to the Document Conversions Load Balancer Service.
On the Services on Server page, click the Start link next to the Document Conversions Launcher Service.
On the Launcher Service Settings page, select the Load Balancer server as VSMOSS.
Click the OK button.
Click the Application Management tab.
Click the link titled Document Conversions under the External Service Connections section.
On the Configure Document Conversions page, make sure that the web application reflects the intranet site collection you created in Chapter 2. If not, use the drop-down menu to change the web application.
Select the Yes option under Enable Document Conversion for This Site.
Note the available document conversions that ship with MOSS are listed on the page, then click the OK button.
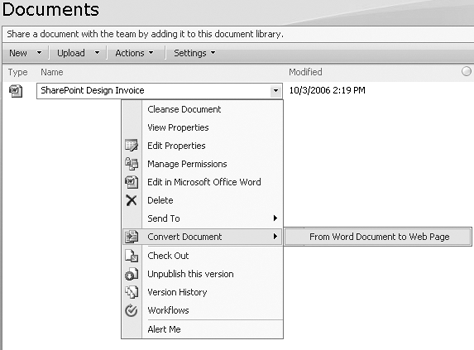
Once the Document Conversions Service is up and running, it's a simple matter to convert documents. Navigate to any document library you created earlier in the book that contains Word documents. You should now find that a conversion option is available from the drop-down menu associated with the document. When you select this menu item, you will be taken to a page where you can specify the name for the converted file, where it will be located, and who to notify. It's important to note that the target site must have the publishing feature I discuss in Chapter 5 activated in order to receive the new document. Figure 6-17 shows the new menu item for converting a Word document.
The records management capabilities in MOSS allow you to create a repository to retain business documents that are necessary for regulatory compliance, business continuity, or historical interest. You can associate a records repository with a web application so that documents may be moved into the repository either manually or automatically as part of a workflow process. Access to the records repository may be closely controlled to ensure that key records are not altered or deleted. Additionally, you may establish policies for the records that ensure they are retained for a defined period of time.
You begin the process of creating a repository by creating a new site collection based on the Records Center template. After the repository is created, you can configure a connection between it and any web application through the Central Administration site. On the Application Management tab, click the Records Center link under the External Service Connection section. This link will open a configuration page where you can define the connection. The repository will utilize the OfficialFile web service to copy documents from production libraries to the Records Center. Therefore, the connection entry must properly reference the web service for the system to work. Generally, you need to provide the address of the root of the Records Center followed by the reference to the web service. An example is displayed on the configuration page to help you out, and Exercise 6.2 at the end of this chapter is a complete walk-through using the Records Center template. Once the connection is properly configured, you should see a new menu item associated with documents in libraries that allows you to send them to the repository.
When the repository site is created, it has a single document library named Unclassified Records and two lists named Record Routing and Holds. If you send a document to the repository at this point, the record will always end up in the Unclassified Records library. If you want to sort the records into different libraries, you must add additional libraries to the site and make appropriate entries in the Record Routing list. The Record Routing list contains entries that map content types to libraries. The Location field references the name of the target library in the repository and the Aliases field contains a delimited set of content type names. Figure 6-18 shows a sample New Item screen for the Record Routing list in the Records Center. This entry maps the content types Expenses, Proposals, and Forecasts to the Sales Records library in the Records Center. You will use this screen in detail in Exercise 6.2 at the end of this chapter.

The Holds list is used to place records on hold so that they cannot be deleted or changed. In order to place a record on hold, you must first add a hold to the Holds list. The hold can be named anything such as "Discovery" or "Audit." Once they are created, you can then place a record on hold by selecting Manage Holds from the drop-down menu associated with the record. If anyone tries to delete or change the record while it's on hold, they will receive an error message.
While InfoPath is technically a separate product from SharePoint, it plays a critical supporting role. Many of the pages you see in SharePointsuch as content type metadataare actually InfoPath forms hosted by SharePoint. Furthermore, InfoPath forms can be used to create complete applications that run within SharePoint. In this exercise, you will create an InfoPath application for submitting and tracking customer issues.
Before you begin this exercise, you should have read through the InfoPath information in this chapter. Additionally, you should have created the Template Parts library from the "Creating Template Parts" section earlier in this chapter and built the sample template part for entering customer information. This exercise will make use of this template part to create a form for customer issues.
For this exercise, you will create a new site for tracking customer issues. This site will have a form library that will contain the form for tracking issues. Therefore, you'll need to create this site before building the form.
Follow these steps to create the new site:
Log in to VSMOSS as a SharePoint administrator.
Open the home page of the intranet site you created in Chapter 2 (e.g.,
http://vsmoss/sites/intranet/Pages/Default.aspx).Click the Sites tab to open the Site Directory.
In the Site Directory, click the Create Site link.
On the New SharePoint Site page, enter Customer Issues in the Title field.
Enter CustomerIssues in the URL Name field.
Select Blank Site from the template list.
Click the Create button.
The form that you'll create will contain a list that will allow you to categorize the customer issue. This list will be maintained in the SharePoint site so that it can be edited when necessary. You will subsequently utilize the list in your form by using a data connection.
Follow these steps to create the new list:
In the Customer Issues site, click the Lists link in the Quick Launch area.
On the All Site Content page, click the Create link.
On the Create page, click Custom List.
On the New page, enter Issue Categories in the Name field.
Click the Create button.
On the Issue Categories page, click the New button.
On the New Item page, enter Product Defect in the Title field and click the OK button.
Repeat steps 6 and 7 to add the following categories to the list: Missing Parts, Wrong Item, and Damaged Item.
The Customer Issues form will utilize several of the new features of InfoPath and SharePoint. You will use template parts to help create the form, the Issue Categories list as a data source, a form library for saving the forms, and a simple workflow to route the issue for review. Once the forms are saved, you'll use library views to analyze the data.
Follow these steps to create the InfoPath form:
Log in to VSCLIENT as a SharePoint administrator.
Select Start
In the Getting Started dialog, click the link titled Design a Form Template.
In the Design a Form template dialog, select the Blank template and click the OK button.
In the Design Tasks pane, click the Controls link.
In the Controls pane, locate the CustomerInformation template part that you created earlier in this chapter.
Drag the CustomerInformation template part from the Controls pane to the blank form.
Creating the Data Connection
The CustomerInformation template part acts as the header for the new form. The body of the form will have the description of the problem and allow the user to select a category. The category will be driven by the Issue Categories list you created earlier.
Follow these steps to create the data connection:
Select Tools
In the Data Connections dialog, click the Add button.
In the data connection wizard, select to create a new data connection to receive data.
Click the Next button.
On the Select Data Source screen, select to receive data from a SharePoint List and click the Next button.
On the SharePoint Site details screen, enter the complete URL to the home page of the Customer Issues site you created earlier (e.g.,
http://vsmoss/intranet/sites/SiteDirectory/CustomerIssues) and click the Next button.Select the Issue Categories list and click the Next button.
Select just the Title field from the available fields and click the Next button.
Check the box to Store a Copy of the Data in the Form Template and click the Next button.
Click the Finish button.
In the Data Connection dialog, click the Close button. Note that you could choose to convert the data connection at this point and save it into a data connection library as I discuss in the section titled "Using Data Connection Libraries."
Creating the Form Body
Once the data connection is created, you can use it to populate a list in the Customer Issues form. The category list along with a text area will make up the body of the form. The form can then be published to the Customer Issues site for use.
Follow these steps to complete the form:
In the Controls pane, click the Design Tasks link.
In the Design Tasks pane, click the Layout link.
In the Layout pane, drag the Table with Title layout onto the form and drop it.
In the heading area labeled Click to Add a title, enter Issue Details.
Click inside the cell labeled Click to Add Form Content.
Select Table
Enter 2 columns and 2 rows in the Insert Table dialog and click the OK button.
In the Layout pane, click the Design Tasks link.
In the Design Tasks pane, click the Controls link.
Drag a Drop-Down List Box control to the upper right cell in the Issue Details table.
Right-click the Drop-Down List Box and select Drop-Down List Box Properties from the context menu.
In the List Box Entries section, select the option to Look Up Values from an External Data Source.
Click the Select XPath button.
In the Select a Field or Group dialog, expand the field nodes and select the Title field.
Click the OK button.
In the Drop-Down List Box Properties dialog, click the OK button.
Drag a Rich Text Box control from the Controls pane to the lower right-hand cell in the Issue Details table.
Type the text Category in the upper left-hand cell of the Issue Details table.
Type the text Description in the lower left-hand cell of the Issue Details table.
Right-click each control on the form and open the Properties dialogs one by one. For each control, change the field name to the value shown in Table 6-2. Figure 6-19 shows the final form.
Once the form is completed you are ready to publish it to the site. In our scenario, you want the form to be accessible over the web. Therefore, you will publish the form so that it can be delivered via InfoPath Form Services. This means that you must run the Design Checker and publish the form to be delivered across the web.
Follow these steps to publish the form:
In the Controls pane, click the Design Tasks link.
In the Design Tasks pane, click the Design Checker link.
In the Design Checker pane, click the Change Compatibility Settings link.
In the Form Options dialog, check the box labeled Design a Form Template That Can Be Opened in a Browser or InfoPath.
Enter
http://vsmossin the InfoPath Services URL field.Click the OK button. After the Design Checker runs, you should have a single error telling you that the selected rich-text formatting options are not supported.
Right-click the Rich Text Box on the form and select Rich Text Box Properties from the context menu.
In the Rich Text Box Properties dialog, click the Display tab.
Uncheck the box labeled Embedded Images and click the OK button.
In the Design Checker pane, click the Refresh button. The error should now be resolved.
Select File
In the Save As dialog, enter CustomerIssue.xsn and click the Save button. It is not important where you save the form at this point because it will ultimately be published to the Customer Issues site.
Select File
In the Publishing Wizard, select to publish the form to a SharePoint Server and click the Next button.
On the next screen, enter the complete URL to the home page of the Customer Issues site (e.g.,
http://vsmoss/sites/intranet/SiteDirectory/CustomerIssues) and click the Next button.On the next screen, be sure that the box is checked to enable the form to be filled out with a browser and select the option to publish the form to a document library.
Click the Next button.
On the next screen, select to create a new document library and click the Next button.
On the next screen, enter Customer Issue Forms in the Name field and click the Next button.
On the next screen, click the Add button to select fields that will be displayed as columns in the document library.
In the Select a Field or Group dialog, select the Name field and click the OK button.
Repeat the previous step to add the Category field. When the fields are added, click the Next button.
Click the Publish button.
Once the form is published, it is available for use. However, you want to configure the new library so that it delivers the form through the browser by default. Additionally, you are going to use a built-in workflow to route the form for review.
Follow these steps to configure the library:
Open the Customer Issues site in the browser.
Click the new Customer Issues forms library link in the Quick Launch area.
In the Customer Issues forms library, select Settings
On the Customize page, click the Advanced Settings link.
On the Advanced Settings page, select the option labeled Display as Web Page to force the form to open in a browser by default.
Click the OK button.
On the Customize page, click the Workflow Settings link.
On the Add a Workflow page, select the Approval workflow from the Workflow Template list.
Enter Approve Resolution in the Name field.
Click the Next button.
On the Customize Workflow page, accept the default settings by clicking the OK button.
Once the new form is published and the library is properly configured, you are ready to use the form. You should now be able to fill out the form with customer information and details about the problem. The category list should also be populated from the SharePoint list you created earlier. Additionally, you should be able to route the form for approval when the issue is resolved.
Follow these steps to fill out a form:
Navigate to the Customer Issues library.
Click the New button on the toolbar.
When the form opens in the browser, enter some data for the customer information.
Enter a problem description and select a category from the drop-down list.
Click the Save link.
When prompted, give the file a name and click the Save link.
Return to the Customer Issues forms library and verify that your new form is saved. You may have to refresh the browser if the form is not listed in the library.
Note that the Name and Category fields are visible. These fields can be used to sort and filter the view.
Using the drop-down list associated with your new form, select Workflows.
On the Workflows page, click the Approve Resolution workflow link.
On the Start page, enter the account you are using for the approver and click the Start button.
Return to the Customer Issues forms library and verify that the form now shows an In Progress status for the workflow.
Select Edit in Microsoft InfoPath from the drop-down menu associated with the new form.
When the form opens in InfoPath, you should be notified that you have a new task to complete. Click the Edit This Task button in the Document Action Panel.
In the task dialog, click the Approve button.
Select File
Combining document and records management within MOSS allows organizations to control the entire life cycle of a document. Team sites and document workspaces can be used to create and collaborate around documents. Created documents can be approved using built-in workflows or custom workflows, which I cover in Chapter 7. Documents that must be archived can then be saved as records in a repository. In this exercise, you will create new content types for important financial records and a records repository to store them in. After you finish this exercise, you should be able to plan out your own document and records management system.
Before getting started with this exercise, it's important to note that you must have MOSS available to complete it. Records management is a MOSS capability and is implemented through a special web service and site template. WSS alone simply doesn't have the functionality.
Another thing you'll want to do before you get started is to download some document templates from the Microsoft Office site. In this exercise, you will create both an Invoice and Purchase Order content type so you'll need templates for them. I simply went to http://office.microsoft.com and searched for templates that I could use. Then I saved the templates for later.
All document and records management revolves around the definition of content types. Therefore, you will create several for this exercise. Content types begin with the definition of site columns that can be used for metadata. In this section, you will create some site columns that can be used later in a content type definition.
Follow these steps to create the site columns:
Log in to the home page of the intranet site you created in Chapter 2.
Select Site Settings
On the Site Settings page, select Site Columns from under the Galleries section.
On the Site Column Gallery page, click the Create link.
On the New Site Column page, enter Client Name in the Column Name field.
Under the group section, select the New Group option and enter Custom Financial Columns in the text field.
Select the option to require that the column contain information.
Click the OK button.
On the Site Column Gallery page, click the Create link.
On the New Site Column page, enter Department Name in the Column Name field.
Select the Choice option for the field type.
Under the group section, select the Existing Group option and choose Custom Financial Columns from the drop-down list.
Select the option to require that the column contain information.
Add the following choices to the list: Administration, Information Services, Facilities, Operations, Sales, and Marketing.
Click the OK button.
On the Site Column Gallery page, click the Create link.
On the New Site Column page, enter Amount in the Column Name field.
Select the Currency option for the field type.
Under the Group section, select the Existing Group option and choose Custom Financial Columns from the drop-down list.
Select the option to require that the column contain information.
Click the OK button.
Content types bring together site columns, templates, and workflows to define a document. In this section, you will use the site columns defined earlier to help create several content types. You will also associate the templates you downloaded at the beginning of the exercise with these content types.
Follow these steps to create the content types:
Return to the intranet home page.
Select Site Settings
On the Site Settings page, select Site Content Types from under the Galleries section.
On the Site Content Type Gallery page, click the Create button.
On the New Site Content Type page, enter Financial Document in the Name field.
Select Document Content Types from the drop-down list labeled Select Parent Content Type From.
Select Document from the drop-down list labeled Parent Content Type.
Under the Group section, select the New Group option and enter Custom Financial Documents in the text field.
Click the OK button.
On the Site Content Type page, under the Columns section, click the link titled Add from Existing Site Columns.
On the Add Columns to Site Content Type page, select Custom Financial Columns from the drop-down list labeled Select Columns From.
Select all of the available columns and click the Add button.
Click the OK button.
Return to the Site Content Type Gallery page and click the Create button.
On the New Site Content Type page, enter Invoice in the Name field.
Select Custom Financial Documents from the drop-down list labeled Select Parent Content Type From.
Select Financial Document from the drop-down list labeled Parent Content Type.
Under the Group section, select Custom Financial Documents from the Existing Group list.
Click the OK button.
On the Site Content Type page, click the Advanced Settings link.
On the Advanced Settings page, select the option to Upload a New Document Template and click the Browse button.
Upload the Invoice template you downloaded earlier.
Click the OK button.
Return to the Site Content Type Gallery page and click the Create button.
On the New Site Content Type page, enter Purchase Order in the Name field.
Select Custom Financial Documents from the drop-down list labeled Select Parent Content Type From.
Select Financial Document from the drop-down list labeled Parent Content Type.
Under the Group section, select Custom Financial Documents from the Existing Group list.
Click the OK button.
On the Site Content Type page, click the Advanced Settings link.
On the Advanced Settings page, select the option to Upload a New Document Template and click the Browse button.
Upload the Purchase Order template you saved earlier.
Click the OK button.
Once the content types are created, they may be associated with a document library. In this exercise, you'll create a document library for the financial documents and configure it to use the content types you defined. Once configured, you can use the library to create new financial documents.
Follow these steps to create the new document library:
Click the Document Center tab on the intranet site.
Select Create from the Site Actions menu.
On the Create page, click Document Library.
On the New page, enter Financial Documents in the Name field.
Select Microsoft Office Word Document as the document template.
Click the Create button.
In the Financial Documents library, select Settings
On the Customize Financial Documents page, click the Advanced Settings link.
On the Advanced Settings page, select the option to Allow Management of Content Types.
Click the OK button.
On the Customize Financial Documents page, under the Content Types section, click the link titled Add from Existing Site Content Types.
On the Add Content Types page, select Custom Financial Documents from the drop-down list labeled Select Site Content Types From.
Select the Invoice and Purchase Order Content Types and click the Add button.
Click the OK button.
On the Customize Financial Documents page, under the Content Types section, click the Document Content Type.
On the List Content Type page, click the link titled Delete This Content Type.
Click the Document Center tab.
The records repository is where important documents will be archived. The repository is created using the Records Center template. Once created, you can associate the repository with a site collection so that documents may be sent to the repository directly from a document library.
Follow these steps to create the records repository:
Log in to VSMOSS as a SharePoint administrator.
Select Start
On the Application Management tab, under the SharePoint Site Management section, click the link titled Create a Site Collection.
On the Create Site Collection page, ensure that the Web Application drop-down is referencing the web application where your intranet site is located. If not, drop the list and select the correct web application.
Enter Records Repository in the Title field.
Enter records in the Web Site Address field.
Under the Template Selection section, click the Enterprise tab, and then select the Records Center template.
Under the Primary Site Collection Administrator section, enter DOMAINAdministrator in the User Name field.
Click the OK button to create the new site collection. When the site collection is created, open it in a separate copy of the browser.
Return to the Application Management tab in the Central Administration web site and click the Records Center link under the External Service Connections section.
On the Configure Connection to Records Center page, select the option to Connect to a Records Center.
In the URL field, type the address of the records repository site followed by a reference to the Official File web service (e.g.,
http://vsmoss/sites/records/_vti_bin/officialfile.asmx).Type Records Repository in the Display Name field.
Click the OK button.
There are several configuration tasks that must be performed when a new records repository is created. Specifically, you must configure the repository to recognize content types and route them to the correct archive within the site. Additionally, you should set up retention policies so documents are automatically processed after they expire.
Follow these steps to configure the records repository:
Navigate to the home page of the records repository site.
Select Create from the Site Actions menu.
On the Create page, click the Document Library link.
On the New page, enter Financial Records in the Name field.
Select Microsoft Office Word Document from the Document Template drop-down list.
Click the Create button.
In the Quick Launch area, click the Records Routing link.
In the Records Routing list, click the New button.
On the Records Routing: New Item page, enter Financial Documents in the Title field.
Enter Financial Records in the Location field.
Enter Invoice/Purchase Order in the Aliases field.
Click the OK button.
In the Quick Launch area, click the Financial Records link.
In the Financial Records library, click Settings
On the Customize Financial Records page, click the link titled Information Management Policy Settings.
On the Information Management Policy Settings page, select the option to Define a Policy and click the OK button.
On the Edit Policy page, check the box labeled Enable Expiration.
Select the option labeled A Time Period Based on the Item's Properties.
Enter 5 years for the expiration.
Select Delete in the Perform This Action drop-down list.
Click the OK button.
Once the repository is configured, you may begin sending documents to it. Documents can be sent to the repository directly from an enabled document library. In this section, you'll make a new document and send it to the repository.
Follow these steps to archive a document:
Click the Document Center tab on the intranet site.
In the Quick Launch area, click the Financial Documents link.
In the Financial Documents library, drop the New menu and verify that both the Invoice and Purchase Order content types are listed.
Select the Invoice content type.
When the document opens in Word, fill in the properties.
Select File
Close Word and return to the Financial Documents library.
Using the drop-down menu associated with the document, select Send To
After the document has been sent to the repository, open the home page of the records repository site.
Click the Financial Records library link and verify that the document was correctly archived.
Once documents are in the repository, they may be put on hold. Holds help ensure that a document is not altered or destroyed during an important time period such as audit or discovery. In this section, you will place an archived document on hold for a tax audit.
Follow these steps to set up a hold:
In the Quick Launch area of the Records Repository site, click the Holds link.
In the Holds list, click the New button on the toolbar.
On the Holds: New Item page, enter Tax Audit in the Title field.
Click the OK button.
In the Quick Launch area of the Records Repository site, click the Financial Records link.
Locate the archived document, and using the drop-down list, select Manage Holds.
On the Item Hold Status page, select the Add to Hold option and choose Tax Audit from the Holds list.
Click the Save button.
Locate the archived document and using the drop-down list, select Delete.
Verify that you receive an error message indicating that the document cannot be deleted while on hold.