
Using Nmap
Introduction
There are several reasons to use Nmap in the enterprise in addition to the fact that it is free and supports a variety of operating systems (OSes). Nmap is full of features and is very user-friendly. Its command-line options are easy to use and script, or you can use the Zenmap graphical user interface (GUI) with a point-and-click interface and command wizard. This chapter covers basic Nmap usage, including command-line options for host discovery, port scanning, OS detection, version detection, logging, and more. You will learn how to discover assets on your network for network inventory, manage assets by detecting OSes and services, and audit your network and systems for compliance and potential security vulnerabilities. Examples are provided to show you step-by-step methods to use Nmap in your enterprise.
Starting Nmap Scanning
Traditionally, Nmap is run from a UNIX shell or Windows command prompt as a command-line interface. Nmap is easily executed with a variety of command-line options and parameters, and also easily scripted. You must have administrator or root privileges to use all of Nmap’s features. After you have followed the installation instruction for your OS in Chapter 3, Getting and Installing Nmap, start running Nmap by typing nmap and pressing Enter. You must ensure that the directory that contains the nmap binary or Windows executable is in your $PATH or that you are in the directory where Nmap is installed. Running nmap with no parameters causes the following usage information to display on the screen:
# nmap
Nmap 4.50 (http://insecure.org)
Usage: nmap [Scan Type(s)] [Options] {target specification}
TARGET SPECIFICATION:
Can pass hostnames, IP addresses, networks, etc.
Ex: scanme.nmap.org, microsoft.com/24, 192.168.0.1; 10.0.0-255.1-254
-iL < inputfilename >: Input from list of hosts/networks
-iR < num hosts >: Choose random targets
--exclude < host1[,host2][,host3],…>: Exclude hosts/networks
--excludefile < exclude_file >: Exclude list from file
HOST DISCOVERY:
-sL: List Scan - simply list targets to scan
-sP: Ping Scan - go no further than determining if host is online
-PN: Treat all hosts as online -- skip host discovery
-PS/PA/PU [portlist]: TCP SYN/ACK or UDP discovery to given ports
-PE/PP/PM: ICMP echo, timestamp, and netmask request discovery probes
-PO [protocol list]: IP Protocol Ping
-n/-R: Never do DNS resolution/Always resolve [default: sometimes]
--dns-servers < serv1[,serv2],…>: Specify custom DNS servers
--system-dns: Use OS’s DNS resolver
SCAN TECHNIQUES:
-sS/sT/sA/sW/sM: TCP SYN/Connect()/ACK/Window/Maimon scans
-sU: UDP Scan
-sN/sF/sX: TCP Null, FIN, and Xmas scans
--scanflags < flags >: Customize TCP scan flags
-sI < zombie host[:probeport]>: Idle scan
-sO: IP protocol scan
-b < FTP relay host >: FTP bounce scan
--traceroute: Trace hop path to each host
--reason: Display the reason a port is in a particular state
PORT SPECIFICATION AND SCAN ORDER:
-p < port ranges >: Only scan specified ports
Ex: -p22; -p1-65535; -p U:53,111,137,T:21–25,80,139,8080
-F: Fast mode - Scan fewer ports than the default scan
-r: Scan ports consecutively - don’t randomize
SERVICE/VERSION DETECTION:
-sV: Probe open ports to determine service/version info
--version-intensity < level >: Set from 0 (light) to 9 (try all probes)
--version-light: Limit to most likely probes (intensity 2)
--version-all: Try every single probe (intensity 9)
--version-trace: Show detailed version scan activity (for debugging)
SCRIPT SCAN:
-sC: equivalent to --script = safe, intrusive
--script = < Lua scripts >: < Lua scripts > is a comma separated list of
directories, script-files or script-categories
--script-args = < n1 = v1,[n2 = v2,…]>: provide arguments to scripts
--script-trace: Show all data sent and received
--script-updatedb: Update the script database.
OS DETECTION:
-O: Enable OS detection
--osscan-limit: Limit OS detection to promising targets
--osscan-guess: Guess OS more aggressively
TIMING AND PERFORMANCE:
Options which take < time > are in milliseconds, unless you append ‘s’
(seconds), ‘m’ (minutes), or ‘h’ (hours) to the value (e.g. 30 m).
-T[0–5]: Set timing template (higher is faster)
--min-hostgroup/max-hostgroup < size >: Parallel host scan group sizes
--min-parallelism/max-parallelism < time >: Probe parallelization
--min-rtt-timeout/max-rtt-timeout/initial-rtt-timeout < time >: Specifies probe round trip time.
--max-retries < tries >: Caps number of port scan probe retransmissions.
--host-timeout < time >: Give up on target after this long
--scan-delay/--max-scan-delay < time >: Adjust delay between probes
FIREWALL/IDS EVASION AND SPOOFING:
-f; --mtu < val >: fragment packets (optionally w/given MTU)
-D < decoy1,decoy2[,ME],…>: Cloak a scan with decoys
-S < IP_Address >: Spoof source address -e < iface >: Use specified interface
-g/--source-port < portnum >: Use given port number
--data-length < num >: Append random data to sent packets
--ip-options < options >: Send packets with specified ip options
--ttl < val >: Set IP time-to-live field
--spoof-mac < mac address/prefix/vendor name >: Spoof your MAC address
--badsum: Send packets with a bogus TCP/UDP checksum
OUTPUT:
-oN/-oX/-oS/-oG < file >: Output scan in normal, XML, s| < rIpt kIddi3, and Grepable format, respectively, to the given filename.
-oA < basename >: Output in the three major formats at once
-v: Increase verbosity level (use twice for more effect)
-d[level]: Set or increase debugging level (Up to 9 is meaningful)
--open: Only show open (or possibly open) ports
--packet-trace: Show all packets sent and received
--iflist: Print host interfaces and routes (for debugging)
--log-errors: Log errors/warnings to the normal-format output file
--append-output: Append to rather than clobber specified output files
--resume < filename >: Resume an aborted scan
--stylesheet < path/URL >: XSL stylesheet to transform XML output to HTML
--webxml: Reference stylesheet from Insecure.Org for more portable XML
--no-stylesheet: Prevent associating of XSL stylesheet w/XML output
MISC:
-6: Enable IPv6 scanning
-A: Enables OS detection and Version detection, Script scanning and Traceroute
--datadir < dirname >: Specify custom Nmap data file location
--send-eth/--send-ip: Send using raw ethernet frames or IP packets
--privileged: Assume that the user is fully privileged
--unprivileged: Assume the user lacks raw socket privileges
-V: Print version number
-h: Print this help summary page.
EXAMPLES:
nmap -v -A scanme.nmap.org
nmap -v -sP 192.168.0.0/16 10.0.0.0/8
nmap -v -iR 10000 -PN -p 80
SEE THE MAN PAGE FOR MANY MORE OPTIONS, DESCRIPTIONS, AND EXAMPLES
The usage output is a quick, handy command reference, but it doesn’t include all of Nmap features and options. To make use of Nmap features, use the following syntax to execute an Nmap command:
nmap [Scan Type(s)] [Options] {target specification}
A simple Nmap scan that scans a single target and uses the default options is the following:
# nmap 192.168.100.2
Starting Nmap 4.50 (http://insecure.org) at 2007-12-22 09:56 EST
Interesting ports on 192.168.100.2:
Not shown: 1705 closed ports
| PORT | STATE | SERVICE |
| 135/tcp | open | msrpc |
| 139/tcp | open | netbios-ssn |
| 3389/tcp | open | ms-term-serv |
| 6346/tcp | filtered | gnutella |
| 6347/tcp | filtered | gnutella2 |
| 8081/tcp | open | blackice-icecap |
MAC Address: 00:12:F0:D3:BF:74 (Intel Corporate)
Nmap done: 1 IP address (1 host up) scanned in 4.837 seconds
The Nmap output includes a timestamp indicating the time the scan is started, a list of interesting ports, and the seconds that elapsed until the scan was completed. The interesting ports table lists the state of each port, its protocol, and the service name. Depending on the options used, Nmap can also show additional information such as the OS type and application versions:
# nmap -A 192.168.2.3
Starting Nmap 4.50 (http://insecure.org) at 2007-12-28 11:45 EST
Interesting ports on 192.168.2.3:
Not shown: 1705 closed ports
| PORT | STATE | SERVICE | VERSION |
| 135/tcp | open | msrpc | Microsoft Windows RPC |
| 139/tcp | open | netbios-ssn | |
| 3389/tcp | open | microsoft-rdp | Microsoft Terminal Service |
| 6346/tcp | filtered | gnutella | |
| 6347/tcp | filtered | gnutella2 | |
| 8081/tcp | open | http | Network Associates ePolicy Orchestrator |
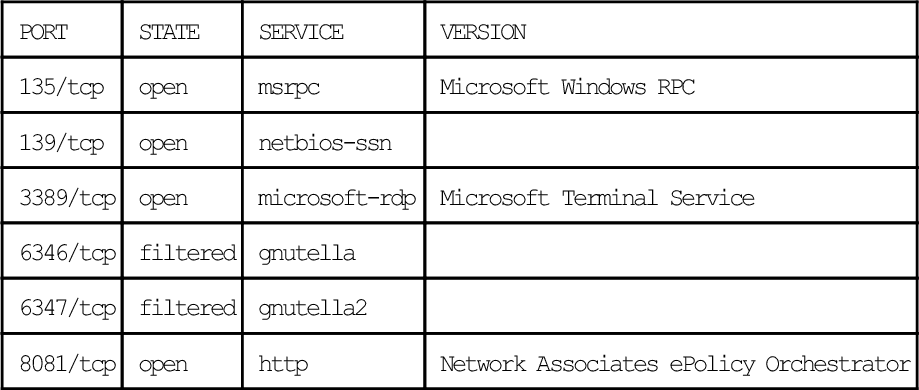
(Computername: LT-A020479 Version: 3.6.0.453)
|_ HTML title: Site doesn’t have a title.
Service Info: OS: Windows
Host script results:
|_ NBSTAT: NetBIOS name: LT-A020479, NetBIOS MAC: 00:11:25:D6:DA:43
Service detection performed. Please report any incorrect results at http://insecure.org/nmap/submit/.
Nmap done: 1 IP address (1 host up) scanned in 1710.661 seconds
The -A command-line option performs OS and version detection, script scanning, and tracerouting, all in addition to default port scanning. As you can see, this is a lot of useful information. To really take advantage of the power of Nmap and its benefit to the enterprise, you must become familiar with the various scan types and command-line options, all of which are covered in this chapter.
Target Specification
Nmap is designed to scan a variety of target types, from a single host to large networks. Nmap supports Classless Inter-Domain Routing (CIDR) notation, octet ranges, Domain Name Server (DNS) names, IPv6 addressing, random targets, and exclude lists directly on the command line. You can also use combinations of target specification methods on the same command line. For example, to scan the entire 192.168.1.0 Class C network using CIDR notation, along with selected systems from 192.168.100.0 using octet ranges, and a single host using the DNS name myhost.xyz.com, you could use the following command:
nmap 192.168.1.0/24 192.168.100.10-25 myhost.xyz.com
You can also specify selected octet ranges using a comma-separated list, for example to scan the following hosts:
■ 192.168.5.20
■ 192.168.10.10
■ 192.168.10.20
■ 192.168.15.10
■ 192.168.15.20
■ 192.168.16.10
■ 192.168.16.20
Another great Nmap feature is the exclude list. If you are interested in scanning your public-facing subnet or demilitarized zone (DMZ), to look for rogue hosts, but you don’t want to scan your known Web, DNS, and mail servers, you could use the following command:
nmap –sP ––exclude web.xyz.com,dns.xyz.com,mail.xyz.com 192.168.100.0/24
Nmap also supports target specification from an input file and excluded targets from an exclude file. The targets must be tab, space, or newline delimited. To perform a software version inventory of your Windows servers use the following command:
nmap –sV –iL windows_servers.txt
The file windows_servers.txt has a list of your known Windows servers from your asset database. A good way to audit a network for rogue hosts is to use an exclude file of known IP addresses from your asset database. For example:
nmap ––excludefile asset_database.txt 192.168.0.0/16
Another good input file (or exclude file, depending on your purpose) to use for asset management is your list of currently leased Dynamic Host Configuration Protocol (DHCP) addresses.
A less used, but still interesting target specification option is the ability to scan random targets using the -iR command-line option. The option accepts a value for the number of target addresses to generate. For example, to scan 10 random targets for a Hypertext Transfer Protocol Secure (HTTPS) service, use the following command:
A value of 0 supplied to the random option produces an infinite scan.
Table 4.1 summarizes the target specification command-line options. As you can see already, Nmap is very flexible at handling input on the command line and from a file. This flexibility offers you a lot of control over the targets that are scanned or not scanned. It also offers the flexibility to use exported host data from other enterprise applications as input to Nmap.
Table 4.1
Target Specification Command-Line Options
| Option | Description |
| -iL < filename > | Specify an input file with a list of tab-, space-, or newline-delimited targets. |
| -iR < number of targets > | Scan a specified number of random targets. |
| --exlude < host1[,host2][,host3],…> | Specify comma-separated targets to not scan |
| --excludefile < filename > | Specify an input file with a list of tab-, space-, or newline-delimited targets to not scan. |

Discovering Hosts
Host discovery in the enterprise is a great way to create and maintain your asset database and to discover rogue devices on the network. Nmap uses a variety of techniques to determine if a host is active by attempting to solicit a response from a host. The simplest way to perform host discovery is to perform a ping scan:
# nmap -sP 192.168.2.0/24
Starting Nmap 4.50 (http://insecure.org) at 2007-12-28 11:40 EST
Host 192.168.2.1 appears to be up.
Host 192.168.2.3 appears to be up.
Host 192.168.2.4 appears to be up.
Nmap done: 256 IP addresses (3 hosts up) scanned in 1.281 seconds
The ping scan sends and Internet Control Message Protocol (ICMP) echo request packet and a Transmission Control Protocol (TCP) acknowledge (ACK) packet to port 80 (TCP SYN packet if executed by an unprivileged user) to all specified targets and prints out information on the hosts that responded. If the active target is on the same local Ethernet network, Nmap includes the Media Access Control (MAC) address and the associated manufacturer according to the Organizationally Unique Identifier (OUI). This is because Nmap uses the ARP scan (-PR) by default on the local Ethernet network. ARP scans are disabled by using the --send-ip command-line option. The ping scan does not scan ports or perform any other scan techniques. The ping scan can be used to create a network inventory, manage the asset database, and monitor system availability.
Nmap allows you to specify a variety of ICMP ping types. The ICMP type 8 echo request (-PE) expects an ICMP type 0 echo reply from an active host. The ICMP type 13 timestamp request (-PP) expects a type 14 timestamp reply from an active host and the ICMP type 17 address mask request (-PM) expects a type 18 address mask reply from an active host. Firewalls can be obstacles to ICMP discovery methods, as responses are often dropped. If you are scanning through a firewall, using one of the advanced host discovery techniques may offer better results.
Nmap offers several advanced methods to solicit replies from active hosts including the TCP SYN ping, TCP ACK ping, and the User Datagram Protocol (UDP) ping. The advanced methods can be combined (and also used with the (-sP) or used individually. The TCP SYN ping (-PS) creates a packet with the SYN flag set and sends it to specified ports on the target. By default, Nmap uses port 80, but you can specify a single port or multiple ports. If the specified port is closed the device will reply with an RST packet; if it is open it will reply with a SYN/ACK. Either response is acceptable for host discovery, because they both indicate that a device is active and responding. If no response is received, the target is either not active or the responses are being blocked by a firewall. The following shows the command-line options and output of a TCP SYN ping to port 80:
# nmap -sP -PS ––reason 192.168.2.1-4
Starting Nmap 4.50 (http://insecure.org) at 2007-12-28 12:02 Eastern StandardTime
Host 192.168.2.1 appears to be up, received syn-ack.
Host 192.168.2.3 appears to be up, received reset.
Nmap done: 4 IP addresses (2 hosts up) scanned in 13.309 seconds
This example uses the --reason command-line option to show more detail on the response from the target hosts. In this case, we see that we received a SYN/ACK from 192.168.2.1 in response to our SYN packet, indicating that both the host and the port are active and responding. Host 192.168.2.3 replied with a RST packet, indicating that the port is closed, but still revealing that the host is active and responding. The other two hosts in the target range, 192.168.2.2 and 192.168.2.4, did not respond, indicating that the host is either inactive or blocked by a firewall.
The TCP ACK (-PA) ping works the same way, except Nmap creates and sends a packet with the ACK flag set. If the target responds with a RST packet it is active. The UDP ping (-PU) is similar to the TCP SYN and ACK pings, but in this case Nmap creates and sends a UDP packet. By default, Nmap uses UDP port 31338 because it is unlikely to be open. If a UDP packet is sent to a closed port, an active host will respond with an ICMP port unreachable packet. Other ICMP error messages and no response may indicate that the host is not active. However, if a UDP port is open, the host will ignore the packet and not return any response. This is why you want to attempt to solicit the ICMP port unreachable response from a closed port to confirm the host is active.
The IP ping (-PO) is another way to solicit a reply from an active target. Nmap creates IP packets with the specified protocol numbers in the protocol field of the IP header. If no protocols are specified, Nmap uses protocols 1, 2, and 4 (ICMP, Internet Group Management Protocol [IGMP], and IP, respectively) by default. Active hosts will respond with a packet using the same protocol as the probes or with an ICMP Protocol Unreachable message. The following example uses protocol 1, ICMP, to solicit a reply, once again we used the --reason command-line option to see more detail on the response packet:
# nmap -sP -PO1 ––reason 192.168.2.1-4
Starting Nmap 4.50 (http://insecure.org) at 2007-12-28 12:10 Eastern Standard Time
Host 192.168.2.1 appears to be up, received echo-reply.
Host 192.168.2.3 appears to be up, received echo-reply.
Nmap done: 4 IP addresses (2 hosts up) scanned in 13.299 seconds
Host discovery can be disabled with the -PN option. When this option is used, all other scanning options (either default or those provided on the command line) are performed against every target specified, whether it is known to be active or not.
The -sL Nmap option prints a list of potential targets and their DNS names. This option is passive since it does not send any packets to the targets, but it does perform DNS name lookups for each host. If you only want to generate an IP address list without names you can use the -n option to disable DNS lookups. The following is an example of a list scan. It is truncated for brevity since the actual output continued to 192.168.100.255 (including all 256 potential hosts in the 192.168.100.0/24 target range):
# nmap -sL 192.168.100.0/24
Starting Nmap 4.50 (http://insecure.org) at 2007-12-22 11:53 EST
Host 192.168.100.0 not scanned
Host router.home.com (192.168.100.1) not scanned
Host systemA.home.com (192.168.100.2) not scanned
Host systemB.home.com (192.168.100.3) not scanned
Host server.home.com (192.168.100.4) not scanned
Host 192.168.100.5 not scanned
Host 192.168.100.6 not scanned
Host 192.168.100.7 not scanned
Host 192.168.100.8 not scanned
Host 192.168.100.9 not scanned
Host 192.168.100.10 not scanned
You could then use this list as an input file for further scanning. You can send this output to a grepable file using the -oG < filename > command-line option:
# nmap -sL -n -oG host_list 192.168.100.0/24
Then you can use the cut command to create a list with just the IP addresses:
# cut -d” “ -f2 host_list > IPs_only
The cut command uses the space to delimit the fields and then extracts the second field, which is the IP address. You must remove the first and last lines of the file either before or after the cut, since these lines contain Nmap status information, not IP addresses. You can perform similar file parsing to extract just the host names by omitting the -n command-line option.
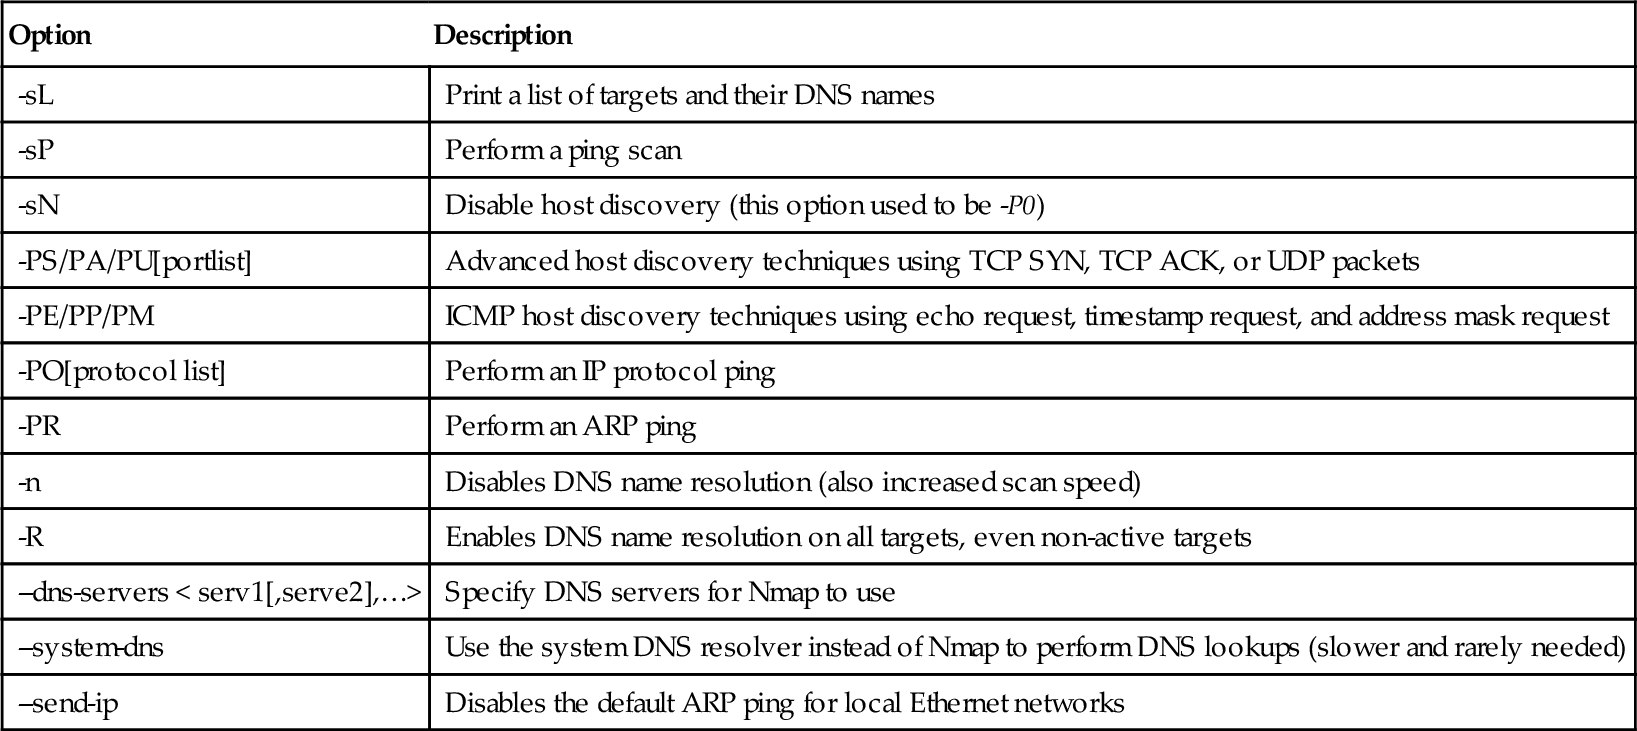
Table 4.2 summarizes the host discovery command-line options. Host discovery techniques can be combined with the target specification methods for greater flexibility. Now you are ready to move on to port scanning. While you don’t need to have a discovered hosts list or asset inventory to perform port scanning (since Nmap can perform both at the same time), having one makes scanning quicker and more efficient.
Table 4.2
Host Discovery Command-line Options
| Option | Description |
| -sL | Print a list of targets and their DNS names |
| -sP | Perform a ping scan |
| -sN | Disable host discovery (this option used to be -P0) |
| -PS/PA/PU[portlist] | Advanced host discovery techniques using TCP SYN, TCP ACK, or UDP packets |
| -PE/PP/PM | ICMP host discovery techniques using echo request, timestamp request, and address mask request |
| -PO[protocol list] | Perform an IP protocol ping |
| -PR | Perform an ARP ping |
| -n | Disables DNS name resolution (also increased scan speed) |
| -R | Enables DNS name resolution on all targets, even non-active targets |
| --dns-servers < serv1[,serve2],…> | Specify DNS servers for Nmap to use |
| --system-dns | Use the system DNS resolver instead of Nmap to perform DNS lookups (slower and rarely needed) |
| --send-ip | Disables the default ARP ping for local Ethernet networks |
Port Scanning
Nmap’s real power is its ability to efficiently scan ports. Nmap offers a variety of port scan techniques, each with their own specific use and expected results. It is important to apply the proper scan technique to the environment and targets being scanned. Port scanning is effective in the enterprise for a number of activities including security auditing, asset management, and compliance. You may be interested in locating systems with file sharing ports or unauthorized File Transfer Protocol (FTP) servers or printers. Open ports reveal potential security weaknesses, provide application and services inventory, and validate compliance with approved software policies. Closed ports are useful for host discovery and OS detection. Remember that port scan results may not always be accurate. Issues such as firewalls and non-RFC compliant hosts and applications can give misleading results. In addition, packet filtering that drops responses to scans slows down the scan significantly as Nmap performs several retries.
Basic Port Scanning
By default, Nmap performs a TCP SYN scan (-sS) against the specified target, when run with root or administrator privileges. SYN scanning is quick and provides reliable results for open, closed, and filtered ports. SYN scanning was once considered a stealthy scan method, however, most host- and network-based intrusion detection systems can now detect SYN scans. Ports are considered open if the port responds to the SYN packet with a SYN/ACK packet, and ports are closed if the system responds with a RST packet. A filtered port indicates an ICMP unreachable error or no response was received. Although Nmap performs a SYN scan by default, you can also perform it with the following command-line option:
# nmap -sS 192.168.2.3
Starting Nmap 4.50 (http://insecure.org) at 2007-12-28 09:46 Eastern Standard Time
Interesting ports on 192.168.2.3:
Not shown: 1707 closed ports
| PORT | STATE | SERVICE |
| 135/tcp | open | msrpc |
| 139/tcp | open | netbios-ssn |
| 3389/tcp | open | ms-term-serv |
| 8081/tcp | open | blackice-icecap |
Nmap done: 1 IP address (1 host up) scanned in 26.248 seconds
What we are interested in here is the ports table, which includes the port number and protocol, the state, and the service. Unless you are using version detection, the service that is displayed is just a guess since it is pulled from the nmap-services file, a list of well know services and the ports they run on.
If a user doesn’t have root or administrator privileges, Nmap will perform the TCP connect scan (-sT ) by default. This is because Nmap uses the underlying OS to establish a connection with the target instead of using its built-in ability to create and send raw packets. This scan method tends to be less efficient since Nmap has less control than it does when creating raw packets. TCP connect scans are more likely to be logged since they complete a full TCP connection. System administrators should monitor logs for a large number of connection attempts to multiple ports, since this activity may indicate a port scan. TCP connect scans can also cause unwanted effects, such as causing DoS conditions for systems that do not efficiently close TCP connections. In our example, running a TCP connect scan against the same target detects additional open ports:
# nmap -sT 192.168.2.3
Starting Nmap 4.50 (http://insecure.org) at 2007-12-28 09:52 Eastern Standard Time
Interesting ports on 192.168.2.3:
Not shown: 1704 closed ports
| PORT | STATE | SERVICE |
| 21/tcp | open | ftp |
| 25/tcp | open | smtp |
| 110/tcp | open | pop3 |
| 135/tcp | open | msrpc |
| 139/tcp | open | netbios-ssn |
| 3389/tcp | open | ms-term-serv |
| 8081/tcp | open | blackice-icecap |
Nmap done: 1 IP address (1 host up) scanned in 365.014 seconds
This may be because the target host is running a host-based firewall that may have been interfering with the results of the SYN scan method.
Many notable exploits (SQL slammer worm) have occurred because of security weaknesses on UDP services. UDP is used by many popular services including DNS, Simple Network Management Protocol (SNMP), Trivial File Transfer Protocol (TFTP), NFS, DHCP, Kerberos, and Syslog. The Nmap UDP scan (-sU) sends an empty UDP header to the target port. The target responds with an ICMP port unreachable error if the port is closed. Other ICMP errors indicate that the port is blocked by a packet filter. UDP services on open ports will respond with a UDP packet, however, some UDP services will not send a response. Because of this lack of response, Nmap performs several retries, which makes UDP scanning very slow. If Nmap cannot determine if the port is blocked by a packet filter it will indicate open|filtered for the port status. In this case, try performing a version scan (-sV ) to gather additional information to determine if the port is actually open. The following is an example of a UDP scan and associated output:
# nmap -sU 192.168.2.3
Starting Nmap 4.50 (http://insecure.org) at 2007-12-28 10:04 Eastern Standard Time
All 1488 scanned ports on 192.168.2.3 are open|filtered (1334) or closed (154)
Nmap done: 1 IP address (1 host up) scanned in 20.670 seconds
In this case, the UDP port scan may be filtered by the host-based firewall, or there may not be any open UDP ports. Let’s scan another target and view the results:
# nmap -sU 192.168.100.4
Starting Nmap 4.50 (http://insecure.org) at 2007-12-28 10:15 Eastern Standard Time
Interesting ports on 192.168.100.4:
Not shown: 1483 closed ports
| PORT | STATE | SERVICE |
| 123/udp | open|filtered | ntp |
| 259/udp | open|filtered | firewall1-rdp |
| 427/udp | open|filtered | svrloc |
| 631/udp | open|filtered | unknown |
| 5353/udp | open|filtered | zeroconf |
MAC Address: 00:30:65:0D:28:32 (Apple Computer)
Nmap done: 1 IP address (1 host up) scanned in 56.742 seconds
This is more of what we are looking for. There are five UDP services that may be open on this target. You need to perform additional testing, with the version detection (-sV ) and other manual tests, to determine actual open services and versions. Version detection is covered later in this chapter.
Nmap provides the ability to analyze IP protocols with the IP protocol scan (-sO). This isn’t technically a port scan, however, it does use the same underlying port scan engine and reports its results in the port table. The IP protocol scan allows you to see which IP protocols are supported by the target system. The response to this scan is an ICMP protocol unreachable for unsupported protocols. Other ICMP responses cause the protocol to be reported as filtered, and no response is reported as open|filtered. The following is an example of an IP protocol scan and associated output:
# nmap -sO 192.168.2.3
Starting Nmap 4.50 (http://insecure.org) at 2007-12-28 12:24 EST
Interesting protocols on 192.168.2.3:
Not shown: 250 closed protocols
| PROTOCOL | STATE | SERVICE |
| 1 | open | icmp |
| 2 | open|filtered | igmp |
| 6 | open|filtered | tcp |
| 17 | open | udp |
| 47 | open|filtered | gre |
| 50 | open|filtered | esp |
MAC Address: 00:11:25:D6:DA:C7 (IBM)
Nmap done: 1 IP address (1 host up) scanned in 1.649 seconds
Advanced Port Scanning
Nmap includes several advanced port scanning options that manipulate the raw packet in a variety of ways to solicit responses from the target. According to the TCP Request For Comment (RFC), any packet not containing a SYN, RST, or ACK flag will result in a returned RST if the port is closed and no response if the port is open (reported as open|filtered). Nmap includes the following three scan options to take advantage of this characteristic:
■ TCP Null scan The TCP Null scan (-sN ) does not set any flag bits in the TCP header.
■ TCP FIN scan The TCP FIN scan (-sF ) sets only the FIN flag.
■ Xmas scan The Xmas scan (-sX ) sets the FIN, PSH, and URG flags.
If Nmap receives an ICMP unreachable error it will report the port as filtered. These advanced port scanning options are stealthy and may bypass firewalls and other security controls. However, most host- and network-based intrusion detection systems (IDSes) will detect this type of scan activity. Keep in mind that OSes that don’t follow the TCP RFC may send misleading responses.
Nmap includes an advanced port scan option that is used to scan firewalls to determine their connection state and rulesets. The TCP ACK scan (-sA) creates and sends a packet to the target with only the ACK flag set. Unfiltered systems will respond with a RST packet for both open and closed ports. If an ICMP error message or no response is received, the port is considered filtered by a firewall.
A similar technique to the TCP ACK scan is the TCP Window scan (-sW ). The Window scan sends a packet with only the ACK flag set, but also analyzes the TCP Window field in the RST response to determine if the port is open or closed. The TCP window size is an implementation detail of a few types of systems. Some systems will use a positive window size if the port is open, and a zero window size if the port is closed.
The Maimon scan (-sM ), named after the discoverer Uriel Maimon, sets the FIN and ACK flags in the port scan packet. The target system will generate a RST packet for a port that is open or closed. More information on this scan technique can be found in Phrack Magazine issue #49 (November 1996), www.phrack.org/issues.html?issue=49&id=15-article.
Another advanced port scanning technique is the Idle scan (-sI ). The idle allows you to specify another system to use in the scanning, known as a zombie host. The zombie host is used to mask your IP address and to analyze IP fragmentation ID sequence generation to determine open ports on the target. The idle scan is a very stealthy, blind TCP port scan. A blind scan spoofs your real IP address as another host, so your scanning system will not see any responses from the target, since they are sent to the spoofed host. The trick is to analyze the spoofed host to conclude responses from the target. Fyodor has a great write up on the idle scan including examples at http://insecure.org/nmap/idlescan.html. The idle scan uses TCP port 80 by default if no ports are specified.
Another stealthy scan method is the FTP bounce scan (-b). The FTP bounce scan uses the FTP proxy feature on an FTP server to scan a target from the FTP server instead of your system. The FTP proxy feature allows you to log into an FTP server and request a file to be sent to another system. By sending files to a target system and port you can determine whether a port is open or closed. Most FTP servers no longer support this functionality, but some are still available. The FTP bounce scan can be used to bypass firewalls by scanning from an organization’s FTP server, which may be on an internal network, or allowed to the internal network by the firewall rules.
To have even more control over packet creation, Nmap provides the --scanflags command-line option to allow you to specify TCP flags to set in the packet. This allows you to solicit a variety of responses from targets, as well as evade IDSes. You can use numerical flag values or symbolic names in any order. For example, to set the URG and PSH flags you would use the following option:
You can provide a TCP scan type to tell Nmap how to interpret the results. For example, supplying the -sA command-line option along with the --scanflags tells Nmap to use the specified flags but to interpret the results the same way an ACK scan would. By default, Nmap uses the SYN scan for result interpretation.
Nmap has two other less used port scanning command-line options that provide valuable information. The --traceroute command-line option is performed after the scan and works with all scan types except the TCP connect scan (-sT ) and idle scan (-sI ). It uses Nmap’s own traceroute algorithm and timing characteristics to determine the mostly likely port and protocol to reach the target. The --reason command-line option shows more detail about the responses from the target host, including the type of packet that was received in response to the probe. This option is also automatically enabled by the nmap debug (-d ) command-line option.
Specifying Ports
Now that we have covered all of the port scanning techniques, let’s take a look at how you can specify the ports to scan. By default, Nmap scans ports 1 through 1024 and those listed in the nmap-services file for the protocol being scanned (TCP or UDP). Its worth taking a look at the nmap-services file to see the ports, especially the higher numbered ports, that Nmap includes. Nmap also allows you to specify the ports to scan and whether to scan them sequentially or randomized. By default, Nmap randomizes the order of ports scanned. You can scan sequentially by using the -r command-line option. To specify ports, use the -p < port range > command-line option. The port range parameter can be a single port or a range of ports. To scan for hosts with port 80 you could use the following:
nmap –p 80 192.168.100.0/24
Starting Nmap 4.50 (http://insecure.org) at 2007-12-28 12:58 Eastern Standard Time
Interesting ports on 192.168.100.1:
PORT STATE SERVICE
80/tcp open http
MAC Address: 00:14:6C:19:F8:45 (Netgear)
Interesting ports on 192.168.100.2:
PORT STATE SERVICE
80/tcp closed http
MAC Address: 00:30:65:0D:28:29 (Apple Computer)
Nmap done: 256 IP addresses (3 hosts up) scanned in 28.291 seconds
You can also specify a range of ports to scan. The following only scans ports 130 to 140 (since no scan methods are included, Nmap uses the SYN scan by default):
# nmap -p 130–140 192.168.2.3
Starting Nmap 4.50 (http://insecure.org) at 2007-12-28 13:05 EST
Interesting ports on 192.168.2.3:
| PORT | STATE | SERVICE |
| 130/tcp | closed | cisco-fna |
| 131/tcp | closed | cisco-tna |
| 132/tcp | closed | cisco-sys |
| 133/tcp | closed | statsrv |
| 134/tcp | closed | ingres-net |
| 135/tcp | open | msrpc |
| 136/tcp | closed | profile |
| 137/tcp | closed | netbios-ns |
| 138/tcp | closed | netbios-dgm |
| 139/tcp | open | netbios-ssn |
| 140/tcp | closed | emfis-data |
MAC Address: 00:11:25:D6:DA:65 (IBM)
Nmap done: 1 IP address (1 host up) scanned in 0.158 seconds
Nmap also includes notation to scan from port 1 to a specified port. The following example scans from port 1 to port 100:
Keeping in similar syntax, Nmap can scan from a specified port to port 65535. The following example scans from port 60000 to port 65535:
nmap –p 60000- 192.168.100.0/24
Combining syntax allows you to scan all 65535 ports by using the following:
If you are performing both TCP and UDP scans, you may want to specify different ports for each protocol. The following example shows the syntax to do just that:
nmap –sU –sS –p U:53,T:80,134–139 192.168.100.0/24
This Nmap command will perform a UDP scan on port 53, and a TCP SYN scan on ports 80 and 134 to 139. You can also specify port names instead of numbers. Make sure you use the port names included in the nmap-services file. Nmap also supports wildcards (⁎ and ?) in port names. The following scans the FTP port and all HTTP ports:
nmap –p ftp, http* 192.168.100.0/24
By viewing the nmap-services file, you can see that this scan includes the following ports:
| ftp | 21/tcp | # File Transfer [Control] |
| http | 80/tcp | # World Wide Web HTTP |
| http-mgmt | 280/tcp | # |
| https | 443/tcp | # secure http (SSL) |
| http-alt | 591/tcp | # FileMaker, Inc. - HTTP Alternate |
| http-rpc-epmap | 593/tcp | # HTTP RPC Ep Map |
| http-alt | 8000/tcp | # A common alternative http port |
| http-proxy | 8080/tcp | # Common HTTP proxy/second web server p |
| https-alt | 8443/tcp | # Common alternative https port |
Nmap also provides syntax to scan port ranges in the nmap-services file. For example, you can scan all ports that are included in the nmap-services file between port 6000 and port 6100:
nmap –p [6000–6100] 192.168.100.0/24
By viewing the nmap-services file, you can see that this scan includes the following ports:
| X11 | 6000/tcp | # X Window server |
| X11:1 | 6001/tcp | # X Window server |
| X11:2 | 6002/tcp | # X Window server |
| X11:3 | 6003/tcp | # X Window server |
| X11:4 | 6004/tcp | # X Window server |
| X11:5 | 6005/tcp | # X Window server |
| X11:6 | 6006/tcp | # X Window server |
| X11:7 | 6007/tcp | # X Window server |
| X11:8 | 6008/tcp | # X Window server |
| X11:9 | 6009/tcp | # X Window server |
| xmail-ctrl | 6017/tcp | # XMail CTRL server |
| arcserve | 6050/tcp | # ARCserve agent |
The port specification command-line option is also used with the IP scan technique to specify the protocol numbers (0–255) to scan. The following example shows the use of the IP protocol scan with the TCP protocol:
# nmap -sO -p 6 192.168.100.0/24
Starting Nmap 4.50 (http://insecure.org) at 2007-12-28 13:34 Eastern StandardTime
Interesting protocols on 192.168.100.1:
MAC Address: 00:14:6C:19:F8:65 (Netgear)
Interesting protocols on 192.168.100.4:
MAC Address: 00:30:65:0D:28:34 (Apple Computer)
Nmap done: 256 IP addresses (3 hosts up) scanned in 39.747 seconds
Another port specification command-line option is the fast scan (-F), which scans only for ports listed in the nmap-services file. To make this option even more efficient, you can specify your own customized nmap-services file using the –servicedb command-line option, for example:
nmap —servicedb /home/me/my-services 192.168.100.0/24
Table 4.3 summarizes the port scanning command-line options. We are really starting to see the power and versatility of the Nmap scanner. One thing to keep in mind in terms of port scanning is that Nmap uses its built in nmap-services file to correlate ports and services to output in the results. Most of the time, these are actually the services running on these ports, however, in some cases it may be a different service or even a Trojan application. Luckily, Nmap also has the ability to probe active services for more information. The next two sections show you how to perform Nmap OS detection, and service and application version detection.
Table 4.3
Port Scanning Command-Line Options
| Option | Description |
| -sS | TCP SYN scan |
| -sT | TCP connect scan |
| -sU | UDP port scan |
| -sN | TCP null scan |
| -sF | TCP FIN scan |
| -sX | TCP Xmas scan |
| -sA | TCP ACK scan |
| -sW | TCP Window scan |
| -sM | TCP Maimon scan |
| -sI < zombie host[:probeport]> | TCP Idle scan |
| -sO | IP Protocol scan |
| -b < FTP relay host > | FTP Bounce scan |
| --scanflags < flags > | Set the TCP flags of your choice |
| --traceroute | Trace the path to the target host |
| --reason | Provide host and port state reasons |
| -p < port range > | Specify ports to scan |
| -F | Fast scan |
| -r | Don’t randomize ports |
| --servicedb < filename > | Specify a file to use other than the default nmap-services file |
Detecting Operating Systems
A really nice feature of Nmap is the ability to remotely detect OS versions. This is particularly useful for network asset inventory and OS patch management. For example, you may use Nmap OS detection to identify outdated or unauthorized systems on your networks. Nmap performs OS detection by probing the target host and analyzing the responses. Probes include TCP and UDP packets that examine OS specifics such as initial sequence numbers (ISN), TCP options, IP identifier (ID) numbers, timestamps, explicit congestion notification (ECN), and window sizes. Each OS has distinctive responses to the probes, which identify the OS and result in an OS fingerprint. The probes and response matches are located in the nmap-os-db file. Nmap will attempt to identify the following parameters:
■ Vendor Name The vendor of the OS such as Microsoft or Sun.
■ Operating System The underlying OS such as Windows, Mac OS X, Solaris.
■ OS Generation The version of the OS such as Vista, XP, 2003, 10.5, or 10.
■ Device Type The type of device such as general purpose, print server, media, router, WAP, or power device.
In addition to these parameters, OS detection also provides useful information on system uptime and TCP Sequence Predictability Classification, which is the measure of the difficulty to forge a TCP connection against the remote host. To enable OS detection with your port scan use the -O command-line option. For example:
# nmap -O 192.168.100.2
Starting Nmap 4.50 (http://insecure.org) at 2008-01-03 21:40 EST
Interesting ports on 192.168.100.2:
Not shown: 1709 closed ports
Device type: general purpose
Running: Apple Mac OS X 10.4.X
OS details: Apple Mac OS X 10.4.8 – 10.4.10 (Tiger) (Darwin 8.8.0 – 8.10.2)
Network Distance: 0 hops
OS detection performed. Please report any incorrect results at http://insecure.org/nmap/submit/.
Nmap done: 1 IP address (1 host up) scanned in 11.844 seconds
This command will use Nmap’s default SYN scan for port detection, but the OS detection option can be combined with any of the port detection techniques.
Nmap includes several command-line options to configure the OS detection engine. To limit OS detection to targets with at least one open port and one closed port, thus increasing your chances of a successful identification, you can use the --osscan-limit command-line option. If Nmap can’t make a perfect match for an OS it will guess something that is close, but not exact. To make Nmap guess more aggressively, you can use the --osscan-guess command-line option. Lastly, to make OS detection quicker you can lower the --max-os-retries command-line option. By default, Nmap will retry OS detection five times, and two times when conditions aren’t favorable. Setting the --max-os-retries to a lower value such as 1 will speed up the detection process, but detection may not be as reliable.
This section provided a basic introduction to Nmap’s OS detection usage. Table 4.4 summarizes the OS detection command-line options. Nmap’s OS detection features are covered in more detail in Chapter 6.
Table 4.4
Operating System Detection Command-Line Options
| Option | Description |
| -O | Enable OS detection |
| --osscan-limit | Only perform OS detection against targets with at least one open and one closed port |
| --osscan-guess | Guess near-matches aggressively |
| --max-retries < number > | Sets the number of OS detection retries |
Detecting Service and Application Versions
By default, Nmap identifies open ports on the target host and correlates those port numbers with common services associated with those ports, located in the nmap-services file. But is it really a Web server running on port 80? When you are managing your network assets and performing security auditing, Nmap can go one step further to probe the open ports to attempt to identify the application or service running on it. For asset management, you are interested in the version of services and applications, not only for inventory reasons, but also for policy compliance. You may find systems running unauthorized servers, so you will want to identify the unauthorized services and applications that are running. For security auditing, you are interested in service and application versions from a vulnerability and patch management perspective.
Nmap can perform version detection to assist in gathering more detail on the services and applications running on the identified open ports. Version detection uses a variety of probes, located in the nmap-services-probes file, to solicit responses from the services and applications. Nmap queries the target host with the probe information and analyzes the response, comparing it against known responses for a variety of services, applications, and versions. Nmap will attempt to identify the following parameters:
■ Service Protocol The service running on the open port, such as FTP, Hypertext Transfer Protocol (HTTP), or Simple Mail Transfer Protocol (SMTP).
■ Application Name The specific application for the service, such as WU-FTPD, Microsoft IIS, or Sendmail.
■ Version Number The version of the application.
■ Hostname The hostname of the target host. (This may be for an internal network and different than the DNS response).
■ Device Type The type of device such as a print server, media, router, WAP, or power device.
■ Operating System Family The underlying OS such as Windows, HP-UX, Cisco IOS, or Linux. (This could be different than what the Nmap OS detection reports if the system uses network address translator (NAT) and forwarding for the application).
■ Miscellaneous Details Other details such as kernel information, serial numbers, firmware versions, user names, and password information.
■ Port State Version detection also attempts to gain more information about UDP and TCP ports that were reported as open|filtered to determine the correct state of the port.
To enable version detection with your port scan use the -sV command-line option. For example:
# nmap -sV 192.168.2.3
Starting Nmap 4.50 (http://insecure.org) at 2008-01-03 21:44 EST
Interesting ports on 192.168.2.3:
Not shown: 1705 closed ports
| PORT | STATE | SERVICE | VERSION |
| 135/tcp | open | msrpc | Microsoft Windows RPC |
| 139/tcp | open | netbios-ssn | |
| 3389/tcp | open | microsoft-rdp | Microsoft Terminal Service |
| 6346/tcp | filtered | gnutella | |
| 6347/tcp | filtered | gnutella2 | |
| 8081/tcp | open | http | Network Associates ePolicy Orchestrator |

(Computername: LT-A030443 Version: 3.6.0.453)
Service Info: OS: Windows
Service detection performed. Please report any incorrect results at http://insecure.org/nmap/submit/.
Nmap done: 1 IP address (1 host up) scanned in 11.317 seconds
This command will use Nmap’s default SYN scan for port detection, but the version detection option can be combined with any of the port detection techniques.
Nmap includes several command-line options to configure the version detection engine. The nmap-service-probes file excludes probing certain ports (e.g., printer ports will print anything that is sent to it). To enable all ports for version detection, use the --allports command-line option. You can also control the version scanning intensity with the ---version-intensity command-line option. By default, Nmap uses an intensity of 7 (out of 0–9). The intensity level controls the probes that are used in version detection; the higher intensity means that more probes are used. Probes are classified with a rarity value between 1 and 9, with 1 being very common and highly useful, and 9 being rare and less useful. Higher intensity scans take longer since they use more of the rare probes, but you are more likely to have services and versions correctly detected. If you want quick but less reliable version detection, you can also use the --version-light command-line option, which is equal to a version intensity level of 2. If you want comprehensive and reliable version detection by executing every probe, you can also use the --version-all command-line option, which is equal to a version intensity level of 9. You can also get detailed information during the version detection process by using the --version-trace command-line option. You can specify a customized service probe file, instead of the default nmap-service-probes, by using the --versiondb command-line option.
Nmap version detection also includes Remote Procedure Call (RPC)-specific probes to discover the RPC program and version. These are enabled by default when version detection discovers RPC services, but it can also be enabled separately outside of version detection by using the -sR command-line option. The RPC probes can gather the same type of information as executing the rpcinfo -p UNIX command, even if the target host’s portmapper is behind a firewall.
Table 4.5 summarizes the service and application version detection command-line options. Version detection is a growing and evolving feature of Nmap, with numerous enterprise capabilities.
Table 4.5
Service and Application Version Detection Command-Line Options
| Option | Description |
| -sV | Enable version detection for services and application |
| -sR | Enable RPC version detection (enabled by default with -sV option) |
| --allports | Don’t exclude any ports from version detection |
| --version-intensity < intensity > | Set version scan intensity from 0 to 9 |
| --version-light | Set version intensity to level 2 for quick version scanning |
| --version-all | Set version intensity to level 9 to attempt all probes |
| --version-trace | Print debugging information during version detection |
| --versiondb < service probes file > | Specify a customized services probes file |
Other Scanning Options
Nmap has a variety of other command-line options to assist with network mapping and port scanning. These command-line options include scripting, performance and optimization, output logging, and evasion and spoofing. You have seen the power of Nmap in its ability to perform robust port scanning and detect OSes and service and application versions. These scanning options demonstrate Nmap’s unrivaled flexibility and features that allow you to customize Nmap scanning to your needs.
Nmap Scripting Engine
The Nmap Scripting Engine (NSE) extends Nmap’s capabilities to enable it to perform a variety of tasks and report the results along with Nmap’s normal output. Some examples of NSE scripts include:
■ Enhanced Network Discovery Perform whois lookups, perform additional protocol queries, and act as a client for the listening service to collect information such as available network shares.
■ Enhanced Version Detection Perform complex version probes and attempt service brute-force cracking.
■ Vulnerability Detection Execute probes to check for specific vulnerabilities.
■ Malware Detection Execute probes to discover Trojan and worm backdoors.
■ Vulnerability Exploitation Execute scripts to exploit a detected vulnerability.
NSE scripts are written in the Lua scripting language and named with the extension .nse. They are stored in the scripts subdirectory of the main Nmap directory. The script. db file is also located in the main Nmap directory, and it contains the list of all NSE scripts and their associated categories (safe, intrusive, malware, backdoor, version, discovery, vulnerability). The NSE script will first determine whether it should be run against the target host (does the target host meet certain criteria such as an open port or running service), by analyzing Nmap’s scan output before it executes the actions of the script. The quickest way to start using NSE is to use the -sC command-line option:
This option will perform a script scan of all safe and intrusive scripts. You can use the --script option to have more granular control over the specific scripts and categories that are executed. For example, to execute all scripts in the vulnerability category you can use the following:
nmap --script = vulnerability 192.168.100.3
This will perform a lightweight vulnerability scan of the specified target. To execute a single script you can use the following:
nmap --script = promiscuous.nse 192.168.100.0/24
This will execute the promiscuous.nse script to look for Ethernet cards in promiscuous mode. In the enterprise, this is something worth investigating for security auditing, because it will discover systems that are running sniffers. Sniffers may be running on legitimate network analyzer systems, or employees may have installed them, or they may be running on a system compromised by an attacker. This security auditing can also be coupled with policy compliance checking to determine if unauthorized individuals are running sniffers. You may have a certain subset of NSE scripts that you would like to execute. You can run these by specifying the directory where they are located:
nmap --script =/my-scripts 192.168.100.0/24
This will execute all NSE scripts in the my-scripts directory. Use the all parameter to execute all NSE scripts that are included with Nmap:
# nmap --script = all 192.168.100.4
Starting Nmap 4.50 (http://insecure.org) at 2008-01-03 21:55 EST
Interesting ports on server.home.com (192.168.100.4):
Not shown: 1705 closed ports
| PORT | STATE | SERVICE |
| 135/tcp | open | msrpc |
| 139/tcp | open | netbios-ssn |
| 445/tcp | open | microsoft-ds |
| 2000/tcp | open | callbook |
| 6346/tcp | filtered | gnutella |
| 6347/tcp | filtered | gnutella2 |
MAC Address: 00:11:F5:92:26:65 (Askey Computer)
Host script results:
|_ NBSTAT: NetBIOS name: MYLAPTOP, NetBIOS MAC: 00:11:F5:92:26:65
|_ Promiscuous detection: Win98/Win2K/WinXP with pcap installed. I’m unsure if they’re sniffing. (tests: “1_1_____1_”)
Nmap done: 1 IP address (1 host up) scanned in 6.343 seconds
Notice the Host script results in the output. The scripts detected the NetBIOS name and that WinPcap is installed. NSE includes a few advanced NSE command-line arguments, mostly for script developers and debugging. These include the ability to pass arguments to scripts to override script values, running a trace for a script, and updating the script database. Table 4.6 summarizes the NSE command-line options. We should see a lot more NSE scripts in the future, since NSE is a new and evolving Nmap feature with lots of expansion capabilities.
Table 4.6
Scripting Command-Line Options
| Option | Description |
| -sC | Execute safe and intrusive scripts |
| --script < script-categories|directory| filename|all > | Execute specified scripts and categories |
| --script-args = < n1 = v1[,n2 = v2,.. .]> | Provide arguments to override script values |
| --script-trace | Print all incoming and outgoing script communication |
| --script-updatedb | Update the script database name/category mapping |
Performance and Optimization
When using Nmap in the enterprise to scan large networks, performance and optimization is a high priority. Nmap has several features to enhance the timing and performance, including advanced algorithms and executing tasks in parallel. You can also control various timing and performance features with Nmap’s command-line options. You can use various parameters to scope your scan to obtain specific information and eliminate unnecessary tests. Throughout this chapter we provide examples on scoping the Nmap scan by using various command-line options and parameters. This section provides information on using timing options for performance and optimization.
Nmap timing options are addressed in the following categories:
■ Timing Template Nmap offers six timing templates to control the speed of the Nmap scan. Timing templates may be specified by their name or numerical value. The timing templates are paranoid (0), sneaky (1), polite (2), normal (3), aggressive (4), and insane (5). By default, Nmap scans with a the normal template (-T3). The slower templates lower the impact on the network and systems and are used for Intrusion Detection System (IDS) evasion. The faster templates are used on very fast networks, and although they are very fast, they may be less accurate. Some example uses of Nmap timing templates include the following:
nmap -T4 192.168.100.0/24
nmap -Tparanoid 192.168.100.0/24
Keep in mind that the paranoid template scans only one port at a time, and waits five minutes between each probe. This can take a very long time!
■ Parallelism Nmap makes good use of parallelism for performance optimization. Nmap divides the target IP addresses into groups and scans one group at a time. You can control the group sizes with the --min-hostgroup and --max-hostgroup command-line options. Specifying a large minimum group size increases the scanning speed. Nmap also executes probes in parallel. Nmap can dynamically adjust the number of parallel probes based on network performance. You can control the probe parallelism with the --min-parallelism and --max-parallelism command-line options. Since Nmap dynamically controls parallelism, these command-line options are rarely used. Some people do set the --max-paralellism to small values, such as 1, to limit the number of probes sent to a host at a time (e.g., scanning critical production systems).
■ Timouts Nmap dynamically adjusts the timeout value to wait for a probe response based on the response time of previous probes. You can specify a minimum timeout value and a maximum timeout value as well as the initial timeout value using the --min-rtt-timeout, --max-rtt-timeout, and --initial-rtt-timeout command-line options. Most people only use the maximum and initial timeout values to lower them to decrease scan times, especially on filtered networks. The --scan-delay and --max-scan-delay command-line options allow you to specify the amount of time to wait between each probe. This is useful for systems that rate limit responses. By default, Nmap dynamically adjusts scan delay when it detects rate limiting. Scan delay may also be used to evade intrusion detection and prevention devices. Some systems will also rate limit RST packets, which can slow down scans. You can use the --defeat-rst-ratelimit command-line option to ignore this type of rate limiting. For example, if you are running a SYN scan, RST packets indicate a closed port, but if you are only interested in open ports, you don’t care about the RST packets. You can also specify the maximum amount of time to spend scanning a target so that you don’t waste a lot of time on very slow responding hosts. For example, you can set the value to 15 m to move on to the next target if the scan on the current host isn’t completed in 15 minutes.
■ Retries When Nmap doesn’t receive a response to a probe it will retransmit it. You can specify the maximum number of retries to increase scan speed by using the --max-retries command-line option. You can set the value to 0 to prevent any retransmissions, but this is not recommended due to poor network reliability and other factors.
Table 4.7 summarizes the timing and performance command-line options. As you can see there is a lot of configurability in terms of timing parameters. In general, unless you are an advanced user you can leave these parameters to Nmap to adjust dynamically (with the exception of the timing templates). If you are an advanced user with special scanning needs you may find the other options beneficial to your scanning performance.
Table 4.7
Timing and Performance Command-Line Options
| Option | Description |
| -T < paranoid|sneaky|polite| normal|aggressive|insane > | Sets the timing template |
| Or | |
| -T < 0-5 > | |
| --min-hostgroup/max-hostgroup < size > | Specify the parallel scan group size |
| --min-parallelism/max-parallelism < time > | Specify the number of probes to execute in parallel |
| --min-rtt-timeout/max-rtt-timeout/initial-rtt-timeout < time > | Specify the probe round trip timeout before giving up or retransmitting a probe |
| --scan-delay/-max-scan-delay < time > | Specify the delay between probes |
| --max-retries < tries > | Specify the number of probe retransmissions |
| --host-timeout < time > | Specify a maximum amount of time to spend scanning a host before moving on to the next target |
| --defeat-rst-ratelimit | Ignore RST rate limiting |
Evasion and Spoofing
As we have mentioned throughout this chapter, security controls such as packet filters, router access control lists, and firewalls will limit the results of your Nmap scanning. Nmap scans are also easily detected by intrusion detection and prevention systems (IDPS). In the enterprise, this may not be a concern since you may have physical access to internal networks behind the security controls and you are not concerned with being detected. However, Nmap does include several options to attempt to evade firewalls and IDPSes. You may be interested in using these features to test the robustness of your security controls and their susceptibility to evasion techniques. You may also wish to use these techniques as part of a full security audit or penetration test to attempt to defeat security controls using the same methods as attackers. For example, evasion techniques are often used to verify that firewall filters are operating properly. We have already mentioned some evasion techniques in the “Port Scanning” section, such as the Idle scan and FTP bounce. We also mentioned some evasion techniques that use timing parameters in the “Performance and Optimization” section. In this section, we will take a closer look at evasion methods that use fragmentation, spoofing, and packet manipulation techniques.
Packet fragmentation is an old and common evasion technique that splits the packet header across many small packets. This will sometimes break up distinguishing characteristics across packets and evade pattern matching detection techniques. You can fragment your Nmap packets by using the -f command-line option. This will break the packets into a maximum of 8 bytes after the IP header. If you use this option twice, Nmap will break the packets into a maximum of 16 bytes after the IP header. You can use the --mtu command-line option (instead of the -f option) to specify your own packet size for fragmentation in multiples of 8. For example, the following command-line options perform the same fragmentation:
nmap -f -f 192.168.100.0/24
nmap --mtu 16 192.168.100.0/24
Fragmentation doesn’t always evade security controls these days, because controls have built-in techniques to detect and handle fragmentation. However, sometimes controls don’t have this feature enabled for performance and routing reasons.
Spoofing is another evasion technique where you mask your IP address by pretending to be another system on the Internet. We saw this with both the Idle and FTP bounce scans. The Nmap decoy scan (-D) combines spoofing and confusion to attempt to evade detection. By specifying decoys, you are making it appear that other hosts are also scanning the target in hopes that you won’t be detected or singled out. You can specify multiple decoys as a comma-separated command-line parameter. You can also specify ME in the list to represent the position for your actual system, otherwise Nmap will position your system randomly. Positioning your system further down the list increases the chances that you will not be detected. Attackers often use real IP addresses of active hosts on the Internet, but for enterprise auditing this may not be necessary, and may get you into trouble if the owners of the active systems take action. For security testing purposes, you can specify other IP addresses in your network, maybe even ones set up in a development or lab environment for this purpose. An example of a decoy scan includes the following:
nmap -D <192.168.100.1,192.168.100.4,192.168.100.20,192.168.100.3,192.168.100.55,19 2.168.100.100,ME,192.168.100.29,192.168.100.57> 192.168.2.0/24
This example uses 8 decoys with the real scanning system at position 7. Although this isn’t “traditional” spoofing since your address will still show up as scanning the target, it can add enough confusion to the mix to evade detection.
If you want to use traditional spoofing to make your system appear as another system, use the -S command-line option. However, you won’t get responses back from the target since they will go to the spoofed system. This option is also used to specify the IP address of the interface on your system that you will use to send packets when Nmap can’t determine your actual IP address. You can also use the -e command-line option to specify an interface to use in this case. You can use the --spoof-mac command-line option to specify a MAC address to be included in the Nmap packets. If you specify a 0 as the option parameter, Nmap will choose a random MAC address for you. You can also specify a full MAC address, or a vendor prefix or name, in which case Nmap fills in the rest for you with random values. However the vendor name must be included in the nmap-mac-prefixes file. Some examples of MAC spoofing include the following:
nmap --spoof-mac 0 192.168.100.0/24
nmap --spoof-mac 11:22:33:44:55:66 192.168.100.0/24
nmap --spoof-mac 000D93 192.168.100.0/24
nmap --spoof-mac D-Link 192.168.100.0/24
Nmap will then report the MAC address that it is using. The last example provided the following output:
Spoofing MAC address 00:05:5D:DA:32:64 (D-Link Systems)
In addition to source IP and MAC addresses, you can also specify source ports to use for scanning. Specifying a popular source port that is often allowed through firewalls (such as DNS port 53) is a common way to evade firewalls. Nmap includes two equivalent command-line options to specify a source port: -g and --source-port. For example, the following uses perform the same scanning, using a source port of 53:
nmap -g 53 192.168.100.0/24
nmap --source-port 53 192.168.100.0/24
Nmap offers several packet manipulation techniques that may be used for evasion. You can use the --date-length command-line option to append a specified number of random bytes to the packets Nmap sends during scans. This may avoid Nmap detection signatures and other detection techniques. You can also specify IP options to include in the packet by using the --ip-options command-line option. You can specify record route (R), record timestamps (T ), record timestamps and route (U ), loose source routing (L), or strict source routing (S). To have more granular control than these built-in parameters, you can also use hex notation to specify IP options as long as they are each preceded by an x. IP options may evade security controls by specifying routes to take to the target.
You can set the time to live (TTL) field to a given value with the --ttl command-line option. This may be effective at evading some security controls. Another method to avoid detection is to randomize the target hosts that are being scanned by using the --randomize-hosts command-line option. You can have Nmap use an invalid TCP or UDP checksum with the --badsum command-line option. Most hosts will drop packets with bad checksums, so if you receive responses to these scans, they are probably coming from security controls, such as firewalls, that don’t verify checksums.
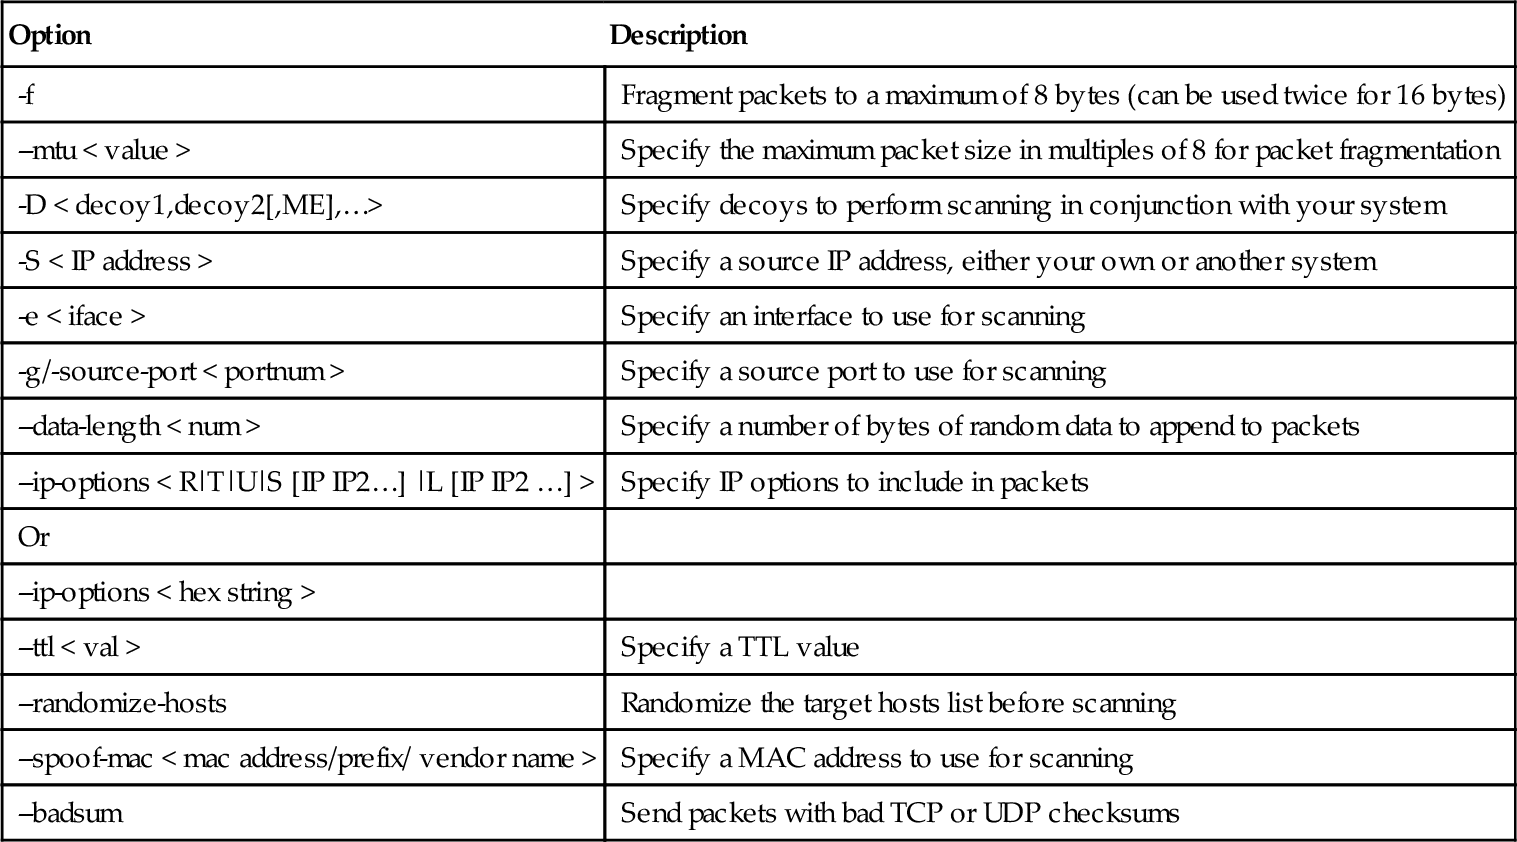
Table 4.8 summarizes the evasion and spoofing command-line options. Nmap just scratches the surface of possible evasion and spoofing techniques. There are a variety of advanced tools available to go beyond what has been presented here. The features that Nmap does provide for evasion and spoofing are more than adequate for typical enterprise scanning.
Table 4.8
Evasion and Spoofing Command-Line Options
| Option | Description |
| -f | Fragment packets to a maximum of 8 bytes (can be used twice for 16 bytes) |
| --mtu < value > | Specify the maximum packet size in multiples of 8 for packet fragmentation |
| -D < decoy1,decoy2[,ME],…> | Specify decoys to perform scanning in conjunction with your system |
| -S < IP address > | Specify a source IP address, either your own or another system |
| -e < iface > | Specify an interface to use for scanning |
| -g/-source-port < portnum > | Specify a source port to use for scanning |
| --data-length < num > | Specify a number of bytes of random data to append to packets |
| --ip-options < R|T|U|S [IP IP2…] |L [IP IP2 …] > | Specify IP options to include in packets |
| Or | |
| --ip-options < hex string > | |
| --ttl < val > | Specify a TTL value |
| --randomize-hosts | Randomize the target hosts list before scanning |
| --spoof-mac < mac address/prefix/ vendor name > | Specify a MAC address to use for scanning |
| --badsum | Send packets with bad TCP or UDP checksums |
Output Logging
Nmap output goes well beyond the on screen reporting shown in the examples so far. Nmap offers a variety of output formats for standard output and file-based formats, such as XML, for interoperability with other software programs. Nmap output also offers various levels of verbosity and debugging messages. Nmap offers the following output formats:
■ Interactive By default, Nmap reports results to standard output, on the screen, to be analyzed interactively. This format is always displayed, even when other output options are used, unless you use the hypen (-) to disable interactive output.
■ Normal The results are also sent to standard output, but with less runtime information and warnings. To report results in normal output format use the -oN < filename > command-line option.
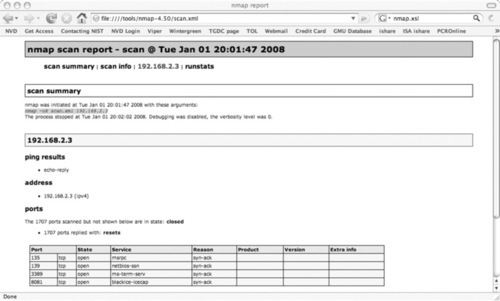
■ XML The results are reported in XML format that can be converted to HTML and parsed by other software programs. To report results in XML format, use the -oX < filename > command-line option. The XML document type definition file is located at http://insecure.org/nmap/data/nmap.dtd. It includes the Nmap XML formatting specifics. You can download the file and view it with a text viewer. Besides using XML for software interoperability, you can also view the XML output in a Web browser, as shown in Figure 4.1.
■ Grepable Output that can be easily parsed by scripts and other software programs. To report output in grepable format, use the -oG < filename > command-line option. Grepable output is considered depreciated in favor of XML output, but grepable output is still highly used because it is a much easier format to use for quick scripting. UNIX tools such as grep, sed, awk, and cut are all used with grepable output. Perl is also a great language to use to parse grepable output. More information on grepable output format can be found at www.unspecific.com/nmap-oG-output.
■ s| < rIpt kIddi3 The output is written in Leetspeak, which uses symbols and numbers to replace alphabet characters. Leet has been used among hackers and script kiddies since the 1980s. Nmap incorporates Leet to mock script kiddies, but to also demonstrate how output can be modified in arbitrary ways, as mentioned at http://seclists.org/nmap-hackers/2000/0005.html. To report results in s| < rIpt kIddi3 (script kiddie) format use the -oS < filename > command-line option.
The following example logs Nmap results in grepable format:
# nmap -oG myscan.gnmap 192.168.100.3
Grepable output contains commas, colons, and forward slashes to facilitate use of UNIX commands and programming languages for parsing the output:
# nmap 4.50 scan initiated Sat Jan 5 18:12:34 2008 as: nmap -oG myscan.gnmap 192.168.100.3
Host: 192.168.100.3 (systemB.home.com) Ports: 135/open/tcp//msrpc///, 139/open/ tcp//netbios-ssn///, 3389/open/tcp//ms-term-serv///, 6346/filtered/tcp//gnutella///, 6347/filtered/tcp//gnutella2///, 8081/open/tcp//blackice-icecap///
# Nmap done at Sat Jan 5 18:12:38 2008 – 1 IP address (1 host up) scanned in 3.810 seconds
The output formats can be combined, but you can only specify each format once. For example, you can send results to both normal and XML format by using the following command:
nmap -oN scan.nmap -oX scan.xml 192.168.100.0/24
You can also use the -oA < filename > command-line option to output results in normal, XML, and grepable formats at once:
nmap -oA myscan 192.168.100.0/24
The files are stored as myscan.nmap, myscan.xml, and myscan.gnmap. As noted earlier, interactive output is always displayed unless it is disabled as in the following example:
Nmap allows users to control the verbosity and debugging features with a variety of command-line options. The most commonly used option is the verbose (-v) option, which provides additional information such as completion time estimates, and displays open ports as they are discovered. The verbose option can be provided twice for greater verbosity. For example:
# nmap -v -v 192.168.2.3
Starting Nmap 4.50 (http://insecure.org) at 2008-01-01 18:40 Eastern
Standard Time
Initiating Ping Scan at 18:40
Scanning 192.168.2.3 [2 ports]
Completed Ping Scan at 18:40, 0.12 s elapsed (1 total hosts)
Initiating Parallel DNS resolution of 1 host. at 18:40
Completed Parallel DNS resolution of 1 host. at 18:40, 11.06 s elapsed
Initiating SYN Stealth Scan at 18:40
Scanning 192.168.2.3 [1711 ports]
Discovered open port 3389/tcp on 192.168.2.3
Discovered open port 135/tcp on 192.168.2.3
Discovered open port 8081/tcp on 192.168.2.3
Discovered open port 139/tcp on 192.168.2.3
Completed SYN Stealth Scan at 18:40, 4.75 s elapsed (1711 total ports)
Host 192.168.2.3 appears to be up … good.
Interesting ports on 192.168.2.3:
Not shown: 1707 closed ports
| PORT | STATE | SERVICE |
| 135/tcp | open | msrpc |
| 139/tcp | open | netbios-ssn |
| 3389/tcp | open | ms-term-serv |
| 8081/tcp | open | blackice-icecap |
Read data files from: C:Program Filesmap
Nmap done: 1 IP address (1 host up) scanned in 19.729 seconds
Raw packets sent: 1746 (76.804 KB) | Rcvd: 1712 (68.484 KB)
You can get even more output information by using Nmap’s debugging option (-d). Nmap debugging accepts a numerical level up to a value of 9. With debugging you can gain insight into the very details of what Nmap is doing during the scan, and you also get a substantially large amount of information to sift through. Another method of debugging is to use the --packet-trace command-line option. This option will print every packet sent and received during the Nmap scan, just like a packet sniffer. The --iflist command-line option is used for debugging, because it displays a list of the scanning system’s interfaces and network routes. This is a status option only and does not perform a scan, so it can be specified without a target host. Another useful debugging feature is error logging. Although errors are displayed on the screen as part of interactive output, you can log them to a file with the --log-errors command-line option. The errors get displayed in the normal output file so you must also use the -oN (or -oA) command-line option:
nmap -oN myoutput.nmap –log-errors 192.168.100.0/24
A way to customize Nmap output is to use the --open command-line option to show only open, open|filtered, and unfiltered ports. Another nice feature is the ability to append to existing output files instead of overwriting them, which is what Nmap will do by default. You can use the --append-output command-line option to add your new results to an existing output file. Existing output files are also useful to resume scans that have been canceled or interrupted. If you are logging out to normal or grepable format, you can use the --resume command-line option to have Nmap continue the scanning and append the new results to the existing output file:
Nmap also includes a few command-line options for configuring XML output. To view XML output as Hypertext Markup Language (HTML), you must have the XSL stylesheet (nmap.xsl) installed on the same system. This file installs by default in the Nmap directory. If you are viewing the XML file on another system, it won’t be displayable if Nmap isn’t installed. You can use the --stylesheet command-line option to specify a path or URL to an nmap.xsl stylesheet, but even easier you can use the --webxml command-line option to retrieve the latest version of the stylesheet from insecure.org. You can also use the --no_stylesheet command-line option to omit a stylesheet altogether.
Table 4.9 summarizes the output logging command-line options. Nmap allows users to display a variety of levels of output information and formats. This configurability allows Nmap to be viewed interactively, scripted, or integrated with other output parsers.
Table 4.9
Output Logging Command-line Options
| Option | Description |
| -oN/-oX/-oS/-oG < file name > | Report output to normal, XML, s| < rIpt kIddi3, and grepable format respectively to the supplied file name |
| -oA < file name > | Report output to normal, XML, and grepable format all at once |
| -v | Specify a verbosity level for more information |
| or | |
| -vv | |
| -d[level] | Specify a debugging level for even more information |
| --packet-trace | Show all packets sent and received |
| --open | Display only open, open|filtered, and unfiltered ports |
| --iflist | Display scanning host interfaces and network routes |
| --log-errors | Logs errors to normal output |
| --append-output | Append instead of overwrite output fi les |
| --resume < filename > | Resume an aborted scan |
| --stylesheet < path/URL > | Specify a stylesheet path or URL |
| --webxml | Reference the latest stylesheet at Insecure.org |
| --no-stylesheet | Don’t use an XLS stylesheet |
Miscellaneous
Nmap has several other usage options that don’t fit into any of the above categories. Many networks are moving to IPv6, so Nmap offers support for most of its main features. You can use the -6 command-line option to enable IPv6 scanning. All other command syntax and output is the same as IPv4 scanning. The -A command-line option is a handy option that combines OS detection (-O), version detection (-sV ), script scanning (-sC), and traceroute (–traceroute) all into one simple option. We have mentioned several data files that Nmap uses for scanning, such as nmap-services, nmapprotocols, and so forth. By default, these are located in the directory where Nmap is installed. If they are in another location you can use the --datadir command-line option to specify where the files are located. Nmap can determine the best layer to use to send raw packets for the platform it is running on. You can also use the --send-ip and --send-eth command-line options to force Nmap to use raw sockets at the IP layer or raw Ethernet at the data link layer. You can also toggle the way Nmap views user privileges at run time by using the --privileged and --unprivileged command-line options. These are useful for debugging purposes. Lastly, two informational command-line options are -V, which prints the Nmap version number, and -h, which prints the Nmap usage help ( just like executing nmap without any command-line options). Table 4.10 summarizes the miscellaneous command-line options.
Table 4.10
Miscellaneous Command-Line Options
| Option | Description |
| -6 | Enable IPv6 scanning |
| -A | Enable OS detection, version detection, script scanning, and traceroute |
| --datadir < dirname > | Specify a location that contains Nmap data files |
| --send-ip | Send data using packets at the IP layer |
| --send-eth | Send data using raw Ethernet frames at the data link layer |
| --privileged | Assume that the user is fully privileged |
| --unprivileged | Assume that the user is not a privileged user |
| -V | Print the Nmap version number |
| -h | Print the Nmap usage |
Summary
This chapter covered basic Nmap usage to assist you with enterprise activities such as network inventory, asset management, policy compliance, and security auditing. In this chapter, you learned how to use Nmap to discover hosts, port status, OSes, services and applications, and more.
You should now be able to use Nmap to gather a variety of information for your asset database, including active host IP addresses and host names, open ports, installed applications and versions, and the OS version. You should also be able to use Nmap for policy compliance to scan for unauthorized services and applications, unauthorized servers, and unauthorized sniffers. In addition to policy compliance, this information will also assist you with vulnerability and patch management. This chapter showed you how to optimized Nmap’s performance for scanning enterprise networks. You can now output your Nmap results in a variety of formats for later analysis, scripting, and software interoperability.
Now that you are familiar with Nmap’s usage and features, you can continue on to the next chapter to learn about Zenmap and its advanced scan management features.
Solutions Fast Track
Starting Nmap Scanning
☑ Nmap can be run from the command line or Zenmap GUI.
☑ You must have administrator or root privileges to use all of Nmap’s features.
☑ Running Nmap with no options displays the usage information.
☑ Nmap supports a variety of ways to specify scanning targets.
Discovering Hosts
☑ Nmap can discover available hosts by using ping scanning and other ICMP requests, TCP SYN pings, TCP ACK pings, UDP pings, and IP Protocol pings.
☑ TCP SYN and TCP ACK pings are often used to detect hosts behind firewalls.
☑ You can disable host discovery during your Nmap scan.
Port Scanning
☑ Nmap offers a variety of port scanning techniques.
☑ Nmap reports port status as one of six possible states.
☑ Nmap performs SYN scanning by default.
☑ If a user doesn’t have root or administrator privileges, Nmap will perform the TCP connect scan (-sT ) by default.
☑ Nmap offers several stealthy port scanning techniques such as idle scanning and FTP bounce scanning.
☑ Nmap offers a variety of ways to specify ports to scan.
Detecting Operating Systems
☑ Nmap performs OS detection by probing the target host and analyzing the responses.
☑ Each OS has distinctive responses to the probes which identify the OS and result in an OS fingerprint.
☑ Nmap includes several command-line options to configure the OS detection engine.
Detecting Service and Application Versions
☑ Nmap can perform version detection to gather more detail on the services and applications running on the identified open ports.
☑ Nmap needs OpenSSL to discover listening services behind SSL encryption.
☑ The OS and version detection probe databases are continually growing from contributions from the user community.
Other Scanning Options
☑ The NSE performs a variety of advanced techniques such as vulnerability and malware detection and exploitation.
☑ Nmap has several features to enhance timing and performance, including advanced algorithms and executing tasks in parallel.
☑ Nmap timing options include timing templates, parallelism, timeouts, and retries.
☑ Nmap includes evasion methods that use fragmentation, spoofing, and packet manipulation techniques.
☑ Nmap reports scanning results to standard output, known as interactive output.
☑ Nmap can log results in normal, XML, grepable, and s| < rIpt kIddi3 format.
☑ You can get more information by using Nmap’s verbosity and debugging levels.
☑ Nmap supports IPv6 scanning.
Frequently Asked Questions
Q: What if I am having problems using Nmap?
A: First, make sure you are using the latest version of Nmap. You can also perform a Web search on the problem you are having. If you are getting an error message, search on the exact message. You can also browse or post to the Nmap development (nmap-dev) list. If you are going to post a question about a problem, make sure you include the Nmap version number, platform you are running, and describe the problem including error messages.
Q: Will Nmap scanning crash a system or network?
A: Although it is rare, sometimes Nmap scanning can crash a system or network device. Some devices may crash in response to perceiving a ping flood or SYN flood.
Q: Can I save my commonly used Nmap commands for repeated use?
A: Nmap doesn’t have a built-in way to save commands, so you should store them in a text file. Zenmap does have the ability to save Nmap commands as profiles for repeat use.
Q: How can I see what Nmap is doing while it performs the scan?
A: There are several ways to view more information while Nmap is scanning, including using increased verbosity levels, debugging, and packet tracing.
Q: Can I craft packets with Nmap?
A: Nmap has some packet-crafting features, such as the ability to specify source and destination IP addresses and ports, TCP flag combinations, IP options, TTL, and append random data to the packet. However, to have full control over packet creation, you should use a packet-crafting tool such as Nemesis.