
Nmap Scanning in the Real World
Introduction
Now that you have learned how Nmap works and how to use it, you are armed and ready to perform real world scans and analyze the results. In this chapter we discuss real-world network scanning scenarios that you could encounter on your systems or network. It is also possible that you may be called upon to perform some of the advanced and stealthier types of scans in your environment, whether to see how your security measures react or to test the attentiveness of outsourced monitoring. You will learn how to interpret the scan results, how to discover more information, and how to act on the results.
Detecting Nmap on your Network
There may be times when an attacker or malicious insider uses Nmap against you. This may be reconnaissance preceding an attack or other information gathering purposes. This section shows you how to detect Nmap scans on your network. Each of the scans are detected and analyzed using the Wireshark network protocol analyzer. You could also use tcpdump or another protocol analyzer of your choice.
TCP Connect Scan
The first scan that we will analyze is the Nmap TCP Connect (-sT) scan. This type of scanning is the most basic because it completes the TCP three-way handshake with open ports and immediately closes them. Nmap first sends a SYN packet to each target port. A response packet with the Reset (RST) and Acknowledgment (ACK) flags set indicates that the port is closed. If a SYN/ACK is received, it indicates that the port is open and listening. Nmap will then respond with an ACK to complete the connection followed by an RST/ACK to immediately close the connection. This aspect of the scan makes it easily detectable at the system level because the error messages made during attempts to connect to a port will be logged.
Figure 8.1 shows the Nmap scanner system, 192.168.100.2, sending SYN packets to the target, 192.168.100.5. Most ports respond with an RST/ACK packet; however, packet 2904 shows the SYN/ACK response from port 139.

You can right click on the packet in the Wireshark output and choose Follow TCP Stream. This Wireshark feature shows only the packets affiliated with any particular connection. In our example, as shown in Figure 8.2, the extracted session shows the initial SYN packet, response SYN/ACK, and the subsequent ACK followed by the RST/ACK exchange on port 139.

Figure 8.3 shows the active ports on the target device. You can find these by using a filter such as tcp.flags==18 to view packets with both the SYN and ACK flags set.

You are going to see a lot of TCP connect activity on your network as a result of normal network communications. However, the fact that the source IP address is connecting to so many ports and/or systems potentially indicates a scan. Also, unless stealth techniques are used, it is also another indicator of scanning activity to see a high number of connections within such a short time frame. IDS and IPS systems will oftentimes maintain a signature to detect scanning that looks for a certain number of sessions within a limited amount of time. If this limit is exceeded, the intrusion system will alert or respond accordingly. One example is to look for X number of SYN requests from a single host within a set number of seconds. This type of signature can generate false positives, but with customization to your specific infrastructure, it can also be a great alert for scanning activity.
The Snort sf Portscan preprocessor will detect Nmap TCP connect scanning activity. The previous scan generated the following entry in the Snort alert file:
[**] [122:1:0] (portscan) TCP Portscan [**]
01/13-20:30:31.107599 192.168.100.2 -> 192.168.100.5
PROTO255 TTL:0 TOS:0x0 ID:0 IpLen:20 DgmLen:161 DF
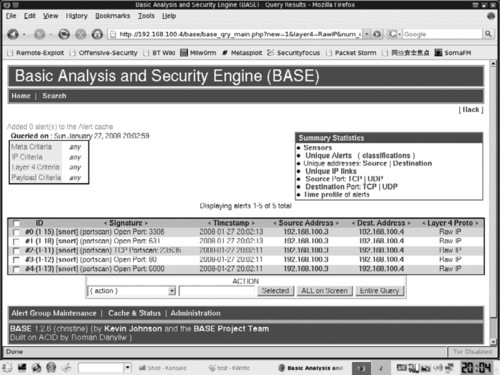
You may also use the Basic Analysis and Security Engine (BASE), which is a Web-based front-end for Snort. Figure 8.4 shows BASE with the portscan alerts generated from an Nmap TCP Connect scan.
Now you know the IP address of the system that was performing the scanning, and the open ports on the systems that responded. Since this was a TCP connect scan, the source IP address is not likely spoofed since it received and replied to packets. What else can we do with this information? If the scanner is an internal system, you should physically track it down to determine why it is sending this scan-like traffic. Notice we say “scan-like”. The reason is that there could be a legitimate purpose for the traffic being generated by the internal system and it is wise to approach your search calmly, without starting a fire-drill. Many an administrator has been embarrassed by going off half-cocked in pursuit of an alleged attacker or hacked box, only to later find that the suspected malicious traffic was in fact, benign.
If this is a system external to your network, review your firewall policy to see how and why the scans are making it into the internal network in the first place. You should also look for other events and traffic targeting the host or indicating further reconnaissance. Depending on what you find, it might be a good idea to also evaluate the host for signs of compromise. If the system has been compromised, you should rebuild it. If this appears to be initial reconnaissance against the target, make sure that all patches are up to date on the system. If you are still seeing traffic from this source IP address, you may need to add a temporary rule to block packets from and to this source system. You should also investigate the open ports that responded to the scan. The attacker may have been looking for a particular open service (possibly because it has a new discovered vulnerability) or a Trojan port of some type.
SYN Scan
The next scan that we will analyze is a TCP SYN scan, also known as a half-open scan because a full TCP connection is never completed. Nmap first sends a SYN packet to each target port. If a RST/ACK is received, it indicates that the port is closed. If a SYN/ACK is received, it indicates that the port is open and listening. The part that makes this scan a half-open scan is that Nmap will then follow with an RST to close the connection (instead of the final ACK in the complete 3-way handshake). SYN scans were originally known as stealth scans because few systems would notice or log them because they never created a full connection. However, many current operating systems, firewalls and intrusion detection systems (IDSes) will notice and even log this type of activity.
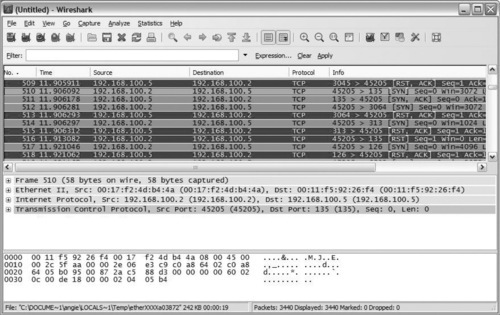
In Figure 8.5, the attacker, 192.168.100.2, is sending SYN packets to the target, 192.168.100.5. Most ports respond with an RST/ACK packet; however, the highlighted packets 511 and 516 show the SYN/ACK response and the subsequent RST exchange on port 135.
As with the TCP Connect scan, the Snort sfPortscan preprocessor will detect Nmap SYN scanning activity and generate an entry in the Snort alert file. You should follow the same response and mitigation recommendations as stated with the TCP Connect scan.
XMAS Scan
The XMAS scan determines which ports are open by sending packets with invalid flag settings to a target device. It is considered a stealth scan because it may be able to bypass some firewalls and IDSes more easily than the SYN scans. The Nmap XMAS scan sends packets with the Finish (FIN), Push (PSH), and Urgent (URG) flags set. Because this flag combination is invalid and should never occur in normal traffic, there is no established convention for dealing with these types of packets. Different TCP stacks will respond in different ways. Typically, closed ports will respond with a RST/ACK, and open ports will drop the packet and not respond. However, some TCP stacks will respond with RST packets from all ports, even open ports, and some systems will not respond to any packets. Personal firewalls and packet filters will also alter responses to this scan.
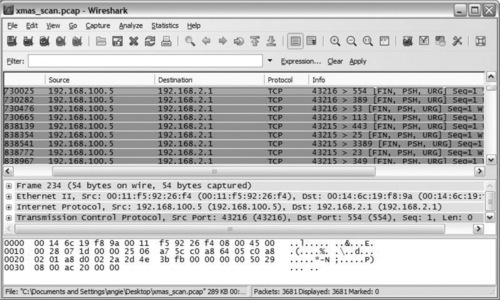
Notice that in Figure 8.6 the attacker, 192.168.100.5, is sending packets to the target, 192.168.2.1, with the FIN, PSH, and URG flags set. This scan is not receiving any responses to the XMAS packets.
As previously mentioned, you should not see packets in normal traffic with the FIN, PSH, and URG flags set. The Snort SCAN nmap XMAS rule will detect Nmap XMAS scanning activity. The previous scan generated the following entry in the Snort alert file:
[**] [1:1228:7] SCAN nmap XMAS [**]
[Classification: Attempted Information Leak] [Priority: 2]
01/13-20:49:13.408003 0:11:F5:92:26:F4 -> 0:17:F2:4D:B4:4A type:0x800 len:0x36
192.168.100.5:55661 -> 192.168.100.2:23 TCP TTL:55 TOS:0x0 ID:12511 IpLen:20 DgmLen:40
**U*P**F Seq: 0x68134FB6 Ack: 0x0 Win: 0x1000 TcpLen: 20 UrgPtr: 0x0
[Xref => http://www.whitehats.com/info/IDS30]
You should follow the same response and mitigation recommendations as stated with the TCP Connect scan.
Null Scan
The Null scan determines which ports are open by sending packets with invalid flag settings to a target device. Actually, the invalid flag settings are packets with all flags turned off (hence the name for the scan). Null scans were also originally considered very stealthy because of their ability to easily bypass operating system logging, fire-walls and IDSes. However, much like the SYN scan, the prevalence of scan-specific signatures on network-based appliances and host intrusion prevention and detection applications have contributed to administrators’ awareness with regards to this scan. Closed ports will respond with a RST/ACK, and open ports will drop the packet and not respond. However, some systems will respond with RST packets from all ports, even open ports, and some systems will not respond to any packets. Personal firewalls and filters will also alter responses to this scan.
In Figure 8.7, the attacker, 192.168.100.5, is sending packets to the target, 192.168.100.2, with all flags turned off, as indicated by the empty brackets []. This scan is not receiving any responses to the NULL packets. Notice that the intruder is using a static source port of 80. Specifying a popular source port that is often allowed through firewalls (such as Web port 80 or DNS port 53) is a common way for the Nmap scan to evade firewall restrictions.

You should not see packets in normal traffic without any flags set. The good news is that Snort has a rule to detect null scans; be sure it is integrated into your rule set and test its responsiveness. You should follow the same response and mitigation recommendations as stated with the TCP Connect scan.
Discovering Stealthy Scanning Techniques
In this section, we’ll cover some Nmap examples of packet fragmentation, decoy and evasion techniques to see what they look like from the sniffer perspective and to see if our IDS can detect them.
We discussed fragmentation and address spoofing in Chapter 4, but we’ll readdress briefly here. Packet fragmentation is a common evasion technique that splits the packet header across many smaller packets. When used maliciously, this technique has the ability to break up distinguishing characteristics across packets and evade pattern matching detection techniques. Nmap can fragment packets by using the -f option. After the IP header, this option breaks data in the packets apart into 8 byte chunks. If you use this option twice, Nmap will break the packets into a maximum of 16 bytes after the IP header. The --mtu (Maximum Transmission Unit) option can also be utilized instead of the -f option to specify packet size for fragmentation in multiples of 8. For example, the following command line options perform the same fragmentation:
nmap -f -f 192.168.100.0/24
nmap --mtu 16 192.168.100.0/24
Packet fragmentation doesn’t always evade security controls these days because controls have built in techniques to detect and handle fragmentation. However, because packet reassembly can be quite processor intensive, it is also common for administrators to disable or turn down the responsiveness of this functionality. You will have to determine a happy medium for your own infrastructure and processing capabilities.
As an additional reminder, spoofing is another evasion technique where you mask your IP address by pretending to be another system on the Internet or network. The Nmap decoy scan (-D) combines source address spoofing and multiple, fake host IP addresses (the decoys) in an attempt to evade true source detection. You can specify multiple decoys as a comma separated parameter. You can also specify your source IP address by using the word ME in the list to represent the position for your actual scanning system; otherwise Nmap positions your system randomly. The theory is that positioning your system further into the list increases the chances that you will not be detected because the victim will be too busy researching the first IP addresses that scan them.
Attackers often use real IP addresses of innocent, active hosts on the Internet, but for enterprise auditing this may not be necessary, and may even get you into trouble if the owners of the active systems take action. Remember, they will receive any traffic responses to their addresses that are generated by your scan. For security testing purposes you can specify other IP addresses in your network, maybe even ones set up in a development or lab environment for this purpose. If the scans in question are originating from the same subnet that the victim resides on, one simple way to determine whether or not the IP addresses are decoys is by looking closely at the layer 2 details of the packet capture. If it reveals the same Media Access Control (MAC) address for all IP addresses, you are dealing with spoofed IP addresses. Why would this answer not be applicable if the scan is originating from another subnet? Keep in mind that the upstream router’s MAC address will appear as the source MAC in this case.
Nmap Fragment Scan
Let’s test a personal firewall running on a fully-patched Windows 2000 Pro server that is sitting in our DMZ. This particular system should only have port 80 accessible as it is serving up a small, static Website. We’ll try a fragmentation scan against the server and since we’ll be testing from the same subnet, we’ll also incorporate some decoy IP addresses and see what the MAC addresses look like in our Wireshark results.
The intended victim, our personal firewall-protected W2K server, has several typical Windows services listening. However, the firewall is configured to only allow DNS queries, ping traffic and inbound HTTP requests, as shown in Figure 8.8.

We want to see how this personal firewall handles an Nmap fragmentation scan. Here is the Nmap command for performing our test:
C:downloads>nmap -f -D 10.0.0.10,10.0.0.15,10.0.0.33,ME,10.0.0.67,10.0.0.99 10.0.0.2
Notice in the Nmap command above, we used the word ME to place the scanning system after the decoy 10.0.0.33 in the list. We inserted several non-existent IP addresses into the decoy list. The IP address that we are scanning is the last item shown in the command, 10.0.0.2. The scan is being performed from a host with the IP address of 10.0.0.7. Wireshark was also set up to capture the details of this scan. Here are the results from Nmap:
Starting Nmap 4.53(http://insecure.org) at 2008-02-01 16:39 Central Standard Time
All 1714 scanned ports on 10.0.0.2 are filtered
MAC Address: 00:02:E3:13:36:4B (Lite-on Communications)
Nmap done: 1 IP address (1 host up) scanned in 72.672 seconds
It looks like our personal firewall is doing a pretty good job against this type of scan! Nmap was able to determine that all of the ports scanned (we used Nmap’s default port scanning list) are in the filtered state. If you recall from our previous chapters, this state implies the fact that Nmap can determine some type of filtering is occurring based on the results received from the scan. Now, let’s check out our Wireshark output and see what those decoy IP addresses look like.
Nmap Decoys
In the first Wireshark screenshot, we can see the details from one of the decoy IP addresses. If you look at the packet details in the lower half of the screenshot, you can see the MAC address information captured by Wireshark, as shown in Figure 8.9.

Now we’ll compare this MAC address information (00:14:a5:13:17:75) to the IP address that we know is the real source of the Nmap scan, as shown in Figure 8.10.

It’s a match! Just remember that this test will only work for scans originating from the same subnet. Otherwise, you would find the MAC address of the upstream router for the source MAC. Now, hopefully you also noticed the fact that our packets were indeed fragmented. For example in packets number 31 and 32 you will notice the offset is equal to 8 and 16 respectively, indicating 8 byte increments. Wireshark shows that the –f Nmap option performed as expected and split our outbound packets into 8 byte fragments.
Detecting Nmap Fragment Scans
Since we are using Snort as our IDS of choice, we want to set it up to detect fragmented traffic. Out of the box, Snort does not have any rules that trigger solely on packet fragmentation, so we’ll have to create one. Here it is:
alert ip $EXTERNAL_NET any -> $HOME_NET any (msg:”TRAFFIC-ALERT more
frag bits set”; fragbits:M; classtype:misc-activity; rev:1;)
This tells our Snort sensor to alert on any IP-based traffic (regardless of the layer 4 protocol), coming from any port on anything defined by our $EXTERNAL_NET variable and destined for any port on our $HOME_NET variable that has the More Fragments (M) flag set. We assigned a revision number of 1 to the signature since we just created it. Depending on your network infrastructure, you might find that a rule such as this will provide interesting insight into fragmentation you might have otherwise overlooked. For our purposes though, it is hopefully going to trigger on our Nmap –f scan.
After running another Nmap fragmentation scan, we can check our Snort alert file to see if the more frag bits set signature fired. Digging into the alert log file, we find:
[**] [1:5555:1] TRAFFIC-ALERT more frag bits set [**]
[Classification: Misc activity] [Priority: 3]
02/02-00:13:43.176044 10.0.0.99 -> 10.0.0.7
TCP TTL:58 TOS:0x0 ID:2130 IpLen:20 DgmLen:28 MF
Frag Offset: 0x0000 Frag Size: 0x0008
[**] [1:5555:1] TRAFFIC-ALERT more frag bits set [**]
[Classification: Misc activity] [Priority: 3]
02/02-00:13:43.176239 10.0.0.99 -> 10.0.0.7
TCP TTL:58 TOS:0x0 ID:2130 IpLen:20 DgmLen:28 MF
Frag Offset: 0x0001 Frag Size: 0x0008
[**] [1:5555:1] TRAFFIC-ALERT more frag bits set [**]
[Classification: Misc activity] [Priority: 3]
02/02-00:13:44.534995 10.0.0.10 -> 10.0.0.7
TCP TTL:52 TOS:0x0 ID:11159 IpLen:20 DgmLen:28 MF
Frag Offset: 0x0000 Frag Size: 0x0008
[**] [1:5555:1] TRAFFIC-ALERT more frag bits set [**]
[Classification: Misc activity] [Priority: 3]
02/02-00:13:44.535143 10.0.0.10 -> 10.0.0.7
TCP TTL:52 TOS:0x0 ID:11159 IpLen:20 DgmLen:28 MF
Frag Offset: 0x0001 Frag Size: 0x0008
Notice that our signature did indeed work. Snort created alerts about the packets that only had the More Fragments flag set. Notice the Frag Offset field in each packet and the Frag Size – these both give an indication of the placement and length of the fragment seen by Snort. The thing to keep in mind with this particular signature is that it will capture any fragmented traffic, regardless of whether it was generated by Nmap or not. If you want to try and create an Nmap-specific signature, you will have to run several fragment scans and look for consistencies in the way that your particular version of Nmap crafts the fragmented packets. These patterns could then used to create an Nmap version-specific signature for fragment scans. With older versions of Nmap, signatures could be created based on static IP ID numbers, predictable timing controls, ACK sequence numbering, etc. Fyodor and the Nmap team have worked diligently to avoid patterns that could assist with intrusion detection signatures however, so you have your work cut out for you!
Discovering Unauthorized Applications and Services
We have previously discussed Nmap’s capability for service and version detection against open ports. What really helps to put it into perspective is discussing real-life scenarios and that is what we’ll do in this section. This feature of Nmap is commonly used to discover unauthorized or outdated applications and services. What happens when you are tasked with finding all the open file shares in the network? How about when the boss calls you and requests a count of how many FTP servers are running in your lab? What if one of your yearly goals is to make sure all SSH versions are up-to-spec? And finally, how about being tasked with tracking down users who are obscuring internal Web sites under atypical port numbers? Here’s a list of some other items you might find yourself tracking down or keeping inventory of, depending on your organization’s policy:
■ Chat applications
■ Samba servers
■ Remote desktop services
■ Unauthorized database services
■ Open mail relays
■ Unauthorized proxy servers
■ Unmanaged printers
■ Virtual operating systems, like VMware
■ Unauthorized operating systems, like MAC OS X or Linux
The nice thing about using Nmap in this capacity is that the service and version detection capability is built right into the tool. Earlier in the book, we covered the –sV or version option, as well as the OS detection capability, called with the –O option. In more recent Nmap versions, you also have the luxury of running both simultaneously by utilize the –A option.
We’ll run a sample scan and take advantage of the version detection capability. Looking back on our usage chapter, we can test out some of the following additional service and version detection options:
SERVICE/VERSION DETECTION:
-sV: Probe open ports to determine service/version info
--version-intensity <level>: Set from 0 (light) to 9 (try all probes)
--version-light: Limit to most likely probes (intensity 2)
--version-all: Try every single probe (intensity 9)
--version-trace: Show detailed version scan activity (for debugging)
As a test, we’ll run the version-intensity at 0 and then at 9 to compare the results. Let’s test against our trusty SUSE system:
C:downloads>nmap -sV --version-intensity 0 10.0.0.5
Starting Nmap 4.53 (http://insecure.org) at 2008-02-01 23:30 Central Standard Time
Interesting ports on 10.0.0.5:
Not shown: 1709 closed ports
PORT STATE SERVICE VERSION
22/tcp open ssh OpenSSH 4.1 (protocol 1.99)
111/tcp open rpcbind 2 (rpc #100000)
139/tcp open netbios-ssn Samba smbd 3.X (workgroup: LAB)
445/tcp open netbios-ssn Samba smbd 3.X (workgroup: LAB)
631/tcp open ipp CUPS 1.1
MAC Address: 00:0C:29:E0:54:1B (VMware)
Host script results:
|_ Discover OS Version over NetBIOS and SMB: Unix
Service detection performed. Please report any incorrect results at http://insecure.org/nmap/submit/.
Nmap done: 1 IP address (1 host up) scanned in 13.422 seconds
This looks great and exactly like the kind of information we would need to complete an inventory of TCP/IP services available on this system. We ran the command again using a version-intensity of 9 and received the same results. Let’s see if we can trip up Nmap a little bit by starting up a netcat listener on TCP port 135 on the SUSE server. This port is normally associated with the Windows MS-RPC service. On the SUSE system, we’ll run this command:
vmware1:/home # nc –l –p135
To verify that the port is now open, we can also run a quick netstat on the SUSE server:
vmware1:/home # netstat –na | grep ‘:135’
tcp 0 0.0.0.0:135 0.0.0.0:* LISTEN
Looks great so far. Now we’ll kick off the service and version detection scan with the most intense setting, a level 9, and specific to our port 135:
C:WINDOWSsystem32>nmap -sV --version-intensity 9 -p135 10.0.0.5
Starting Nmap 4.53 (http://insecure.org) at 2008-02-01 23:55 Central Standard Time
Interesting ports on 10.0.0.5:
PORT STATE SERVICE VERSION
135/tcp open msrpc?
MAC Address: 00:0C:29:E9:43:0A (VMware)
Service detection performed. Please report any incorrect results at http://insecure.org/nmap/submit/.
Nmap done: 1 IP address (1 host up) scanned in 13.000 seconds
Looks like the trick is somewhat successful. Nmap’s best guess is that the port is indeed running the MS-RPC service. However, since Nmap is unable to provide any real version information, and we see the question mark in the results, we know that this service will require more intensive and possibly, hands-on, investigation. This really demonstrates the importance of remaining objective with regards to your Nmap results. Most likely, the majority of services in your infrastructure will be easily and properly identified by Nmap’s service and version detection scan; however if an end-user really wants to cover up their tracks, you will have to be more vigilant in your own discovery efforts.
Testing Incident Response and Managed Services Alerting
Nmap can be very useful when you have been tasked with testing your enterprise incident response plan or team. Another example of using Nmap to test responsiveness is when you are working with a managed service provider, who is tasked with monitoring your organization’s IDS or IPS environment. It can be very enlightening to discover whether or not your service level agreements are being adhered to in these types of arrangements. We’ll discuss an example of using Nmap in such a way to trigger a known signature in your intrusion detection environment.
Scanning to Test Alert Procedures
It is critical to test your internal network alerting facilities and/or your outsourced managed services alerting. Both can be tricky to test. This is due in part to technical issues, but also from a political standpoint. You want to make sure you have your management’s approval to conduct such a test in case the end result does not meet expectations or even worse, you cause a system crash or network instability. You must also conform to any existing contractual agreements with your managed service providers that specify the rules of engagement before you test their monitoring and alerting measures for your infrastructure.
Nmap has many types of scans and scan options that have been well-documented by IDS and IPS vendors over the years. Many signatures and heuristics have been devised to detect scanning and even to detect scanning from specific tools, like Nmap. As a result, there are most likely several ways to kick off an Nmap scan that will cause alerts to trigger on the monitoring stations of your managed service provider. The issue is finding a scan pattern that should attract enough attention because of its difference to the normal ebb and flow of traffic. Any intrusion analyst can testify that after a few million packets or so, you start to tune out common scans, service version queries and many other forms of general broad-range reconnaissance that happen on a daily basis and are commonly accepted as part of being “connected to the Web”. Therefore, your job in performing this alert testing is to pinpoint an appropriate target in your network infrastructure in conjunction with the right attention-getting scan. When performed by a legitimate attacker, this process would be considered targeted reconnaissance. The attacker most likely has a preferred exploit in their arsenal or is looking for a certain type of target based on the latest vulnerability information. Your managed service provider should be tasked with staying on top of cutting edge vulnerability information and exploit signatures. You should also have in your contract some information about risk priorities specific to your protected oranization assets, in addition to guidelines for response timeliness. With our Nmap testing, we’ll zero in on a specific target and utilize what should be some eye-catching scan techniques in order to test gaining the attention and response of our monitoring and managed services analysts. Keep in mind that we are talking about external-facing hosts. Unless otherwise instructed, your provider should immediately alert you to any internally-protected assets that come under Nmap scan-related fire.
Targeted Reconnaissance with Nmap
Targeted reconnaissance refers to the ever-tightening circle of information-gathering that occurs in the primary phase of an attack. To demonstrate how an attacker might perform this targeting using Nmap, we’ll start off with a broad-based scan, looking for servers with Web ports. We’re going after Web ports because that is one of the most published entry-points for the attacker into your infrastructure. Other externalfacing servers of interest typically include DNS servers, mail servers, routers and unprotected desktops. With a Web server, if an attacker can exploit their way onto the system, odds are they will have access to further pathways into your infrastructure. This ties into the need for segregated server networks, server hardening, separation of duties, and the principle of least privilege – but that is a different book!
Working out of our demo lab, we’ll only be scanning the 10.0.0.0/24 network, but in the real world an attacker would either be scanning multiple, miscellaneous subnets looking for certain ports or if they were targeting your organization specifically, then they might already have your subnet/s in their sites. As a reminder, here’s what a basic Nmap port 80 scan would look like:
nmap -p80 10.0.0.0/24
There are certainly ways we could make this port 80 scan less obvious, the biggest one being the timing switch. Remember Nmap has the capability to slow down the speed with which it scans utilizing the –t, timing, option. Keep in mind though we are mimicking an attacker who is scanning from the Internet and servers that have an internet-exposed address receive numerous scans of this type on a daily, if not hourly, basis. At this stage in the reconnaissance game, these scans are typically ignored by managed services providers.
Why didn’t the attacker incorporate the version detection option into this port 80 scan? The primary reason is for scan speed. They can come up with an extensive list of servers with an available HTTP port in a very short amount of time by using a pared down scan such as this one. If the attacker is already focused on a certain company or subnet, it is also likely that they want to minimize the number of probes being sent to the targets.
Now we have a listing of IP addresses that have an Internet-accessible port 80 listening. The attacker will feed this list of IP address back into a tool like Nmap and perform the next phase of targeted reconnaissance; determining what service versions are running on the open ports. The reason for this step is that most likely the attacker has exploit code ready to use against the matching, vulnerable service version. Hence the reason for staying on top of your patching and security hardening efforts.
Our scan discovered five active hosts, three of which have listening HTTP ports:
C:Downloads>nmap -p80 10.0.0.0/24
Starting Nmap 4.53 (http://insecure.org) at 2008-02-03 16:01 Central Standard Time
Interesting ports on 10.0.0.1:
PORT STATE SERVICE
80/tcp open http
MAC Address: 00:0F:B5:6D:EF:F1 (Netgear)
Interesting ports on 10.0.0.2:
PORT STATE SERVICE
80/tcp open http
MAC Address: 00:02:E3:14:47:5C (Lite-on Communications)
Interesting ports on 10.0.0.3:
PORT STATE SERVICE
80/tcp closed http
MAC Address: 00:12:3F:FD:18:67 (Dell)
Interesting ports on 10.0.0.4:
PORT STATE SERVICE
80/tcp closed http
MAC Address: 00:0D:0B:BE:2C:67 (Buffalo)
Interesting ports on 10.0.0.5:
PORT STATE SERVICE
80/tcp open http
MAC Address: 00:0C:29:E0:54:1B (VMware)
Nmap done: 256 IP addresses (6 hosts up) scanned in 6.797 seconds
Now we’ll run the –sV version scan against IP addresses 10.0.0.1, 10.0.0.2, and 10.0.0.5 to see what information Nmap can collect about the HTTP services found on the systems with the open HTTP ports:
C:Downloads>nmap -sV -p80 10.0.0.1-2,5
Starting Nmap 4.53 (http://insecure.org) at 2008-02-03 16:10 Central Standard Time
Interesting ports on 10.0.0.1:
PORT STATE SERVICE VERSION
80/tcp open tcpwrapped
MAC Address: 00:0F:B5:6D:EF:F1 (Netgear)
Interesting ports on 10.0.0.2:
PORT STATE SERVICE VERSION
80/tcp open http?
MAC Address: 00:02:E3:14:47:5C (Lite-on Communications)
Interesting ports on 10.0.0.5:
PORT STATE SERVICE VERSION
80/tcp open http Apache httpd 1.3.23 ((Unix))
MAC Address: 00:0C:29:E0:54:1B (VMware)
Service detection performed. Please report any incorrect results at http://insecure.org/nmap/submit/.
Nmap done: 3 IP addresses (3 hosts up) scanned in 11.266 seconds
Now we’re getting somewhere. From an attacker’s perspective, we have one system, 10.0.0.1, that doesn’t appear to be a viable target because the HTTP port is potentially protected. Our next option, 10.0.0.2, looks promising except for the fact that Nmap doesn’t have any feedback on the HTTP version that is running. For the attacker, this could indicate a non-HTTP service masquerading on port 80. We actually ran a netcat listener on this system and collected the Nmap queries. The –l command tells netcat to listen on a port and we used the –p option to specify port 80. Here is a copy of the Nmap query data that was received on the console of the netcat listener:
F:Netcat_for_Windows>nc -l -p80
GET /HTTP/1.0
OPTIONS /HTTP/1.0
OPTIONS /RTSP/1.0
l ? GET /nice%20ports%2C/Tri%6Eity.txt%2ebak HTTP/1.0
Ç (r¦?? ? ?åá ?ù| ? ?? ? version?bind ? ? ? ? HELP
?? S? O? ?G+~¦,eO¦′˜= 2é{¦+û+w¢μ-¦<=¦on?n (? ?
f ? ? e d c b a ′ § ? ¶ ? ?? ñ SMBr ?@ @? ? ü ?PC NETWORK PROGRAM 1.0 ?MICROSOFT
NETWORKS 1.03 ?MICROSOFT NETWORKS 3.0 ?LANMAN1.0 ?LM1.2X002 ?Samba ?NT LANMAN 1.0
?NT LM 0.12 ?default
0????′???? Ç OPTIONS sip:nm SIP/2.0
Via: SIP/2.0/TCP nm;branch=foo
From: <sip:nm@nm>;tag=root
To: <sip:nm2@nm2>
Call-ID: 50000
CSeq: 42 OPTIONS
Max-Forwards: 70
Content-Length: 0
Contact: < sip:nm@nm >
Accept: application/sdp
TNMP? TNME ? ? ??a DmdT ? ? ?? ? ?: / ? @?¤ ? =? / @? <NTP/1.0>
? 2+.?¦á MMS¶ ? ? ? ====? ? ? ? N S P l a y e r / 9 . 0 . 0 . 2 9 8 0 ; {0 0 0
0 A A 0 0 - 0 A 0 0 - 0 0 a 0 - A A 0 A - 0 0 0 0 A 0 A A 0 A A 0} am–_ Z ?
?6?, ¦ ? : 4 μ ? (CONNECT_DATA=(COMMAND=version))
As you can see, Nmap runs several different types of tests in its attempt to determine the service version of what it thinks should be a Web-enabled port. We can easily spot queries for headers, version.bind type, Server Message Block (SMB) and even Session Initiation Protocol (SIP) checks. Keep in mind that from the attacker’s point of view, they would never see this output. It is included here only for the purpose of demonstrating Nmap’s service version scan against this host.
The last host scanned, 10.0.0.5, is going to be the most interesting to the attacker at this point. Not only is it reporting a live host with an open port 80, but Nmap was also able to determine the version of Web server running on the port! In this case, it appears to be a rather outdated version of Apache, 1.3.23. If we do some basic searches online for vulnerability information pertaining to this version, we find that not only does it have vulnerability issues; one of those issues is incorporated into a Metasploit exploit, shown in Figure 8.11.

Luckily for us, this particular exploit appears to only work against vulnerable Apache versions installed on Windows machines. Nmap reported that this particular version is running on a UNIX-based platform:
Interesting ports on 10.0.0.5:
PORT STATE SERVICE VERSION
80/tcp open http Apache httpd 1.3.23 ((Unix))
MAC Address: 00:0C:29:E0:54:1B (VMware)
At this point, you might expect to see further Nmap queries from the attacker while they attempt to determine whether or not the operating system really is UNIX-based (although in the author’s experience, they should save themselves the time and just trust Nmap’s assessment). However, this doesn’t necessarily mean that the attacker won’t still attempt to run the exploit against your UNIX-based Apache server. Their mileage may even vary in terms of whether or not they cause any service disruption. Regardless, it is definitely time to update the Apache server. This also proves how easily an attacker could use Nmap to narrow down on a particular system. Back at your managed service provider, the analyst’s alerting workstation should have generated several Events of Interest (EOI) pertaining to these scans. Hopefully you have received a notification by now of a potential intrusion attempt! If your targeted reconnaissance scanning efforts do not generate notifications of any type, it is definitely time to investigate the monitoring performance agreement with your vendor.
Summary
This chapter introduces some different problems you might run into while managing systems and networks in an enterprise networking environment. We discussed four common issues and provided insight into utilizing Nmap as a solution or part of the solution for each issue. As a reminder, here are some of the capabilities and possible uses we have discussed throughout this chapter and the this book, for using Nmap to meet the needs of your enterprise infrastructure:
Compliance:
■ Testing for open ports on the interfaces of a firewall.
■ Performing scans across workstation IP address ranges to determine if any unauthorized networking applications are installed.
■ Determining if the correct version of Web service is installed in your DMZ.
■ Locating systems with open file sharing ports.
■ Locating unauthorized FTP servers, printers or operating systems.
Auditing:
■ Auditing firewalls by verifying the firewall filters are operating properly.
■ Searching for open ports on perimeter devices. Perimeter being anything from Internet-edge, to extranet or intranet boundary lines.
■ Performing reconnaissance for certain versions of services.
■ Performing vulnerability and patch management.
■ Utilizing the OS detection feature to pin-point outdated or unauthorized systems on your networks.
■ Identify an unknown, but “suspicious” system - whether thought to be infected or acting in a “strange” manner on the network.
■ Identify a certain port across multiple subnets of IP addresses: For example, if a file sharing-based worm hits, performing Nmap scans looking for port 135.
■ Utilizing an Nmap add-on tool like NDiff: when performing enterprise scanning to compare scan results. There are often times you want to run the same scan more than once and compare results. For example, you may be interested in running Nmap before and after you install a patch or apply new software to a system, make a firewall or router access control list change, or making configuration changes.
■ Identify all open ports and perform service and OS identification on Web servers that are going through the security review process before being allowed into production.
■ Discovering unauthorized applications and services.
Advanced scanning:
■ TCP scan flags customization.
■ Packet fragmentation.
■ IP and MAC address spoofing.
■ Adding decoy scan source IP addresses.
■ Source port specification.
■ Ability to add random data to sent packets.
■ Manipulatable time-to-live field.
■ Ability to send packets with bogus TCP or UDP checksums.
Solutions Fast Track
Detecting Nmap on your Network
☑ A network protocol analyzer, such as Wireshark, is a good tool to use to monitor your network and detect network scanning.
☑ The Snort sfPortscan preprocessor will detect Nmap TCP connect and SYN scanning activity.
☑ If you detect scanning activity on a specific host, you should investigate other events and traffic targeting the host and evaluate the host for signs of compromise.
☑ Some attackers will use a popular source port that is often allowed through firewalls (such as Web port 80 or DNS port 53) to evade firewalls.
Discovering Stealthy Scanning Techniques
☑ Packet fragmentation is oftentimes used as a method for evading intrusion detection systems.
☑ Nmap can insert decoy IP addresses into the scan with the –D option.
☑ Snort can detect fragmented Nmap scans if you include a signature with the M, or More fragments, flag enabled.
Discovering Unauthorized Applications and Services
☑ Nmap’s service and version detection scan is called by the –sV option.
☑ The intensity of the service/version detection scan can be controlled by applying the --version-intensity option.
☑ If Nmap is uncertain of its results regarding a service or version, it will include a question mark (?) next to the output.
Testing Incident Response and Managed Services Alerting
☑ You must ensure that appropriate agreements are in place with your managed services vendor before attempting to test their monitoring and alerting capabilities of your infrastructure.
☑ Targeted reconnaissance is the primary phase of a directed attack. The attacker will first locate a broad range of targets and then, utilizing a scanner like Nmap, begin to narrow down their attack scope to the most vulnerable systems.
☑ Many IDS and IPS signatures have been created for Nmap scans. Check with your managed services provider to determine which ones they include and monitor for.
Frequently Asked Questions
Q: If I am seeing scanning activity on my network how can I tell if it is Nmap?
A: Snort has some rules to detect Nmap scans, but it is very difficult to tell by passively monitoring network traffic what tool is being used. You can sometimes detect Nmap because some scan types send a TCP ACK packet to port 80 by default.
Q: I have never seen any fragmented packets on my network. Should I worry about looking for them?
A: In modern networks, fragmented packets can indeed be uncommon to find. However, that actually provides more reason to watch for them. If you ever actually find fragmented traffic, this could indicate some serious networking problems or as we saw in our examples, IDS or IPS evasion attempts. This certainly isn’t to say that every fragmented packet is indicative of a malicious event, but rather that it should be investigated and understood in your infrastructure.
Q: It sounds like I need to be a TCP/IP guru in order to fully understand Nmap?
A: You can reap a multitude of benefits from Nmap without becoming a TCP/IP top gun. However, learning more about the intricacies of TCP/IP will also help you become a better security analyst and all-around network troubleshooting genius. The authors always like to recommend TCP/IP Illustrated, Volume 1: The Protocols by W. Richard Stevens. Even though the book was published in 1994, it is still one of the best references you will find.
Q: I’m tired of only being able to run Nmap scans and tests in my lab or home network. Do you think I’ll get caught if I start scanning valid IP address space?
A: As common sense-sounding as the answer should be for most, the authors have actually been asked this question on numerous occasions. Will you get caught? No one knows for sure. Could you get caught? You bet. And if you do, there could be any number of consequences depending on whether or not your scanning caused any downtime or damage. Simply put, don’t chance it. They don’t get a lab at all in jail.