
Introducing Nmap
Introduction
In the first chapter, we learned about network scanning at a high level and discussed some of the different technologies and methodologies available to perform scans. Now we’re going to start our deep dive into one of the most popular network scanning tools of all time, Nmap, which can be found at http://insecure.org/nmap/index.html. Having a background in IT audit, information security or even system administration will definitely help as you start to learn about this tool. However, the neat thing about Nmap is both the ease with which it can be installed and utilized, as well as how advanced you can get with the tool as you become more familiar with it and learn more about how it can meet your own scanning needs.
We’ll properly introduce Nmap in this chapter, talking a bit about its history and some of the scanning ideas that the author, Fyodor, integrated into that first release. Ten short Internet-years have passed since the release of Nmap and we’ll discuss how Nmap has evolved and where it continues to help us with current enterprise scanning needs. We’ll dig into a section devoted to securing and optimizing. Finally, the chapter will close with information related to advanced Nmap scanning techniques. These are ways of not only setting up and running the scans in your environment but also for interpreting the feedback.
What is Nmap?
Nmap, or Network Mapper, is a free, open source tool that is available under the GNU General Public License as published by the Free Software Foundation. It is most often used by network administrators and IT security professionals to scan enterprise networks, looking for live hosts, specific services, or specific operating systems. Part of the beauty of Nmap is its ability to create IP packets from scratch and send them out utilizing unique methodologies to perform the above-mentioned types of scans and more. In addition, Nmap comes with command-line or GUI functionality and is easily installed on everything from Unix and Windows to Mac OS X. Installation requirements are dependent on the Nmap version you are installing and consist mainly of network library dependencies specific to that version.
History of Nmap
In the grand scheme of things, Nmap is a relative newcomer to the world at the tender young age of 10 years old. However, in Internet-parlance, Nmap is practically a great-grandfather. The application was originally released to the world in September of 1997 via an article Fyodor posted in Phrack, www.phrack.org/issues.html?issue=51&id=11# article. His article included the entire source code for the application, including all his code comments, interesting variables, and error messages:
/* gawd, my next project will be in c++ so I don’t have to deal with this crap … simple linked list implementation */
to:
struct in_addr bullshit, bullshit2;
and:
if (gethostname(myname, MAXHOSTNAMELEN) ||
!(myhostent = gethostbyname(myname)))
fatal(“Your system is fucked up. ”);
and:
fprintf(stderr, “Your ftp bounce server sucks, it won’t let us feed bogus ports! ”);
exit(1);
As Nmap gained followers and began drawing more and more interest, Fyodor was launched into geek fame, developer-style. The proof of Nmap’s fame was enforced by the use of Fyodor’s application in one of the most innovative movies of all times: The Matrix. In the sequel, The Matrix Reloaded, one of the main characters whips out a laptop, executes a perfect example of an Nmap port scan, and then proceeds to follow it up with an SSH-based exploit.

Nmap was created with thoughts of firewall subversion and has always been very good at staying abreast of network and operating systems updates that impact the scanning capabilities of the tool. Fyodor has actually come under verbal attack from many administrators for continuing to refine and include evasive measures in the application. In Nmap’s defense, Fyodor’s stance has always been in support of the administrator. In documentation and forum postings submitted by Fyodor, he describes the necessity for administrators to stay one step ahead of attackers. His opinion is that an attacker will find a way to scan your network, so why shouldn’t you? As an example of trying to stay ahead of the challenges, halfway through 2004 Microsoft introduced certain changes to their XP operating system with Service Pack (SP) 2 that impacted the way raw sockets could be constructed. Since Nmap requires the ability to create and manipulate raw sockets to produce and send packets, this created a huge impact for the Windows XP version of the tool. Fyodor and developers working with him on Nmap reported on all the changes and then promptly began coding an XP SP2-specific release of Nmap in order to work around the constraints imposed by Microsoft. This type of response had been previously duplicated when Fyodor discovered that many IDS tools started creating signatures to detect Nmap scans based on timing and patterns utilized by the various scan types. In order to defeat this, he introduced new timing capabilities and types of scans, including the capability to fragment packets, spoof source addresses, and craft packet options.
Nmap Features
Nmap is packed with features. It has the capacity to perform basic, bare-bones scans, such a simple ICMP pings to determine if hosts are up or down. It also has the means to command advanced scans containing a multitude of options and scanning across a huge spectrum of IP address space while logging to specific file types or systems. The reporting functionality also contains a myriad of options with available types from stdout (displayed to the screen), normal (which contains fewer runtime messages and warnings) to XML, s|<rIpt kIddi3, and a grepable format. We will cover many of these features and scan types throughout the book as we continue to discuss the application itself and various enterprise situations showcasing it.
Nmap’s User Interface
Traditionally, Nmap is utilized as a command-line driven, UNIX-based tool. This is the way it was originally written and since command-line based applications have an advantage when it comes to creating batch scripts, geeks have flocked to this version for years. The GUI versions of Nmap have seen a rise in popularity in recent years as federal regulations, international, state and local laws have created an urgency surrounding data security and more organizations have been forced to find a way to locate and track things like open ports and service types in their infrastructures. For folks newer to these security roles, using a GUI in front of the application is a comfortable way to gain understanding of how Nmap works and learn more advanced usage techniques. Another factor in pushing more techies to Nmap and GUI-based versions of Nmap was the rise in worm-based vulnerabilities, starting around 1999-2000. Finding infected machines on a network became a challenge. Nmap came to the rescue in the form of a solid tool, with a great reputation and the price of ‘free’.
From the command-line, Nmap is executed by simply calling the name of the application (nmap or nmap.exe) and applying the appropriate parameters or switches. It is very helpful, especially for the new user or for advanced configuration, to have a copy of the help instructions close-by. These can be easily accessed from the command-line by typing nmap –h.
Once you start investigating GUI renditions of the tool, you will find that historically there were a couple of different options depending on your platform type and which version of the tool you downloaded. There were versions maintained at the Insecure. org website (Nmapwin, NmapFE) and separate versions maintained by developers at other sites (like NmapNT). It was confusing at times to determine which version was the latest and greatest. Fortunately for us now, this has all been replaced with Zenmap. In November 2007, Insecure.org posted a Windows installer that includes a checkbox for installing the Zenmap front-end (see Figure 2.2).

Once installed, a Zenmap icon appears on the desktop and when double-clicked, the user is presented with the ability to work with all Nmap configuration options and parameters (see Figure 2.3).

Additional Nmap Resources
Like many of the popular open source applications that exist today, Nmap has a huge following from the developer community. Many developers have spent considerable time and effort to port Nmap to different platforms, integrate it into other pieces of software, and create new ways of working with it or create output from it. You can find an extensive list of these related projects on the insecure.org website at http://insecure.org/nmap/projects.html. Here is a sampling of some of the additional tools and capabilities that have been designed:
■ Nmap Online http://nmap-online.com/, is a web-based interface to Nmap, written and hosted by Matousec Security. This is a handy way to scan yourself and see what your computer looks like from the Internet side.
■ Nmap-CGI is a web-based application for scanning your network with Nmap. It offers user management and privilege levels to control who can scan what.
■ Nmap::Scanner performs Nmap scans programmatically using perl. It was written by Max Schubert <[email protected]>.
■ Nmap-Parser is a perl module for parsing Nmap’s XML output. It was created by Anthony Persaud <[email protected]>.
■ Cancerbero is an Nmap-based port scan engine which automates regular scans, storing results in MySQL and generating alerts, change reports, etc. A web interface is provided for configuration and data mining.
■ Jens Vogt has created a useful Windows frontend for Nmap called NMapWin. It offers many cool features, such as automatic service scheduling.
■ Nmap-Audit is a perl script which automates port scans, running them in parallel and producing a report of differences between successive scans. It was written by Keith Resar <[email protected]>.
■ Inprotect offers free (GPL) web front-end software for Nmap and Nessus, as well as certain services.
■ Julio David Quintana has created a Web PHP front-end for Nmap called nmapWebFE.
■ Alexandre Sagala has created a Qt/KDE front-end called KNmap.
■ Ian Zepp < icszepp&at&islc.net > has created another excellent Nmap front end, this time with Qt along with KDE integration. It is called kmap.
■ Joshua Grubman <[email protected]> has created this extremely cool Network Tool which is a CGI form allowing you to conduct OS scans, traceroutes, and other tests on arbitrary machines. This is a great anti-spam resource!
■ The Zaurus Developer Community has created an Nmap package for the Sharp Zaurus handheld!
■ Dennis Webb has created Qpenmapfe – A graphical (QTopia) frontend for Nmap on handhelds like the Sharp Zaurus or specially configured IPAQ.
■ Chris Martin has created another ARM Nmap package for the Zaurus or Linux-equipped IPAQ. It is available at www.killefiz.de/zaurus/showdetail.php?app=340 and works with the front-end above.
■ Joshua D. Abraham <[email protected]> has created Pbnj, a tool for running Nmap scans and diff ‘ing the results.
■ Jay Freeman (saurik) ([email protected]) has created Nmap+ V – a patch that allows Nmap to capture version numbers for numerous services.
■ Remote nmap (Rnmap) is a pair of client and server programs which allow for various authorized clients to run their port scans from a centralized server. It was written by Tuomo Makinen <[email protected]>.
■ The Alldas defacement mirror uses Nmap for port scanning and OS detection of compromised hosts. Their defacement/announce lists are mirrored at seclists.org.
■ Nat <[email protected]> has created a Mac OS X frontend for Nmap known as XNmap.
Keep in mind that these projects are owned and maintained separately from the tools you will find on the insecure.org website, so your mileage may vary (YMMV) as you start to explore some of them. It is common to find open source offshoots that are no longer maintained or not maintained to the same high standards as the original piece of software. However, you will still often come across that rare gem that does exactly what you need.
Using Nmap in the Enterprise
Nmap has achieved mass following from system administrators, security and network engineers, incident response teams, firewall administrators, penetration testers, desktop administrators, and domain administrators – the list goes on. Anyone who has ever had a job function that required locating a system, testing for an open port, determining what service might be running on a given port, or identifying a target’s operating system has looked to Nmap to help fulfill these service needs. As any IT professional can attest, the biggest hurdle to fixing a problem is how much money a particular fix might cost. Being able to utilize well-known, well-maintained, open source tools is a huge bonus for administrators and engineers. Some locations will have difficulties getting approval to use open source technology. Usually these organizations are interested in vendor support, maintenance agreements, and a sense of assurance about the security built into the software. The opposing side to these requirements is that well-supported open source software generally has very extensive testing and excellent ongoing maintenance. Additionally, it is easy to find large, very involved and very vocal user communities associated with these types of open source software. Wireshark, Snort, and Nessus are some other examples that spring to mind.
We’ll be discussing different scenarios you might find in any given enterprise infrastructure, regardless of size, where Nmap capabilities might fit the bill. We’ll talk about using Nmap when testing for policy compliance, for desktop and server inventory assistance, for security auditing purposes and finally for general system administration needs.
Using Nmap for Compliance Testing
Testing for compliance can be one of the most important detective security controls you perform in a enterprise infrastructure. The purpose of compliance testing is to measure the critical components of the organization to the policies and controls that govern them. Normally this function falls to either an internal or external audit team. An internal team is generally comprised of employees of the organization and perhaps some long-term contractors, while an external team is often part of a managed services or consulting package. The audit team is responsible for conducting compliance testing against controls they have developed that are specific to meeting regulatory and legal requirements. These requirements vary based on the type of business your organization is in (the vertical market), in addition to where your organization is located or does business. International, state and local laws all come into play. It is the audit team’s responsibility to stay on top of the latest requirements and also to ensure that compliance testing is done in both an orderly and timely fashion. Much like designing and maintaining the policies themselves, compliance testing requires persistent and ongoing attention.
There are many different types of compliance testing where Nmap could be utilized as part of the solution. Some examples:
■ Testing for open ports on the interfaces of a firewall.
■ Performing scans across workstation IP address ranges to determine if any unauthorized networking applications are installed.
■ Determining if the correct version of web service is installed in your De-Militarized Zone (DMZ).
■ Locating systems with open file sharing ports.
■ Locating unauthorized File Transfer Protocol (FTP) servers, printers or operating systems.
■ Any number of needs specific to the controls written around your organization’s policies.
Let’s take the example of determining what version of web service is running on the server located in your DMZ. We’ll pull out our trusty Nmap application and use the Version Scan, –sV, setting:
Starting Nmap 4.50 (http://insecure.org) at 2007-12-13 19:41 Central Standard Time
Interesting ports on host.example.com (192.168.10.10):
Not shown: 1686 closed ports
PORT STATE SERVICE VERSION
21/tcp open tcpwrapped
80/tcp open http Microsoft IIS webserver 5.0
135/tcp open msrpc Microsoft Windows RPC
443/tcp open https?
445/tcp open microsoft-ds Microsoft Windows 2000 microsoft-ds
1025/tcp open msrpc Microsoft Windows RPC
1027/tcp open msrpc Microsoft Windows RPC
1433/tcp open ms-sql-s?
2301/tcp open http Compaq Diagnostis httpd (CompaqHTTPServer 4.2)
3389/tcp open ms-term-serv?
49400/tcp open http Compaq Diagnostis httpd (CompaqHTTPServer 4.2)
Service Info: OS: Windows
In this example, we see that Nmap believes the server to be running Microsoft IIS 5.0. You can also see a lot of other port information that isn’t really specific to our current question. We’ll discuss how to narrow down our Nmap query in order to facilitate the scan. First though let’s telnet to port 80 on the server and see if Nmap has given us the correct information.
GET/HTTP/1.0
HTTP/1.1 200 OK
Server: Microsoft-IIS/5.0
Date: Wed, 13 Dec 2007 21:24:22 GMT
X-Powered-By: ASP.NET
X-AspNet-Version: 2.0.50727
Cache-Control: private
Content-Type: text/html; charset=utf-8
Content-Length: 9578
Keep in mind that it is very easy to mask this information at the server, but if you are checking organization owned assets for version compliance, most likely you have found an outdated system. Now, if you wanted to narrow down your Nmap scan to only check ports 80 and 443 (or any other ports you know your organization might be using for web-based applications), it is fairly easy to scan specific ports with the –p command.
The most important point to keep in mind when scanning for policy compliance is that you should have an established set of controls that map back to and describe the particular piece of policy you are checking. As an example, let’s say your organization has a policy mandating the usage of AV (anti-virus) software on all desktops. Depending on the type of anti-virus application that is deployed, you might find that you have an open port on each system running the AV client. By creating a control that describes this port and the fact that it should be present on systems in your Desktop VLANs, you can then utilize Nmap to locate active systems and subsequently query for this specific port. The beauty of Nmap and its various output capabilities is that you can script this entire process and end up with a small report of online systems having this AV port. One thing to keep in mind (and this goes for any discovery process) is that an end-user’s workstation could make it onto the “has AV installed” list and not be running the AV client. This happens when users inadvertently or purposely reassign ports to other networked applications. This author once came across the elite port of 31337 (default port for the Back Orifice Trojan) during a scheduled port scan of a small intranet and then discovered that a programmer was beta-testing a new application and had chosen this port because it was “fun to use infamous ports”! Needless to say, the programmer was asked to change the default port setting of the application.
Using Nmap for Inventory and Asset Management
There are many commercial applications designed to track assets, manage inventory counts, relay information about installed services, and monitor system uptime. Luckily for non-commercial application owners, this is another area where Nmap’s ease of use pays off with succinct results. In a matter of minutes, an administrator can generate a scan request for a range of IP addresses, an entire subnet, or even re-scan pre-identified systems. The options for identifying services and Operating System (OS) type come in handy when you are trying to identify existing desktops or servers in the infrastructure.
Let’s assume you have been tasked with identifying any outdated OS in your network. Step one is to use Nmap to identify up systems. This will help us narrow down the number of IP addresses that we have to scan more in-depth. Step two is to use Nmap to query those systems to determine what OS is installed. We’ll do this in an Nmap 2-step process first to get used to the idea:
nmap –n -sP 10.0.0.1-10 (ok, it’s a small network)
Starting Nmap 4.50 (http://insecure.org) at 2007-12-13 19:52 Central Standard Time
Host 10.0.0.1 appears to be up.
MAC Address: 00:0 F:B5:6C:DE:E0 (Netgear)
Host 10.0.0.2 appears to be up.
MAC Address: 00:02:E3:13:36:4B (Lite-on Communications)
Host 10.0.0.3 appears to be up.
MAC Address: 00:19:C5:D5:70:EA (Unknown)
Host 10.0.0.4 appears to be up.
Host 10.0.0.5 appears to be up.
MAC Address: 00:14:A5:13:17:75 (Gemtek Technology Co.)
Host 10.0.0.6 appears to be up.
MAC Address: 00:10:A4:7C:22:AF (Xircom)
Host 10.0.0.7 appears to be up.
MAC Address: 00:0C:29:E9:43:0A (VMware)
Nmap finished: 10 IP addresses (7 hosts up) scanned in 1.000 seconds
Here we utilized the –sP parameter to perform a ping scan and determine which hosts are up on this small ten host network. We also used the –n option to disable DNS lookups of the IP addresses. This is a common practice to help speed up the performance of the network mapping scan (although Nmap is extremely efficient, even when performing DNS lookups). Notice that the 10.0.0.4 host did not report a MAC address. This is because the scan was performed from this system.
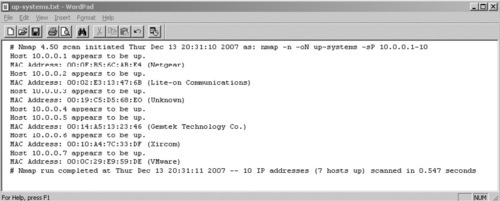
Now let’s use the –oN parameter to write our results to a normal output file, to try and make it easier to perform step two:
nmap -n -oN up-systems -sP 10.0.0.1-10
If we open the up-systems file in Wordpad (or whatever your text viewer of choice might be), we find the following (see Figure 2.4):
While this is a great format for viewing the results off-line or at a later point in time, this does not easily lend itself to our step two. In order to submit a list of online hosts to Nmap, we need to have just a listing of hosts without any extraneous information. If you try to submit this list, Nmap will complain that it is unable to determine what the hosts are:
Starting Nmap 4.50 (http://insecure.org) at 2007-12-13 20:47 Central Standard Time
Invalid target host specification: #
QUITTING!
What we need is a nice, well-ordered list that we can work with for our step two submission to Nmap. Let’s try a different output option to see what impact it has. In this example, we’ll use the –oG or ‘grepable’ format. This format has been deprecated but is still very popular for this very reason: It is simple to create a file that can later be searched and manipulated.
nmap -sP -oG up-systems2 10.0.0.1-10
This produces a report with output that is very easy to read:
# Nmap 4.50 scan initiated Thur Dec 13 22:03:28 2007 as: nmap -sP -oG up-systems2 10.0.0.1-10
Host: 10.0.0.1 () Status: Up
Host: 10.0.0.2 () Status: Up
Host: 10.0.0.3 () Status: Up
Host: 10.0.0.4 () Status: Up
Host: 10.0.0.5 () Status: Up
Host: 10.0.0.6 () Status: Up
Host: 10.0.0.7 () Status: Up
# Nmap run completed at Thur Dec 13 22:03:29 2007 -- 10 IP addresses (7 hosts up) scanned in 0.922 seconds
At this point, we can simply delete the top and bottom status lines and then use a combination of cut and tr to cull the IP addresses from our resulting file and create a new file of only active IP addresses that can be fed into Nmap for our OS scan. As an example for this file, we can use cut to create a list with only our active IP addresses in it (see Figure 2.5).

cut -b7-15 up-systems2 > IPs-only
As our final prep step, we’ll use the tr command to delete the carriage returns and prep our IP address list so that it is ready to be fed into our Nmap OS scan:
tr -d ‘ ’ < IPs-only > Nmap-ready_IPs
If you take a peek into the Nmap-ready_IPs file, you will see the IP addresses are all on one line, each separated by a space. It’s not very easy to manually read, but this is the perfect format for Nmap:
10.0.0.1 10.0.0.2 10.0.0.3 10.0.0.4 10.0.0.5 10.0.0.6 10.0.0.7
As another alternative, this single command line will create a CR delimited list of IP addresses that Nmap can use as an input file:
cat up-systems2 | grep Host | awk ‘{print $2}’ > Nmap-ready_IPs
Now we are ready for our second Nmap step: Let’s run this Nmap-ready_IPs file as an input file to an Nmap –A scan to detect service and OS versions of these live hosts. We’ll output the data to a file named OS-Svc-info and then peek into the contents of the resulting file (edited for length) to get our OS info:
Nmap –A –iL Nmap-ready_IPs > OS-Svc-info
Starting Nmap 4.50 (http://insecure.org) at 2007-12-13 23:48 Central Standard Time
Insufficient responses for TCP sequencing (1), OS detection may be less accurate
Interesting ports on 10.0.0.1:
Not shown: 1694 filtered ports
PORT STATE SERVICE VERSION
23/tcp open telnet?
80/tcp open tcpwrapped
1723/tcp closed pptp
MAC Address: 00:0 F:B5:6C:AB:E4 (Netgear)
Device type: remote management|firewall|media device
Running: Compaq embedded, Enterasys embedded, Phillips embedded
OS details: Compaq Inside Management Board, Enterasys XSR-1805 Security Route, Phillips ReplayTV 5000 DVR
Network Distance: 1 hop
< Author’s Note: This host is a Netgear 54Mps Wireless Router WGR614 v5 >
Interesting ports on 10.0.0.2:
Not shown: 1694 closed ports
PORT STATE SERVICE VERSION
135/tcp open msrpc Microsoft Windows RPC
139/tcp open netbios-ssn
1026/tcp open mstask Microsoft mstask (task server - c:winntsystem32Mstask.exe)
MAC Address: 00:02:E3:13:47:6B (Lite-on Communications)
Device type: general purpose|firewall|VoIP adapter|specialized
Running (JUST GUESSING): Microsoft Windows NT/2 K/XP|95/98/ME|2003/.NET|PocketPC/CE (97%), NetBSD (92%), IBM OS/400 V5 (92%), Secure Computing embedded (92%), Cisco embedded (91%), Ixia embedded (90%), Apple Mac OS X 10.2.X (90%)
Aggressive OS guesses: Microsoft Windows 2000 Professional SP2 (97%), Microsoft Windows XP Pro SP1/SP2 or 2000 SP4 (95%), Microsoft Windows Millennium Edition (Me), Windows 2000 Professional or Advanced Server, or Windows XP (94%), Microsoft Windows 2003 Server or XP SP2 (93%), Microsoft Windows 2000 Professional RC1 or Windows 2000 Advanced Server Beta3 (93%), Microsoft Windows 2003 Server Enterprise Edition (93%), NetBSD 1.6.2 (alpha) (92%), IBM AS/400 running OS/400 5.1 (92%), Microsoft Windows NT 3.51 SP5, NT 4.0 or 95/98/98SE (92%), Secure Computing Sidewinder firewall 5.2.1.06 (92%)
No exact OS matches for host (test conditions non-ideal).
Network Distance: 1 hop
Service Info: OS: Windows
< Author’s Note: This host is running Windows 2000, SP4 >
Warning: OS detection for 10.0.0.3 will be MUCH less reliable because we did not find at least 1 open and 1 closed TCP port
All 1697 scanned ports on 10.0.0.3 are closed
MAC Address: 00:19:C5:D5:68:EO (Unknown)
Device type: general purpose
Running: NetBSD
OS details: NetBSD 4.99.4 (x86)
Network Distance: 1 hop
< Author’s Note: This is actually a Playstation 3, v. 2.01 on a wireless connection >
Skipping SYN Stealth Scan against 10.0.0.4 because Windows does not support scanning your own machine (localhost) this way.
Skipping OS Scan against 10.0.0.4 because it doesn’t work against your own machine (localhost)
All 0 scanned ports on 10.0.0.4 are
Insufficient responses for TCP sequencing (0), OS detection may be less accurate
< Author’s Note: This is my scanning system and it is a Windows XP SP2 box >
Interesting ports on 10.0.0.5:
Not shown: 1695 closed ports
PORT STATE SERVICE VERSION
135/tcp open msrpc?
912/tcp open ftp vsftpd or WU-FTPD
MAC Address: 00:14:A5:13:23:46 (Gemtek Technology Co.)
Too many fingerprints match this host to give specific OS details
Network Distance: 1 hop
< Author’s Note: This host is running XP SP2 and connecting wirelessly using an internal Broadcom 802.11b/g WLAN adapter >
Interesting ports on 10.0.0.6:
Not shown: 1693 closed ports
PORT STATE SERVICE VERSION
135/tcp open msrpc?
139/tcp open netbios-ssn
445/tcp open microsoft-ds Microsoft Windows XP microsoft-ds
1025/tcp open NFS-or-IIS?
MAC Address: 00:10:A4:7C:33:DF (Xircom)
Device type: general purpose|firewall|VoIP adapter|specialized
Running (JUST GUESSING): Microsoft Windows NT/2 K/XP|95/98/ME|2003/.NET|PocketPC/CE (97%), NetBSD (92%), IBM OS/400 V5 (92%), Secure Computing embedded (92%), Cisco embedded (91%), Ixia embedded (90%), Apple Mac OS X 10.2.X (90%)
Aggressive OS guesses: Microsoft Windows 2000 Professional SP2 (97%), Microsoft Windows XP Pro SP1/SP2 or 2000 SP4 (95%), Microsoft Windows Millennium Edition (Me), Windows 2000 Professional or Advanced Server, or Windows XP (94%), Microsoft Windows 2003 Server or XP SP2 (93%), Microsoft Windows 2000 Professional RC1 or Windows 2000 Advanced Server Beta3 (93%), Microsoft Windows 2003 Server Enterprise Edition (93%), NetBSD 1.6.2 (alpha) (92%), IBM AS/400 running OS/400 5.1 (92%), Microsoft Windows NT 3.51 SP5, NT 4.0 or 95/98/98SE (92%), Secure Computing Sidewinder firewall 5.2.1.06 (92%)
No exact OS matches for host (test conditions non-ideal).
Network Distance: 1 hop
Service Info: OS: Windows
< Author’s Note: This is another Windows 2000 SP4 system >
Interesting ports on 10.0.0.7:
Not shown: 1694 closed ports
PORT STATE SERVICE VERSION
22/tcp open tcpwrapped
111/tcp open rpcbind?
631/tcp open ipp?
MAC Address: 00:0C:29:E9:59:DE (VMware)
Device type: general purpose
Running: Linux 2.4.X
OS details: Linux 2.4.22-ck2 (x86) w/grsecurity.org and HZ=1000 patches
Network Distance: 1 hop
< Author’s Note: This is a Vmware box running SuSe Linux 10.0 with a 2.6.13-15kernel >
OS and Service detection performed. Please report any incorrect results at http://insecure.org/nmap/submit/.
Nmap finished: 6 IP addresses (6 hosts up) scanned in 223.859 seconds
Now you are probably saying “That definitely was not a quick, easy method” and since our test environment is really just a small, home network, this really is overkill. However, once you start scanning class C and larger networks, it is often very handy to have a separate file that contains just live host information. This is true both from an ongoing live hosts comparison perspective and also from the proficiency angle when you start firing up service and OS scans.
Using Nmap for Security Auditing
Security auditing can be defined as creating a set of controls specific to the technology or infrastructure being reviewed and then applying those controls, like a filter, to your environment. Any gaps in or outside that filter become audit points and could negatively impact the audit’s overall assessment of your security framework.
Nmap can assist with such audit needs as:
■ Auditing firewalls by verifying the firewall filters are operating properly.
■ Searching for open ports on perimeter devices (perimeter being anything from Internet-edge, to extranet or intranet boundary lines).
■ Performing reconnaissance for certain versions of services.
■ Utilizing the OS detection feature to pin-point outdated or unauthorized systems on your networks.
■ Discovering unauthorized applications and services.
Using Nmap for System Administration
Although it is normally seen as a go-to application for security professionals, its wide-range of port scanning, service and OS identification capabilities make it perfect for the system administrator. If you decide to make Nmap available to administrators outside IT Security, keep in mind that this could increase unwanted scanning activity in your network. This is a perfect lead-in to our next subject–important security facets of employing Nmap.
Securing Nmap
Nmap is a security tool, but it must also be utilized in your infrastructure with security in mind. Any administrative tool running in your environment, security-related or otherwise, will require certain policies and procedures to ensure a successful deployment and operation. When you start specifically addressing security-related tools, you have to be sure to incorporate everything from separation of duties to principle of least privilege, as well as access tracking and usage reporting.
Executable and End-User Requirements
As with almost any security-related application, the first things to think about when starting the installation process includes security of the user context for the application and what permissions are required to manipulate the executable. Commonly you will find that the user must have root permissions on a UNIX system and administrator rights on a Windows box for both application installation and execution. Security best practices for accountability dictate that in order for administrative access to be properly tracked, Nmap users must have credentials that are individually identifiable. For example, John must have a personal use account and an administrative use account, both of which personally identify John as the account holder. If a common administrative username is utilized across the team, you have lost all tracking and auditing abilities. Shared “administrator” or “root” usage can be a hard habit to break; however it only takes getting caught by one auditing requirement to justify making the break.
This is connected to another important security best practice, the principle of least privilege. If John’s day-to-day work does not require administrative access, he should be logged in with his personal use account the majority of time. He must only switch to the administrative account when and if the details of his work require those extra access privileges. The theory behind this practice is that by limiting his access to the administrative account, he is helping to limit exposure to any vulnerability that might be associated with the use of that account. For example, many worms have achieved superior results for the simple reason that users were logged on at the time of infection with higher-than-necessary privilege. There are also ways of limiting users’ access by properly setting up and utilizing user groups or granting temporary access via commands like run as in the Windows Active Directory environment. Access control can also be implemented in the UNIX world via the use of group permissions and commands like sudo.
System Environment
What is the organization’s policy for acceptable use of security tools? When you get ready to incorporate Nmap into your enterprise infrastructure, there are a few things to think about in terms of the infrastructure and Nmap environment:
■ Should Nmap be installed on a workstation contained in a separate domain?
■ Is Nmap part of your open source software repository?
■ Is Nmap maintained by your package installation team or maintained separately by IT Security?
■ Do you have hash definitions of acceptable versions of Nmap?
■ Have you updated your IDS/IPS teams so that they can recognize the Nmap scanning footprint?
■ Do Nmap users scan from a segregated, remote system or do they scan from their own workstation?
The answers to these questions will help determine the organization’s overall posture towards scanning and Nmap’s place in the infrastructure.
Security of scan results
Once you have started to obtain results with Nmap, you have to decide if you are going to store them on a short- or long-term basis. Either decision will require careful consideration of what data classification is assigned to the results information, as well as what your organization’s policy for data retention and storage dictates. This is a direct proportion formula. These classification decisions will become more critical as the sensitivity of your scanned assets increases. Here are some additional questions to address:
■ Does this information require encryption at rest (in storage)?
■ Will we need to back up the scanning reports?
■ What is our ongoing retention schedule?
■ What permissions will we establish for report accessibility?
Addressing all of these questions will help meet what security personnel like to call the non-functional requirement of auditability. Properly securing your Nmap scanning workstation, user permissions, and output creates an auditor’s paradise of controls. Separation of duties is employed, principle of least privilege applied, authorized access is required and monitored, and report output and storage are carefully controlled.
Optimizing Nmap
Nmap has integrated functionality for helping the efficiency of your scans. You can make the scan run faster or slower depending on the timing option you choose. You can also manipulate the number of probe retransmits and other facets of the scan operation. This type of functionality has a dual purpose: It helps create more efficiently-run scans, and it can also be used to make scans stealthier. Attackers love this functionality of course, but we can also use it to our advantage when scanning in the enterprise. For example, if you are concerned about impacting servers during a scan of new IP address space, you can set the timing option (-T) so that the probes are sent very far apart. As a matter of fact, by using the -T0 option, Nmap will only send probes every 5 minutes! On the opposite end of the spectrum, using the -T5 option will cause Nmap to send probes approximately every 5 milliseconds. The concern with sending probes at such an insane rate is that you create a greater potential for upsetting the server you are trying to scan. The T5 option is also called the insane timing parameter for this very reason.
Here is the tcpdump output from a Windows host that has been hit with a -T5 timed scan (shortened and trimmed for clarity). In the output below, 10.129.0.196 is the host conducting the Nmap scan. Notice the SYN (S) probes are sent within 80-100 thousandths of a second of each other:
11:22:51.181872 IP 10.129.0.196.50900 > 10.129.0.193.321: S
11:22:51.181956 IP 10.129.0.196.50900 > 10.129.0.193.2766: S
11:22:51.182044 IP 10.129.0.196.50900 > 10.129.0.193.1495: S
11:22:51.182146 IP 10.129.0.196.50900 > 10.129.0.193.887: S
11:22:51.182329 IP 10.129.0.196.50900 > 10.129.0.193.1467: S
11:22:51.182456 IP 10.129.0.196.50900 > 10.129.0.193.6347: S
11:22:51.182541 IP 10.129.0.196.50900 > 10.129.0.193.2046: S
11:22:51.182630 IP 10.129.0.196.50900 > 10.129.0.193.975: S
11:22:51.182717 IP 10.129.0.196.50900 > 10.129.0.193.1373: S
11:22:51.182843 IP 10.129.0.196.50900 > 10.129.0.193.351: S
The Nmap help documentation includes a section specific to timing and performance. For reference, here are some of the options and information available from that documentation:
■ Options which take < time > are in milliseconds, unless you append ‘s’ (seconds), ‘m’ (minutes), or ‘h’ (hours) to the value (e.g. 30 m).
■ –T[0-5]: Set timing template (higher is faster); timing options from 0 (paranoid) to 5 (insane).
■ –min-hostgroup/max-hostgroup < size >: Parallel host scan group sizes.
■ –min-parallelism/max-parallelism < time >: Probe parallelization.
■ –min-rtt-timeout/max-rtt-timeout/initial-rtt-timeout < time >: Specifies probe round trip time.
■ –max-retries < tries >: Caps number of port scan probe retransmissions.
■ –host-timeout < time >: Give up on target after this long.
■ –scan-delay/–max-scan-delay < time >: Adjust delay between probes.
By default Nmap will sometimes perform DNS resolution of hosts it is scanning. You can avoid any potential performance hit by using the –n switch. Many UNIX-based networking and security tools use the –n switch to mean “Do not DNS resolve hosts”.
Advanced Nmap Scanning Techniques
In this section, we’ll be covering some Nmap advanced scanning techniques as applicable to an enterprise. There are many advanced options and combinations available; we’ll cover some of the more useful ones for assisting with the types of scans you might find yourself needing to run in an enterprise infrastructure. Advanced scanning options cover a wide range of possibilities:
■ TCP scan flags customization
■ Packet fragmentation
■ IP and MAC address spoofing
■ Adding decoy scan source IP addresses
■ Source port specification
■ Ability to add random data to sent packets
■ Manipulatable time-to-live field
■ Ability to send packets with bogus TCP or UDP checksums
One thing to be careful of when working with advanced scanning options is that your results will vary based on the type of scan you create. It sounds easy, but depending on what is going on behind the scenes, you might end up with a port being reported closed that is really open. It’s critical to have an understanding of TCP flags, for example, if you start customizing your scans with this option. Here’s a great example of the difference in results if we select a synchronize (SYN) flag as our customization versus selected the push (PSH) flag. Notice in the first scan, we are looking to determine if port 135 is open by sending a packet with the PSH flag enabled. The results come back and let us know that port 135 appears closed … why? In this example, 10.129.0.197 is the host running Nmap and 10.129.0.196 is the server being scanned. We are using Windump to capture the packets being sent. (Trimmed for clarity)
vm1:~ # nmap --scanflags PSH -p135 10.129.0.196
10.129.0.197.49671 > 10.129.0.196.135: P win 1024
10.129.0.196.135 > 10.129.0.197.49671: R 0:0(0) ack 4148940485 win 0
Interesting ports on 10.129.0.196:
PORT STATE SERVICE
135/tcp closed msrpc
Let’s contrast this scan with one that uses the SYN flag. What is the difference? Why does the port now appear open?
vm1:~ # nmap --scanflags SYN -p135 10.129.0.196
10.129.0.197.50224 > 10.129.0.196.135: S 2609233962:2609233962(0) win 2048 < mss 1460 >
10.129.0.196.135 > 10.129.0.197.50224: S 3256184574:3256184574(0) ack 2609233963 win 65535 < mss 1260 >
10.129.0.197.50224 > 10.129.0.196.135: R 2609233963:2609233963(0) win 0
Interesting ports on 10.129.0.196:
PORT STATE SERVICE
135/tcp open msrpc
Now we can tell that with the first scan attempt, the box being scanned replied to our push packet with a reset (R) packet. At this point, to our scanner, it appears that the port is not open and it reports that finding. However, when we contrast that with our second attempt and the synchronize packet, we see the server respond first with a synchronize/acknowledge or SA packet. This tells our scanner that the port is open and ready to complete the 3-way handshake. Since this scan customization conforms to TCP standards for setting up a socket, we see the server respond accordingly, and now Nmap is able to tell that the port is actually open. If you want to conduct different types of scans against your external firewall interface utilizing the scanflags option to see what responses an attacker might see, remember to complete your test with a valid connection scan and look for responsive ports.
Another advanced scanning technique that Nmap performs is the ability to pad out a packet’s length with random data to make it equal a set length. This is useful for testing intranet or extranet connections where you might have concerns about the allowable maximum segment size. It’s also useful for testing a link’s capacity for handling potential packet fragmentation. This can also be accomplished with the -f option to fragment Nmap packets. From the security perspective, these advanced features can give the penetration test team a real advantage when it comes to testing the IDS logging capability or IPS response.
Summary
We’ve seen Nmap’s ability to provide assistance across the enterprise: everything from maintaining lists of available systems, mapping open ports to running services, and identifying operating systems.
This chapter provided an overview of Nmap and high-level techniques used to scan networks and systems. To do this adequately it was also necessary to provide background information on securely implementing Nmap in your enterprise framework. We provided various scanning scenarios and potential uses of network scanning by security professionals, auditors, and system administrators. Lastly, we discussed different ways of optimizing your Nmap scans and a few advanced scanning techniques.
Now that you have been introduced to network scanning and the techniques used to discover active hosts, ports, services, and operating systems you are armed with the knowledge to start exploring your organization’s infrastructure. This chapter introduces the Nmap network scanner and its many uses across the enterprise. As you continue reading through this book, you will discover even more ways to use advanced Nmap features in the enterprise environment.
Finally, it’s worth reiterating that you must remember to only use network scanning if you have permission and the law is on your side. A security administrator could be mistaken for an attacker from the IDS or IPS point of view. If non-security IT professionals, like auditors, are given permission to use the tool make sure it is documented that they are allowed to do so. Always make certain you have permission, or use your own private network to experiment with Nmap or any other security tools.
Solutions Fast Track
What is Nmap?
☑ Nmap, or Network Mapper, is a free, open source tool that is available under the GNU General Public License as published by the Free Software Foundation.
☑ Nmap has capabilities for network mapping, port scanning, service and version detection, and operating system detection.
☑ Nmap can be installed on Windows, Linux, or Mac OS X.
Using Nmap in the Enterprise
☑ Make sure you have well-documented permission from the appropriate upper-management to conduct Nmap scans.
☑ Identify change control windows for scanning of critical assets.
☑ Post an email address or phone number to reach the Nmap team in case of scanning-caused outage.
☑ Approach reconnaissance of your networks as an attacker would. Start with a wide-reaching scan to determine available systems, and then gradually narrow down your scans to identify specific operating systems, ports or services.
Securing Nmap
☑ Nmap requires administrative privilege in order to successfully install and run.
☑ Employees conducting Nmap scans should be utilizing special access accounts in order to maintain accountability and the principle of least privilege.
☑ According to your data classification policies, it may be necessary to securely store Nmap results of critical assets.
☑ Create a solid working relationship with your internal IT audit team to help facilitate your understanding of their audit controls.
Optimizing Nmap
☑ Nmap has integrated timing policies that vary from T0 (very, very slow) to T5 (extremely fast).
☑ You can tell Nmap to never perform DNS resolution of the IP addresses it is scanning by using the -n option.
☑ Additional parameters give Nmap the power to control parallel scanning of a certain number of IP addresses.
Advanced Nmap Scanning Techniques
☑ Nmap comes with additional parameters that can provide scanning capabilities beyond the basic syn – syn/ack – ack connect scan.
☑ Manipulating options like the time-to-live, packet size or fragmentation can be used to test your organization’s intrusion detection or prevention teams.
☑ Understanding how TCP and UDP respond to certain stimuli is critical to working with advanced Nmap scanning features.
Frequently Asked Questions
Q: Which OS should I install Nmap on? Is one better than the other?
A: It used to be that Nmap was much better on Linux, simply because that was the original platform for the tool. However, over the past few years, Nmap’s popularity has led to more developments in the application for other operating systems. These days, you should download and start working with Nmap on whichever supported platform you are most comfortable with.
Q: Can I scan systems that are not on the same local network as my scanning system?
A: You bet! There are a couple of things to keep in mind when scanning through a router or firewall. For example, access controls on the firewall may impact whether or not your scan-generated packets will be able to pass through or if certain types of responses will be able to get back to the scanner. Oftentimes, firewall and network administrators will block protocols that Nmap relies on for certain scan types, such as ICMP or UDP. Your best chance for running successful scans across networks is to become good friends with your network and firewall teams. You will need upper management support and their assistance to setup the appropriate access control rules for your scanners.
Q: Can Nmap scans for service and OS version cause a system to crash?
A: It is not common for an Nmap scan to cause a system to crash, however this does not detract from the fact that you should have established scanning permission in your environment and also be certain to perform the scans during a change control window or a pre-established scanning window.
Q: Nmap’s OS scanning option doesn’t seem very exact, how is it going to benefit me when I need to identify systems in my enterprise infrastructure?
A: As you begin working with this –O Nmap option in your environment, you will get a feel for how it responds to different system builds. At that point, anomalies will pop out and you can zero in on those hosts to perform further testing on or attempt to track down.