
Using Zenmap
Introduction
Zenmap is a multi-platform, user-friendly, front-end GUI for Nmap. Like Nmap, Zenmap is free and open source. Zenmap allows you to perform all of the same usage options as in the command line version of Nmap, and it has the following additional features:
■ Command wizard. An interactive method to create Nmap commands.
■ Profile creation. Zenmap includes several default profiles for common scan configurations. You can also save your own scans as profiles so you can run them repeatedly.
■ Scan tabs. Zenmap allows you to run and display more than one scan at a time by using scan tabs.
■ Scan results saving. Scan results can be saved to a file and viewed later.
■ Results comparison. Saved scan results can be compared with each other to look for differences.
■ Searchable database. Scan results are stored in a searchable database.
In this chapter you will learn how to use the Zenmap GUI and its various features for robust scanning management in the enterprise.
Running Zenmap
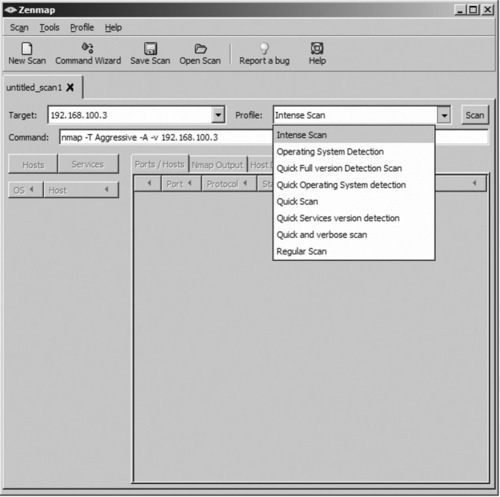
You can start Zenmap by typing zenmap on the command line or by clicking on the Zenmap desktop icon. The main Zenmap window opens with a default setting for an intense scan. To start using Zenmap you can enter a target address in the Target field and click on the Scan button. The Zenmap Target field supports the same target specification methods as Nmap. You can use the Target drop down box to select previously scanned targets. You can also choose from one of the default profiles as shown in Figure. 5.1. The Nmap command line option is displayed in the Command field for each profile. You can also edit the parameters in the Command field directly. This allows you to edit default profile options and to create a new command with customized options.
Like Nmap’s interactive mode, Zenmap displays output as the scan is running and when it completes. You will see the Scanning status in the left window pane and results displayed in the Nmap Output tab. When the scan completes, the left window pane will display the target hosts scanned. Zenmap displays the same output as Nmap, in an aggregated and easily readable format. The results are arranged into four tabbed pages: Ports/Hosts, Nmap Output, Host Details, and Scan Details.
■ Ports/Hosts. You can toggle the Ports and Hosts output by clicking on either the Hosts or Services buttons in the left hand window pane. Clicking the Hosts button displays a list of all hosts that were scanned. Hosts can be sorted by OS or IP address by clicking on the headers above the list. If you click on a host the Ports/Host pane shows the ports and version information for the selected host (Figure 5.2). Clicking the Services button displays a list of ports/services that are open, filtered, or open|filtered on any of the scanned hosts. The list can be sorted in regular or reverse alphabetical order by clicking on the header above the list. If you click on a service, the Ports/Host pane shows the hosts that have the selected port open or filtered (Figure 5.3).


■ Nmap Output. The Nmap Output tab displays the same interactive output that Nmap displays to standard out. This tab is displayed by default when a scan starts. Figure 5.4 shows the Nmap Output tab with example results. You can enable highlighting by clicking on the “Enable Nmap output highlight” at the bottom of the tab. You can view and change the highlighting options by clicking on the Preferences button at the bottom of the tab, shown in Figure 5.5.


■ Host Details. The Host Details tab displays host information, such as addresses, host names, state, port information, operating system, and uptime, in a hierarchical format. The output also shows a vulnerability icon based on the number of open ports. You can also enter remarks in the Comment field, which are saved when the scan results are saved to a file. Figure 5.6 shows the Host Details tab with example results.

Table 5.1 shows the types of icons used for various operating systems based on their representative mascots or logos.
Table 5.1
Operating System Icons
| Icon | Operating System |
 | OS detection not performed or no matches were made |
 | FreeBSD |
 | Irix |
 | Linux |
 | Mac OS |
 | OpenBSD |
 | Red Hat Linux |
 | Solaris or OpenSolaris |
 | Ubuntu Linux |
 | Microsoft Windows |
 | Other |


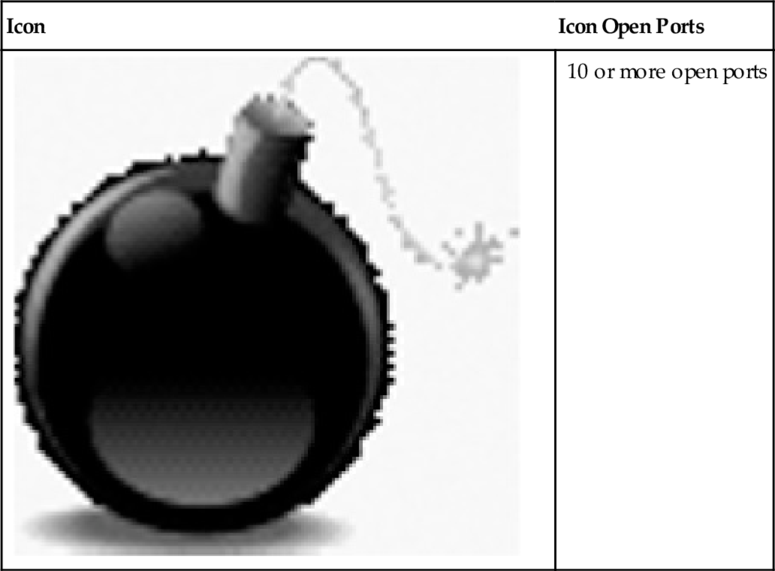
Table 5.2 shows the list of icons which represent the number of ports open on the target system.
Table 5.2
Vulnerability Icons
| Icon | Icon Open Ports |
 | 0–3 open ports |
 | 4–5 open ports |
 | 6–7 open ports |
 | 8–9 open ports |
 | 10 or more open ports |

■ Scan Details. The Scan Details tab lists miscellaneous information about the scan itself, such as the Nmap command that was executed, Nmap version, verbosity and debug level, scan start and finish times, host and port information, and scan type information. Figure 5.7 shows the Scan Details tab with example results.

Managing Zenmap Scans
Zenmap allows you to run and view results for multiple scans using the scan tabs. The following features are available to manage Zenmap scans:
■ Create a new scan. To open a new scan tab, choose “New Scan” from the toolbar icon or Scan menu.
■ Close a scan. To close a scan, choose “Close Scan” from the Scan menu or click on the X on the tab.
■ Save a scan. You can save scan results by clicking on the scan tab you would like to save and choosing “Save Scan” from the toolbar icon or Scan menu. The results are saved in Umit Scan Results (.usr) format.
■ Open a scan. To open saved scan results, choose “Open Scan” from the toolbar icon or Scan menu. Zenmap can open Umit Scan Results (.usr) files and Nmap XML (.xml) files.
Building Commands with the Zenmap Command Wizard
You don’t have to remember all of those Nmap command line options when using Zenmap, it comes with a built-in command wizard to assist you in constructing Nmap commands. The following steps walk you through the command constructor wizard:
1. You can start the Nmap command constructor wizard by choosing the Command Wizard from the toolbar icon or Tools menu.
2. You are first presented with the option to construct the profile as a Novice or Expert user. The Expert user option opens the Profile Editor, discussed in the following section. Choose Novice and click Forward.
3. Next you have the option of just creating a command or creating a profile for the command. Creating a profile is recommended if you intend to repeatedly run the scan. If you select to create a profile you will be prompted to enter a profile name and optional description information. If you don’t wish to create a profile, choose the Command option and enter a target. The target can be in any of the target specification formats discussed in Chapter 4. Once you have created a profile or selected a target you can click Forward and begin selecting your command options.
4. The next screen presents three drop down menus to allow you to select your TCP scan type (ACK, FIN, Null, SYN, Connect, Window, Xmas), special scan (IP protocols, List, and Ping scanning), and one of the seven timing options (None, Paranoid, Sneaky, Polite, Normal, Aggressive, Insane). You also have the option of performing service version detection and operating system detection by clicking the check boxes. Each selection you make automatically updates the Nmap command in the Command field. Once you have selected your parameters, click Forward to continue.
5. The next screen presents you with a variety of Ping options. You can choose to disable pinging, or select one of the other ICMP, TCP, or UDP options. Once you have selected your parameters, click Forward to continue.
6. The next screen allows you to select specific target options, such as hosts or network to exclude and ports to scan. You must enter excluded hosts and ports to scan according to the syntax discussed in Chapter 4. You can also select the check box to only scan ports listed in the Nmap service file. Once you have selected your parameters, click Forward to continue.
7. The next screen allows you to select limited evasion techniques, such as specifying decoys, a source IP address, and source port address. Once you have selected your parameters, click Forward to continue.
8. The next screen presents a variety of miscellaneous options, such as TTL value, fragmentation, verbosity, debugging, and packet tracing. It also includes a field for other user defined options. Once you have selected your parameters, click Forward to continue.
9. The next screen allows you to create your profile or command. If you chose to create a command it will run immediately. If you chose to create a profile, it will be available in the Profile drop down menu to use when needed.
Managing Zenmap Profiles
Zenmap includes several default profiles of commonly used commands. When you select a profile, the Nmap command line option is displayed in the Command field. As you saw during the Command Wizard, you have the option to create a new profile for a command. Command profiles allow you to save Nmap commands and run them repeatedly. You can create, edit, and remove profiles by using the options on the Profile menu.
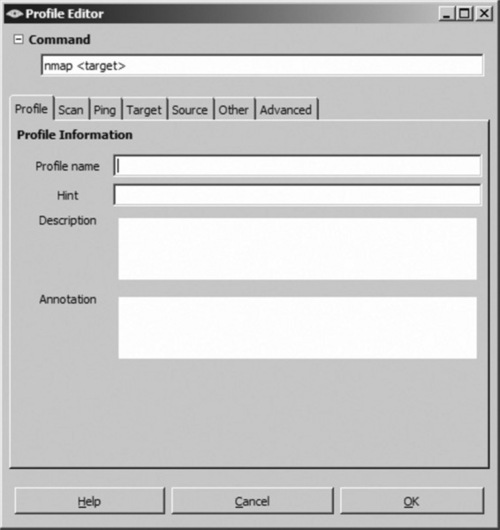
To create a new profile, select New Profile from the Profile menu. You will be presented with the Profile Editor, as shown in Figure 5.8. The Profile Editor allows you to create your profile name and associated Nmap command through a series of tabs. The tabs include similar options as the Command Wizard, with some advanced options as well. As you select scan options, the command displayed in the Command field will automatically update. Once you have created your profile it will be displayed along with the default profiles in the Profile drop down menu.
You can edit current profiles by selecting the profile from the Profile field drop down menu in the scan tab, then choosing Edit Selected Profile from the Profile menu. The Profile Editor appears with the information for the selected profile. Once you make a change to a profile you can not undo the change. If you wish to delete the profile click the Cancel button in the Profile Editor. You will be prompted to make sure you really want to delete the profile. Clicking Cancel even after you have made changes to the profile, prompts you to delete the profile, so once again, there is no way to undo changes.
Instead of editing a profile directly, you may want to make a copy of it to edit and test. You can do this by creating a new profile using a selected profile as a template. First, select the profile you would like to copy from the Profile field drop down menu in the scan tab. Next, choose New Profile with Selected from the Profile menu. This will open the Profile Editor with the same Nmap command line options as the selected profile, but with a blank profile name. You can choose a name for the profile, make modifications and click OK when you are done.
Managing Zenmap Results
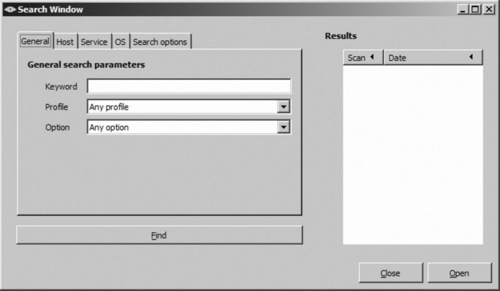
Zenmap scan results are saved in a searchable database, named zenmap.db, for 60 days. You can also save your scan results to a file in Umit Scan Results (.usr) format. Both of these formats are searchable by the Zenmap search feature. You can open the Search Window, by choosing Search Scan Results from the Tools menu. Figure 5.9 shows the Zenmap Search Window. You can search on a variety of criteria by clicking on the various tabs. For example you could search by target IP or MAC address, port number and state, OS class, or general keyword. The Search Options tab allows you to specify the search location. By default, Zenmap only searches scans in open scan tabs and the scan database. If you want to search saved scan files, you must specify a directory that contains the files. You can search both Zenmap and Nmap file types by specifying them in semicolon delimited format, for example: usr;nmap;gnmap;xml. The Search Options tab also allows you to modify the Zenmap database options including enabling and disabling database storage and database searching, and modifying how long scans are stored in the database.
Once you have entered your search criteria, click on Find button to start the search. Search results will appear in the Results window pane on the right. You can open a found scan in the Results window by selecting it and clicking on the Open button.
When performing scanning in the enterprise, there are often times you want to run the same scan more than once and compare results. For example, you may be interested in running Nmap before and after you install a patch or new software to a system, make a firewall or router access control list change, or make a configuration change. You may also be interested in comparing the results of a scan of two different systems to see how they differ, or compare the results of scans that used different scanning options. In addition to the ability to save your Nmap command to make it easy to run it repeatedly, Zenmap also has the ability to compare the results of multiple scans.
You can open the Compare Results window, by choosing Compare Results from the Tools menu. Zenmap allows you to compare the results of two scans at a time. You can use the drop down box for each Scan Result field to open a current scan results tab, or you can click on the Open button to open a saved scan result. Make sure you take into consideration which scans you open as Scan Result 1 and Scan Result 2 because this will impact your comparison. Comparisons are made to show how Scan Result 2 differs from Scan Result 1. Comparison automatically starts once you choose your two scans to compare.
Figure 5.10 shows the Zenmap Compare Results window with the graphical comparison of two scans that use different Nmap options to scan the same system. The graphical results are depicted with colors that represent how the second scan differs from the first. For example, was this aspect of the scan unchanged, added, modified, or not present in the second scan? You can change the color mapping by clicking the Color Descriptions button and choosing alternate colors. If you don’t want to see the graphical results, you can change the comparison mode by clicking on the Text Mode button. Text mode still uses colors to represent changes, but the results can easily be copied and pasted into a file.

Text mode results use special characters to indicate the meaning of a line. Table 5.3 shows the special characters and their meanings. Lastly, you can click on the Open in Browser button to view the results in HTML format.
Summary
This chapter showed you the enterprise capabilities of the Zenmap GUI in terms of building and running Nmap commands and managing scan profiles and results. In this chapter, you learned about the major features of the Zenmap GUI and how to use them. You should now be able to run Zenmap scans and analyze the results. You are also equipped to create and edit scanning profiles, save scan results, and search and compare scan results. You can also use the Zenmap Command Wizard to build complex Nmap commands. The Zenmap GUI is great to use in the enterprise for full-scale Nmap capabilities wrapped up into a scan management platform.
Solutions Fast Track
Running Zenmap
☑ Zenmap is a GUI front-end for Nmap that was originally named UMIT.
☑ Zenmap has all of the Nmap capabilities, plus scan management features.
☑ Zenmap scan results are arranged into four tabbed pages: Ports/Hosts, Nmap Output, Host Details, and Scan Details.
☑ Zenmap includes graphical icon representations for vulnerability severity.
Managing Zenmap Scans
☑ Zenmap allows you to run and view results for multiple scans using the scan tabs.
☑ You can create new scans, open scans, and save scans.
☑ Scans are saved in Umit Scan Results (.usr) format.
Building Commands with the Zenmap Command Wizard
☑ The Command Wizards walks you through creating an Nmap command by allowing you to check boxes and choose from pull down lists.
☑ You can create a command or a profile to save a command.
☑ The Expert user option opens the profile editor for access to advanced features.
Managing Zenmap Profiles
☑ Zenmap includes several default profiles of commonly used commands.
☑ Command profiles allow you to save Nmap commands and run them repeatedly.
☑ You can create, edit, and remove profiles.
☑ You can easily create copies of current profiles.
Managing Zenmap Results
☑ You can use Zenmap’s search feature to search results saved in the database and files.
☑ You can search on a variety of criteria including target IP or MAC address, port number and state, OS class, general keyword, and others.
☑ Zenmap also has the ability to compare the results of multiple scans.
☑ Comparison results are displayed in color coded graphical or text formats.
Frequently Asked Questions
Q: Zenmap has several configuration files; do I need to make changes to them?
A: You do not need to change anything in the configuration files manually. When you make changes to profiles, etc. in the GUI, these files are automatically updated. Extreme care should be used if you are going to edit the files directly.
Q: I am an experienced UNIX system administrator that prefers the command line over GUIs, what advantages do I have running Zenmap instead of Nmap?
A: The biggest advantage to running Zenmap is its scan management features such as profile creation and built in results searching and comparison. Otherwise, Zenmap includes all of the same capabilities as Nmap.
Q: Can I save my results in other formats besides the .usr format?
A: Zenmap can only save results in Umit Scan Results (.usr) format.
Q: I am using the Command Wizard to create an Nmap command, but some of the options I need are not there, where do I find them?
A: You can use the Profile Editor to create commands with advanced features.