
Introduction
A lot of material has been covered up to this point in the book
including an overview of an iOS device, the file system used, the types of data storage, device
and application security, and an in-depth review of the various forensic acquisition methods.
All this information has been important in leading up to this chapter, which covers the analysis
of the data recovered from the device.
Analysis techniques
This section
provides an overview of the analysis techniques that can be used on an image in order to
recover the greatest amount of data possible.
Mount disk image
As discussed
throughout this book, the directories and files in the device's file system are the primary
focus of a forensic investigation. The final section of this chapter, iPhone Application
Analysis and Reference, provides a detailed analysis of both default and downloaded iPhone
apps. Combining this information with the techniques demonstrated in Chapter 3 , File
System and Data Storage, will provide the most significant results for an
investigation.
After performing a physical acquisition on an
iOS device using one of the available methods, the resulting file will be in a disk image
(.dmg) format. On a Mac, this file can be marked as read-only (see Chapter 5 ,
section on “Postacquisition Steps”) and mounted by double-clicking the file. By default, this
should launch the DiskImageMounter on a Mac.
Oftentimes, an
iPhone image may be corrupt or, for one reason or another, will not mount successfully on a
Mac. In this case, Linux can also be used to mount a dmg file. The following command will
mount an HFS Plus disk image on a Linux workstation or virtual machine (VM):
kstrzempka@linux-wks:~$ sudo mount -t hfsplus -o ro,loop
~/Desktop/iPhone.dmg ~/Desktop/mount-
To mount the dmg, a folder needs to be created first in the location where the
image should be mounted. Above, the “mount” folder was created on the user's desktop. Now, let
us walk through the previous command to make sure we understand all of the options
listed:
• sudo: Provides extended security privileges to the
user.
• -t
hfsplus: Specifies the file system type of HFS Plus.
• -o ro,loop: Specifies the option to open the
device as read-only (ro) and as a loopback device, which makes the file accessible as a
block device.
• ~/Desktop/iPhone.dmg: Source path where the dmg file is
stored.
•
~/Desktop/mount: Destination path to the folder where the image is to be
mounted.
Once the image is mounted on
either a Mac or a Linux workstation, the examiner will see the entire file system of the
device (see Appendix C to view the full iPhone file system). The analysis of folders and files
within these directories is discussed in the “iPhone Data Storage Locations” section later in
this chapter.
File carving
File carving is a process in which specified
file types are searched and extracted across binary data, often a forensic image of an entire
disk or partition. File carving works by examining the binary data and identifying files based
on their known file headers. If the file format has a known footer, it will scan from the
header until it finds the footer (or hits a maximum file length set by the configuration
file), and then it saves the carved file to disk for further examination.
Traditional file carving techniques require that the data is
sequential in the image and therefore they cannot produce the full file if it is fragmented.
There are many reasons why files are fragmented, as the process for saving the file to
nonvolatile storage varies by file system type as well as by the strong influence of the
memory type such as NAND Flash. This also means that files that are very large (such as
videos) will be more difficult to recover.
Newer file
carving techniques are being researched and developed to address the limitations experienced
with file fragmentation. One such technique has been developed by Digital Assembly, a digital
forensics solutions company based in New York. Their technique, called SmartCarving, profiles
the fragmentation characteristics of several popular file systems and uses this information to
carve even fragmented photos. Their product, Adroit Photo Forensics, can also carve images
from unknown file systems ( Digital Assembly,
n.d. ).
The process of data carving typically involves
a data carving tool, a configuration file for that tool, and a disk image containing the
desired data. The configuration file contains details related to the file types that are to be
carved out of the image. The tool will then search the raw data for file signatures of the
file types referenced in the configuration file.
Once the
data carving process is complete, the output is typically grouped by file type. The following
is an example of the resulting file types after file carving was performed on an iPhone disk
image file. If there are more than 1000 files, a new folder is created. For example, thousands
of jpg images were contained on the device, and therefore a large number of jpg folders were
created (jpg-2-0 through jpg-3-2). The “amr” file type stands for Adaptive Multi-Rate and this
is where media files are commonly stored.
kstrzempka@linux-001:~# tree -L 1 scalpel-output/
scalpel-output/
├── amr-16-0
├── audit.txt
├──
bplist-8-0
├── bplist-8-1
├── bplist-8-2
├── bplist-8-3
├──
bplist-8-4
├── bplist-8-5
├── bplist-8-6
├── bplist-8-7
├──
bplist-8-8
├── bplist-8-9
├── dat-6-0
├── email-10-0
├──
email-10-1
├── gif-0-0
├── gif-1-0
├── htm-13-0
├──
jpg-2-0
├── jpg-2-1
├── jpg-2-2
├── jpg-2-3
├── jpg-2-4
├──
jpg-2-5
├── jpg-2-6
├── jpg-2-7
├── jpg-2-8
├── jpg-2-9
├──
jpg-3-0
├── jpg-3-1
├── jpg-3-2
├── mov-11-0
├── pdf-15-0
├──
plist-7-0
├── plist-7-1
├── plist-7-2
├── plist-7-3
├──
plist-7-4
├── png-5-0
├── png-5-1
├── png-5-2
├──
process
├── sqlitedb-9-0
└── sqlitedb-9-1
One popular tool used for carving data files is known as scalpel.
Scalpel is an open source high-performance file carving utility written by Golden G. Richard
III. It reads a database of header and footer definitions in order to extract files from a raw
image. This utility is filesystem-independent and will work on FATx, NTFS, ext2/3, HFS, or raw
partitions. Scalpel was rewritten based on foremost 0.69, which is another popular open source
file carving utility. It is written in C and runs on Linux, Windows, Mac OS X, and other
operating systems that can compile the C code ( Richard, 2006 ).
Installing scalpel
The source code for scalpel
can be downloaded from http://www.digitalforensicssolutions.com/Scalpel/ or installed via command line. The
latter will automatically install the latest version. The following command must be run on
the Linux workstation to install scalpel.
sudo apt-get
install scalpel
Alternatively,
one can compile from source, which will allow the installation of the latest version on Linux
or other platforms without waiting for the specific platform maintainer to update the
prepackaged version. In this method, the package must be compiled and built from the source
code using the specific commands. First, the archive must be extracted using the tar command
(-x will extract the files, -z unzips the files, -v signifies verbose output, and -f
specifies the archived file). The following commands should be run to extract the files and
compile the program. In this example, Scalpel version 1.60 was used. The most up-to-date
software available at the time should be used.
$ cd
~
$ wget
http://www.digitalforensicssolutions.com/Scalpel/scalpel-1.60.tar.gz
$ tar xzvf
scalpel-1.60.tar.gz
$ cd scalpel-1.60/
$ make
The scalpel executable is now in ~/scalpel-1.60 and is simply called
scalpel. In addition, there is a sample scalpel.conf in the same directory, which is needed
for scalpel to run and to extend the supported file definitions. Here is a starter
scalpel.conf for an iPhone device:
#ext case size header footer
gif y 5000000 x47x49x46x38x37x61 x00x3b
gif y 5000000 x47x49x46x38x39x61 x00x3b
jpg y 200000000 xffxd8xffxe0x00x10 xffxd9
jpg y 5000000 xffxd8xffxe1 x7fxffxd9
png y
102400 x50x4ex47?
xffxfcxfdxfe
png y 102400 x89PNG
tif y 20000000 x49x49x2ax00
db y 409600 SQLitex20format
dat y 8192 DynamicDictionary-
plist y 4096 <plist </plist
bplist y 4096 x62x70x6cx69x73x74x30x30
sqlitedb y 819200
SQLitex20format
email y
10240 From:
mov y 8192000 x00x00x00x14x66x74x79x70x71x74x20x20x00x00x00x00
doc y 10000000 xd0xcfx11xe0xa1xb1x1axe1x00x00
xd0xcfx11xe0xa1xb1x1axe1x00x00 NEXT
doc y
10000000 xd0xcfx11xe0xa1xb1
htm n 50000 <html </html>
pdf y
5000000 %PDF
%EOFx0d REVERSE
pdf y
5000000 %PDF
%EOFx0a REVERSE
wav y
200000 RIFF????WAVE
amr y 200000 #!AMR
zip y
10000000 PKx03x04 x3cxac
java y 1000000 xcaxfexbaxbe
As one can tell,
the headers for this configuration file define the extension or file type, whether it is case
sensitive, the maximum size to carve, the header definition (in ASCII, hex, and other
supported notations), and the footer (if it exists). A targeted file type for carving does
not need to define each setting. For additional information, see the sample configuration
file in the downloaded source files, as there are many additional options that are quite
powerful. Your workstation now has the software needed for file carving.
It is worth pointing out that a large number of file signatures have
already been assembled. Gary Kessler, an independent consultant and practitioner of digital
forensics, actively maintains a table of file signatures on his website. He references the
“magic file,” which is found on most Unix systems and is located at /usr/share/file/magic on
the Ubuntu workstation. On the workstation, one can run the “file” command, which takes a
file as an argument and attempts to determine the file type based on the signatures in the
magic file ( Kessler, 2011 ).
A simple example would include looking at an unknown file that cannot
be easily identified by the file name (of course, some people might try to hide file types by
changing the extension, but this is easily discovered by examining the file
signature):
root@linux-wks:~/Desktop/iPhone-mount/run#
file syslog.pid
syslog.pid: ASCII text
Looking at the “syslog.pid” file found in the “run” directory at the root of the
device, the file command shows that this file contains ASCII characters.
Usage
To use scalpel, you will first need to have the program installed and compiled and
also have access to a dmg (or other image file) and the scalpel configuration file. By
default, scalpel will create a “scalpel-output” directory in the current folder, so make sure
you are cd'd into the directory where you would like the output to go. Run the following
command:
kstrzempka@linux-wks:~/Desktop$ time
scalpel -c /home/kstrzempka/Documents/scalpel-iphone.conf iPhone.dmg
Scalpel version
1.60
Written by Golden G. Richard III, based on Foremost 0.69.
Opening target
“iPhone.dmg”
Image file pass 1/2.
iPhone.dmg: 100.0%
|*******************************************************************| 14.6 GB 00:00 ETAAllocating
work queues…
Work queues allocation complete. Building carve lists…
Carve lists built.
Workload:
gif with header “x47x49x46x38x37x61” and footer “x00x3b” - -> 0
files
gif with header “x47x49x46x38x39x61” and footer “x00x3b” - -> 31
files
jpg with header “xffxd8xffxe0x00x10” and footer “xffxd9” - -> 45
files
jpg with header “xffxd8xffxe1” and footer “x7fxffxd9” - -> 13
files
png with header “x50x4ex47x3f” and footer “xffxfcxfdxfe” - -> 0
files
png with header “x89x50x4ex47” and footer “” - -> 955
files
dat with header
“x44x79x6ex61x6dx69x63x44x69x63x74x69x6fx6ex61x72x79x2d” and footer “”
- -> 1 files
plist with header “x3cx70x6cx69x73x74” and footer
“x3cx2fx70x6cx69x73x74” - -> 802 files
bplist with header
“x62x70x6cx69x73x74x30x30” and footer “” - -> 1273 files
sqlitedb with header
“x53x51x4cx69x74x65x20x66x6fx72x6dx61x74” and footer “” - -> 56
files
email with header “x46x72x6fx6dx3a” and footer “” - -> 13
files
mov with header “x00x00x00x14x66x74x79x70x71x74x20x20x00x00x00x00”
and footer “” - -> 0 files
doc with header “xd0xcfx11xe0xa1xb1” and footer “”
- -> 0 files
htm with header “x3cx68x74x6dx6c” and footer
“x3cx2fx68x74x6dx6cx3e” - -> 8 files
pdf with header “x25x50x44x46” and
footer “x25x45x4fx46x0d” - -> 0 files
pdf with header “x25x50x44x46” and
footer “x25x45x4fx46x0a” - -> 0 files
amr with header “x23x21x41x4dx52” and
footer “” - -> 0 files
Carving files from image.
Image file pass
2/2.
iPhone.dmg: 100.0%
|******************************************************************| 14.6 GB 00:00 ETAProcessing
of image file complete. Cleaning up…
Done.
Scalpel is done, files carved = 3197,
elapsed = 409 seconds.
real 6m48.487s
user 4m28.320s
sys
0m25.050s
The command is broken
down as follows:
• time: This is optional and will simply
document how long the process took (see the previous output for the real, user, and sys
times).
•
scalpel: Runs the scalpel program.
• -c /home/kstrzempka/Documents/scalpel-iPhone.conf: Points
the scalpel program to the appropriate configuration file: in this case,
“scalpel-iPhone.conf.”
• iPhone.dmg: Tells scalpel to run against the specified dmg file. If the dmg
is not in the current directory, a path can also be specified, such as
“/home/kstrzempka/Desktop/iPhone.dmg.”
When scalpel has finished, a “scalpel-output” folder is created in the current directory,
which contains all the recovered files, sorted by file type. Table 6.1 contains a breakdown of the
standard file types recovered from an iPhone using scalpel and the type of information that
may be found within these files.
Strings
The strings command on a Linux
workstation will extract, by default, ASCII printable strings at least four characters long
from any file, text, or binary. While this technique is not terribly elegant or sophisticated,
it is quite effective at quickly examining binary data to determine whether information of
interest might be contained in the file.
There are several
options that have a great impact on what the strings command will output. First, let us take a
look at the synopsis section of the command's man page (manual):
STRINGS(1) GNU Development Tools STRINGS(1)
NAME
strings - print the strings of printable characters in
files.
SYNOPSIS
strings [-afovV] [-min-len]
[-n min-len] [- -bytes=min-len]
[-t radix]
[- -radix=radix]
[-e encoding]
[- -encoding=encoding]
[-] [- -all]
[- -print-file-name]
[-T bfdname]
[- -target=bfdname]
[- -help] [--version]
file…
There are a few options you should always consider using when executing strings.
First, the “- -all” option tells strings to examine the entire file (on certain files, it only
examines certain portions of the file. Second, the “- -radix=” option tells strings to print
the offset within the file where the string was found. This is extremely helpful when you
combine strings and a hex editor to examine possible evidence found in the file. The radix
option can print the offset in octal (- -radix=o), hex (- -radix=x), or decimal (- -radix=d).
For most hex editors, you should consider hex, or perhaps decimal, offsets.
Another extremely important option controls the character encoding of
the strings that provide support for Unicode characters in both big endian and little endian
formats:
- -encoding=encoding
Select the character encoding of the strings that are
to be found.
Possible values for encoding are: s = single-7-bit-byte
characters
(ASCII, ISO 8859, etc., default), S = single-8-bit-byte
characters,
b = 16-bit bigendian, l = 16-bit littleendian, B =
32-bit
bigendian, L = 32-bit littleendian. Useful for finding
wide
character strings. (l and b apply to, for example, Unicode
UTF-16/UCS-2
encodings).
An example of utilization of the strings command on an iPhone.dmg file is given as
follows:
kstrzempka@linux-wks:~$ strings - -all - -radix=x
iPhone-book.dmg | less
8bd586a Message-ID:
<[email protected]>
8bd58a7 From:
<[email protected]>
8bd58cd thread-topic: Test
8bd58e0 thread-index:
Acs00TXUVxQEEp2BTLq8uC10r43JSA==
8bd590f To:
<[email protected]>
8bd5931 Content-Type: text/plain;
format=flowed; charset=“us-ascii”
8bd596d Content-Transfer-Encoding:
7bit
8bd598d MIME-Version: 1.0 (iPhone Mail 7D11)
8bd59b2 Subject:
Test
8bd59c0 Date: Thu, 5 Aug 2010 14:05:42 -0500
8bd59e5 Return-Path:
[email protected]
8bd5a05 X-OriginalArrivalTime: 05 Aug 2010
19:05:46.0948 (UTC)
8bd5a3c
FILETIME=[3607C840:01CB34D1]
8bd5a5b This is a test message that will be deleted
from the gmail account
8bd5a9f Sent from my
iPhone
In this
example, the first lines of the results were omitted; however, a known deleted e-mail was
located on the dmg. The message content says “This is a test message that will be deleted from
the Gmail account” and it is at offset 0x8bd5a5b. By jumping to this section in a hex editor,
further information can be revealed (as discussed in the “Advanced Forensic Analysis”
section).
Now, let us change the encoding parameter and look
for the following:
kstrzempka@linux-wks:~$ strings - -all
- -radix=x --encoding=b iPhone-book.dmg | less
5e8a1e
O-www.groupon.com-api-v1-users-katie-strzempka-groupons-5620002-0-1-29169321.png
5e8ad0
bakin-eggs-chicago.plist
5e8b10
Owww.groupon.com-images-site_images-avatars-deals-bakin-eggs-chicago_sidebar.jpg
5e8bc0
O-www.groupon.com-api-v1-users-katie-strzempka-groupons-6290319-0-1-78638381.png
5e8c70
&southport-lanes-seven-ten-lounge.plist
5e8cce
]www.groupon.com-images-site_images-avatars-deals-southport-lanes-seven-ten-lounge_sidebar.jpg
5e8d9c
gap-inc-chicago.plist
In this example, we are looking for 16-bit big endian characters. In this case, an
example was pulled from the results related to the Groupon mobile application (which allows
users to purchase coupons for local businesses from their mobile device). The string results
revealed three groupons that were potentially purchased. In a hex editor, an examiner could
jump to 0x5e8a1e and view further details, perhaps the date and time of the
purchase.
Strings is a very powerful command that, when
combined with searching and filters, can quickly determine whether phone numbers, names,
locations, GPS coordinates, dates, and many more pieces of information are easily extractable
in a data file. It is strongly encouraged to explore other encoding options in order to locate
the greatest amount of data.
Timeline development and analysis
Many files and directories have times associated with them. For this reason,
timeline analysis should be a key component of any investigation, as the timing of events is
nearly always relevant. There are many ways to build a forensic timeline; however, most are
manual and quite tedious. The creation of a timeline provides a high-level look at system
activity, such as when files were compiled and when archives were opened.
For supported file systems, a number of tools are available that can
create the timeline. The primary source of timeline information is the file system metadata
including the date modified (file metadata), accessed, changed (file contents), and created.
This metadata is often referred to as MAC times or sometime MACB, where the “B” represents
when a file was created (birthed). File systems track different timestamps and have nuances
that must be taken into account when performing forensic analysis.
One tool used in this book for timeline analysis is The Sleuth Kit (TSK), which
supports several file systems, including hfs/hfs+. TSK contains various forensic tools,
including the ability to create a timeline. This process involves two steps, which require the
use of the tools within TSK ( Carrier, 2009
):
• First, the “fls” tool is used to list file and directory
names in a disk image. The fls command gathers data from sources such as file systems,
registries, logs, etc. and saves them into a “body file” format.
• The “mactime” script is
then used to sort and merge this data into a timeline.
Details on how to install, create, and analyze a timeline are covered
in the following sections.
Download, compile, and install TSK
In this
example, TSK is going to be installed on a Linux machine. To install and compile on a Mac,
Apple's Developer Tools are first required (specifically, XCode 3 must be installed from
developer.apple.com). Details on compiling TSK on a Mac can be found on www.appleexaminer.com , a site developed by Ryan
Kubasiak, which contains a wide range of free tools and information dedicated to Apple device
forensics.
The source code for TSK can be downloaded from
http://www.sleuthkit.org/sluethkit/download.php . Once downloaded, the examiner can
extract, compile, and install the software. The following command will extract the contents
of the tar file (-x) in verbose mode (-v) to a file (-f), with much of the output removed for
simplicity. In this example, TSK version 3.2.0 was downloaded, as this was the most recent
version available.
Katie-Strzempkas-MacBook:Downloads
kstrzemp$ tar xvf sleuthkit-3.2.0.tar
x sleuthkit-3.2.0/
x
sleuthkit-3.2.0/aclocal.m4
x sleuthkit-3.2.0/ChangeLog.txt
x
sleuthkit-3.2.0/config/
x sleuthkit-3.2.0/configure/
x
sleuthkit-3.2.0/configure.ac
x sleuthkit-3.2.0/docs/
x
sleuthkit-3.2.0/INSTALL.txt
x sleuthkit-3.2.0/licenses/
…
Next, the software must be
compiled. The following commands will complete this process; however, it must be kept in mind
that one will first need to “cd” into the sleuthkit directory that was created in the
previous step. Once again, most of the output for this command was removed.
Katie-Strzempkas-MacBook:Downloads kstrzemp$ cd
sleuthkit-3.2.0/
Katie-Strzempkas-MacBook:sleuthkit-3.2.0 kstrzemp$
./configure
checking for a BSD-compatible install… /usr/bin/install
-c
checking whether build environment is sane… yes
checking for a
thread-safe mkdir -p… config/install-sh -c -d
checking for gawk… no
checking for mawk…
no
checking for nawk… no
checking for awk… awk
checking whether make
sets $(MAKE)… yes
…
Katie-Strzempkas-MacBook:sleuthkit-3.2.0 kstrzemp$
make
Making all in tsk3
make all-recursive
Making all in base
/bin/sh …/…/libtool
- -tag=CC - -mode=compile gcc -DHAVE_CONFIG_H -I.
-I…/…/tsk3
-I…/… -Wall -g -O2 -I/usr/local/include -MT md5c.lo -MD -MP -MF
.deps/md5c.Tpo -c -o md5c.lo md5c.c
libtool: compile: gcc -DHAVE_CONFIG_H -I.
-I…/…/tsk3 -I…/… -Wall -g -O2 -I/usr/local/include
-MT md5c.lo -MD -MP -MF .deps/md5c.Tpo -c
md5c.c -fno-common -DPIC -o .libs/md5c.o
libtool: compile: gcc -DHAVE_CONFIG_H -I.
-I…/…/tsk3 -I…/… -Wall -g -O2 -I/usr/local/include -MT
md5c.lo -MD -MP -MF
.deps/md5c.Tpo -c md5c.c -o md5c.o >/dev/null 2>&1
…
Finally, the program can be
installed:
Katie-Strzempkas-MacBook:sleuthkit-3.2.0
kstrzemp$ sudo make install
Password:
Making install in
tsk3
Making install in base
make[3]: Nothing to be done for
‘install-exec-am’.
make[3]: Nothing to be done for
‘install-data-am’.
…
The two specific tools used to create a timeline, fls and mactime, should be
installed in /usr/local/bin/ (if installed on a Mac). If installed on Linux, scalpel will be
installed in /usr/bin/scalpel. This means that the commands can be run from any directory,
rather than having to “cd” into the folder in which the tools were downloaded or
installed.
Usage
Once the install is successfully completed, the first
step in timeline creation is to run the “fls” tool. “fls” goes through the entire directory
structure on an image and lists each file contained on the file system, both allocated and
unallocated. This command accepts several different arguments, and the general command
contains the following parameters:
fls -z EST5EDT -s 0 -m
‘/’ -f hfs -r ~/Desktop/iPhone_3GS.dmg >
~/Desktop/iPhone3GS.body
A
description of the options can be found in Table 6.2 ( Kubasiak, n.d
.).
The body file is simply a listing of all the
files, file paths, and metadata that were gathered using the fls command. This file is not
organized in a manner that allows an examiner to easily read its contents. A small section of
the body file is shown below. While the directory path and file can easily be read, the
remaining data are difficult to determine. Many of the numbers shown are various timestamps,
but let us hold off on analyzing this data until it is organized a little better.
0|/mobile/Library/Caches/com.apple.itunesstored/url-resolution.plist|1394|r/rrw-r- -r- -|501|501|1531|1282758918|1282758918|1282758918|1282758918
0|/mobile/Library/Caches/com.apple.mobile.installation.plist|6337|r/rrw-r--r--|501|501|10260|1282782974|1282782974|1282782974|1282782974
0|/mobile/Library/Caches/com.apple.notes.sharedstore.lock|721|r/rrwx- - - - - -
|501|501|0|1282757434|1282757434|1282757434|1282757434
0|/mobile/Library/Caches/com.apple.pep.configuration.plist|751|r/rrw-r- -r- -|501|501|924|1282757563|1282757563|1282757563|1282757563
0|/mobile/Library/Caches/com.apple.persistentconnection.cache.plist|11378|r/rrw-r- -r- -|501|501|294|1282927983|1282927983|1282927983|1282927983
0|/mobile/Library/Caches/com.apple.springboard.displaystate.plist|11058|r/rrw-r- -r- -|501|501|781|1282927293|1282927293|1282927293|1282927293
0|/mobile/Library/Calendar|143|d/drwx- - - - - -|501|501|0|1282755309|1282927980|1282927980|1282755309
0|/mobile/Library/Calendar/Calendar.sqlitedb|185|r/rrw-r- -r- -|501|501|110592|1282755315|1282927980|1282927980|1282755315
0|/mobile/Library/CallHistory|170|d/drwx- - - - - -|501|501|0|1282755314|1282926559|1282926559|1282755314
0|/mobile/Library/CallHistory/call_history.db|171|r/rrw-r- -r- -|501|501|28672|1282755314|1282926559|1282927981|1282755314
Next, the mactime command must be run in order to sort, merge, and
otherwise organize the data into a readable format so that an examiner can more easily
analyze the data. Similar to the fls command, mactime accepts a few different arguments with
the following general format:
mactime -b
~/Desktop/iPhone3GS.body -z EST5EDT -d >
~/Desktop/iPhone3GS-Timeline.csv
A
description of these parameters is shown in Table 6.3 ( Kubasiak, n.d
.).
Timeline analysis
Once the timeline.csv file is opened, the
examiner can see all actions taken on the device including the file, file path, whether it
was created, modified, or deleted, as well as the date and time on which this action
occurred. A timeline is especially helpful in an investigation when an examiner can jump to a
specific date and time to determine what actions took place. As you can see in Figure 6.1 , there are many different fields
within an fls timeline including Date, Size, Type, Mode, UID, GID, Meta, and File Name. While
some of those columns are fairly straightforward, let us discuss the contents within each
column and what they represent.

The Date column is pretty clear. It contains the
date and time (time zone specified when running the command) that the event occurred. The
next field contains the size of the file in bytes. Following that is the “Type” column which
plays an important role in the timeline analysis. These are the MACB times which tell whether
the specified file was modified, accessed, created, or birthed. Let us describe these a bit
further as they are very important in analyzing the data in this timeline. The MACB time can
be defined as follows (Kubasiak, 2009):
• m: modified
(metadata modified about the file)
• a: accessed (file itself has been accessed)
• c: changed (content of the
file has been changed)
• b: birth (file created)
The fourth column, Mode, contains file permissions in Unix format. Every file on the file
system has a set of permissions that determine read, write, and execute permissions for a
user, group, or other. The “user” is the owner of the file, a “group” may contain multiple
users that have elevated privileges on the file, and “other” refers to everyone else with an
account on that system. In Table 6.4 , file
permission values are explained ( Dartmouth,
n.d. ). So, looking back at the fourth column in Figure 6.1 , the file permissions show
“r/rrw-r- -r- -.” The user has “rw” or read and write access, while the group and others have
“r” or read access.
The UID and GID columns are the user and group
IDs, and the Meta column, or metadata address, is the inode number of the file, which
contains information about the object. Finally, the File Name column represents the path and
file name on which the action occurred.
As an example, let
us take a look at the timeline of events for August 25, 2010, around noon. A portion of this
time frame has been extracted from a timeline.csv file created using the fls and mactime
commands. For simplicity and readability, the following columns have been removed: Size,
Mode, UID, GID, and Meta.
Wed Aug 25 2010 12:02:02
.a.b /mobile/Media/DCIM/.MISC
Wed Aug 25 2010 12:02:02 .a.b
/mobile/Media/DCIM/.MISC/Info.plist
Wed Aug 25 2010 12:02:02 .a.b
/mobile/Media/DCIM/100APPLE
Wed Aug 25 2010 12:02:02 ma.b
/mobile/Media/DCIM/100APPLE/IMG_0001.JPG
Wed Aug 25 2010 12:02:03 .a.b
/mobile/Media/DCIM/100APPLE/.MISC
Wed Aug 25 2010 12:02:04 …c.
/mobile/Media/DCIM/100APPLE/IMG_0001.JPG
Wed Aug 25 2010 12:02:04 macb
/mobile/Media/DCIM/100APPLE/.MISC/IMG_0001.THM
Wed Aug 25 2010 12:02:04 macb
/mobile/Media/DCIM/100APPLE/.MISC/IMG_0001.BTH
Wed Aug 25 2010 12:04:27 .a.b
/root/Library/Caches/locationd/cells.plist
Wed Aug 25 2010 12:04:27 .a.b
/root/Library/Caches/locationd/cells-local.plist
Wed Aug 25 2010 12:04:27 .a.b
/root/Library/Caches/locationd/cache.plist
Wed Aug 25 2010 12:04:27 .a.b
/root/Library/Caches/locationd/stats.plist
Wed Aug 25 2010 12:11:01 .a.b
/mobile/Library/DataAccess
Wed Aug 25 2010 12:11:01 .a.b
/mobile/Library/Caches/Snapshots
Wed Aug 25 2010 12:16:02 macb
/mobile/Library/Preferences/com.apple.dataaccess.launchd
Wed Aug 25 2010 12:16:10
m.c. /mobile/Library/Keyboard
Wed Aug 25 2010 12:16:10 .a.b
/mobile/Library/Keyboard/dynamic-text.dat
Wed Aug 25 2010 12:16:57 macb
/mobile/Library/Mail/Mailboxes
Wed Aug 25 2010 12:16:57 macb
/mobile/Library/Mail/Mailboxes/.mboxCache.plist
Wed Aug 25 2010 12:23:30 .a.b
/mobile/Library/Mail/[email protected]@imap.gmail.com
Wed Aug 25 2010 12:23:30
.a.b
/mobile/Library/Mail/[email protected]@imap.gmail.com/.mboxCache.plist
Wed Aug 25 2010 12:23:31
macb /mobile/Library/Mail/AutoFetchEnabled
Wed Aug 25 2010 12:23:40 .a.b
/mobile/Library/Mail/MFData
Wed Aug 25 2010 12:30:20 .a.b
/mobile/Library/Notes
Wed Aug 25 2010 12:30:20 .a.b
/mobile/Library/Notes/notes.db
Wed Aug 25 2010 12:30:34 macb
/mobile/Library/Caches/com.apple.notes.sharedstore.lock
Wed Aug 25 2010 12:30:34
.a.b /mobile/Library/Notes/notes.idx
Wed Aug 25 2010 12:31:55 m.c.
/mobile/Library/Notes
Wed Aug 25 2010 12:31:55 m.c.
/mobile/Library/Notes/notes.db
Wed Aug 25 2010 12:31:55 m.c.
/mobile/Library/Notes/notes.idx
Wed Aug 25 2010 12:32:04 macb
/mobile/Library/Caches/Snapshots/com.apple.mobilenotes-Default.jpg
As you can see, the date and time is shown in the first column,
followed by the MACB times, and finally the path/file name in the third. Analyzing the files
within a timeline can be very time consuming, as it requires a lot of research to understand
what the files signify. For the first example, we will start with an easy one. Starting at
the top, we see a list of files within the /mobile/Media/DCIM folder. On the iPhone, this
folder contains photos either taken on the device or synced to the device. Let us jump
straight to the first jpeg file: IMG_0001.JPG. The timeline shows that this file was created,
accessed, and metadata modified at 12:02:04. It is known that photos within the “100APPLE”
folder were those taken from the on-board camera, so it would be safe to assume that this
particular photo was taken at that time. To see which picture this was, an examiner could
navigate to that file on the file system.
Moving down
further in the timeline, the Mail app appears to have been used in some way. It shows that
the viaforensicstest Gmail account was accessed and birthed (created) around 12:23 p.m. The
next line shows “AutoFetchEnabled” which is updated when the e-mail is synced between the
device and the mail server. It is likely that the Gmail account was originally synced with
the device at this time.
As a final example, let us look at
the final three lines. The timeline shows that the notes database was changed and the
metadata modified, which implies that a note was viewed, created, or deleted from that
particular database. The last line shows that a snapshot was taken of the notes application.
Snapshots of applications on the device are taken at random points in time (this is discussed
in more detail later in this chapter). This particular snapshot was most likely taken of the
Notes application while it was open. Assuming the examiner is able to get a physical image of
the device, this snapshot could very possibly be recovered through file carving.
This portion of the timeline contained merely 31 records out of the
several thousand that were available in the timeline.csv file. To truly benefit from timeline
analysis, it is important to have a specific time frame in mind and jump straight to that
section.
Forensic analysis
In many forensic
investigations, a logical acquisition or a logical file system analysis from a physical
acquisition will provide more than enough data for the case. However, certain cases require a
deeper analysis to find deleted data or unknown file structures. This is also necessary when
the file system has little or no support in standard forensic tools.
Understandably, many forensic analysts would prefer not to perform a deeper
analysis because it requires a significant amount of time, is extremely tedious, and requires
a fairly deep understanding and curiosity of data structures. But the results from this type
of analysis are often quite amazing, and important information learned from individual cases
might generally be applicable to many cases in the future.
For these reasons, every forensic analyst should be comfortable using a hex editor, if the
need arises. This allows the analysts to see exactly what data is being stored, to look for
patterns and, perhaps, to identify deleted or previously understood data structures.
This can be explained better with an example. First, it is essential
to install the following package on a Linux workstation:
kstrzempka@linux-wks:~$ sudo apt-get install hexedit
This is a very fast, terminal-based hex editor. Of course, one can use
any hex editor one is comfortable with. Next, the strings command is used to look at the
sms.db file, which is located in the /mobile/Library/SMS directory, to see whether some
deleted text messages are found. In this sample case, it is known that text messages to
3128781100 were deleted from the device. First, let us use strings to see whether we find that
phone number in the SQLite file:
kstrzempka@linux-wks:~$
strings - -all - -radix=x sms.db | grep -A 1 3128781100 | wc -l
28
In this command, we use the
pipe (“|”) operator, which takes the output from one command and sends it to the next command.
In this way, we can chain many commands together, which can be a very powerful analysis
technique. So the above command does the following:
1. Runs the
strings command on the SQLite database.
2. Takes the output of the strings command and runs it through
the grep program, which filters the output-based patterns provided. In this case, we
provide the phone number in question; however, you can create very powerful search strings
for grep including regular expressions.
3. Takes the output from the grep command and sees how many
lines are returned, but pipes the output to the word count program (“wc”). It then
instructs it to count by line instead of by word.
The result is that 28 entries for that phone number are found, obviously indicating
that the phone number was indeed communicated with on the device. Next, we want to take a
close look at the messages, so instead of piping the output to the wc program, we look at the
results directly and include one line of text after the phone number by adding the option “-A
1” to grep (also, we pipe the output to the “less” command in order to display it one page at
a time):
kstrzempka@linux-wks:~$ strings - -all - -radix=x
sms.db | grep -A 1 3128781100 | less
2462
+13128781100Lv
2471 Great. I may need to head out around
830
- -
24e0
+13128781100Lv
24f0 Sure ill meet you at the Italian place on the
corner
- -
2542
+13128781100Lv
2552 Dinner at 7?
- -
257c +13128781100Lv
258c Working until
6.
So, we
know we have a SQLite database with the targeted number and messages. Let us use SQLite 3 to
better understand the database. Here we will use a command line, but you can use a SQLite
viewer with a graphical front end if you prefer (such as SQLite Database Browser).
kstrzempka@linux-wks-001:~/Desktop$ sqlite3
mms-example.db
SQLite version 3.6.22
Enter “.help” for instructions
Enter SQL statements
terminated with a “;”
sqlite> .tables
_SqliteDatabaseProperties
msg_group
group_member msg_pieces
message
sqlite> .schema message
CREATE TABLE message
(ROWID INTEGER PRIMARY KEY AUTOINCREMENT, address TEXT, date INTEGER, text TEXT, flags
INTEGER, replace INTEGER, svc_center TEXT, group_id INTEGER, association_id INTEGER,
height INTEGER, UIFlags INTEGER, version INTEGER, subject TEXT, country TEXT, headers
BLOB, recipients BLOB, read INTEGER);
CREATE INDEX message_flags_index ON
message(flags);
CREATE INDEX message_group_index ON message(group_id,
ROWID);
CREATE TRIGGER delete_message AFTER DELETE ON message WHEN NOT read(old.flags) BEGIN
UPDATE msg_group SET unread_count = (SELECT unread_count FROM msg_group WHERE ROWID =
old.group_id) - 1 WHERE ROWID = old.group_id; END;
CREATE TRIGGER delete_newest_message AFTER
DELETE ON message WHEN old.ROWID = (SELECT newest_message FROM msg_group WHERE ROWID =
old.group_id) BEGIN UPDATE msg_group SET newest_message = (SELECT ROWID FROM message WHERE
group_id = old.group_id AND ROWID = (SELECT max(ROWID) FROM message WHERE group_id =
old.group_id)) WHERE ROWID = old.group_id; END;
CREATE TRIGGER delete_pieces AFTER DELETE
ON message BEGIN DELETE from msg_pieces where old.ROWID == msg_pieces.message_id;
END;
CREATE TRIGGER insert_newest_message AFTER INSERT ON message WHEN new.ROWID >=
IFNULL((SELECT MAX(ROWID) FROM message WHERE message.group_id = new.group_id), 0) BEGIN
UPDATE msg_group SET newest_message = new.ROWID WHERE ROWID = new.group_id;
END;
CREATE TRIGGER insert_unread_message AFTER INSERT ON message WHEN NOT read(new.flags)
BEGIN UPDATE msg_group SET unread_count = (SELECT unread_count FROM msg_group WHERE ROWID
= new.group_id) + 1 WHERE ROWID = new.group_id; END;
CREATE TRIGGER
mark_message_read AFTER UPDATE ON message WHEN NOT read(old.flags) AND read(new.flags)
BEGIN UPDATE msg_group SET unread_count = (SELECT unread_count FROM msg_group WHERE ROWID
= new.group_id) - 1 WHERE ROWID = new.group_id; END;
CREATE TRIGGER
mark_message_unread AFTER UPDATE ON message WHEN read(old.flags) AND NOT read(new.flags)
BEGIN UPDATE msg_group SET unread_count = (SELECT unread_count FROM msg_group WHERE ROWID
= new.group_id) + 1 WHERE ROWID = new.group_id; END;
sqlite> .mode
line
sqlite> select * from message limit 1;
ROWID =
4
address = (312) 878-1100
date = 1282844546
text =
Sure is a nice day out
flags =
3
replace = 0
svc_center =
group_id = 3
association_id = 1282844546
height
= 0
UIFlags = 4
version = 0
subject
=
country = us
headers =
recipients
=
read = 1
sqlite>
.quit
In the previous sqlite3
sessions, the following was done to better understand the data:
1. sqlite3 sms.db: Opened database for querying.
2. .tables: Listed off the tables in the
database.
3.
.schema sms: Focused on the sms table and asked database for the structure (schema) of the
table. The schema was quite long and truncated.
4. .mode line: Set the display mode to line for
easier viewing.
5. select * from sms limit 1: Instructed sqlite3 to display one record to the
screen (limit 1) from the sms table showing all columns.
6. .quit: Exited the
program.
So, we can now see that there are
a number of fields in the sms table, but that after the phone number (address), there is a
timestamp, followed by the text content. Using a hex editor, let us see whether we can
determine the date/time stamp from the message regarding the meeting at the Italian place on
the corner. First, let us open the sms.db in the hex editor we have just installed:
kstrzempka@linux-wks:~$ hexedit
sms.db
which will then show the
beginning of the file in hex as well as the printable ASCII strings in the right
column:
00000000 53 51 4C 69 74 65 20 66 6F 72 6D 61 74 20 33 00 SQLite format
3.
00000010 08 00 01 01 00 40 20 20 00 00 00 FA
00 00 00 00 ……@
………
00000020 00 00 00 00 00 00 00 00 00 00 00 0F
00 00 00 01 …………….
00000030 00 00 00 00 00 00 00 0C 00 00 00 01
00 00 00 00 …………….
00000040 00 00 00 00 00 00 00 00 00 00 00 00
00 00 00 00 …………….
00000050 00 00 00 00 00 00 00 00 00 00 00 00
00 00 00 00 …………….
00000060 00 00 00 00 05 00 00 00 01 07 FB 00
00 00 00 0E …………….
00000070 07 FB 05 72 04 C6 04 2D 03 0E 02 A9
02 4F 01 3E …r…-……O.>
00000080 00 00 00 00 00 00 00 00 00 00 00 00
00 00 00 00 …………….
00000090 00 00 00 00 00 00 00 00 00 00 00 00
00 00 00 00 …………….
000000A0 00 00 00 00 00 00 00 00 00 00 00 00
00 00 00 00 …………….
000000B0 00 00 00 00 00 00 00 00 00 00 00 00
00 00 00 00 …………….
000000C0 00 00 00 00 00 00 00 00 00 00 00 00
00 00 00 00 …………….
000000D0 00 00 00 00 00 00 00 00
00 00 00 00 00 00
00 00 …………….
000000E0 00 00 00 00 00 00 00 00 00 00 00 00
00 00 00 00 …………….
000000F0 00 00 00 00 00 00 00 00
00 00 00 00 00 00
00 00 …………….
00000100 00 00 00 00 00 00 00 00 00 00 00 00
00 00 00 00 …………….
00000110 00 00 00 00 00 00 00 00
00 00 00 00 00 00
00 00 …………….
00000120 00 00 00 00 00 00 00 00 00 00 00 00
00 00 00 00 …………….
00000130 00 00 00 00 00 00 00 00
00 00 00 00 00 00
82 0E …………….
00000140 0A 07 1B 37 1B 01 83 53 74 72 69 67 67 65 72 69
…7…Striggeri
00000150 6E 73 65 72 74 5F 75 6E 72 65 61 64 5F 6D 65 73
nsert_unread_mes
00000160 73 61 67 65 6D 65 73 73 61 67 65 00
43 52 45 41 sagemessage.CREA
We
can press “Enter” to specify an offset in the file. In this case, the previous strings command
included the - -radix=x, so we have the offset in hex (0x24F0) to be searched:
000000A0 00 00 00 00 00 00 00 00 00 00 00 00 00
00 00 00 00 00 00 00 …………………
000000B4 00 00 00 00 00 00 00 00 00 00 00 00 00
00 00 00 00 00 00 00 …………………
000000C8 00 00 00 00 00 00 00 00 00 00 00 00 00
00 00 00 00 00 00 00 …………………
000000DC 00 00 00 00 00 00 00 00 00 00 00 00 00
00 00 00 00 00 00 00 …………………
New position ?
0x24F0
0000012C 00 00 00 00 00
00 00 00 00 00 00 00 00 00 00 00 00 00 82 0E …………………
00000140 0A 07 1B 37 1B 01 83 53 74 72 69 67 67 65 72 69 6E 73 65 72
…7…Striggerinser
00000154 74 5F 75 6E 72 65 61 64 5F 6D 65
73 73 61 67 65 6D 65 73 73 t_unread_messagemess
00000168 61 67 65 00 43 52 45 41 54 45 20 54 52 49 47 47 45 52 20 69 age.CREATE TRIGGER
i
The hex editor is extremely
responsive and jumps to the offset:
000024B8 79 20 6F 66 20 74 69 6D 65 20 03 00 04 00 00 00 00 75 73 01 y
of time …….us.
000024CC 60 08 12 00 25 04 75 01 01 00 01
01 01 01 01 00 11 00 00 01 ‘…%.u………….
000024E0 2B 31 39
32 30 32 37 37 31 38 36 39 4C 76 AC 01 53 75 72 65
+19202771869Lv…Sure
000024F4 20 69 6C 6C 20 6D 65 65 74 20 79
6F 75 20 61 74 20 74 68 65 ill meet you at
the
00002508 20 49 74 61 6C 69 61 6E 20 70 6C 61 63 65
20 6F 6E 20 74 68 Italian place on
th
0000251C 65 20 63 6F 72 6E 65 72 02 00 04 00 00 00
00 75 73 01 38 07 e corner…….us.8.
00002530 12 00 25 04 25
01 01 00 01 01 01 01 01 00 11 00 00 01 2B 31 …%.%………….+1
00002544 39 32 30 32 37 37 31 38 36 39 4C 76 AB DC 44 69 6E 6E 65 72
9202771869Lv…Dinner
00002558 20 61 74 20 37
3F 03 00 04 00 00 00 00 75 73 01 3C 06 12 00 at
7?…….us.<…
0000256C 25 04 2D 01 01 00 01 01 01 01 01
00 11 00 00 01 2B 31 39 32 %.-………….+192
00002580 30 32 37
37 31 38 36 39 4C 76 AB BE 57 6F 72 6B 69 6E 67 20 02771869Lv…Working
00002594 75 6E 74 69 6C 20 36 2E 02 00 04 00 00 00 00 75 73 01 49 05
until 6………us.I.
Looking at the
hex data above, we can see the phone number and it ends at 0x24EB. After that, we should see a
timestamp field, which takes up the next 4 bytes. In hex, this is 0x4C76AC01. When translated
to decimal, the resulting number is 1282845697. Finally, we can use a couple of techniques to
convert this time to a date/time more easily read by examiners. One technique is to use the
built-in date command on a Mac:
Katie-Strzempkas-MacBook:~ kstrzemp$ date -r @ 1282845697
Thu Aug 26 12:01:37 CDT
2010
The date command
automatically displays the date in the current system timezone. Another quick way to convert
the time is to use a website designed to convert Unix Epoch time at http://www.epochconverter.com/ . This site handles
both Unix epoch in seconds and milliseconds. To convert, copy the timestamp into the website
text box and click “Timestamp to Human date”:
A third
timestamp conversion technique that can be used is the CFAbsoluteTimeConverter utility. On an
Apple device, Core Foundation (CF) measures time in seconds, similar to Unix Epoch time (which
is the number of seconds since January 1, 1970). The CFAbsoluteTime data type represents the
number of seconds since January 1, 2001. The CFAbsoluteTimeConverter software will convert
only the OS X Epoch time into a human-readable time (Apple Inc., 2007 ). If a Unix Epoch
timestamp is converted using this utility, the date and time will be accurate, but the year
will be 31 years off. The timestamps recovered from the sms.db are in Unix Epoch time;
however, many of the timestamps within files on the iPhone and other iOS devices are in the
unique OS X Epoch format. Be sure to pay attention to the differences when attempting to
convert those numbers.
For the example shown in Figure 6.2 , a different timestamp is used
than in the previous examples as it requires an OS X Epoch timestamp for an accurate
conversion. The timestamp selected is from the Safari History plist file.

iPhone data storage locations
When an iPhone dmg is first
mounted, the following directory structure is displayed at the root of the device:
├── CommCenter
├── db
├──
ea
├── empty
├── folders
├── Keychains
├── log
├──
logs
├── Managed Preferences
├── mobile
├── MobileDevice
├──
msgs
├── preferences
├── root
├── run
├── tmp
└──
vm
While evidence is scattered
throughout these directories, a great majority of the data is going to be found in the /mobile
folder, which consists of three subdirectories: Applications, Library, and Media. In the
sections that follow, each of these subdirectories will be broken down and its contents
described in detail.
Default applications
Most of the data stored within the
default applications that arrive with the device are going to be found in the /mobile/Library
folder. Let us take a look at the breakdown of the directories within:
kstrzempka@linux-wks:/home/kstrzempka/Desktop/iPhoneapp-mount/mobile# tree
-L 2 Library/
Library/
├── AddressBook
│ ├──
AddressBookImages.sqlitedb
│ └──
AddressBook.sqlitedb
├── Caches
│ ├──
AccessToMigrationLock
│ ├──
AccountMigrationInProgress
│ ├──
com.apple.AppStore
│ ├──
com.apple.itunesstored
│ ├──
com.apple.mobile.installation.plist
│ ├──
com.apple.notes.sharedstore.lock
│ ├──
com.apple.pep.configuration.plist
│ ├──
com.apple.persistentconnection.cache.plist
│ ├──
com.apple.springboard.displaystate.plist
│ ├──
com.apple.UIKit.pboard
│ ├──
com.apple.WebAppCache
│ ├──
Maps
│ ├── MapTiles
│ ├── Safari
│ ├──
SBShutdownCookie
│ ├── Snapshots
│ ├── SpringBoardIconCache
│ └── SpringBoardIconCache-small
├──
Calendar
│ └── Calendar.sqlitedb
├──
CallHistory
│ └──
call_history.db
├── Carrier Bundle.bundle -> /System/Library/Carrier
Bundles/310410
├── com.apple.iTunesStore
│ └──
LocalStorage
├── com.apple.itunesstored
│ ├──
itunesstored2.sqlitedb
│ └──
itunesstored_private.sqlitedb
├── ConfigurationProfiles
│ ├── EASPolicies.plist
│ ├── PasswordHistory.plist
│ └── PayloadManifest.plist
├──
Cookies
│ ├──
com.apple.itunesstored.plist
│ └──
Cookies.plist
├── DataAccess
│ ├──
AccountInformation.plist
│ ├──
ASFolders-492BF7DC-7739-47B8-9B5D-01111DF482C9
│ └──
ASFolders-D9D2E90A-5A76-4C92-B598-012C2BA348F6
├── Keyboard
│ └── dynamic-text.dat
├── Logs
│ ├── ADDataStore.sqlitedb
│ ├── ADDataStore.sqlitedb-journal
│ ├── AppleSupport
│ ├──
CrashReporter
│ └──
MobileInstallation
├── Mail
│ ├──
AutoFetchEnabled
│ ├── Envelope
Index
│ ├──
[email protected]@imap.gmail.com
│ ├──
Mailboxes
│ ├──
metadata.plist
│ └── MFData
├──
Maps
│ ├── Directions.plist
│ └── History.plist
├── MobileInstallation
│ └── ApplicationAttributes.plist
├──
Notes
│ ├── notes.db
│ └── notes.idx
├── Operator Bundle.bundle ->
/System/Library/Carrier Bundles/310410
├── Preferences
│ ├── com.apple.accountsettings.plist
│ ├── com.apple.aggregated.plist
│ ├── com.apple.AppStore.plist
│ ├── com.apple.AppSupport.plist
│ ├── com.apple.apsd.plist
│ ├── com.apple.BTServer.airplane.plist
│ ├── com.apple.BTServer.plist
│ ├── com.apple.carrier.plist -> /System/Library/Carrier
Bundles/310410/carrier.plist
│ ├──
com.apple.commcenter.plist
│ ├──
com.apple.dataaccess.launchd
│ ├──
com.apple.GMM.plist
│ ├──
com.apple.iqagent.plist
│ ├──
com.apple.itunesstored.plist
│ ├──
com.apple.locationd.plist
│ ├──
com.apple.Maps.plist
│ ├──
com.apple.mobilecal.alarmengine.plist
│ ├──
com.apple.mobilecal.plist
│ ├──
com.apple.MobileInternetSharing.plist
│ ├──
com.apple.mobileipod.plist
│ ├──
com.apple.mobilemail.plist
│ ├──
com.apple.mobilenotes.plist
│ ├──
com.apple.mobilephone.plist
│ ├──
com.apple.mobilephone.speeddial.plist
│ ├──
com.apple.mobilesafari.plist
│ ├──
com.apple.mobileslideshow.plist
│ ├──
com.apple.MobileSMS.plist
│ ├──
com.apple.mobile.SyncMigrator.plist
│ ├──
com.apple.mobiletimer.plist
│ ├──
com.apple.operator.plist -> /System/Library/Carrier
Bundles/310410/carrier.plist
│ ├──
com.apple.PeoplePicker.plist
│ ├──
com.apple.persistentconnection.plist
│ ├──
com.apple.preferences.datetime.plist
│ ├──
com.apple.preferences.network.plist
│ ├──
com.apple.Preferences.plist
│ ├──
com.apple.springboard.plist
│ ├──
com.apple.voicemail.plist
│ ├──
com.apple.weather.plist
│ ├──
com.apple.youtubeframework.plist
│ ├──
com.apple.youtube.plist
│ └──
dataaccessd.plist
├── RemoteNotification
│ └──
Clients.plist
├── Safari
│ ├──
Bookmarks.plist
│ ├── History.plist
│ └── SuspendState.plist
├──
SMS
│ ├── Drafts
│ ├── Parts
│ ├──
sms.db
│ └── sms-legacy.db
├──
Voicemail
│ ├── 1.amr
│ ├── 4.amr
│ ├──
_subscribed
│ └── voicemail.db
├──
Weather
├── WebClips
├── WebKit
│ ├──
Databases
│ └── LocalStorage
└──
YouTube
45 directories, 85 files
As
seen from this listing, many of the file names are fairly straightforward. The AddressBook,
Calendar, Call History, Notes, SMS, and Voicemail data are all stored in a database. These
files can be opened within SQLite Database Browser (as demonstrated in Chapter 3 ) to
view the data contents within the tables. As an example, let us take a look at the
calendar.sqlitedb file. When opened in a SQLite browser, the database structure is shown,
including the table names and schema (see Figure
6.3 ).

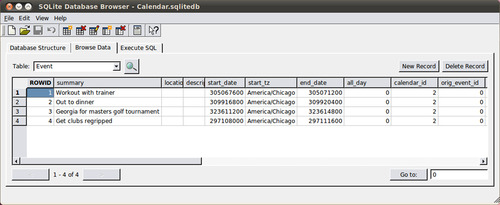
Next, click on “Browse Data” to select a specific
table. As can be seen from the database structure, this particular database contains a large
number of tables. Sometimes it is necessary to go through each table one by one in order to
see what kind of data can be recovered from each. The calendar events are going to be found in
the “Event” table. Here, a summary of the event is shown as well as a start date, end date,
time zone, and other optional information that the user may or may not have entered (such as
location and description). In Figure 6.4 ,
the Event table is displayed with a few items populated. The timestamp used in this particular
file is the OS X Epoch time described in the previous section; therefore, the
CFAbsoluteTimeConverter utility is required.
Also contained in the “Library” directory are
default app files in the form of plists. These applications include Google Maps directions and
history, Safari web browser bookmarks and history, and numerous preference files containing
items such as speed dial numbers, YouTube data, and a list of installed applications. By
selecting a plist and hitting the space bar, the examiner can quickly get a preview of the
file. This is the quickest way to view the data contents. However, it is just a preview, so if
the examiner wishes to search the text within the plist, it will have to be opened in
TextEdit, Text Wrangler, or another text editor. As an example of viewing and interpreting
data within a plist, the Safari History.plist file will be looked at.
First, since it is a binary plist, it will need to be converted to XML (as
described in Chapter 3 ). Since the dmg is mounted as read-only, this file will first need to be
copied elsewhere, in this case to the desktop, prior to converting to an ASCII
plist.
Katie-Strzempkas-MacBook:Desktop kstrzemp$ plutil
-convert xml1 History.plist
Now,
it is in XML format and can be easily read. The beginning section of this file is shown in the
following text:
<?xml version=“1.0”
encoding=“UTF-8”?>
<!DOCTYPE plist PUBLIC “-//Apple//DTD PLIST
1.0//EN”
“http://www.apple.com/DTDs/PropertyList-1.0.dtd”>
<plist
version=“1.0”>
<dict>
<key>WebHistoryDates</key>
<array>
<dict>
<key></key>
<string>http://viaforensics.com</string>
<key>D</key>
<array>
<integer>1</integer>
</array>
<key>WebViewportArguments</key>
<dict>
<key>height</key>
<real>-1</real>
<key>initial-scale</key>
<real>-1</real>
<key>maximum-scale</key>
<real>-1</real>
<key>minimum-scale</key>
<real>-1</real>
<key>user-scalable</key>
<real>-1</real>
<key>width</key>
<real>-1</real>
</dict>
<key>lastVisitedDate</key>
<string>304467798.6</string>
<key>redirectURLs</key>
<array>
<string>http://viaforensics.com</string>
</array>
<key>title</key>
<string>viaForensics</string>
<key>visitCount</key>
<integer>1</integer>
</dict>
Within History.plist, each visited website is organized within its own
section, noted by the <dict> and </dict> tags. Within these tags, the website URL
and last visited date are both shown as a string. The date is in OS X Epoch time, so it will
need to be converted using CFAbsoluteTimeConverter. From the information shown here, it can be
said that the user visited http://viaforensics.com on
Thursday, August 26, 2010, at 6:21:50 PM (CST).
The Library
directory contains a significant amount of valuable data in plist, SQLite, and other formats.
Many of the default applications that are found in this folder have been analyzed and
described in great detail. These results are included in the “iPhone Application Analysis and
Reference” section later in this chapter.
Moving on to the
“Media” folder, this is where any type of photo, video, or music files are stored. Here, the
subdirectories are broken down further:
kstrzempka@linux-wks:/home/kstrzempka/Desktop/iPhoneapp-mount/mobile# tree -L 3
Media/
Media/
├── com.apple.itdbprep.postprocess.lock
├──
com.apple.itunes.lock_sync
├── DCIM
│ └──
100APPLE
│ ├── IMG_0001.JPG
│ ├── IMG_0002.JPG
│ ├──
IMG_0003.JPG
│ └── IMG_0004.JPG
├──
Downloads
│ └──
manifest.plist
├── iTunes_Control
│ ├──
iTunes
│ │ ├──
IC-Info.sidb
│ │ ├── IC-Info.sidv
│ │ ├── iTunesCDB
│ │
├── iTunesControl
│ │ ├──
iTunesDB
│ │ ├── iTunes Library.itlp
│ │ ├── iTunesPrefs
│ │
├── iTunesPrefs.plist
│ │ ├──
PhotosFolderAlbums
│ │ ├── PhotosFolderName
│ │
├── PhotosFolderPrefs
│ │ ├──
Rentals.plist
│ │ ├── Ringtones.plist
│ │ └── VoiceMemos.plist
│ └──
Music
│ ├── F00
│ ├──
F01
│ ├── F02
│ ├──
F03
│ ├── F04
│ ├──
F05
│ ├── F06
├── Photos
│ ├── Photo Database
│ └──
Thumbs
│ ├── F3004_1.ithmb
│ ├── F3008_1.ithmb
│ ├──
F3009_1.ithmb
│ └── F3011_1.ithmb
├──
Podcasts
├── Purchases
├── Recordings
└── Safari
└── goog-phish-shavar.dat
Pictures taken from the device itself, using the on-board camera, are
stored in one central location: Media/DCIM/100Apple. When a photo is taken, the file is stored
as a jpeg in that location, with a filename of “IMG_000X.JPG.” The number in the file name
increments by 1 with each new picture taken. When a file is deleted and a new picture is
taken, the number of the deleted file will not be reused, but the next number in sequence will
be assigned. For example, looking at the previous output, images IMG_0001 through IMG_0004 are
listed. If IMG_003 is deleted, this number will not be reused. Instead, IMG_0005 will be the
file name assigned to the next photo. Since the device uses this technique to save files, it
is easy to identify whether any photos were deleted by simply noting if there are any numbers
missing.
While this is not shown in the “tree” output, there
is also a special location for screen shots that have been taken from the device. On the
iPhone, if the user holds down the “Home” button and presses “Power,” a screen shot of the
phone is taken and stored. These images are saved in Media/DCIM/999Apple.
A third storage format for photos involves those pictures that were
synced to the device through iTunes. These are stored in a Photo Database on the iPhone (as
shown in the “tree” output under Photos > Photo Database). On a Mac, this database can be
opened within the iPhoto application in order to view the photos within.
Prior to the iPhone 3GS, videos could not be taken from the device
without first downloading an app that would record video. A standard camera came on the
device, but recording videos was not an option. The previous “tree” output was from an iPhone
3G device, therefore videos were not included. For iPhone 3GS and later, an on-board video
camera exists. When a video is taken on the device, it is stored in the /DCIM/100APPLE folder
along with the photos.
Music that was synced through iTunes
is located in Media/iTunes_Control/Music, and the actual audio files are stored within the
F00, F01, F02, etc. subfolders.
Downloaded apps
The final
subdirectory within the “mobile” folder is Applications. Here, a unique directory is created
for each application downloaded to the device. Let us take a look at the hierarchical
structure of this folder before discussing further.
kstrzempka@linux-wks:/home/kstrzempka/Desktop/iPhoneapp-mount/mobile# tree -L 2
Applications/
Applications/
├──
04DA17CB-0D8E-469F-83CD-B928DF15A64E
│ ├──
Documents
│ ├──
foursquare.app
│ ├── iTunesArtwork
│ ├── iTunesMetadata.plist
│ ├── Library
│ └──
tmp
├── 2FDA6380-1869-4797-B999-0B59359C4288
│ ├──
Documents
│ ├── Groupon.app
│ ├── iTunesArtwork
│ ├──
iTunesMetadata.plist
│ ├──
Library
│ └── tmp
├──
59FA89C0-FC51-45F6-8270-93B624473CD9
│ ├──
AroundMe.app
│ ├── Documents
│ ├── iTunesArtwork
│ ├──
iTunesMetadata.plist
│ ├──
Library
│ └── tmp
├──
65E4725B-3E7F-4AB1-B539-5F46FCCF3D27
│ ├──
Documents
│ ├── iTunesArtwork
│ ├── iTunesMetadata.plist
│ ├── Library
│ ├──
Taxi_Magic.app
│ └── tmp
├──
974F6DC6-BD41-445C-838E-4DA64C4FB158
│ ├──
Documents
│ ├──
golfputtpro.app
│ ├── iTunesArtwork
│ ├── iTunesMetadata.plist
│ ├── Library
│ └──
tmp
└── CEBBA659-F8BC-4C71-9DBD-2CCDB74D4B4F
├── Documents
├── Facebook.app
├── iTunesArtwork
├──
iTunesMetadata.plist
├── Library
└──
tmp
When an app
is downloaded, a directory is created in the Applications folder, which contains the
application executable, documents, and other files needed for the app to run. On the phone
from which the sample output was extracted, there were six third-party applications downloaded
on the device: Foursquare, Groupon, AroundMe, Taxi Magic, Golf Putt Pro, and
Facebook.
A general hierarchy of folders (and some files) is
consistent across all applications. In this section, the standard folders and files are
discussed; however, the “iPhone Application Analysis and Reference” section will contain a
detailed analysis of many of the popular apps available for download.
First, the application itself is installed in the root of its unique application
folder. This file is a bundle that contains several files needed for the application to run.
The following text is a listing of the files contained within the “AroundMe” app. While many
of the files are unique to that application, some common files are found across most
third-party applications including Info.plist, ResourceRules.plist, and others (however, the
content within these files will always be unique to each app).
kstrzempka@linux-wks:/home/kstrzempka/Desktop/iPhoneapp-
mount/mobile/Applications/59FA89C0-FC51-45F6-8270-93B624473CD9/AroundMe.app#
ls
100000.png 120001.png 122200.png 320102.png 330011.png
333000.pngdist.plist Italian.lproj ruby
110000.png 120002.png
122201.png 320200.png 330012.png 333001.png email.png ja.lproj SC_Info
110001.png 120010.png
122202.png 320201.png 330020.png 333002.png emptylocation.png loginbackground.png searchit.png
110002.png 120011.png 123000.png 320202.png 330021.png 333300.png English.lproj MainWindow.nib SearchLocationView.nib
110010.png 120012.png 123001.png 320300.png 330022.png 333301.png FacebookView.nib [email protected] SearchView.nib
110011.png 120020.png 123002.png 320301.png 330030.png 333302.png fancy
mapcompassarrow.png setting.png
110012.png 120021.png
23300.png 320302.png 330031.png applestores.db FavoriteView.nib [email protected] [email protected]
110030.png 120022.png 123301.png 321000.png 330032.png arcompassglass.png FBConnect.bundle mapcompassdial.png settings.png
110031.png 120030.png 123302.png 321001.png 330100.png arfunnel.png [email protected] [email protected] SettingsView.nib
110032.png 120031.png 300002.png 321002.png 330101.png
ARItemBackground.png forward.png mapcompassglass.png simulator.plist
110100.png 120032.png 300003.png 321100.png 330102.png ARItem.nib frameimage.png mark1.png Spanish.lproj
110101.png 120100.png
300004.png 321101.png 330200.png AroundMe French.lproj mark2.png symbol-backgroundbw.png
110102.png 120101.png 300005.png 321102.png 330201.png AroundMe_114.png German.lproj mark3.png symbol-background.png
110300.png 120102.png 300006.png 322000.png 330202.png AroundMe_72.png
[email protected] mark4.png touchlocallogo.png
110301.png 120200.png 300204.png 322001.png
330300.png AroundMeBeta_114.png globeIcon.png ModalWaitView.nib
transportuk.db
110302.png 120201.png 320000.png 322002.png
330301.png AroundMeBeta_72.png googleads-bw-de.png [email protected]
turnlandscape.png
111000.png 120202.png
320001.png 322200.png 330302.png AroundMeBeta.png googleads-bw-en.png [email protected] warburgbg.png
111001.png 120300.png 320002.png 322201.png 331000.png
AroundMe.png googleads-bw-es.png moreArrow.png WarburgDetail.nib
111002.png 120301.png 320010.png 322202.png 331001.png black
googleads-bw-fr.png more.png warburgicon.png
111100.png 120302.png 320011.png 323000.png
331002.png CategoryView.nib googleads-bw-it.png NewTweetViewController.nib Warburg.nib
111101.png 121000.png 320012.png 323001.png
331100.png classic googleads-de.png [email protected] warburg.png
111102.png 121001.png 320020.png 323002.png
331101.png CodeResources googleads-en.png phone.png weatherbackgroundbw.png
113000.png 121002.png
320021.png 323300.png 331102.png _CodeSignature
googleads-es.png PhotoDetailView.nib weatherbackground.png
113001.png 121100.png
320022.png 323301.png 332000.png coffeebreak.png googleads-fr.png PhotoView.nib WeatherView.nib
113002.png 121101.png 320030.png 323302.png 332001.png
[email protected] googleads-it.png PkgInfo WikipediaView.nib
113300.png 121102.png 320031.png 330000.png 332002.png Default.png
google.png PrivacyView.nib WikipediaWebview.nib
113301.png 122000.png 320032.png 330001.png
332200.png DetailTextView.nib imageplaceholder.png ResourceRules.plist
113302.png 122001.png
320100.png 330002.png 332201.png DetailView.nib Info.plist RetailStoresView.nib
120000.png 122002.png 320101.png 330010.png 332202.png directionarrow.png Info.png RootViewController.nib
Each
application also contains a Documents, Library, and tmp folder. The files within those folders
will vary depending on the application. As an example, Foursquare is an application that
allows users to “check-in” to various businesses in order to notify their friends (possibly
through Facebook) about where they are. As a Foursquare user, an individual can search for
nearby businesses and check into that location. Foursquare's Documents folder contains an
archive file containing the locations where the user had previously checked in. On the other
hand, the Facebook application's Documents folder contains a “Friends” database, which
contains a listing of the user's Facebook friends.
The
Library folder contains many other subdirectories as well, including Caches, Cookies, and
Preferences (though additional folders/files may be included depending on the application).
The Preferences folder typically contains a plist file, such as com.ApplicatoinName.plist.
This plist often times will have the username (and sometimes password) which is used to login
to that application. Other general application data can also be recovered from this file such
as version, application description, and even GPS info.
Finally, the tmp folder is typically empty since the device is not imaged while an
application is running. If an iPhone was jailbroken and physically imaged while an application
transaction was in progress, it is possible that temporary files would be stored in this
folder.
Other
Besides the default applications that arrive on the
iPhone as well as those downloaded through the iTunes store, other relevant data can also be
recovered from the device, which can be very important in an investigation.
Geographical location data
Various applications will either ask the user if they
wish to cache their current location, or the apps will store GPS data behind the scenes
depending on the functionality of the app. For example, both the iPhone's camera and video
camera will store latitude and longitude coordinates which describe where the device was at
the time the photo or video was taken. The Google Maps application that arrives on the device
by default also stores the user's current location as well as any other location that was
searched within the application.
On top of these standard
applications, there are countless apps available for download that will track GPS
coordinates.
The consolidated.db file is new in iOS 4, and
there is not a significant amount of documented information on the topic. This file stores
GPS and Wi-Fi data in one central location, presumably to improve device efficiency since it
now only has to access one file in order to send or retrieve location data. The database
contains the following tables. The two that have been found to be the most beneficial are the
WifiLocation and CellLocation tables.
Katie-Strzempkas-MacBook:~ kstrzemp$ sqlite3
~/Desktop/consolidated.db
SQLite version 3.6.12
Enter “.help” for
instructions
Enter SQL statements terminated with a “;”
sqlite>
.tables
Cell Fences
CellLocation Location
CellLocationBoxes LocationHarvest
CellLocationBoxes_node LocationHarvestCounts
CellLocationBoxes_parent Wifi
CellLocationBoxes_rowid WifiLocation
CellLocationCounts WifiLocationCounts
CellLocationHarvest WifiLocationHarvest
CellLocationHarvestCounts WifiLocationHarvestCounts
CompassSettings
sqlite>
The WifiLocation table contains the MAC address, timestamp, latitude and longitude
coordinates, and other fields that can determine which wireless locations the device was
connected to at a certain point in time. As an example, let us analyze the first row of the
table shown in Figure 6.5 .

First, we will need to translate the timestamp
displayed in the first column (306439818.409918). Using the CFAbsoluteTimeConvert (as these
times are in OS X Epoch format), the time converts to Friday, September 17, 2010, at 01:10:18
p.m.
Next, we will need to look up the latitude and
longitude coordinates provided in order to determine the actual location. There are various
websites available that will translate these coordinates into an address; however, an easy
way is to simply go to Google Maps ( http://maps.google.com ). Here, you will need to enter in the coordinates in the
following format: +latitude, −longitude (see Figure 6.6 ).

A similar conversion can be done using the
CellLocation table. Instead of Wi-Fi locations, this table contains cell tower logs,
timestamps, and GPS coordinates (see Figure
6.7 ). The cell tower logs are displayed as MCC, MNC, LAC, and CI:

• MCC: Mobile Country Code
• MNC: Mobile Network
Code
• LAC:
Location Area Code
• CI: Cell ID
Using the
timestamp and GPS coordinates within this table, a similar conversion can be done to
determine which cellular tower the device was connected to at a certain point in
time.
Using these resources, we can determine that the
device was possibly in Oak Park, IL, on Friday, September 17, 2010, at 01:10:18 p.m. You
might be wondering why this is not definitive. With this file, it is understood that several
different coordinates are populated into the database at one time. So, according to the
timestamps and location, the device could be in several different areas at the same time
(however, these areas are typically within a few miles of one another). This could be because
the database is not constantly being updated as a new location is populated therefore, there
might be 3, 4, or even 20 locations updated into the table at one time. For this reason, it
is important not to rely solely on the timestamps until the consolidated.db file is
researched further and better understood.
Do not rely
solely on the timestamps within the consolidated.db file. Several different records can
be populated into the database at the same time. If the timestamps within all records
were converted, this would show that the device was in multiple locations at one time.
The information in this database should be used as a general
guideline.
In the WiFiLocation
table, there were 404 records on a lightly used iPhone 3GS. Imagine having to manually
convert the timestamp and GPS coordinates for each record in order to find the right one. It
has been mentioned that a script was developed that would parse the data into Google Earth,
but there is no word on its release ( iPhone
GPS Data…, 2011 ). Until this file is better understood and tools developed to extract
and convert the data, the information in this database should be used cautiously.
Within the file system, another area that contains geographical
information on the device and its apps is the “locationd” folder. This folder is located in
/private/var/root/Library/Caches/locationd. The locationd folder contains many different
files:
kstrzempka@linux-wks:/home/kstrzempka/Desktop/iPhoneapp-mount/root/Library/Caches#
tree locationd/
locationd/
├── cache.plist
├── cells-local.plist
├──
cells.plist
├── clients-b.plist
├── ephemeris
├── h-cells.plist
├──
lto2.dat
├── stats.plist
└── wifi
├── B894C7D_1281764032.dat
├──
B894CA7_1281764031.dat
├── B894CB0_1281764031.dat
├──
B894CB1_1281764031.dat
├── B894CB4_1281764030.dat
├──
B894CB5_1281764030.dat
├── B894D8F_1281764025.dat
├──
B894D9D_1281764021.dat
├── B894DC3_1281764019.dat
└──
B894DC7_1281764019.dat
2 directories, 17
files
One file worth mentioning is
“cache.plist.” This file contains the Core Location's last GPS fix, or where the device was
last located on the basis of identified wireless signals. This portion of the file is shown
in the beginning and looks similar to what is shown in the following code:
<?xml version=“1.0”
encoding=“UTF-8”?>
<!DOCTYPE plist PUBLIC “-//Apple//DTD PLIST
1.0//EN”
“http://www.apple.com/DTDs/PropertyList-1.0.dtd”>
<plist
version=“1.0”>
<dict>
<key>CLLocationCore::kLastFix</key>
<dict>
<key>Altitude</key>
<real>0.0</real>
<key>HorizontalAccuracy</key>
<real>500</real>
<key>Latitude</key>
<real>41.873892060000003</real>
<key>Lifespan</key>
<real>-1</real>
<key>Longitude</key>
<real>-87.794191889999993</real>
<key>Suitability</key>
<integer>65534</integer>
<key>SupportInfo</key>
<dict>
Latitude and longitude coordinates are provided, which will translate
to an approximate geographical location. While timestamps within the cache.plist file are not
provided, an examiner can look at the day and time on which this particular file was last
modified in order to get an approximate time the device was at this particular
location.
Another file in the locationd folder that may be
of use is cells.plist. This file contains numerous records of cell tower locations, similar
to the CellLocations table found in consolidated.db. A snapshot of this file is shown in the
following code:
<?xml version=“1.0”
encoding=“UTF-8”?>
<!DOCTYPE plist PUBLIC “-//Apple//DTD PLIST
1.0//EN”“http://www.apple.com/DTDs/PropertyList-1.0.dtd”>
<plist
version=“1.0”>
<dict>
<key>310,410,0x1e7a</key>
<string>2,+41.88355916,-87.62691020,8000.000000,240,304557710.149</string>
<key>310,410,0x1e94</key>
<string>2,+41.93214869,-87.64807087,8000.000000,240,304557710.149</string>
<key>310,410,0x52d3</key>
<string>2,+41.95102542,-87.92777836,13030.000000,240,304557710.149</string>
<key>310,410,0x52d4</key>
<string>2,+41.87647861,-87.62853527,8000.000000,240,304557710.149</string>
<key>310,410,0x52d5</key>
<string>2,+41.84576398,-87.84617710,12400.000000,240,304557710.149</string>
…
</dict>
The numbers shown in the “key” correspond with the same numbers displayed in the
consolidated.db CellLocations table: MCC, MNC, and LAC. So, in the example above, 310 is the
MCC, 410 is the MNC, and 0x1e7a (in decimal this is 7802) is the LAC. The “string” listed
directly below these numbers contains latitude and longitude coordinates as well as a
timestamp shown in OS X Epoch (304.557710.149). This is very similar to the data we saw in
the CellLocations table of the consolidated.db file. This is because all of the cell tower
and GPS data was consolidated into one database with the release of iOS 4. Nevertheless, it
is important for an examiner to understand that this data can be found in both locations.
This way, regardless of whether the device is running iOS 4 or earlier, geographical location
data can be recovered.
User names and passwords
Many applications, both
default and downloaded, leverage Apple's Keychain database for user name and password
management. The keychain-2.db file is stored on the root of the device in
/private/var/Keychains. This database consists of six tables: genp, sqlite_sequence, inet,
cert, keys, and tversion. The two main tables that are known to contain the most evidentiary
data are genp and inet (however, it is never a bad idea to analyze all the tables in the
database to ensure that important data are not missed).
The
“genp” table contains a list of accounts that the device has been logged into at one point.
Included in this table are wireless access points the device was connected to, voicemail
login, device login (passcode), and any downloaded applications that elected to use the
keychain database to store login credentials. The account name (username) and a description
of that account are provided along with a “data” field, which contains an encrypted password
for each account. This data is shown in Figure
6.8 .

The “inet” table contains any e-mail accounts the
device has been synced to through the default Mail application. The following information can
be found about each account:
• Account (e-mail address or
domain/username)
• E-mail server that the device was connected to
• Protocol used to connect
to the server (imap, smtp, https, etc.)
• Port number (143, 25, 443, etc.)
• Data (encrypted
password)
While the passwords in both
tables are in an encrypted format, there are ways to decrypt this data. As pointed out in Chapter 5 ,
with the release of iOS 4, encryption is now done at the device level. When an unencrypted
backed-up device is initiated, the keychain file is encrypted using hardware keys stored on
the device. When the database is opened, much of the information can be seen, but the
passwords remain encrypted (as shown previously in this section). If an encrypted backup is
generated, the keychain file is now encrypted using software keys generated from the backup
password. Using Elcomsoft's iPhone Password Breaker, the passwords within the keychain file
can be unencrypted and viewed in clear text. This technique is successful only on devices
running firmware version 4.0 or higher. For detailed procedures on the use of Elcomsoft's
software to crack the keychain file, see the section in Chapter 5 that
discusses encrypted backups.
Another technique was able to
reveal the keychain passwords without the use of purchased software. This attack requires
possession of the phone as well as knowledge on jailbreaking the device. Once the device is
jailbroken, an SSH server is installed on the device in order to allow software to run on the
iPhone. Next, a keychain access script is copied to the device which is able to communicate
with the keychain database and extract data, including passwords. This works because, with
iOS 4, a key can be generated from within the device, without having to know the device
passcode.
Snapshots
When the user selects the “Home” button to exit
an application and go back to the main screen on the device, a screen shot is sometimes taken
of the app prior to exiting, depending on the options selected by that particular
application's developer. If enabled, these snapshots are stored on the device, and can later
be recovered.
The images taken of the default apps can be
found in /private/var/mobile/Library/Caches/Snapshots, and the filename will be something
like com.apple.mobilemail-Default.jpg, com.apple.mobilenotes-Default.jpg, or
com.apple.mobilesafari-Default.jpg. Since these screen shots are taken at random points
throughout the use of an application, they will often contain useful data. For example, if a
user selected the “Home” button after reading an e-mail, it is possible that a snapshot of
the e-mail content would be taken and stored on the device. The same goes for third-party
applications that have been downloaded by the user. If the developer enabled this option,
snapshots for a downloaded application would be stored in that particular Application
folder.
For the recovery of these snapshots, data carving
techniques are typically required. While a few snapshots may be stored in the
/Caches/Snapshots folder, the remaining images are unallocated. Most of these images,
however, can be recovered by running Scalpel (or another file carving utility) on the disk
image, and they will be stored in one of the “jpg” folders.
Paired devices
Often times, it is necessary to prove that a device belonged to a
certain individual. While this can be a difficult task, using the pairing records is one way
to achieve this. Whenever an iPhone is synced with a computer, a key is stored on both the
phone and the workstation in order to allow the two devices to share data. If the certificate
on the phone matches the certificate on the computer, then it can be concluded that those two
devices were paired at one point.
This information on the
iPhone is stored within a plist file, which is named after the desktop's unique identifier.
There will be one file per device, and they can be found at
/var/root/Library/Lockdown/pair_records/ (refer to Table 6.5 ). Below, you can see that this
particular iPhone was paired with five unique devices (not necessarily all
computers).
Insert Tree
Pair_records
Several files are
listed, and the examiner will need to look at the modification date and time to determine
which device to look at. Once the plist is open, the information is displayed in XML format.
The “DeviceCertificate” is the key we are looking for. As it is, this key is base64 encoded.
Once decoded, the certificate can be found within a file on the workstation. To decode the
base64 certificate, any websites and tools are available on the Internet. Go to one of these
websites, copy and paste the certificate in the field, click decode (or whatever the program
specifies), and the resulting output will be the certificate you need.
Next, the examiner must look at the certificate contained on the workstation. The
location of these files will depend on the operating system running on this machine. Refer to
Table 6.5 for locations in both Windows
and Mac environments as well as on the iPhone itself ( Zdziarski, 2008 ).
In this example, a Mac workstation was used. So after navigating to the Lockdown
directory, a series of plist files were found. In this case, the file names referred to the
Unique Identifier of the device was synced to the computer, not necessarily all iPhones. The
certificates in the plist files on the iPhone must be compared with the certificates in the
plist files on the computer. Manually, this could be a time-consuming process. It is
suggested that comparison tools be utilized, such as “diff.” This utility will compare two
files, and the output will show only the differences between the two files. When using “diff”
to compare the certificates, if there are two keys that do not result in any differences, it
can be determined that those two devices were paired.
..................Content has been hidden....................
You can't read the all page of ebook, please click here login for view all page.