Chapter 12. Testing your application
- An introduction to testing with Play
- Explaining the different levels of testing
- Unit, functional, and integration testing with Play and JUnit
- Browser testing with Play and Selenium
Now that we have a complete application, we need to start thinking about further development and maintenance. But as you evolve your application, new bugs may creep into your code, and changes in external factors may introduce errors in your application even if you never touch it.
Automated testing is an invaluable tool when you want to make sure that your application still works like you expect it to. In addition, automated tests also help you during development—they allow you to verify that your code does what you think it does.
In this chapter, we’ll show you different kinds of tests that help you test applications at different levels, and how Play helps you create and run these tests.
12.1. Testing Play applications
As we’ve seen in the previous chapters, a Play application consists of several core components—controllers, models, view templates, routes, forms, and so on. One of the nice things about Play is that they all result in runnable code. This means that for all these concepts, there’s a class or method that you can access from your Java code. It also means that you can take any separate component and test it by executing its code and checking the result. This is the core principle of automated testing—run some code, compare the result against an expected value, and return the findings. This kind of testing is called unit testing. It’s called unit testing because you take an individual unit of code and... well... test it.
Of course, you don’t only want to check the internal behavior of your application. You also want to make sure that it interacts with the outside world—the browser or system that’s calling your web app or API—correctly. This is called integration testing. Play offers a library to test your web service API and integration with a tool called Selenium. This will test how your application behaves in a browser.
Play has facilities to make it possible to test every part of your application and make running your tests easy. In this section, we’ll create our first unit test, and learn how to run it. In the following sections, we’ll show you how to test every aspect of your application.
But first things first. Let’s see how to write and run tests in Play.
12.1.1. Writing tests
In Play 2, all tests are written using JUnit. JUnit is probably the most popular testing framework for Java. In JUnit, a test is a method annotated with the @org.junit.Test annotation. Inside a test method, you write some code and verify your assumptions about that code using assertions—methods that compare an expected and an actual situation. JUnit provides a lot of assertion methods to help you make comparisons and report exactly what’s wrong when an assertion fails.
Let’s write a simple test to see how this works in practice. Any test you write should go in your application’s test folder, so create one now. If you’re using an IDE, you might have to regenerate your IDE project files for it to show up properly. In this folder, create a new Java class called ApplicationTest, with the contents shown in the following listing.
Listing 12.1. ApplicationTest.java
import org.junit.Test;
import static org.junit.Assert.*;

public class ApplicationTest {

  @Test
  public void passingTest() {
    String first = "OK";
    String second = "OK";
    assertEquals("This test will pass", first, second);
  }

  @Test
  public void failingTest() {
    String first = "OK";
    String second = "NOT OK";
    assertEquals("This test will fail", first, second);
  }
}
As you can see, this test is a simple Java class: it doesn’t extend any classes or implement any interfaces. But we did create a static import of org.junit.Assert.*. The Assert class, part of JUnit, contains a lot of static assertion methods. We import them all statically, so that they’re directly available from our code in our class.
The two methods in our class are the actual tests. To indicate that these are our test methods, they have to be annotated with org.junit.Test. Our two tests, passingTest and failingTest, compare two strings for equality. First we set up two strings, and then we call assertEquals to do the comparison. The first parameter is optional, but allows you to define a message about what you’re testing. If this were a real test, you’d call some of your own code, and then compare the return value of some method calls, or the state of your objects.
Now that we have our tests, let’s see what happens if we run them.
12.1.2. Running tests
In Play 2, all tests are run from the Play 2 console. To run them, simply run the test command. Play will run your tests. Go ahead and run the test we just wrote. You should get output as shown in listing 12.2. You can also use the ~test (with a tilde) command. The command allows you to run the test as soon as the code changes. This is useful when using the test-driven development methodology. This method focuses on writing the test first that defines the desired improvement or new function, then producing the minimum amount of code to pass that test.
Listing 12.2. Running our test
[test-test] $ test
[info] ApplicationTest
[error] Test ApplicationTest.failingTest failed:
 These strings should be
    equal expected:<[]OK> but was:<[NOT ]OK>
[info] + ExampleTest.passingTest
[info] x ExampleTest.failingTest
[info]
[info]
[info] Total for test ApplicationTest
[info] Finished in 0.062 seconds
[info] 2 tests, 1 failures, 0 errors
[error] Failed: : Total 2, Failed 1, Errors 0, Passed 1,
    Skipped 0
[error] Failed tests:
[error]     ExampleTest
[error] test-test/test:test: Tests unsuccessful
[error] Total time: 0 s, completed Nov 10, 2012
  8:36:09 PM
Now, this way of running tests is fine if you only have one, or maybe even a few tests, but since the test command runs all the tests in your application, it’ll eventually be too slow and there will be too much output to find what you’re looking for. Therefore, if you ever want to focus on one test only, you can use the test-only command.
The test-only command takes one or more class names as parameters, and will execute only the tests in those classes. So, if you wanted to run our example test, you’d run test-only ApplicationTest. The output would in this case be the same as before, since it’s currently the only test we have.
Unit tests are great for testing classes that are more or less standalone, and require no outside dependencies that aren’t easily faked (we call that mocking the dependencies). Examples of such are model classes or utility classes and methods. But not every part of your application can exist in such a vacuum, as we’ll see next.
Let’s write a more useful test to test our Product model. We want to test that our findByEan() method introduced in chapter 3 works correctly. For this, we need to add the following test:
@Test
public void findByEan() {
 Product product = Product.findByEan("1111111111111");
 assertThat(product.name).isEqualTo("Paperclip 1111111111111");
}
For now, go ahead and run the test. You’ll get the following output:
Test ApplicationTest.findByEan
failed: javax.persistence.PersistenceException:
java.sql.SQLException: Attempting to obtain a connection
 from a pool that has already been shutdown.
That’s probably not what you expected. But what went wrong?
Not all classes and methods (and therefore templates) are completely standalone. Sometimes your code depends on objects and code from other methods and classes. In Play, some code may depend on a running Play application. For example, your code might need to read configuration, access the database, or just use one of Play’s contexts (such as Session or Flash). When you try to run code like that outside the scope of your Play application, you’ll encounter an error. That’s exactly what happened in this case:
java.sql.SQLException: Attempting to obtain a connection
 from a pool that has already been shutdown
Our test tried to access the database, but Play isn’t running, and therefore the configuration isn’t loaded.
Now that we know what’s wrong, how do we fix it? Of course, Play has the tools for you. Play allows you to use a fake application. By wrapping your test code in a fake application, the Global object that loads initial data and the database access you’ve defined are available by default. But things such as the session or request won’t be available. You still need to pass those, as we’ll see later in the chapter.
Play’s facilities to make testing easier can be found in the play.test.Helpers class. Go ahead and add a static import for all its members:
import play.test.Helpers.*;
This will give us access to a bunch of things, but for now we’re interested in the running() and fakeApplication() methods. The fakeApplication will give us our fake application, whereas running() allows us to run code in the context of that application. The running() method takes two parameters: Application to use as context, and a block of code to run, represented by an implementation of Runnable, which contains a run() method that will execute our code.[1] Wrap the test in these methods:
1 This way of passing around runnable code is verbose, but will have to do until JDK 8 brings us lambdas, which provide a much nicer syntax to do this kind of thing.
@Test
public void findByEan() {
 running(fakeApplication(), new Runnable() {
   public void run() {
 Product product = Product.findByEan("1111111111111");
 assertThat(product.name).isEqualTo("Paperclip 1111111111111");
   }
  });
}
Please note that the Product with EAN 1111111111111 exists and has been added to our evolution scripts as explained in section 7.5.3. We’re also using some helpers that allow us to be more human when describing what we’re testing. Indeed, we’re asserting that product.name is equal to "Paperclip 1111111111111". In order to use those helpers, you need to import statically org.fest.assertions.Assertions.*:
import static org.fest.assertions.Assertions.*;
Rerunning the test gives us the expected results:
[error] Test ApplicationTest.failingTest failed:
This test will fail expected:<[]OK> but was:<[NOT ]OK>
[info] play - Starting application default Akka system.
[info] play - Shutdown application default Akka system.
[info] ApplicationTest
[info] x failingTest
[info] + findByEan
[info] + pagination
[info] + passingTest
[info]
[info]
[info] Total for test ApplicationTest
[info] Finished in 0.019 seconds
[info] 4 tests, 1 failures, 0 errors
You can also observe that Play was bootstrapped correctly and made the database available to the tests. Let’s quickly create a pagination test:
@Test
public void pagination() {
  running(fakeApplication(), new Runnable() {
   public void run() {
     Page<Product> products = Product.find(1);
     assertThat(products.getTotalRowCount()).isEqualTo(50);
     assertThat(products.getList().size()).isEqualTo(10);
    }
   });
}
Here we’re testing that whenever we’re performing pagination, the total number of results is 50 and then we get 10 results for the current page. Of course, we pre-filled our database with 50 products, as explained in section 7.5.3.
By default, fakeApplication() instantiates a fake Play application based on your current application.conf file. But you might want to test a different setup sometimes, for example when you want to use a different database. For that reason, you can supply a Map<String, String> as a parameter to fakeApplication(). You can use that map to supply configuration key/value pairs, and they will override the configuration from your application.conf.
12.2. Functional testing
In this section we’re going to test various functions of our application. The first test is to confirm that not every user can log in to our application.
12.2.1. Testing your controllers
In order to know if our application works correctly, we need to test that not everyone can access the application. As you may remember, in our application, before you can access the product listing, you need to show credentials. In plain English, the software function is: “only authenticated users can access the product listing.” Let’s verify that by writing the corresponding test.
Create a new class under the test directory called FunctionalTest, and create the test shown in the following listing.
Listing 12.3. FunctionalTest.java

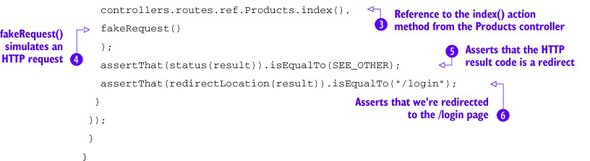
In our test, we first start a fakeApplication ![]() , as seen in the previous section, to instantiate Play persistence and routing features. From there, we’re calling our index() action method on the Products
, as seen in the previous section, to instantiate Play persistence and routing features. From there, we’re calling our index() action method on the Products ![]() controller through the generated routes Java file with the callAction() method. You can actually access all action methods from any controllers using the callAction method and passing a reference to an action method. The callAction()
controller through the generated routes Java file with the callAction() method. You can actually access all action methods from any controllers using the callAction method and passing a reference to an action method. The callAction() ![]() method also requires a Request object as argument: we’re passing a fakeRequest()
method also requires a Request object as argument: we’re passing a fakeRequest() ![]() that mocks a Play request.
that mocks a Play request.
We then test that we’re redirected. This is done by checking that the result status code is SEE_OTHER (HTTP Redirect—303 status code) ![]() . And finally, we test that the redirect location is /login
. And finally, we test that the redirect location is /login ![]() .
.
If you run the test now, you’ll see that it passes! Indeed, as long as we’re not authenticated, we can’t display the product listing. It’s now time to test a successful authentication. Let’s edit our FunctionalTest.java file and add the test shown in listing 12.4.
Listing 12.4. FunctionalTest.java—authenticateSuccess

The test first starts a fakeApplication ![]() , as seen previously. We then call the authenticate()
, as seen previously. We then call the authenticate() ![]() method from the application controller that we defined in section 10.3 using the callAction() method
method from the application controller that we defined in section 10.3 using the callAction() method ![]() . If you recall, the authenticate()
. If you recall, the authenticate()![]() method expects an email and a password through an HTTP form. We’re creating a URL encoded form with the withFormUrlEncodedBody(ImmutableMap.of("email", "nicolas", "password", "nicolas"))
method expects an email and a password through an HTTP form. We’re creating a URL encoded form with the withFormUrlEncodedBody(ImmutableMap.of("email", "nicolas", "password", "nicolas")) ![]() method—the ImmutableMap isn’t really relevant here; just consider it as a map. This is appended to our fakeRequest() that’s given as a parameter to the callAction() method.
method—the ImmutableMap isn’t really relevant here; just consider it as a map. This is appended to our fakeRequest() that’s given as a parameter to the callAction() method.
We then test that we’re redirected ![]() to the root application page
to the root application page ![]() . Finally, we make sure we’re signed in to the application
. Finally, we make sure we’re signed in to the application ![]() .
.
Running the test shows that our application is working and that we can authenticate. It’s now time to test our product listing web page.
12.2.2. Template testing
Let’s write our first test for a template. As you may recall, templates get compiled to classes and methods, which means that they can be unit tested, just like any other bit of code. We’ll create a test for the product list template. Figure 12.1 shows a reminder of our products list.
Figure 12.1. The products list

So what can we test about this template? There are a few things:
- It should render HTML
- It should show products
- It should contain links
- It contains 10 products out of 50
We could use the render() method from our template and test the generated output. The following listing shows an example of such a test.
Listing 12.5. Not working FunctionalTest.java

This test isn’t going to work in our case because we can only use the render() method for simple use cases, but it’s important to understand what’s going on. In this test, we first need to retrieve a
list of test products that we’ll pass to the template ![]() , and then we call the render method on our template’s class (views.html.catalog)
, and then we call the render method on our template’s class (views.html.catalog) ![]() . That method returns an object of type Content, on which we can run our assertions.
. That method returns an object of type Content, on which we can run our assertions.
Now we assert that the Content returned is of the expected type: text/html ![]() . Then, we check the rendered HTML for the names of our test products
. Then, we check the rendered HTML for the names of our test products ![]() .
.
We can only use the render() method for simple use cases, when we’re not making use of the Play scopes. As we stated earlier, the fakeApplication() doesn’t provide a session nor a request. This means that things like the flash scope, the session scope, and the request scope can’t be used. Actually, if they’re used by your template, Play will give you an error stating that it has no HTTP context available. This is useful for testing independent HTML components like the navigation menu we defined in section 8.4.1, and this is why we presented this test. But this isn’t the case for the product listing page, because we’re using the flash scope in our main.scala.html template.
Let’s now see how to correctly implement our test for the product listing page. Let’s edit our FunctionalTest.java file and add the test shown in the following listing.
Listing 12.6. FunctionalTest.java—listProductsOnTheFirstPage

This test is quite similar to the one we’ve seen previously using the callAction method. We’re calling the list() action method from our Products controller. That’s the action used to display the product listing. The list(0) indicates that we want to display the first page. As annotated in the code, we then assert that Play returns an OK status, Play is serving us HTML, and that we’re displaying the first page. We then make sure that if we query the database directly for the first 10 products (page 0), the same products are displayed on the first page.
These tests are rudimentary, and string comparison is usually not the way to go to test an HTML page. These tests suffice as a basic smoke test, but aren’t very good as a complete web page test. Later in the chapter we’ll introduce browser testing, which is a nicer and more complete way to correct the behavior of your web pages in a browser.
12.2.3. Testing the router
We’re now able to test three major components from our Play application: the model, the controller, and the template. It’s time to consider testing another crucial part of our Play application: the router.
Until now, we’ve trusted that our routes were all correct and according to specification. For example, in the previous section, we trusted that calling the list() action method on the Products controller was the same as calling the /products/ URL. Let’s see how we can make sure our assumptions are correct and enforce that the product listing is served by the /products/ URL. Edit the file FunctionalTest.java one more time and add the test shown in the following listing.
Listing 12.7. listProductsOnTheFirstPageWithRouter
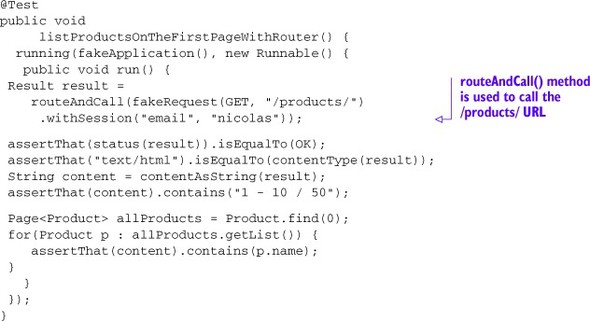
This example is exactly the same as the previous one, except that this time we’re testing the /products/ URL directly. We’re now using the routeAndCall() instead of the callAction method. The routeAndCall() method takes two parameters: the URL we want to test and the HTTP method it should call the URL with. The routeAndCall() method is useful to test the not found or error pages, for example.
Now that we’ve seen how we can test our application’s internals, let’s see how we can test its interaction with the outside world. This is also called integration testing.
12.3. Integration testing
Integration testing is all about testing your application’s behavior when dealing with the “outside world.” This can be anything from a user’s web browser to the communication with another web service—whether you’re calling it from your application, or it’s calling your application.
Integration testing differs from the way we’ve been testing so far. Up to now, we’ve been testing our application’s code directly by calling methods and checking the results. Integration testing tests your application as a whole, by verifying the behavior of its external interface (your UI or web service API).
12.3.1. Testing your HTTP interface
As we’ve seen throughout the book, any web application, whether it’s a web service or meant to be used through a web browser, consists of a set of HTTP URLs as far as the outside world is concerned. When doing integration testing, you make these calls and inspect the results. Other than testing something completely different, the actual testing is the same—you run some code, and run assertions on the results. Play comes with helpers to make this easy.
The first step in writing an integration test is getting the application running. This time, a fake application like we saw in section 12.2 isn’t enough—we need a running server. For that, we’ll use the testServer() method, instead of the fakeApplication() method that we saw in section 12.2. The testServer() method takes one parameter: the port number on which the server will run.
Other than using a TestServer instead of a FakeApplication, the mechanism for testing with a test server is the same as when testing using a fake application: use the running() method, and pass it the TestServer instance and a Runnable that contains the test code. The following listing illustrates this.
Listing 12.8. Testing using a test server
public void myIntegrationTest() {
  running(testServer(9001), new Runnable() {
    @Override
    public void run() {
      // Test code goes here
    }
  });
}
To actually make our HTTP calls, we can use the WS class. The WS class is part of the WS (WebService) library provided with Play and allows us to make web calls to remote systems from a client perspective. It’s straightforward to use, as we’ll see. We’ll test that the products list URL returns status code 200 and has a non-empty body. Listing 12.9 shows the test. Go ahead and run it: it should pass.
Listing 12.9. A simple test for an HTTP call
public void myIntegrationTest() {
  running(testServer(9001), new Runnable() {
    @Override
    public void run() {
      final WS.Response response =
        WS.url("http://localhost:9001").get().get();
      assertEquals(200, response.getStatus());
      assertFalse(response.getBody().isEmpty());
    }
  });
}
Using the testing techniques we’ve seen so far, you can test a fair amount of your application. If your application has no UI, but is “just” a web service, you can test pretty much everything. But if you have a web application with an HTML/CSS/JavaScript user interface, that’s a big part of your application that you can’t test just by verifying the results of your Play code. You need a browser, and a way to automate testing your UI.
12.3.2. Browser testing
Play comes with integration for Selenium[2] and FluentLenium.[3] Selenium is a tool that allows automated browser testing. It has support for several browsers, as well as HtmlUnit, which is a way to do headless browser testing—browser testing without actually running a browser. FluentLenium is a test framework that allows you to write Selenium tests much like you would a unit test, rather than recording and playing back browser interaction, which is the “regular” way to create Selenium tests.
Play makes it easy to run Selenium/FluentLenium tests. The basic approach is the same as what we’ve seen with integration tests: use the running() method, and pass it a TestServer and an object that holds your actual test code. The difference is that we must now also pass it a browser configuration, and that our test code is contained in a Callback rather than a Runnable.[4]
4 We use a Callback because it can take a parameter, and a Runnable can’t.
Explaining all of Selenium and FluentLenium would require a whole book, so we won’t attempt to do that here, but we’ll show you a basic test to illustrate how you can use these tools with Play. If you’d like to know more, both Selenium and Fluent-Lenium have excellent documentation.
For our test, let’s see if the product list page works like we expect. We’re going to test that the page actually contains the product list, and that clicking on a product takes us to the product detail view. First, let’s set up the basic test structure. Listing 12.10 shows how.
Listing 12.10. IntegrationTest.java

We’ve configured our test to use the HTMLUNIT TestBrowser ![]() , which instructs Play to use Selenium with the headless HtmlUnit test browser. Since this browser is often used, play.test.Helpers.HTMLUNIT makes this test browser conveniently available as a constant. There’s also a FIREFOX constant that sets up the test to use Firefox, but we’ll use HtmlUnit.
, which instructs Play to use Selenium with the headless HtmlUnit test browser. Since this browser is often used, play.test.Helpers.HTMLUNIT makes this test browser conveniently available as a constant. There’s also a FIREFOX constant that sets up the test to use Firefox, but we’ll use HtmlUnit.
Now that we have the framework for our test, let’s implement it. You might’ve noticed that the invoke method is passed a browser parameter. That object actually represents our test browser and allows us to interact with it using the FluentLenium API. We’ll use it to create the following test:
1. Go to the URL for the product list page.
2. Assert that at least one link to a product is present on the page.
3. Click one of the products in the list.
4. Assert that the browser’s location has changed to the URL of the product detail page.
5. Assert that the page displays the correct product name.
The bold verbs in our test steps highlight what kind of interaction we want with our test browser: we want to be able to control navigation (go to), simulate user interaction (click), and read information from the page so we can verify that it shows what we expect (assert).
The first step, navigating to the proper URL, is the easiest one to do, so let’s do that first. We’ll use the goTo() method on the browser object, passing it the URL we want to navigate to, like so:
browser.goTo("http://localhost:3333/products");
Now, presumably, our browser has opened the page at the URL we gave it. But how do we verify that we’re actually where we want to be, and that the correct page is showing? That’s step two of our test: “Assert that the product list is present on the page.”
For assertions, we’ll use JUnit, just like we’ve been doing all along. The only thing that’s not immediately obvious is how to ask the browser for information about the page that is currently rendered. For that, we can use the FluentLenium API as well.
If you’ve ever used CSS or jQuery, you’re probably familiar with selectors. Selectors allow you to select elements of an HTML page by specifying element names, classes, and IDs. FluentLenium allows you to use selectors for this purpose as well. Play’s integration with FluentLenium borrows the $ syntax from jQuery to give us access—the browser object has a $() method that allows us to run selectors on the currently rendered page.
Now that we have the tools, let’s assert that we have a product list on our page. First, we need to sign in to the application as an authorized user. We’re using the fill() method to input our username and password in the login screen. The selector for our input element is simply input[name='email'] and input[name='password'], as defined in our HTML. We then submit the sign-in form and are redirected to the product listing page, where we’re looking for at least one a element contained in a td element. The selector for this is "table td a". To assert that we have at least one result, we’ll use the isNotEmpty() method. The next listing shows the corresponding code.
Listing 12.11. Testing the presence of the product list
import org.junit.*;

import play.mvc.*;
import play.test.*;
import play.libs.F.*;

import static play.test.Helpers.*;
import static org.fest.assertions.Assertions.*;

import static org.fluentlenium.core.filter.FilterConstructor.*;

public class IntegrationTest {

@Test
public void productListingTest() {
 running(testServer(3333,
  fakeApplication()),
  HTMLUNIT, new Callback<TestBrowser>() {
  public void invoke(TestBrowser browser) {
   browser.goTo("http://localhost:3333");
    // login
    browser.fill("input[name='email']").with("nicolas");
    browser.fill("input[name='password']").with("nicolas");
    browser.submit("button[type='submit']");
    assertThat(browser.$("table td a")).isNotEmpty();
   }
  });
}
}
Now that we’ve verified that our product list page correctly shows up in a browser, let’s test some interaction. When we click the link, we expect to be taken to the product’s detail page. To verify this behavior, we need to click the link, and then check the state of the browser.
To click the link, we can select it and then call the click() method on it. To then check the location of the browser, we can call the url() method on the browser object. Of course, the URL isn’t enough to convince us. To verify that this is the product detail page, we’ll check its title for the product name. The final test is shown in the following listing.
Listing 12.12. Testing interaction
...
@Test
public void productListingTest() {
 running(testServer(3333,
 fakeApplication()),
 HTMLUNIT, new Callback<TestBrowser>() {
 public void invoke(TestBrowser browser) {
  browser.goTo("http://localhost:3333");
  // login
  browser.fill("input[name='email']").with("nicolas");
  browser.fill("input[name='password']").with("nicolas");
  browser.submit("button[type='submit']");
  assertThat(browser.$("table td a")).isNotEmpty();
  browser.$("table td a").first().click();
  assertThat("http://localhost:3333/products/0000000000000")
   .isEqualTo(browser.url());
  assertThat("Product (Paperclip 0)").isEqualTo(
  browser.$("legend").getText());
 }
 });
}
...
If you haven’t yet, go ahead and run these tests—they should all pass fine. Now, these tests may seem simple—why test if a link works, when you could just as easily check the value of its href attribute? Well, though it’s correct that, in this case, we’re essentially testing if the browser works, consider a JavaScript-heavy web page. An event handler might actually break navigation functionality. There’s no way to test that without actually running the code in the browser. That is why browser tests are incredibly useful—they test your web pages like a user would, without burdening an actual human with all sorts of tedious clicking. Now that we’ve automated this kind of testing as well, we can test our application at every level.
12.4. Summary
In this chapter, we’ve seen how Play helps you write automated tests. We’ve seen how we can run JUnit tests, and the difference between unit, integration, and browser tests. We’ve seen that we could test different parts of our Play application: the models, the controllers, the templates, and the router. Using FakeApplication, and the running() method found in the play.test.Helpers class, your entire application can be tested by calling the application code directly. The TestServer allows you to call your application’s HTTP interface like a client application would, enabling you to run integration tests. Play’s integration with Selenium and FluenLenium means that you can easily test your application as the user sees it, including the effects of JavaScript and user interaction.
You’ve now made it through Play and learned a lot; you have the knowledge to tackle modern web applications and can expand on that knowledge. As a final suggestion, try to keep in touch with the Play community. It’s a busy and exciting place, and we’d love to hear from you there. Hope you’ve enjoyed the ride!