
Chapter 6. Handling user input
- Working with forms
- Data binding
- Using body parsers
- Validation
- Handling file uploads
In this chapter, we’ll explain in detail how users can interact with our application. This is where we’ll enable users to send data to our application. We’ll see how to handle different kinds of data and how to customize Play to use our own data types. We’ll also explain how to make sure the data sent is correct and, if it’s not, how to alert our users.
6.1. Forms
Working with forms in a web application involves two operations: displaying the form and processing the form submission. Forms allow users to send data to the server (our application). In Play, forms are represented by objects that you can manipulate. Play provides useful helpers to handle form submission. Because we don’t want users to send just any kind of data, Play makes sure the data is properly formatted and processed. If data isn’t well formatted, we need to tell the user what the problem is, so they can correct it and resubmit the form.
In our application, to submit a new product, we created two action methods: the first one, called newProduct(), displays the create a new product form, whereas the second, save(), handles the form submission. First we’ll take a closer look at what exactly the action method that shows the empty form does.
As a reminder, figure 6.1 shows the form.
Figure 6.1. Our “create new product” form

As we’ve seen, displaying a form involves the following steps:
- Creating an action method to display the form template
- Creating the form template
- Creating an action method to handle the form submission
Figure 6.2 illustrates the different steps.
Figure 6.2. “Create product form” workflow

6.1.1. Displaying the new product form
To display a form, we create a Form object to represent it. In this case, we want our form to represent a Product instance, so we create a form based on the Product class (a Form<Product>). Our existing newProduct() action method does that:

As you can see, we’re creating a new Form object using the Form.form() method. The resulting object holds all the information about our product and can contain additional information that we can use while rendering the form, such as validation errors, prefilled values, and so on. We’ll examine the form object in more detail later in this chapter.
The route to our form
When we created the newProduct() action method back in chapter 3, we also set up a route to it. Here’s a reminder:
GET /products/new controllers.Product.newProduct()
This route makes the form available at http://localhost:9000/products/new.
Adding the view
Also in chapter 3, we created the product.scala.html template that renders our HTML product form. The newProduct() action method uses it to render a blank product form.
The “new product” form template allows us to collect the information needed to create a new product. It uses HTML input tags to allow the user to input information.
The important thing to realize is that the HTML form is backed by a Play Form object. A form object is a container object. It contains information about our object model and, potentially, validation error information. In section 6.4 we’ll talk extensively about validation.
For now, it’s important to know you can access any form field value via a form object, and that you can use it to re-render the original value that was entered by the user if the action method detects a validation error. Our input helpers take care of that for us, so we don’t see the code that does it.
The following listing shows the full template for our form.
Listing 6.1. The “new product” form template
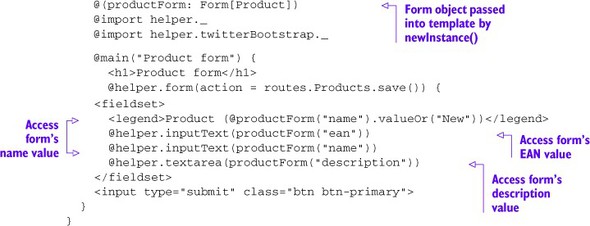
This HTML template is responsible for rendering the new product page (repeated in figure 6.3).
Figure 6.3. The “create new product” form

If your form looks different, please refer back to chapter 3, in which we showed you how to include Bootstrap to make things look a little nicer.
This form is for creating a new product and, therefore, it’s empty. Let’s see how the same template can serve as an edit form.
6.1.2. Displaying the edit product form
In our application, we also want to be able to edit a product. The “edit product form” is more or less the same form as the “create new product” form. The only difference is that we need to prefill some values and update an existing model object. But from a presentation point of view, the two forms are similar.
To turn the create form into an edit form, we perform the following actions:
- Prefill the edit form with the product value
- Display the edit form with the prefilled data
- Handle the user’s input
Figure 6.4 illustrates the workflow.
Figure 6.4. “Edit product” workflow

Filling a form with initial values
Because we’re using a form object in our view, we can decide to prefill the form with some default values. This is exactly what we need to do if we want to edit a product. When we know the unique identifier for the object we want to edit, we can then fetch it from our database so we can use the values in our HTML form. The action method we wrote to accomplish this is shown in the following listing.
Listing 6.2. Displaying a form with preset values
public class Products extends Controller {
    private static final Form<Product> productForm =
        Form.form(Product.class);

...
  public static Result details(String ean) {
    final Product product = Product.findByEan(ean);
    if (product == null) {
      return notFound(String.format("Product %s does not exist.", ean));
    }

  Form<Product> filledForm = productForm.fill(product);
  return ok(details.render(filledForm));
  }
...
}
We also added the following route in our routes file. The route indicates that every time we access the /products/xxx page, we will in fact render an edit page for the product xxx, where xxx is the product’s EAN number.
GET /products/:ean controllers.Product.edit(ean:Long)
Now let’s see why the existing products/details.scala.html supports both creating and updating a product. Take a look at the following listing.
Listing 6.3. /products/details.scala.html

As you see, the edit product form and the create new product form can use the same template. If the form contains a value for the product’s ID, then it’s an update; otherwise, we’re creating a new product.
We’re now able to display a form to create or edit a product. Next, we need to process the data from the submitted form.
6.1.3. Processing form input
After the form is submitted, our action method that handles the form submission transforms the data the browser sent to the server into a Product instance and saves it. Finally, it sets a success message in the flash scope[1] and redirects to the page showing all products. The following listing shows save(), an action method that processes the form submission.
1 We introduced the flash scope in the previous chapter, in which we also added the message to our main template.
Listing 6.4. The save() action method

First, we’re creating the form object with all the information that we have received via HTTP ![]() . Then, we check whether the submitted information is valid, and display a message if it isn’t.
. Then, we check whether the submitted information is valid, and display a message if it isn’t.
If everything’s in order, we ask the now-populated form object for the Product instance ![]() that it contains. The object instance will have its fields populated with the data extracted from the HTTP request. We then
save the Product instance to our data store. Finally, we present another page to the user, using a redirect to the “all products” page.
that it contains. The object instance will have its fields populated with the data extracted from the HTTP request. We then
save the Product instance to our data store. Finally, we present another page to the user, using a redirect to the “all products” page.
Our save() action method is also represented in our routes file:
POST /products/ controllers.Product.save()
We’ve seen how our form submission is processed. Once the form is displayed, the user enters the data and submits the form. The browser will then send a POST request with the form data to our application. The routes file determines that the processing is to be delegated to the save() action method.
We’re now able to add or edit a product, but let’s see in more detail how our action method managed to transform the HTTP form parameters into a Form object.
6.2. Data binding
Play transformed the submitted information into a Java object using a process called data binding. Data binding is the process of converting elements of a request into objects. There are three binding types in Play:
- Form binding, which we saw in the previous section
- URL query parameters binding
- URL path binding
Data binding is a simple principle. The HTTP parameters are mapped to their counterpart attributes on the Java object. The mapping is done using the parameter’s name. Each time a parameter name matches the name of an object attribute, the object attribute is set to the parameter’s value. Figure 6.5 illustrates this binding process.
Figure 6.5. The binding process

In Play, form binding is primarily done with the help of a Form object, via the bindFromRequest() method. The binding processing is delegated to Spring Data, a library that can take a request’s body and convert it to the properties of a Java object.
URL query parameter binding consists of taking the URL’s parameters (for example, ?x=y) and mapping them onto a Java object. The pattern is derived from the routes file.
For example, if our products had an ID, we could have a route like this:
GET /products Products.edit(id: Long)
Which would match the following URL:
http://localhost:9000/products?id=12
Play will convert the string “12” (query parameters are always strings) to the Long 12.
URL query path binding consists of mapping a query path (again, always a string), to another Java type or object. This also happens using the route definitions. For example, when you declare:
GET /products/:id Products.edit(id: Long)
http://localhost:9000/products/12
Play will convert the string “12” (the query path) to the Long 12.
Data unbinding is the reverse process. We have an object and we want to translate it into a valid URL or form representation. This is notably used in case of reverse routing. For more information about reverse routing, please refer to section 5.3.5.
It’s important to note that in Play, each type of binding can be customized and extended. But let’s take a step back first, and see how our product form is mapped.
6.2.1. Binding single values
Product is defined as the following class:
public class Product {
    public String ean;
    public String name;
    public String description;
}
To fully understand how binding works, we’ll cheat a little and respond to a GET HTTP request to trigger our save() action method, so that we can easily make requests using a browser.
Let’s edit our routes file, and add the following line:
GET /products/save controllers.Product.save()
We can now invoke our save() action method from the browser, and we should remove this route entry once we’re done experimenting (and use the POST /products/ one).
http://localhost:9000/product/save?ean=1111111111111&
    name=product&description=a%20description
The first line of the save() action method is the most important one:
Form<models.Product> productForm =
          form(models.Product.class).bindFromRequest();
This creates a new Product instance and then, for each HTTP parameter that matches a property by name, sets the value on that property. For this GET request, a new Product is created and the ean parameter is bound to the ean property, the name parameter is bound to the name property, and so on.
Our product form is filled with the HTTP parameter values from our request. We can then access the newly created Product instance with the following code:
models.Product product = productForm.get();
And the product object contains the following data:
ean: 1111111111111,
name: product,
description=a description
As you can see, it matches with the parameters we supplied in our URL. It’s a simple and predictable mechanism. It’s now trivial to map back and forth from HTTP parameters to objects.
It works well for simple types such as String, Integer, Long, and so forth. Play also provides support for more complex types such as Date and for multiple values that must be mapped to an array or List object.
For dates, you can annotate your model with the @play.data.format.Formats .DateTime annotation to indicate how to transform the HTTP parameter into a Date object:
@Formats.DateTime(pattern = "yyyy-MM-dd")
public Date date;
Here, if we use the date HTTP parameter with a year, month, and day date format, Play will be able to transform the string into a Date object using a form data binder called Formatter. For example, calling
http://localhost:9000/product/save?date=2021-10-02
results in a Date object when bound to a Form object.
Play provides some built-in Formatters, namely DateFormatter, AnnotationDateFormatter, and AnnotationNonEmptyFormatter. DateFormatter attempts to convert parameters to Dates with a date format of yyyy-MM-dd whenever a Date object is required. AnnotationDateFormatter is used in conjunction with the @DateTime annotation and allows you to specify a date format. The AnnotationNonEmptyFormatter is used in conjunction with the @NonEmpty annotation and prints an empty string instead of a null value.
All the built-in Formatters are located in the play.mvc.data.Formats class.
Next, let’s see how binding multivalued parameters works.
6.2.2. Binding multiple values
This is a common use case: the user selects multiple values from a list of possible values, and we have to store them. To illustrate this use case, let’s define a new scenario. We want to be able to tag our product with a certain label. For example, we can tag a product with the words metal or plastic. Each product can have zero or more tags, and each tag can be applied to multiple products. Figure 6.6 illustrates this relationship.
Figure 6.6. Product–Tag relationships

We first need to define our new model. Let’s create a Tag model class. We create a new file in the app/models directory.
Listing 6.5. Project directory structure

It’s a relatively simple class; it holds a tag name. The following isting shows our new class.
Listing 6.6. /app/models/Tag.java
package models;

import play.data.validation.Constraints;
import java.util.*;

public class Tag {
  public Long id;
  @Constraints.Required
  public String name;
  public List<Product> products;

  public Tag(){
    // Left empty
  }

  public Tag(Long id, String name, Collection<Product> products) {
    this.id = id;
    this.name = name;
    this.products = new LinkedList<Product>(products);
    for (Product product : products) {
      product.tags.add(this);
    }
  }
}
We also need to modify our Product class to link the Tag class. We use a List so that each product can hold multiple tags. This is easily done by adding the following line to our Product class (/app/models/Product.java).
public List<Tag> tags = new LinkedList<Tag>();
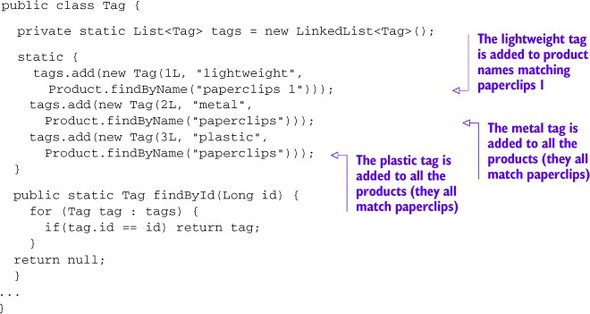
We now need to create some tags. In order to do that, we’ll fake some Tag objects in the same way that we created some test Products. We’ll show you how to use a database as a backing store in chapter 7. For now, let’s stick with a static list of tags. In the Tag class, add the lines shown in the following listing.
Listing 6.7. Adding mock data to Tag.java
We now have our tags ready to be used. Next we need to modify our view so we can tag our products. Because we want to keep things simple, we’ll use a predefined set of tags rather than dynamically generate the list of check boxes. Let’s add the following code snippet to our products/details.scala.html.
<div class="control-group">
<div class="controls">
<input name="tags[0].id" value="1" type="checkbox" > lightweight
<input name="tags[1].id" value="2" type="checkbox" > metal
<input name="tags[2].id" value="3" type="checkbox" > plastic
</div>
</div>
We’ve added some HTML input elements of type checkbox. For the binding process, the important part of these input elements is the id attribute. The [] notation tells Play that we want to bind the check boxes to the product’s tag collection (in our case, the List<Tag>). Once the form is submitted, Play will automatically create a new List, with new Tag objects for each checked box, and with the ID specified in the value attribute. For example, if we select “lightweight” and “plastic,” Play will create a new List with two new Tag objects during the binding process. The first tag object will have its ID set to 2 and the second one to 3. Figure 6.7 illustrates exactly that.
Figure 6.7. Binding HTML check boxes

Now that we have our form ready with the check boxes, let’s see how our product form looks (figure 6.8).
Figure 6.8. Edit product form with tags

We need to modify our Products controller’s save method slightly, to take our tags into account. We need to save our relationship between the product and the tags. But our tag objects do not yet correspond to the Tag objects that we have in our datastore; they are new objects with only the ID set. We need to modify our action method to look up the tag, and set it. This can easily be done in our controller, as the following listing shows.
Listing 6.8. Product save method with tag relationship
public class Products extends Controller {
...
  public static Result save() {
    ... (binding and error handling)

    Product product = boundForm.get();

    List<Tag> tags = new ArrayList<Tag>();
    for (Tag tag : product.tags) {
      if (tag.id != null) {
        tags.add(Tag.findById(tag.id));
      }
    }
    product.tags = tags;
    product.save();
    ... (success message and redirect)
  }
}
We now need to display the tags when displaying a product. For this, we need to update our view so the correct tag check boxes are selected when a tag is present. We have already seen (in section 6.1.2) how our product prepopulates our product form:
productForm = productForm.fill(product);
This also loads the product’s associated tags, so the action method doesn’t need to be changed. Our goal can easily be achieved with a bit of code in our view. When rendering the view, we need to add a checked attribute to each check box if its associated tag is present in the productForm. The following line of code does exactly that:
@for(i <- 0 to 2) { @if(productForm("tags[" + i + "]").value!=null
   && productForm("tags[" + i + "]").value == "1") { checked }}
Because our product’s associated tags might contain between zero and three tags, we need to iterate through them (the for loop in our code). If the tags contain the value 1, then we preselect the check box. Don’t worry if you don’t fully understand this line; we’ll take a closer look at template syntax in chapter 8.
We now need to apply this code for each check box we’re displaying:
<div class="control-group">
  <div class="controls">
    <input name="tags[0].id" value="1" type="checkbox"
    @for(i <- 0 to 2) {
      @if(productForm("tags[" + i + "].id").value=="1"){ checked }
    }> lightweight
    <input name="tags[1].id" value="2" type="checkbox"
    @for(i <- 0 to 2) {
      @if(productForm("tags[" + i + "].id").value=="2"){ checked }
    }> metal
    <input name="tags[2].id" value="3" type="checkbox"
    @for(i <- 0 to 2) {
      @if(productForm("tags[" + i + "].id").value=="3"){ checked }
    }> plastic
  </div>
</div>
Again, in chapter 8, we’ll see how we can refactor all this code to make it less repetitive and verbose.
We now can deal with related tags for our product. More importantly, we’re now able to map back and forth from check boxes or select fields to our object model.
Let’s see what happens if we want to bind a type that Play doesn’t know about yet.
6.2.3. Custom data binders and formatters
As we have seen in the previous section, Play is able to bind most of the usual types automatically. But what about special types? Play allows you to define your own binder or your own formatter. There are three different ways of binding objects. You can bind objects via the URL or via URL parameters, and it’s also possible to use a custom formatter that will transform your object when submitting a form.
Path binders
When requesting a URL with a named parameter in it, Play already performs some kind of binding. For example, in our application, we have:
/product/1111111111111
where 1111111111111 is our product EAN number. Internally, Play binds this value to the product’s EAN number. This is done when declaring our URL in the route file (see chapter 5):
GET /product/:ean Product.details(ean: String)
Play looks for the ean type and converts it into the proper type.
In our case, it binds a string to another string. But Play can also deal with values such as primitives and primitive wrappers, based on information in the routes file. If we have the following route:
GET /product/:ean Product.details(ean: Int)
Play would make sure to convert
/product/1122334455
into an Integer with the value 1122334455. If we were to use aabbcc1122334455, Play would yield an error, because it can’t convert aabbcc1122334455 into an Integer.
Therefore, there is a mechanism that allows Play to transform part of a URL (our URL parameter, a string) into an object. This means that we could, for example, automatically load and bind our Product objects based on the EAN number that is used in our URL.
Whenever we call
/product/1111111111111
we can have the matching product object passed to our controller, and we can have a details action method that looks like this:

Figure 6.9 illustrates what we want to achieve: automatic binding of our Product object based on our EAN product number.
Figure 6.9. The binding process

Play allows you to define your own binder for URL paths. This is called a bindable path in Play. In order to provide our own custom URL path binder, we need to create a new class that implements the play .mvc.PathBindable interface, and our implementation must reference itself as a generic type argument:[2] if we create a class called ProductBinder, we have to implement play.mvc.PathBindable <ProductBinder>.
2 This might change in the next version of Play.
Because we want to bind the Product entity to the EAN number that is used in our URL, we need to implement the play.mvc.PathBindable interface on our Product class.
Open your editor and edit the Product.java class from the models directory.
Listing 6.9. Project directory structure

The code is simple; all we need to do is implement three methods. Like we said, our Product class implements the play.mvc.PathBindable interface and references itself (we have the class declaring a Product, and play.mvc.PathBindable references Product via the use of generics). The three methods we need to implement to satisfy the interface are:
- T bind(String key, String txt)
- String unbind(String key)
- String javascriptUnbind()
The bind method indicates how to bind our product from the URL. The unbind method tells Play what to display when a Product is referenced from the view, for example, in case of reverse routing (see chapter 5). In our case, we should display the product’s EAN number. The method javascriptUnbind is used for Ajax calls. We also want to use the product’s EAN number for that.
Let’s add our three new methods. The bind method performs a lookup in the database, using the EAN number. The EAN number is passed via the txt parameter. That is the EAN number as it appears in the URL. The unbinding process is simple and consists of returning our Product instance’s EAN number. The following listing shows our implementation.
Listing 6.10. Product class that is PathBindable-aware

We now need to change our routes file to modify our Product.edit() route. Edit the routes file located in your conf directory.
Let’s replace
GET /product/:ean controllers.Product.details(ean: String)
with
GET /products/:ean controllers.Products.details(ean: models.Product)
This is how we tell Play that we want to use our object. The automatic binding between the Product object and the EAN number in our URL path will be performed by the methods we have implemented.
We now need to change our Products controller with the following method:

Now that we’ve changed the method signature, we need to update its callers too. At this point, we only have one caller. In the products list template, products/list .scala.html, change the following line
<a href="@routes.Products.details(product.ean)">
to
<a href="@routes.Products.details(product)">
and we’re done! We can now automatically bind a URL to an instance of Product. Calling http://localhost:9000/products/111111111111 will show the product with EAN 111111111111. This simplifies the code for our controllers and centralizes the program logic that turns a path parameter into a Product instance. Any action method that requires a Product can now accept it as a parameter directly.
Query string binders
Up to this point, we’ve seen that we can bind the URL path to our model objects. We can do exactly the same for URL parameters (the query string part of a URL). Let’s take our product example. This time, we’re going to bind to a Product object when we pass the product’s EAN as a query parameter:
http://localhost:9000/products?ean=1
When Play encounters this URL, it should look up the Product in the database, based on the provided EAN. In order to achieve that, we have to implement the play.mvc.QueryStringBindable interface, similar to how we implemented PathBindable earlier. Because we want to look up Product objects, we’ll implement the interface on our Product model class.
Edit the Product model class.
Listing 6.11. Project directory structure

This time, we need to change it to implement the play.mvc.QueryStringBindable interface. Like PathBindable, this interface provides three methods we need to implement:
- Option<T> bind(String key, Map<String,String[]> data)
- String unbind(String key)
- String javascriptUnbind()
The bind method gives us access to the query parameters, both values and associated keys, and must return an Option object of type T. In our case, T is type Product. Option is the class that allows us to say that either we return something or we return nothing, giving a nicer alternative to returning null. The data parameter of the bind method gives us access to the query parameters. It’s represented by a Map object that contains the query parameter names with their corresponding values.
Like before, bind indicates how to bind our product from the URL parameters, unbind tells Play what to display when a Product is referenced from the view, and javascriptUnbind is to support JavaScript. In our case, the logic is based on the id property of our Product class.
Let’s implement the required methods in the Product model class. Please note that this is a simple example, and so it doesn’t check for null values or other possible errors.
Listing 6.12. Product class that is QueryStringBindable-aware

We need to declare a new route in our routes file that links the URL call to our controller. Open the routes file (located in your conf directory), and add the following route:
GET /products/ controllers.Product.details(ean: models.Product)
We’re ready to accept URLs such as /products?ean=1. Modify the details method on the Products controller, if you haven’t already done so in the previous section.
Listing 6.13. Project directory structure

The edit method becomes the same as when we used the path binder:

As you can see, we can manipulate the Product object straight from our controller methods. This is quite nice if you want to reduce the size of your controller code. We can now automatically bind URL parameters (id, in our case) to an instance of Product. Calling http://localhost:9000/products?ean=1 shows the product with id 1.
Form field binders
Another form of binding occurs when a form is submitted or displayed. Values are mapped back and forth between the Form object and the forms in the views. Inside the form object, the data is stored as objects, but on the client side we can only display their string representations. This is why customized form field binders can be useful. Form field binders in Play are also referred to as formatters, because they format data to and from controllers.
Formatters, both predefined and custom, are always used to map Strings to objects. You can register a Formatter using the register() method of play.data .format.Formatters. Let’s do that now with a custom formatter for dates, by extending the SimpleFormatter class. We have to register the formatter at application startup in the Global object (or a class that extends GlobalSettings and overrides the onStart method). For that we need to create a Global.java file in the app folder. The Global object is part of Play and defines methods that are called during the application lifecycle (onStart, onStop, onError, and so forth). The Global.java file content is shown in the following listing.
Listing 6.14. Registering a DateFormatter class


Because we’re extending the SimpleFormatter class, we have to implement two methods: the parse() method and the print() method. The parse() method converts a String to a Date object (the binding process), whereas the print() method converts a Date to a String (the unbinding process). An incoming date string, such as 11-02-2008, will now be converted to a Date object representing that date. Similarly, an outgoing Date object will be converted to a “dd-MM-yyyy”-formatted string.
As you can see, this is straightforward to declare. Now every time we encounter a Date object, Play knows how to bind a date and send it back as String. But there are cases when you don’t want the formatting to be global, or you want the date format to be enforced and/or different.
If we were to add a date to our product, the user would have to enter the date as 21-01-2012 in a product details input field using the formatter we defined earlier. Similarly, the date will be shown as 21-01-2012 in the details form. In our object model, however, it will be a Date and not a String; the formatter handles the conversion between String and Date.
For example, what if you want to have multiple date representations? For example, suppose you want the user to input 11-02-08 on the main page and 11/02/08 on the login screen. Play allows you to control the binding behavior with annotations, including custom annotations. Let’s transform our date formatter into an annotation-based formatter by creating the following:
- An annotation
- A formatter that extends Play’s AnnotationFormatter
Let’s start with our annotation:
Listing 6.15. The DateFormat annotation, /app/utils/DateFormat.java
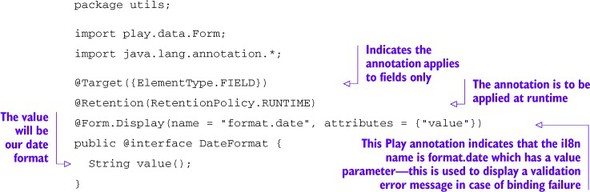
The annotation is simple and is mainly a holder for our date format. The Display annotation defined on the DateFormat annotation holds metadata for Play. When a date can’t be bound because of an incorrect date format, Play uses that metadata to display an error message on the form. The annotation tells Play to use the format.date message key and that value can be used as a parameter for the message.
Let’s now define our formatter. We have to indicate that we want an annotation formatter. This is done by extending Formatters.AnnotationFormatter.
Listing 6.16. The AnnotationDateFormatter class


Because we’re extending the Formatters.AnnotationFormatter abstract class, as before with the SimpleFormatter class, we have to implement two methods: the parse() method and the print() method. And as before, the parse() method binds the date string representation to a concrete Date object, whereas the print() method does the exact opposite. But this time, the Formatters.AnnotationFormatter is annotation aware, and our print() and parse() methods take an extra parameter: our DateFormat annotation. We use it to access the configured pattern.
As we’ve seen in the previous section, we need to register our AnnotationDate-Formatter in our Global.java class. Listing 6.17 shows how to do that.
Listing 6.17. Registering our AnnotationDateFormatter in the Global.java file

Now we can now annotate any object property on a model class to indicate that we want to bind and unbind Date from a Form object using the following syntax:
Listing 6.18. Object model using the DateFormat annotation
public Person {
    @DateFormat("MM-dd-yyyy")
    public Date birthDate;
}
Now in our view, each Person’s birth date will be displayed as MM-dd-yyyy. When submitting a form, the birthDate attribute will contain a Date object with the expected date. Note that in practice, the example we’ve seen is already part of Play. You don’t need to code it and you can use the @DateTime annotation defined in the play.data.format.Formats class.
6.3. Body parsers
We’ve looked at request body data mapped to form objects and vice versa, but we haven’t explored how the raw request bodies are processed. This step is the job of body parsers.
Each incoming HTTP POST and PUT request contains a body. This body may be single part or multipart, and may contain XML, JSON, binary data, or any other type as specified in the request’s Content-Type header. A body parser will parse the body (hence the name) into a Java object. Further operations, such as formatting, can then take place. Figure 6.10 illustrates this process.
Figure 6.10. Body parser interaction with an incoming request

Body parsers “decode” the request and transform it into objects that can then be used by the other Play components. Because a JSON body is parsed differently to an XML body, Play uses pluggable body parsers. Different content types, therefore, have specific body parsers that can translate arbitrary incoming data into something Play can understand.
Using body parsers, it’s possible to directly manipulate the object obtained from a request. The interaction is done through a body-parser API.
6.3.1. The body-parser API
All body parsers must generate a play.mvc.Http.RequestBody value. This value can then be retrieved via request().body(). The following listing shows how to use the API.
Listing 6.19. Accessing the request body

You can specify the BodyParser to use for a particular action using the @BodyParser.Of annotation. This means that we can tell Play to use a specific body parser to parse the request and then access the body request to read the value. Listing 6.20 shows an example in which we’re specifying a JSON body parser and reading the result via the body.asJson() method.
Listing 6.20. Specifying a specific body parser to use

All body parsers will give you a play.mvc.Http.RequestBody value. From this body object you can retrieve the request body content in the most appropriate type. In our previous example, we used the asJson() method. But if we’d used an XML body parser, we would’ve used the asXML method.
RequestBody methods may return null
RequestBody methods such as asText() or asJson() will return null if the parser used can’t handle that content type. For example, in an action method annotated with @BodyParser.Of(BodyParser.Json.class), calling asXml() on the generated body will return null.
Some parsers can provide a more specific type than Http.RequestBody (a subclass of Http.RequestBody). You can automatically cast the request body into another type using the as() helper method. An example is shown in the following listing.
Listing 6.21. Using the as() helper method

If you don’t specify a body parser, Play will use the Content-Type header to determine which built-in parser to use:
- text/plain— String, accessible via asText()
- application/json— JsonNode, accessible via asJson()
- text/xml— org.w3c.Document, accessible via asXml()
- application/form-URL-encoded— Map<String, String[]>, accessible via asFormUrlEncoded()
- multipart/form-data— Http.MultipartFormData, accessible via asMultipartFormData()
- Any other content type— Http.RawBuffer, accessible via asRaw()
Please note that if the requested body type isn’t available, the method will return null. The following listing shows an example of how the asText() method can be used.
Listing 6.22. Using the body.asText() method
public static Result save() {
  RequestBody body = request().body();
  String textBody = body.asText();

  if(textBody != null) {
    return ok("Got: " + text);
  } else {
  return badRequest
    ("Expecting text/plain request body");
  }
}
Text-based body parsers (such as text, JSON-, XML-, or URL-encoded forms) use a maximum content length because they have to load all the content into memory. There is a default content length limit of 100 KB.
Overriding the default max content-length
The default content size can be defined in application.conf: parsers.text.maxLength=128K.
You can also specify a maximum content length via the @BodyParser.Of annotation, for example to only accept 10 KB of data:
@BodyParser.Of(value = BodyParser.Text.class, maxLength = 10 * 1024)
public static Result index() {
  ...
}
Custom body parsers must be written in Scala, because they process incoming data incrementally using Scala’s Iteratee I/O.
But Play has body parsers for typical web content types such as JSON and binary data, and these can be reused to create body parsers in Java.
Now that we understand how to receive and transform data, we need to be able to ensure the data is valid.
6.4. Validation
We’ve seen how we can translate user data to our own object model and vice versa. But we also need to ensure the data is valid in the context of our application by meeting certain criteria. For example, some fields might be mandatory. The binding process can’t guarantee that data is valid. Play allows you to define constraints to catch invalid submitted data. It also provides detailed feedback to the client in the case of invalid data. In this section we’ll see how we can define constraints on the data the user inputs.
6.4.1. Using the built-in validators
Play validates the data once it is bound to the domain model. Play uses JSR-303[3] and Hibernate validators for this step. Defining constraints is as simple as annotating the object model. For example, ensuring that the user inputs an EAN number in our product form is as simple as adding the @Required annotation on the Product object:
3 JSR-303 is a Java specification that defines a metadata model and API for JavaBean validation based on annotations; see http://jcp.org/en/js/r/detail?id=303.

To ensure the user input complies with the constraint defined by the annotation, we need to check the hasError method on our Form object. Validation occurs immediately after binding and registers errors in the form as they are found. The validation process sets any validation errors to the Form that was bound. Validation errors contain the relevant i18n error message key, the field name, and a potential parameter list to display with the error message. Listing 6.23 shows the save method seen in section 6.1.3, with the validation check added.
Listing 6.23. Save action method with validation

As you can see, validating a form is straightforward.
Play comes with a lot of commonly used validations, and these are detailed in table 6.1.
Table 6.1. Built-in Play validation annotations
|
Name |
Description |
|---|---|
| @Required | A Play-specific validation indicating the field must be non-null or, in the case of Strings and Collections, not null and not empty. Works with any object. |
| @Min | Indicates the minimum this number should be; for example, @Min(1). |
| @Max | Indicates the maximum this number should be; for example, @Max(2). |
| @MinLength | Defines a minimum length for a string field. |
| @MaxLength | Defines a maximum length for a string field. |
| @Pattern | Checks if the annotated string matches the regular expression pattern. |
| @ValidateWith | Uses a custom validator (see section 6.4.3). |
| Checks whether the specified string is a valid email address. |
Play uses an implementation of the JSR-303 specification,[4] better known as Bean Validation, to perform the validation. The standard also comes with its own set of validation annotations that covers most common use cases.
4 Hibernate Validator, to be precise.
Table 6.2 shows some built-in annotations that come with Bean Validation. They can all be found in the javax.validation package.
Table 6.2. Built-in Hibernate validation annotations
|
Name |
Description |
|---|---|
| @Null | Indicates that the field should be null (but it can be empty). |
| @NotNull | Indicates that the field cannot be null. |
| @NotEmpty | Checks if the string is not null nor empty. |
| @AssertTrue | Asserts that this field is a Boolean that resolves to true. |
| @AssertFalse | Asserts that this field is a Boolean that resolves to false. |
| @Min | Indicates the minimum this number should be; for example, @Min(1). |
| @Max | Indicates the maximum this number should be; for example, @Max(2). |
| @DecimalMin | Indicates the minimum this decimal number should be; for example, @Min(1.1). |
| @DecimalMax | Indicates the maximum this decimal number should be; for example, @Max(4.2). |
| @Size | Indicates range this number should be in; for example, @Size(min=2, max=4). |
| @Digits(integer=, fraction=) | Checks whether the property is a number, having up to {integer} digits and {fraction} fractional digits. |
| @Past | Checks whether the annotated date is in the past. |
| @Future | Checks whether the annotated date is in the future. |
| @Pattern(regex=) | Checks if the annotated string matches the {regex} regular expression pattern. |
| @Valid | Performs validation recursively on the associated object. |
| Checks whether the specified string is a valid email address. | |
| @Length(min=, max=) | Validates that the annotated string is between {min} and {max} (inclusive). |
These annotations are self-explanatory, but further information can be found in the documentation for Bean Validation (http://beanvalidation.org).
6.4.2. Partial validation
A common use case is having multiple validation constraints for the same object model. Because we’re defining our constraint on the object model, it’s normal to have multiple forms that refer to the same object model. But these forms might have different validation constraints. To illustrate this use case, we can imagine a simple wizard in which the user inputs a new product in two steps:
1. The user enters the product name and submits the form.
2. The user enters the product EAN number and the description.
We could validate the product’s name during step 2, but displaying an error message for the product name at that point would be weird. Fortunately, Play allows you to perform partial validation. For each annotated value, we need to indicate at which step it applies. We can do that with the help of the groups attribute from our annotations. Let’s change our Product model class to do that:

We now need to indicate which step we’re at. This is done when binding from the request, specifying Step1:

We can do the same for Step2. This is useful if the model object is used on different forms and has different validation constraints.
6.4.3. Creating a custom validator
Play gives you the ability to add your own validators. This is useful if you need to perform custom validation. You can implement your own validator in different ways:
- Using ad hoc validation—this method is the quickest and simplest one
- Using @ValidateWith and defining your own Validator class
- Defining a new JSR 303 annotation and defining a new Validator class
We’ll take a closer look at each of these approaches, starting with ad hoc validation.
Ad hoc validation
You can define an ad hoc validation by adding a validate method to your model object. Play will invoke the validate method of every object model. For example, to validate our EAN number, we can add a validate method on our Product object model. The validate method must return a String or null. If it returns a String, it must either contain the validation error message or the i18n key for one. A null return value indicates there are no errors.
An EAN is a 13-digit number. Our validate method must check that the String EAN variable contains exactly 13 digits. Listing 6.24 shows you how to do that.
Listing 6.24. EAN number ad hoc validation adding the validate method

The validate method is not practical if you have several attributes to validate, but it’s the easiest and quickest way to add simple validation constraints. Let’s take a look at how we can do more complex validation.
Play @ValidateWith
Using @ValidateWith, we can have fine-grained control over validation. Let’s use the EAN number as an example again. First, we need to annotate the ean attribute with the @Constraints.ValidateWith.ValidateWith annotation. The @ValidateWith method takes a class as parameter: the class that will do our custom validation.
We need to implement a class that extends the Play Constraints.Validator class. In our Validator class, we need to implement the isValid and getErrorMessageKey methods. isValid() tests the field’s validity, and getErrorMessageKey() returns the i18n message key for the error message. The following listing shows how to validate the EAN number using @ValidateWith.
Listing 6.25. EAN number validation using the @ValidateWith annotation

Using @ValidateWith, we now have a custom, fine-grained, reusable validation mechanism. This approach to validation is Play-specific, but using the JSR-303 standard, there is a way to specify validation logic in a more portable way. Let’s see how that works.
JSR-303 custom annotation and validator
This approach is the JSR-303 standard way to add custom validation. It’s not specific to Play and could be used in other, non-Play applications. This approach requires two steps:
- Define an annotation and reference a Validator class
- Define the Validator class that is referenced by our annotation
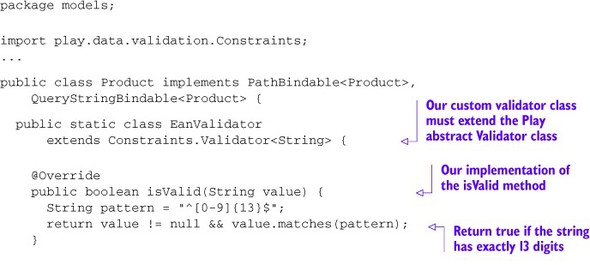
Let’s define an @EAN annotation that will be used to make sure our EAN number has exactly 13 digits. We need to declare a new annotation and annotate that with the @javax.validation.Constraint annotation later. The @Constraint annotation references a Validator class that we need to implement next. The following listing shows you how to create the annotation.
Listing 6.26. Custom JSR-303 EAN annotation

We now need to define a Validator that will hold the business logic to validate our EAN number. Our validator has to implement the JSR-303 ConstraintValidator interface, and we need to implement the isValid method. The isValid method returns a Boolean that indicates whether the value is valid. The following listing shows the EanValidator implementation.
Listing 6.27. Custom JSR-303 validator

We can now annotate our Product object model with the @EAN annotation:
public Product extends Model {
...
  @EAN
  public String ean;
}
And our EAN field will automatically be validated. As you can see, it’s easy to add new validation logic to our object models. Play allows you to validate your objects with your own custom validation code, so you can validate against a database if you wish to.
6.4.4. Displaying the validation errors on the form
Nice—we can now validate our forms. But we also need to present the cause of the validation errors to our users. This is trivial to do; the error messages are stored in our Form object. By passing the Form object to our views, we can easily display the error messages. For example, in our controller’s save() action, we check the form for errors and pass it along to the view:

In our view, we can access the form object and display the errors. We can access the error message using the errors() method on the form or on a specified field. If you want to display all the validation errors, iterate over the form errors using the errors() method:
<p>Please fix the following errors<ul>
@for(error <- productForm.errors() ) {
  <li>@error.message</li>
}
<ul></p>
If you want to access the errors per field, then you can use the errors() method on the field value. For example, if we want to access the potential validation error for the product name field:
@productForm("name").errors()
This returns a list. But using the built-in mkString method to join strings, we can have a comma-separated list of errors per field using the following code:
@productForm("name").errors().mkString(", ")
For our current form, there’s no need to use these methods, because the form helpers already include errors. But there’s no magic to the form helpers; they render the errors using exactly this technique, as you can see in the following listing, which shows the template for the field helper.
Listing 6.28. Source code for the field helper template
@(elements: views.html.helper.FieldElements)

@import play.api.i18n._
@import views.html.helper._

@************************************************** *
Generate input according twitter Bootstrap rules *
**************************************************@

<div class="clearfix @elements.args.get('_class)
  @if(elements.hasErrors) {error}"
  id="@elements.args.get('_id).getOrElse(elements.id + "_field")">
  <label for="@elements.id">@elements.label(elements.lang)</label>
  <div class="input">
    @elements.input
    <span class="help-inline">
      @elements.errors(elements.lang).mkString(", ")
    </span>
    <span class="help-block">
      @elements.infos(elements.lang).mkString(", ")
    </span>
  </div>
</div>
We now know how to validate and to report any validation errors back to the user. We’re now able to submit any user inputs, process them, and reject any invalid data. Let’s see about a more complicated type of input: file uploads.
6.5. File uploads
It’s time to go back to our current application. There’s something missing that could make our paperclips more identifiable; we need to visually recognize them. Let’s add a picture. For that we need to modify the Product object model slightly: see the following listing.
Listing 6.29. Adding a picture to the Product object model

We now need to give our users a chance to upload a picture for a product; we need to add an HTML input file element to our form. To do that, we need to edit the existing product.scala.html template that we created in section 6.1.1, add an HTML file input element, and display a picture if one exists using an HTML img element. We also need to change the form encoding type to send multipart data.
The form now looks like the one shown in the following listing.
Listing 6.30. “Product create” form with picture uploading
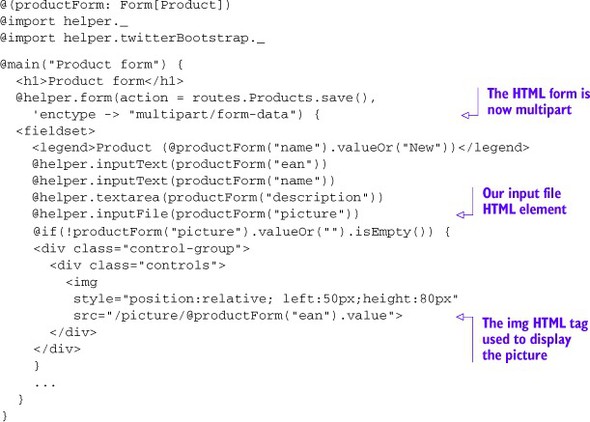
Once the form is submitted, we need to save the picture sent by the user. Unfortunately, because of the way HTTP file uploads work, Play is unable to bind the file directly to the picture field, so we’ll need to modify our save() method on the Product controller.
In order to obtain the file that was uploaded by the user, we need to access the part of the HTTP body that holds the file. We’ve seen how we can use the body-parser API to do that in section 6.3.1; we call request().body().asMultipartFormData().
Once we access the body, we can request the file and convert it to a byte array. Then we can save our product and the associated picture to the datastore. We could also access the filename and its content type through the FilePart object that we obtain from the multipart body, but we currently have no need for that in our application.
The following listing shows how to read and save the file.
Listing 6.31. Obtaining and saving uploaded files
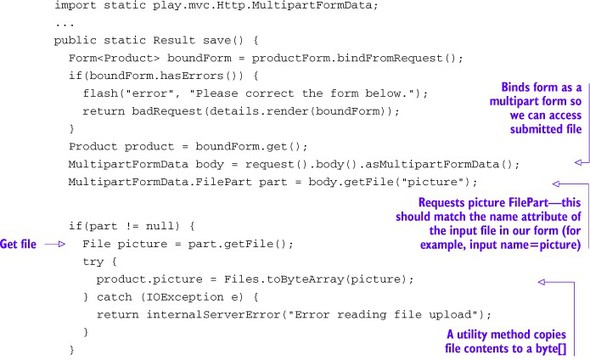

We’re now able to save our product and the associated picture to our datastore. If you wanted to store the file some other way, such as on the filesystem, you could easily write code that does that; once you have the File object, it handles like any other file.
Now, we still need a way to display the product picture on our form. This is easily done by adding a new method on our Product controller. Let’s add a picture() method. This method takes an EAN number, uses it to look up the matching product in the database, and uses the image byte array to generate a Result.
The following listing shows how the picture() method is implemented.
Listing 6.32. Our picture method
public static Result picture(String ean) {
  final Product product = Product.findByEan(ean);
  if(product == null) return notFound();
  return ok(product.picture);
}
As usual when we implement a new action method, we need to edit our routes file to link the picture method to a URL. To request a picture for a product, we want to call the /picture/ean URL. We add the following line to our routes file:
GET /picture/:ean controllers.Products.picture(ean: String)
In our product.html.scala file, we already added the image:
@if(!productForm("picture").valueOr("").isEmpty()) {
  <img src="@routes.Products.picture(productForm("ean").value)"/>
}
We’re now able to display our product picture. Figure 6.11 shows what you should now see in the application.
Figure 6.11. Our paperclip picture

Now that we’re able to handle file uploads, we’ve covered all aspects of handling user input!
6.6. Summary
This chapter has been dense, and we saw a lot. We learned how to handle user input—from a simple form submission to a more complex file submission. We also learned how all this was possible through the use of body parsers. We saw in detail how the Play binding process transforms user-submitted data into data that our application can understand. We also learned how we could extend that binding process; we know how to customize and create our own binders.
Once we were ready to process user data, we saw how to validate that data. We also saw how we could create our own validator if needed. We then saw how to handle invalid data and to report those errors back to the user. We finished the chapter with a concrete example of how to handle file submission. We’re now able to handle any data type, process it, and validate it when needed. In the next chapter, we’ll see how to model our warehouse application.