Chapter 2. The parts of an application
This chapter covers
- Introducing our sample application
- Discussing the contents of a new application
- Setting up an IDE
- Configuring a debugger
Now that you know what Play is all about, it’s time to start building a serious application. In this chapter, we’ll dive deeper into what makes up a Play application, and give you an introduction to all the important concepts you’ll need to know about when building a Play application. The following chapters will then explore each concept in more detail.
In this chapter, we’ll also introduce the example application that we’ll evolve into an enterprise-like application as we progress through the chapters of this book. The application we chose will be an example of a real-world application; not the next Twitter or Facebook, which have specific and uncommon requirements and challenges,[1] but something your customer might ask you to build. We start by creating a new application and identifying all the files that make up the new application. After that, we’ll set up an IDE so that we’re ready to start the coding in the next chapter.
1 Although you could certainly use Play for them!
Let’s see what we’re going to build.
2.1. Introducing our application
Throughout the rest of this book, we’ll build an enterprise web application from the ground up. The Acme Paperclip Company has asked us to build them a web-based warehouse management application. They have all sorts of plans for automation of their warehouse processes, but they first want us to show them that we’re up to the job by building a simple product catalog for their product range.
The application we’ll build for them in this chapter is a simple CRUD[2] application for maintaining a product catalog. Users will be able to browse a list of products, as well as add new ones. Because this is only a proof of concept, we’ll simulate storing these products; the data storage will be mocked, rather than use a database. We’ll add persistence in chapter 7.
2 Create, Retrieve, Update, Delete
But first, let’s create a new Play application that will become our warehouse application. As we did in chapter 1, when we created the “Hello World” example, we’ll use the play new command. Go ahead and run play new warehouse, and you’ll have a new directory, warehouse, that will contain a default Play application. Let’s see what’s inside.
2.2. A rundown of a Play application
If you take a look at your application’s directory, you’ll see it contains the following files and directories:
├── README
├── app
│   ├── controllers
│   │   └── Application.java
│   └── views
│       ├── index.scala.html
│       └── main.scala.html
├── conf
│   ├── application.conf
│   └── routes
├── project
│   ├── build.properties
│   └── plugins.sbt
├── build.sbt
├── public
│   ├── images
│   │   └── favicon.png
│   ├── javascripts
│   │   └── jquery-1.9.0.min.js
│   └── stylesheets
│   │   └── main.css
└── test
    ├── ApplicationTest.java
    └── IntegrationTest.java
We’ll take a closer look at each of the top-level directories. The app directory is the most important one, but we’ll cover that last, and talk about the others first.
To start, we’ll discuss a directory that doesn’t show up in a newly created application, but which will be there after you run it once: the target directory. There’s only one thing you have to know about the target directory: you should ignore it. The target directory is the build process’s working directory. This is where your compiled classes are stored, among other things. Be sure to never commit it in your versioning system. If you’re using Git as your versioning system, you probably won’t; Play also generated a .gitignore file for you, making sure you never commit files that are generated at runtime.
Now that we know what to ignore, let’s start discussing the first directory of interest, the conf directory.
2.3. Play’s configuration files
The conf directory is where you configure the application. Its contents look like this:
.
├── application.conf
└── routes
As you can see, this directory contains two files: application.conf and routes. The application.conf file contains configuration information about your Play application. This is where you’ll configure things like logging, database connections, which port the server runs on, and more.
The application configuration file is loaded at startup time and is globally readable. This means that any code that needs to can access it. If you need some configuration options for your application, you can add some custom options to the file, and use them in your own code. Play generated an example configuration when you ran play new, so open it up and poke around if you’re curious. We’ll cover some of the options in here when we run into them, both later in this chapter and through the rest of the book.
The other file in the conf directory is the routes file. Here you can define your application’s routes, mappings from HTTP URLs to application code. It already contains two example routes:
# Home page
GET     /   controllers.Application.index()

# Map static resources from the /public folder to the /assets URL path
GET     /assets/*file    controllers.Assets.at(path="/public", file)
Every line of the routes file defines a single route. Let’s focus on the first route; we’ll explain what the second route does in section 2.5.
Any route consists of three parts: the HTTP method, the path, and the action method, as illustrated in figure 2.1.
Figure 2.1. Components of a route

Our example route maps any HTTP GET request for ‘/’ to controllers.Application .index(). This means that any GET request for the / (root) URL is handled by the index method on the Application class in the controllers package. We call methods that handle requests action methods.
If you’re unfamiliar with the HTTP protocol, the concept of an HTTP “method” may be new to you. An HTTP method has nothing to do with the kinds of methods you find in Java. There’s a lot of documentation to be found about the HTTP protocol and its methods and what they imply; search the web if you’re curious, but here’s a summary that will get you through the chapter.
The method of an HTTP request signifies the purpose of your request: whether you want to retrieve a resource from the server or post information to it, for example. A number of different methods are defined in the HTTP specification, and some extensions to the protocol add even more, but the two most-used methods in the HTTP standard are GET and POST.
GET is a retrieval request for a resource, and it contains no body, although the URL used may contain parameters (everything that comes after the ?). It’s important that a GET request may never have any lasting effects on the server; every time you GET a URL it should have the same effect. The fancy word for this is idempotence. The most important thing to remember is that you should only use it for information retrieval, not for submission of data.
The POST method, on the other hand, is a request for data submission, and may contain a body. It is still directed at a URL, but a POST request has effects server-side. A POST request is often used for forms that create or modify information. This is why your browser will likely warn you when you reload a URL that you POSTed to before.
There are more methods in the HTTP standard, such as PUT and DELETE, but we’ll talk about those when we discuss HTTP APIs.
The routes file is important to any Play application. It allows you to “design” your URLs. This is a big deal. Some (if not most) other Java web frameworks dictate what your URLs should be, or the framework can’t do its job. Because Play gives you full control over your URL schema, you can design clean, human-readable, bookmarkable URLs.
The next directory in our list is the project directory, and it contains files that configure the build process.
2.4. Build configuration files
The project directory looks like this:
├── README
├── app
├── conf
├── project
│   ├── build.properties
│   └── plugins.sbt
├── build.sbt
└── public
Of these files, you’ll only deal with build.sbt at the top root directory. Both build.properties and plugins.sbt are SBT configuration files, which describe the Play version to use and the SBT version to use. SBT (Scala Build Tool) is the build tool that Play’s console and build process is based upon. We’ll tell you more about what this file does whenever we need to change it, but don’t worry about it for now.
The file build.sbt is a file you will have to edit occasionally. The file looks like this when newly generated:
name := "warehouse"

version := "1.0-SNAPSHOT"

libraryDependencies ++= Seq(
  javaJdbc,
  javaEbean,
  cache
)

play.Project.playJavaSettings
In this file you define your application’s version number as well as any managed dependencies it might need. Managed dependencies are libraries and modules you use in your application that Play[3] can look up and download automatically. This is called resolving dependencies. You might be familiar with this process if you’ve used Maven or Ivy before.
3 Play delegates this to SBT.
As you can see, Play has already added some default modules for you. Every Java Play project uses by default the javaJdbc component to interact with databases, the java-Ebean component to add object-relational mapping, and the cache module to provide caching capabilities. You can read more about the database modules in chapter 7.
If you want to add a dependency on a library, you need to add a line describing it to the list of dependencies. As an example, suppose you want to use Google’s Guava library[4] to get some useful extra functionality on top of what the JDK standard library provides. You’d add a dependency on version 14.0 like this:
4 Visit http://code.google.com/p/guava-libraries/ for more information on Guava.
name := "warehouse"

version := "1.0-SNAPSHOT"

libraryDependencies ++= Seq(
  javaJdbc,
  javaEbean,
  cache,
  "com.google.guava" % "guava" % "14.0"

)

play.Project.playJavaSettings
The next time the application is started, Play will resolve the dependency, automatically download the correct JAR, and add it to the classpath.
The way dependency resolving works is that several preconfigured dependency repositories are queried for the correct versions of the files you need. There are various dependency repositories on the internet that serve the majority of the libraries available in the Java ecosystem. The best-known repository is the Maven central repository at http://search.maven.org/.
The dependency management system is smart enough to also download your dependencies’ dependencies, also called transitive dependencies. If you’re using transitive dependencies, and you want to include a library that has lots of dependencies itself, you no longer have to keep track of what version of what JAR to put where. The dependency management system does all of this for you.
Another great benefit of using managed dependencies is that you don’t need to keep any library files with your source files, keeping your codebase nice and small, while ensuring that it will always build (as long as any repository server containing the files is still available). Another bonus you get is that it’s easy to upgrade a library to a different version: change the version in your dependency declaration, and you’re done.
Play 2 will automatically resolve any dependencies as soon as it finds any change in this file when your application starts, so you don’t need to worry about having to trigger a dependency update.
If you want to use a library that’s not in any repository (yet)—for example, when it’s a new library, or one you developed in-house—you don’t have to use dependency management to use that library. You can create a new directory called lib in your application’s root directory, and any JAR Play finds there will automatically be added to the classpath for your application.
We’ll talk more about dependencies and dependency management in chapter 11. Let’s move on to the next directory, public.
2.5. Public assets
The public directory contains a few files already:
├── README
├── app
├── conf
├── project
├── public
│   ├── images
│   │   └── favicon.png
│   ├── javascripts
│   │   └── jquery-1.7.1.min.js
│   └── stylesheets
│       └── main.css
└── target
As you can maybe guess from its contents and its name, the public directory contains resources that are served directly, without any processing. This is what the second route we saw in section 2.3 does: it makes the contents of this directory available as public assets, files that are available to the client directly.
# Map static resources from the /public folder to the /assets URL path
GET  /assets/*file   controllers.Assets.at(path="/public", file)
Public assets are usually support files that are not your application. Things like images, stylesheets, JavaScript files, and static HTML pages are all public assets. Public assets are not generated by your application; they’re served straight to the client.
Play adds some additional features to requests serving public assets. It adds support for caching by providing ETag headers and for compression using gzip.
If you’re interested in preprocessing certain files, such as LESS stylesheets, CoffeeScript files, or JavaScript files, be sure to read section 2.6.1 about compiled assets. But first, let’s move on to the app directory.
2.6. Application code
The app directory is the most important directory of your application. It contains your application code—any part of your application that will need to be compiled, such as your Java source files and view templates, which we’ll discuss in a bit. When newly generated, the app directory contains the following files:
├── app
│   ├── controllers
│   │   └── Application.java
│   └── views
│       ├── index.scala.html
│       └── main.scala.html
├── conf
├── project
├── public
└── target
The files that are there are responsible for generating the welcome page we saw when we navigated to http://localhost:9000/ in section 1.5.5 in chapter 1.
There is one file, Application.java, that contains Java code implementing the business logic for generating the web page. Classes that take an HTTP request, run some logic on it, and return an HTTP result are called controller classes, which explains why they’re in the controllers folder.
There are two template files, index.scala.html and main.scala.html, which are responsible for defining the HTML page. Any content that’s generated on the server and sent to the client in an HTTP body, such as an HTML page, is called a view; therefore, the files are in the views folder.
The template files contain a template in Play’s Scala template syntax. An important aspect of Scala templates is that they’re compiled to regular classes. This has all sorts of advantages, the most important of which are compile-time syntax and type checking.
Although Play’s Scala templates in fact contain Scala code, this does not mean you have to learn or understand Scala. Any template language has structures you need to know to build your templates, and Scala templates are no different. Once you know what you have to do to, for example, iterate over a collection or insert a variable value somewhere, you know all you have to know to use that feature. You don’t have to think of it as Scala if you don’t want to. Think of it as another template language.
Now if you happen to know Scala, you will recognize the structures used in the tags and understand why they work the way they work. But the point is that you don’t have to in order to use the template syntax and enjoy all the benefits it brings.
Another thing that’s important to note about the app directory is that it’s the root for all your source code, meaning that any subfolder will automatically have to be a package, as with any regular Java project.
You might be used to having your packages look more like a domain space, such as org.mycompany.myproject.mypackage, but there’s nothing in the Java language that forces you to do that. It happens to be convention, and that convention mainly exists for namespacing purposes, to prevent classes with the same name stepping on each other’s turf. Because you won’t be running two Play apps in the same JVM at the same time, you don’t have to worry about that in your Play apps, so Play doesn’t follow that convention. That’s why your controllers are in the controller package, your views in the views package, and so on. Nice, concise, and easy to follow.
Now let’s look at another cool feature in Play that also uses the app directory: compiled assets.
2.6.1. Compiled assets
We’ve seen what assets are in section 2.5, where we introduced assets as files served to the client, but assets can also be the result of compilation. A CSS or JavaScript file doesn’t have to be compiled, but there are certain tools that generate them. Play has the option to preprocess assets before they’re served to the client, giving you more convenience and flexibility over these files. Out of the box, Play 2 comes with support for LESS, CoffeeScript, and Google’s Closure compiler. Using them is completely optional, but Play makes it easier for you to use these technologies if you want to.
The source files for compiled assets should be kept in your application’s app/assets directory. That directory is not auto-generated by Play, so create it if you want to use this feature.
LESS
LESS (http://lesscss.org) is a dynamic stylesheet language that is compiled to CSS, offering a more powerful and flexible stylesheet language that is still compatible with any browser. Any .less file saved in the app/assets directory will be compiled into the application’s public folder, which means the result will be available as a regular public asset.
CoffeeScript
CoffeeScript (http://coffeescript.org) is a programming language that compiles to JavaScript. It’s generally considered a cleaner and more readable language than JavaScript, and is gaining popularity. Any .coffee file placed in app/assets will be compiled to the application’s public folder, like LESS files.
JavaScript
If you’re not using CofeeScript, but JavaScript, you might want to use Google’s Closure compiler (https://developers.google.com/closure/compiler/; not to be confused with the programming language “Clojure”). The Closure compiler analyzes your JavaScript code, tries to make it run faster, and warns you about potential problems. It also makes your code smaller (this is called minifying), which will make it download and run faster. Like LESS and CoffeeScript, place any .js files you want to compile in the app/assets directory, and they will be compiled to /public/.
2.7. Setting up an IDE
Now that we know what all the directories and files are for, we’re going to edit some of them in a moment, and then start implementing our proof-of-concept application. You could edit the files with a plain text editor. But if you use a Java IDE such as Eclipse or IntelliJ, you’ll find that editing your source code becomes a lot easier, and you’ll be more productive. One of the advantages of using a type-safe language like Java is that tools like IDEs can do a lot to make coding faster and easier (and therefore more fun). Most IDEs offer features such as autocompletion, automated refactoring, and static code analysis. In short, an IDE makes your life easier.
Play makes it easy to import your applications into most well-known IDEs by including commands that will set up a project for you. Play comes with support for Eclipse and IntelliJ IDEA. This does not mean that you can’t use any IDE you want; it means that you have to set up the project in your IDE yourself if you use an IDE other than Eclipse or IntelliJ IDEA.
2.7.1. Eclipse
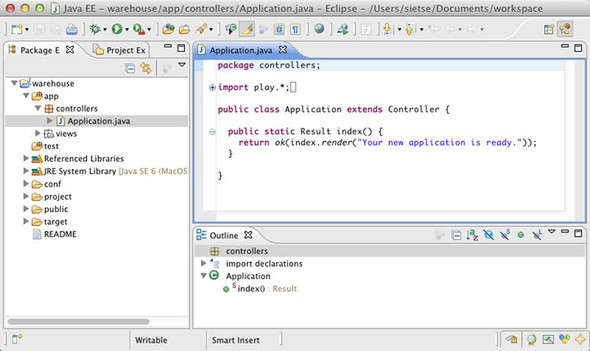
Eclipse is one of the most well-known and widely used Java IDEs. It’s open source and free to use. Figure 2.2 shows how you set up your application for Eclipse.
Figure 2.2. A new Play application in Eclipse
First of all, you need to generate the Eclipse-specific files that instruct Eclipse how to load your application and its dependencies and how to build it. Play generates the necessary files for you when you run the eclipse command from the Play console.
Once these files have been generated, Eclipse will be able to recognize your application’s directory as an Eclipse project, and you can import it directly. To do so, use the Import command under the File menu in Eclipse’s menu bar. When Eclipse asks you what you want to import, choose General > Existing Projects into Workspace. On the next screen, click Browse to select your application’s root directory, and Eclipse will recognize the project as figure 2.3 shows. Click the Finish button, and you’re all done setting up your Eclipse project.
Figure 2.3. Importing a project in Eclipse

2.7.2. NetBeans
NetBeans is another well-known and widely used Java IDE. It’s open source and free to use. NetBeans 7.3 supports Play natively. All you need to do is to install the NBPlay plugin in your NetBeans IDE. To do so, go to http://plugins.netbeans.org/plugin/47637/.
You should see a screen similar to figure 2.4.
Figure 2.4. NetBeans plugin center

Download the plugin by clicking the Download button and save the plugin in a known location. Once you have it downloaded, in NetBeans IDE, select the menu Tools and Plugins. Select the Downloaded tab and then click the Add Plugins button. Select the previously saved NBPlay plugin as shown in figure 2.5.
Figure 2.5. Install the NetBeans plugin

You are now installing the plugin.
Now, open your previously created project. NetBeans now recognises that it is a Play 2 project, as shown in figure 2.6.
Figure 2.6. Open a new Play project in NetBeans IDE

The Play NetBeans plugin provides syntax highlighting, syntax checking, and autocomplete in Play 2 templates and routes files as figure 2.7 shows.
Figure 2.7. A new Play application in NetBeans IDE

2.7.3. IntelliJ IDEA
IntelliJ IDEA is a commercial IDE from JetBrains. It is open source, and the community edition is free to use, with more powerful features available in the paid “ultimate” edition.
Since version 12, IntelliJ has support for Play 2. This means you get syntax highlighting, syntax checking, and autocomplete in Play 2 templates and routes files as shown in figure 2.8.
Figure 2.8. A new Play application in IntelliJ IDEA

Play 2 can make an IntelliJ “project” out of your application, but the model that is part of this project can also be imported into any existing project you might have. To create the IntelliJ project, run the idea command from the Play 2 console.
To open the project in IntelliJ, select File > Open project... from the menu bar, and choose the directory for your application.
2.7.4. Using a debugger
One of the most useful features in Java IDEs is their debuggers, which tap into the JVM that’s running your application and allow you to pause code execution at any point (such a point is called a break point) to inspect the state of your application.
To debug a Play application, you need to start it in debug mode, and then configure your debugger to use remote debugging, which means that your debugger will connect to a JVM that’s already running, rather than the IDE launching one and connecting to that.
To start Play in debug mode, start it with the debug parameter. Play will tell you which port to connect your debugger to, which is port 9999 by default:
~/warehouse  > play debug
Listening for transport dt_socket at address: 9999
[info] Loading project definition from /Users/sietse/hello/project
[info] Set current project to hello (in build file:/Users/sietse/hello/)
If you want to use Eclipse’s debugger with your Play application, you need to set up a new debug configuration under the Run menu. Select Remote Java Application and click the New button to create a new remote debug configuration. Set it to connect to your Play application on localhost, by default on port 9999. To start debugging, select Run > Debug in the menu bar as shown in figure 2.9.
Figure 2.9. Adding a debug configuration in Eclipse

To use IntelliJ’s debugger with a Play application, select Run > Edit Configurations from the menu bar, and then click the plus button in the upper-left corner. From the menu that pops up, select Remote to create a new remote debug configuration. To start using your new configuration, select Run > Debug... from the menu bar as shown in figure 2.10.
Figure 2.10. Adding a debug configuration in IntelliJ

Explaining how to use the debugger is beyond the scope of this book, but this should be enough to get you started debugging with Eclipse or IntelliJ.
2.8. Summary
In this chapter, we’ve created a new Play 2 Java project and identified what directories and files make up a Play application.
We’ve learned that compiled code goes under /app/, and that includes any compiled assets, such as LESS and CoffeeScript files. Static assets go in /public/, and /conf/ holds important configuration data, such as the routes file and application.conf.
We’ve also seen how to set up an IDE and how to attach a debugger to a running Play application.
In the next chapter, we’ll start coding our example application.