Chapter 5. Controllers—handling HTTP requests
This chapter covers
- How to use controllers
- Using action methods and results
- Using routing to wire URLs to action methods
- Composing actions with interceptors
- Using the different scopes
In this chapter we’ll explain in detail one of the key concepts of the Play framework MVC paradigm: the controller. We’ll take a closer look at our warehouse web application and at the same time explain how interaction with a web client works in Play.
We’ll start by explaining controllers, and from there we’ll examine action methods and how we can return results to web clients. We’ll then see how to use routes to link HTTP requests to a controller’s action method. After that, we’ll look at what interceptors are and talk about what scopes are available in Play. All of these concepts are important when processing and responding to client requests.
Let’s see how we can accept and process a request from a client. First, we’ll introduce the concepts of controllers and talk some more about action methods.
5.1. Controllers and action methods
Business data is often stored in a relational database. That means that if you wanted to add a new product to the catalog, you’d have to write some SQL. But that wouldn’t be very practical, would it? This is where web applications come to the rescue. Using a web application, the warehouse manager can interact with the database stock level. This is an easier and cheaper solution than learning SQL or having an on-site SQL expert.
But there’s still a problem: the web browser can’t directly access the data because it doesn’t speak SQL. The web browser speaks HTTP. Moreover, the model layer is usually fine-grained, whereas the user usually wants to execute a series of actions in one go. For example, when you add a product, you want to make sure the data describes a valid product and that the product wasn’t already created.
This is precisely the role the controller plays. The controller connects HTTP requests to the server business logic. It acts as glue between domain model objects and transport layer events. A controller exposes some application functionality at a given address or URI (unique resource identifier). In fact, it exposes the application business logic at a given address: it’s our web application’s public API. Like the HTTP interface, controllers are procedural and request/response oriented.
Figure 5.1 illustrates the role of the controller in a typical web application.
Figure 5.1. Role of the controller

A controller is one of the central points in Play, as in any MVC framework. It is also the application entry point for you as a developer. As soon as a client (for example, a web browser) issues a request, Play will accept this request and delegate the processing of it to a controller. This is usually where your code comes into action. Figure 5.2 illustrates this lifecycle.
Figure 5.2. Controller lifecycle

While the controller is a central point in any Play application, its actual code resides in its action methods.
5.1.1. Action methods
In Play, a controller is an aggregation of action methods. An action method is a static method that takes some parameters as input and always returns an instance of (a subclass of) the Result class. In other words, an action method always takes the following form:
public static play.mvc.Result methodName(params...)
Note that action methods are static. This is because controllers are effectively singletons, which fits the HTTP approach. Because HTTP doesn’t have the concept of an object but is mainly procedural, we shouldn’t try to map those object concepts in our controller. You should really think of your action methods as the entry point from HTTP to your application. You could compare them to the static main() method of a Java program.
Since an action method mainly serves as an entry point, you shouldn’t put too much business logic into your controllers and action methods. Rather, you should do what is necessary to translate an incoming HTTP request to data your business logic understands, hand it off to that business logic, and translate the result into an HTTP response.
When coding static methods, thread safety is usually a concern, but Play will make sure all action methods are thread-safe. You will see that making action methods static has little impact on the way you write code.
For now, imagine that Play queues the incoming requests for a controller in order to process them as fast as possible. Netty and Akka are used under the hood to dispatch and process users’ requests as fast as possible in a thread-safe way. But the cool thing about Play is that all this complexity is handled for you, so don’t have to worry about it.
We’ve already created our first controller, Products, in chapter 3. Let’s examine it.
5.1.2. Examining our controller
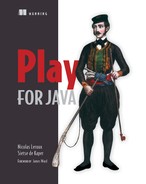
In chapter 3, we created a controller class called Products. We put it in the /app/ controllers/ folder, which is the default location for all controllers in a Play application. You can change these defaults if you want to, but you should rarely need to do so.
Let’s revisit the contents of the controller. In your favorite text editor or IDE, open the file called Products.java in the app/controllers directory, as shown in listing 5.1.
Listing 5.1. Project directory overview
We’ll first pick apart the class definition. The following listing shows a reminder.
Listing 5.2. Products class definition
...
import play.mvc.Controller;
...

public class Products extends Controller {
  ...
}
The class definition tells us that we’re extending the Controller class from Play. That’s the only prerequisite for a controller; there is nothing else that makes a controller class “special.” Let’s move on to the action methods.
The first action method of this controller, list(), displays the product items in stock at the warehouse. The following listing shows a reminder.
Listing 5.3. The list() action method
public static Result list() {
  List<Product> products = Product.findAll();
  return ok(products.list.render(products));
}
In this example, the ok method constructs a 200 OK HTTP response containing a response body that is the result of rendering the list template. Note how little code this method contains. All it does is delegate data lookup to the model layer (the models .Product class) and data presentation to the view layer (the list template).
As you may recall from chapter 3, we can access the list method by requesting the /products/ URL from our application. The reason why this works is because we’ve also configured a route. We’ll learn everything about routing in section 5.3, but first, let’s learn a little more about results.
5.2. Returning results from action methods
Besides the list() action methods, our Products controller contains several more action methods. Listing 5.4 shows an overview of their definitions.
Listing 5.4. The action methods in Products
public class Products extends Controller {

    public static Result list() {
    ...
    }

    public static Result newProduct() {
    ...
    }

    public static Result details(String ean ) {
    ...
    }

    public static Result save() {
    ...
    }

}
An action method is a Java method that processes the request parameters and produces a result to be sent to the client. The action method is where the response is processed. Each action method returns a result, represented by a play.mvc.Result value, which represents an HTTP response.
5.2.1. Results
Let’s take a closer look at what our action method returns: a Result object. A result is a response to a client request. Since we’re creating a web application, it’s always an HTTP response. It can be an OK with some text body, an error with an HTML error message, a redirect to another page, a 404 page, and so on.
The Controller class contains several static methods that generate Results. These methods all correspond to an HTTP status code, and they wrap an object that represents the body for the request. An example of this is the ok() method that we used to create the 200 - OK response code. We supplied it with HTML contents from the list template, thus generating the Result that we returned. Try to find the best response code for any situation.
For example, if a user enters an unknown EAN number as a parameter for the show method, we could return:
return badRequest("Incorrect EAN: " + ean)
This code returns an HTTP error code 400 with the text “Incorrect EAN: x” as content.
A more appropriate response would be to answer that we didn’t find the product:
return notFound("No product with EAN " + ean);
This code returns an HTTP 404 error code with the text “No product with EAN: x” as content.
5.2.2. Redirect result
Another useful Result object is the Redirect result object. As its name suggests, it redirects to another action method. For example, using the Redirect result, we can redirect the user from the index method to the list method, allowing our users to see a list of products on the main page.
![]()
The routes object is a class that’s generated by Play 2 based on your routes file. The class only contains static members that allow you to access your controller methods. For now, remember that the Redirect result redirects from one action method to another action method. We’ll go into more detail in the next section.
The TODO result
There is also a useful Result object called TODO. As you might have guessed, this Result indicates that the action method has not been implemented yet. This is useful when you’re developing your application and don’t have your action method implementation finished, but still need to return a result. For example, if we have the following action method but our implementation is not ready yet, we can return a TODO result:
public static Result items() {
  return TODO;
}
When an action method returns a TODO result, the client will receive a 501 - Not Implemented HTTP response.
5.2.3. Using results
We are now able to control what status codes we return. But what about the response body? And how does Play know how to set the correct content-type header?
All result methods let you pass a Content object as a parameter. The type of content that object contains tells Play what kind of data it is. As it turns out, templates in Play also return Content.
In chapter 3, we built our first template, products/list.scala.html. The following listing reminds you of what it does.
Listing 5.5. Displaying our stock items
@(products: List[Product])
@main("Products catalogue") {

  <h2>All products</h2>

   <table class="table table-striped">
    <thead>
      <tr>
        <th>EAN</th>
        <th>Name</th>
        <th>Description</th>
      </tr>
    </thead>
    <tbody>
    @for(product <- products) {

      <tr>
        <td><a href="@routes.Products.details(product.ean)">
          @product.ean
        </a></td>
        <td><a href="@routes.Products.details(product.ean)">
@product.name</a></td>
        <td><a href="@routes.Products.details(product.ean)">
@product.name</a></td>
      </tr>
      }

    </tbody>
   </table>

  <a href="@routes.Products.newProduct()" class="btn">
    <i class="icon-plus"></i> New product</a>
}
This template prints a list of products and their descriptions. What you need to know is that Play automatically compiles the template when it sees it. The result of this compilation step is a Java class with a render() method. By convention, it’s compiled into a class with the name views.html.{name of the template}. In this case, since we created a template called list under the views/products/ directory, the corresponding class is views.html.products.list.
When we render the template, the generated classes contain a render method. In Play, all templates are type-safe, which means the render() method expects a certain number of parameters of the correct types. In this case, we have to pass the products list as a parameter. All this will be explained in more detail in chapter 8.
What matters to us at the moment is to understand how we send HTML from our controller. In chapter 3, we rendered the template and immediately passed it the ok() method, like so:
public static Result list() {
  ...
  return ok(list.render(products));
}
This is the most concise way to render a template and return a Result that wraps the rendered content, but we could have also used an intermediary variable, like so:
public static Result list() {
  ...
  Html renderedTemplate = list.render(products);
  return ok(renderedTemplate);
}
As you can see, the template rendering doesn’t simply return a string containing HTML; it actually returns an object of type play.api.templates.Html. That class is a subtype of play.mvc.Content, which is a type that can be used as a parameter for the ok() method (and all result methods, for that matter).
You should now have an idea of how templates and results fit into the bigger picture of a Play application. Figure 5.3 shows the place of the controllers and products in the lifecycle diagram.
Figure 5.3. Detailed view of the controller lifecycle

We’ve displayed some HTML without much effort; we only changed the provided Result object in our action method with some Content. Let’s do something extra. Let’s serve the client with the type of result they’re asking for. If the web client asks for text, we’ll return some text; if it asks for HTML, we’ll return some HTML. This is easy to do with Play:

We are now able to serve content according to the client’s wishes. We added our Content object to the diagram to explain the complete request/response lifecycle in Play, as shown in figure 5.4.
Figure 5.4. Adding Content to the controller lifecycle

We are now able to respond to a request with some content. Let’s take a look at how our code is actually called in response to a request.
5.3. Using routing to wire URLs to action methods
We now know how we can render some content and how to execute business logic. But how do we link the controller method to be executed to the URL that the client invokes?
5.3.1. Translating HTTP to Java code
Remember, our client only speaks HTTP. But the code that we’re writing is in Java. We therefore need to translate the HTTP “language” to the Java language. This is the role of the router: translating each incoming HTTP request to an action method call. This way, it exposes the controller’s action methods to the client. An HTTP request can been seen as an event, from Play’s point of view. The router’s role is to coordinate a reaction to such an event (figure 5.5).
Figure 5.5. Role of the router

Two major pieces of information are contained in the request:
- The request path (such as /clients /1542, /photos/list), including the query string (such as id=2)
- The HTTP method (GET, POST, ...)
For example, when you enter the URL http://localhost/ in your browser, let’s say to view the home page, it issues a request to the localhost server. On the server, the request is then decomposed as shown in figure 5.6.
Figure 5.6. Request

Let’s take a look at another example. To display the first page of a product listing, a URL could be http://localhost/product?page=1. It would decomposed as shown in figure 5.7.
Figure 5.7. Request with query string

The HTTP method can be any of the valid methods supported by HTTP (GET, POST, PUT, DELETE, or HEAD). The request path identifies the resource we’re trying to serve. Query strings are optional and are used to provide dynamic parameters. A query string is specified after the ? sign and is always of the form name=value. We assume you know all about what a URL is and what HTTP methods are. If not, please read about them in chapter 3.
Let’s get back to our application. We’d like to provide certain functionality, and therefore we should be able to respond to the requests shown in table 5.1.
Table 5.1. List of requests
|
Method |
Request path |
Description |
|---|---|---|
| GET | / | Home page |
| GET | /products/ | Product list |
| GET | /products/?page=2 | The products list’s second page |
| GET | /product/5010255079763 | The products with the given EAN |
| POST | /product/5010255079763 | Update the product details |
As you might have guessed, we need to translate each of these requests to a controller and action method. This way, we’re translating from an HTTP request to a Java method call. This translation is what we call a route definition. Route definitions are contained inside a routes file. For our application, the routes file will expose the application functionality just listed.
Routes are defined in the conf/routes file, as shown in the following listing.
Listing 5.6. Project directory structure

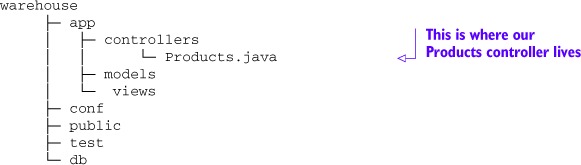
The routes file isn’t just a text-based configuration file; it’s actually code that will be compiled into a Java object. The object is accessible in our controllers and is called routes. This means that you’ll see compile-time errors if a route definition is not valid or if a requested URL doesn’t exist in your application, as shown in figure 5.8.
Figure 5.8. An error in the routes file
This is convenient, as you know immediately that something is wrong in your application. This is another example of Play 2 employing type safety to make your application more robust. Let’s see what other benefits we get from that.
Type safety in the routes file
Beside the obvious error reporting, another benefit of compilation is that the routes object is accessible from the controllers and templates. This comes in handy when you want to refer from one action method to another, or when you want to link to an action from a template.
An example of using the routes from a controller is redirection. Let’s say we have an index method available at http://localhost:9000/ that should redirect the client to the product list method available at http://localhost:9000/product. Using the routes object, you can simply refer to the products method, which is used to do something called reverse routing, which is explained in section 5.3.5. But for now, let’s focus on the syntax of the routes file.
5.3.2. The routes files explained
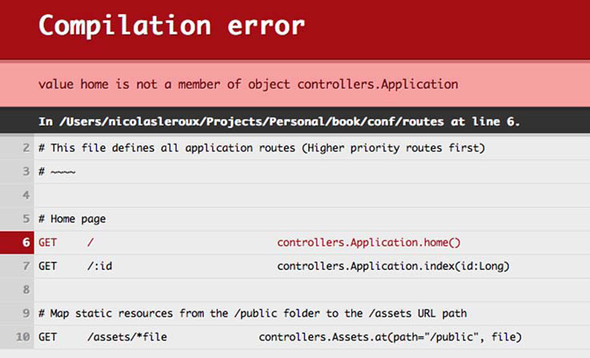
So, what are routes, exactly? As explained previously, the routes file is where the translation between the HTTP request and your code is performed. Let’s take a close look at the routes file syntax. The routes file lists all of the routes needed by the application, and each route consists of an HTTP method and a URI pattern associated with a call to an action method. This is what we call a route definition.
Let’s see what a route definition looks like for the products home page:
![]()
This means that when a client issues an HTTP request GET /, the action method located in the Products class should be called. The Products class is our code; it’s our entry point.
In the routes file, a route definition is composed of the following parts:
- The HTTP method
- The request path
- Optionally, the query string
- The call definition
Figure 5.9 breaks down our example route definition. Figure 5.10 breaks down a route definition that includes the optional query string.
Figure 5.9. Route definition
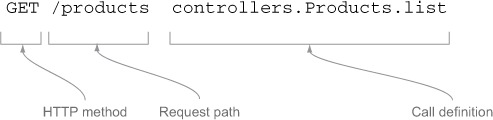
Figure 5.10. Route definition with query string

Let’s take a look at a more complicated route definition. If we want to have a route definition that displays product details based on the product EAN, we could put the following entries into our route files:
GET /product/1111111111111 controllers.Products.details("1111111111111")
GET /product/2222222222222 controllers.Products.details("2222222222222")
GET /product/3333333333333 controllers.Products.details("3333333333333")
....
But that wouldn’t scale very well (not to mention that we’d need to predict future products). We need to have a way to have a dynamic part in our route definition.
5.3.3. Dynamic path parts
Part of the path of our route can actually be used as a parameter for our action method. It would look like this:
GET /product/:ean controllers.Products.details(ean: String)
We replaced the part of the path that indicates the ID with a parameter name, indicated by the colon (:). We then reference that parameter in the action method call.
You’ll notice that in the action method call, we added the parameter type after the parameter name. For parameters of type String, specifying the type of the parameter is optional, but it’s required for every other type.
Every time we request /product/1111111111111 in our browser, the details method on the Products controller is called, with 1111111111111 as the ean parameter. Since our parameter is a String, Play doesn’t have to do much. But if our parameter’s type had been a Long, for example, Play would make sure the parameter is transformed into a Long. Play is also able to convert to other types such as arrays and dates, and you can even add your own types as well, as we’ll show you in chapter 6.
If Play can’t convert to the required type, it means that the expected type is not the right one, and you’re doing something you should not. You’ll see an error screen like the one shown in figure 5.11.
Figure 5.11. Bad request error screen

Type conversion is handled automatically by Play, so you don’t have to handle the conversion between Strings and other types. The automatic conversion is called binding. It’s binding values from the HTTP requests (which are strings by definition) to a Java type. In chapter 6, we’ll explain how Play can bind to other types. Binding is actually part of the translation process from HTTP to your Java code.
This is a really nice feature that allows us to concentrate on the problem at hand. If you were using Servlet or any other framework, you’d probably have to write something along the lines of the following listing.
Listing 5.7. A conventional Servlet method
public void doGet(HttpServletRequest request,
  HttpServletResponse response) throws ServletException, IOException {
  try {
      final String id = request.getStringParameter("id");
      final Long idCode = Long.parseLong(id);
       // Process request...
  } catch (NumberFormatException e) {
    final int status = HttpServletResponse.SC_BAD_REQUEST;
    response.sendError(status, e.getMessage());
  }
}
Play takes care of this for us. Note that you’ll only see the message between brackets (in figure 5.11) while developing. In production, the detailed information is left out. Now let’s get back to the discussion about dynamic route parts.
When using this syntax to define dynamic path parts, each parameter will match exactly one path part, which means each part between forward slashes (or the start of the path).
But you might sometimes want more flexibility. If you want a dynamic part to capture more than one request path segment, separated by forward slashes, you can define a dynamic part using the *id syntax, which will use the rest of the path as the value for the parameter.
For example, let’s say that we want to get the path to our product image. The route definition is as follows:
GET  /product/image/*imagePath
              controllers.Products.downloadImage(imagePath: String)
If we issue a request like GET /products/image/29929/paperclip.jpg, the imagePath value will be 29929/paperclip.jpg.
If you know what regular expressions are, you can also define your own regular expression for the dynamic parts using the $id<regex> syntax:
GET  /product/$ean<[0-9]{13}>
               controllers.Products.details(ean: Long)
This route definition will only apply if the EAN consists of 13 digits, which is handy in our case, because we know that our product EAN codes consist of 13 digits. Play will return a not found error code if we enter alphanumeric characters as IDs.
As you know, you can also pass parameters with your URL. For example, http://google.com?query=playframework contains a parameter called query, with the value “playframework.” So how do you specify a parameter like that in your routes file so that you can access it from your action methods? Actually, you don’t have to declare it in your routes file at all. You can just use a parameter of the same name in your action method signature:
public static Result products(String filter) {
   ...
If the action method defines some parameters, all of these parameter values will be searched for in the request path. They will either be extracted from the request path as we saw before, or they will be extracted from the query string.
Let’s see a more detailed example. Let’s say we want to display a list of products. But that’s potentially a really large list, so we want to paginate it. To access the first 20 items, we will request the first page; for the next 20, we will request the second page, and so on. The following route definitions can be seen as equivalent, functionally:
GET /products/:page controllers.Products.list(page: Int)
GET /products/ controllers.Products.list(page: Int)
What is the difference between the two route definitions? The first route definition has the page parameter as part of the actual request path. The client requests the following URL to access the second product list page: http://localhost/products/2. The second route definition doesn’t require the page parameter to be part of the request URL. Instead, it’s a parameter that the user needs to provide. This is done by requesting the following URL: http://localhost/products/?page=2.
It’s interesting to note that http://localhost/products/2 (where “2” is the page number) isn’t a good identifier for a resource. The product list for the second page is likely to change over time. Therefore the second definition is to be preferred. For more information about RESTful concepts like this, please refer to chapter 4.
Also notice that Play complains if we don’t specify the page parameter in the request URL, as shown in figure 5.12. The error is thrown because Play has no way to tell what the default value for the parameter is. There’s a way to find out, though: default values in the routes file.
Figure 5.12. Bad request error screen for missing parameter

Route with default value
We can (and should) choose a default value to use if none is specified in the request. For example, for our list of products with pagination, the following syntax will request the first page to be displayed if no first page is specified.
GET /products controllers.Products.list(page: Int ?= 0)
Using this syntax, it’s impossible to get “Bad request” errors due to missing parameters. When the parameter isn’t provided, the value specified (“1” in this case) will be used instead. Please note that we’re using the Int keyword, as it is the Scala representation of an integer. This is the equivalent of the Java Integer type.
Fixed value as parameter
Now let’s say that we want the home page to display the first page of our product listing. We can do that using a fixed value as a parameter:
GET / controllers.Products.list(page: Int = 0)
The value of the page parameter will always be 1 on the home page, even if another value is provided using a query string parameter.
Using all these different syntaxes for route definition, it’s very possible to construct multiple routes that will match the same URL. What happens then?
Conflicting routes
Because many routes can match the same request, if there is a conflict, the first route (in declaration order) is used. For example, in our routes file we have the following route definitions:
GET  /products/new         controllers.Products.newProduct()
GET  /products/:ean        controllers.Products.details(ean: String)
The bottom line would also match on /products/new. But since there is a line matching that URL first, that is the one that is used. Therefore, calls to /products/new will be served by newProduct(), which is exactly what we want. If we were to switch the lines around, the same request would be handled by the details() method, with the value “new” used for the ean parameter, which would cause problems.
We now know enough about route definitions. Let’s get back to our application.
5.3.4. Completing our routes file
With all we’ve learned about routes so far, we can finish the routes file for our application’s product catalog. Edit the routes file so it contains the routes shown in the following listing.
Listing 5.8. Our current routes file

Compared to what we ended with in chapter 3, the first two lines have changed. The first line, which matches the root URL of our application, used to point to Application .index(), but it now points to the index method of our Products controller. Since we now no longer have any routes using the Application controller, feel free to delete that class.
The second route still points to our product catalog, but the call to the action method has gained a page parameter, which defaults to 1. To get the application to compile and run again, we need to change the action methods to match the routes. The first method, index, is new. We want it to show the first page of the product catalog, which we’ll do by redirecting to it. Add the following action method to the Products class:
public static Result index() {
  return redirect(routes.Products.list(0));
}
The other change we made in our routes file was that we added the page parameter to the product listing. We need to change the action method to match the call in the routes file, or the routes file won’t compile. Go ahead and add the parameter to the list method in the Products class, and fix the call to it on the last line of the save() method, like so:
public class Products extends Controller {
  public static Result list(Integer page) {
    ...
  }

  ...
  public static Result save() {
    ...
    return redirect(routes.Products.list(1));
  }
}
Don’t worry about changing the method’s implementation; we’ll get to that later. For now, it’s enough to get our routes compiling again.
So we now know how to link a URL to an action method. But what about the other way around? If we know the action, how do we get a corresponding URL? That is a process called reverse routing.
5.3.5. Reverse routing
The implementation of our index method from the previous section is interesting. It sends an HTTP response that redirects the user to the list method. To construct the URL for that method, it uses the routes object.
The routes object was generated by Play as a result of compiling the routes file. The routes object is a singleton object that contains only static methods that return an object of type Action. It’s used as a way to reference our action methods from the controller, but it’s also used anywhere else we might need it (in our views, for example). Our action methods are added as methods to the object at compilation time, when Play generates the routes object.
The routes object provides what we call reverse routing.
Reverse routing, as the name implies, does the opposite from regular routing: it translates from Java to HTTP. Reverse routing is important, as it allows us to get an HTTP request for a given action method.
For example, say you want to be able to point your client to the edit method. Remember, your client only speaks HTTP. You need to return an HTTP call: an HTTP method and a URL. It’s as simple as asking the routes object how to access the action method. The routes object returns a play.mvc.Call object. The play.mvc.Call defines an HTTP call, and provides both the HTTP method and the URL. It also makes sure the method call is correctly translated, especially when parameters are part of the action method. For example, the following call:
routes.Products.list(4)
is translated to:
GET /products?page=4
You now know everything about how to translate HTTP requests to action methods and vice versa with reverse routing. You should now have a complete picture of how Play operates when a request is received from the client and executed as Java code. Now it’s time to see in more detail how to simplify some tedious operations in the controller.
5.4. Interceptors
Let’s get back to our warehouse application. From time to time, an exception may occur. But if that happens, we can’t spot it. It would be nice if we could just tell Play to send an email with the error whenever an exception occurs in specific controllers or action methods.
Action methods can be easily composed. This means that you can add extra behavior to action methods, and that’s what we want to do: we want to catch any exceptions occurring in our action methods and send an email about them. Let’s see how it works.
5.4.1. The @With annotation
Play provides an @With annotation, which allows you to compose an action. The @With annotation is used before an action method declaration. It can also be used on the class level—on the controller itself. Declaring the @With annotation on our action method tells Play that a certain action must be performed around each execution, meaning before and after. This is also called an interceptor, because it intercepts a call to the action method.
The @With annotation takes one parameter: the type of Action we want our code to be composed with. We will build a CatchAction class shortly.
For example, the following code tells Play it must execute the action method using the CatchAction action:
@With(CatchAction.class)
public static Result show(Long ean) { .... }
Because we specify the annotation on the method level, Play will only use it for this specific action method. If we were to declare it at the class level, the CatchAction would be used for all the controller’s action methods:
@With(CatchAction.class)
public class Products extends Controller { .... }
But what exactly is this CatchAction class? It’s where we will put our code that will provide the added functionality. We need to build it. The @With annotation takes an Action object as a parameter. An action object must extend the abstract class play.mvc.Action, which means it must implement the following method:
public Result call(Http.Context ctx)
The call method is called before the action method execution. From there, the call method must actually call the action method using the delegate object. The delegate object is a reference to the action method of type play.mvc.Action that is marked with the @With annotation. In other words, it represents the original action method.
Let’s just go ahead and code our exception interceptor. First, we’ll create a fake ExceptionMailer class, to stand in for what would be an actual emailing class, which is not the point of this exercise. Create the file shown in the following listing.
Listing 5.9. /app/utils/ExceptionMailer.java
package utils;

public class ExceptionMailer {
  public static void send(Throwable e) {
    System.out.println("Sending email containing exception " + e);
  }

}
We’ll create our interceptor action by extending the Play.SimpleAction abstract class that Play provides. The Play.SimpleAction class provides everything we need to get started. In the next listing, we’ll define our CatchAction, which will catch any exceptions and email them.
Listing 5.10. /app/controllers/CatchAction.java

We can now use our CatchAction on our Products controller, by annotating the controller with @With(CatchAction.class):
...
import play.mvc.With;

@With(CatchAction.class)
public class Products extends Controller {
  ..
}
Let’s see how our implementation does its trick.
5.4.2. Explaining our CatchAction
The behavior of our custom Action is defined by our implementation of the call method. That method takes one parameter, the Play context object. The context object holds our session, request, response, and flash objects. We’ll take a closer look at those concepts in the next section.
In our implementation, the actual call to the action method is done via the delegate object, which contains its own call method. In case an exception is triggered, we catch it, and our ExceptionMailer class sends an email with the exception stack trace.[1]
1 The ExceptionMailer code is not relevant at this moment, as the goal is to show you how interceptors work.
Now that we know how actions work, let’s see some other ways to use them.
5.4.3. Action composition
Once you have one interceptor, you’re probably wondering how you can use more of them; for example, a LogAction that logs any access to our controllers. We can just add another parameter to the @With annotation:
@With(CatchAction.class, LogAction.class)
If you are familiar with annotations,[2] you can also define your own, to signify that a certain action should be added to an action method. This is a more readable notation, and it allows reuse across multiple web applications. For example, an annotation for our CatchAction would be:
2 Read http://en.wikipedia.org/wiki/Java_annotation if you’re not.
@With(CatchAction.class)
@Target({ElementType.TYPE, ElementType.METHOD})
@Retention(RetentionPolicy.RUNTIME)
public @interface Catch {

}
In this example, we define a new annotation called Catch, and use the @With annotation as usual to indicate which action class it should use. Using our newly defined annotation, we can now annotate our controller as follows:
![]()
We don’t just use our own annotation is for readability purposes; we can also use it to pass extra configuration information. Using the previous example, we could specify if we want to send an email, or if we want to log the exception instead. Let’s redefine our catch annotation:

We’ve added a send parameter to our annotation, with a default value of true, specifying whether we want to send an email or just log instead. The parameter value can be accessed via the configuration object in our action. The following listing shows how.
Listing 5.11. CatchAction using configuration

In this version of CatchAction, we extend the Action class directly, supplying a generic type parameter to indicate that we want to use our Catch annotation for configuration ![]() . The configuration object will now be an instance of our Catch annotation, meaning we can access the send parameter on it
. The configuration object will now be an instance of our Catch annotation, meaning we can access the send parameter on it ![]() . We can then use a simple if statement to decide what we want to do
. We can then use a simple if statement to decide what we want to do ![]()
![]() .
.
We are now able to be notified of any exceptions occurring in our code. This is a trivial example, but think about how you can use interceptors for transactions, security, and for a lot of other interesting examples you can think of.
There’s one more important aspect of controllers that we haven’t covered yet: scopes.
5.5. About scopes
We saw that by using the controllers and the routes, we’re able to retrieve data from the clients and send data back to those clients. We didn’t really talk about the lifetime and accessibility of that data. We assumed the data was transmitted each time a communication was made between the server and the client; that really is what’s happening.
But as a developer, you don’t really want to manage that dataflow. You want to store data for a certain period of time; for example, for the duration of a request or a browser session. You store that data in a certain scope. Play supports a number of scopes, for which it stores data for a certain lifetime. They’re accessed in a similar way as a Map in Java; you store and retrieve values based on a key.
5.5.1. A bit of history about the scopes
Java EE traditionally defines these scopes:
- Application scope
- Session scope
- Request scope
- Page scope
The application scope has an application lifetime: you store data that will stay as long as your application is running.
The session scope has a session lifetime: you store data that will stay as long as your browser is open. This is traditionally the JSESSIONID parameter you sometimes see in URLs. The JSESSIONID is also stored in a cookie, so it’s always available to the server on consecutive requests. This JSESSIONID is just an ID that points to some server-side storage space. The session scope is usually used to store information about your shopping basket or the fact that you’re logged in.
The request scope defines data within the lifetime of request: the client makes an HTTP request, and with the request comes some data. That data is stored in the request scope and can only be accessed while that particular request is being processed.
The page scope defines data that is accessible in the view only: it can be accessed during the rendering phase. For example, you might want to store the current breadcrumb of your application in that scope, to display the current application path.
The different scopes can be conceptually viewed as shown in figure 5.13.
Figure 5.13. In JEE, application scope is the longest lived and page scope is the shortest lived.

Note
Though some Java EE frameworks introduce a conversation scope, we don’t think this is relevant for our explanation and may be confusing more than anything else.
In a traditional Java EE environment, all the storage happens server-side. This means that each client has a unique ID, and the server uses that unique ID to retrieve the client storage space server-side.
Though this has the advantage of potentially using less bandwidth, it can be problematic when scaling up (adding more servers) since you need to synchronize all the client storage space between the different servers. Another disadvantage is that it makes the servers compute more operations, while the client stays idle. This used to be an advantage, but nowadays web clients are powerful beasts. An iPhone is more powerful, CPU-wise, than any computer older than five years. Moreover, web standards have evolved and added a lot of features to web clients, such as local storage and web workers.
5.5.2. Storing data with Play
Of course, as you may have guessed by now, Play is a bit different from Java EE frameworks. It’s interesting to note that web frameworks from other languages, such as Django, Ruby on Rails, and Symphony, have been following an approach similar to that of Play.
Play defines four scopes:
- Session scope
- Flash scope
- Request scope
- Response scope
Before we start explaining those scopes, there is a fundamental difference between Play and the more traditional Java EE frameworks (read: servlet-based frameworks). Play doesn’t hold any data server-side. Data is held either in the client or in the database. Because of that fact, scaling up is easy with Play. Just add a new server and a load balancer, and you’re done. No server-side session replication is needed, so there’s no risk of losing data on the server since there is no data to lose. But how does that work? What’s Play’s secret?
A cookie, also known as an HTTP cookie, web cookie, or browser cookie, is used by a web server to store data in the client’s browser. The browser sends that information back to the server on every request. That information can be used, for example, for authentication, identification of a user session, user preferences, shopping cart contents, or anything else that can be accomplished through storing text data on the user’s computer. A cookie can only be used to store text.
Well, really, there is no secret. Play stores the data client-side using cookies. It also encourages developers to think differently, to architect their application differently (following REST principles), and to fully embrace client-side technology.
While a Java EE developer would see the session as a giant cache in which everything is allowed, Play forces developers to think in terms of web development. And that is a good thing, since we happen to use Play mainly to develop web applications. So, no, you can’t store your complete object tree in your session. And no, you can’t save your last 10,000 database results. In fact, you can “only” store up to 4 KB (maximum cookie size), and you can only store string values. You might see that as a step back, but we’ll attempt to explain to you that in fact it’s a step forward. But first, let’s go back and explain the four scopes in Play.
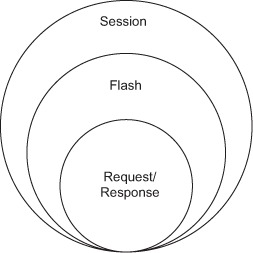
The four different scopes can be conceptually viewed as shown in figure 5.14.
Figure 5.14. In Play, request scope is the shortest lived and session scope is the longest lived.
5.5.3. The context object
First of all, all accessible scopes in Play are stored in a Context object. The Context object is a final static class that contains the Request, Response, Session, and Flash objects. You can access it statically using the current() method. From there, you can access all the Play scopes:

In your controllers, the request, response, session, and flash objects are also available directly, since they are part of the Controller class that any controller must extend.
Let’s take a look at each of the scopes, starting with the request scope.
If the context object is static, what does that mean for thread safety? The answer is easy. Each Context object is associated to the current thread using a ThreadLocal object. This ensures that there’s no thread-safety problem and that your context object is really your context object and not the one from your neighbor (each thread holds an implicit reference to its copy of a thread-local variable). This ensures that our scope objects are our scope objects.
If you didn’t follow all of that, just take our word for it: access to the context and scope objects is thread-safe.
5.5.4. The request scope
The request scope can’t be used to store objects. It is used to access the data of the current request. For example, you can access the values submitted using an HTML form via the request scope.
5.5.5. The response scope
The response scope can’t be used to store objects. It is used to set the response content type and any extra cookies to send extra information. For example, you can set the response content type to XML with the following code:
Context.current().response().setContentType("application/xml");
For text-based HTTP responses, it’s important to set the character set (or character encoding) correctly when you set the response content type. Play handles that for you and uses UTF-8 by default.
The charset is used to both convert the text response to the corresponding bytes to send over the network socket, and modify the ContentType header with the proper ;charset=xxx extension.
The charset can also be specified when you are generating the result value, in this case the ok result value:

Using the response object, we can also store extra data on the client, using a new cookie. For example, if we were to save the preferred theme for our application from our controller:
response().setCookie("theme","blue");
Then, on a next request, from our controller’s action method, we could check if the theme was set using the cookie method:
public static Result index() {
   if ("blue".equals(cookies("theme").value())){
       // Do something
   }
   ....
}
You could also store more information by serializing your data into strings, but remember that you can only store up to 4 KB per cookie. Therefore, save only what you need, which is often entity IDs.
Finally, to discard a cookie, use discardCookies:
response().discardCookies("theme");
As you can see, the response object is rather straightforward.
5.5.6. The session scope
Objects stored in the session scope have a session lifetime: you can store data that will stay as long as the client’s browser is open. It’s important to understand that sessions are not stored on the server but are added to each subsequent HTTP request, using the cookie mechanism. So the data size is very limited (up to 4 KB), and you can only store string values. This means that the Session object should not be used as a cache! Play does offer a caching mechanism, which you can use instead.
To store a value in the session:

From a controller, you can also use the convenience methods provided by the controller:

You may argue that a Session object that can only store String objects is a regression; we feel that it’s the way it should be. By disallowing the storing of complex objects, we’re also removing a lot of associated problems of synchronizing the object states and/or any side effects. By storing immutable objects, like Strings, in our session, no side effects can occur.
For example, if we were to store an attached (marked as connected to the DB) database entity in our session, the entity might really well be detached (no longer connected to the DB) the next time we access the object, causing all sorts of troubles. Or the entity may have been modified by a third party since we last accessed it, causing unexpected behavior.
5.5.7. The flash scope
Objects stored in the flash scope have a lifetime of exactly two requests. It means that data in the flash scope will service one redirect. This is really useful when you want to retain data after a redirection. To understand this better, let’s look at a concrete example.
The client issues the following request:
GET /
The server renders an HTML page. On the page, we have a form to input a telephone number and a Submit button. When the user submits the form, a POST request is made to the server to the following address:
POST /phonenumber/
Now, once the controller receives the request, it attempts to validate the phone number. In case the validation fails, the server renders the same page with an error message. But if you try to refresh your browser, you’re in for a surprise: your browser is asking you if you want to resubmit the data. Why is that? This is because, as far as your client is concerned, its last execution point matches POST /phonenumber. And indeed, the URL that your browser shows is http://localhost:9000/phonenumber.
Figure 5.15 illustrates the problem we just described.
Figure 5.15. Submitting an invalid form without using the flash scope

A way to avoid bad surprises is to send a redirect instruction to your client, so it redirects to GET /. But of course, in the meantime, because of the redirect, you lost your error message. This is exactly the use case for which flash scope was invented. Storing the error messages in the flash scope allows you to still have access to your error messages after the redirect.
In Play, the objects in the flash scope are stored in a special cookie that’s flushed after the second consecutive request.
Figure 5.16 illustrates the same problem, but uses the flash scope as a solution.
Figure 5.16. Submitting an invalid form using the flash scope

Note
The flash scope has been introduced in Java EE 6 and defines the same lifetime as its Play equivalent, but it lives server-side. At the time of this writing, most Java EE web frameworks do not have flash scope.
5.5.8. What about security?
Storing data client-side brings some security concerns with it. Because the user has access to this data, it can’t be trusted without taking some additional measures. For example, when you store the user’s username, there is nothing preventing the user from putting in another username and impersonating a different user.
For this reason, cookies are signed with a secret key so that the client can’t modify the cookie data (if they do, the data will be invalidated).
The secret key used to sign the cookie is actually set in your conf/application .conf file (see following listing).
Listing 5.12. Project structure

If you open the application.conf file in an editor, you will find a line starting with application.secret:
application.secret="FuqsIcSJlLppP8s?UpVYb5CvX1v55PVgHQ1Pk"
This is the key we’re signing our cookies with. It’s essential to keep it secret, so be sure you don’t divulge your key. This also brings us to another important point: if you’re running multiple instances of your application, the secret key needs to be shared between the applications, or one instance won’t be able to verify the data that has been set by another instance.
Let’s imagine the following scenario. One load balancer and the same application are running on two different nodes: server1 and server2. Each client can be dispatched to either server1 or server2. If server1 and server2 don’t share the same key, the clients will need to communicate with the same server every time; otherwise the server can’t decipher the cookies. If both server1 and server2 have the same key, they can decipher the same cookies, and neither the client nor the load balancer will need to distinguish between server1 and server2.
Figure 5.17 illustrates the data encryption/decryption flow.
Figure 5.17. Secret key with a cluster of applications

We can argue that session timeouts were introduced as a technical solution for server-side session storage rather than as a useful feature. Indeed, without this feature, user sessions could only grow on the server, resulting in memory deprivation. But developers are so used to session timeouts that they actually see them as useful functionality.
In Play, there is no technical timeout for the session. It expires when the user closes the web browser. If you need a functional timeout for a specific application, just store a time stamp in the user session and check it against your application needs (max session duration, max inactivity duration, and so forth).
5.6. Summary
We started this chapter by explaining what controllers are. We then looked into the specifics of Play controllers and more particularly the controller’s action methods. We learned about routing our clients’ requests to our action method code.
Let’s pull out some of the key practices to take away from the chapter:
- Use flash scope. Flash scope is ideal for passing messages to the user (when a redirect is involved).
- Use action methods. This is the entry point for your business logic. Keep them short and delegate all business logic to your business models.
- Simple data binding is URL-centric data mapping to your action methods.
We covered how to use interceptors and why they’re useful. We implemented a simple interceptor that catches all errors and sends an email.
We’ve learned a lot about the internals of controllers in this chapter, and in the next chapter we’ll build on our knowledge by implementing some nice views to give our warehouse application some visual appeal.