Chapter 12. Security and control
- Authentication
- Authorization
- ACLs and policies
- Retentions and holds
This chapter looks into different security- and control-related aspects of CMIS. It starts with some general security considerations and hints for web application developers. We’ll then cover authenticating users. The chapter also addresses authorization, ACLs, and policies, and finally it skims through retentions and holds.
12.1. General security considerations
Many CMIS repositories contain confidential data. It’s the repository’s task to protect this data. It has to check the user’s credentials and figure out what this user is allowed to see and do. CMIS is only the transport vehicle for that data and responsible for a secure transport.
Because all CMIS bindings are based on HTTP, the easiest and most compatible way to secure the connection is to use SSL everywhere. That sounds obvious and trivial. But many CMIS repositories allow unencrypted access, which can reveal user credentials and confidential documents. And many production CMIS applications don’t use HTTPS or have disabled the SSL certificate checks. We strongly recommend that you always use HTTPS in production environments!
Having unencrypted access may help during development, though. In chapter 11, which discusses CMIS bindings, we used it to look directly at the wire protocols. It’s handy to find out exactly what the repository returned when you get something unexpected.
Once the data has reached the application, it’s the application’s responsibility to keep the data secure. In this section, we’ll point out two general and repeating issues with web applications: cross-site scripting (XSS) attacks and cross-site request forgery (CSRF) attacks.
12.1.1. Cross-site scripting (XSS) attacks
Web applications should be protected against XSS attacks. That is, they should make sure no foreign and potentially malicious HTML and JavaScript code could be injected into a web page of the application. CMIS applications have to be careful with property values and document content because either may contain HTML or JavaScript fragments. A user might be tricked into looking at the properties of a CMIS document or opening a document that contains malicious code. This code would run in the user’s application context and would potentially be able to read and modify data in the CMIS repository.
Whether property values should be HTML-encoded before they’re displayed on a web page depends on the application and the properties. CMIS has an HTML property data type to indicate that the property value is an HTML fragment, and it’s generally used for a good reason. The application has to decide if it can trust this property. All other string property data types are usually good candidates for encoding.
Dealing with content is a bit more complicated. Many applications provide a means to download a document’s content. The user clicks a link, and the content is streamed to the web browser. The web browser then decides whether to open the document in the browser, offer the user a dialog box to open the content in another application, or download the content to a file. Most web browsers open HTML documents in the browser, and that can be a potential attack vector. CMIS repositories provide the content as it was stored. If the content contains malicious JavaScript code, this code is executed in the context of the user who clicked the download link.
There’s no perfect solution for this problem. The application could encode or ban HTML and other problematic documents. But that would prohibit a user from downloading the original document, which could be genuine and harmless. The application could send a different MIME type for an HTML document, such as text/plain. Most web browsers then show the HTML code and don’t interpret it. But this isn’t a bulletproof solution either. Some applications store their web pages or parts of them—for example, images—in a CMIS repository. They definitely want the original document from the repository to be loaded by the web browser. So it’s up to the application. But being aware of the issue is important.
12.1.2. Cross-site request forgery (CSRF) attacks
The second common issue with web applications is CSRF attacks. This is an issue for both the application and the repository. CSRF attackers take advantage of the fact that web browsers always send cookies and basic authentication information back to the origin website. A malicious web application might use this to send POST requests after the user has logged in to the CMIS applications. These malicious requests would be executed in the context of that user.
There are generic solutions for this issue for web applications that we won’t explore here. The CMIS 1.1 specification defines how applications and repositories can solve the issue when the browser binding is used directly by a JavaScript application running in a web browser. The idea is to send tokens back and forth that only the CMIS application and the repository know. A malicious web application can’t attack without these tokens. We’ll cover that later in this chapter.
Repositories that allow authentication via cookies, basic authentication, or single sign-on (SSO) for the AtomPub binding and the Web Services binding must implement their own solution. These bindings aren’t intended to be used in a web browser, but they can be exploited by a malicious web application.
But we’re tapping into the authentication topic. Let’s do that systematically in the next section.
12.2. Authentication
User authentication can be the most difficult topic in a CMIS project. There are many ways to authenticate a user, and they depend on the repository, the environment, business and security constraints, the application itself, and the end-user device. Authentication from a mobile application might be completely different from authentication in a web application.
The CMIS specification doesn’t talk much about authentication. It recommends that repositories implement basic authentication (via an HTTP header) for the AtomPub binding and the Browser binding, and UsernameTokens (via a SOAP header) for the Web Services binding. Both mechanisms require a username and password to be sent with each request.
Most CMIS repositories support this recommendation, and all Apache Chemistry libraries support it out of the box. Remember the method in chapter 8 that created the OpenCMIS session? All you had to do was add the username and password to the session parameters, like this:
parameter.put(SessionParameter.USER, username);
parameter.put(SessionParameter.PASSWORD, password);
OpenCMIS automatically turns this information into an HTTP header or a SOAP header and adds it to all requests. There’s nothing else you have to do. A session is always bound to a specific user because of this.
12.2.1. Cookies
Using usernames and passwords to authenticate can be expensive. The repository has to check the username and password for each request. In many cases, it has to contact another system like a user directory (for example, an LDAP server) to do this, and that costs valuable time. Therefore, some repositories return session cookies. It’s faster to check whether a cookie is still valid than to authenticate the user with a username and password every time. To make that work, the repository must depend on the client to send back that cookie. Because the CMIS specification doesn’t say a word about cookies, a repository vendor must not rely on cookie support on the client side.
Cookie support varies in the different Apache Chemistry libraries. Although cookies are automatically turned on in DotCMIS, they have to be manually activated in OpenCMIS via a session parameter:
parameter.put(SessionParameter.COOKIES, "true");
It’s recommended that you always turn on cookies. It doesn’t do any harm if the repository doesn’t send cookies. And if it does, the performance gain can be significant.
Authentication with a username and password is simple, but also has its drawbacks. First, the user’s credentials are always sent in clear text over the wire. That might not be a big deal if you’re using HTTPS in production. But it might be a problem during development when you use unencrypted access. Another common issue is that the client application doesn’t (and shouldn’t) know the user’s password. Think of SSO scenarios, portals, and mobile applications.
Many authentication mechanisms try to solve one or both issues: NTLM, Kerberos, SSL client certificates, SAML tokens, and OAuth, just to name a few. There are also many product-specific and homegrown solutions.
12.2.2. AuthenticationProvider interface
Because the Apache Chemistry CMIS libraries can’t implement every flavor of every authentication mechanism, OpenCMIS, DotCMIS, and ObjectiveCMIS provide interfaces that let you plug in your own authentication implementations. We’re using OpenCMIS for the following examples. The interfaces of the other libraries are slightly different because of the underlying technologies, but the general idea is the same.
OpenCMIS lets you provide HTTP headers and SOAP headers for the requests to the repository, which can transport authentication details. You can also take control of the SSL socket factory to attach an SSL client certificate to the requests, which identifies the user. All you have to do is to implement the AuthenticationProvider interface. To use your implementation, add the class name to the session parameters when you set up a new session, like so:
parameters.put(SessionParameter.AUTHENTICATION_PROVIDER_CLASS,
   "org.example.MyAuthenticationProvider");

parameters.put("org.example.user", "cmisuser");
parameters.put("org.example.secret", "b3BlbmNtaXMgdXNlcg==");
The example also shows that you can add your own parameters to the session parameters. In your authentication provider implementation, you can access these parameter values and use them as needed.
It’s recommended that you not implement the AuthenticationProvider interface directly, but instead derive your implementation from the AbstractAuthenticationProvider class or the StandardAuthenticationProvider class. The latter gives you support for the standard authentication recommended in the specification as well as cookie support. You may also want to look at the source code for the StandardAuthenticationProvider class; it could be a good starting point for your own implementation.
12.2.3. Example of an authentication provider
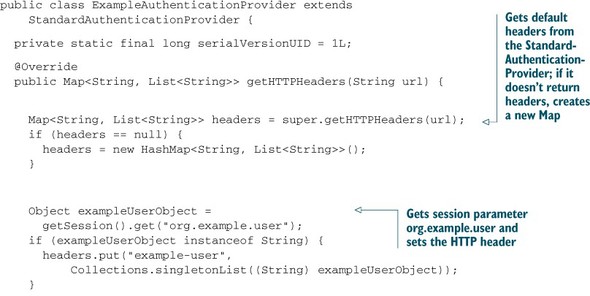
The most important method is getHTTPHeaders. It’s called before each request to the repository for all CMIS bindings and returns the HTTP headers that should be added to the request. Listing 12.1 shows a simple authentication provider implementation that uses the additional parameters from the previous example. The parameter values are sent to the repository as nonstandard HTTP headers.
Listing 12.1. A sample AuthenticationProvider implementation

The getSOAPHeaders method works similarly to the getHTTPHeaders method. It returns a SOAP header, which is attached to all Web Services calls. This method is called only once per Web Services service. Therefore, you can’t customize every call.
Another (often) important method is putResponseHeaders. It provides the HTTP response headers and the HTTP status code after each call. If the CMIS repository returned something that can be used to authenticate a follow-up request (a token, perhaps), this is the method you should override to extract this information.
The AuthenticationProvider object is kept for the whole session. Because sessions can be used across multiple threads, the AuthenticationProvider object must be thread-safe. So if you get a token back from the repository, make sure you manage it in a thread-safe manner.
The loose definition of how the authentication works can cause some headaches and often requires extra code if a simple username/password combination isn’t sufficient. It’s even more complicated in web applications that should directly talk to a CMIS repository from a web browser. It not only has to authenticate the user; it also has to prevent CSRF attacks. Fortunately, the Browser binding specification defines this authentication process for web applications. That’s the topic of the next section.
12.3. Authentication in web applications using the Browser binding
Web applications that use the Browser binding have another option to authenticate a user, which additionally protects the repository from CSRF attacks. The idea is to let the repository handle authentication. The web application only has to trigger the authentication process and then send tokens with each request that it gets from the repository. Let’s start at the beginning with the entry points.
12.3.1. JavaScript entry points
The entry point for the web application is a JavaScript file that’s served from the repository server. The application includes the file into its web page, like so:
<script src="http://cmis.example.com/cmis.js"/>
This JavaScript file defines the following four functions:
- cmisServiceURL()—Returns the URL to the Browser binding service document (see chapter 11)
- cmisLogin(callback)—Triggers a login
- cmisLogout(callback)—Triggers a logout
- cmisNextToken(callback)—Provides a token for the next CMIS request
12.3.2. Sequence: log in, nextToken, ..., log out
When the application starts up, it calls the function cmisLogin. What happens next is repository-specific. It’s very likely that the repository will redirect the user to a login page or to a page that handles SSO. If the user authentication was successful, the user is redirected back to the application page. Now the application again calls cmisLogin. It’s the repository’s responsibility not to run into an endless loop here. If everything works correctly, there’s no second redirection, and the application moves on.
Every call the application makes to the repository must be authorized with a token. To get a token, the application calls cmisNextToken and retrieves a token from the repository. Whether this requires another round trip to the repository depends on the underlying implementation. If the next call is a GET request, the application attaches a token parameter to the URL. If the next call is a POST request, the application adds a token field to the HTML form.
Ideally, these are one-time-use tokens. That is, a token works for one request, but a second request with the same token would fail. Tokens may also expire after a preset time. But these rules aren’t defined by the CMIS specification. The repository vendor decides how the tokens are generated and managed and when they become invalid.
The application can also log out a user by calling the function cmisLogout. All issued tokens should become invalid, and the function cmisNextToken shouldn’t return any more new tokens.
Figure 12.1 shows this sequence of events as an activity diagram.
Figure 12.1. Activity diagram of the secure login sequence for the Browser binding

12.3.3. Example JavaScript
Here’s a short example taken from the CMIS specification. It calls cmisLogin when the web page is loaded. If the login was successful, it calls the displayRootFolder function, which is defined here. This function first gets the next token and provides it to the loadChildren function, which isn’t in this example. The loadChildren function uses the token to make requests to the CMIS repository. That’s the basic pattern for JavaScript applications that use this authentication option:

This procedure should work against all CMIS repositories that support it, without adapting the application code. If one-time tokens are used, it additionally provides protection against CSRF attacks. If you’re interested in the details, refer to section 5.2.9.2 of the CMIS 1.1 specification. The OpenCMIS server framework ships a working example of a mini application that uses this authentication procedure.
Once the repository knows who the user is, it can determine what the user is allowed to see and do. The following sections examine authorization and different forms of permissions.
12.4. Authorization and permissions
CMIS knows about two concepts of modeling permissions: policies and access control lists (ACLs). Policies are rules that determine whether a user can do a certain action with an object, whereas ACLs are mappings from users to permissions. Repository vendors map their permission model to either one or both CMIS concepts. It’s the repository’s responsibility to check and enforce permissions. Remember that CMIS is only the messenger.
12.4.1. Policies
The mechanics of policies are defined in the CMIS specification, but the specific semantics isn’t. The idea is that a repository provides a set of policy types, and applications create instances of such types and attach them to objects. Policies can be any type of rules. For example, a policy could restrict access to a document to a certain time of the day. Let’s say a document should be accessible only between 8:00 a.m. and 5:00 p.m. Another policy could enforce that a document can be updated only if the user is accessing the repository from a certain network segment. That could restrict editing to a special part of a building. A policy could also take a user’s classification level into account and only allow the user to download a document if they have the required security clearance.
To test if a repository supports policies, fetch the CMIS base types from the repository with the operation getTypeChildren. If the base type cmis:policy is in the list of returned types, the repository supports policies. Not all objects may be controllable by policies, though. All CMIS types have the flag controllablePolicy, which indicates whether policies can be applied to objects of that type.
The base policy type is of no direct use because it doesn’t represent any rule. Repositories derive their own policy types from that base type. The display name and the type description should be something an end user can understand, because it’s usually the end user who picks a policy. A policy type may also define extra properties. A policy that restricts access to a certain time of day may need a start and an end time, for example. Or a policy that restricts edits to a network segment may need an IP address range.
Before a policy can be applied, you must create a policy object and set its properties with the createPolicy operation. You then use applyPolicy to put an object under the control of a policy. A policy object can be applied to multiple objects. The removePolicy operation releases a policy from an object. Policy objects live on when they’ve been removed from all objects; a policy object can’t be deleted while it’s applied to at least one object. The next listing shows an example of manipulating policy objects using OpenCMIS.
Listing 12.2. Applying and removing policies with OpenCMIS

12.4.2. ACLs
ACLs are more common than policies. An ACL is an integral part of an object if the repository supports ACLs. A capability flag in the repository info indicates whether the repository supports ACLs, as well as the level of support, for example, read-only versus the ability to fully manage ACLs.
An ACL consists of zero or more access control entries (ACEs). Each ACE defines the permissions for a principal. A principal could be a user, a group, a role, or some grouping of that nature. CMIS has no notion of these user-management concepts and treats the principal IDs as opaque strings. The assumption is that the client and the repository share a common understanding of principals, which is transparent to CMIS. For example, both client and repository are using the same LDAP directory or Active Directory, which provides user and group information.
Anyone, anonymous, and current users
Repositories that have a notion of “any authenticated user” or “anonymous users” provide the corresponding principal IDs with the repository info. CMIS clients can use those to compile ACEs. The CMIS specification also defines the principal ID cmis:user. Repositories that support this macro replace this principal ID with the principal ID of the current user when an ACL is applied.
There should be only one ACE per principal, which collects all permissions for that principal. But some repositories do expose multiple ACEs per principal in some cases.
The CMIS specification defines three basic permissions, but allows repositories to expose additional, repository-specific permissions. The basic permissions are as follows:
- cmis:read—A user with this permission can read an object’s metadata and content.
- cmis:write—A user with this permission has the authorization to update metadata and content. In almost all repositories, the cmis:write permission contains the cmis:read permission.
- cmis:all—A user with this permission has full control of the object. This permission contains the cmis:write and cmis:read permissions.
There are some fuzzy areas regarding these permissions. For example, does a user need the cmis:write or cmis:all permission to delete an object or change the ACL of an object? If you want to move an object, what permissions are required on the source folder, the target folder, or the object itself? The repository info provides some general hints: it contains a permission mapping that maps input parameters of CMIS operations to permissions. For concrete objects, you should also check the allowable actions of each involved object. Figure 12.2 shows the CMIS Workbench displaying the ACLs that are set for a selected document. When you look at this, you might wonder about the other permissions it shows. Those repository-specific permissions are discussed next.
Figure 12.2. CMIS Workbench displaying the ACLs for a document

12.4.3. Repository-specific permissions
Many repositories also provide more fine-grained permissions and permissions that are specific to each repository. For example, a repository might a have special permission for folders that sits between cmis:read and cmis:write and defines whether a user can file an object in this folder. That would allow a repository to distinguish between users who are only allowed to see the folder, users who are allowed to add new children to the folder, and users who are allowed to add new children and rename the folder. An example of a repository-specific permission could be the right to publish a document. There’s no concept of publishing a document in CMIS, but it’s possible to see and manage such a repository-specific permission through the CMIS interface. This permission would be orthogonal to the CMIS basic permissions.
A list of all available permissions is also part of the repository info. Each permission should have a human-readable explanation, such that end users can pick the right permission when presented with a choice.
When an application requests the ACL of an object from the repository, it can ask for the full ACL or an ACL that contains only the CMIS basic permissions. If the latter is requested, the repository has to try hard to map all its specific permissions to the basic permissions. It then also returns a flag that indicates whether the mapping is an exact mapping or if the user has more rights that aren’t expressed with basic permissions. Let’s assume that a user has the permission to file objects in a folder as described earlier. A mapping to the basic permission would return the cmis:read permission for this user, because that is the next-lower basic permission. The publishing permission wouldn’t show up at all. The returned ACL would be an approximation or best fit.
12.4.4. Changing permissions (applyACL)
Calling the applyACL operation can change an object’s ACL. This operation takes a list of ACEs that should be added to and a list of ACEs that should be removed from the current ACL of the object. Either list can be empty. The repository takes these lists, calculates and sets a new ACL, and returns it. The resulting ACL may look different than you expect, because the repository has the freedom to change and streamline the ACL based on its internal rules. For example, a repository might decide not to change the ACL if a user already has the cmis:all permission and the application tries to add the cmis:read permission. But if the application tries to remove the cmis:write permission from that user, the repository may remove all permissions for that user or changes the permission to cmis:read.
The applyACL operation also takes a parameter that tells the repository how to propagate ACL changes. The three available options are as follows:
- object only—Tells the repository to change this object only.
- propagate—Forces the repository to update all inheriting objects. The repository info provides a capability flag that indicates whether the repository supports propagation. Applications should check it before trying to propagate ACL changes.
- repository determined—Allows the repository to decide whether the ACL changes should be forwarded to inheriting objects. In this case, inheriting objects usually means that if the ACL is changed on a folder, the ACLs of all descendants of this folder are also updated. It might also affect objects that are connected through a relationship.
There are two models of permission propagation, and a repository usually supports just one or the other. Propagation can mean that the ACEs are added to and removed from each descendant. That is, if an ACE is added, the object owns the ACE. This ACE is independent of the same ACE on the parent or a sibling. The CMIS term for such an ACE is direct ACE. CMIS ACEs have a flag that indicates whether or not the ACE is a direct ACE.
Nondirect ACEs are defined on a parent, but affect the descendants. They appear in the ACLs of the descendants and have the same impact as direct ACEs, but can only be removed or changed on the parent. For some repositories, that is the definition of permission propagation.
Listing 12.3 shows an example of adding ACEs to an object. You give the principals florian and jeff write permissions and the user jay all permissions for an object. Afterward, all three are allowed to update the object.
Listing 12.3. Adding ACEs to an object with OpenCMIS

Another obstacle with ACL updates is the AtomPub binding. It works slightly differently for the procedure just described. Instead of taking the two lists of ACEs to add and remove, it requires the client to send a complete ACL to the repository. The repository has to calculate the difference between the retrieved ACL and the current ACL of the object to determine which ACEs should be added and which should be removed.
applyAcl versus setAcl
OpenCMIS provides two methods to change ACLs: applyAcl and setAcl. applyAcl works as described in the CMIS specification. For the AtomPub binding, it calculates the complete ACL under the hood on the client side to make it work like the other two bindings. setAcl takes a complete ACL and tries to apply it. If the AtomPub binding is used, the ACL is forwarded as is to the repository. For the other two bindings, OpenCMIS calculates the ACE add list and the ACE remove list and calls applyACL. Because that doesn’t work with propagation, the ACL can only be set for one object.
ACL management can be repository- and binding-specific. You should carefully test how your repository handles ACL changes. This is an area where switching from one repository vendor to another might require some application code adjustments.
Applications that only need to know what the user is allowed to do and don’t change permissions should rely on the allowable actions. They’re computed by the repository, which should take all aspects of the object into account. One of these aspects could be the document’s retention settings; which we’ll cover in the next section.
12.5. Retentions and holds
Retentions and holds were introduced in CMIS 1.1. They control whether documents can be updated and deleted. Before CMIS 1.1, they had to be modeled as policies. Although it was technically possible, the lack of standardization in this area made it difficult to build interoperable applications.
CMIS 1.1 defines two types of retentions:
- Repository-managed retentions
- Client-managed retentions
We’ll discuss them next.
12.5.1. Repository-managed retentions
A repository that supports repository-managed retentions provides a hierarchy of secondary types derived from the type cmis:rm_repMgtRetention. This hierarchy might be the same as a classification hierarchy or a file plan in a repository. A client that wants to put a document under retention must attach the appropriate secondary type to the document. Some retention types need specific property values, and some need special permissions. Not everyone is allowed to apply a certain retention type.
The semantics of the retention types is transparent to the CMIS client, and the impact on a document is unpredictable from the client point of view. In this regard, repository-managed retentions are similar to policies. But in many cases, applying such a retention means the repository calculates a date until which the document can’t be updated or deleted. For example, if invoices have to be kept for seven years starting from the beginning of the next month, the repository calculates the date and makes sure the document can’t be altered and the retention can’t be removed.
12.5.2. Client-managed retentions
Client-managed retentions allow the client to set the retention date. For this purpose, the client has to attach to the object the secondary type cmis:rm_clientMgtRetention or a type derived from it. These types have the cmis:rm_expirationDate property, which defines the retention date. This property doesn’t have to be set initially. But once it’s set, the retention time can only be prolonged and can never be reduced. There’s also the cmis:rm_startOfRetention property, which takes the start date of the retention. It exists only for documentation purposes and doesn’t have any impact on document protection.
Repositories can also provide the secondary type cmis:rm_destructionRetention, which is derived from cmis:rm_clientMgtRetention. On top of the inherited retention-date property, it adds the cmis:rm_destructionDate property. This date defines when the destruction of the document should be triggered. That doesn’t necessarily mean the document will be automatically deleted on this date; what happens depends on the repository. Some use cases require an administrator to approve the deletion of every document.
12.5.3. Holds
CMIS 1.1 also introduced holds. Documents that have at least one hold applied can’t be update or deleted. But in contrast to retentions, everyone with sufficient permissions can remove holds at any time.
You set a hold by attaching the secondary type cmis:rm_hold. This type defines the multivalue string property cmis:rm_holdIds. This list contains hold identifiers that are defined somewhere else; they’re opaque strings for CMIS. An empty list means that no hold is applied and the hold type can be detached.
You may have noticed that we’ve only talked about documents in this section. Retentions and holds are only defined for documents. To be precise, they’re only defined for document versions and for the content of the document version. Protecting a document version may or may not also protect all other documents in the version series. Some repositories may also freeze property values, not just the content. The semantics of setting a retention or a hold on a folder isn’t defined by the CMIS specification, but a repository may allow that.
Retentions and holds again demonstrate that looking at a document’s ACL doesn’t reveal a user’s true permissions. Even if a user has the cmis:all permission, they may not be allowed to delete the document because of a retention. But the allowable actions should reflect this fact.
12.6. Summary
This chapter covered authentication and authorization topics and pointed out some general security issues that CMIS applications frequently face. We started with some obvious, but sometimes overlooked, issues in web applications that deal with documents. We then explained that CMIS doesn’t define how a client should authenticate an end user against the repository. A short introduction into the implementation of an OpenCMIS authentication provider showed you how to handle authentication in real projects. This was followed by the special authentication mechanism for web applications.
We also looked into policies and access control lists and explained what they’re good for and how to use them. Finally, we touched on retentions and holds.
We’ve reached a major milestone in this book. At this point, we’ve covered all the functional details of CMIS. The next chapter covers a nonfunctional but important topic: performance.