
Chapter 8. The Blend: create, update, and delete functionality
- Creating folders, documents, and document versions
- Working with primary and secondary types
- Updating properties and content
- Optimistic locking and change tokens
- Copying, moving, and deleting objects
In the last chapter, you learned how to read metadata and content from a CMIS repository. In this chapter, you’ll learn about adding, updating, and removing data. You’ll enhance the web pages that you built in the previous chapter and add new web pages to your version of The Blend.
8.1. Creating folders
In the previous chapter, we started out with folder browsing; in the opening section of this chapter we’ll tie in with that. We’ll extend the browse page with the capability to create a new subfolder in the folder that’s displayed.
The operations that create objects in CMIS need at least two pieces of information: the type of the object and a name for the object. If the object should be filed (and folders are always filed), they also need a parent folder. To let the user provide these details about the new folder, you’ll have to extend the browse page starting with this HTML, which you can place wherever you want on the page:
<h2>Create new folder</h2>

<form method="POST" action="browse">
  <input type="hidden" name="parent" value="<%= folder.getId() %>">
  Folder name:
  <input type="text" size="20" name="name"><br>
  Folder type:
  <input type="text" size="20" name="type" value="cmis:folder"><br>
  <input type="submit" value="create">
</form>
Let’s note a few things about this code:
- The form points back to the browse servlet using HTTP POST, which means the folder creation logic will be in the browse servlet.
- There’s a hidden field called parent that gets the ID of the current folder. Remember, in a real application, you’d want to encode the ID. The repository may use characters like double quotes in its IDs that must be encoded here.
- There are input fields for the name and type, and the type field is prefilled with the value cmis:folder. It’s inconvenient for the end user that the type field is a text field. Typically, users don’t know which types are available, and even if they know, it’s inconvenient (and error prone) to enter a potentially long value. Keep that in mind; we’ll fix it later.
On the browse servlet side, you have to override the doPost method, which provides the OpenCMIS session as the third parameter. Before you can do anything else, you have to get the values from the form like this:
String parentId = getStringParameter(request, "parent");
String name = getStringParameter(request, "name");
String typeId = getStringParameter(request, "type");
You might recall from chapter 3 that you need all three of these values to create a folder. You can proactively check them here, but to keep the code short and readable, we’ll let the repository throw exceptions later if something is missing.
8.1.1. Two ways to create folders
OpenCMIS offers two ways to create new objects:
- The Session object provides create methods for all the primary base types. If you want to create an unfiled object, this is your only option. (Set the parent folder ID to null.) These methods only return the object ID and nothing else about the newly created object. If you want to create and forget an object, this is your best choice. If you want to do something with the newly created object, the next option will make more sense.
- The OpenCMIS folder interface provides create methods for all fileable base types (which means there’s no create method for relationships). Objects created in this manner are created already filed in this folder. Also, these create methods return complete objects, so you can provide an OperationContext to control what these objects should contain.
Let’s look at examples of both techniques.
Session.createFolder()
This first example is straightforward—it calls the createFolder method on the OpenCMIS Session object. This method takes two parameters: a set of properties and the parent folder ID. It returns the ID of the new folder:
Map<String, Object> properties = new HashMap<String, Object>();

properties.put(PropertyIds.NAME, name);
properties.put(PropertyIds.OBJECT_TYPE_ID, typeId);

ObjectId parentFolderId = session.createObjectId(parentId);

ObjectId newFolderId = session.createFolder(properties, parentFolderId);
Property name constants
The class PropertyIds has constants for the property names that are defined by the CMIS specification. For example, PropertyIds.NAME maps to cmis:name and PropertyIds.OBJECT_TYPE_ID maps to cmis:objectTypeId.
The two properties, name and type ID, are always required to create an object. You can also set any other property that isn’t read-only. OpenCMIS filters read-only properties for you, and if you set them, they have no effect. Other libraries forward them to the repository, and you should be prepared for an exception if you send values for read-only properties.
You’ll need to make sure that the data types are correct, though. OpenCMIS automatically converts common Java data types into appropriate CMIS data types. For example, Date and Calendar objects are converted to the CMIS DateTime data type, and all Java integer types are converted to the CMIS Integer data type. But if you supply an integer for a CMIS String property, OpenCMIS throws an exception. And multivalue properties must always be supplied as a List, as the following shows:
List<String> colors = new ArrayList<String>();
colors.add("red");
colors.add("green");
colors.add("blue");

properties.put("colors", colors);
Remember, per the specification, this list must not contain any null values. The list itself can be null, but not empty (although OpenCMIS takes care of empty lists and treats them like a null value).
Folder.createFolder()
For the second way to create a folder, you have to get the parent Folder object first. To simplify the following example, we’ll use the repository’s root folder:
Folder root = session.getRootFolder();

Map<String, Object> properties = new HashMap<String, Object>();
properties.put(PropertyIds.NAME, name);
properties.put(PropertyIds.OBJECT_TYPE_ID, typeId);

Folder newFolder = root.createFolder(properties);
That looks similar to the first example. The (parent) Folder object provides a createFolder method that takes the properties. The main difference here is that it returns a real Folder object for the newly created folder. This variant of createFolder uses the default OperationContext of the session to fetch the new folder. As you’d expect by now, there’s also a second createFolder method that lets you specify your own OperationContext, among other details.
This second option has a few advantages. For example, you can check the allowable actions of the parent folder to see if the current user is allowed to create a subfolder here. If not, you can provide an error message without even making a round trip to the server. Repositories can also restrict which object types can be filed in a specific folder. The IDs of the allowed types are provided in the multivalue property cmis:allowedChildObjectTypeIds. If this list isn’t set, all object types are allowed. You can check this list before you create the folder or any other object.
Even with all of this careful capability checking, folder creation can fail for many other reasons. For example, the nameConstraintViolation exception can be thrown for two reasons:
- The name is empty or contains characters that the repository doesn’t support.
- An object with this same name already exists in the folder.
If this happens, the repository is allowed to change the name or use a different path segment. But most repositories throw an exception in this case.
8.1.2. Create folder: doPost()
Getting back to the browse servlet, you now have all the parameters you need, and you know how to create a folder. Let’s put that all together in the doPost method, shown in the next listing.
Listing 8.1. doPost method for creating a folder


The doPost method goes through four steps. It first gets the servlet parameters, and then it fetches the parent folder to check that it’s a real folder. Next, it creates the new subfolder, and finally it redirects to the browse page of the parent folder. The page should now display the new subfolder in the list of children.
Folder creation should work now, but you still have this annoying text field for the folder type. Before we move on, let’s turn that into a more convenient and mouse-friendly select box.
8.1.3. Enumerating the creatable folder types
When you create a folder, you have to provide an object type that’s either cmis:folder or a type derived from cmis:folder. The descendants of cmis:folder form a hierarchy, and to reflect that on the web page you’d have to provide some kind of a tree selection box. Let’s keep it simple and collapse this tree down to a flat list. This list should only contain types that can be used to create a folder, because a repository might provide types that aren’t “creatable,” such as abstract types that serve as parents for other types but can’t have objects associated with them.
Let’s look at the methods that turn the types tree into a flat list. The getCreateableTypes method (see listing 8.2) requires an OpenCMIS Session object and a root type ID, which can be any valid type ID. That is, you can use this to get the list of creatable folder types and reuse this code later to retrieve the creatable document types.
For now, copy the methods in listing 8.2 into the browse servlet. In a real application, you’d want to get that list only once when the application starts up and cache it. Type information usually doesn’t change in a production environment, and it isn’t necessary to retrieve the type hierarchy over and over again unless you have special circumstances.
Listing 8.2. getCreatableTypes() helper methods

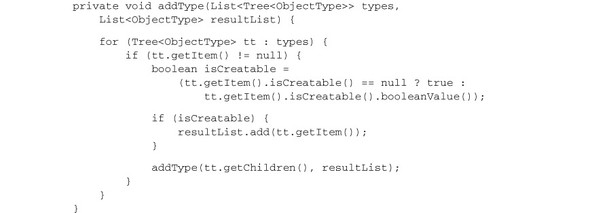
The getCreateableTypes method calls getTypeDescendants. It returns the descendant types of the given root type. The method takes three parameters:
- The ID of the root type.
- The depth of the tree that should be returned. The depth here is set to -1, which means that the whole tree should be retrieved.
- A Boolean that indicates whether the property definitions should be retrieved as well. In this case, it’s set to false because you’re not interested in the properties.
To make the list of folder types available on the web page, add the following lines at the top of the doGet method of the servlet:
List<ObjectType> folderTypes =
  getCreatableTypes(session, "cmis:folder");
request.setAttribute("folderTypes", folderTypes);
Next, load the folder types and put the list into an attribute that can be retrieved in the JSP, like so:
List<ObjectType> folderTypes =
  (List<ObjectType>) request.getAttribute("folderTypes");
Now you can replace this line,
<input type="text" size="20" name="type" value="cmis:folder">
with this snippet:
<select name="type">
  <% for(ObjectType type: folderTypes) { %>
    <option value="<%= type.getId() %>"<%=
      ("cmis:folder".equals(type.getId()) ? " selected" : "") %>>
  <%= type.getDisplayName() %>
  </option>
  <% } %>
</select>
This snippet generates a select box with all the folder types, and it preselects cmis:folder. The user sees the display names of types instead of the type IDs. That’s much more convenient than the text box with the type ID.
If you’re connecting to the InMemory Repository, the list of folder types is short. In fact, cmis:folder is the only one. It gets more interesting when you look at the document types, though. Let’s create some documents next.
8.2. Creating documents
Creating documents is similar to creating folders. The main difference is that you have to handle the content in addition to the properties.
Let’s add another web page to create documents. The user has to specify the folder in which the document should be created, a name for the document, the type of the document, and the content. The JSP in the following listing contains a form that asks for all this data. Copy it to the other JSPs and call it add.jsp.
Listing 8.3. add.jsp code for creating a new document

We’ll keep it simple. The user has to enter the path of the parent folder, and by now you should know how to navigate folders and provide a more convenient way to let the user pick a folder, so we won’t repeat that in this example. The user also has to enter the type ID here. In the last section, you built a type select box for folder types, and the same code will work here for document types. Next we’ll prepare the servlet.
In the package titled com.manning.cmis.theblend.servlets, create a new class called AddServlet that extends AbstractTheBlendServlet, and then add the following XML snippet to the web.xml file:
<servlet>
 <servlet-name>AddServlet</servlet-name>
 <servlet-class>
   com.manning.cmis.theblend.servlets.AddServlet
 </servlet-class>
</servlet>
<servlet-mapping>
 <servlet-name>AddServlet</servlet-name>
 <url-pattern>/add</url-pattern>
</servlet-mapping>
8.2.1. Creating doGet() and doPost() for document creation
With all of the previous preparations completed, you’re ready to tackle the doGet and doPost methods of the servlet. You don’t have much to do in the doGet method except call the JSP shown here:
protected void doGet(HttpServletRequest request,
  HttpServletResponse response, Session session)
    throws ServletException, IOException, TheBlendException {
      dispatch("add.jsp", "Add a new document", request, response);
}
The doPost method requires a bit more code. Let’s start from the beginning. As we mentioned in the previous section, you can create documents in one of two ways. You can use the createDocument method on the Session object or the createDocument method on a Folder object. Because they’re similar, we’ll only look at the createDocument method on the Session object, as shown in the next listing.
Listing 8.4. createDocument() example
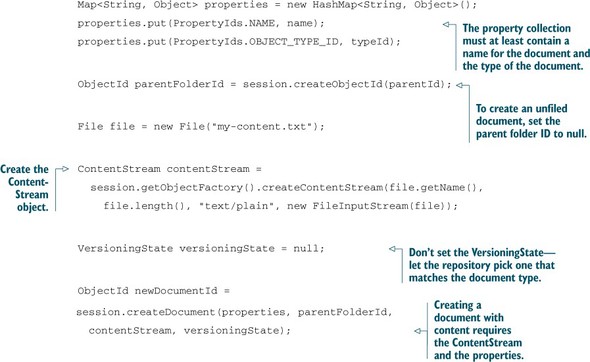
The first few lines of this listing should look familiar to you. The createDocument method needs properties and a parent folder ID. The property collection must at least contain a name for the document and the type of the document. The type ID must be cmis:document or the ID of a type derived from cmis:document.
Some repositories don’t support documents without content. To be safe, you can test for this using the following code:
DocumentType docType =
  (DocumentType) session.getTypeDefinition(typeId);

if (docType.getContentStreamAllowed() ==
  ContentStreamAllowed.REQUIRED) {
  // document must always have content
}
else if (docType.getContentStreamAllowed() ==
  ContentStreamAllowed.NOTALLOWED) {
  // document must never have content
}
else {
  // document may or may not have content
}
ContentStream is an interface, which means you can implement it yourself. Use the ContentStreamImpl class that comes with OpenCMIS, or use the factory method, as shown in listing 8.4. You have to provide an input stream and we strongly recommend you also provide a name, length, and MIME type for the stream.
If you don’t know the MIME type, set application/octet-stream. If you don’t know the length, set it to null (or -1 if you’re using the object factory). The length is only a number that’s transmitted to the repository; OpenCMIS doesn’t verify it. If this number and the length of the stream don’t match, you may or may not get an exception from the repository.
If you want to create a document without content, don’t provide a ContentStream object at all—set it to null. That’s entirely different from a ContentStream object with an empty stream, because an empty stream still has a length (0), a MIME type, and a name.
CMIS 1.1 introduced a new base type called cmis:item. This type is similar to an unversionable, contentless document type. An Item object only carries properties.
Item objects can be used to model data (think complex types) that are obviously not documents. Think of a project modeled as an item. It may have properties for a project name, a project ID, a start and end date, project members, and so on. You can attach documents and folders to this project object with relationships. Or you can discover a connection between documents using a query that takes the properties of a project item into account. The project object itself is neither a document nor a folder. An object type derived from cmis:item is the best choice for a such a case.
Chapter 7 explained how you can check if the repository supports relationships. The same works for items. Call getTypeChildren() and check if cmis:item is in the returned list. If it is, the repository supports items. You can then use the createItem method to create cmis:item objects.
The last parameter to explain from the createDocument call is the versioningState. It specifies whether the new document should become a major version, a minor version, or a Private Working Copy (PWC) when the document is created. If the document type isn’t versionable, only the fourth state, none, is valid. If you don’t set the versioningState, as in this example, the repository will make it a major version if the document type is versionable.
To play it safe, you can check whether the type is versionable and set a concrete versioningState like this:
VersioningState versioningState = VersioningState.NONE;
DocumentType docType =
  (DocumentType)session.getTypeDefinition(typeId);
if (Boolean.TRUE.equals(docType.isVersionable()) {
  versioningState = VersioningState.MAJOR;
}
8.2.2. Performing file uploads
You’ve now got all you need to create a CMIS document. But in a web application, you don’t want to read the content from a file. You want to get the content from your user’s web browser. The Apache Commons FileUpload library can help with that, as the following listing shows.
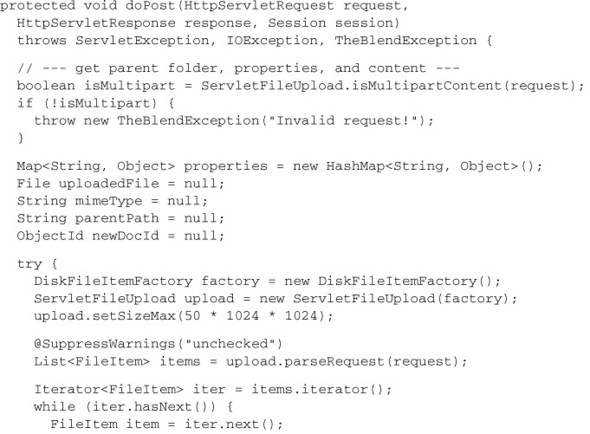
Listing 8.5. File upload

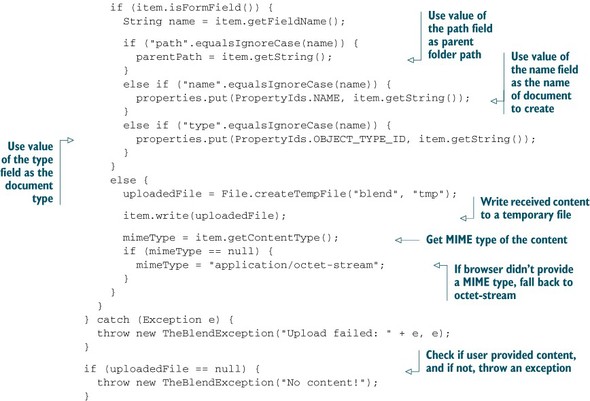
Let’s take a quick tour through this code. First, the servlet checks whether the request is a multipart request. If not, it hasn’t been sent from the web page and you return an error message. If everything looks good, the code iterates over all of the form fields and gathers the field values. The content is written to a temporary file that you’ll later have to delete. If no content was transmitted, the code returns an error message.
Next, the doPost method needs to perform the following functions:
- Get the properties, path, and content from the request
- Get the parent folder by path because you need the ID of the folder to create the document
- Create the document with the right versioningState
- Delete the temporary file
- Redirect to the show page to display only the uploaded document
The following listing puts this all together for you.
Listing 8.6. doPost()method for creation of document

Congratulations! Your application now creates documents in a CMIS repository. Restart the server, log in, and append/add to the URL in the address bar of your web browser.
The web page you’ve built is simple, though. In real applications, you know the domain the user is dealing with—be it invoices, photos, or CAD drawings—and you know the object type of those documents.
Properties become more important with specific types, because they let you use the CMIS query in much more powerful ways. Your users will expect you to set more property values at creation time. Also important is updating these properties. That’s the topic of the next section.
Apache Tika
If you’ve played with The Blend version that comes with this book, you may have noticed that many property values are magically set when you upload a file. For example, when you upload an MP3 file, the title and artist are retrieved from the file and set. When you upload an image, the height and width are set. This works for PDFs, Office files, and various types of media files as well. The magic behind this is the Apache Tika library, which can extract metadata and text from many different file formats. Before we create the document in the CMIS repository, we let Apache Tika scan the temporary file in the servlet. It delivers a set of metadata that we then map to properties of the object type the user has specified. Apache Tika can also detect the MIME type of a file, which is handy if you have content but no idea what type of content it is. If you want to learn more about Apache Tika, check out Tika in Action by Chris Mattmann and Jukka Zitting (Manning, 2011).
8.3. Updating properties
As you’ll recall, the CMIS specification defines a bunch of properties for the base object types. You’ve seen most of them already in previous chapters. Most properties defined in the specification are read-only, and you can only change their values indirectly by doing something with the object. But only one property is modifiable for almost all repositories and all types: the object’s name, also known as cmis:name. In this section, you’ll build a web page that allows you to rename objects.
To rename an object, the user has to specify the object and provide a new name. The HTML form could look like this:
<h1>Rename object</h1>

<form method="POST" action="rename">
 Object path:
 <input type="text" size="20" name="path"><br>
 New name: <input type="text" size="20" name="name"><br>
 <input type="submit" value="rename">
</form>
To specify the object, we’ll use the object’s path this time. That excludes unfiled objects, but you know already how to modify the code to accept the object ID.
As in previous sections, copy the echo JSP from chapter 6 and rename it (to rename.jsp). Remove everything between the line that includes the header JSP and the line that includes the footer JSP, and copy in the previous HTML fragment. The result should look like the next listing.
Listing 8.7. rename.jsp with inserted HTML form

In the package titled com.manning.cmis.theblend.servlets, create a new class called RenameServlet that extends AbstractTheBlendServlet, and then add the following XML snippet to the web.xml file:
<servlet>
  <servlet-name>RenameServlet</servlet-name>
  <servlet-class>
    com.manning.cmis.theblend.servlets.RenameServlet
  </servlet-class>
</servlet>
<servlet-mapping>
  <servlet-name>RenameServlet</servlet-name>
  <url-pattern>/rename</url-pattern>
</servlet-mapping>
CMIS has no explicit rename operation. The object’s name is stored in the cmis:name property. To rename an object, you only have to modify this property and persist the change:
String path = "/path/to/some/object.txt";
String newName = "newname.txt";
try {
  CmisObject object = session.getObjectByPath(path);

  Map<String, Object> properties = new HashMap<String, Object>();
  properties.put(PropertyIds.NAME, newName);

  CmisObject newObject = object.updateProperties(properties);
}
catch (CmisBaseException cbe) {
  // handle error
}
You must first acquire a CmisObject. Then you create a Map with all the properties you want to update and their new corresponding values. If you want to unset a property, set the value to null. Don’t add any properties here that you don’t want to modify. At this point, calling updateProperties will update the object on the server.
As always, exception handling is important because the update could fail. For example, the object might not exist anymore, or a property value might be invalid. You’ll want to be careful about handling the CmisNameConstraintViolationException when changing the cmis:name property.
The updateProperties method on CmisObject doesn’t only update the properties in the repository, it also refreshes the Java object afterward. This means the property values in the CmisObject are up to date after this call, including properties that have been changed indirectly, such as the last modification date.
Note that the CmisObject you get back may be an entirely new one, and not merely the same object with a couple of different properties. The reason for this is that a few repositories have autoversioning for certain document types, so that whenever you change a property, the repository automatically creates a new version. If that’s the case, updateProperties returns this new version. In all other cases, including all nondocument objects, it returns the original CmisObject.
If you think there’s too much going on with refreshing the object and possibly fetching a new version, here’s a second updateProperties method. You can do an update-and-forget operation like this:

This updateProperties method only returns the object ID rather than the whole replacement object. The second parameter indicates whether or not the Java object should be refreshed. In this example, the object isn’t refreshed, which is the least expensive way to update properties.
8.3.1. Concurrent access and locking
When multiple people work on the same object at the same time, they may not see each other’s modifications, and updates could get lost when overwritten. Some sort of locking mechanism is required to prevent this.
CMIS doesn’t support pessimistic locking. That is, you can’t reserve an object only for you, and do something with it, while forcing everybody else to wait until you unreserve it.
But CMIS does support optimistic locking. That is, a repository can send a change token with each object. It’s transmitted as the property cmis:changeToken. When you update an object to include this change token, the repository can check whether someone else has updated the object since you got your copy. If it has been updated, the repository throws a CmisUpdateConflictException. You can then reload the object and either reapply or merge your changes with the new object and its corresponding fresh change token.
OpenCMIS takes care of sending the change token along—if it’s available. The token isn’t available if the repository doesn’t support optimistic locking. It’s also not available if you didn’t select the property cmis:changeToken when you fetched the object. This property needs to be in the property filter of your OperationContext if you want to use this feature.
That covers everything you need to know about updating the name of an object. Let’s now implement the rename servlet. The doGet method has only to call the JSP, as shown here:
protected void doGet(HttpServletRequest request,
  HttpServletResponse response, Session session)
    throws ServletException, IOException, TheBlendException {
  dispatch("rename.jsp", "Rename an object", request, response);
}
The doPost method, shown in listing 8.8, does all of the hard work. It gets the path and name parameters, fetches the object, and updates the properties. Note that the OperationContext selects the cmis:changeToken property.
Listing 8.8. doPost method for updating properties


You may have noticed this line in listing 8.8:
opCtx.setCacheEnabled(false);
The OperationContext explicitly disabled the OpenCMIS cache for the getObjectByPath method. The reason is simple. If getObjectByPath() always got the object data from the cache, there’s a chance that it might get an outdated change token, which would cause all update attempts to fail. Chapter 13 explains how caching works in detail and how to deal with this situation more elegantly.
As we’ve shown, updating properties isn’t difficult. What works for the cmis:name property also works for any properties with updatability equal to read-write. For details on property constraints, choices, default values, and other factors that might affect a property’s writeability, take a quick pass through chapter 4 again.
8.3.2. Properties from CMIS 1.1 secondary types
CMIS 1.1 introduced two new features that have to do with properties. We’ll touch on them briefly in this section because they’re worth mentioning, although they’re not used in The Blend.
When we’ve talked about properties up to this point, the type of the object defined them. But the type doesn’t only define the properties of an object, it also defines its behavior and the operations that you can perform on the object. These primary types aren’t changeable after an object has been created. You can’t turn a document into a folder, just as you couldn’t turn an x-ray image into an invoice.
CMIS 1.1 adds secondary types, which gives you more flexibility. A secondary type defines a discrete bag of properties. With secondary types you can add additional properties to an object that aren’t defined by its primary object type. You can’t use a secondary type like a primary type to create an object, but you can attach secondary types to or detach them from an existing object whenever you want, where they’re supported. You can even attach a secondary type as an additional type when the object is created. Attaching a secondary type means that the object gains the properties that are defined by that secondary type. If a secondary type is detached from an object, the object loses these properties and the associated property values.
The secondary types are managed in the multivalue property cmis:secondaryObjectTypeIds at the object. Adding a secondary type ID to that list attaches the secondary type. Removing a type ID detaches the secondary type.
You use the updateProperties and checkIn methods to attach and detach types. When you attach a secondary type, you can also supply values for the new properties, as shown here:

The other new CMIS 1.1 addition is the bulkUpateProperties operation. As the name suggests, it updates a bunch of objects with the same property values in one call. That’s handy if you have to attach a secondary type to multiple objects.
Let’s say you have a secondary type that holds data about projects. You could have properties for the project name, a project number, the team members working on the project, the project start date, and so on. If you have documents that belong to that project already, you can identify them and attach the secondary type with all of that data in one go, as in this example:

Note that the bulkUpateProperties operation isn’t an atomic operation. If something goes wrong mid-operation and this method throws an exception, some objects might be updated and others might not. Usually, bulkUpateProperties doesn’t throw an exception. It returns a list of all objects that have been updated. The application has to figure out which objects haven’t been updated, if any, by comparing the input list and the output list.
In addition to properties, documents also have content that can be updated. Let’s look at that next.
8.4. Updating and deleting content
The content of documents can be replaced, deleted, and, since CMIS 1.1, appended. The Blend doesn’t have any real use case for doing any of those operations, which means this section will be a dry run. The Blend uses document versions to add new content, and we’ll talk about that in the next section.
8.4.1. Deleting content
You won’t find anything simpler than deleting the content of a document, as you can see in this example:
try {
  Document doc = (Document) session.getObject(id);
  Document newVersion = doc.deleteContentStream();
}
catch(CmisBaseException e) {
  // handle error
}
Be prepared for exceptions, though. This example uses the change token as well, which means you may encounter a CmisUpdateConflictException. To check in advance if you can delete the content at all, examine the allowable actions of the document.
Similar to the updateProperties method, deleteContentStream refreshes the Java object and returns a new version of the object if one has been created. A delete-and-forget variant of this method also is available, and is shown here:

8.4.2. Replacing content
You can replace content with the setContentStream method:

The second parameter of this method specifies whether or not to overwrite existing content. If it’s set to false and you already have content, the repository throws a CmisContentAlreadyExistsException. If it’s set to false and you don’t have any content, the provided content will be set. You can’t use this method to remove content by not setting a ContentStream object. Use deleteContentStream instead.
The remaining behavior is similar to deleteContentStream. It refreshes the Java object and returns a new version if one has been created. Note that there’s an allowable action available, which you can use to check whether new content can be set. Again, there’s a set-and-forget variant of this method:
try {
  Document doc = (Document) session.getObject(id);

  ContentStream contentStream =
    session.getObjectFactory().createContentStream(name,
      length, mimeType, stream);

  ObjectId newVersionId =
    doc.setContentStream(contentStream, true, false);
}
catch(CmisBaseException e) {
  // handle error
}
8.4.3. Appending content
Appending content is new in CMIS 1.1. It was added to support uploads of huge documents in multiple steps. Think of a video that consists of several gigabytes. Such an upload can take some time, and the longer the time needed for such a connection, the greater the probability of a connection failure between client and repository during that time.
The appendContentStream operation allows clients to upload partial chunks of the content. Applications can, for example, chop a video into smaller chunks, say 100 megabytes, and upload them sequentially in a batch. If the connection fails, only the last chunk has to be repeated. This operation isn’t intended to support parallel uploads from one or multiple users. The behavior of the repository in this case isn’t defined by the specification and may vary from repository to repository. The change token can prevent some of these types of collisions, but not all:
byte[][] chunks = new byte[][] {
  "First line
".getBytes(),
  "Second line
".getBytes(),
  "Third line
".getBytes()
};

try {
  Document doc = (Document) session.getObject(id);
  doc.deleteContentStream();

  for (int i = 0; i < chunks.length; i++) {

    ByteArrayInputStream stream = new ByteArrayInputStream(chunks[i]);

    ContentStream contentStream =
      session.getObjectFactory().createContentStream("lines.txt",
        chunks[i].length, "text/plain", stream);

    boolean isLastChunk = (i == chunks.length - 1);

    doc.appendContentStream(contentStream, isLastChunk, false);
  }
} catch (CmisBaseException e) {
  // handle error
}
The second parameter tells the repository whether this chunk is the last chunk of the document. For some repositories, that can be important information, because it might trigger some content processing in the background. For example, the repository might create low-resolution renditions of videos, but generating such a rendition would only make sense when the video is fully uploaded, so the repository has to know what the last chunk is. If you define a chunk as the last chunk and then try to append yet another chunk, the repository may throw a CmisConstraintException. You can also start over by calling setContentStream and providing the first chunk of the content.
When you call deleteContentStream or setContentStream, you don’t leave a trace of the content that’s been there before—you’re not able to switch back or recover a previous state of the document. But versioning of the documents makes that possible. The next section focuses on how to accomplish versioning.
8.5. Versioning
Chapter 3 described how versioning works in CMIS. Let’s put that into practice and build a web page that creates a new version of a document. We can borrow quite a bit of code from section 8.2.
The user has to specify the document and the new content. To keep it simple, we won’t update any properties when we create this new version. Here’s the HTML form we’ll use:
<h1>Add a new version</h1>

<form method="POST" action="addversion" enctype="multipart/form-data">
  Path to the document:
  <input type="text" size="20" name="path"><br>
  File:
  <input name="content" type="file"><br>
  <input type="submit" value="add version">
</form>
Copy the echo JSP from chapter 6 and rename it to addversion.jsp. Remove everything between the line that includes the header JSP and the line that includes the footer JSP, and copy in the preceding HTML fragment.
In the package com.manning.cmis.theblend.servlets, create a new class called AddVersionServlet that extends AbstractTheBlendServlet, and then add the following XML snippet to the web.xml file:
<servlet>
 <servlet-name>AddVersionServlet</servlet-name>
 <servlet-class>
  com.manning.cmis.theblend.servlets.AddVersionServlet
 </servlet-class>
</servlet>
<servlet-mapping>
 <servlet-name>AddVersionServlet</servlet-name>
 <url-pattern>/addversion</url-pattern>
</servlet-mapping>
Good. Now add the code for the doGet method. It only redirects to the JSP:
protected void doGet(HttpServletRequest request,
    HttpServletResponse response, Session session)
    throws ServletException, IOException, TheBlendException {
  dispatch("addversion.jsp", "Add a new version", request, response);
}
8.5.1. Creating a new version
This last piece of code looks familiar, doesn’t it? If you’re thinking that the doPost method will be a bit longer, you’re absolutely right.
But first things first. This next snippet shows you how to create the new version of the specified document:
try {
  Document doc = (Document) session.getObject(id);

  ObjectId pwcId = doc.checkOut();

  Document pwc = (Document) session.getObject(pwcId);

  // ... do something with the Private Working Copy ...

  ObjectId newVersionId =
    pwc.checkIn(true, properties, contentStream, "a new version");

  Document newVersion = (Document) session.getObject(newVersionId);
}
catch(CmisBaseException e) {
  // handle error
}
Creating a version is a two-step process: check out and check in. First, you have to check out a document. The document must also be versionable. If it isn’t, the repository will return a CmisConstraintException. Usually, repositories only allow you to check out the latest version, but that’s not a strict rule. Inspect the allowable actions to verify that you can do a checkout. If you can’t, you might want to get the latest version and try again.
The following code snippet shows how to check if the document is the latest version, and if it isn’t, how to retrieve the latest document version. The Boolean parameter that getObjectOfLatestVersion accepts defines whether you want the latest major version. Here, you want the very last version, even if it’s a minor version, so you set this parameter to false:
if (!Boolean.TRUE.equals(doc.isLatestVersion())) {
  doc = doc.getObjectOfLatestVersion(false);
}
Keep in mind that you have to select the cmis:isLatestVersion property when you fetch the object to make that snippet work.
The checkOut method returns the ID of the Private Working Copy (PWC). As the name suggests, this working copy might only be visible to you. (There are exceptions to this rule. For example, a few repositories provide ways to make the PWC also visible to other users by changing the ACL of the PWC.)
When a version series is checked out, it can’t be checked out a second time. There can be exactly one PWC per version series, and CMIS only supports linear versioning. You and other users can test whether the version series is checked out with the following piece of code:
if (!Boolean.TRUE.equals(doc.isVersionSeriesCheckedOut())) {
  String user = doc.getVersionSeriesCheckedOutBy();
  String pwcId = doc.getVersionSeriesCheckedOutId();
}
The getVersionSeriesCheckedOutBy method returns the user that owns the PWC. This information is optional, and some repositories don’t provide it. The getVersionSeriesCheckedOutId method returns the ID of the PWC. If you checked out the version series, you should get the ID. Other users may not get this ID, but that depends on the repository. Again, make sure you’ve selected all of the properties that are backing these methods.
You can also retrieve the list of all checked-out documents. The Session interface and the Folder interface both provide a getCheckedOutDocs method for this purpose, though their scopes are different. The variant at the Session interface covers the whole repository, whereas the Folder variant only covers one folder. You’re probably going to see only the documents that you’ve checked out, but they are repository-specific. A superuser might see all checked out documents:

With the PWC ID, you can now retrieve the PWC object. This object is a copy of the checked-out document, though a few system properties like the creation date may be different. Most repositories also copy the content during checkout, but to be sure, examine the content properties, length, and MIME type.
This Document object can now be updated. You can change the properties and content as often as you want. In fact, in some cases you can change more properties than when the document isn’t checked out. The updatability of a property can be one of the following four states:
- READONLY—Property is a system property and can’t be changed directly.
- READWRITE—Property can be updated at any time.
- WHENCHECKEDOUT—Property can be updated only when the document is checked out (it can only be updated on a PWC instance).
- ONCREATE—Property can only be set during object creation.
Content also has a similar flag. The repository capability ContentStreamUpdatability tells applications when content can be updated. These are the possible values:
- ANYTIME—Content can always be updated.
- PWCONLY—Content can only be updated when the document is checked out.
- NONE—Content can never be updated.
At some point, you’ll have to decide whether or not you want to keep your changes and make a new version, or discard all of your changes. If you want to discard them, you can cancel the checkout like this:
pwc.cancleCheckOut();
That deletes the Private Working Copy and all your changes are lost. The version series can always be checked out again.
8.5.2. The checkIn() method
If you want to create the new version, you have to check it in:
ObjectId newVersionId =
  pwc.checkIn(true, properties, contentStream, "a version comment");
The first parameter defines whether this new version should become a major or a minor version. The second parameter changes properties, and the third parameter sets new content. You can see that you can work with a PWC in one of two ways. You can update a PWC object, and when you check it in, set the properties and content parameters to null. The current state of the PWC then becomes the new version. You can also get the PWC object and not change anything. When you call checkIn, you provide all property updates and/or the new content. It’s up to you what makes more sense for your application.
The fourth parameter is a comment that’s associated with the version and is stored in the property cmis:checkinComment. Some repositories don’t support it and therefore won’t set this property even when you supply it. Not supporting this property is allowed in the specification for repositories that don’t have a checkIn comment.
The checkIn method returns the ID of the newly created version, allowing you to fetch it from the repository if you need it again. The Java object that represented the PWC is now invalid. The new version provides a version label property, cmis:versionLabel. This property should reflect the version number. The format of the version is repository-specific, though.
CMIS doesn’t specify how long a version series can be checked out. That’s repository-specific, and most repositories don’t have a limit. A version series can be blocked forever if nobody cancels a checkout or checks in the PWC. There are use cases that require a version series to be checked out for a longer period of time, but in most cases the time between checkout and check-in is short, and both operations are controlled by the same application. It’s good practice to clean up the version series if something goes wrong. For example, if a check-in fails, the application should try to cancel the checkout. That enables the next application to work with the version series.
Creating a version is straightforward, and so is the doPost method of the servlet, which is shown in the next listing.
Listing 8.9. doPost method for checkIn()


There shouldn’t be any surprises in the doPost and checkIn code. If performs the following steps:
- Gathers the input parameters and the new content
- Fetches the document and checks it out
- Fetches the Private Working Copy and checks it in (creating a new version)
- Redirects to the show page where the user can gaze in awe at the new version
Now, restart the server, log in, and append /addversion to the URL in the web browser. When you’re testing it, make sure that the document is versionable. Otherwise the repository will throw an exception. The document type cmis:document in the InMemory Repository isn’t versionable. You’ll have to choose another type when you’re creating your test document.
Sometimes creating a new version isn’t exactly what you want. Sometimes you’ll need an independent copy of a document with its own version series. Let’s look into copying documents next.
8.6. Copying documents
CMIS has no discrete copy operation, but you can use a createDocumentFromSource operation, which is a close second. In this section, you’ll build a web page that makes use of createDocumentFromSource to let the user copy a document.
Let’s start building the copy web page. The HTML form could look like this:
<h1>Copy document</h1>

<form method="POST" action="copy">
  Document path:
  <input type="text" size="20" name="path"><br>
  Target folder path:
  <input type="text" size="20" name="target"><br>
  <input type="submit" value="copy">
</form>
The user has to specify the document to copy and the target folder. It’s possible to create a copy in the same folder, but we’ll discuss that later.
Now copy the echo JSP from chapter 6 and rename it to copy.jsp. Remove everything between the line that includes the header JSP and the line that includes the footer JSP, and copy in the preceding HTML fragment. In the package com.manning.cmis .theblend.servlets, create a new class called CopyServlet that extends AbstractTheBlendServlet, and then add the following XML snippet to the web.xml file:
<servlet>
 <servlet-name>CopyServlet</servlet-name>
 <servlet-class>
  com.manning.cmis.theblend.servlets.CopyServlet
 </servlet-class>
</servlet>
<servlet-mapping>
 <servlet-name>CopyServlet</servlet-name>
 <url-pattern>/copy</url-pattern>
</servlet-mapping>
Here’s the code for the doGet method:
protected void doGet(HttpServletRequest request,
  HttpServletResponse response, Session session)
    throws ServletException, IOException, TheBlendException {
  dispatch("copy.jsp", "Copy a document.", request, response);
}
You know the pattern. It calls the JSP.
Before we jump into the doPost method, let’s cover the basics. As mentioned previously, CMIS has no copy operation, and if you want to copy folders or other nondocument objects, you’re on your own. CMIS only provides a createDocumentFromSource operation.
createDocumentFromSource is similar to createDocument. The only difference is that it doesn’t accept a ContentStream object but instead copies the content of an already existing document in the repository. You can provide properties, a versioning state, an ACL, and policies if you want. If you don’t, the repository will copy those, too. In the case of the properties, you only have to provide the property values you want to change. All other properties are copied as they are in the source document. The repository might adjust the ACL depending on the parent folder of the new document.
The main advantage of the createDocumentFromSource operation is that the content isn’t transferred to the application and then back to the repository. The content is copied inside the repository, which saves time and bandwidth. That sounds good, but there’s a hitch—the AtomPub binding doesn’t support this operation. If you want or need to build a binding-agnostic application, you’ll have to handle that yourself.
Luckily, OpenCMIS already has a solution. The Document interface provides two copy methods. The simplest one makes a straight copy:
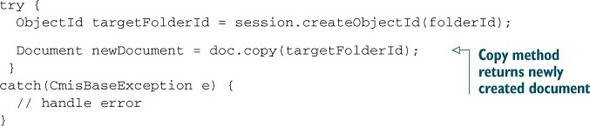
If you set the target folder to a folder that the source document already resides in, the execution is likely to fail. The new document is created with the same name, and most repositories reward the attempt to have two documents with the same name in the same folder with a CmisNameConstraintViolationException.
You’re still left with the AtomPub binding problem. OpenCMIS detects whether or not createDocumentFromSource is supported, and if it isn’t, OpenCMIS loads the properties and the content from the source document and creates a new document with that data. That is, it streams the content from the repository to the application and back. That can be an expensive operation if it’s a big document. The advantage is that you don’t have to care about this problem anymore in your business logic.
If you want to duplicate a document in the same folder, you have to use the second method, which lets you, among other things, define the properties that should be changed. You only have to choose a different name:

This method gives you full control over the new document.
For the servlet’s doPost method, we’ll go for the first simple option, shown in the following listing.
Listing 8.10. doPost method for copying document
protected void doPost(HttpServletRequest request,
   HttpServletResponse response, Session session)
   throws ServletException, IOException, TheBlendException {

   String path = getStringParameter(request, "path");
   String target = getStringParameter(request, "target");

   // --- fetch the document ---
   CmisObject object = null;
   try {
     object = session.getObjectByPath(path);
   } catch (CmisBaseException cbe) {
      throw new TheBlendException(
         "Could not retrieve the document!", cbe);
   }

   Document doc = null;
   if (object instanceof Document) {
     doc = (Document) object;
   }
   else {
     throw new TheBlendException("Object is not a document!");
   }

   // --- fetch the target folder ---
   CmisObject targetObject = null;
   try {
     targetObject = session.getObjectByPath(target);

   } catch (CmisBaseException cbe) {
      throw new TheBlendException(
         "Could not retrieve target folder!", cbe);
   }

   if (!(targetObject instanceof Folder)) {
     throw new TheBlendException("Target is not a folder!");
   }

   Document newDoc = null;
   try {
     newDoc = doc.copy(targetObject);
   } catch (CmisBaseException cbe) {
     throw new TheBlendException("Could not copy the document!", cbe);
   }

   // --- redirect to show page ---
   try {
     String url = request.getRequestURL().toString();
     int lastSlash = url.lastIndexOf('/'),

     url = url.substring(0, lastSlash) + "/show?id=" +
         URLEncoder.encode(newDoc.getId(), "UTF-8");

     redirect(url, request, response);
   }
   catch(UnsupportedEncodingException e) {
     throw new ServletException(e);
   }
}
Again, it’s a simple buildup. Get the parameters, fetch the document and the target folder, copy the document, and redirect to the show web page to display the copy of the source document.
Copying is easy, but what about moving? Can we move a document to a different folder? Of course we can. Read on.
8.7. Moving objects
The move operations in CMIS are slightly different than what you’re used to in a filesystem, because you have to take multifiled objects into account. In this section, you’ll build a web page that lets a user move an object from one folder to another.
You start as always with the web page:
<h1>Move object</h1>

<form method="POST" action="move">
  Object path:
  <input type="text" size="20" name="path"><br>
  Target folder path:
  <input type="text" size="20" name="target"><br>
  <input type="submit" value="move">
</form>
This time you definitely want to use the path to the object. You’ll understand why in a moment. The user must also define the target folder.
Again, copy the echo JSP from chapter 6 and rename it to move.jsp. Remove everything between the line that includes the header JSP and the line that includes the footer JSP, and copy in the preceding HTML fragment. Our next listing shows the result.
Listing 8.11. Move.jsp with inserted HTML form

In the package com.manning.cmis.theblend.servlets, create a new class called MoveServlet that extends AbstractTheBlendServlet, and then add the following XML snippet to the web.xml file:
<servlet>
 <servlet-name>MoveServlet</servlet-name>
 <servlet-class>
  com.manning.cmis.theblend.servlets.MoveServlet
 </servlet-class>
</servlet>
<servlet-mapping>
 <servlet-name>MoveServlet</servlet-name>
 <url-pattern>/move</url-pattern>
</servlet-mapping>
Here’s the code for the doGet method:
protected void doGet(HttpServletRequest request,
  HttpServletResponse response, Session session)
    throws ServletException, IOException, TheBlendException {
  dispatch("move.jsp", "Move an object", request, response);
}
You don’t have anything else to do here except call the JSP.
CMIS provides three methods that you can use to move objects around: move, addToFolder, and removeFromFolder.
The move method moves an object from one folder to another folder, as the following example shows:
try {
  CmisObject object = session.getObjectByPath(path);

  if (!(object instanceof FileableCmisObject)) {
    throw new TheBlendException("Object is not fileable!");
  }

  FileableCmisObject fileableCmisObject = (FileableCmisObject) object;

  ObjectId sourceFolderId = session.createObjectId(moveFromFolderId);
  ObjectId targetFolderId = session.createObjectId(moveToFolderId);

  FileableCmisObject movedObject =
    fileableCmisObject.move(sourceFolderId, targetFolderId);
}
catch(CmisBaseException e) {
  // handle error
}
The previous code snippet has three interesting aspects to it.
First, to move an object it must be fileable. OpenCMIS classes that represent fileable objects implement the interface FileableCmisObject. Because the move method is declared on that interface, you have to cast to that interface first.
The second interesting aspect is that you have to provide the ID of the source folder when you move an object. That makes sense if the object is filed in multiple folders, because the repository has to know from which folder it should move the object. If the object is only filed in one folder, it’s unambiguous, but you have to provide the source folder ID anyway.
The third interesting aspect is that the move method returns the moved object after it has been moved. There’s only one rare use case for this object. A repository might implement the move operation by deleting the original object and creating a new one in the target folder. In that case, the new object would have a new ID, and that would be the only reliable way to get to the new ID. Because all serious repositories have native support for move, this isn’t generally a concern.
Another way to move an object would be to remove it from the source folder first and then add it to the target folder:

But that requires that the repository supports unfiled objects, because the object could be potentially unfiled for a moment. It also works the other way round:
fileableCmisObject.addToFolder(targetFolderId, true);
fileableCmisObject.removeFromFolder(sourceFolderId);
The object is added to the target folder first and then removed from the source folder. In this case, the repository has to support multifiling because the object would reside in multiple folders for a moment. If you have to deal with unfiled and multifiled objects, these are the two methods you want to look into. For our servlet, we’ll stick with the move method.
The following listing shows the completed doPost with the move logic.
Listing 8.12. doPost method for move document
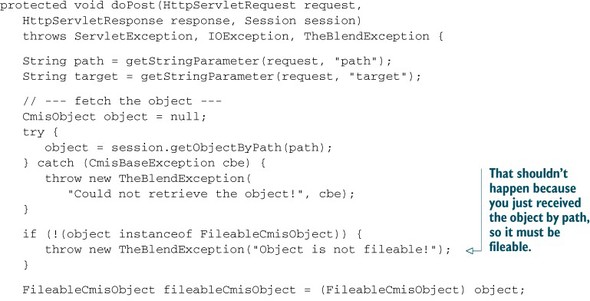
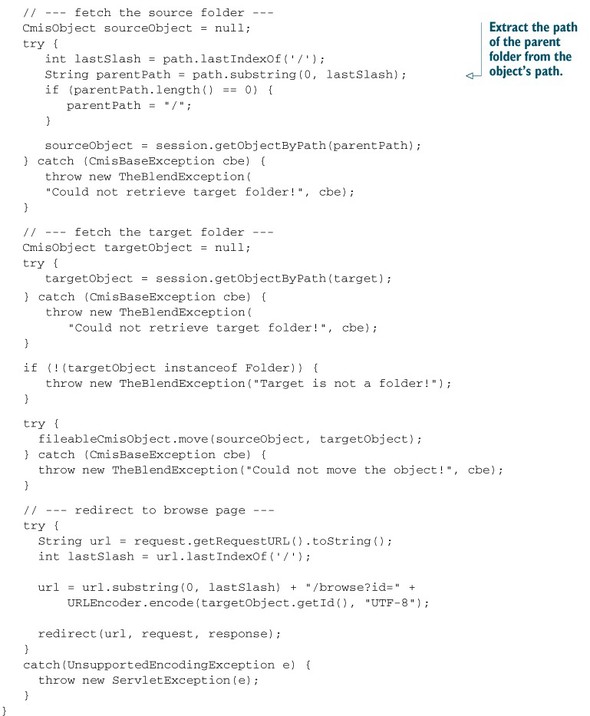
Let’s do a quick rundown of what happens in this code. The method gets the parameters, fetches the object, and checks if the object is fileable. Then it gets the parent folder of the object because this path already contains the parent from which the object should be moved. Even if the object is multifiled, the parent is unambiguous here. To get to the parent object, you remove the last path segment and fetch the folder object. Then the target folder is fetched and checked. The object is moved and the web browser is redirected to the browse page of the new parent of the object.
You can now create and manipulate objects with CMIS, but one important operation is missing. Let’s talk about deleting objects.
8.8. Deleting objects
It should come as no surprise that CMIS objects can be deleted, after all of these other operations we’ve been performing on them in this chapter. Let’s build a web page that deletes objects and handles the deletion of folder trees.
The only input you need is an object. We’ll go with the path again, as follows:
<h1>Delete object</h1>

<form method="POST" action="delete">
  Object path:
  <input type="text" size="20" name="path"><br>
  <input type="submit" value="delete">
</form>
8.8.1. Deleting documents
For unfiled objects and document versions, you’d need the object ID because they don’t have a path. Modifying this web page to accept an ID should be a simple exercise for you at this point.
Next (and for the final time), copy the echo JSP from chapter 6 and rename it to delete.jsp. Then remove all lines between the line that includes the header JSP and the line that includes the footer JSP, and copy in the preceding HTML fragment, shown in the next listing.
Listing 8.13. delete.jsp with inserted HTML form

In the package com.manning.cmis.theblend.servlets, create a new class called DeleteServlet that extends AbstractTheBlendServlet, and then add the following XML snippet to the web.xml file:
<servlet>
 <servlet-name>DeleteServlet</servlet-name>
 <servlet-class>
  com.manning.cmis.theblend.servlets.DeleteServlet
 </servlet-class>
</servlet>
<servlet-mapping>
 <servlet-name>DeleteServlet</servlet-name>
 <url-pattern>/delete</url-pattern>
</servlet-mapping>
The doGet method only has to call the JSP:
protected void doGet(HttpServletRequest request,
  HttpServletResponse response, Session session)
    throws ServletException, IOException, TheBlendException {
  dispatch("delete.jsp", "Delete an object", request, response);
}
The CmisObject interface has a delete method that we’ll use here:
try {
  CmisObject object = session.getObject(id);
  object.delete(true);
}
catch(CmisBaseException e) {
    // handle error
}
The Boolean parameter is only relevant for documents. It indicates whether this one version (false) or all versions in the version series (true) should be deleted. Before you delete an object, you should check the allowable actions to check whether you’re allowed to do that. The Java object becomes invalid after you’ve called delete. All subsequent calls to the repository are likely to fail, and the object also removes itself from the OpenCMIS cache.
8.8.2. Deleting folders
Folders can be deleted with the delete operation if they’re empty. When you call it on a non-empty folder, the repository returns a CmisConstraintException. To delete a non-empty folder, use the deleteTree method on the Folder interface:
try {
  Folder folder = (Folder) session.getObject(id);
  List<String> failedToDelete =
    folder.deleteTree(true, UnfileObject.DELETE, true);
}
catch(CmisBaseException e) {
  // handle error
}
The first parameter again defines what should happen to documents and document versions. The second parameter lets you choose whether nonfolder children of this folder should be deleted or unfiled. Three possible options are available:
- UNFILE—Objects aren’t deleted, only unfiled. This option is available only if the repository supports unfiling and/or multifiling.
- DELETESINGLEFILED—Objects are deleted only if they’re not filed in another folder.
- DELETE—Objects are deleted even if they’re also filed in another folder.
The third parameter defines whether or not the operation should continue if the deletion of a child fails. If you set it to true, the repository deletes everything it can delete in the context of the current user. If you set it to false, it stops when it hits the first object the current user can’t delete. Other objects might be already deleted by then. The deletion-processing order is repository-specific, but you can’t predict which object in the folder tree is deleted first and which is deleted last.
The deleteTree method returns a list of IDs of objects that couldn’t be deleted. If this list is empty or null, the delete operation was successful. If the list contains IDs, objects were left undeleted. This list doesn’t need to be complete, though. If many objects are left, some repositories truncate the list.
That’s all you need for the doPost method; here it is in the next listing.
Listing 8.14. doPost method for deleting objects
protected void doPost(HttpServletRequest request,
   HttpServletResponse response, Session session)
   throws ServletException, IOException, TheBlendException {

   String path = getStringParameter(request, "path");

   // --- fetch the object ---
   CmisObject object = null;
   try {
     object = session.getObjectByPath(path);

   } catch (CmisBaseException cbe) {
      throw new TheBlendException(
        "Could not retrieve the object!", cbe);
   }

   // --- delete the object ---
   try {
     if (object instanceof Folder) {
         Folder folder = (Folder) object;
         List<String> failedToDelete =
           folder.deleteTree(true, UnfileObject.DELETE, true);

         if (failedToDelete != null && !failedToDelete.isEmpty()) {
             throw new TheBlendException("Deletion failed!");
         }
     }
     else {
         object.delete(true);
     }
   }
   catch (CmisBaseException cbe) {
     throw new TheBlendException("Could not delete the object!", cbe);
   }

   // --- redirect to browse page of the root folder ---
   String url = request.getRequestURL().toString();
   int lastSlash = url.lastIndexOf('/'),
   url = url.substring(0, lastSlash) + "/browse";

   redirect(url, request, response);
}
You won’t find any magic in this code. It fetches the object and checks if it’s a folder or something else. If it’s a folder, it calls deleteTree and checks if all children have been deleted. If it isn’t a folder, it calls only the delete method.
With this final step, you’ve rebuilt the most important parts of The Blend. Now it’s up to you to tidy it up, add new features, and develop your own user interface.
As a final recap, let’s look at all of the functionality we’ve implemented in chapters 6, 7, and 8.
- Login/connection—Chapter 6
- Folder browsing (includes paging logic)—Chapter 7
- Document display (metadata) and retrieval (includes version series information)—Chapter 7
- Query—Chapter 7
- Creating folders and documents—Chapter 8
- Updating properties—Chapter 8
- Updating and deleting content—Chapter 8
- Copying, moving, and deleting objects—Chapter 8
8.9. Summary
This and the previous chapter covered the bigger part of the OpenCMIS API. You were introduced to all the major CMIS create, read, update, and delete (CRUD) operations as you rebuilt a stripped-down version of The Blend.
With this knowledge, you’re now able to build CMIS applications in Java for the desktop, for the web, and for Android. These chapters were also a blueprint for .NET developers, because the Apache Chemistry DotCMIS API is similar to the OpenCMIS API.
In the next chapters, you’ll learn more about other CMIS libraries for other programming languages and environments. The general principles, such as type system, properties, content, versioning, exceptions, filing, and so on, are the same for all of the other libraries, which makes jumping between them much easier.