
Chapter 14. Networking
This chapter covers
- Connecting to web services
- Requesting data from a web service
- Downloading from a web service
- Parsing JSON data
- Using dependency managers
Without a doubt, web services can transform an everyday app into an extraordinary experience. By hooking into the vast and diverse number of services and information online, or using the processing power of virtual servers, connecting to third-party web services can turn your humble app into an app that astounds!
You may be interested in connecting to your own web service, too. Perhaps Apple’s iCloud and CloudKit services don’t meet your needs precisely; maybe you need a more sophisticated back-end solution; or perhaps you already have a web service built that you hope to use.
In this chapter, we’ll focus on using iOS networking capabilities to connect your app with online web services. Along the way, you’ll encounter additional concepts:
- URL sessions and URL session tasks
- JSON serialization and SwiftyJSON
- CocoaPods and Carthage
- Operation queues
- App Transport Security
14.1. Using a web service
Most of the big players such as Google, Amazon, Twitter, and Facebook offer a range of web services such as mapping, cloud computing, login, analytics, or mobile advertising. Many of these services also provide their own SDK for iOS to simplify the process of using their service. In fact, basic social interactions such as posting to Facebook or Twitter are built right into the iOS SDK via the Social framework. Plenty of small players are out there though, and directories such as http://programmableweb.com can help you discover that potential.
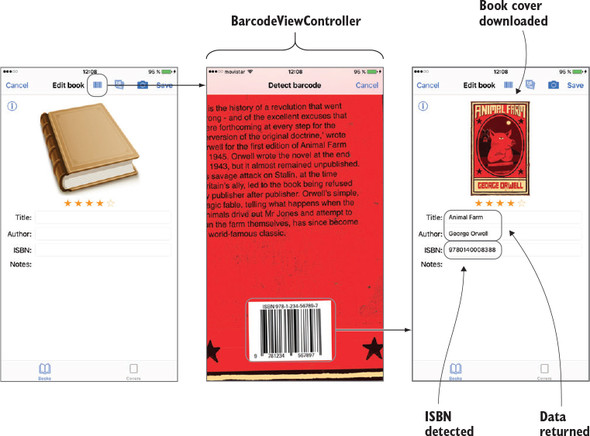
In the previous chapter, you implemented bar code detection in your Bookcase app, which automatically filled in the ISBN field. How cool would it be if, by scanning a book’s bar code, the book’s details were automatically filled in as well! See figure 14.1.
Figure 14.1. Request book data from a web service.

In this chapter, you’ll improve your Bookcase app by integrating it with the Google Books web service (https://developers.google.com/books/). You’ll download JSON data for scanned books, parse the data, and download cover images for scanned books.
Checkpoint
Open the Bookcase app where you left it at the end of the last chapter, or you can check it out at https://github.com/iOS-AppDevelopmentwithSwiftinAction/Bookcase.git (Chapter13.7.AVAudioPlayer).
14.2. Setting up a books service
When the BookViewController receives the bar code, it will send this code to the books web service to request data on the book.
The temptation might be to add networking code directly to the BookViewController, but to keep code nicely organized, testable and reusable, you’re going to set up a model class to connect with the books web service, and return the book data to the BookViewController, which will then update the views (see figure 14.2).
Figure 14.2. Model view controller getting book data

- Right-click on the Model group in the Project Navigator, select New File > Swift File, and name the new file “GoogleBooksService.”
- Set up a class to connect with the Google Books web service:
class GoogleBooksService {
}
The BookViewController class needs to call a method on this class to get the data on a book. Because the networking code will be performed on a background thread, this method needs to be passed a closure that will receive the response from the server. - Add to the GoogleBooksService a getBook method that receives the bar code and a completion handler to notify the BookViewController when it has finished. We’ll fill the details of this method later.
func getBook(with barcode: String,
   completionHandler: @escaping (Book?, Error?) -> Void) {
   // Get book from web service
}
Because the completion handler will be called from an asynchronous operation, it needs to be defined as @escaping. - Add a cancel method, if you need to cancel an operation. You’ll fill in the details of this method later, too.
func cancel() {
   // Cancel any web service operations
}
One day, who knows—Google might close their web service to developers or you might decide an alternative web service does a better job. Let’s ensure with a protocol that, from the perspective of your view controllers, the internal details of the web service are irrelevant. - Before the GoogleBooksService class definition, set up a protocol that defines the two main public methods of this class.
protocol BooksService { func getBook(with barcode: String, completionHandler: @escaping (Book?, Error?) -> Void) func cancel() } - Now, set the GoogleBooksService to adopt the BooksService protocol.
class GoogleBooksService: BooksService {The BookViewController will request data from the BooksService when the user scans a barcode. - Instantiate a GoogleBooksService object instance property in the Book-ViewController. Define the variable with the BooksService protocol, so it can be easily swapped out if you go with a different service in the future.
var booksService: BooksService = GoogleBooksService()
Now, when a barcode is detected, the BookViewController can request the booksService to get the details of the book, and use these details to fill in the details of the book in the form, ready for the user to either save this information or cancel. - Add the request to get the book details to the end of the foundBarcode method in the BookViewController extension.
booksService.getBook(with: barcode) {                    1
       (scannedBook, error) in                           2
   if error != nil {                                     3
       // Deal with error here
       return
   } else if let scannedBook = scannedBook {             4
       self.titleTextField.text = scannedBook.title      4
       self.authorTextField.text = scannedBook.author    4
       self.bookCover.image = scannedBook.cover          4
       self.coverToSave = scannedBook.cover              4
       self.saveButton.isEnabled = true                  5
   }
} else {
   // Deal with no error, no book!
}
- 1 Gets book from BooksService
- 2 Completion handler
- 3 Error handling to go here
- 4 Moves book information into form fields
- 5 Ensures Save button enabled
Now that the skeleton of the GoogleBooksService is ready, and it’s communicating with the BookViewController, you can focus on setting up communication with the web service itself.
14.3. Communicating with the web service
We’ll look in detail shortly about how to communicate with the web service using the URLSession API. As an overview, you’ll want to follow these steps:
- Create or access a URLSession object (optionally configured with a URL-SessionConfiguration object).
- Create a URL object (optionally using a URLComponents object to customize the URL).
- Optionally create a URLRequest object to further customize the URL request.
- Use the URLSession object and the URL (or URLRequest) object to create a task.
- Resume (begin) the task.
- Receive responses from the web service either in a completion callback or with delegate methods.
See figure 14.3 for a broad overview of the path for creating and configuring all objects that are involved in communicating with a web service.
Figure 14.3. Create and configure objects for communicating with the web service.

14.4. Creating a URL Session
First, you’ll need a URLSession object to coordinate communication with the web service.
Most of the configuration of your URLSession object is performed with a URLSessionConfiguration object.
14.4.1. URLSessionConfiguration
URLSessionConfiguration objects come in three flavors:
- Default— Caches responses to requests to disk
- Ephemeral— Performs no caching
- Background— Permits tasks to be performed when the app is in the background
The following sets up a default session configuration object:
let configuration = URLSessionConfiguration.default
Once you have a standard URLSessionConfiguration object, you can configure it further by modifying properties such as
- requestCachePolicy—Determines when requests in this session check for cached data. The following, for example, requests that local caches are
ignored:
configuration.requestCachePolicy = .reloadIgnoringLocalCacheData
- timeoutIntervalForRequest—The acceptable waiting time before a request times out. The following, for example, changes the timeout interval from 60
(the default) to 30:
configuration.timeoutIntervalForRequest = 30
- allowsCellularAccess—Specifies whether this session should connect via cellular networks. The following, for example, prevents your session from
connecting via cellular networks:
configuration.allowsCellularAccess = false
14.4.2. URLSession
There are three ways to access a URLSession, which range from basic access to the session to broader access to configure the session and receive session events.
- Shared session. URLSession contains a type property called shared which contains a reference to a URLSession singleton.
let session = URLSession.shared
This shared session is appropriate for basic network tasks because it can’t be customized beyond the default configuration, and doesn’t have access to more-advanced session events. As the shared session is a singleton, multiple sessions aren’t available via this property. - Instantiated with a session configuration object.
let session = URLSession(configuration: configuration)
- Instantiated with a session configuration object, delegate, and queue.
let session = URLSession(configuration: configuration, delegate: self, delegateQueue: OperationQueue.main)
In addition to a configuration object, you can specify a delegate to receive additional session notifications and permit additional configuration. Because network operations are performed on a background thread, when you receive notifications from the server, you can’t be sure to be on the main thread. Specifying a queue when instantiating the session configuration object can request that responses from the server be served on a specific queue (often, this would be the main queue to be able to update the user interface).
- Add a URLSession as a lazy property to the GoogleBooksService class that is instantiated with a default URLSessionConfiguration object, sets the GoogleBooksService class as the session’s delegate, and specifies that session responses are sent to the main queue.
lazy var session: URLSession = {
   let configuration = URLSessionConfiguration.default
   return URLSession(configuration: configuration,
       delegate: self, delegateQueue: OperationQueue.main)
}()
Because you’ve made GoogleBooksService the delegate of the URLSession, it needs to adopt the URLSessionDelegate. Because the URLSession-Delegate inherits from NSObjectProtocol, your class also needs to adopt this protocol. The easiest way to inherit NSObjectProtocol is to subclass NSObject. - Update the GoogleBooksService class definition.
class GoogleBooksService: NSObject, BooksService, URLSessionDelegate {
Tip
When defining a subclass, the class it subclasses always precedes protocols in its definition.
In chapter 12, we looked at one approach for managing threads, called the dispatch queue. The API for using dispatch queues is known as Grand Central Dispatch, or GCD. An alternative approach to GCD is what’s known as the operation queue. Built on top of the GCD API, the operation queue provides additional features and control.
Similar to dispatch queues, you either create a background operation queue with a certain quality of service or request access to the main queue, which has access to the main thread. You then add operations (known in GCD as tasks) to the operation queue. You can build up an operation either by subclassing Operation or by using one of Apple’s subclasses such as the BlockOperation class, which creates an operation from one or more closures. You can also add an operation directly to the OperationQueue via a closure.
Here’s one way you could request a background operation queue to perform a time-consuming operation and then request the main queue to display the result of the operation to the user:
let queue = OperationQueue()                     1
queue.qualityOfService = .utility                2
let operation = BlockOperation {                 3
   // Time consuming operation here
   OperationQueue.main.addOperation {            4
       // Update the UI here
   }
}
queue.addOperation(operation)                    5
- 1 Creates background operation queue
- 2 Specifies queue quality of service
- 3 Creates Block Operation
- 4 Adds operation to main queue
- 5 Adds block operation to background queue
Here are several advantages to operation queues over dispatch queues:
- Unlike GCD tasks, the state of operations can be monitored, and operations can be cancelled.
- The quality of service of specific operations can be changed independently of the operation queue they’re in.
- An operation’s readiness to execute can also be dependent on the completion of other operations.
These additional features also add overhead, so in situations where only the more basic features of GCD are required, an argument could be made for using GCD.
Because the URLSession class makes use of the OperationQueue API under the hood, it expects a reference to an operation queue in the delegateQueue parameter.
14.5. Setting up the URL request
To connect to the books web service, you need to pass a URL to the URLSession. According to the API documentation at the Google Books web service page (https://developers.google.com/books/docs/v1/using#WorkingVolumes), you can get information on a book by passing its ISBN in a URL that looks something like this:
https://www.googleapis.com/books/v1/volumes?q=9780767926034
Note
You can check this URL in the browser to see what sort of data you should expect to see returned. You should see a JSON structure with information about the book requested.
- Create a constant in the GoogleBooksService class containing the URL of the Google Books web service as a String, minus the query string.
let googleUrl = "https://www.googleapis.com/books/v1/volumes"
To get data on a specific book, you will need to pass in the ISBN in a parameter named q. One way to do this is to build this parameter directly into the URL itself with a query string, when instantiating the URL object. You can then see the query string in the query property.let url = URL(string: "(googleUrl)?q=9781617294075")! print(url.query!) //q=9781617294075
The query property of URL is read only. If you prefer to construct the components of your URL object (such as the query string), you can instead build your URL object with a URLComponents object. To define each parameter of the query, for example, you could pass in an array of URLQueryItem to the queryItems property. You’ll use a URLComponents object to build up your URL. - Create a URL object from a URLComponents object, in the getBook method of the GoogleBooksService class:
var components = URLComponents(string: googleUrl)!       1
components.queryItems = [                                2
   URLQueryItem(name: "q", value: barcode)]              2
guard let url = components.url else {return}             3
print(url.query!) // q=9781617294075 for example
The URLComponents object has a url property that, in this case, would be identical to the URL created in the previous code listing. You can pass this URL object directly to the URLSession, or you can customize the request with a URLRequest object (see figure 14.3). - Create a URLRequest object from the URL object.
let request = URLRequest(url: url)
A URLRequest object can customize features of the request such as- cachePolicy—Determines whether the request checks for cached data.
- timeOutInterval—The acceptable waiting time before a request times out.
- HTTPMethod—The request method. GET is the default; then, there’s POST.
- networkServiceType—Specifies the type of data, to help iOS to prioritize network requests. Options are default, voip, video, background, and voice.
Note
These customizations only override the configuration of URL-Session if they’re stricter than the configurations set in the URLSession-Configuration object.
Now that you have either a URL or a URLRequest, you can use this to create a task. A URL session task is the object that performs a request from the web service.
14.6. Requesting data from a web service
With the URL or URLRequest you just created, the URLSession object will create and coordinate one or more tasks for you. You have three types of tasks available:
- Data tasks are used for requesting small amounts of data, such as text-based data. The data will be delivered to you as a Data object, either in small chunks via a delegate method or all at once via a completion closure.
- Download tasks download larger amounts of data and will be delivered to you via a file.
- Upload tasks are used to upload data as a file.
We’ll look at download tasks shortly, but for now, let’s use a data task to get data about a book from the Google Books web service.
- Create a URLSessionDataTask by passing in the URLRequest object to the URLSession. A completion handler will receive the response from the server, which contains data, response, and error optional objects.
Because all tasks begin life by default in a suspended state, you must trigger them to start by calling the resume method to activate them.
let dataTask = session.dataTask(with: request) { 1 (data, response, error) in 2 // -------> Deal with data/error } dataTask.resume() 3- 1 Creates data task
- 2 Completion handler
- 3 Triggers task to begin
Tip
Tasks have an additional property called priority that allows you to adjust the priority of certain tasks relative to others.
- If there’s an error, call the getBook method’s completion handler, passing the error object. Otherwise, unwrap the data object, ready to extract book information.
if let error = error { 1 completionHandler(nil, error) 2 } guard let data = data else { return } 3 // Get book information- 1 Unwraps error object
- 2 Calls getBook completion handler
- 3 Unwraps data object
14.7. Examining the data
You now have a Data object returned from the web service in the dataTask completion handler. Because Data objects are binary, conversion will be necessary.
To convert the data object to text, you could instantiate a String, pass in the data object, and specify the most frequently used character encoding, UTF-8.
let dataAsString = String(data: data, encoding: String.Encoding.utf8)
Open an example book in the browser to see what results you expect the Google Books service to return. (Here’s the link again: https://www.googleapis.com/books/v1/volumes?q=9780767926034.) Notice that the data you get back is in JSON format.
To better analyze the structure of the data returned, it can be useful to view it in an online JSON viewer. See figure 14.4 for the raw JSON returned and how it looks in the JSON viewer at http://jsonviewer.stack.hu/.
Figure 14.4. JSON data returned

We’ll look at three different approaches for parsing this JSON data to a Book object. The API returns multiple books that contain the requested barcode. For simplicity for now, we’ll assume the first book returned is correct.
14.8. Parsing JSON data with JSONSerialization
First, let’s see what parsing the data object as JSON using the jsonObject method of the JSONSerialization class looks like:
let dataAsJSON = JSONSerialization.jsonObject(with: data, options: [])
This method serializes the JSON object into Foundation data types. Because this method by default returns an Any type, and we know to expect a dictionary at the top level of the JSON data, you can downcast this result to [String: Any]. Because this method can throw an error, surround it with a do-catch method and unwrap the result.
- Parse the JSON data in a parseJSON method in the GoogleBooksService class, that receives a completion handler for returning the result.
private func parseJSON(data: Data, 1 completionHandler: 1 @escaping (Book?, Error?) -> Void) { 1 do { 2 if let dataAsJSON = 3 try JSONSerialization.jsonObject( 3 with: data, 3 options: []) 3 as? [String: Any] { 4 // -------> Traverse hierarchy } else { completionHandler(nil, nil) 5 } } catch let error as NSError { 6 completionHandler(nil, error) 6 return } }- 1 Function receives Data object and completion handler
- 2 do-catch statement
- 3 Parses data as JSON to Foundation data types
- 4 Downcasts to Dictionary
- 5 If downcast unsuccessful
- 6 If error thrown in parsing
dataAsJSON["items"][0]["volumeInfo"]["title"]
dataAsJSON["items"][0]["volumeInfo"]["authors"]
Because Swift is a strictly typed language, you need to downcast each value to the type of data you expect. - Continue to traverse the hierarchy in the do clause, using optional binding and downcasting to Foundation data types:
if let dataAsJSON =
   try JSONSerialization.jsonObject(
       with: data,
       options: [])
       as? [String: Any],
    let items = dataAsJSON["items"] as? [Any],                    1
    let volume = items[0] as? [String: Any],                      2
    let volumeInfo = volume["volumeInfo"] as? [String: Any],      2
    let title = volumeInfo["title"] as? String,                   3
    let authors = volumeInfo["authors"] as? [String] {
            4
Finally, you’ve dug down into the hierarchy of the data to the book’s title and authors and can use this information to generate a Book object. - Instantiate a Book object from the JSON data and call the completion handler.
let book = Book(title: title,                     1
   author: authors.joined(separator: ","),        2
   rating: 0, isbn: "0", notes: "")               3
completionHandler(book,nil)                       4
- 1 Creates a book
- 2 Joins authorarray with comma
- 3 Blank values
- 4 Sends book to completion handler
- The getBook method can now call the parseJSON method, passing it the completion handler to call when it’s done.
self.parseJSON(data: data, completionHandler: completionHandler)
Now, if you run the app, create a new book, and scan a book barcode, the form fields should automatically fill with the data returned from the Google Books web service. Hooray!
14.9. Parsing JSON data with JSONDecoder
Let’s look at parsing the JSON data using the JSONDecoder. The JSONDecoder can automatically decode data to native Swift types that are set up using the Decodable (or Codable) protocol.
You may remember you encountered encoding and decoding data to JSON using the Codable protocol back in chapter 11, but the data you used was fairly straightforward. How can data that has a complex structure be decoded, such as the data being returned from the Google Books service?
First, you need to set up a ServerResponse type that manages the data that’s returned from the server.
- Create a ServerResponse.swift file. Because you’re only going to decode this server response, adopt the Decodable protocol. The ultimate aim of this ServerResponse is to retrieve a Book object, so set up a book property.
struct ServerResponse: Decodable { var book:Book } - Because you’re only interested in the array of items returned in the JSON data, set up a CodingKeys enum.
enum CodingKeys: String, CodingKey { case items } - Next, you need to set up custom implementation of the Decodable protocol’s init method that works with the Decoder to decode the data. Get a reference to the items array with the nestedUnkeyedContainer method and loop through the array, digging out Book objects. As mentioned earlier, you’ll use the first book in the array for simplicity.
init(from decoder: Decoder) throws { let values = try decoder.container( 1 keyedBy: CodingKeys.self) 1 var items = try values.nestedUnkeyedContainer( 2 forKey: .items) 2 var books:[Book] = [] while !items.isAtEnd { 3 //Get title and author here /* ... */ let book = Book(title: title, author: author, 4 rating: 0, isbn: "0", notes: "") 4 books.append(book) 5 } book = books[0] 6 }- 1 Gets main data container
- 2 Gets Items array
- 3 Loops through array
- 4 Creates Book
- 5 Appends book to array
- 6 Extracts first book
- In the raw JSON data, each item contains a volumeInfo property. Set up another keys enum called ItemKeys.
enum ItemKeys: String, CodingKey { case volumeInfo } - Use the ItemKeys enum in the init method to define the data you expect.
let item = try items.nestedContainer(keyedBy: ItemKeys.self)
- The volumeInfo data in the raw JSON contains the title and author properties. Set up another keys enum to describe this.
enum VolumeKeys: String, CodingKey { case title case authors } - Back in the init method, use this VolumeKeys enum to define the structure that you expect in the volumeInfo property.
let volumeInfo = try item.nestedContainer(keyedBy: VolumeKeys.self,
 forKey: .volumeInfo)
- You can now extract the title and author from this volumeInfo container. Because author is an array of String for cases of multiple authors, merge these to make one String, separated by a comma.
let title = try volumeInfo.decode(String.self, forKey:.title)
let authors:[String] = try volumeInfo.decode([String].self,
 forKey:.authors)
let author = authors.joined(separator: ",")
forKey:.authors)
let author = authors.joined(separator: ",") - Let’s look at the completed ServerResponse structure, ready to decode data returned from the Google Books service:
import Foundation
struct ServerResponse:Decodable {                               1
  var book:Book

  enum CodingKeys: String, CodingKey {                          2
    case items                                                  2
  }                                                             2
  enum ItemKeys: String, CodingKey {                            2
    case volumeInfo                                             2
  }                                                             2
  enum VolumeKeys: String, CodingKey {                          2
    case title                                                  2
    case authors                                                2
  }                                                             2

  init(from decoder: Decoder) throws {
    let values = try decoder.container(                         3
     keyedBy: CodingKeys.self)                                  3
    var items = try values.nestedUnkeyedContainer(              4
     forKey: .items)                                            4
    var books:[Book] = []
    while !items.isAtEnd {                                      5
      let item = try items.nestedContainer(                     6
       keyedBy: ItemKeys.self)                                  6
      let volumeInfo = try item.nestedContainer(                7
       keyedBy: VolumeKeys.self, forKey: .volumeInfo)           7
      let title = try volumeInfo.decode(                        8
       String.self, forKey:.title)                              8
      let authors:[String] = try volumeInfo.decode(             9
       [String].self, forKey:.authors)                          9
      let author = authors.joined(separator: ",")               10
      let book = Book(title: title, author: author,             11
       rating: 0, isbn: "0", notes: "")                         11
      books.append(book)                                        12
    }
    book = books[0]                                             13
  }
}
Now that you have the ServerResponse Decodable structure set up, you can use it to parse data returning from the Google Books service. - Create a method in the GoogleBooksService class that parses the JSON using a combination of the JSONDecoder and your ServerResponse struct.
private func parseJSONDecodable(data:Data, 1 completionHandler: 1 @escaping (Book?, Error?) -> Void) { 1 do { 2 let jsonDecoder = JSONDecoder() 3 let serverResponse = try jsonDecoder.decode( 4 ServerResponse.self, from: data) 4 let book = serverResponse.book 5 completionHandler(book,nil) 6 } catch let error as NSError { 7 completionHandler(nil, error) return } } - Last, the getBook method can now call the parseJSONDecodable method.
self.parseJSONDecodable(data: data, completionHandler:
 completionHandler)
14.10. Parsing JSON data with SwiftyJSON
You may have noticed that both techniques we’ve looked at for parsing JSON have required a number of lines of code:
- With JSONDecoder, because the structure of the raw JSON data differs significantly from the model’s structure in code, you had to define your own decoding logic in your custom implementation of Decodable, missing out on the convenience of automatically generated decoding.
- With JSONSerialization, due to Swift’s type safety, the code involved in extracting information from JSON data can also be verbose. With the data returned from the JSONSerialization class, it’s then necessary to unwrap and downcast every object as you traverse the data hierarchy.
Several third-party solutions out there address this problem and try to reduce the number of lines required to extract data from JSON. Probably the most popular at present is SwiftyJSON (https://github.com/SwiftyJSON/SwiftyJSON).
Let’s explore using SwiftyJSON to parse the same JSON data. To use SwiftyJSON, you need to integrate it with your project.
In previous chapters, when you integrated third-party code into your projects, you downloaded the relevant files and dragged them into the Project Navigator. But what happens when you come back to tweak your code in six months and find that all your third-party frameworks are out of date? You’d need to manually step through each of your dependencies, repeating the process. This time, you’re going to integrate third-party code into your project using a dependency manager to help automate this process.
Dependency managers specify a list of third-party code, called dependencies, that your app requires. They then provide a mechanism for you to automatically load and update this third-party code. They may also integrate this code into your Xcode project for you.
At the time of writing, three main dependency managers are available for your Xcode projects.
Swift Package Manager
Because the Swift Package Manager is being developed by Apple, you’d think that it would be the safest option, but (at the time of writing) it’s still a work in progress, and doesn’t yet support iOS.
CocoaPods
CocoaPods, with a long history since its release in 2011, is probably the most popular dependency manager. CocoaPods isn’t only a dependency manager, but it maintains a central database of third-party libraries at http://cocoapods.org that you can browse to find what you’re looking for. It’s compatible with Swift and Objective-C and automatically integrates dependencies (called pods) into your project.
As pods are managed by a CocoaPods project, something called a workspace is created to contain both your project and the CocoaPods project.
All that sounds great, but CocoaPods does have several cons:
- The CocoaPods software can be a pain to set up, requiring you to install the correct version of several command-line tools such as Gem and Ruby.
- Complete automation to integrate dependencies in a workspace can feel inflexible, and, ironically, add complexity, especially when something goes wrong.
- Removing CocoaPods from a project can be laborious.
Carthage
Carthage, released in 2014, is a little newer than CocoaPods, but has been steadily gaining in popularity. Carthage is less feature-heavy than CocoaPods; Carthage merely manages your dependencies and leaves it up to you to integrate them into your Xcode project. This lack of automation could be seen as a negative, but supporters of Carthage would say it reduces complexity and increases flexibility. A couple more points in favor of Carthage:
- Carthage is easier to install than CocoaPods, only requiring the running of an installer package.
- Carthage is decentralized, and unlike CocoaPods, it doesn’t have a central database of frameworks.
In the end, which dependency manager you use (if any) can come down to personal preference, but it’s definitely worth exploring the options. We’re going to explore using dependency managers with the simplest of the three main options, Carthage.
14.10.1. Integrating SwiftyJSON with Carthage
You’re going to integrate SwiftyJSON with your project, using the Carthage dependency manager.
- First, you need to install the software for Carthage via an installer package or Homebrew. You can find instructions for installing Carthage at https://github.com/Carthage/Carthage#installing-carthage. To add dependencies to your project, you need what Carthage calls a Cartfile. A Cartfile is basically a list of your project’s dependencies that you want Carthage to manage.
- With your favorite text editor, create a file called Cartfile and save it your project folder. The basic syntax for adding
a dependency to your Cartfile is straightforward:
github "profile name/repository name"
- Add SwiftyJSON as a dependency in your Cartfile.
github "SwiftyJSON/SwiftyJSON"
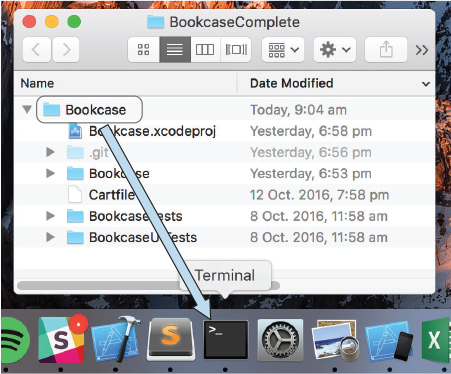
Now, it’s time to request that Carthage automatically download your requested dependencies. You’ll do this from the Terminal. - Find the Terminal application in the Application/Utilities folder—or, even better, keep it conveniently in the dock. Drag
your project folder from the Finder to the Terminal icon, and the Terminal should open, ready to go at the right path (see
figure 14.5).
Figure 14.5. Drag folder to the Terminal
- Run the command carthage update in the Terminal (see figure 14.6).
Figure 14.6. Fetch Carthage dependencies.

Note
If you’re building only for iOS, you can specify that you want only iOS frameworks to download by adding the flag --platform iOS to the Terminal command.
Like magic, all your project’s dependencies (that is, the SwiftyJSON framework!) should appear in the Carthage/Build folder in your project. Later, when you want to update your dependencies, you should run this command again. Unlike CocoaPods, Carthage doesn’t integrate your dependencies into your Xcode project for you. Not to worry, doing so is straightforward; you have a few simple steps left to complete this process. - First, you need to add the SwiftyJSON framework to your project. Open the project in the Finder. In the Carthage/Build folder, you should find an iOS folder, which contains the SwiftyJSON framework relevant to the iOS platform.
- Back in Xcode, open the General settings for the main project target. At the bottom, you should find Linked Frameworks and
Libraries. Drag the Swifty-JSON.framework file from the Carthage/Build/iOS folder in the Finder to the Linked Frameworks and
Libraries section in the General settings (see figure 14.7).
Figure 14.7. Add linked framework
Next, you need to add a special script that will run when your project builds and copy debug information from the SwiftyJSON framework to your project.
- Open the Build Phases tab of the settings for the main project target. Select the plus (+) symbol at the top left of the window,
and select New Run Script phase (see figure 14.8).
Figure 14.8. Add run script to build phases

- Add the following text to the script area (figure 14.8):
/usr/local/bin/carthage copy-frameworks
- Now, in the same area, add the SwiftyJSON framework to be copied, by selecting the plus (+) symbol beneath the Input Files
title and pasting in the location of the framework, using a shortcut variable to the root path of the project (figure 14.8).
$(SRCROOT)/Carthage/Build/iOS/SwiftyJSON.framework
Note
If you want to know more about project settings, check appendix A.
14.10.2. Using SwiftyJSON
Now that you have SwiftyJSON integrated into your Xcode project, parsing your JSON and digging down to the data you need is a piece of cake!
First, any Swift file that uses the SwiftyJSON framework will need to import it.
- Add a line to import the SwiftyJSON framework at the top of the GoogleBooksService.
import SwiftyJSON
Now, create a new method to parse the JSON with SwiftyJSON, so that you can compare it with the other JSON parsing methods we’ve looked at. - Add a new method called parseSwiftyJSON, with the same definition as the other JSON parsing methods you’ve created.
private func parseSwiftyJSON(data:Data, completionHandler: @escaping (Book?, Error?) -> Void) { } - Parse the JSON in the parseSwiftyJSON method by instantiating SwiftyJSON’s JSON class, passing in the data object.
let dataAsJSON = JSON(data: data)
Using SwiftyJSON, you can now drill down to the data you’re after using familiar dictionary and array syntax. To finally extract a foundation type, use the property relevant to the type. For example, to extract a String, Double, Int, or Array you would use the properties string, double, int, or arrayObject. (If you prefer a default value to an optional, add the suffix Value to the property, that is, stringValue, doubleValue, intValue, or arrayValue.) - Extract and unwrap the title and authors properties from the parsed JSON. Like before, if this is successful, create a book object and pass it in a call to the completion handler; otherwise, call the completion handler, passing nil to indicate the method was unsuccessful in extracting a book from the JSON data.
if let title = dataAsJSON["items"][0]["volumeInfo"]               1
                "title"].string,                               1
   let authors = dataAsJSON["items"][0]["volumeInfo"]             2
                  "authors"].arrayObject as? [String] {        2
   let book = Book(title: title,                                  3
       author: authors.joined(separator: ","),                    3
       rating: 0, isbn: "0", notes: "")                           3
   completionHandler(book,nil)                                    4
} else {
   completionHandler(nil, nil)                                    5
}- 1 Extracts title
- 2 Extracts authors
- 3 Creates book
- 4 Sends book to completion handler
- 5 If parsing unsuccessful
- Finally, you need to call your new parseSwiftyJSON method from the getBook method:
self.parseSwiftyJSON(data: data, completionHandler: completionHandler)
- Run the app, and test your barcode detection. You should find the app fills the title and authors fields the way it did before, but this time using the Swifty-JSON framework to parse the JSON returned from the Google Books web service. You’ll still need to give your book a title to save it.
Note
Because the Google Books web service searches for any incidence of the ISBN number in the book data, it can sometimes return multiple books for a search query if the same number coincidentally occurs in a different field. Your challenge (if you choose to accept it!) is to ensure that the book data you use has the correct ISBN. You need to analyze the structure of the data being returned from Google Books web service to find the ISBN for each book. Remember, you’re detecting barcodes with standard 13-character ISBNs.
Checkpoint
If you’d like to compare your project with mine at this point, you can check mine out at https://github.com/iOSApp-DevelopmentwithSwiftinAction/Bookcase.git (Chapter14.1.WebServiceData).
14.11. Downloading data from a web service
How cool would it be if you could automatically load the cover art for a book when the user scans the book’s ISBN? In this section, you’re going to explore using a download task to download a book cover image (see figure 14.9).
Figure 14.9. Download book cover
Looking at the data being returned from the Google Books web service, you’ll see you’re already receiving a URL with a thumbnail for the book at the following path:
dataAsJSON["items"][0]["volumeInfo"]["imageLinks"]["thumbnail"]
- Extract the URL for the book cover thumbnail in the parseSwiftyJSON method after extracting the title and author.
let thumbnailURL = volumeInfo["imageLinks"]?["thumbnail"].string {Now, instead of calling the completion handler, you have more work to do! - Call a loadCover method that you’ll define next. Pass in the book object that you generated, the thumbnailURL that you extracted from the JSON, and the completion handler.
loadCover(book: book,
   thumbnailURL: thumbnailURL,
   completionHandler: completionHandler)
- Create the stub of the method to load the cover art in the GoogleBooksService class. Because you eventually want to modify the book parameter by passing it the image, you’ll need to reassign it as a variable.
func loadCover(book: Book, thumbnailURL: String, completionHandler: @escaping (Book?, Error?) -> Void) { var book = book } - Set up a URL object using the thumbnailURL string.
guard let url = URL(string: thumbnailURL) else {return}Because an image is a larger chunk of data that makes sense to receive as a file, you’re going to get the book cover using a download task from the URLSession. Because you’ll use the default configuration, this time let’s not instantiate a URLRequest, and instead instantiate the task passing the URL object directly. - Create a download task, and activate it by calling the resume method.
task = session.downloadTask(with: url) { 1 (temporaryURL, response, error) in 2 // -------> Deal with data/error } task?.resume() 3- 1 Creates download task
- 2 Completion handler
- 3 Triggers task to begin
- Unwrap the optional URL and use it to create a Data object. (Creating a data object can throw an error, so prefix this with an optional try.) Use the data object to generate a UIImage object, which you can use to set the cover property on the book object. Finally, regardless of the success of the task, you should call the completion handler, passing it the book object.
if let imageURL = temporaryURL, 1 let data = try? Data(contentsOf: imageURL), 2 let image = UIImage(data: data) { 3 book.cover = image 4 } completionHandler(book, error)- 1 Unwraps URL
- 2 Extracts Data from local URL
- 3 Extracts UIImage from data
- 4 Sets book cover to image
Note
Because you’re using UIImage, ensure that the GoogleBooks-Service class imports UIKit.
- Run the app, add a book, and scan a book barcode. The details of the book should appear—but the cover? Nothing changes. What’s going on?
Check the console and you’ll find the error:
App Transport Security has blocked a cleartext HTTP (http://) resource load
     since it is insecure. Temporary exceptions can be configured via your
     app's Info.plist file.
14.11.1. Accessing insecure domains
By default, apps aren’t permitted to connect to insecure domains. Secure domains are defined as those using HTTPS that use a Transport Layer Security of at least 1.2. If you look at the URLs for the book cover art, you’ll notice that they’re only HTTP and so are blocked from loading.
As the error indicates, you can specify that you want to make an exception for specific (or all) insecure domains by editing the Info.plist file.
As you saw in chapter 11, the XML representing the attributes in the Info.plist file consists of key tags followed by data type tags. To add exceptions, you’ll add an NSAppTransportSecurity key that contains a dictionary describing the security level you want in your app. This dictionary accepts the keys shown in table 14.1.
Table 14.1. App Transport Security keys
|
Type |
Default |
Description |
|
|---|---|---|---|
| NSAllowsArbitraryLoads | Boolean | false | Disables security on all domains. This option requires justification when you publish your app to the App Store. |
| NSAllowsArbitraryLoadsInMedia | Boolean | false | Disables security on media loaded with AVFoundation. |
| NSAllowsArbitraryLoadsInWebContent | Boolean | false | Disables security on content loaded into web views. |
| NSAllowsLocalNetworking | Boolean | false | Disables security on loading local resources. |
| NSExceptionDomains | Dictionary | None | Disables security for specific domains. |
Make domain exceptions by adding them as keys to the NSExceptionDomain dictionary. You then add a dictionary describing how this domain should be treated, using the keys shown in table 14.2.
Table 14.2. Exception domain keys
|
Key |
Type |
Default |
Description |
|---|---|---|---|
| NSIncludesSubdomains | Boolean | false | Exception applies to subdomains |
| NSRequiresCertificateTransparency | Boolean | false | Requires valid certificate transparency timestamps |
| NSExceptionAllowsInsecureHTTPLoads | Boolean | false | Allows insecure HTTP loads* |
| NSExceptionRequiresForwardSecrecy | Boolean | true | Requires cyphers that support forward secrecy |
| NSExceptionMinimumTLSVersion | String | TLS v1.2 | Specifies the minimum Transport Layer Security version[*] |
These options require justification when you publish your app to the App Store.
All the book cover art seems to be derived from the same insecure HTTP domain at http://books.google.com, so you’ll make this domain an exception.
- Open the Info.plist file, this time as raw XML. Right-click on the Info.plist file in the Project Navigator, and select Open
As > Source Code. Add books.google.com to the NSAppTransportSecurity dictionary in the NSAppTransport-Security dictionary, and request that insecure HTTP loads for this domain be permitted.
<dict>
...
    <key>NSAppTransportSecurity</key>
    <dict>
        <key>NSExceptionDomains</key>
        <dict>
            <key>books.google.com</key>
            <dict>
                <key>NSExceptionAllowsInsecureHTTPLoads</key>
                <true/>
            </dict>
        </dict>
    </dict>
</dict>
Note
If you view the Info.plist file in the property list editor, you’ll see more human-readable names for these keys by default. NSAppTransportSecurity, for example, is called “App Transport Security Settings.”
- Run the app, add a book, and scan a book barcode. This time, because you’ve added the books.google.com domain to the list of exception domains, the cover art should appear.
- Select Save, and you’ve added a book’s details and cover art by scanning a barcode—too easy!
Managing session tasks by implementing a custom delegate has an alternate approach. This approach provides greater configuration and control over the session task.
To use this approach, you’ll want to instantiate the task without a callback and implement the delegate for the specific task type.
For example, to use the custom delegate approach to download the book cover, you’d take these steps:
- Instantiate the task without a completion handler.
task = session.downloadTask(with: url)
- GoogleBooksService would adopt the URLSessionDownloadDelegate. (This protocol subclasses URLSessionDelegate, so you don’t have to specify that delegate.)
class GoogleBooksService: NSObject, BooksService, URLSessionDownloadDelegate
- GoogleBooksService then implements required protocol methods. The URLSessionDownloadDelegate requires you to respond to when the data has finished downloading. This is where you would generate an image from the data
downloaded to the temporary URL at location and update the book object.
public func urlSession(_ session: URLSession, downloadTask: URLSessionDownloadTask, didFinishDownloadingTo location: URL) { //Set book cover from image downloaded } - GoogleBooksService could then implement any optional protocol methods. For example, the URLSessionDownloadDelegate and its subclasses permit additional customization of the task, such as providing authentication details to the server and managing HTTP redirects. The delegate can also be used to provide notifications, such as if a session becomes invalidated or of a download’s progress (this is useful for showing percentage downloaded in a progress bar for downloads of larger file sizes).
14.12. Displaying the network activity indicator
If a networking task can take more than a couple of seconds, it’s a good idea to indicate this to the user with a network activity indicator in the status bar (see figure 14.10).
Figure 14.10. Network activity indicator

Displaying the network activity indicator is straightforward—all that’s needed is to set the isNetworkActivityIndicatorVisible property of the UIApplication to true.
- In the foundBarcode method in BookViewController, get a reference to the UIApplication with its singleton type property shared and turn on the activity indicator.
UIApplication.shared.isNetworkActivityIndicatorVisible = true
- In the completion handler of getBook, when network activity is complete, hide the indicator by setting the same property to false:
UIApplication.shared.isNetworkActivityIndicatorVisible = false
14.13. Cancelling a task
It may have occurred to you that the user is currently able to exit the book edit form while a data or download task is in progress.
If the user exits the book view controller by saving or cancelling while the BooksService is still waiting for a response from the web service, you should cancel any ongoing operations.
- Add a request to cancel web operations in the viewDidDisappear method of BookViewController.
booksService.cancel()
- In the GoogleBooksService class, fill out the cancel method by cancelling the current task.
func cancel() {
   task?.cancel()
}
Checkpoint
If you’d like to compare your project with mine at this point, you can check mine out at https://github.com/iOSAppDevelopmentwithSwiftinAction/Bookcase.git (Chapter14.2.WebServiceDownload). You may need to call carthage update in the Terminal to update Swifty-JSON to the latest version.
14.14. Summary
In this chapter, you learned the following:
- You can optionally use URLRequest to configure your URL request beyond the defaults and URLSessionConfiguration to configure your URLSession beyond the defaults.
- Use the URL session task delegate for fine-grained control over a task. Alternatively, for basic requirements, use the completion handler when instantiating the URL session task.
- Use a third-party JSON parser such as SwiftyJSON to access more-complex JSON data with a more readable syntax.
- You can use operation queues instead of dispatch queues to manage threads for additional control, such as dependencies between operations.
- You can use dependency managers such as Carthage and CocoaPods to maintain third-party code and keep it conveniently updated.
- Configure your app’s App Transport Security to be able to connect to insecure domains.