A namespace provides a wrapper around a global system resource of the kernel and makes the resource appear to the process within the namespace as if they have an isolated instance. Global resource changes are visible to processes in the same namespace but invisible to others. Containers are considered an excellent implementation of a kernel namespace.
The following namespaces are implemented by Docker:
- pid namespace: Used for process isolation (PID—Process ID)
- net namespace: Used for managing network interfaces (NET—Networking)
- ipc namespace: Used for managing access to IPC resources (IPC—Inter Process Communication)
- mnt namespace: Used for managing mount points (MNT—Mount)
- uts namespace: Used for isolating kernel and version identifiers (UTS—Unix Time sharing System)
Adding namespace support in libcontainer required adding patches in the system layer of GoLang (https://codereview.appspot.com/126190043/patch/140001/150001<emphsis>src/syscall/exec_linux.go</emphsis>) so that new data structures could be maintained for PIDs, user UIDs, and so on.
pid namespaces isolate the process ID number space; processes in different pid namespaces can have the same pid. pid namespaces allow containers to provide functionality such as suspending/resuming the set of processes in the container, and migrating the container to a new host while the processes inside the container maintain the same pids.
pids in a new namespace start with PID 1. The kernel needs to be configured for the flag CONFIG_PID_NS for the namespace to work.
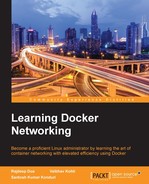
pid namespaces can be nested. Each pid namespace has a parent, except for the initial (root) pid namespace. The parent of a pid namespace is the pid namespace of the process that created the namespace using clone or unshare. pid namespaces form a tree, with all namespaces ultimately tracing their ancestry to the root namespace as shown in the following figure:

net namespace provides isolation of the system resources associated with networking. Each network namespace has its own network devices, IP addresses, IP routing tables, /proc/net directory, port numbers, and so on.
Network namespaces make containers useful from a networking perspective: each container can have its own (virtual) network device and its own applications that bind to the per-namespace port number space; suitable routing rules in the host system can direct network packets to the network device associated with a specific container. Use of network namespaces requires a kernel that is configured with the CONFIG_NET_NS option (https://lwn.net/Articles/531114/).
As each container has its own network namespace, which basically means its own network interface and routing tables, net namespace is also directly leveraged by Docker to isolate IP addresses, port numbers, and so on.
Network namespaces are created by passing a flag to the clone() system call, CLONE_NEWNET. From the command line, though, it is convenient to use the IP networking configuration tool to set up and work with network namespaces:
# ip netns add netns1
This command creates a new network namespace called netns1. When the IP tool creates a network namespace, it will create a bind mount for it under /var/run/netns, which allows the namespace to persist, even when no processes are running within it, and facilitates the manipulation of the namespace itself. Since network namespaces typically require a fair amount of configuration before they are ready for use, this feature will be appreciated by systems administrators.
The ip netns exec command can be used to run network management commands within the namespace:
# ip netns exec netns1 ip link list
1: lo: <LOOPBACK> mtu 65536 qdisc noop state DOWN mode DEFAULT link/loopback 00:00:00:00:00:00 brd 00:00:00:00:00:00
This command lists the interfaces visible inside the namespace. A network namespace can be removed with the use of following command:
# ip netns delete netns1
This command removes the bind mount referring to the given network namespace. The namespace itself, however, will persist for as long as any processes are running within it.
New network namespaces will have a loopback device but no other network devices. Aside from the loopback device, each network device (physical or virtual interfaces, bridges, and so on) can only be present in a single network namespace. In addition, physical devices (those connected to real hardware) cannot be assigned to namespaces other than the root. Instead, virtual network devices (for example, virtual Ethernet or vEth) can be created and assigned to a namespace. These virtual devices allow processes inside the namespace to communicate over the network; it is the configuration, routing, and so on that determines who they can communicate with.
When first created, the lo loopback device in the new namespace is down, so even a loopback ping will fail.
# ip netns exec netns1 ping 127.0.0.1
connect: Network is unreachable
In the previous command, we can see that since the net namespace for a Docker container is stored in a separate location, and thus a symlink is required to be created to /var/run/netns, it can be done in the following way:
# pid=`docker inspect -f '{{.State.Pid}}' $container_id`
# ln -s /proc/$pid/ns/net /var/run/netns/$container_id
In this example, it is done by bringing that interface up, which will allow the pinging of the loopback address.
# ip netns exec netns1 ip link set dev lo up
# ip netns exec netns1 ping 127.0.0.1
 PING 127.0.0.1 (127.0.0.1) 56(84) bytes of data.
64 bytes from 127.0.0.1: icmp_seq=1 ttl=64 time=0.052 ms
64 bytes from 127.0.0.1: icmp_seq=2 ttl=64 time=0.042 ms
64 bytes from 127.0.0.1: icmp_seq=3 ttl=64 time=0.044 ms
64 bytes from 127.0.0.1: icmp_seq=4 ttl=64 time=0.031 ms
64 bytes from 127.0.0.1: icmp_seq=5 ttl=64 time=0.042 ms
This still doesn't allow communication between netns1 and the root namespace. To do that, virtual Ethernet devices need to be created and configured.
# ip link add veth0 type veth peer name veth1
# ip link set veth1 netns netns1
The first command sets up a pair of virtual Ethernet devices that are connected. Packets sent to veth0 will be received by veth1 and vice versa. The second command assigns veth1 to the netns1 namespace.
# ip netns exec netns1 ifconfig veth1 10.0.0.1/24 up
# ifconfig veth0 10.0.0.2/24 up
Then, these two commands set IP addresses for the two devices.
# ping 10.0.0.1
# ip netns exec netns1 ping 10.0.0.2
Communication in both directions is now possible as the previous ping commands show.
As mentioned, though, namespaces do not share routing tables or firewall rules, as running route and iptables -L in netns1 will attest:
# ip netns exec netns1 route
Kernel IP routing table
Destination   Gateway    Genmask        Flags    Metric Ref    Use Iface
10.0.0.0         *      255.255.255.0     U        0  0  0       veth1

# ip netns exec netns1 iptables -L
Chain INPUT (policy ACCEPT)
target     prot opt source               destination
Chain FORWARD (policy ACCEPT)
target     prot opt source               destination
Chain OUTPUT (policy ACCEPT)
target     prot opt source               destination
User namespaces allows per-namespace mappings of user and group IDs. This means that user IDs and group IDs of a process inside a user namespace can be different from its IDs outside of the namespace. A process can have a non-zero user ID outside a namespace while, at the same time, having a user ID of zero inside the namespace. The process is unprivileged for operations outside the user namespace but has root privileges inside the namespace.
User namespaces are created by specifying the CLONE_NEWUSER flag when calling clone() or unshare():
clone() allows the child process to share parts of its execution context with the calling process, such as the memory space, the table of file descriptors, and the table of signal handlers.
unshare() allows a process (or thread) to disassociate parts of its execution context that are currently being shared with other processes (or threads). Part of the execution context, such as the mount namespace, is shared implicitly when a new process is created using fork() or vfork().
As mentioned previously, Docker containers are very similar to LXC containers as a set of namespaces and control groups are created separately for containers. Each container gets its own network stack and namespace. Until and unless containers do not have the privileged access, they are not allowed to access other hosts sockets or interfaces. If the host network mode is given to the container, then only it gets the ability to access the host ports and IP address, which can cause a potential threat to other programs running on the host.
As shown in the following example, where we use the host network mode in the container and it is able to access all the hosts bridges:
docker run -it --net=host ubuntu /bin/bash
$ ifconfig
docker0   Link encap:Ethernet  HWaddr 02:42:1d:36:0d:0d
          inet addr:172.17.0.1  Bcast:0.0.0.0  Mask:255.255.0.0
          inet6 addr: fe80::42:1dff:fe36:d0d/64 Scope:Link
          UP BROADCAST MULTICAST  MTU:1500  Metric:1
          RX packets:24 errors:0 dropped:0 overruns:0 frame:0
          TX packets:38 errors:0 dropped:0 overruns:0 carrier:0
          collisions:0 txqueuelen:0
          RX bytes:1608 (1.6 KB)  TX bytes:5800 (5.8 KB)

eno16777736 Link encap:Ethernet  HWaddr 00:0c:29:02:b9:13
          inet addr:192.168.218.129  Bcast:192.168.218.255  Mask:255.255.255.0
          inet6 addr: fe80::20c:29ff:fe02:b913/64 Scope:Link
          UP BROADCAST RUNNING MULTICAST  MTU:1500  Metric:1
          RX packets:4934 errors:0 dropped:0 overruns:0 frame:0
          TX packets:4544 errors:0 dropped:0 overruns:0 carrier:0
          collisions:0 txqueuelen:1000
          RX bytes:2909561 (2.9 MB)  TX bytes:577079 (577.0 KB)

$ docker ps -q | xargs docker inspect --format '{{ .Id }}: NetworkMode={{ .HostConfig.NetworkMode }}'
52afb14d08b9271bd96045bebd508325a2adff98dbef8c10c63294989441954d: NetworkMode=host
While auditing, it should be checked that all the containers, by default, have network mode set to default and not host:
$ docker ps -q | xargs docker inspect --format '{{ .Id }}: NetworkMode={{ .HostConfig.NetworkMode }}'
1aca7fe47882da0952702c383815fc650f24da2c94029b5ad8af165239b78968: NetworkMode=default
Each Docker container is connected to an Ethernet bridge in order to provide inter-connectivity between containers. They can ping each other to send/receive UDP packets and establish TCP connections, but that can be restricted if necessary. Namespace also provides a straightforward isolation in restricting the access of the processes running in the other container as well as the host.
We will be using the following nsenter command line utility in order to enter into namespaces. It is an open-source project on GitHub available at https://github.com/jpetazzo/nsenter.
Using it, we will try to enter existing container namespaces or try to spawn a new set of namespaces. It is different from the Docker exec command as nsenter doesn't enter the cgroups, which gives potential benefits for debugging and external audits by escaping the resource limitations using namespace.
We can install nsenter from PyPI (it requires Python 3.4) and use the command line utility to connect to a running container:
$ pip install nsenter
To replace pid with the container's pid, use the following command:
$ sudo nsenter --net --target=PID /bin/ip a
1: lo: <LOOPBACK,UP,LOWER_UP> mtu 65536 qdisc noqueue state UNKNOWN group default
    link/loopback 00:00:00:00:00:00 brd 00:00:00:00:00:00
    inet 127.0.0.1/8 scope host lo
       valid_lft forever preferred_lft forever
    inet6 ::1/128 scope host
       valid_lft forever preferred_lft forever
14: eth0: <BROADCAST,UP,LOWER_UP> mtu 1500 qdisc noqueue state UP group default
    link/ether 02:42:ac:11:00:06 brd ff:ff:ff:ff:ff:ff
    inet 172.17.0.6/16 scope global eth0
       valid_lft forever preferred_lft forever
    inet6 fe80::42:acff:fe11:6/64 scope link
       valid_lft forever preferred_lft forever
We can use the docker inspect command to make it more convenient as follows:
- First start a new nginx server:
$ docker run -d --name=nginx -t nginx - Then get pid of the container:
PID=$(docker inspect --format {{.State.Pid}} nginx) - Connect to the running nginx container:
$ nsenter --target $PID --uts --ipc --net –pid
docker-enter is also one of the wrappers that can be used to enter inside the container specifying the shell commands, and if no command is specified, a shell will be invoked instead. If it is required to inspect or manipulate containers without executing another command line tool, we can use context manager to do this:
import subprocess
from nsenter import Namespace
with Namespace(mypid, 'net'):
# output network interfaces as seen from within the mypid's net NS:
  subprocess.check_output(['ip', 'a'])