Kubernetes is a container cluster management tool. Currently, it supports Docker and Rocket. It is an open source project supported by Google, and the project was launched in June 2014 at Google I/O. It supports deployment on various cloud providers such as GCE, Azure, AWS, and vSphere as well as on bare metal. The Kubernetes manager is lean, portable, extensible, and self-healing.
Kubernetes has various important components, as explained in the following list:
- Node: This is a physical or virtual-machine part of a Kubernetes cluster, running the Kubernetes and Docker services, onto which pods can be scheduled.
- Master: This maintains the runtime state of the Kubernetes server runtime. It is the point of entry for all the client calls to configure and manage Kubernetes components.
- Kubectl: This is the command-line tool used to interact with the Kubernetes cluster to provide master access to Kubernetes APIs. Through it, the user can deploy, delete, and list pods.
- Pod: This is the smallest scheduling unit in Kubernetes. It is a collection of Docker containers that share volumes and don't have port conflicts. It can be created by defining a simple JSON file.
- Replication controller: It manages the lifecycle of a pod and ensures that a specified number of pods are running at a given time by creating or killing pods as required.
- Label: Labels are used to identify and organize pods and services based on key-value pairs.
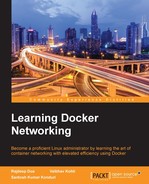
The following diagram shows the Kubernetes Master/Minion flow:

Let's get started with Kubernetes cluster deployment on AWS, which can be done by using the config file that already exists in the Kubernetes codebase:
- Log in to AWS Console at http://aws.amazon.com/console/.
- Open the IAM console at https://console.aws.amazon.com/iam/home?#home.
- Choose the IAM username, select the Security Credentials tab, and click on the Create Access Key option.
- After the keys have been created, download and keep them in a secure place. The downloaded
.csvfile will contain anAccess Key IDandSecret Access Key, which will be used to configure the AWS CLI. - Install and configure the AWS CLI. In this example, we have installed AWS CLI on Linux using the following command:
$ sudo pip install awscli - In order to configure the AWS CLI, use the following command:
$ aws configure
AWS Access Key ID [None]: XXXXXXXXXXXXXXXXXXXXXXXXXXXXXXXX
AWS Secret Access Key [None]: YYYYYYYYYYYYYYYYYYYYYYYYYYYY
Default region name [None]: us-east-1
Default output format [None]: text
- After configuring the AWS CLI, we will create a profile and attach a role to it with full access to S3 and EC2:
$ aws iam create-instance-profile --instance-profile-name Kube - The role can be created separately using the console or AWS CLI with a JSON file that defines the permissions the role can have:
$ aws iam create-role --role-name Test-Role --assume-role-policy-document /root/kubernetes/Test-Role-Trust-Policy.jsonA role can be attached to the preceding profile, which will have complete access to EC2 and S3, as shown in the following screenshot:

- After the creation of the role, it can be attached to a policy using the following command:
$ aws iam add-role-to-instance-profile --role-name Test-Role --instance-profile-name Kube - By default, the script uses the default profile. We can change it as follows:
$ export AWS_DEFAULT_PROFILE=Kube - The Kubernetes cluster can be easily deployed using one command, as follows:
$ export KUBERNETES_PROVIDER=aws; wget -q -O - https://get.k8s.io | bash
Downloading kubernetes release v1.1.1 to /home/vkohli/kubernetes.tar.gz
--2015-11-22 10:39:18--  https://storage.googleapis.com/kubernetes-release/release/v1.1.1/kubernetes.tar.gz
Resolving storage.googleapis.com (storage.googleapis.com)... 216.58.220.48, 2404:6800:4007:805::2010
Connecting to storage.googleapis.com (storage.googleapis.com)|216.58.220.48|:443... connected.
HTTP request sent, awaiting response... 200 OK
Length: 191385739 (183M) [application/x-tar]
Saving to: 'kubernetes.tar.gz'
100%[======================================>] 191,385,739 1002KB/s   in 3m 7s
2015-11-22 10:42:25 (1002 KB/s) - 'kubernetes.tar.gz' saved [191385739/191385739]
Unpacking kubernetes release v1.1.1
Creating a kubernetes on aws...
... Starting cluster using provider: aws
... calling verify-prereqs
... calling kube-up
Starting cluster using os distro: vivid
Uploading to Amazon S3
Creating kubernetes-staging-e458a611546dc9dc0f2a2ff2322e724a
make_bucket: s3://kubernetes-staging-e458a611546dc9dc0f2a2ff2322e724a/
+++ Staging server tars to S3 Storage: kubernetes-staging-e458a611546dc9dc0f2a2ff2322e724a/devel
upload: ../../../tmp/kubernetes.6B8Fmm/s3/kubernetes-salt.tar.gz to s3://kubernetes-staging-e458a611546dc9dc0f2a2ff2322e724a/devel/kubernetes-salt.tar.gz
Completed 1 of 19 part(s) with 1 file(s) remaining
- The preceding command will call
kube-up.shand, in turn,utils.shusing theconfig-default.shscript, which contains the basic configuration of a K8S cluster with four nodes, as follows:ZONE=${KUBE_AWS_ZONE:-us-west-2a} MASTER_SIZE=${MASTER_SIZE:-t2.micro} MINION_SIZE=${MINION_SIZE:-t2.micro} NUM_MINIONS=${NUM_MINIONS:-4} AWS_S3_REGION=${AWS_S3_REGION:-us-east-1}
- The instances are
t2.microrunning Ubuntu OS. The process takes 5 to 10 minutes, after which the IP addresses of the master and minions get listed and can be used to access the Kubernetes cluster.
Kubernetes strays from the default Docker system's networking model. The objective is for each pod to have an IP at a level imparted by the system's administration namespace, which has full correspondence with other physical machines and containers over the system. Allocating IPs per pod unit makes for a clean, retrogressive, and good model where units can be dealt with much like VMs or physical hosts from the point of view of port allotment, system administration, naming, administration disclosure, burden adjustment, application design, and movement of pods from one host to another. All containers in all pods can converse with all other containers in all other pods using their addresses. This also helps move traditional applications to a container-oriented approach.
As every pod gets a real IP address, they can communicate with each other without any need for translation. By making the same configuration of IP addresses and ports both inside as well as outside of the pod, we can create a NAT-less flat address space. This is different from the standard Docker model since there, all containers have a private IP address, which will allow them to be able to access the containers on the same host. But in the case of Kubernetes, all the containers inside a pod behave as if they are on the same host and can reach each other's ports on the localhost. This reduces the isolation between containers and provides simplicity, security, and performance. Port conflict can be one of the disadvantages of this; thus, two different containers inside one pod cannot use the same port.
In GCE, using IP forwarding and advanced routing rules, each VM in a Kubernetes cluster gets an extra 256 IP addresses in order to route traffic across pods easily.
Routes in GCE allow you to implement more advanced networking functions in the VMs, such as setting up many-to-one NAT. This is leveraged by Kubernetes.
This is in addition to the main Ethernet bridge which the VM has; this bridge is termed as the container bridge cbr0 in order to differentiate it from the Docker bridge, docker0. In order to transfer packets out of the GCE environment from a pod, it should undergo an SNAT to the VM's IP address, which GCE recognizes and allows.
Other implementations with the primary aim of providing an IP-per-pod model are Open vSwitch, Flannel, and Weave.
In the case of a GCE-like setup of an Open vSwitch bridge for Kubernetes, the model where the Docker bridge gets replaced by kbr0 to provide an extra 256 subnet addresses is followed. Also, an OVS bridge (ovs0) is added, which adds a port to the Kubernetes bridge in order to provide GRE tunnels to transfer packets across different minions and connect pods residing on these hosts. The IP-per-pod model is also elaborated more in the upcoming diagram, where the service abstraction concept of Kubernetes is also explained.
A service is another type of abstraction that is widely used and suggested for use in Kubernetes clusters as it allows a group of pods (applications) to be accessed via virtual IP addresses and gets proxied to all internal pods in a service. An application deployed in Kubernetes could be using three replicas of the same pod, which have different IP addresses. However, the client can still access the application on the one IP address which is exposed outside, irrespective of which backend pod takes the request. A service acts as a load balancer between different replica pods and a single point of communication for clients utilizing this application. Kubeproxy, one of the services of Kubernetes, provides load balancing and uses rules to access the service IPs and redirects them to the correct backend pod.
Now, in the following example, we will be deploying two nginx replication pods (rc-pod) and exposing them via a service in order to understand Kubernetes networking. Deciding where the application can be exposed via a virtual IP address and which replica of the pod (load balancer) the request is to be proxied to is taken care of by Service Proxy. Please refer to the following diagram for more details:

The following are the steps to deploy the Kubernetes pod:
- In the Kubernetes master, create a new folder:
$ mkdir nginx_kube_example
$ cd nginx_kube_example
- In the editor of your choice, create the
.yamlfile that will be used to deploy the nginx pods:$ vi nginx_pod.yamlCopy the following into the file:
apiVersion: v1
kind: ReplicationController
metadata:
  name: nginx
spec:
  replicas: 2
  selector:
    app: nginx
  template:
    metadata:
      name: nginx
      labels:
        app: nginx
  spec:
    containers:
    - name: nginx
      image: nginx
      ports:
      - containerPort: 80
- Create the nginx pod using
kubectl:$ kubectl create -f nginx_pod.yaml - In the preceding pod creation process, we created two replicas of the nginx pod, and its details can be listed using the following command:
$ kubectl get podsThe following is the output generated:
NAME          READY     REASON    RESTARTS   AGE
nginx-karne   1/1       Running   0          14s
nginx-mo5ug   1/1       Running   0          14s
To list replication controllers on a cluster, use the
kubectl getcommand:$ kubectl get rcThe following is the output generated:
CONTROLLER   CONTAINER(S)   IMAGE(S)   SELECTOR    REPLICAS
nginx        nginx          nginx      app=nginx   2
- The container on the deployed minion can be listed using the following command:
$ docker psThe following is the output generated:
CONTAINER ID        IMAGE                                   COMMAND                CREATED             STATUS              PORTS               NAMES
1d3f9cedff1d        nginx:latest                            "nginx -g 'daemon of   41 seconds ago      Up 40 seconds       k8s_nginx.6171169d_nginx-karne_default_5d5bc813-3166-11e5-8256-ecf4bb2bbd90_886ddf56
0b2b03b05a8d        nginx:latest                            "nginx -g 'daemon of   41 seconds ago      Up 40 seconds
- Deploy the nginx service using the following .
yamlfile in order to expose the nginx pod on host port82:$ vi nginx_service.yamlCopy the following into the file:
apiVersion: v1
kind: Service
metadata:
  labels:
    name: nginxservice
  name: nginxservice
spec:
  ports:
    # The port that this service should serve on.
    - port: 82
  # Label keys and values that must match in order to receive traffic for this service.
  selector:
    app: nginx
  type: LoadBalancer
- Create the nginx service using the
kubectl createcommand:$kubectl create -f nginx_service.yaml services/nginxservice
- The nginx service can be listed using the following command:
$ kubectl get servicesThe following is the output generated:
NAME           LABELS                                    SELECTOR    IP(S)          PORT(S)
kubernetes     component=apiserver,provider=kubernetes   <none>      192.168.3.1    443/TCP
nginxservice   name=nginxservice                         app=nginx   192.168.3.43   82/TCP
- Now, the nginx server's test page can be accessed on the following URL via the service:
http://192.168.3.43:82