The Amazon EC2 container service (ECS) provides a highly scalable, high-performance container management service that supports Docker containers. It allows you to easily run applications on a managed cluster of Amazon EC2 instances. Amazon ECS eliminates the need for you to install, operate, and scale your own cluster management infrastructure. With simple API calls, you can launch and stop Docker-enabled applications and query the complete state of your cluster.
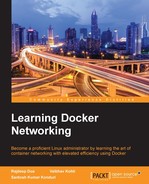
In the following example, we will see how to deploy a secured web application using two Docker containers, one containing a simple web application (application container), and the other containing a reverse proxy with throttling enabled (proxy container), which can be used to protect the web application. These containers will be deployed on the Amazon EC2 instance using ECS. As can be seen in the following diagram, all the network traffic will be routed through the proxy container that throttles requests. Also, we can perform activities such as filtering, logging, and intrusion detection at proxy containers using various security software.
The following are the steps to do so:
- We will build a basic PHP web application container from the GitHub project. The following steps can be performed on a separate EC2 instance or a local machine:
$ sudo yum install -y git
$ git clone https://github.com/awslabs/ecs-demo-php-simple-app
- Change directories to the
ecs-demo-php-simple-appfolder:$ cd ecs-demo-php-simple-app - We can examine
Dockerfileas follows in order to understand the web application it will deploy:$ cat Dockerfile - Build the container image using Dockerfile and then push it in your Docker Hub account. The Docker Hub account is required as it helps to deploy the containers on the Amazon ECS service by just specifying the container name:
$ docker build -t my-dockerhub-username/amazon-ecs-sample.The image built over here is required to have
dockerhub-username(correct without spaces) as the first parameter.The following figure depicts a hacker not able to access the web application, as the request is filtered via a proxy container and access is blocked:

- Upload the Docker image to the Docker Hub account:
$ docker login - Check to ensure your login worked:
$ docker info - Push your image to the Docker Hub account:
$ docker push my-dockerhub-username/amazon-ecs-sample - After creating the sample web application Docker container, we will now create the proxy container, which can also contain some security-related software, if required, in order to strengthen security. We will create a new proxy Docker container using a customized Dockerfile and then push the image to your Docker Hub account:
$ mkdir proxy-container
$ cd proxy-container
$ nano Dockerfile
FROM ubuntu
RUN apt-get update && apt-get install -y nginx
COPY nginx.conf /etc/nginx/nginx.conf
RUN echo "daemon off;" >> /etc/nginx/nginx.conf
EXPOSE 80
CMD service nginx start
In the previous Dockerfile we are using a base Ubuntu image and installing nginx and exposing it on port 80.
- Next, we will create a customized
nginx.conf, which will override the defaultnginx.confin order to ensure the reverse proxy is configured properly:user www-data; worker_processes 4; pid /var/run/nginx.pid; events { worker_connections 768; # multi_accept on; } http { server { listen 80; # Proxy pass to servlet container location / { proxy_pass http://application-container:80; } } }
- Build the proxy Docker image and push the built image to the Docker Hub account:
$ docker build -t my-dockerhub-username/proxy-image.
$ docker push my-dockerhub-username/proxy-image
- The ECS container service can be deployed by navigating to AWS Management Console (https://aws.amazon.com/console/).
- Click Task Definitions in the left sidebar and then click Create a New Task Definition.
- Give your task definition a name, such as
SecurityApp. - Next, click on Add Container and insert the name of the proxy web container pushed to the Docker Hub account, as well as the name of the application web container. View the contents of the JSON using Configure via JSON tab to see the task definition that you have created. It should be like this:
Proxy-container:
Container Name: proxy-container
Image: username/proxy-image
Memory: 256
Port Mappings
Host port: 80
Container port: 80
Protocol: tcp
CPU: 256
Links: application-container
Application container:
Container Name: application-container
Image: username/amazon-ecs-sample
Memory: 256
CPU: 256
Click the Create button in order to deploy the application.
- Click Clusters in the left sidebar. If a default cluster does not exist, create one.
- Launch an ECS-optimized Amazon Machine Image (AMI), ensuring it has a public IP address and a path to the Internet.
- When your instance is up and running, navigate to the ECS section of the AWS Management Console and click Clusters, then default. Now, we should be able to see our instance under the ECS Instances tab.
- Navigate to the TASK definitions from the left side of the AWS Management Console tab and click Run Task.
- On the next page, ensure the cluster is set to Default and the number of tasks is 1, then click Run Task.
- After the process completes we can see the state of the task from a pending state to a green running state.
- Clicking on the ECS tab, we can see the container instance created earlier. By clicking on it, we will get information about its public IP address. By hitting this public IP address via the browser we will be able to see our sample PHP application.