In Chapter 1, Machine Learning – A Gentle Introduction, we sketched the general idea of a supervised learning algorithm. We have the training data where each instance has an input (a set of attributes) and a desired output (a target class). Then we use this data to train a model that will predict the same target class for new unseen instances.
Supervised learning methods are nowadays a standard tool in a wide range of disciplines, from medical diagnosis to natural language processing, image recognition, and searching for new particles at the Large Hadron Collider (LHC). In this chapter we will present several methods applied to several real-world examples by using some of the many algorithms implemented in scikit-learn. This chapter does not intend to substitute the scikit-learn reference, but is an introduction to the main supervised learning techniques and shows how they can be used to solve practical problems.
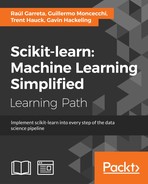
Imagine that the instances in your dataset are points in a multidimensional space; we can assume that the model built by our classifier can be a surface or using linear algebra terminology, a hyperplane that separates instances (points) of one class from the rest. Support Vector Machines (SVM) are supervised learning methods that try to obtain these hyperplanes in an optimal way, by selecting the ones that pass through the widest possible gaps between instances of different classes. New instances will be classified as belonging to a certain category based on which side of the surfaces they fall on.
The following figure shows an example for a two-dimensional space with two features (X1 and X2) and two classes (black and white):

We can observe that the green hyperplane does not separate both classes, committing some classification errors. The blue and the red hyperplanes separate both classes without errors. However, the red surface separates both classes with maximum margin; it is the most distant hyperplane from the closest instances from the two categories. The main advantage of this approach is that it will probably lower the generalization error, making this model resistant to overfitting, something that actually has been verified in several, different, classification tasks.
This approach can be generalized to construct hyperplanes not only in two dimensions, but also in high or infinite dimensional spaces. What is more, we can use nonlinear surfaces, such as polynomial or radial basis functions, by using the so called kernel trick, implicitly mapping inputs into high-dimensional feature spaces.
SVM has become one of the state-of-the-art machine learning models for many tasks with excellent results in many practical applications. One of the greatest advantages of SVM is that they are very effective when working on high-dimensional spaces, that is, on problems which have a lot of features to learn from. They are also very effective when the data is sparse (think about a high-dimensional space with very few instances). Besides, they are very efficient in terms of memory storage, since only a subset of the points in the learning space is used to represent the decision surfaces.
To mention some disadvantages, SVM models could be very calculation intensive while training the model and they do not return a numerical indicator of how confident they are about a prediction. However, we can use some techniques such as K-fold cross-validation to avoid this, at the cost of increasing the computational cost.
We will apply SVM to image recognition, a classic problem with a very large dimensional space (the value of each pixel of the image is considered as a feature). What we will try to do is, given an image of a person's face, predict to which of the possible people from a list does it belongs (this kind of approach is used, for example, in social network applications to automatically tag people within photographs). Our learning set will be a group of labeled images of peoples' faces, and we will try to learn a model that can predict the label of unseen instances. The intuitive and first approach would be to use the image pixels as features for the learning algorithm, so pixel values will be our learning attributes and the individual's label will be our target class.
Our dataset is provided within scikit-learn, so let's start by importing and printing its description.
>>> import sklearn as sk
>>> import numpy as np
>>> import matplotlib.pyplot as plt
>>> from sklearn.datasets import fetch_olivetti_faces
>>> faces = fetch_olivetti_faces()
>>> print faces.DESCR
The dataset contains 400 images of 40 different persons. The photos were taken with different light conditions and facial expressions (including open/closed eyes, smiling/not smiling, and with glasses/no glasses). For additional information about the dataset refer to http://www.cl.cam.ac.uk/research/dtg/attarchive/facedatabase.html.
Looking at the content of the
faces object, we get the following properties: images, data, and target. Images contain the 400 images represented as 64 x 64 pixel matrices. data contains the same 400 images but as array of 4096 pixels. target is, as expected, an array with the target classes, ranging from 0 to 39.
>>> print faces.keys()
['images', 'data', 'target', 'DESCR']
>>> print faces.images.shape
(400, 64, 64)
>>> print faces.data.shape
(400, 4096)
>>> print faces.target.shape
(400,)
Normalizing the data is important as we saw in the previous chapter. It is also important for the application of SVM to obtain good results. In our particular case, we can verify by running the following snippet that our images already come as values in a very uniform range between 0 and 1 (pixel value):
>>> print np.max(faces.data)
1.0
>>> print np.min(faces.data)
0.0
>>> print np.mean(faces.data)
0.547046432495
Therefore, we do not have to normalize the data. Before learning, let's plot some faces. We will define the following helper function:
>>> def print_faces(images, target, top_n):
>>>     # set up the figure size in inches
>>>     fig = plt.figure(figsize=(12, 12))
>>>     fig.subplots_adjust(left=0, right=1, bottom=0, top=1,
        hspace=0.05, wspace=0.05)
>>>     for i in range(top_n):
>>>         # plot the images in a matrix of 20x20
>>>         p = fig.add_subplot(20, 20, i + 1, xticks=[],
            yticks=[])
>>>         p.imshow(images[i], cmap=plt.cm.bone)
>>>
>>>         # label the image with the target value
>>>         p.text(0, 14, str(target[i]))
>>>         p.text(0, 60, str(i))
If we print the first 20 images, we can see faces from two persons.
>>> print_faces(faces.images, faces.target, 20)

To use SVM in scikit-learn to solve our task, we will import the SVC class from the sklearn.svm module:
>>> from sklearn.svm import SVC
The Support Vector Classifier (SVC) will be used for classification. In the last section of this chapter, we will use SVM for regression tasks.
The SVC implementation has different important parameters; probably the most relevant is kernel, which defines the kernel function to be used in our classifier (think of the kernel functions as different similarity measures between instances). By default, the SVC class uses the rbf kernel, which allows us to model nonlinear problems. To start, we will use the simplest kernel, the linear one.
>>> svc_1 = SVC(kernel='linear')
Before continuing, we will split our dataset into training and testing datasets.
>>> from sklearn.cross_validation import train_test_split
>>> X_train, X_test, y_train, y_test = train_test_split(
    faces.data, faces.target, test_size=0.25, random_state=0)
And we will define a function to evaluate K-fold cross-validation.
>>> from sklearn.cross_validation import cross_val_score, KFold
>>> from scipy.stats import sem
>>>
>>> def evaluate_cross_validation(clf, X, y, K):
>>>     # create a k-fold croos validation iterator
>>>     cv = KFold(len(y), K, shuffle=True, random_state=0)
>>>     # by default the score used is the one returned by score
     method of the estimator (accuracy)
>>>     scores = cross_val_score(clf, X, y, cv=cv)
>>>     print scores
>>>     print ("Mean score: {0:.3f} (+/-{1:.3f})").format(
        np.mean(scores), sem(scores))

>>> evaluate_cross_validation(svc_1, X_train, y_train, 5)
[ 0.93333333  0.91666667  0.95        0.95        0.91666667]
Mean score: 0.933 (+/-0.007)
Cross-validation with five folds, obtains pretty good results (accuracy of 0.933). In a few steps we obtained a face classifier.
We will also define a function to perform training on the training set and evaluate the performance on the testing set.
>>> from sklearn import metrics
>>>
>>> def train_and_evaluate(clf, X_train, X_test, y_train, y_test):
>>>
>>>     clf.fit(X_train, y_train)
>>>
>>>     print "Accuracy on training set:"
>>>     print clf.score(X_train, y_train)
>>>     print "Accuracy on testing set:"
>>>     print clf.score(X_test, y_test)
>>>
>>>     y_pred = clf.predict(X_test)
>>>
>>>     print "Classification Report:"
>>>     print metrics.classification_report(y_test, y_pred)
>>>     print "Confusion Matrix:"
>>>     print metrics.confusion_matrix(y_test, y_pred)
If we train and evaluate, the classifier performs the operation with almost no errors.
>>> train_and_evaluate(svc_1, X_train, X_test, y_train, y_test)
Accuracy on training set:
1.0
Accuracy on testing set:
0.99
Let's do a little more, why don't we try to classify the faces as people with and without glasses? Let's do that.
First thing to do is to define the range of the images that show faces wearing glasses. The following list shows the indexes of these images:
>>> # the index ranges of images of people with glasses
>>> glasses = [
   (10, 19), (30, 32), (37, 38), (50, 59), (63, 64),
   (69, 69), (120, 121), (124, 129), (130, 139), (160, 161),
   (164, 169), (180, 182), (185, 185), (189, 189), (190, 192),
   (194, 194), (196, 199), (260, 269), (270, 279), (300, 309),
   (330, 339), (358, 359), (360, 369)
]
You can check these values by using the
print_faces function that was defined before to plot the 400 faces and looking at the indexes in the lower-left corners.
Then we'll define a function that from those segments returns a new target array that marks with 1 for the faces with glasses and 0 for the faces without glasses (our new target classes):
>>> def create_target(segments):
>>>     # create a new y array of target size initialized with
     zeros
>>>     y = np.zeros(faces.target.shape[0])
>>>     # put 1 in the specified segments
>>>     for (start, end) in segments:
>>>         y[start:end + 1] = 1
>>>     return y
>>> target_glasses = create_target(glasses)
So we must perform the training/testing split again.
>>> X_train, X_test, y_train, y_test = train_test_split(
        faces.data, target_glasses, test_size=0.25, random_state=0)
Now let's create a new SVC classifier, and train it with the new target vector using the following command:
>>> svc_2 = SVC(kernel='linear')
If we check the performance with cross-validation by the following code:
>>> evaluate_cross_validation(svc_2, X_train, y_train, 5)
[ 0.98333333  0.98333333  0.93333333  0.96666667  0.96666667]
Mean score: 0.967 (+/-0.009)
We obtain a mean accuracy of 0.967 with cross-validation if we evaluate on our testing set.
>>> train_and_evaluate(svc_2, X_train, X_test, y_train, y_test)
Accuracy on training set:
1.0
Accuracy on testing set:
0.99
Classification Report:
             precision    recall  f1-score   support

          0       1.00      0.99      0.99        67
          1       0.97      1.00      0.99        33

avg / total       0.99      0.99      0.99       100

Confusion Matrix:
[[66  1]
 [ 0 33]]
Could it be possible that our classifier has learned to identify peoples' faces associated with glasses and without glasses precisely? How can we be sure that this is not happening and that if we get new unseen faces, it will work as expected? Let's separate all the images of the same person, sometimes wearing glasses and sometimes not. We will also separate all the images of the same person, the ones with indexes from 30 to 39, train by using the remaining instances, and evaluate on our new 10 instances set. With this experiment we will try to discard the fact that it is remembering faces, not glassed-related features.
>>> X_test = faces.data[30:40]
>>> y_test = target_glasses[30:40]
>>> print y_test.shape[0]
10
>>> select = np.ones(target_glasses.shape[0])
>>> select[30:40] = 0
>>> X_train = faces.data[select == 1]
>>> y_train = target_glasses[select == 1]
>>> print y_train.shape[0]
390
>>> svc_3 = SVC(kernel='linear')
>>> train_and_evaluate(svc_3, X_train, X_test, y_train, y_test)
Accuracy on training set:
1.0
Accuracy on testing set:
0.9
Classification Report:
             precision    recall  f1-score   support

          0       0.83      1.00      0.91         5
          1       1.00      0.80      0.89         5

avg / total       0.92      0.90      0.90        10

Confusion Matrix:
[[5 0]
 [1 4]]
From the 10 images, only one error, still pretty good results, let's check out which one was incorrectly classified. First, we have to reshape the data from arrays to 64 x 64 matrices:
>>> y_pred = svc_3.predict(X_test)
>>> eval_faces = [np.reshape(a, (64, 64)) for a in X_test]
Then plot with our print_faces function:
>>> print_faces(eval_faces, y_pred, 10)

The image number 8 in the preceding figure has glasses and was classified as no glasses. If we look at that instance, we can see that it is different from the rest of the images with glasses (the border of the glasses cannot be seen clearly and the person is shown with closed eyes), which could be the reason it has been misclassified.
With a few lines, we created a face classifier with a linear SVM model. Usually we would not get such good results in the first trial. In these cases, (besides looking at different features) we can start tweaking the hyperparameters of our algorithm. In the particular case of SVM, we can try with different kernel functions; if linear does not give good results, we can try with polynomial or RBF kernels. Also the C and the gamma parameters may affect the results. For a description of the arguments and its values, please refer to the scikit-learn documentation.