In this recipe, we'll look at how well our regression fits the underlying data. We fit a regression in the last recipe, but didn't pay much attention to how well we actually did it. The first question after we fit the model was clearly "How well does the model fit?" In this recipe, we'll examine this question.
Let's use the lr object and boston dataset—reach back into your code from the Fitting a line through data recipe. The lr object will have a lot of useful methods now that the model has been fit.
There are some very simple metrics and plots we'll want to look at as well. Let's take another look at the residual plot from the last chapter:
>>> import matplotlib.pyplot as plt
>>> import numpy as np
>>> f = plt.figure(figsize=(7, 5))
>>> ax = f.add_subplot(111)
>>> ax.hist(boston.target - predictions, bins=50)
>>> ax.set_title("Histogram of Residuals.")
If you're using IPython Notebook, use the %matplotlib inline command to render the plots inline. If you're using a regular interpreter, simply type f.savefig('myfig.png') and the plot will be saved for you.
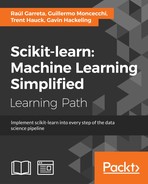
The following is the histogram showing the output:

Like I mentioned previously, the error terms should be normal, with a mean of 0. The residuals are the errors; therefore, this plot should be approximately normal. Visually, it's a good fit, though a bit skewed. We can also look at the mean of the residuals, which should be very close to 0:
>>> np.mean(boston.target - predictions)
4.3250427394093058e-15
Clearly, we are very close.
Another plot worth looking at is a Q-Q plot. We'll use SciPy here because it has a built-in probability plot:
>>> from scipy.stats import probplot
>>> f = plt.figure(figsize=(7, 5))
>>> ax = f.add_subplot(111)
>>> probplot(boston.target - predictions, plot=ax)
The following screenshot shows the probability plot:

Here, the skewed values we saw earlier are a bit clearer.
We can also look at some other metrics of the fit; mean squared error (MSE) and mean absolute deviation (MAD) are two common metrics. Let's define each one in Python and use them. Later in the book, we'll look at how scikit-learn has built-in metrics to evaluate the regression models:
>>> def MSE(target, predictions):
       squared_deviation = np.power(target - predictions, 2)
       return np.mean(squared_deviation)
>>> MSE(boston.target, predictions)
21.897779217687496

>>> def MAD(target, predictions):
       absolute_deviation = np.abs(target - predictions)
       return np.mean(absolute_deviation)

>>> MAD(boston.target, predictions)
3.2729446379969396
The formula for MSE is very simple:
It takes each predicted value's deviance from the actual value, squares it, and then averages all the squared terms. This is actually what we optimized to find the best set of coefficients for linear regression. The Gauss-Markov theorem actually guarantees that the solution to linear regression is the best in the sense that the coefficients have the smallest expected squared error and are unbiased. In the Using ridge regression to overcome linear regression's shortfalls recipe, we'll look at what happens when we're okay with our coefficients being biased.
MAD is the expected error for the absolute errors:
MAD isn't used when fitting the linear regression, but it's worth taking a look at. Why? Think about what each one is doing and which errors are more important in each case. For example, with MSE, the larger errors get penalized more than the other terms because of the square term.
One thing that's been glossed over a bit is the fact that the coefficients themselves are random variables, and therefore, they have a distribution. Let's use bootstrapping to look at the distribution of the coefficient for the crime rate. Bootstrapping is a very common technique to get an understanding of the uncertainty of an estimate:
>>> n_bootstraps = 1000
>>> len_boston = len(boston.target)
>>> subsample_size = np.int(0.5*len_boston)
>>> subsample = lambda: np.random.choice(np.arange(0, len_boston),
                size=subsample_size)

>>> coefs = np.ones(n_bootstraps) #pre-allocate the space for the coefs

>>> for i in range(n_bootstraps):
       subsample_idx = subsample()
       subsample_X = boston.data[subsample_idx]
       subsample_y = boston.target[subsample_idx]

>>> lr.fit(subsample_X, subsample_y)

>>> coefs[i] = lr.coef_[0]
Now, we can look at the distribution of the coefficient:
>>> import matplotlib.pyplot as plt
>>> f = plt.figure(figsize=(7, 5))
>>> ax = f.add_subplot(111)
>>> ax.hist(coefs, bins=50)
>>> ax.set_title("Histogram of the lr.coef_[0].")
The following is the histogram that gets generated:

We might also want to look at the bootstrapped confidence interval:
>>> np.percentile(coefs, [2.5, 97.5])
array([-0.18566145,  0.03142513])
This is interesting; there's actually reason to believe that the crime rate might not have an impact on the home prices. Notice how zero is within CI, which means that it may not play a role.
It's also worth pointing out that bootstrapping can lead to a potentially better estimation for coefficients because the bootstrapped mean with converge to the true mean is faster than the coefficient found using regular estimation when in the limit.