Image processing is an important topic in which clustering has some application. It's worth pointing out that there are several very good image-processing libraries in Python. scikit-image is a "sister" project of scikit-learn. It's worth taking a look at if you want to do anything complicated.
We will have some fun in this recipe. The goal is to use cluster to blur an image.
First, we'll make use of SciPy to read the image. The image is translated in a 3-dimensional array; the x and y coordinates describe the height and width, and the third dimension represents the RGB values for each image:
# in your terminal
$ wget http://blog.trenthauck.com/assets/headshot.jpg
Now, let's read the image in Python:
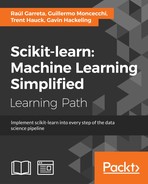
>>> from scipy import ndimage
>>> img = ndimage.imread("headshot.jpg")
>>> plt.imshow(img)
The following image is seen:

Hey, that's (a younger) me!
Now that we have the image, let's check its dimensions:
>>> img.shape
(420, 420, 3)
To actually quantize the image, we need to convert it into a two-dimensional array, with the length being 420 x 420 and the width being the RGB values. A better way to think about this is to have a bunch of data points in three-dimensional space and cluster the points to reduce the number of distant colors in the image—a simple way to put quantization.
First, let's reshape our array; it is a NumPy array, and thus trivial to work with:
>>> x, y, z = img.shape
>>> long_img = img.reshape(x*y, z)
>>> long_img.shape
(176400, 3)
Now we can start the clustering process. First, let's import the cluster module and create a KMeans object. We'll pass n_clusters=5 so that we have five clusters, or really, five distinct colors.
This will be a good recipe to practice using silhouette distance that we reviewed in the Optimizing the number of centroids recipe:
>>> from sklearn import cluster
>>> k_means = cluster.KMeans(n_clusters=5)
>>> k_means.fit(long_img)
Now that we have our fit KMeans objects, let's take a look at our colors:
>>> centers = k_means.cluster_centers_
>>> centers
array([[ 142.58775848, 206.12712986,  226.04416873],
       [  86.29356543,  68.86312505,   54.04770507],
       [ 194.36182899,  172.19845258,  149.65603813],
       [  24.67768412,   20.45778933,   16.19698314],
       [ 149.27801776,  132.19850659,  115.32729167]])
Now that we have the centers, the next thing we need is the labels. This will tell us which points should be associated with which clusters:
>>> labels = k_means.labels_
>>> labels[:5]
array([1, 1, 1, 1, 1], dtype=int32)
At this point, we require the simplest of NumPy array manipulation followed by a bit of reshaping, and we'll have the new image:
>>> plt.imshow(centers[labels].reshape(x, y, z))
The following is the resultant image:
