
Chapter 11: Operationalize ML Projects with SageMaker Projects, Pipelines, and Model Registry
Data scientists used to spend too much time and effort maintaining and manually managing ML pipelines, a process that starts with data, processing, training, and evaluation and ends with model hosting with ongoing maintenance. SageMaker Studio provides features that aim to streamline these operations with continuous integration and continuous delivery (CI/CD) best practices. You will learn how to implement SageMaker projects, Pipelines, and the model registry to help operationalize the ML lifecycle with CI/CD.
In this chapter, we will be learning about the following:
- Understanding ML operations and CI/CD
- Creating a SageMaker project
- Orchestrating an ML pipeline with SageMaker Pipelines
- Running CI/CD in SageMaker Studio
Technical requirements
For this chapter, you will need to ensure that the SageMaker project template permission is enabled in the Studio setting. If you have finished Chapter 8, Jumpstarting ML with SageMaker JumpStart and Autopilot, you should have the permissions. You can verify it in the Studio domain view with the following steps:
- If either of the permissions is disabled as shown in Figure 11.1, you can click Edit Settings to change this.

Figure 11.1 – Checking and editing the SageMaker projects permissions
- Go to Step 2 Studio Settings to switch on the SageMaker projects and JumpStart permissions as shown in Figure 11.2.
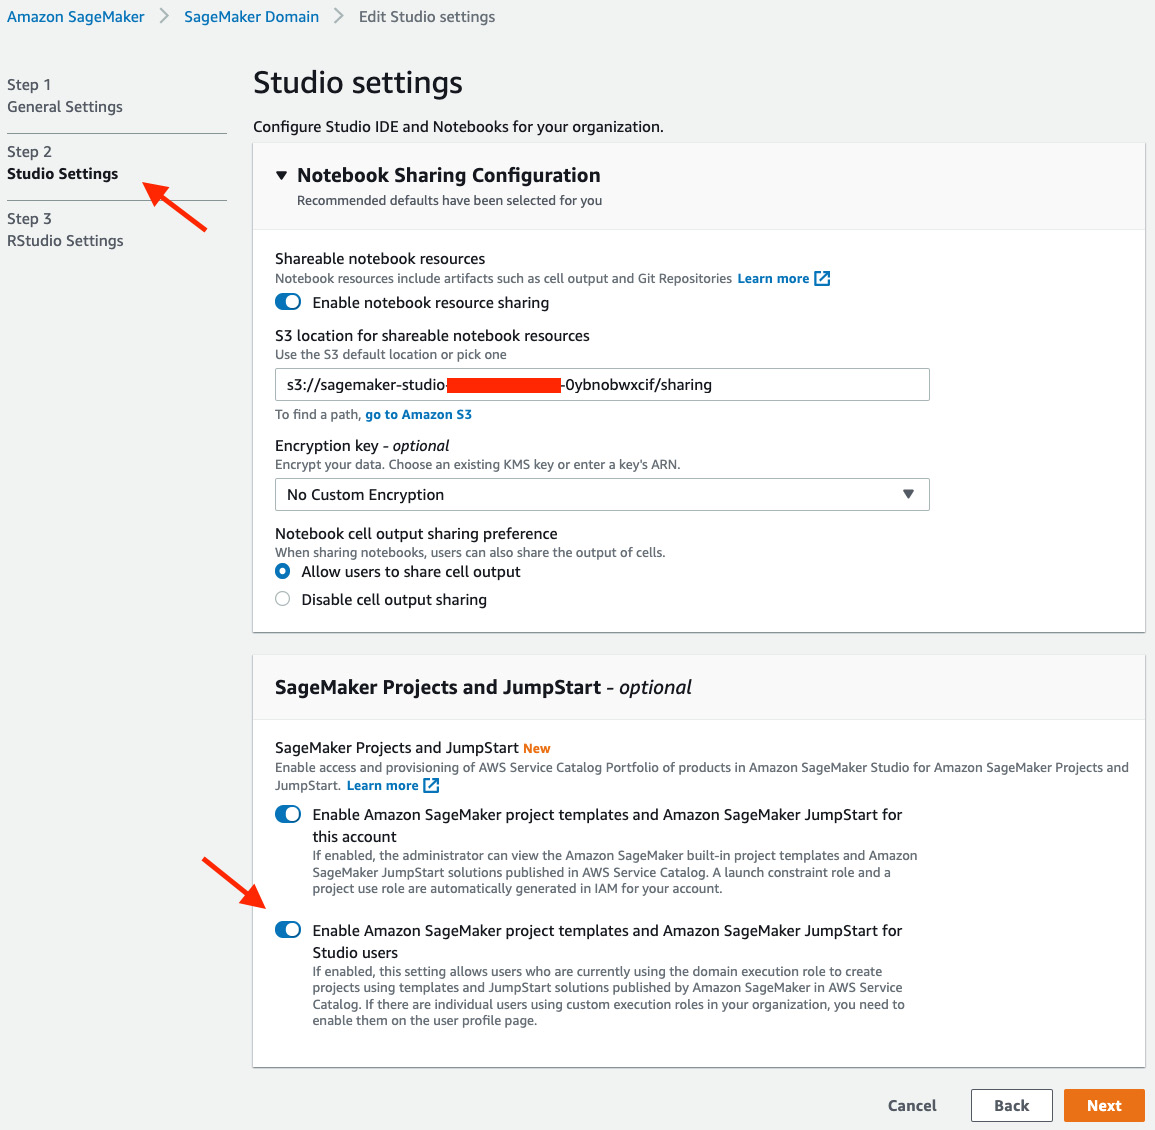
Figure 11.2 – Enabling SageMaker project templates for the account and users
- Then click Next to go to the next page and click Submit.
This ensures SageMaker project template permissions are enabled for you.
Understanding ML operations and CI/CD
In the ML lifecycle, there are many steps that require a skilled data scientist's hands-on interaction throughout, such as wrangling the dataset, training, and evaluating a model. These manual steps could affect an ML team's operations and speed to deploy models in production. Imagine your model training job takes a long time and finishes in the middle of the night. You either have to wait for your first data scientist to come in during the day to evaluate the model and deploy the model into production or have to employ an on-call rotation to have someone on standby at all times to monitor the model training and deployment. But neither option is ideal if you want an effective and efficient ML lifecycle.
Machine Learning Operations (MLOps) is critical to a team that wants to stay lean and scale well. MLOps helps you streamline and reduce manual human intervention as much as possible. It helps transform your ML lifecycle to enterprise-grade. It helps you scale and maintain the quality of your models that are put into production and it also helps you improve time to model delivery with automation.
So, what exactly is MLOps?
MLOps refers to a methodology to apply DevOps best practices to the ML lifecycle. DevOps stands for software Development (Dev) and IT Operations (Ops). DevOps aims to increase a team's ability to deliver applications at a high pace with high quality using a set of engineering, practices, and patterns. It also promotes a new cultural and behavioral paradigm in an organization. MLOps recommends the following practices, which are built upon DevOps best practices with some modifications tailored to the nature of ML:
- Continuous Integration (CI): In DevOps, developers constantly commit and merge their code changes into a central repository, after which tests are automatically run to validate the code. In ML, not only does the code need to be integrated and validated, but so does the training data and ML models. The training data needs to be versioned, model lineage needs to be tracked for traceability, and tests on data and models, besides the code, need to be implemented as well.
- Continuous Delivery (CD): In DevOps, this is a practice where code is built, tested, and released for production in an automatic fashion. In MLOps, similar to what was discussed about continuous integration, the operations include data and models besides the ML source code.
- Everything as code: In order to streamline and automate for CI and CD (CI/CD for short), everything needs to be implemented as code: the process, infrastructure, and configuration, instead of any manual setup and point-and-click process on screen. This practice also enables version control and reproducibility for your processes, infrastructures, and configurations.
- Monitoring and logging: This practice encourages you to log all things related to your software/ML system for visibility and auditability. You not only log the ML metrics, data lineage, data versions, and model versions, but also log the CI/CD processes, and any errors for debugging and monitoring purposes. This enables the next practice.
- Communication and collaboration: Because everything is code, and everything is automated and logged, you have a transparent environment that invites collaboration and communication. Instead of working in silos with a manual hand-off, which causes friction and opacity, your entire team can work more closely together on the system.
The key benefits that MLOps brings to the table are the following:
- Faster time to market: Because now your model deployment is automatically created and deployed as part of the CI/CD process, your model training and deployment are streamlined without any handoff or manual processes. You can expect more iterations of refinement within the same timeframe and a quicker turnaround time for a mature product.
- Productivity: A lot of manual processes are taken away from data scientists and ML developers so that they can focus on ML modeling where things cannot be automated.
- Repeatability: Also, because everything is code and is automated, your ML lifecycle can be performed by anyone at any time with exactly the same output.
- Reliability: With the tests and validations performed in the CI/CD process, you know that your models are high quality. You can also consistently produce high-quality models thanks to the repeatability CI/CD provides.
- Auditability: As code, data, and models are versioned and lineage and processes are logged, you can tell exactly how the models were trained and deployed.
- Better quality: Combining all the benefits above, MLOps enables us to spend more time creating better models and letting the system take care of the integration and delivery quickly, reliably, and repeatably.
You may think: MLOps seems too perfect to be easily adopted. Yes, you do need to incorporate additional technology into your ML lifecycle to enable the CI/CD process. And yes, you need to implement many details to enable the logging and monitoring. It is also true that to adopt the everything as code practice, many iterations of testing on the infrastructure code and configuration are required at the beginning. The good news is, in SageMaker Studio, adopting MLOps practices for your ML project is made easy. SageMaker Studio has templatized the CI/CD processes for numerous use cases so that you can easily pick one and adopt the MLOps best practices and technologies from the templated ML use case for your use case. The features that enable MLOps and CI/CD are SageMaker projects, SageMaker Pipelines, and SageMaker Model Registry.
Let's get started by creating a SageMaker project first.
Creating a SageMaker project
A SageMaker project enables you to automate the model building and deployment pipelines with MLOps and CI/CD from SageMaker-provided templates and your own custom templates. With a SageMaker-provided template, all the initial setup and resource provisioning is handled by SageMaker so you can quickly adopt it for your use case.
In this chapter, we will run an ML example with MLOps and CI/CD in SageMaker Studio. As we focus on MLOps and CI/CD in this chapter, we use a simple regression problem from the abalone dataset (https://archive.ics.uci.edu/ml/datasets/abalone) to predict the age of abalone from physical measurements. I will show you how you can create a project from SageMaker projects, and how each part of the MLOps system works. The MLOps system created from SageMaker projects enables automation of data validation, model building, model evaluation, deployment, and monitoring with a simple trigger from a code commit. This means that whenever we make any changes to the code base, the whole system will run through the complete ML lifecycle in SageMaker that we've learned about throughout this book automatically. You will see how much SageMaker has simplified MLOps for you. Let's open up SageMaker Studio and follow the steps given here:
- On the Launcher page, click the plus sign on the New project card, as shown in Figure 11.3.
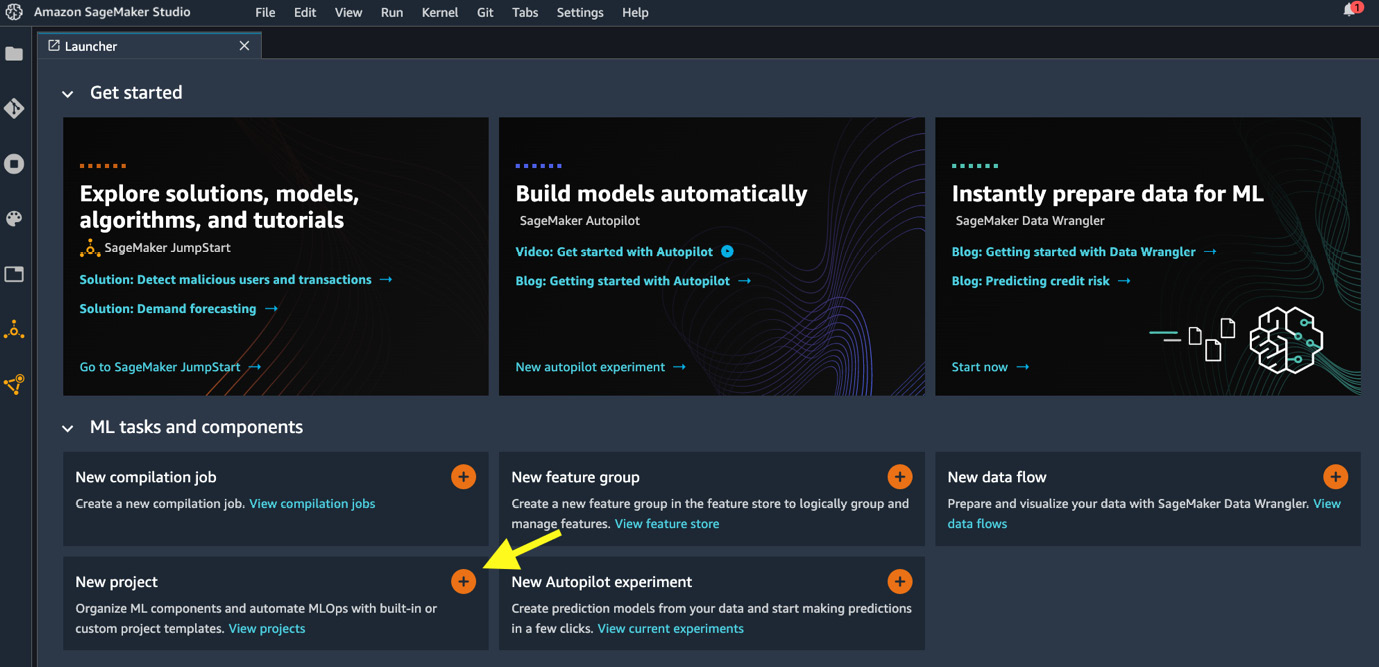
Figure 11.3 – Opening a new project in Launcher
- There are MLOps templates for various use cases created by SageMaker (under SageMaker templates) for us to choose from, as shown in Figure 11.4. Let's select MLOps template for model building, training, deployment and monitoring. This template automates the entire model lifecycle, which includes model building, deployment, and monitoring workflows. Click Select project template.
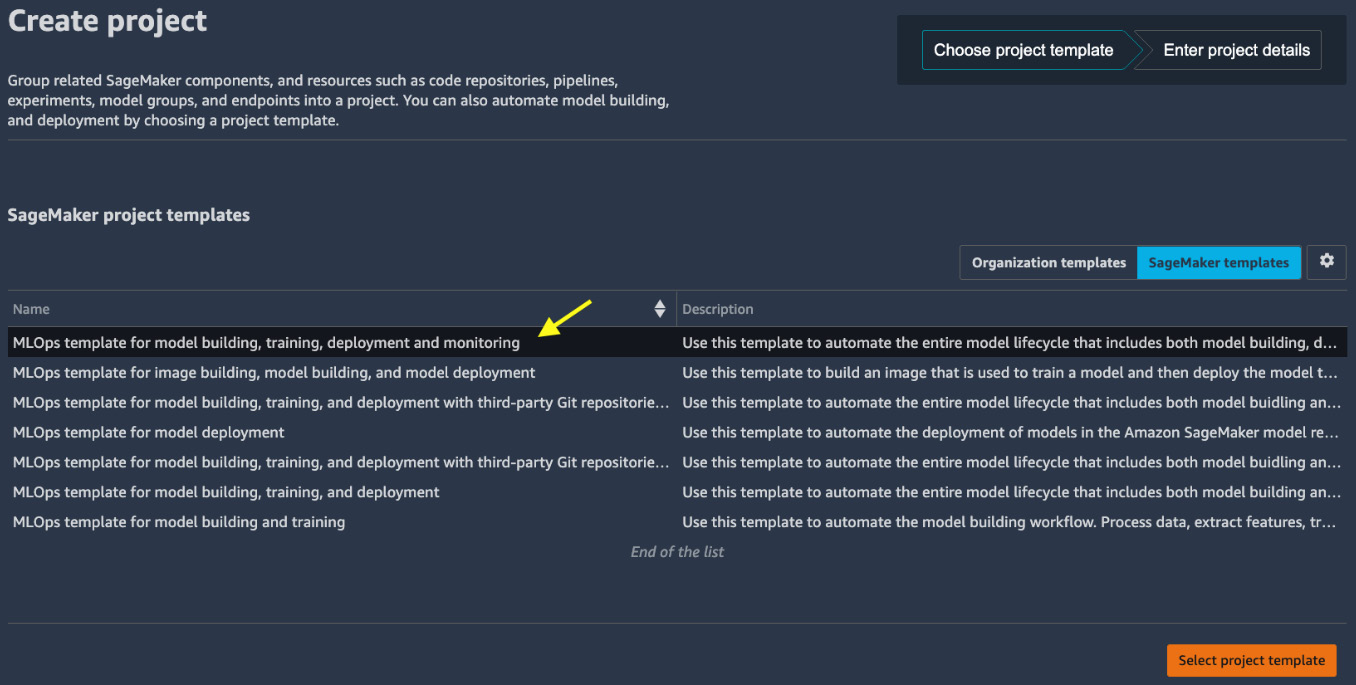
Figure 11.4 – Choosing SageMaker managed templates
Note
Templates whose names contain with third-party Git repositories are designed to work with your external Git repositories or CI/CD software such as Jenkins. You will need to provide additional information in the next step.
- Provide a name, description, and tags for the project on the Project details page. Click Create project.
With this project template, SageMaker Studio is now provisioning cloud resources for MLOps and deploying the sample code. Let's illustrate the MLOps architecture with the diagram shown in Figure 11.5:

Figure 11.5 – Architecture diagram of an MLOps setup with a SageMaker projects template
The cloud resources created include the following:
- Three code repositories in AWS CodeCommit, a managed source control service that hosts private Git repositories. They can also be found in the AWS CodeCommit console: https://console.aws.amazon.com/codesuite/codecommit/repositories. Remember to switch to your own AWS Region from the URL.
- Three continuous delivery pipelines in AWS CodePipeline, a managed service that helps automate build, test, and release pipelines, can be found in the AWS CodePipeline console: https://console.aws.amazon.com/codesuite/codepipeline/pipelines. Remember to switch to your own AWS Region from the URL.
- Five event trigger rules in Amazon EventBridge, a managed service that makes it easier to build event-driven applications, can be found in the Amazon EventBridge console: https://console.aws.amazon.com/events/home#/rules. Remember to switch to your own AWS Region from the URL.
These are essentially the backbone CI/CD framework that supports MLOps in SageMaker Studio. Repositories in CodeCommit are where we store, develop, and commit our code. Every commit to a code repository in CodeCommit is going to trigger, managed by rules in EventBridge, a run of the corresponding pipeline in CodePipeline to build, test, and deploy resources.
Once the project creation is complete, you can see a portal for the project in the main working area as shown in Figure 11.6.

Figure 11.6 – SageMaker project detail portal
This portal contains all the important resources and information that are associated to the project—code repositories in CodeCommit, ML pipelines from SageMaker Pipelines (which we will talk about soon), experiments tracked using SageMaker Experiments, models, hosted endpoints, and other settings.
- We can clone the repositories from CodeCommit to a local SageMaker Studio directory. As the final step before we move on to describe the ML pipeline, let's clone the <project-name-prefix>-modelbuild repository, which contains the ML pipeline that builds, trains, and evaluates the ML model using the abalone dataset. Click the clone repo… hyperlink next to the <project-name-prefix>-modelbuild repository as highlighted with an arrow in Figure 11.6.
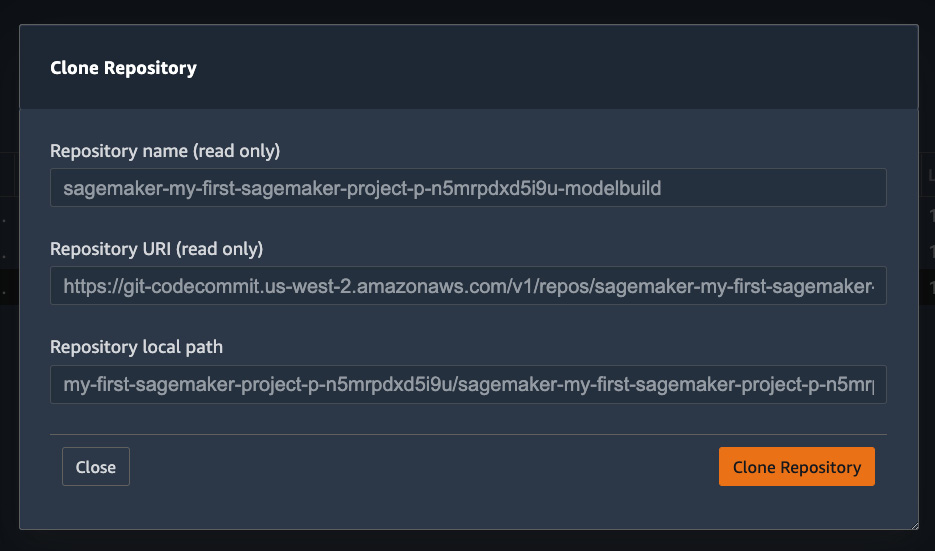
Figure 11.7 – Cloning a repository from CodeCommit to a local SageMaker Studio directory
- In the popup shown in Figure 11.7, click Clone Repository. The repository will appear in the home directory ~/<project-name-prefix>/<project-name-prefix>-modelbuild/.
Let's look at the ML pipeline defined in this abalone example first, before we dive into the CI/CD part.
Orchestrating an ML pipeline with SageMaker Pipelines
The template we're using contains an ML lifecycle pipeline that carries out data preprocessing, data quality checks, model training, model evaluation steps, and eventually model registration. This pipeline is a central piece of the MLOps process where the model is being created. The pipeline is defined in <project-name-prefix>-modelbuild using SageMaker Pipelines. SageMaker Pipelines is an orchestration tool for ML workflow in SageMaker. SageMaker Pipelines integrates with SageMaker Processing, training, Experiments, hosting, and the model registry. It provides reproducibility, repeatability, and tracks data/model lineage for auditability. Most importantly, you can visualize the workflow graph and runtime live in SageMaker Studio. The pipeline can be found under the Pipelines tab in the details portal as shown in Figure 11.8.
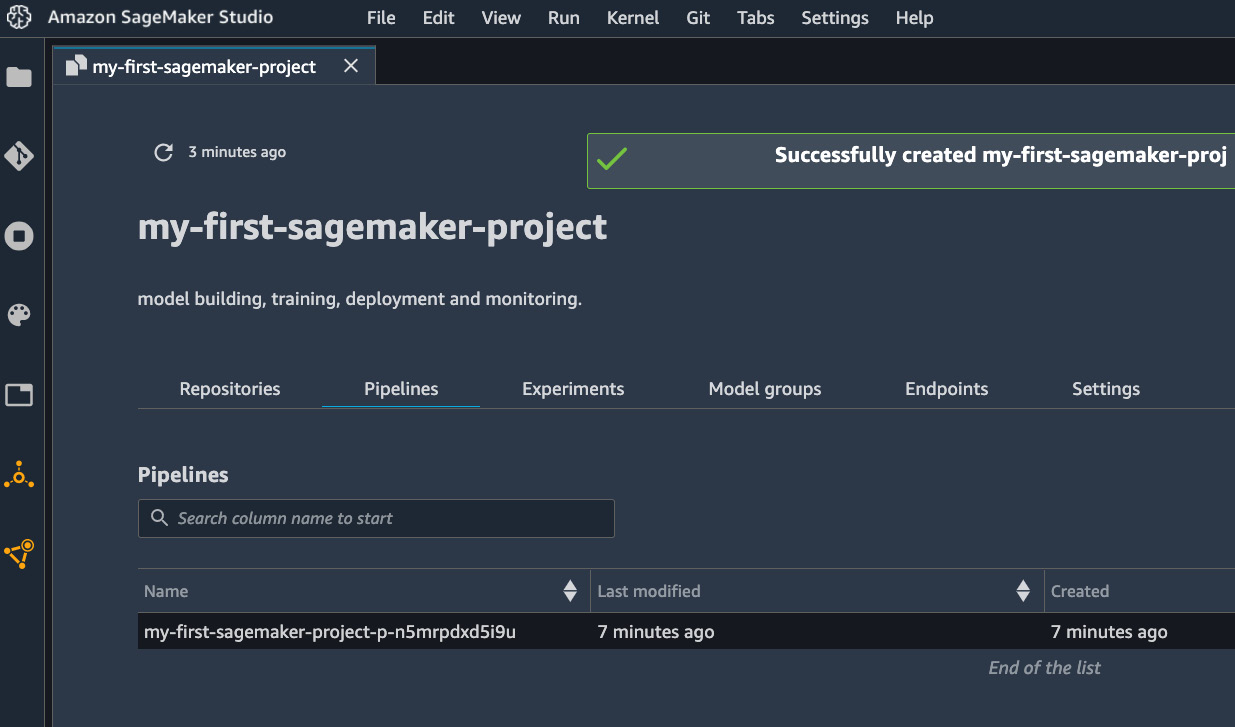
Figure 11.8 – A list of pipelines in the project
Note
I have used the term pipeline a lot in this chapter. Let's settle this once and for all. I am referring to the pipeline from SageMaker Pipelines, shown in Figure 11.8 and Figure 11.9, as the ML pipeline. Please, do not confuse an ML pipeline with a CI/CD pipeline from AWS CodePipeline, which is briefly mentioned in the last section and will be further discussed in the Running CI/CD in SageMaker Studio section.
On double-clicking the pipeline, we can see the full execution graph and the live status of the pipeline, as shown in Figure 11.9. The corresponding pipeline code is in ~/<project-name-prefix>/<project-name-prefix>-modelbuild/pipelines/abalone/pipeline.py.
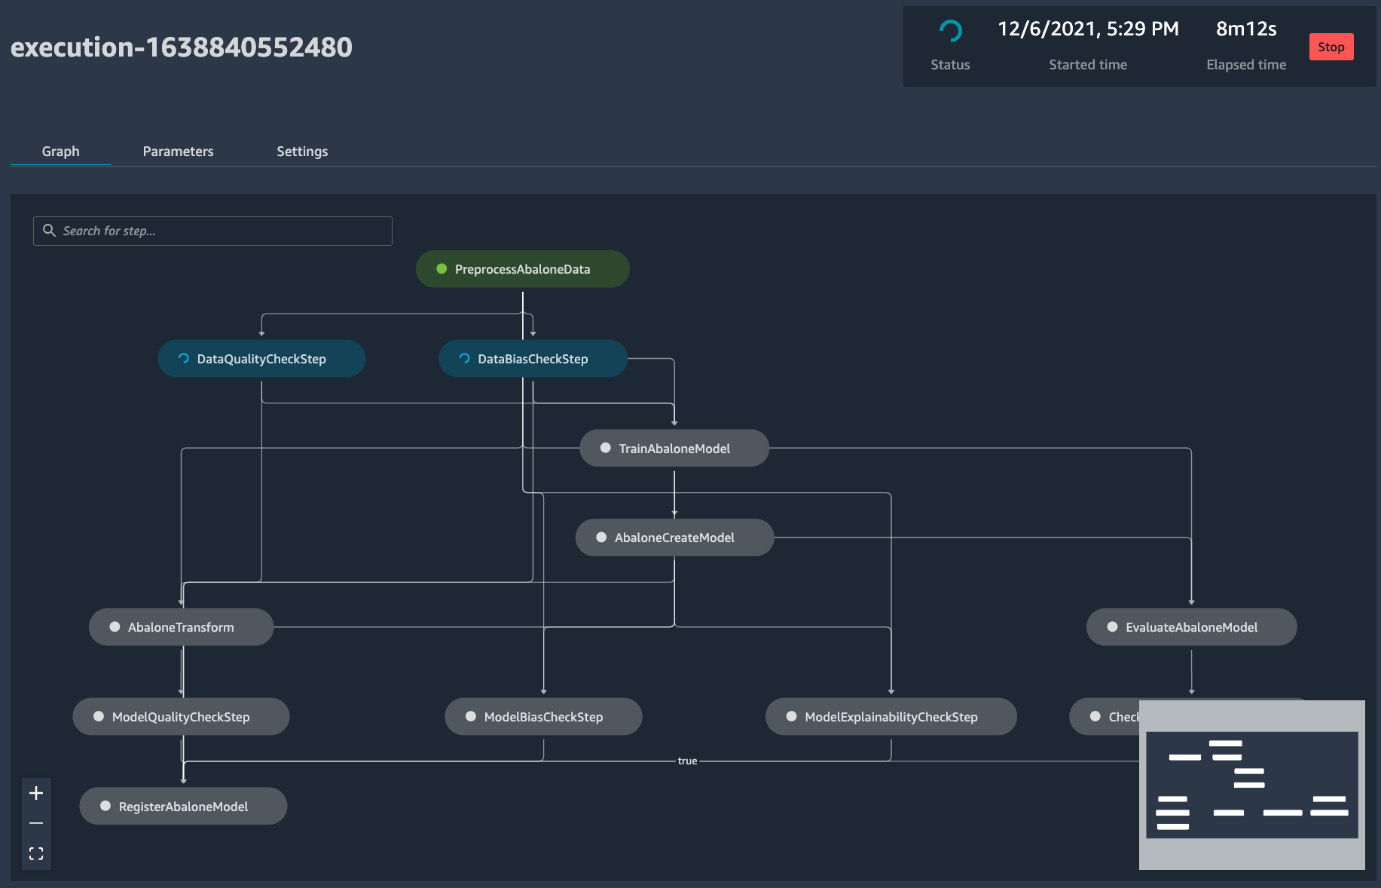
Figure 11.9 – Pipeline workflow and live status
Let's walk through the pipeline and how it is set up in the code. The pipeline contains the following steps (from top to bottom in the graph):
- First is preprocessing the dataset with SageMaker Processing (PreprocessAbaloneData in Figure 11.9). In the pipeline code pipeline.py file, where we use classes and functions in the sagemaker.workflow module along with other sagemaker classes, a scikit-learn processor is defined to run a script preprocess.py in the same directory. Also, ProcessingStep is a class from the sagemaker.workflow.steps module:
# Line 209 in pipeline.py
step_process = ProcessingStep(
name="PreprocessAbaloneData",
processor=sklearn_processor,
outputs=[
ProcessingOutput(output_name="train", source="/opt/ml/processing/train"),
ProcessingOutput(output_name="validation", source="/opt/ml/processing/validation"),
ProcessingOutput(output_name="test", source="/opt/ml/processing/test"),
],
code=os.path.join(BASE_DIR, "preprocess.py"),
job_arguments=["--input-data", input_data],
)
- After the data is preprocessed, the pipeline checks against previously registered data quality and bias metrics and/or calculates the data quality and bias using SageMaker Clarify. Here, the output of the previous step step_process.properties.ProcessingOutputConfig.Outputs["train"] is used as the input baseline data. A QualityCheckStep() step object is instantiated here. This step computes the data quality statistics from the baseline training data and registers the statistics into the model registry once the model is created toward the end:
# Line 238
data_quality_check_config = DataQualityCheckConfig(
baseline_dataset=step_process.properties.ProcessingOutputConfig.Outputs["train"].S3Output.S3Uri,
dataset_format=DatasetFormat.csv(header=False, output_columns_position="START"),
output_s3_uri=Join(on='/', values=['s3:/', default_bucket, base_job_prefix, ExecutionVariables.PIPELINE_EXECUTION_ID, 'dataqualitycheckstep'])
)
data_quality_check_step = QualityCheckStep(
name="DataQualityCheckStep",
skip_check=skip_check_data_quality,
register_new_baseline=register_new_baseline_data_quality,
quality_check_config=data_quality_check_config,
check_job_config=check_job_config,
supplied_baseline_statistics=supplied_baseline_statistics_data_quality,
supplied_baseline_constraints=supplied_baseline_constraints_data_quality,
model_package_group_name=model_package_group_name
)
- At the same time, the pipeline also computes the data bias using a step instantiated from the ClarifyCheckStep() class:
data_bias_check_config = DataBiasCheckConfig(
data_config=data_bias_data_config,
data_bias_config=data_bias_config,
)
data_bias_check_step = ClarifyCheckStep(
name="DataBiasCheckStep",
clarify_check_config=data_bias_check_config,
check_job_config=check_job_config,
skip_check=skip_check_data_bias,
register_new_baseline=register_new_baseline_data_bias,
model_package_group_name=model_package_group_name
)
These two checking steps are conditional based on the skip_check arguments. skip_check_data_quality and skip_check_data_bias are pipeline input parameters and can be configured for each run. For the first run, you may skip the checks because there are no baseline statistics to check against. register_new_baseline is also conditional from pipeline input parameters, but most of the time you would register new baseline statistics when you have a new dataset unless you have a specific reason not to update the statistics.
- After the data quality and bias checks, a training job is created from a SageMaker estimator. In this example, the built-in XGBoost algorithm is used. TrainingStep is dependent on DataQualityCheckStep and DataBiasCheckStep, meaning that the training step waits for the two check steps to complete before starting, and takes the output from the preprocessing step, step_process:
# Line 326
step_train = TrainingStep(
name="TrainAbaloneModel",
depends_on=["DataQualityCheckStep", "DataBiasCheckStep"],
estimator=xgb_train,
inputs={
"train": TrainingInput(
s3_data=step_process.properties.ProcessingOutputConfig.Outputs["train"].S3Output.S3Uri,
content_type="text/csv",
),
"validation": TrainingInput(
s3_data=step_process.properties.ProcessingOutputConfig.Outputs["validation"].S3Output.S3Uri,
content_type="text/csv",
),
},
)
- Next is to create a SageMaker Model from the training job using CreateModelStep(). CreateModelInput() takes instance types used for hosting purposes:
# Line 346
model = Model(
image_uri=image_uri,
model_data=step_train.properties.ModelArtifacts.S3ModelArtifacts,
sagemaker_session=sagemaker_session,
role=role,
)
inputs = CreateModelInput(
instance_type="ml.m5.large",
accelerator_type="ml.eia1.medium",
)
step_create_model = CreateModelStep(
name="AbaloneCreateModel",
model=model,
inputs=inputs,
)
- Once the SageMaker Model is created, two branches of model evaluation are performed. One is applied on a held-out test set for evaluation purposes using SageMaker Batch Transform Transformer:
# Line 364
transformer = Transformer(
model_name=step_create_model.properties.ModelName,
instance_type="ml.m5.xlarge",
instance_count=1,
accept="text/csv",
assemble_with="Line",
output_path=f"s3://{default_bucket}/AbaloneTransform",
)
step_transform = TransformStep(
name="AbaloneTransform",
transformer=transformer,
inputs=TransformInput( data=step_process.properties.ProcessingOutputConfig.Outputs["test"].S3Output.S3Uri,
...)
)
Note
The additional arguments in the TransformInput() class that have been omitted here in text but are available in pipeline.py are to configure Batch Transform input/output and to associate the output results with the input records. For more information, see https://docs.aws.amazon.com/sagemaker/latest/dg/batch-transform-data-processing.html.
The output of the Batch Transform, which is the prediction, is then used to calculate model quality metrics such as mean absolute error, root mean squared error, and the r-squared value:
model_quality_check_config = ModelQualityCheckConfig(
baseline_dataset=step_transform.properties.TransformOutput.S3OutputPath,
dataset_format=DatasetFormat.csv(header=False),
output_s3_uri=Join(on='/', values=['s3:/', default_bucket, base_job_prefix, ExecutionVariables.PIPELINE_EXECUTION_ID, 'modelqualitycheckstep']),
problem_type='Regression',
inference_attribute='_c0',
ground_truth_attribute='_c1'
)
model_quality_check_step = QualityCheckStep(
name="ModelQualityCheckStep",
skip_check=skip_check_model_quality,
register_new_baseline=register_new_baseline_model_quality,
quality_check_config=model_quality_check_config,
check_job_config=check_job_config,
supplied_baseline_statistics=supplied_baseline_statistics_model_quality,
supplied_baseline_constraints=supplied_baseline_constraints_model_quality,
model_package_group_name=model_package_group_name
)
- The other evaluation route EvaluateAbaloneModel and CheckMSEAbaloneEvalution aims to evaluate the test dataset and use the performance metric as a condition in the ML pipeline to only proceed to register the model in the model registry if the mean squared error is less than or equal to 6.0:
# Line 650
cond_lte = ConditionLessThanOrEqualTo(
left=JsonGet(
step=step_eval,
property_file=evaluation_report,
json_path="regression_metrics.mse.value"
),
right=6.0,
)
step_cond = ConditionStep(
name="CheckMSEAbaloneEvaluation",
conditions=[cond_lte],
if_steps=[step_register],
else_steps=[],
)
- Two other checks are applied on models too in ModelBiasCheckStep and ModelExplainabilityCheckStep. They both use SageMaker Clarify to compute model bias and model explainability:
# Line 450
model_bias_check_step = ClarifyCheckStep(
name="ModelBiasCheckStep",
clarify_check_config=model_bias_check_config,
check_job_config=check_job_config,
skip_check=skip_check_model_bias,
register_new_baseline=register_new_baseline_model_bias,
supplied_baseline_constraints=supplied_baseline_constraints_model_bias,
model_package_group_name=model_package_group_name
)
# Line 494
model_explainability_check_step = ClarifyCheckStep(
name="ModelExplainabilityCheckStep",
clarify_check_config=model_explainability_check_config,
check_job_config=check_job_config,
skip_check=skip_check_model_explainability,
register_new_baseline=register_new_baseline_model_explainability,
supplied_baseline_constraints=supplied_baseline_constraints_model_explainability,
model_package_group_name=model_package_group_name
)
- After the checks to confirm the model's performance, the model is registered in SageMaker Model Registry along with evaluation metrics, stored in the model_metrics variable, captured during the process, including performance metrics on test data, data bias, and model bias:
# Line 635
step_register = RegisterModel(
name="RegisterAbaloneModel",
estimator=xgb_train,
model_data=step_train.properties.ModelArtifacts.S3ModelArtifacts,
content_types=["text/csv"],
response_types=["text/csv"],
inference_instances=["ml.t2.medium", "ml.m5.large"],
transform_instances=["ml.m5.large"],
model_package_group_name=model_package_group_name,
approval_status=model_approval_status,
model_metrics=model_metrics,
drift_check_baselines=drift_check_baselines
)
- With the steps defined, they are put into the steps argument in a Pipeline object. Parameters that are exposed to users are placed in the parameters argument:
# Line 666
pipeline = Pipeline(
name=pipeline_name,
parameters=[
processing_instance_type,
processing_instance_count,
...],
steps=[step_process, data_quality_check_step, data_bias_check_step, step_train, step_create_model, step_transform, model_quality_check_step, model_bias_check_step, model_explainability_check_step, step_eval, step_cond],
sagemaker_session=sagemaker_session,
)
You may wonder how SageMaker determines the order of the steps. SageMaker determines the order based on the data dependency and any explicit, custom dependency. We put the steps in a list of the steps argument and SageMaker takes care of the rest.
Note
After the project is created, the three CodePipeline pipelines are run automatically. Only the first pipeline, <project-name-prefix>-modelbuild, will proceed correctly. The other two pipelines, <project-name-prefix>-modeldeploy and <project-name-prefix>-modelmonitor, depend on the output of the first pipeline so they will fail in the first run. Don't worry about the failure status now.
- At the end, a successfully executed pipeline creates and registers a model in SageMaker Model Registry. You can see the model in the model registry in the left sidebar, as shown in Figure 11.10. We will learn more about the model registry in later sections.

Figure 11.10 – Resulting model in SageMaker Model Registry
There are several ways to run a pipeline. One is with the CI/CD process, which is how the pipeline initially runs after deployment from the template. We will talk more about the CI/CD process in the next section, Running CI/CD in SageMaker Studio. The following shows how to trigger the pipeline manually:

Figure 11.11 – Starting an execution of a pipeline in the pipeline list
- You can specify user inputs such as instance types, training data location, and other conditions for the checks, as shown in Figure 11.12. Click Start to start the workflow individually for a new dataset.
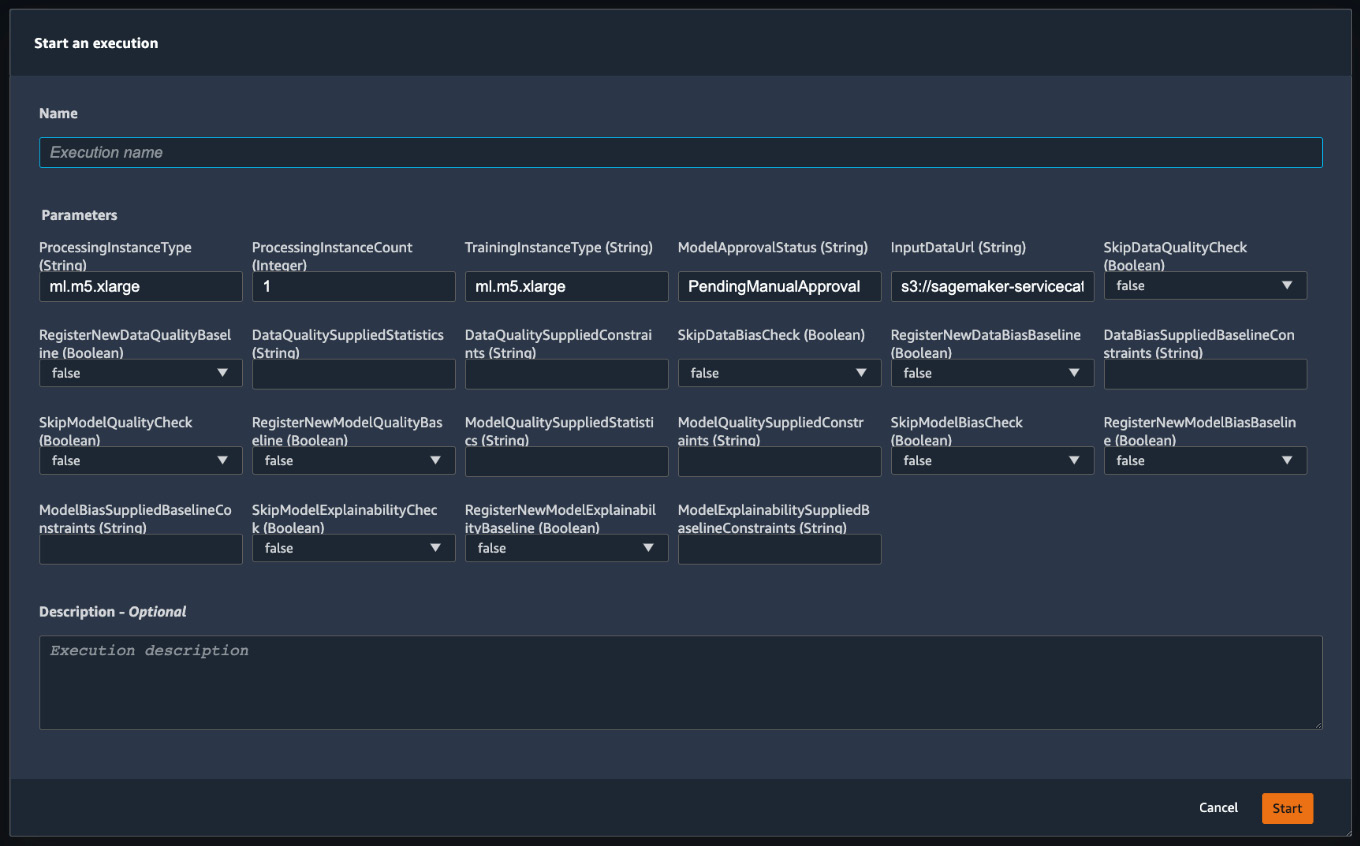
Figure 11.12 – Starting the execution of a pipeline with user inputs
- You can also run a pipeline using the SageMaker Python SDK. The templatized code repository ~/<project-name-prefix>/<project-name-prefix>-modelbuild/ has an example notebook, sagemaker-pipelines-project.ipynb, explaining the code structure in greater detail and showing how to run a pipeline programmatically. You can open the notebook, as shown in Figure 11.13, and run it as an alternative.

Figure 11.13 – A screenshot of the sagemaker-pipelines-project.ipynb notebook that shows you details such as code structure in the repository, and runs the pipeline programmatically
With SageMaker Pipelines, we can orchestrate steps that use SageMaker managed features to run an ML lifecycle. In the next section, let's see how the CI/CD system that the template creates uses SageMaker Pipelines for MLOps.
Running CI/CD in SageMaker Studio
The ML pipeline we've seen running previously is just one part of our CI/CD system at work. The ML pipeline is triggered by a CI/CD pipeline in AWS CodePipeline. Let's dive into the three CI/CD pipelines that the SageMaker project template sets up for us.
There are three CodePipeline pipelines:
- <project-name-prefix>-modelbuild: The purpose of this pipeline is to run the ML pipeline and create an ML model in SageMaker Model Registry. This CI/CD pipeline runs the ML pipeline as a build step when triggered by a commit to the repository. The ML model in the SageMaker model registry needs to be approved in order to trigger the next pipeline, modeldeploy.
- <project-name-prefix>-modeldeploy: The purpose of this pipeline is to deploy the latest approved ML model in the SageMaker model registry as a SageMaker endpoint. The build process deploys a staging endpoint first and requests manual approval before proceeding to deploy the model into production. This ensures the model and endpoint configuration are working correctly before deploying to production. Once the staging endpoint is deployed and becomes live with an InService status, it triggers the next pipeline, modelmonitor.
- <project-name-prefix>-modelmonitor: The purpose of this pipeline is to deploy SageMaker Model Monitor to the two SageMaker endpoints created in the modeldeploy pipeline. This pipeline is triggered whenever a staging endpoint goes live and asks for manual approval on the model monitoring deployment for the staging endpoint before it deploys Model Monitor to the prod endpoint.
Coming back to our previous ML pipeline execution, which is part of the modelbuild build process, we have a model created and registered in the model registry. This is the first checkpoint of the CI/CD system: to manually verify the model performance metrics. In order to proceed, we need to go to the model registry as shown in Figure 11.10 to review the results.
- From the view in Figure 11.10, double-click the model version entry in the model registry to see more detail about this model version, as shown in Figure 11.14.
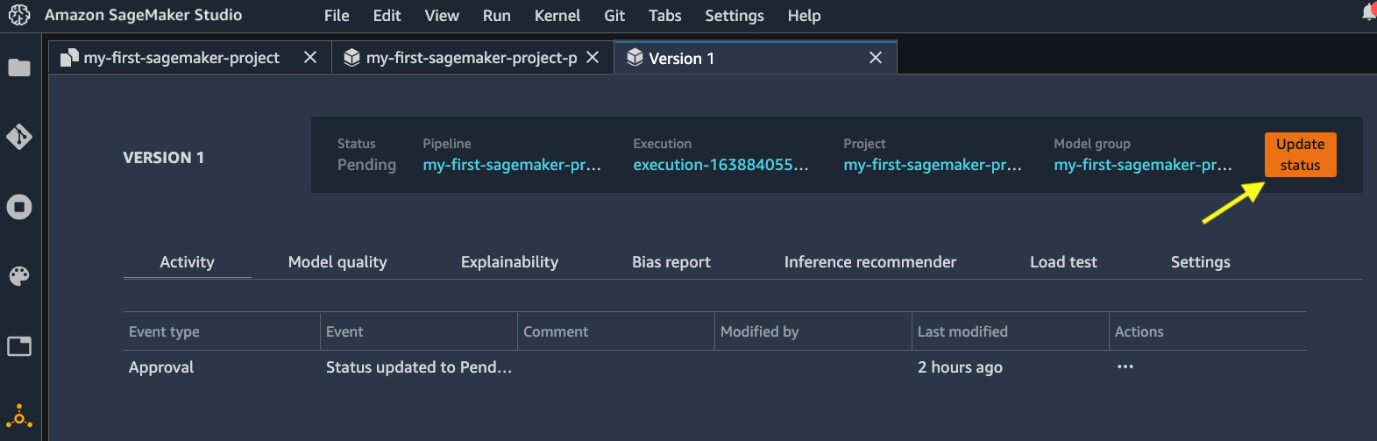
Figure 11.14 – Detail page of a model version
- We can view the model's performance in the Model quality tab, model explainability in the Explainability tab, and data bias in the Bias report tab. These are all relevant pieces of information to help us decide whether this is an acceptable model or not.
- Click the Update status button at the top right to approve or reject this model after review. For the sake of demonstration, we approve the model to proceed with the MLOps system, as shown in Figure 11.15. If we reject the model, nothing happens from this point.

Figure 11.15 – Approve or reject a model version. You can put a comment in the box too
- Model approval automatically triggers the execution of the modeldeploy pipeline. If you go to the CodePipeline console, you can see it in the In progress state, as shown in Figure 11.16.
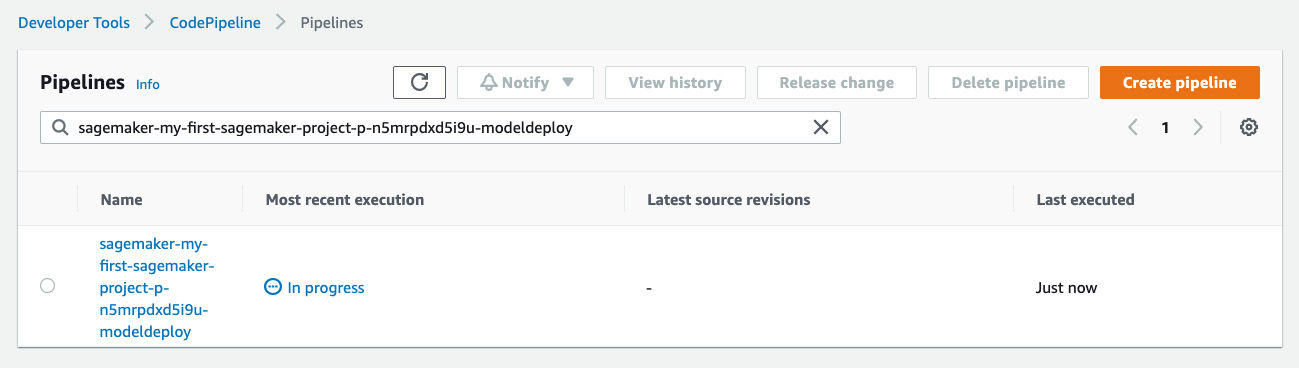
Figure 11.16 – Model approval automatically triggers the modeldeploy pipeline
- As mentioned before, the modeldeploy pipeline first deploys a staging SageMaker endpoint for review. Once the endpoint is created (in 5-7 minutes), you can see a new event on the model version page, as shown in Figure 11.17. Click on Endpoint: <project-name-prefix>-staging to find out more information about the endpoint. You can test out the endpoint.

Figure 11.17 – Model version showing the latest event in the deployment of the staging endpoint
- After confirming the endpoint's status, we can approve the staging endpoint deployment in the CodePipeline console. Click the pipeline name from Figure 11.16. We can see the current progress of the pipeline is pending in the DeployStaging stage, as shown in Figure 11.18. Click the Review button in the ApproveDeployment step to approve/reject the deployment.
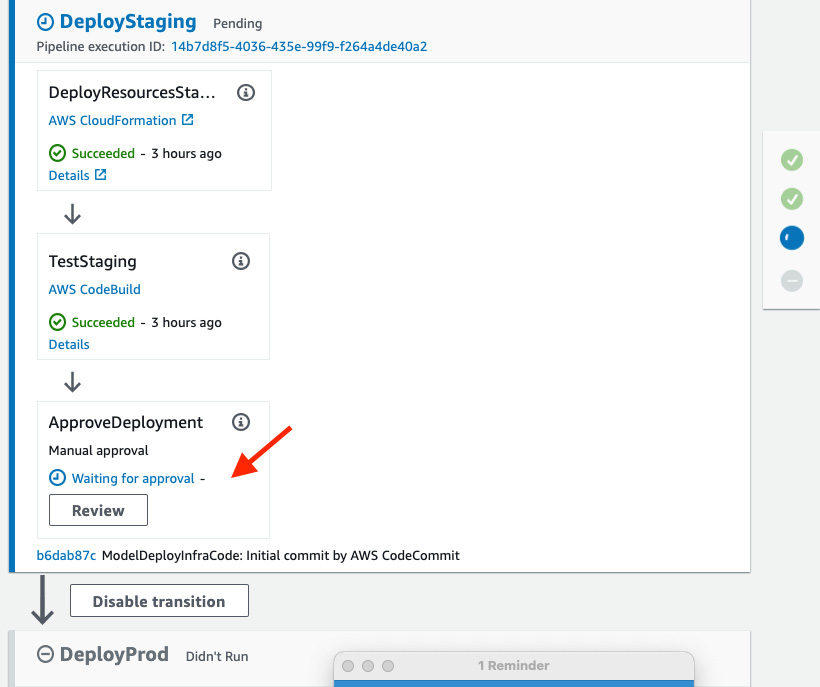
Figure 11.18 – Manual approval required by the modeldeploy pipeline
- Approve or reject the deployment with any comments in the popup, as shown in Figure 11.19. As the endpoint is live and working, let's approve the staging deployment.
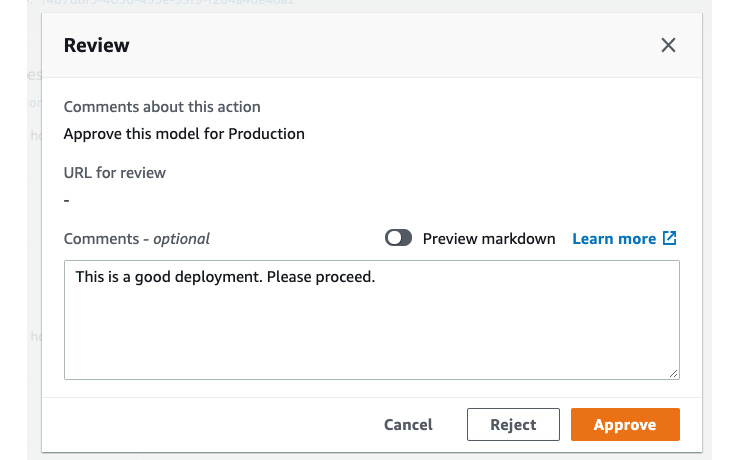
Figure 11.19 – Approve/reject a staging deployment
- The modeldeploy pipeline moves on to the final stage, DeployProd, to deploy the model to a production endpoint. Once deployed, the pipeline is updated to the Succeeded status. You can see a new event on the model version page, as shown in Figure 11.20. Also notice Last Stage is now prod.

Figure 11.20 – Model version is now updated to prod
- When we approve the staging deployment, the modelmonitor pipeline is triggered to deploy SageMaker Model Monitor to the staging endpoint. We can see in the CodePipeline console that the modelmonitor pipeline is In progress, as shown in Figure 11.21.
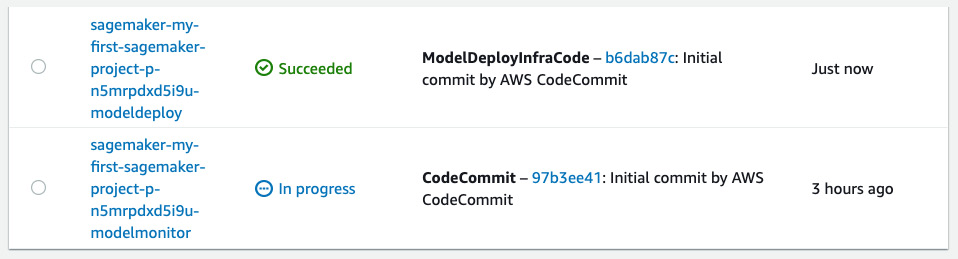
Figure 11.21 – Staging endpoint deployment triggers the modelmonitor pipeline
- The modelmonitor pipeline also requires manual approval in the DeployStaging stage. We should review the endpoint to see if Model Monitor is enabled. As shown in Figure 11.22, we can see in the Data quality tab that Model Monitor is indeed enabled and scheduled. We do not have a live traffic setup yet for the endpoint, and the monitoring schedule will only kick in at the top of the hour, so let's proceed and approve DeployStaging in the CodePipeline console similar to step 6 and step 7.

Figure 11.22 – Reviewing the Model Monitor schedule for the staging endpoint
- Lastly, the DeployProd stage will also deploy SageMaker Model Monitor to the prod endpoint. This marks the end of the complete MLOps and CI/CD system.
The three CI/CD pipelines in CodePipeline constitute a common MLOps system that enables continuous integration and continuous delivery of an ML model in response to any code changes to the modelbuild repository and to any manual ML pipeline runs. You do not have to worry about the complicated implementation as these steps take place automatically, thanks to the SageMaker projects template.
SageMaker Projects make it easy to bring a robust MLOps system to your own ML use case with the templatized code and repositories. You don't have to build a sophisticated system. You can just choose a template provided by SageMaker projects that suits your use case and follow the README files in the repositories in CodeCommit to customize the configuration and code for your own use case. For example, we can update the model training in pipeline.py to use a different set of hyperparameters as shown in the following code block and commit the change to the modelbuild repository:
# Line 315 in pipeline.py
xgb_train.set_hyperparameters(
objective="reg:linear",
num_round=70, # was 50
max_depth=7, # was 7
eta=0.2,
gamma=4,
min_child_weight=6,
subsample=0.7,
silent=0)
You can see a new execution from the modelbuild pipeline with the latest commit message, as shown in Figure 11.23.

Figure 11.23 – A new modelbuild execution is triggered by a commit to the repository
The CI/CD pipelines are going to be run as we described in this chapter once again to deliver a new model/endpoint automatically (except the manual approval steps) after we update the version of the core training algorithm. You can apply this to any changes to the ML pipeline, in the modelbuild pipeline, or configurations in the other two CI/CD pipelines.
Summary
In this chapter, we described what MLOps is and what it does in the ML lifecycle. We discussed the benefits MLOps brings to the table. We showed you how you can easily spin up a sophisticated MLOps system powered by SageMaker projects from the SageMaker Studio IDE. We deployed a model build/deploy/monitor template from SageMaker projects and experienced what everything as code really means.
We made a complete run of the CI/CD process to learn how things work in this MLOps system. We learned in great detail how an ML pipeline is implemented with SageMaker Pipelines and other SageMaker managed features. We also learned how the SageMaker model registry works to version control ML models.
Furthermore, we showed how to monitor the CI/CD process and approve deployments in CodePipeline, which gives you great control over the quality of the models and deployment. With the MLOps system, you can enjoy the benefits we discussed: faster time to market, productivity, repeatability, reliability, auditability, and high-quality models.
This example also perfectly summarizes what we've learned about Amazon SageMaker Studio throughout the book. Amazon SageMaker Studio is a purpose-built ML IDE that makes building ML models with an end-to-end ML lifecycle easy with its rich user interface. With the 11 chapters, code examples, and real-world ML use cases in this book, you've learned how to use SageMaker Studio and many SageMaker features for preparing data, building, training, deploying ML models, and running an MLOps system for a production-grade ML project. You now can start building your own ML projects in Amazon SageMaker Studio.