
5
Building a Search Engine with Azure Cognitive Search
When in need of a search engine, it's always a good idea to use tested and well-known solutions that have been available on the market for a while. One of those solutions is Azure Cognitive Search (formerly known as Azure Search), which offers a search-as-a-service cloud solution with an API for developers, so users can focus on developing a working solution without the need to manage infrastructure or configuration.
The following topics will be covered in this chapter:
- Creating an Azure Cognitive Search instance
- A full-text search in Azure Cognitive Search
- Linguistic analysis in full-text search
- Indexing in Azure Cognitive Search
- Cognitive search – adding AI to the indexing workloads
Technical requirements
To perform the exercises in this chapter, you will need the following:
- Access to an Azure subscription
- A tool for sending HTTP requests (such as curl or Postman)
Creating an Azure Cognitive Search instance
Creating an Azure Cognitive Search instance is an easy task and should not take more than a few minutes. The important thing to remember here is that if you must recreate a service, there is no way to back up and restore data – if you make mistakes here, everything must be done again from scratch.
The reason for recreating a service is if you needed to change the datatypes or other search attributes of the search index columns. While it will not be a problem during this exercise, keep that in mind when creating a production workload.
Using the Azure portal
As with most services in Azure, we will start our journey by creating an Azure Cognitive Search instance in the portal. To do so, click on + Create a resource and search for Azure Cognitive Search. On the introduction screen, click on the Create button, which will take you to the configuration of this service:
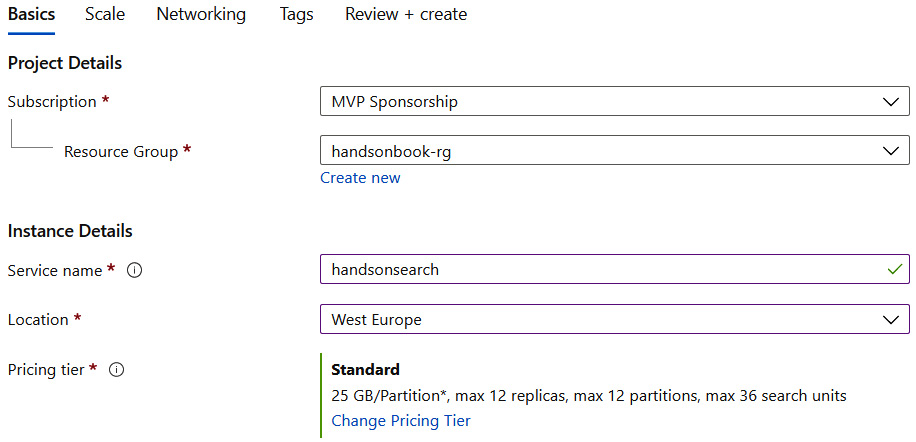
Figure 5.1 – The Basics tab in the creation wizard
As you can see, the Basics tab does not contain any surprising options and should be clear to you at this point. There is, however, an option to select Pricing tier, where currently there are different options to choose from:
- Free: This is the most basic one without replicas and shared resources available.
- Basic: This comes with load balancing, scaling, and dedicated resources available.
- Standard: This has three different tiers with more compute power and partitions available.
- High-density: The same as Standard but with more indexes available (and fewer partitions). This tier is designed for Software as a Service (SaaS) developers specifically.
- Storage Optimized: This offers similar capabilities as the High-density tier but comes with fewer indexes in favor of making huge storage available.
Before we proceed, we need to understand what all these concepts are:
- Replica: This is an individual instance of your search service, which hosts one copy of an index. If you have more than one replica, you can load-balance your queries.
- Index: You can think of this as a table that contains multiple rows (or, in other words, documents) with additional metadata used by a service.
- Search Unit (SU): This is a billing unit for Azure Cognitive Search, which is a composition of the number of replicas and partitions (SU = replicas x partitions).
- Partition: Each partition provides storage and Input/Output (I/O) for your instance of Azure Search, so scaling this unit will provide more of those.
The main difference between replicas and partitions is that if you need more computational resources, you can increase partitions, while for larger query volumes, you need more replicas (so that a query can be load-balanced).
Once you have filled all the fields from the Basics tab, select the Scale tab. You will see a new screen, where you can see the scaling options for your search engine instance:

Figure 5.2 – The Scale tab for Azure Cognitive Search
As with many cloud services, at some point in time, you will have to consider the availability of your solution. For non-production workloads, that parameter is negligible, but production environments, in most cases, must work as consistently as possible. For Azure Cognitive Search, you will need at least the Basic tier to achieve 99.9% availability for both read and write operations. The reason for that is the requirement of having at least three replicas in your service to get a proper replication setup.
Important Note
If you need availability only for reads, you can stay with two replicas. Also, remember that each additional replica increases the overall cost of the solution.
We will skip the Networking tab for now, so you can go to the Review + create tab and click on the Create button to initialize the provisioning of your service. Wait for a moment for service creation, and once it is created, go to the Overview blade. Once there, select Import data so that we can start with some samples before diving deeper into Azure Cognitive Search:
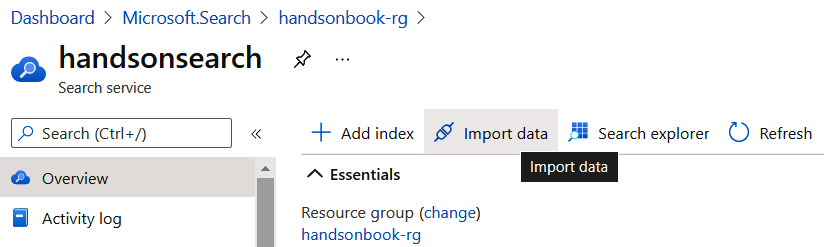
Figure 5.3 – Import data on the Overview blade
On the next screen, you will see multiple options for importing records – you will be able to select the data source and index, and enable Cognitive Search, which we will cover in the next sections:
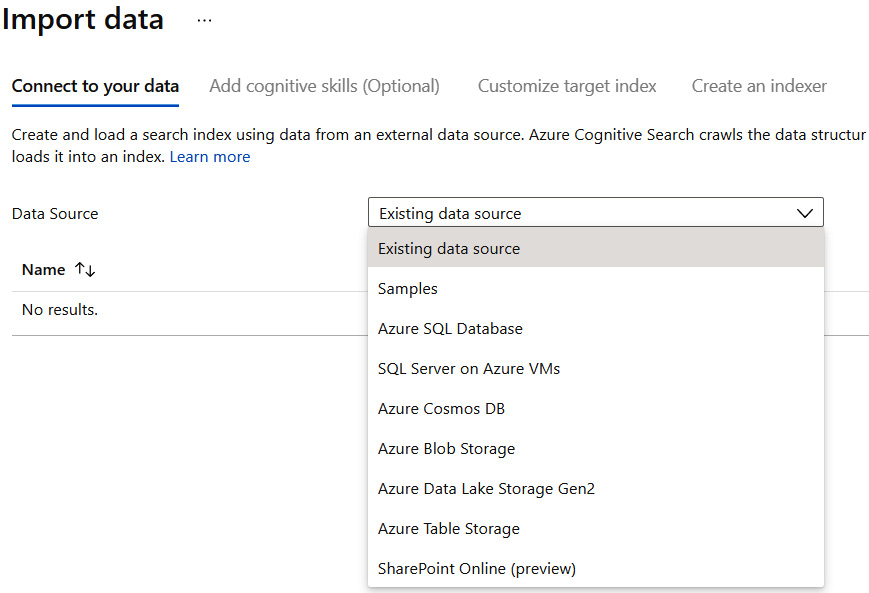
Figure 5.4 – The Data Source import options
Remember that it is possible to delete or change the fields used for indexing data, but such operations require re-indexing all documents. By re-indexing, I mean that you must delete and then recreate the index. However, it is possible to add new fields without re-indexing the documents – in that case, the values for the new columns will be null.
For now, let's select the Samples option, which you can see in Figure 5.5, to ease things a bit. It will give us an option to select a source database for our exercise. Select the SQL database and proceed to the next tab:

Figure 5.5 – Two samples available in a training data source
We will skip adding cognitive skills for now, as they are part of the latter exercises. Let's go directly to the Customize target index tab, where we can configure the search engine index:

Figure 5.5 – The preconfigured index
As you can see, Index name is already filled with some default values. Normally, you would adjust them according to your needs, but for now, we should be good with the default values. Now, you can proceed to the next tab, where we can create an indexer. You may wonder what an indexer is exactly. Its definition is quite simple – it is a crawler that looks at your data source and extracts everything from it, based on the mapping between an index and stored information. For example, if you selected a field named Status as a part of your index, the indexer will search for all records containing it and push them to your index.
Indexers can be configured either to fetch data once or on schedule. We will cover scheduled indexers in the section regarding indexes and indexing documents:
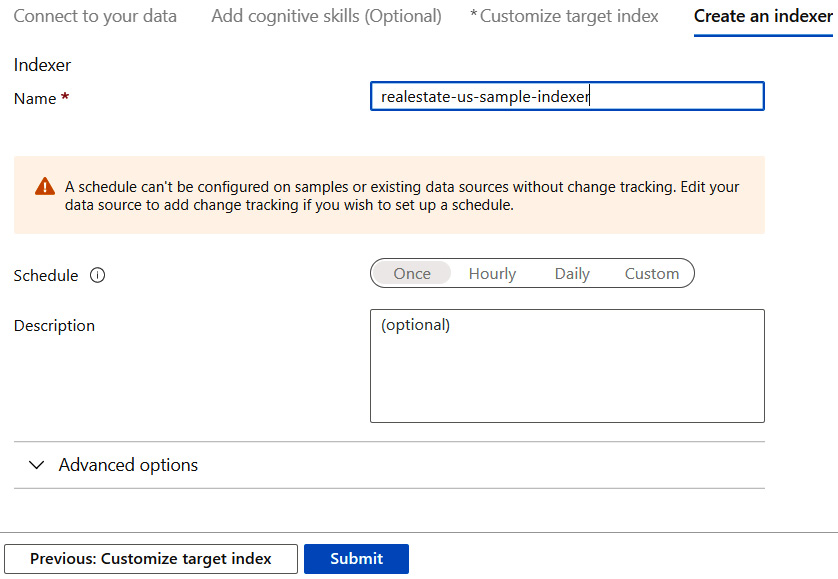
Figure 5.6 – The configuration of an indexer
If you are satisfied with the import configuration, click on the Submit button and wait a moment until the data is imported and indexed. Now, we can test how our service works – on the Overview blade, you will find the Search explorer button. When you click on it, you will see a new screen, where you can enter your Query string and Request URL details, which can be used in your application to get results:

Figure 5.7 – The result of sending a query to an instance of Azure Cognitive Search
In the next section, we will learn what a full-text search is and how it can be performed in Azure.
A full-text search in Azure Cognitive Search
The power of Azure Cognitive Search comes when you need to perform a full-text search to find relevant documents that will satisfy your query. This Azure service uses Apache Lucene under the hood, which is a well-known high-performance search engine written in Java. In many cases, common text queries should be covered by the basic capabilities of search engines built with the help of Azure Cognitive Services. For more sophisticated scenarios, a full-text search can help in getting the desired results.
You can find more information about Lucene here: https://lucene.apache.org/core/. It is an open source project that everyone can download.
In this chapter, you will learn how to perform a full-text search, what the syntax is, and how to recognize potential issues.
Sending a request
In the first section of this chapter, you created your Azure Search instance and saw Search explorer, which enables you to send simple queries. Now, we will extend our requests so that you can select which fields should be used for query analysis to filter results and to order by a particular property. Here is the basic URL, which you can use for all your requests:
https://[service name].search.windows.net/indexes/[index name]/docs/search?api-version=2016-09-01
However, before we proceed, we need to do one more thing – as with most APIs, Azure Cognitive Search is secured and requires a key to authorize a request. If you do not send it, you will get an HTTP 403 response error message. To obtain a key, go to the Azure portal and select the Keys blade:
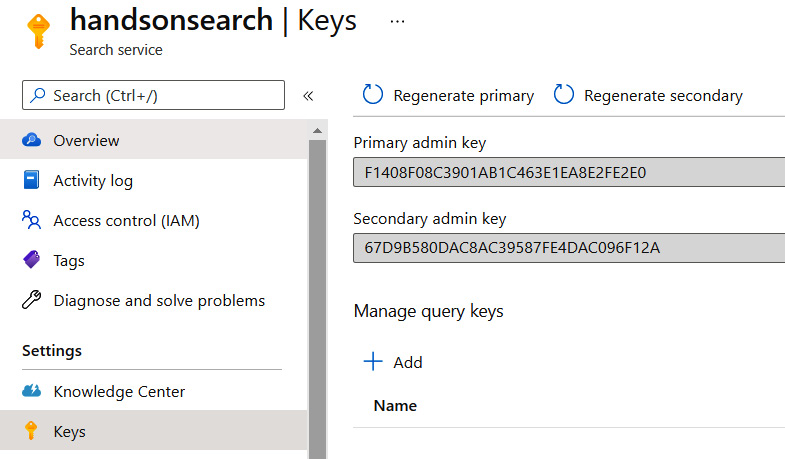
Figure 5.8 – The Keys blade in Azure Cognitive Search
Now, with each request to your API, you will have to use the api-key header with the appropriate value. Here, you can find an example:
GET /indexes/realestate-us-sample/docs?api-version=2016-09-01&search=* HTTP/1.1
Host: handsonazuresearch.search.windows.net
api-key: 38B4F66ACD480406328C62273C056CA4
Cache-Control: no-cache
Nonetheless, in most cases, we are not interested in literally all documents available – we have specific parameters that we would like to use. Let's assume that you would like to search for a specific city. In such a case, we must use another endpoint and pass a valid payload, which will be used to build a query:
POST /indexes/realestate-us-sample/docs/search?api-version=2020-06-30 HTTP/1.1
Host: handsonazuresearch.search.windows.net
api-key: {API_KEY}
Content-Type: application/json
Cache-Control: no-cache
{
    "search": "Sammamish",
    "searchFields": "city"
}
The most important thing, however, is the body – for now, we'll use two fields:
- search: This is our query string, which we are using to tell Azure Search what we are interested in.
- searchFields: Here, we are passing fields, which should contain our query string.
Please remember that the fields passed in the request body are case-sensitive, and you should follow camel case if there are multiple words.
If you run the preceding query on the sample index, you should see some results returned. If you search for a city that is not in the indexed documents, you will see an empty result:
{
    "@odata.context": "https://handsonazuresearch.search.windows.net/indexes('realestate-us-sample')/$metadata#docs",
    "value": []
}
You may ask what the rules are for choosing a search field – the only requirement is that it must be marked as Searchable, which can be defined during index creation. Let's see what will happen if I use beds to search for records with a specific number:
{
    "error": {
        "code": "",
        "message": "The field 'beds' in the search field list is not searchable.
Parameter name: searchFields"
    }
}
It seems we cannot use any field we would like to. You can check which fields can be used for searching on the index screen. To do so, go to the Overview blade and search for the Indexes tab:
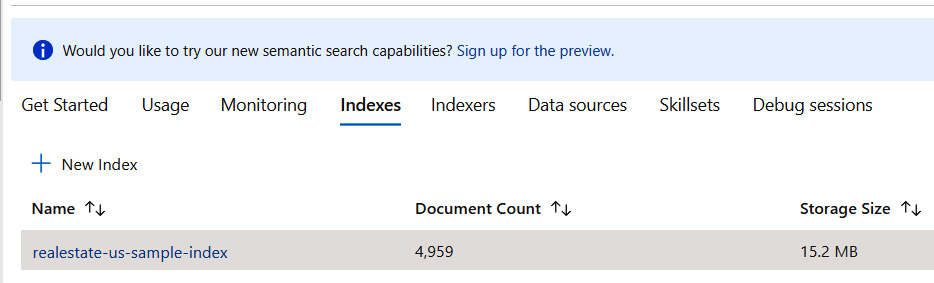
Figure 5.9 – The Indexes tab
Now, click on the name of your index and proceed to the Fields tab. You should be able to see a field that we are trying to use at the very beginning of the screen:

Figure 5.10 – Fields inside an index
As you can see, the beds field is here, but we are unable to check it. In fact, you cannot use any field of the Edm.Int32 type as Searchable. There are some other types that are also not supported (for example, Edm.GeographyPoint) – you can find more information about them when building or modifying fields used in an index.
To overcome the problem, you can use filters – these are expressions based on the OData syntax, which you can leverage to search for the entities you are interested in. The only requirement is to make a field that you want to use as a filter using filterable. Here, you can find all the possible fields, which you can use in such an HTTP request:
{
  "count": true | false(default),
  "facets": ["facet_expression_1", "facet_expression_2", ...],
  "filter": "odata_filter_expression",
  "highlight": "highlight_field_1, highlight_field_2, ...",
  "highlightPreTag": "pre_tag",
  "highlightPostTag": "post_tag",
  "minimumCoverage": #( % of index that must be covered to declare query successful; default 100),
  "orderby": "orderby_expression",
  "scoringParameters": ["scoring_parameter_1", "scoring_parameter_2", ...],
  "scoringProfile": "scoring_profile_name",
  "search": "simple_query_expression",
  "searchFields": "field_name_1, field_name_2, ...",
  "searchMode": "any" (default) | "all",
  "select": "field_name_1, field_name_2, ...",
  "skip": #(default 0),
  "top": #
}
Not all of the fields are shown in the preceding snippet.
Important Note
For full reference of the fields, you can check the following link: https://docs.microsoft.com/rest/api/searchservice/preview-api/search-documents#request-body.
We will not cover them all, as this would take the whole chapter; however, we will focus a little more on the actual syntax of queries sent to Azure Cognitive Search. As you probably remember, this service uses the Lucene search engine to index data and handle requests. Lucene supports a variety of different query types, such as fuzzy search and wildcard search. You can decide which parser should be used by sending the queryType parameter with one of the available values – simple or full (Lucene).
You can find the query operations supported by Lucene by reading the following page: https://docs.microsoft.com/azure/search/query-lucene-syntax.
Linguistic analysis in a full-text search
When doing a full-text search, you have to understand what the rules are for performing such an operation. Search engines must analyze search queries lexically to be able to extract important information and pass it to a query tree. In this section, we will cover the most common lexical analysis, which is linguistic analysis, to help you understand how Azure Search works and how to perform correct queries.
Analyzers in Azure Cognitive Search
To perform linguistic analysis, Azure Search supports a variety of different analyzers, which can be specified in the index definition. However, before we start defining one of those, we need a brief overview of what we are talking about. When creating an index, each search service must analyze all input documents and decide what will be important when performing a search procedure.
Additionally, each search query should be adjusted to some common rules so that the search engine can understand it. The necessary operations can be described as follows:
- All non-essential words should be removed (such as the in English).
- All words should be lowercase.
- If a word contains multiple words (such as "upfront"), it should be divided into atomic ones.
Now, let's assume that you are searching for an apartment using the following search query – Spacious apartment with 4 and the Red Kitchen. Your analyzer will have to perform all the preceding operations before passing the query to a search engine, and in fact, you can find the result of this analysis here:
{
    "@odata.context": "https://handsonazuresearch.search.windows.net/$metadata#Microsoft.Azure.Search.V2016_09_01.AnalyzeResult",
    "tokens": [
        {
            "token": "spacious",
            "startOffset": 0,
            "endOffset": 8,
            "position": 0
        },
        {
            "token": "apartment",
            "startOffset": 9,
            "endOffset": 18,
            "position": 1
        },
        {
            "token": "with",
            "startOffset": 19,
            "endOffset": 23,
            "position": 2
        },
        {
            "token": "4",
            "startOffset": 24,
            "endOffset": 25,
            "position": 3
        },
        {
            "token": "and",
            "startOffset": 26,
            "endOffset": 29,
            "position": 4
        },
        {
            "token": "the",
            "startOffset": 30,
            "endOffset": 33,
            "position": 5
        },
        {
            "token": "red",
            "startOffset": 34,
            "endOffset": 37,
            "position": 6
        },
        {
            "token": "kitchen",
            "startOffset": 38,
            "endOffset": 45,
            "position": 7
        }
    ]
 }
As you can see, each word has its position and offset. To get a result like the previous one, you can send the following query:
POST /indexes/[index name]/analyze?api-version=2016-09-01 HTTP/1.1
Host: [service name].search.windows.net
api-key: [api key]
Content-Type: application/json
Cache-Control: no-cache
{
  "text": "Spacious apartment with 4 and the Red Kitchen",
  "analyzer": "standard"
}
In the request's body, you must provide both texts to use the analyzer. Note that I used standard here, which means that the standard Lucene analyzer is used here.
Azure Cognitive Search supports several different analyzers for different languages – what's more, both Microsoft and Lucene versions are available. To get the full list, go to the documentation page: https://docs.microsoft.com/pl-pl/rest/api/searchservice/language-support.
If you are proficient in language analysis and syntax, you can create a custom analyzer that can be used for text analysis. Such analyzers can be defined during index creation; however, we will not cover that topic in this book, as it is an advanced exercise and is out of our present scope. You will find a link to the tutorial in the Further reading section of this chapter.
Analyzer selection
You can select an analyzer for a specific field either during the creation of an index or while editing it. If you go to the Azure portal and your Azure Cognitive Search instance, you can click on an index and select the Fields section. It should display a list of all the fields used in that index:

Figure 5.11 – The fields available inside an index
In the preceding listed fields, you will see the + Add field button, which enables you to add a new field. If you would like to select an analyzer, you will need to mark a field as Searchable. Doing so will allow you to select an analyzer for that field:

Figure 5.12 – Adding a new field to an index with the analyzer selected
Note that selecting a different analyzer than the custom one is crucial when you have fields containing multiple languages. In such a scenario, you should select an analyzer appropriate for the language used.
Indexing in Azure Cognitive Search
An index is one of the most important constructs in Azure Search. We defined it as a table that contains all imported documents with searchable data defined in it. At the beginning of this chapter, we learned how to create it and add or edit fields. In this section, we will learn a bit more about modifying it, as an index is not a fixed being and can be altered and adjusted to your needs.
Importing more data
There is always a need to push more data to your index – your application grows, the storage of your documents becomes bigger and bigger, especially if you are creating a document repository, and you would like to be able to find what you are searching for even in the most recent documents. However, there are two options to add data to your index:
- The push model
- The pull model
We will cover both these models in the following sections.
The push model
The push model is the best solution for applications that have low-latency requirements. As opposed to the pull model, using this model indexes your document immediately after pushing it using a RESTful API.
Currently, there is no other option to use a push model besides using a RESTful API or the .NET SDK to perform an operation. In the pull model, it is also possible to get data using the Azure portal. Here, you can find an example request for pushing a document:
POST /indexes/realestate-us-sample/docs/index?api-version=2016-09-01 HTTP/1.1
Host: [service name].search.windows.net
api-key: [api key]
 Content-Type: application/json
Cache-Control: no-cache
{
  "value": [
    {
      "listingId": "12344234",
      "@search.action": "upload",
      "price": 250.0,
      "description": "The very apartment in Warsaw",
      "city": "Warsaw",
      "tags": ["pool", "view", "wifi", "gym"],
      "beds": 4,
      "location": { "type": "Point", "coordinates": [52.237049, 21.017532] }
    }
  ]
}
If everything is correct, you should see a successful result:
{
    "@odata.context": "https://handsonazuresearch.search.windows.net/indexes('realestate-us-sample')/$metadata#Collection(Microsoft.Azure.Search.V2016_09_01.IndexResult)",
    "value": [
        {
            "key": "12344234",
            "status": true,
            "errorMessage": null,
            "statusCode": 201
        }
    ]
 }
Now, let's check whether the document is already indexed and available:
POST /indexes/realestate-us-sample/docs/search?api-version=2016-09-01 HTTP/1.1
Host: [service name].search.windows.net
api-key: [api key]
 Content-Type: application/json
Cache-Control: no-cache
{
    "search": "Warsaw",
    "searchFields": "city"
}
The result should be a document that contains all the fields we passed in the push request.
The pull model
A pull model is a bit different than a push model, as it uses indexers to fetch the data. When using it, you are configuring both a data source and deciding how frequently data should be pulled. As opposed to the push model, it can be configured and accessed when using the Azure portal.
Please note one important difference between push and pull – when using push, you can use any data source you want. When using the pull model, you are limited to Blob storage, Table storage, CosmosDB, and SQL Database (both on Azure and Virtual Machines (VMs).
Here, you can find an indexer configuration for pulling data when using Table Storage as a source:

Figure 5.13 – The indexer configuration when importing data from Table Storage
In the next section of this chapter, we will cover one of the most interesting capabilities of Azure Cognitive Search – an ability to add AI to enrich indexing and enhance the functionalities of your search engine.
Cognitive Search – adding AI to the indexing workload
When creating and managing an index, you must always make sure that you have selected all the required fields and marked them as searchable where needed. Additionally, we are limited to the current service functionalities, so we cannot use things such as image or natural language processing. Fortunately, Azure Cognitive Search now supports AI enrichment of your indexing operations, allowing for richer analysis using more vectors. In this chapter, you will learn how to configure it so that you can start using it from the very beginning.
Configuring cognitive skills
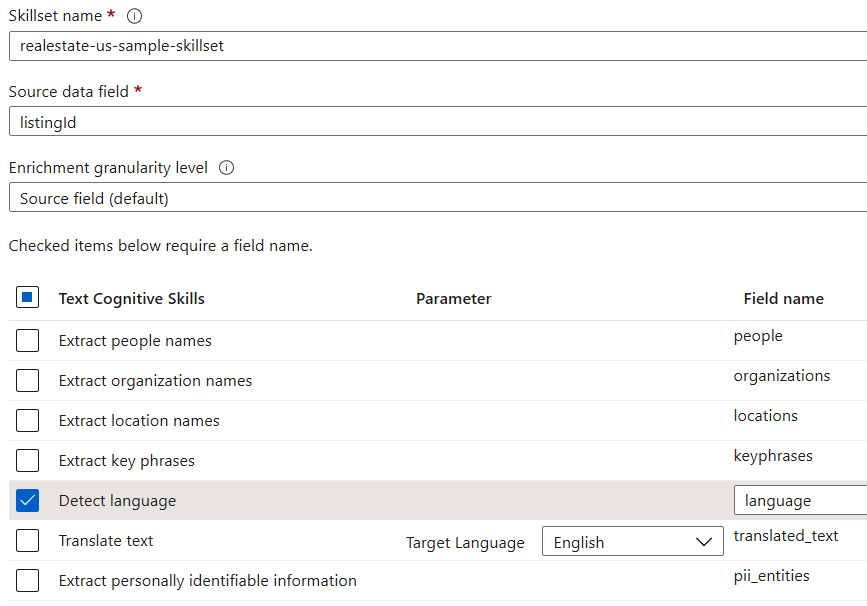
Cognitive Search can be configured when importing data for your service. When you click on the Import data button, you will see that one of the available tabs gives you the possibility to add AI through cognitive skills:

Figure 5.14 – Cognitive skills screen
There is a list of cognitive skills (called enrichments) that can be used for indexing your data. Whether you use one or not depends on your actual requirements – for the purpose of this exercise, I selected Detect language. You can customize the name of a field also; this can be crucial if your index contains another field with the same name, as it will be added to the result of a query:
If a cognitive skill is added to your index, you should be able to see it on the fields list. As the detect language option adds a language column, we now can see that it is available among the other fields in our index:

Additionally, when I query a service using a newer index, I get a result containing the language field:
{
 (...)
"location": {
  "type": "Point",
  "coordinates": [
    -122.388,
    47.576
  ],
  "crs": {
    "type": "name",
    "properties": {
      "name": "EPSG:4326"
    }
  }
},
"price": 762048,
"thumbnail": "https://searchdatasets.blob.core.windows.net/images/bd2bt2apt.jpg",
"tags": [
  "condominium",
  "dream home",
  "lake access",
  "no outlet",
  "miele appliances",
  "wall of windows",
  "guest room"
],
"language": "en"
}
As you can see, the use of cognitive skills can quickly enhance your search results and can simplify the development of more advanced search engines. This gives you more time for focusing on actual business requirements and lowers the chances of errors on your side.
Summary
Azure Cognitive Search is a great service if you want to have your very own search solution and do not plan to maintain its infrastructure and configuration. With its flexibility and intuitiveness, you can quickly develop your application, leveraging features such as the push/pull model, scheduled indexing, and support for different kinds of data sources. Additionally, with the option to start from the free tier, even for production workloads, you can gradually progress and scale your solution up, adjusting costs based on real requirements. This chapter has given you your first steps in developing search engines in the cloud and should help you as an entry point for further exploration of the service.
In Chapter 6, Mobile Notifications with Notification Hubs, we will cover topics related to handling mobile applications and push notifications using Azure Notification Hubs.
Questions
As we conclude, here is a list of questions for you to test your knowledge regarding this chapter's material. You will find the answers in the Assessments section of the Appendix:
- What is an index?
- What is the difference between the push and pull models?
- Can an indexer be scheduled using a custom interval?
- What analyzer does Azure Cognitive Search use by default?
- Can you implement a custom analyzer and use it in Azure Cognitive Search?
- What is the difference between a partition and a replica?
- What is the name of a header used for authorizing requests to Azure Cognitive Search?
Further reading
To learn more on the topics covered in this chapter, please visit the following links:
- Azure Cognitive Search documentation:
https://docs.microsoft.com/en-us/azure/search/
- Cognitive skills for Azure Cognitive Search:
https://docs.microsoft.com/en-us/azure/search/cognitive-search-predefined-skills
- Apache Lucene documentation:
https://lucene.apache.org/core/
- Filters in Azure Cognitive Search:
https://docs.microsoft.com/en-us/rest/api/searchservice/odata-expression-syntax-for-azure-search