
17
SQL in Azure – Azure SQL
Microsoft SQL Server is one of the most popular databases and is often the core of many popular applications. Thanks to Azure, we can skip the whole cluster setup, installation, and maintenance by using Azure SQL—a cloud version of SQL Server with the same features available. Thanks to flexible pricing, we can select whichever option we want when it comes to both performance and available features. We don’t have to worry about geo-replication and storing backups either—all these functionalities can be easily configured and automated in the cloud.
By the end of the chapter, you will have gained fundamental knowledge regarding working with Azure SQL in Azure and learned various built-in features of that service.
The following topics will be covered in this chapter:
- Differences between Microsoft SQL Server and Azure SQL
- Creating and configuring an Azure SQL Database instance
- Working with Azure SQL in the Azure portal
- Security features of Azure SQL
- Scaling Azure SQL
- Monitoring and tuning
Technical requirements
To perform the exercises in this chapter, you will need the following:
- An Azure subscription
Differences between Microsoft SQL Server and Azure SQL
Microsoft SQL Server is a well-known and widely used Structured Query Language (SQL) database server that has gained much popularity and is considered a default choice for many projects, ranging from very simple websites to enterprise-class services that handle high load and are considered critical for a business. As cloud technologies gain more and more popularity, the natural consequence of such a situation is the expectation that by moving an application to Azure, it is also possible to move its database. To meet such needs, Microsoft has developed Azure SQL Service—a platform-as-a-service (PaaS) version of Microsoft SQL Server that is managed and upgraded by their teams; the only things you are responsible for are configuration and data management. There is also one more offering from Azure called SQL Server VMs, which is one more option for using this database in the cloud. In this section, we will focus on the differences between these two offerings and try to identify different use cases for them.
Azure SQL fundamentals
By using PaaS services in the cloud, you are shifting responsibilities a little bit, in the following ways:
- You are no longer the maintainer of the infrastructure.
- You are no longer responsible for different updates when software is considered.
- By signing a service-level agreement (SLA) with you, your provider is responsible for making sure that a service is up and running.
Instead, you should focus on the following points:
- Properly configuring a service so that it meets your performance targets and legal requirements
- Integrating different services and applications so that they reflect best practices when it comes to communicating with a service
- Implementing high availability (HA)/disaster recovery (DR) scenarios so that an outage or disaster in one region does not impact your systems
By using Microsoft SQL Server, you are fully on your/leased machines, which you must maintain and monitor. While such a case is valid in many scenarios (as there can be some legal requirements that disallow you from storing data outside your own data center or, simply, for some reason, Azure does not provide you with the expected performance you seek), yet in many situations, having a PaaS instance of your SQL database is a big improvement. In fact, you are given a few different options when using this service, including the following:
- A single database with isolated resources
- A pooled database in an elastic pool
- A managed instance, which is the closest model when it comes to comparing it with on-premises SQL Server
The important thing to know is that all new features and updates are deployed to SQL databases hosted within Azure. This gives you an advantage in comparison with traditional Microsoft SQL Server, as you are always up to date: you do not have to schedule updates on your servers on your own.
Tip
The more servers and databases you have, the more complicated and difficult the process of updating them becomes. Take that into account when comparing these two offerings.
Another crucial thing when talking about Azure SQL is its purchasing model. Currently, you have three options, as follows:
- Database transaction unit (DTU)-based (provisioned): A DTU is a mix of computing, memory, and input/output (I/O) resources that are given to your database.
- Virtual core (vCore)-based (serverless): A similar model to the provisioned one, it provides auto-scaling and billing per second based on vCores used.
- vCore-based (provisioned): This one simply allows you to select all things on your own (including the number of vCores, the amount of memory, and storage performance).
You may wonder how a DTU reflects the actual hardware; there is a good article that tries to explain these metrics a little bit in the Further reading section of this chapter.
Tip
In most cases, using a DTU as the metric is the better choice—very often, it is hard to predict the exact hardware requirements for your application. Use the vCore-based model when you are an advanced SQL Server user and know how many cores or memory you really need.
You may be wondering what the scaling capabilities of Azure SQL Service are. While of course, you can assign more (or fewer) resources to your database, there are scenarios when this makes things much more complicated (or, simply, your application has different demands when it comes to database performance, and such a model simply will not work). To cover those situations, you are given the option to use elastic pools. The concept is simple—normally, you allocate resources to a single database, as depicted in the following screenshot:

Figure 17.1 – Single database with 100 DTUs assigned
With elastic pools, you change the model a little bit and instead, your pool has resources allocated, as follows:

Figure 17.2 – Multiple databases using a single pool
What effect does this change have? Well, this gives you much more flexibility; instead of hosting a huge single database (when it comes to resources allocated), you can easily scale it out so that it can share the load with other instances. What is more, it gives you better control when it comes to costs; you can scale your databases at the same time without the need to control what their individual requirements are.
Important Note
Scaling Azure SQL is an important topic that initially requires much attention—we will come back to this at the end of this chapter.
Besides performance and different scaling capabilities, Azure SQL gives you many additional features that are very important when considering it as storage for your data. Because an application without information stored in a database is, in most cases, useless, availability considerations are also very important here. Fortunately, Azure SQL has implemented many great features that make it a full-fledged storage option, such as the following:
- Automatic backups: In the on-premises world, configuring and managing backups is much more complicated, as it requires you to know the server configuration and find a place to store them. In Azure, things are greatly simplified by integrating automatic backups for Azure Storage for performance and reliability.
- Geo-replication: Even if a single region fails, you can still serve data to your customers. With Azure SQL, you can configure a secondary read region that will make sure you can stay online until an outage is resolved.
- Failover groups: Instead of implementing failover capabilities and logic on your own, you can rely on what Azure SQL currently provides. This makes creating globally distributed applications much easier as you care only about the configuration and not infrastructure.
Tip
To know exactly what is different in Azure SQL in comparison with Microsoft SQL Server, refer to the following link:
https://docs.microsoft.com/en-us/azure/sql-database/sql-database-features
After that very short introduction to the basic features of Azure SQL, let’s now check more advanced topics.
Advanced Azure SQL features
Besides some basic functionalities that ensure Azure SQL is a full version of a relational database on which you can rely and build your system, there are plenty of additional features that make using this service real fun, such as the following:
- Automatic monitoring and tuning: How many times, after using a database for several months, have you ended up with a database full of outdated indexes, procedures, and functions? Azure SQL makes things much easier by actively monitoring how you use and maintain your database and advising you whenever an improvement is possible. I find this feature extremely helpful—nowadays, when development is especially rapid and focused on delivering new values to the market, it is easy to get lost and lose track of what should be removed from a database. With the service recommendations for dropping indexes, schema improvements, and query parameterization, I find my storage in much better shape most of the time.
- Adaptive query processing: While this feature is also available for SQL Server, having it in Azure SQL is a great addition to other performance recommendations. Basically, when it is enabled, the server engine tries to find the best execution plan for your queries.
- Security and compliance features: It is really important to ensure that the data you store is secure and all vulnerabilities are detected as quickly as possible. In Azure SQL, you are given plenty of additional features that try to analyze your data in terms of sensitivity and compliance. There are built-in tools that search for any kinds of anomalies and threats that could affect data integrity or lead to their leak. Additionally, Azure SQL is integrated with the Azure Active Directory (Azure AD) service and allows for multi-factor authentication (MFA)—this makes things such as auditing and authorization much easier without additional effort.
Note
The security features for Azure SQL will be described later in this chapter so that you have a whole picture of this service’s capabilities that matter.
Let’s now learn more about using an alternative SQL service, leveraging SQL Server installed on an Azure virtual machine (VM).
SQL Server on VMs
If you do not want to go full PaaS, you can create a VM with a SQL Server image already built in. In that option, the performance of the service will rely on the performance of the VM—if you find the database running low on the central processing unit (CPU) or memory, the only thing you must do is scale up the machine. To create a VM in the portal, search for a SQL Server running on an operating system (OS) of your choice, as follows:

Figure 17.3 – SQL Server offering in Azure Marketplace
By browsing available versions, you will see there are free SQL Server licenses available, and what is more, newer versions can run on Linux machines. Once you select the image you are interested in, you can click on the Create button to begin the machine’s configuration.
As you can see in the following screenshot, many fields must be filled in to be able to use the service:

Figure 17.4 – Details of Azure VM with SQL Server image
This is, of course, related to the infrastructure-as-a-service (IaaS) model of that way of hosting SQL Server inside Azure. The configuration wizard will advise you about the default size of the VM and other parameters required for the machine. Once the configuration is completed, you will be able to connect to it either via Remote Desktop Protocol (RDP) or a secured Secure Shell (SSH) tunnel.
Tip
Remember to open port 1433 if you want to connect to SQL Server remotely.
Let’s now see how we can create and configure an Azure SQL database.
Creating and configuring an Azure SQL Database instance
After reading the beginning of this chapter, you should have a sense of how Azure SQL works and what it offers you. While some theory is always a good thing, it is practice that creates a full picture and allows you to fully understand the topic. In this section, we will focus on creating and configuring an Azure SQL database in the portal and trying to identify all the aforementioned features. You will also see how managing this PaaS service is different from the on-premises version, especially when it comes to using its features.
Creating an Azure SQL Database instance
In the Azure portal, when you search for Azure SQL, you will see plenty of different options such as SQL Database, SQL server (logical server), or SQL Elastic database pool. While they all allow you to create a database, the easiest way to get started with the service is to use SQL Database—this will require creating a server, nonetheless. In the following screenshot, you can find a configuration for my server:
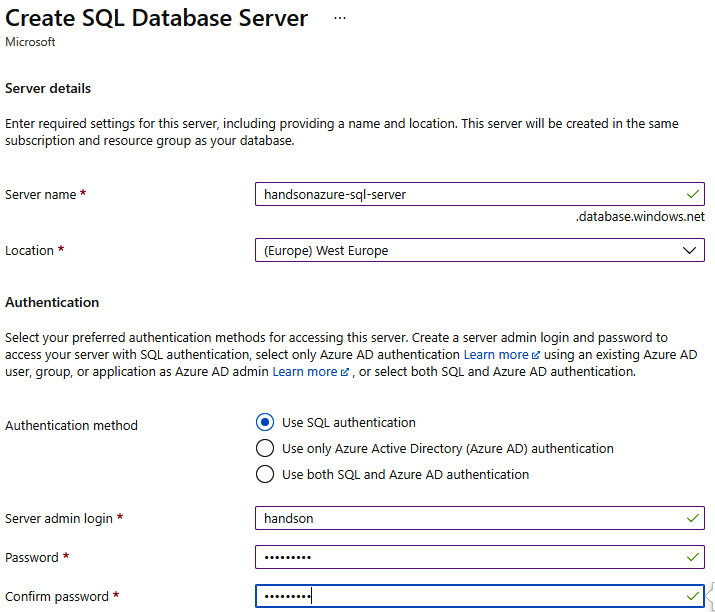
Figure 17.5 – SQL database server configuration
The following screenshot shows the configuration for my database:

Figure 17.6 – SQL database configuration
Let’s click on Configure database and see what are our options for setting up pricing.
For now, we can skip the Networking and Security tabs and go directly to Additional settings. The important thing here is to select the source—you have three options here, as follows:
- None: In most cases, this will be the first option you are interested in
- Sample: This will create a sample database called AdventureWorksLT with example data
- Backup: A great option if you want to provision a database from an available backup
For the Blank database option, you will also have the possibility to select a collation; in that dropdown, select the option that is correct for your data. We will also focus a little bit on the pricing configuration, as shown in the following screenshot:

Figure 17.7 – Pricing configuration
As you can see, when using the DTU-based purchasing model, you decide on how many DTUs and the database size you need (for the Basic tier, there is no slider for DTU selection). In general, you have available three different tiers, as follows:
- Basic: For smaller workloads
- Standard: This offers the best balance between cost and performance
- Premium: For all workloads that require massive performance capabilities
Depending on the tier, you will be offered either a fixed DTU amount (for Basic) or you will have to select the amount you are interested in, as illustrated in the following screenshot:

Figure 17.8 – DTU and database size selection
Tip
The important thing here is the fact that most of your database costs are resource-allocated—remember to select the biggest database size you can (for example, in the Standard tier and with 400 DTUs selected, there is no difference in the pricing between 100 megabytes (MB) and 250 gigabytes (GB)).
Of course, you can also switch between a DTU-based model and vCores selection, as illustrated here:

Figure 17.9 – Database configuration for vCore purchasing model
When using vCores, selecting the Data max size option does affect the pricing. What is more, you have three different tiers available here, as follows:
- General Purpose: The best choice for most common scenarios without specific needs when it comes to resiliency and traffic
- Business Critical: This tier offers better performance and lower latency (and is significantly more expensive)
- Hyperscale: Unlimited storage scaling with database size.
When you are satisfied with your configuration, you can click on the Apply button to save the configuration and then Review + Create so that the provisioning process will start. When it is finished, you can access your resource by going to the Overview blade where basic information is available, as illustrated in the following screenshot:

Figure 17.10 – New SQL database Overview blade
We will now try to go through most of the features so that you have a better understanding of how to work with this service.
Azure SQL features in the portal
We will start with the Compute + storage blade—when you click on this, you will see that it allows you to set both the tier and the pricing model of your database. This option is especially helpful when you want to improve the performance of your database; you can easily change the amount of DTUs or vCores allocated for it, so it can work with queries much quicker.
Tip
As I mentioned before, configuring a single database will work for simpler scenarios, where you can easily monitor it and the performance requirements do not rapidly change. In all other cases, the better option is to use elastic pools.
When you go to the Replicas blade, you will see a screen where is possible to create a new geo replica. This feature is especially helpful if you need to secure your database from regional failures and aim for HA. You can see what this screen looks like here:

Figure 17.11 – Replicas screen
From this screen, you can quickly create a secondary region that allows you to perform a failover when you need it. To do so, click on the Create replica button, which will display the following screen:

Figure 17.12 – Creating a new replica
Note that most of the fields are grayed out and disabled. This is because they are used only for information purposes. What you need is to enter replica details in the Database details section, as follows:

Figure 17.13 – Entering replica details
As you can see, creating a replica will create a new database attached to an additional SQL Server instance managed by Azure. Both replica and primary databases can differ in size and performance.
Note
The database size for the replica and its performance depend on your replication model. If the replica is served as a passive component, it can be less performant than the primary one. However, in an active-active model, all databases should guarantee the same level of performance.
Once a replica is created, you should see a similar view to mine here:

Figure 17.14 – Primary database with replica
Now, if you proceed to the Connection strings blade, you will see a template for a connection string for different environments, as follows:

Figure 17.15 – Connection string for Azure SQL Database
You will also be able to download different drivers for ADO.NET, JDBC, ODBC, or PHP.
Note
Remember that the service presents only a template for your connection string—you will have to set your username and password to make it work.
Currently, we are exploring a SQL database in Azure—let’s check exactly what SQL Server looks like currently. You can find this out by clicking on the server’s name on the Overview blade. Initially, the screen will look the same, but you will quickly realize that it offers many different features, as we can see here:
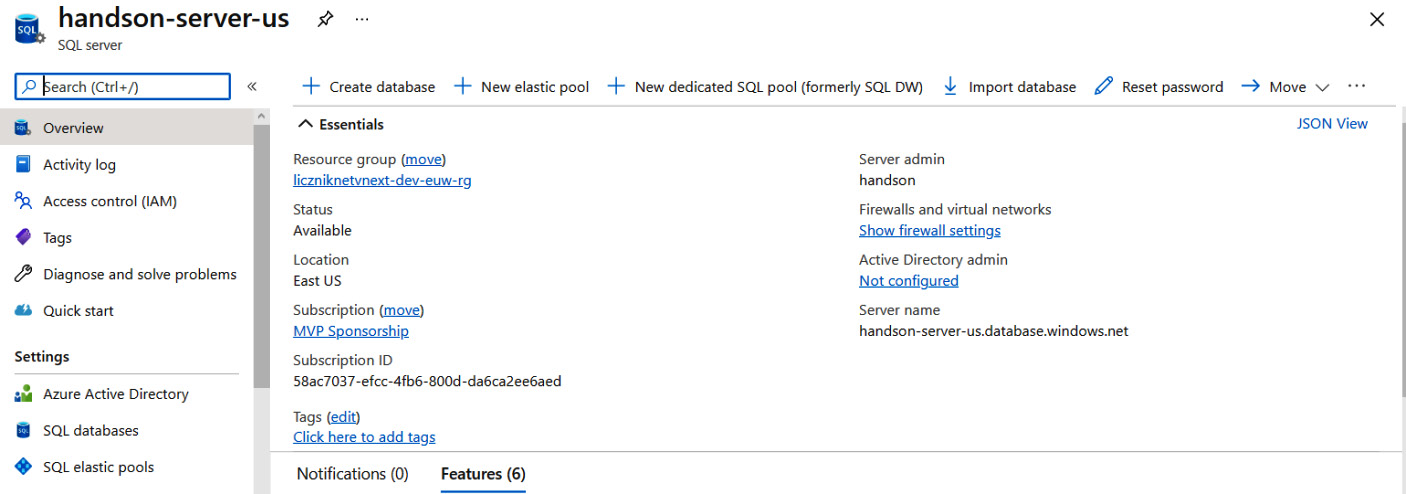
Figure 17.16 – Azure SQL Server overview
Unfortunately, we will not be able to go through all the features, but I will try to describe most of them for you. When we look at the features on the left, we will see the following blades:
- Failover groups: To introduce automatic failover, you must create a failover group. A group consists of a primary and secondary server that have a defined failover policy and grace period—a setting that defines the time between outage detection and the actual failover.
- Backups: To configure backups for your server (for example, to enable long-term retention (LTR)), you can access this blade. It also displays all available backups.
- Azure Active Directory: It is possible to set an admin for your server using a user which is defined within your AD users. Of course, you can set more than a single user for that—the trick is to use a group instead of an individual account.
- SQL databases: To quickly access a database that is served by this server, use this blade.
- SQL elastic pools: Similarly to SQL databases, this blade displays available elastic pools. To create a new pool, go to the Overview blade and click on the + New elastic pool button.
- Deleted databases: Even if a database is removed from a service, you will still have a chance to restore it. In such a scenario, consult this blade for all databases available to be restored.
- Import/Export history: All import and export operations on your databases will be displayed here. This is a great auditing tool, so you will not miss a situation when somebody exported your data without notice.
- DTU quota: If you are interested in seeing the quota of DTUs/vCores for your server, you can access this blade.
As you can see, many functionalities of Azure SQL are similar to on-premises installations of SQL Server or other databases you may be familiar with. In general, the managed version of SQL Server (called Azure SQL Database) should represent the same look and feel as unmanaged versions. However, there can be bigger differences, such as in security features, which we are about to cover.
Security features of Azure SQL
When it comes to Azure SQL features, there are multiple different options you can use to make your solution secure. Things such as firewalls, full operation auditing, and data encryption are the common capabilities of this service and are available even for the Basic tier. In this section, we will focus on learning the aforementioned capabilities so that your instance is secured and immune to most threats.
Firewall
When browsing your SQL database, you probably noticed the Set server firewall button that is available on the Overview blade, as shown here:

Figure 17.17 – Set server firewall button available on Overview blade of SQL database
This is the easiest way to set a firewall rule that allows traffic to Azure SQL.
Note
In Azure SQL, all traffic is initially rejected—you must whitelist all Internet Protocol addresses (IPs) of computers that should be allowed to communicate with the server.
Before we start configuring the firewall, you must understand why we really need it. Here is what happens if I try to connect to my server using Microsoft SQL Server Management Studio (SSMS):

Figure 17.18 – Connecting to Azure SQL Database with no firewall rules applied
As you can see, it automatically detects that my IP is not whitelisted, hence the server refuses to communicate with me. What we need here is to add a particular IP address so that communication will be allowed.
In the portal, you can add the rule by clicking on the Set server firewall button—this will then display a screen where you can explicitly set an IP address that should be able to communicate with the server, as illustrated in the following screenshot:
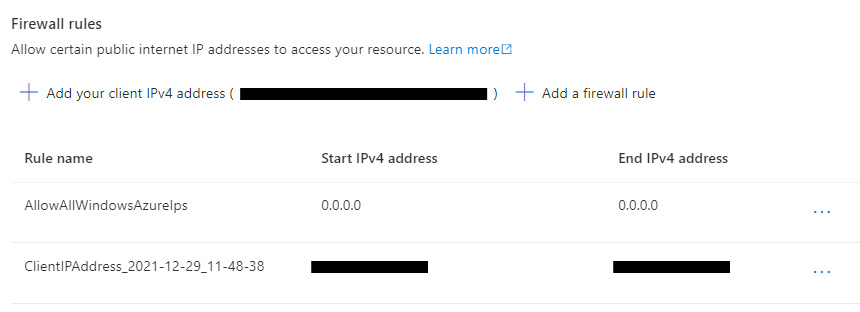
Figure 17.19 – Whitelisting IP address for Azure SQL Server
From this screen, you can also prevent the Azure service from communicating with your instance of Azure SQL. Additionally, you can add a virtual network (VNet) integration here (using service endpoints/private endpoints). Thanks to that feature, you can create a whole ecosystem with your applications and databases so that they are protected from accessing it with a very strict set of rules.
Microsoft Defender for SQL
Microsoft Defender for SQL is a part of Microsoft Defender for Cloud, which by default is not enabled for your service. Currently, it allows for a free trial of 30 days, during which you can test whether this capability is for you. You can enable it using the Microsoft Defender for Cloud blade, as illustrated here:

Figure 17.20 – Accessing Microsoft Defender for SQL
It consists of the following two separate features:
- Vulnerability Assessment: A simple solution for discovering, tracking, and remediating database vulnerabilities
- Advanced Thread Protection: A feature that actively monitors your database for suspicious activities and logs them for you
Once enabled, it will take care of monitoring your database and verifying operations performed against it.
Data classification
By accessing the Data Discovery & Classification blade, you will have access to another Azure SQL functionality that can help you in securing data stored inside your database, as depicted here:

Figure 17.21 – Data classified by Azure SQL
By going to the Classification tab, you will see a table that contains all classifications saved by you or another person working with the database, as illustrated in the following screenshot:

Figure 17.22 – Classifications added for data inside the database
Azure SQL can automatically detect the data type and declare its sensitivity label. Then, it displays a summary that gives you an overall picture of the shape of the data stored in the database.
Tip
This feature is a great tool for analyzing big databases for compliance with new regulations—use it when in doubt as to whether you are storing some sensitive data.
Let’s now check out the auditing features of Azure SQL.
Auditing
If you want to know exactly what happens inside your server, you must enable auditing. The following screenshot shows how to do this:

Figure 17.23 – Enabling auditing
This will log all operations within the selected storage (if, of course, you selected the Storage option). Currently, there are three different options for storing auditing logs, as follows:
- Storage
- Log Analytics
- Event Hub
While Storage is a little bit of a static option, you can use the remaining two for more dynamic integrations (especially when using Azure Event Hubs). Once auditing is enabled, you can see all logged operations as well when you click on the View audit logs button, as illustrated in the following screenshot:

Figure 17.24 – Auditing log of Azure SQL Database
Thanks to integration with external sources, you can easily integrate your database audit with other security tools you are using.
Dynamic Data Masking
Sometimes, you want to allow somebody to read data inside a database, yet at the same time, you do not want them to read more sensitive data (such as birth date, addresses, or surnames). In Azure SQL, there is a feature for that named Dynamic Data Masking, as illustrated here:

Figure 17.25 – Dynamic Data Masking screen
There are two ways to add a mask—either use the recommendation or click on the + Add Mask button to add it manually. The latter option will take you to the following screen:

Figure 17.26 – Adding a masking rule
What you will have to do is select Schema, Table, Column, and Masking field format values—once you configure these and save the rule, users who are not administrators will see masked values instead. The following screenshot shows values for an admin:

Figure 17.27 – Reading database as an admin with data masking enabled
The following screenshot shows values for a user without admin rights:

Figure 17.28 – Reading database as a user with data masking enabled
As you can see, LastName and Email are masked for a non-admin user.
The built-in features of Azure SQL can be really helpful when building advanced systems that require a stricter approach to data integrity and security. We will now see how scaling works for Azure SQL and how to use it in a standard daily scenario.
Scaling Azure SQL
The required performance of your database may differ depending on the time and current state of your application. This is when scaling is all-important—you can adjust cost and available resources depending on the needs of your service. In Azure SQL, there are multiple different scenarios that you will need to consider: whether you wish to use a single database or an elastic pool, whether you need to scale out reads, or whether you need all features available everywhere. In this short section, I will show you how to quickly proceed with your decision and where you can find scaling tools.
Single database
As we mentioned previously, with a single database, scaling is simple—you just need to go to the Compute + storage blade and select the new tier you are interested in. You can easily decide whether you need to scale a database up by watching its performance, as demonstrated in the following screenshot:

Figure 17.29 – Monitoring database performance
If you see constant spikes or, simply, utilization of the database is becoming dangerously close to the maximum values, it is always a good decision to give it a few more DTUs or other resources.
Tip
Remember—you can set alerts when utilization hits upper limits, so there are some ways to automate the process.
Elastic pool
With an elastic pool enabled, things change a little bit—instead of operating on, for example, a DTU for a single database, you can select an elastic pool, which introduces a slightly different model of an elastic DTU. You can see an illustration of this in the following screenshot:

Figure 17.30 – Scaling an elastic pool
In that model, you scale your database using an elastic pool configuration instead. For a single database, you will be able to only change the maximum data size available (which is also limited to the value set by the pool).
Read scale-out
Sometimes, you only need to scale reads for your database. Such a situation occurs when you would rather serve content than modify it (for example, you have a very popular portal that is managed from a single place but is served globally). In Azure SQL, there is a possibility to scale out only a part of the service—the one responsible for managing reads for you.
Note
You need the Premium/Business Critical/Hyperscale tier to get this feature working.
To enable read scale-out on your database, you can use the REpresentational State Transfer (REST) application programming interface (API), as illustrated in the following code snippet:
HTTP PUT
URL: https://management.azure.com/subscriptions/{SubscriptionId}/resourceGroups/{GroupName}/providers/Microsoft.Sql/servers/{ServerName}/databases/{DatabaseName}?api-version= 2014-04-01-preview
Body: {
   “properties”: {
      “readScale”:”Enabled”
   }
}
Alternatively, you can use PowerShell, as follows:
Set-AzSqlDatabase -ResourceGroupName <resourceGroupName> -ServerName <serverName> -DatabaseName <databaseName> -ReadScale Enabled
Remembering that Azure SQL can be scaled out for reads only can be helpful when dealing with database bottlenecks as this can save you from upgrading the whole server and will thus save you some money.
Sharding
The last way to scale your database is to use sharding. As opposed to elastic pools, by using sharding, you allocate individual resources to each of your databases. It is also one of the models for horizontal scaling (so you provision another database rather than scale up the existing one).
Note
You can also use sharding for elastic pools by using the Elastic Database split-merge tool:
In general, you will use sharding if the following applies:
- You have too much data to be able to handle it with an individual instance
- You want to load-balance requests
- You want to geo-distribute your data
The important thing here is the requirement that the data structure for each shard must be the same. You can find full documentation on sharding in Azure SQL in the Further reading section of this chapter.
In general, that approach is much more complicated than simply scaling up/out as it involves careful designing of your database and making sure that data is consistent.
Monitoring and tuning
The last item we cover in this chapter will be the monitoring and tuning of Azure SQL. Because databases are often the heart of many applications, it is crucial to have a quick way to diagnose any issues regarding performance or usage, and easily tweak things if needed. Azure SQL uses multiple different features that you can leverage to get insights from your instance.
Monitoring
To monitor your SQL database, you can use alerts, which should be familiar to you (assuming you have read the previous chapter, Chapter 16, Using Application Insights to Monitor Your Applications). You can access this functionality by clicking on the Alerts blade, as illustrated here:

Figure 17.31 – Alerts blade for Azure SQL
You can use Azure SQL alerts to cover the following things:
- Insufficient performance (metric)
- Invalid queries (metric)
- Configuration issues (metric)
- Overall service health (metric)
- Incoming maintenance activities (activity log)
- Actual service issues (activity log)
- Service health recommendations (activity log)
Tuning
There is a whole group of features, called Intelligent Performance, that allow you to monitor and tune your SQL database performance, as shown in the following screenshot:

Figure 17.32 – Intelligent Performance section
Let’s check out Performance recommendations for now, as follows:

Figure 17.33 – Performance recommendations
While this feature is initially empty, it displays different recommendations while working with Azure SQL. The important thing here is that we can automate things—just click on the Automate button to display another screen where you can select what you are interested in, as illustrated in the following screenshot:

Figure 17.34 – Configuring tuning automation
This screen is, in fact, the Automatic tuning blade presented earlier. You can use it to automate things such as managing indexes or forcing a query plan.
Summary
Azure SQL is a very complex and extended service that works in a similar way to its on-premises version, Microsoft SQL Server. While being a full PaaS Azure component, it still allows for many advanced operations such as sharding, multi-tenancy, AD integration or failover, and geo-replication. Besides being hosted in within a cloud provider's infrastructure, you can still use it in the same way you would a standalone version of SQL Server.
In the next chapter, we will cover the last PaaS service mentioned in this book, which is Azure Data Lake Storage (ADLS).
Questions
Here are some questions to test your knowledge of the important topics in this chapter:
- What is different in terms of update policy between Azure SQL and Microsoft SQL Server?
- What is sharding?
- You created a new SQL database in Azure SQL, but the server refuses to connect to it. What could be the issue here?
- What are the two available purchasing models for Azure SQL?
- What is an elastic pool?
- What is the difference between a DTU and an elastic DTU (eDTU)?
- How can you mask a particular field in Azure SQL?
- Which audit log destinations are available?
Further reading
For more information, refer to the following sources:
- How to understand DTUs: https://sqlperformance.com/2017/03/azure/what-the-heck-is-a-dtu
- Performance recommendations: https://docs.microsoft.com/en-us/azure/sql-database/sql-database-advisor
- Adaptive query processing: https://docs.microsoft.com/pl-pl/sql/relational-databases/performance/adaptive-query-processing?view=sql-server-2017
- Securing SQL Database: https://docs.microsoft.com/en-us/azure/sql-database/sql-database-security-overview
- Read scale-out: https://docs.microsoft.com/en-us/azure/sql-database/sql-database-read-scale-out
- Sharding: https://docs.microsoft.com/en-us/azure/sql-database/sql-database-elastic-scale-introduction