
23
Azure Application Gateway as a Web Traffic Load Balancer
Many load-balancing solutions operate on Layer 4 in the OSI model. This means that they cannot make any decisions based on HTTP, which carries information relating to the URL or headers. With Azure Application Gateway, you can extend your current architecture with a service that offers features such as Web Application Firewall (WAF), static IPs, and zone redundancy.
By going through this chapter, you will learn another way of load balancing requests. In the previous chapter, we learned about a global load balancer – Azure Front Door. Azure Application Gateway can be used as either a separate solution or another element of your architecture that is connected to your applications in a tighter way.
The following topics will be covered in this chapter:
- Azure Application Gateway features
- Configuring routing
- Integrating with web applications
- URL rewriting and redirects
Technical requirements
To perform the exercises in this chapter, you will need the following:
- An Azure subscription
Azure Application Gateway features
When hosting a web application, we always need to consider how it will be exposed to the public internet. While exposing them directly will likely work for all cases, there are things that should be discussed before deciding:
- Load balancing – how we are going to distribute traffic between existing instances
- Security – handling malicious and malformed requests
- SSL offloading – do we need to handle HTTPS directly on our web server?
In general, a web application that is directly exposed to external traffic is a viable choice only for smaller web pages. If our architecture requires a more sophisticated approach (for example, we are going to have multiple instances hosted across various regions), we will need an additional component to handle incoming requests.
Now, let us consider how traffic should be handled. If we are going to decide whether a request is correct or incorrect depending on its payload, we need a component that can handle traffic coming through OSI Layer 7. In other words, we need something that can read an HTTP request and understand it. Standard Azure Load Balancer, very often used in connection with Azure Virtual Machines (VMs), will not satisfy that requirement as it works only on OSI Layer 4 (TCP/UDP). To be able to do that, we need Azure Application Gateway.
To explain the whole concept better, let us look at the following diagram (Figure 23.1):
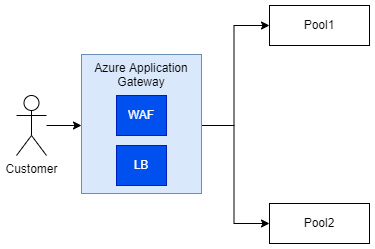
Figure 23.1 – Simplified diagram of Azure Application Gateway communication
The diagram shows three important concepts of Azure Application Gateway:
- WAF
- LB (Load Balancer)
- Pool
We will introduce them one by one for a better understanding of the service.
WAF
To secure your web application against common attacks, the concept of WAF was forged. WAF is a centralized service, which helps in protecting services against known exploits and vulnerabilities. Under the hood, WAF is based on OWASP core rulesets, which include mitigation paths for attacks such as SQL injection, Cross-Site Scripting (XSS), and shell injection.
While WAF cannot secure you from all possible attacks, it greatly improves the security of your application and gives you more time to introduce additional layers of security. It is also a common pattern for web security, plus it is based on a well-known set of rules, which are used across hundreds of applications.
Note
WAF in Azure is a part of different services, which can be configured independently. You can use it in Azure Application Gateway, Azure Front Door, and Azure CDN. While general capabilities stay the same, its configuration will be different for each of the listed services.
Remember that in Azure Application Gateway, WAF is a separate feature (a separate tier), which is billed differently than the basic version of the service. Here is a comparison:
- $0.26 per hour for the Standard tier
- $0.468 per hour for WAF
As you can see, there is quite a huge difference between those two tiers in terms of pricing – on the other hand, if you think about securing a web application endpoint, even if you use standard Azure Application Gateway, you will need to host WAF somewhere else.
Load balancing
Azure Application Gateway acts as a load balancer working on OSI Layer 7, meaning it can understand HTTP requests and make decisions based on a request’s payload. Under the hood, the concept is based on pools, which are your web servers handling requests. For example, let us assume you have two separate logical routes:
- /app
- /images
The first one is handled by one backend, which hosts your web app. The second one is configured to access CDN or a similar kind of server, which returns cached images. As Azure Application Gateway understands the differences between those requests, it can forward them to the appropriate backends. We will talk more about this feature later in the chapter.
Multiple-site hosting
Many load balancing solutions require configuring a single domain, which is then used for further configuration of connected backends. In Azure Application Gateway, you can attach multiple domains to the same instance of the service, meaning you can use it as a central gateway to your infrastructure, which load balances all the requests coming to it. The same applies to the use of subdomains.
Rewriting URLs and headers
Similar to Azure Front Door, Azure Application Gateway can rewrite both URLs and headers. This is helpful when you want to remove headers, which should not be passed to applications, add a new one centrally, or redirect each request to an additional backend for further verification. It also allows for a more advanced setup with the use of conditional rewrites allowing you to implement additional logic for the process.
While those are not all the features available, let us now see how Azure Application Gateway is provisioned and how we can configure its basic feature – routing.
Configuring routing
To enable load balancing with Azure Application Gateway, we need to configure routing. To explain that concept a little bit – we need a way to connect our frontend (the part of the architecture responsible for handling incoming requests) with backends (services hosting our application logic). We will explain that concept using the Azure portal and the Azure Application Gateway configurator.
In the Azure portal, click on + Create a resource and search for Application Gateway, then click on the Create button to start the process:

Figure 23.2 – Starting configuration
The basic configuration of my instance looks as follows. I selected StandardV2 tier (no WAF) and created a virtual network directly on that screen (Azure Application Gateway cannot be created without integration with a virtual network):
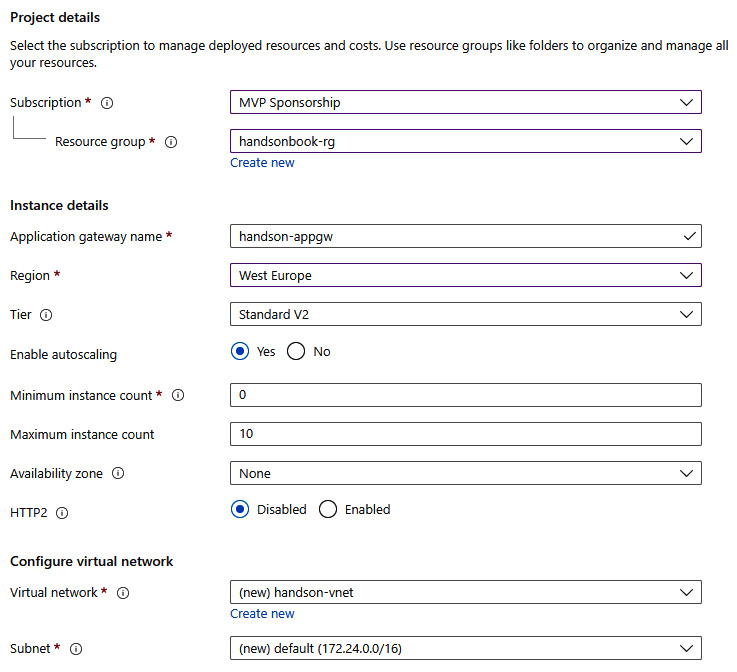
Figure 23.3 – Basic configuration
There are additional features that we could enable right now, but we’ll skip them as they are not required. However, if you want, you can configure availability zones for your instance (so the availability of the service will be improved) and enable HTTP2 if your client will communicate using that protocol. With the basics configured, let us go to the next tab – Frontends.
We need to tell Azure how we want to handle incoming traffic for Azure Application Gateway. We have three choices:
- Public
- Private
- Both
The choice depends on your architecture. If you want to keep traffic private and handle internal requests only, you can go for a private IP. For handling public traffic, we need to have a public IP assigned to our instance of the service.
Note
When Standard V2 tier is selected, we cannot select a private IP frontend as it is not supported. For that tier, the options available are a Public IP or Both.
If you do not have an available IP address, you can click on the Add new link for a quick create option. Here, you can see my frontend configuration:

Figure 23.4 – Configured frontend
With the frontend configured, we can do the rest of the configuration. First, we need to configure a backend pool. To keep things short, a backend pool is a collection of resources (backends) that can be linked with Azure Application Gateway and then used for routing. Here, you can see my simple backend pool with a single Azure App Service instance inside it:

Figure 23.5 – Backend configuration
Tip
If you do not want to link a backend pool to a backend, you can just create an empty one by switching Add backend pool without targets to Yes.
The last step of configuring our instance is to connect the dots – our frontend with the backend pool. This is done via routing rules, which can be configured in the Configuration tab:

Figure 23.6 – Configuration tab
Let us click on the + Add a routing rule button to see what can be done here. The routing rule is quite a complicated concept as it is based on two elements – a listener and a backend target. Here, you can see my listener configured to listen on HTTP 80:

Figure 23.7 – Configuring a listener to listen on port 80 for HTTP
I chose a Basic listener type as I have a single site, which would be connected to it. For more advanced scenarios (multi-site), you would need to go for the Multi site type. With the listener configured, we need to select Backend targets, which will be linked to it:

Figure 23.8 – Configured routing rule
Additionally, you will need to create a backend setting. This element is responsible for configuring how the backend will be reached – which protocol and port will be used – and additional settings (such as session affinity or path override). You can see a simple configuration here:
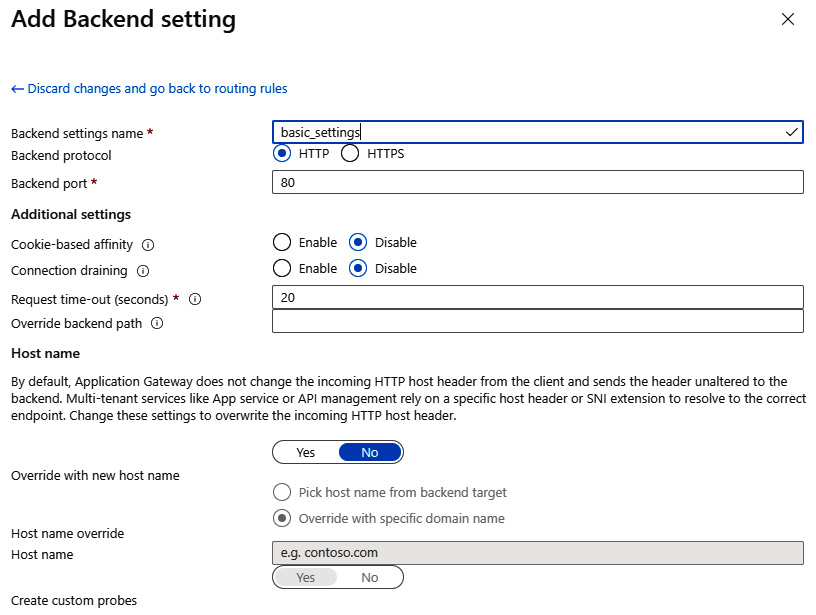
Figure 23.9 – Backend setting configuration
With all the elements correctly set, you can click on the Review + create button and start provisioning. Note that it can take some time as Azure Application Gateway consists of multiple underlying components that need to be deployed. Once it is created, you can access your instance – if everything is correct, you should see no errors and be able to use the public IP of the service to access your backend. However, the default configuration can contain some errors that prevent users from accessing the web application. In that scenario, you will see the following error:
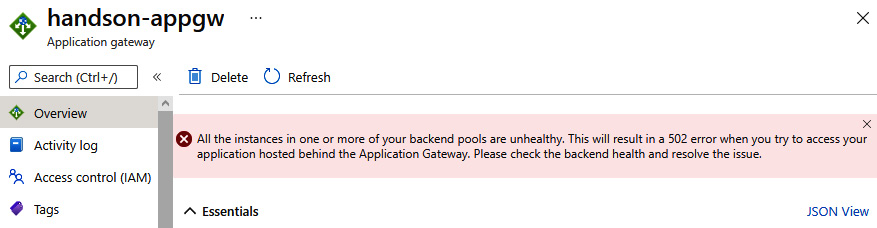
Figure 23.10 – Error indicating that backend pools are incorrectly configured
We will cover adjusting settings in the next section of this chapter.
Integrating with web applications
To connect to your web application, Azure Application Gateway needs to have a proper configuration of the backend. By accessing the Backend settings blade, you have access to all the parameters that are used for a connection. If they are incorrect, the backend pool will report Unhealthy as the endpoint status and return HTTP 502 as a result. It is important to understand the implications of the parameters used to avoid problems with connectivity.
In the previous sections, we created an instance of Azure Application Gateway using default settings. This can cause problems as, by default, the incoming host header will not be rewritten to match a backend. To change that, go to Backend settings, select your settings, and see the Host name section:

Figure 23.11 – Proper configuration of the host name override
To fully integrate our service with Azure App Service, we need to change the Override with new host name option to Yes and allow it to select a host name from the backend itself. With that enabled, you should be able to access the underlying web page:

Figure 23.12 – Working Azure Application Gateway routing request to Azure App Service
The reason for doing that is quite simple – technically, Azure App Service relies on a host header to resolve it to a correct endpoint. Without overriding it, we are sending Azure Application Gateway’s endpoint downstream, which results in an error as it cannot be resolved to match an existing web application endpoint in Azure.
This parameter is not always required as it solely depends on the infrastructure handling a request. If it does not require a host header to be present (or correct), you will not have to change anything on that level.
Let us now see how we can perform rewrites and redirects.
URL rewriting and redirects
As most load balancers work on Layer 7 of the OSI model, Azure Application Gateway is capable of performing rewrites and redirects of incoming requests. That feature is handy if we need to change the desired URL or the underlying resource moved and we could not make that change on the client layer.
To configure rewriting, go to the Rewrites blade and click on the + Rewrite set button:

Figure 23.13 – Rewrites blade
Creating a rewrite set requires two actions:
- Giving it a name
- Associating it with existing routing rules
The mentioned configuration may look like this:

Figure 23.14 – Configuring the name and association of a rewrite set
Then we can go to the next tab and start configuring rewrite rules. By clicking on + Add rewrite rule, you will start the process and all the buttons and fields will become enabled. In the beginning, we need to enter both the name of a rule and its sequence, which determines the order of rule execution:

Figure 23.15 – Rule name and sequence number
The next step involves clicking on the + Add condition button so our rule will contain two elements:
- A condition
- An action
In other words, the rule’s action will be executed only if a request matches the configured condition. On your screen, you should see the following view:

Figure 23.16 – Empty rule with one action and one condition
Let us try to configure a condition first. To do so, click on it, so an extended view will be displayed. There, we can enter all the details needed to decide whether an action should be applied. I configured a condition, which checks for a value of a custom header as follows:
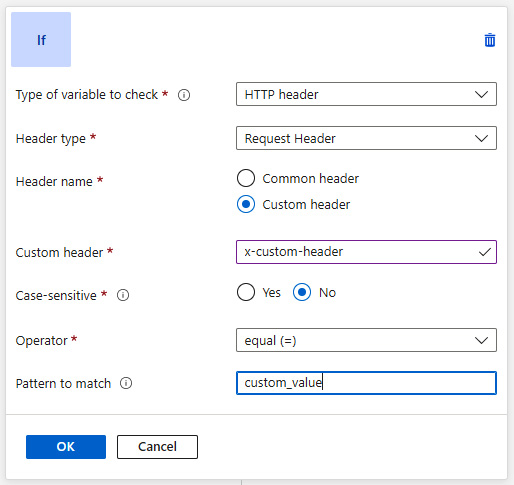
Figure 23.17 – Condition checking for a value of a custom header
As you can see, if a request contains the x-custom-header header with the value custom_value, the condition will be matched, and the action can be performed. Now let us configure an action:

Figure 23.18 – Action configuration for URL rewrite
The action defined in Figure 23.18, when applied, will rewrite the request to /custom_path. In general, the possibilities are quite wide-ranging – you can decide to rewrite either a path, a query string, or both. By using Re-evaluate path map, you can rewrite a request to a different pool post rewrite. If everything is correct, you can save a rule and test it.
Summary
This was the last chapter describing Azure services and load balancing in particular. It should allow you to further explore the topic as traffic management in Azure is quite a broad subject and, depending on your needs, a different service may be the best fit.
In this chapter, we talked about the basic capabilities of Azure Application Gateway, integration with Azure web applications, and URL rewrite configuration. Compare those features with Azure Front Door, described in the previous chapter, to get a better understanding of the differences.
In the next chapter, we will cover tips and tricks useful when working with Azure. We will also describe automated deployments of infrastructure using an Infrastructure-as-Code (IaC) approach with ARM templates and Azure Bicep.
Questions
Here are some questions to test your knowledge of the important topics covered in this chapter:
- What is WAF?
- Is WAF enabled in Azure Application Gateway by default?
- Can you apply a URL rewrite based on a condition?
- Does Azure Application Gateway work on the same OSI layer as Azure Load Balancer and Azure Front Door?
- Can you use Azure Application Gateway with private IPs only?
Further reading
For more information, refer to the following source:
- WAF core ruleset: https://coreruleset.org