
3
Deploying Web Applications as Containers
Containers are one of the hottest topics in the IT industry. They allow for deploying an application in a box, so you don't have to worry about the OS your application will run on or the installed services that are required for it. While containers are sometimes criticized for redundant abstraction over underlying resources, they guarantee a stabilized environment for both developing and hosting applications.
In this chapter, we will cover the following topics:
- Different ways of hosting containerized applications
- Azure App Service – a web app for containers
- Azure Kubernetes Service – a managed Kubernetes service
- An introduction to Azure Kubernetes Service, which is a managed Kubernetes service designed to host your applications in a structured way
Technical requirements
To start working with containers in Azure, you will need the following:
- A basic understanding of Docker concepts: https://docs.docker.com/get-started/
- A Docker development environment: depending on the OS you are using – https://docs.docker.com/docker-for-mac/, https://docs.docker.com/docker-for-windows/, or https://docs.docker.com/install/
- A Docker Hub account
- The Azure CLI: https://docs.microsoft.com/en-us/cli/azure/install-azure-cli?view=azure-cli-latest
- A basic understanding of Kubernetes: https://kubernetes.io/docs/home/
- The Kubernetes CLI: https://kubernetes.io/docs/tasks/tools/install-kubectl/
Different ways of hosting containerized applications
As already mentioned in the previous chapter, to host a containerized application using any kind of service provider, you will need a container registry. Once a registry is deployed, you can push your images there. This process can be easily visualized with the help of the following diagram:

Figure 3.1 – A high-level diagram of a container image life cycle
Once an image is available inside your registry, it can be used by any kind of container platform available on the market, assuming it can authenticate with Authentication Context Class Reference (ACR). If we consider Azure only, there are several ways to run an application using its container image:
- Using ACR Tasks
- Running an image using Azure Container Instances (to be discussed in Chapter 4, Using Azure Container Instances for Ad Hoc Application Hosting)
- Deploying a virtual machine with support for running containers and running a container with one of the available options:
- Installing Docker and pulling images from ACR
- Pushing your application data along with a Dockerfile to the machine and just using the Docker CLI to run it
- Installing any kind of container platform/orchestrator on a machine and using it to run the application (for example, Kubernetes)
- Using Azure Kubernetes Service
- Using Azure App Service, which can run an application using an image instead of its code
Each of these methods has some pros and cons. We can summarize them using the following table (where green represents the best option, yellow introduces some minor issues, and red constitutes major problems or a lack of key features):

Figure 3.2 – Different features of various container hosting methods
As you can see, there is not a single method that does not have any kind of flaw. Some of these are bigger (such as the scalability of a virtual machine with code that is way beyond the capabilities of Azure Kubernetes Service) and some are smaller (the flexibility of Azure App Service depends solely on your requirements and often can be addressed by a slightly different application design or the support of an additional Azure service), but ultimately, the choice is yours. You must always apply your business and technical requirements to each of the mentioned services and see what suits you the most.
There are three important factors when hosting web applications using containers:
- What is your scalability target – is this application going to serve tens, hundreds, or thousands of requests in a unit of time?
- What is your deployment method of choice? Are you going to use CI/CD for each of the deployments? How often will deployments be made? Do you need additional checks while deploying code?
- What kind of application do you have? Is it a typical API-like service, a continuously running web job, or a static website?
Now, if you aim for specific characteristics, you must consider how each of the possible solutions will behave when the targeted traffic hits:
- ACR Tasks needs additional orchestration to be able to run multiple containers and, in fact, is not designed to answer any kind of web requests (rendering the whole solution unusable in a web application scenario that needs user/application interaction).
- Azure container instances are mostly used for fire-and-forget scenarios such as performing analysis, data generation, and background tasks. They can easily scale to the desired size though.
- Using a VM gives you the best flexibility (as you govern most of the OS aspects) but it can be cumbersome as it requires infrastructure knowledge (including networking, disks, and firewalls) and often generates lots of technical debt, which is hard to deal with.
- Setting up a container platform can address most of the issues, but it is one of the most difficult tasks to be done properly and is rarely a good solution unless you can really leverage the benefits of that approach.
- Deploying your web application using a managed container platform such as Azure Kubernetes Service is something that is gaining more and more popularity and helps to build a whole ecosystem rapidly and in a business-focused manner. Still, it is not the easiest task as, in most real-world scenarios, you will have to deal with abstraction layers for the underlying infrastructure that have to be understood and applied with care.
- Azure App Service is a safe choice and offers a good balance between flexibility, cost, and required technical knowledge. If you are familiar with web apps in Azure (see Chapter 1, Web Applications in Azure – Azure App Service, for more information), there is a huge chance the whole transition will be seamless.
There are also additional options to consider when using Microsoft Azure, but they are mostly connected to virtual machines and often are just an additional layer over currently described solutions. You've probably heard about platforms called service meshes. If you do not know what a service mesh is, here is a short explanation.
Many developed applications consist of multiple services, which communicate with each other. This is often a result of moving from a monolith architecture, where all the parts of the application were the same code base. That kind of fragmented architecture is often called a microservice architecture and can be visualized as follows:
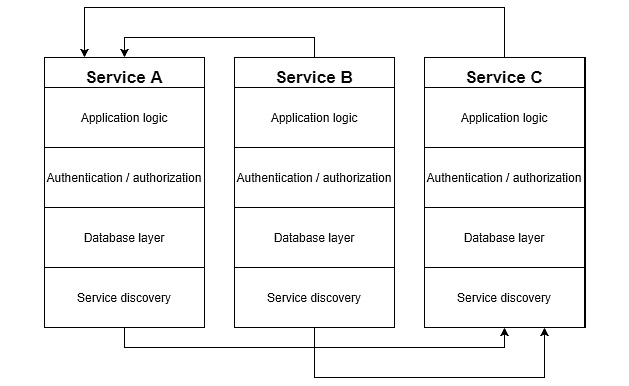
Figure 3.3 – Simple microservices architecture
As you can see, each service can communicate with the others. What's more, each service is built using the same layers, including database access, service discovery, and authentication/authorization logic. For obvious reasons, that method of building an application can become problematic at some point in time:
- Logic duplication forces developers to start building common packages, which quickly become outdated and differ between services.
- Each application implements additional layers for performing common operations, which should be implemented in dedicated services (why does an application perform authorization when its purpose is to push an order into a database?).
- Communication becomes hard to monitor as more and more services are added and they connect with each other chaotically.
Now, let's imagine that each service is a separate container image pushed to our ACR. Containers will help in making hosting much easier as they encapsulate a service ecosystem and can be easily moved between different hosting options. What none of the described solutions solve is the mentioned fragmentation of responsibilities and logic. If your application is already containerized, you can try to leverage the benefits of using service meshes, which will simplify the diagram from Figure 3.3 to something like this:

Figure 3.4 – A simple service mesh architecture
To cut a long story short, service meshes change the way services communicate by hosting a thing called a sidecar along with each of the services. Each service has its own sidecar running on the very same host and communicates only with it. Sidecars and service mesh control planes take care of implementing common application logic such as routing, authentication, service discovery, and many, many more. They play very well with containerized applications as most service mesh implementations use either virtual machines or Kubernetes as their host. As Microsoft Azure currently does not offer any kind of managed service mesh, if you want to use it, you will have to install it on your own. There are many different mesh implementations available, but if you want to give it a try, here is a list of the most popular ones:
- Linkerd – https://linkerd.io/
- Istio – https://istio.io/
- Consul – https://www.consul.io/
- Kuma – https://kuma.io/
Each of the implementations offers detailed instructions on how to set it up and configure it. If you liked this topic, I encourage you to at least demo one of them. It will give you a better understanding of how service meshes work and what they can offer you.
Azure App Service – a web app for containers
In Chapter 1, Web Applications in Azure – Azure App Services, we went through the basic configuration of web applications in Azure and discussed ways to deploy them. What we used there was deployment via code – we prepared our application's structure, packaged it, and sent it to Azure App Service. Depending on the deployment choice (whether you are using a simple file deployment or running your application from a package), Azure App Service either just uploaded files to the appropriate directory or used an archive as the source. In this chapter, we will take a little bit of a different approach and deploy our application using a container image.
Note
A prerequisite for this exercise is having an Azure Container Registry deployed. If you do not know how to do that, look at Chapter 2, Using Azure Container Registry for Storing and Managing Images, where we discussed the process in detail.
Now, let's prepare a simple application for deployment.
Preparing an application
If you are familiar with Docker and any kind of application platform (such as .NET, Java, or Python), you can prepare your very own application and you do not have to follow instructions from this section. I, to keep things simple, will reuse a simple PHP application from Chapter 1, Web Applications in Azure – Azure App Services, so we can keep track of the important aspects of this exercise.
The first thing we need here is our application code. My application will display a short message once it is run successfully. Its code looks like this and is saved as an index.php file:
<?php
echo('Hello world from Azure App Service - PHP here!');
?>
As I want to run my application using a container, I will need a Dockerfile, which will containerize it and allow it to be run using any kind of container platform (or in this case, Azure App Service). To run a PHP application inside a container, we will need a PHP base image. You can see it configured in the following Dockerfile:
 FROM php:8.0-apache
WORKDIR /var/www/html
COPY index.php index.php
EXPOSE 80
The above instructions tell Docker to fetch the base PHP image, copy all the files from my working directory to the /usr/src/myapp catalog, and then run PHP from the CLI and pass the index.php file as an argument. You can check whether your Dockerfile is valid by running the docker build command like this:
> docker build -t <image-tag> .
Depending on your internet connection and the availability of the base image locally, the process may take either several seconds or a few minutes. Be patient – Docker will inform you about all the intermediary steps:

Figure 3.5 – Building a Docker image locally
You can also use the docker run command to check how a container behaves:
> docker run -it –-rm –-name <container-name> <image-tag>
If everything is correct, you should see a result similar to mine:

Figure 3.6 – Running a container locally
Now, as everything seems to work locally, we need to prepare our image to be pushed to ACR. To do that, we will need to make an alias for our image. That can be done easily with the docker tag command:
> docker tag <current-tag> <login-server><target-tag>
In my case, as I named my image handsonbook-php, the command will look like this:
> docker tag handsonbook-php handsonbookacr.azurecr.io/handsonbook-php
Note the prefix I added to the target image name – it is a parameter called login server, which can be found in your ACR. To get it, go to the Azure portal and find your ACR instance. Login server will be available on the Overview blade:
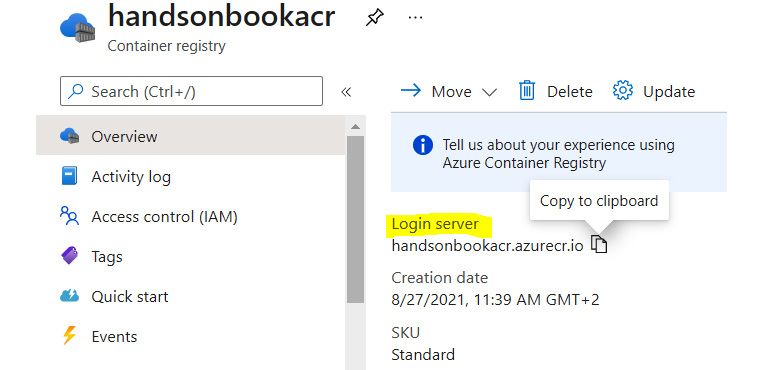
Figure 3.7 – Login server parameter
It can be also fetched using the Azure CLI:
> az acr show -g <resource-group> -n <acr-name>
Once you run the command, search for the loginServer parameter:

Figure 3.8 – Finding the loginServer name parameter with the Azure CLI
Let's now create an alias. Prepending the local tag with the name of your login server is required for Docker, so it knows to which server to push an image:

Figure 3.9 – Creating an alias for an image and verification
As you can see, immediately after creating an alias, I used the docker images command to verify whether a new alias was created. Now we can finally push our image to ACR. To do that, we will simply use the docker push command:

Figure 3.10 – Pushing an image to ACR if not authenticated
Unfortunately, the whole process finished with an error – it seems we are not authenticated and ACR rejects such a request. To authenticate, we can use one of the following methods:
- Use az acr login
- Use docker login
The commands look like this – this is the first one:
> az acr login -–name <acr-name>
And this is the Docker one:
> docker login <acr-name>
Both will give you the same result, so it is up to you which one to choose. Personally, I always go for the first one using the Azure CLI:

Figure 3.11 – Successful ACR login
Now, let's try to run docker push once again. With ACR authenticated, we should be able to finally push our image:

Figure 3.12 – Container image successfully pushed to ACR
With a container image pushed, we can now create an Azure app service, which will use that image as the application source.
Using a container image in an Azure App Service plan
Go to the Azure portal and click the + Create a resource button, and then go and find Web App in the marketplace:

Figure 3.13 – Searching for Web App in Azure Marketplace
Fill in the Project Details section as described in Chapter 1, Web Applications in Azure – Azure App Services, and then go to the Instance Details section. There, set the Publish parameter to Docker Container:

Figure 3.14 – Configuring Web App to run from a container
The rest of the parameters can be configured as you want as they do not affect how a container is run.
Tip
If you need help configuring the rest of the parameters on the Basics tab, refer to Chapter 1, Web Applications in Azure – Azure App Services. There, you have all the parameters explained in detail.
Note that once you have selected Docker Container, there is a new tab available named Docker. Once everything from the Basics tab is ready, click the Next : Docker button:
Figure 3.15 – Docker tab button
From the Docker tab, you will gain access to the Web App configuration related to running an application using a container image. Change the image source to Azure Container Registry and select the registry where your image is stored.
Tip
Accessing ACR from Azure App Service requires an admin account enabled for ACR, which is disabled by default. To enable it, see the following article from the documentation: https://docs.microsoft.com/en-us/azure/container-registry/container-registry-authentication?tabs=azure-cli#admin-account. If your Azure Container Registry does not have this option enabled, you need to follow the previous link and restart the creation wizard.
The default parameters for the Docker tab should suffice. The final configuration on your side should look like mine:

Figure 3.16 – Docker configuration for Azure App Service
Now you can click the Review + create button and run the final validation and then click on Create. The process of provisioning your application will begin and you will have to wait a moment for it to finish. Once it is completed, you can go and try to access your website to see whether it works.
When running a containerized application, you can find Azure App Service in the portal and access the Deployment Center blade and then the Logs tab:

Figure 3.17 – Logs from a container run by Azure App Service
The first run can take some time as Azure App Service needs to download and run a container based on the image fetched from ACR. In this section, we prepared an application that uses Apache as a web server for handling requests. This is a case for languages such as PHP, while other platforms, such as .NET or Java, do not have such a problem with running from Docker images as they often bundle a server with the framework code and allow you to run an application directly from the CLI. The only thing needed here is to provide the link to your application code.
In the last part of this chapter, we will talk a little about Azure Kubernetes Service and how it can be used to run a web application in a container.
Azure Kubernetes Service – a managed Kubernetes service
So far, we have discussed different ways of hosting containerized applications, such as Azure Virtual Machines and Azure App Service. While they provide a set of functionalities that should address most requirements, they lack one key feature, which is important in a real-world scenario – orchestration. It is difficult to orchestrate the deployment of multiple services and arrange communication between them. They also rarely offer optimal hosting density – using virtual machines allows you to utilize their capacity in a way you expect, but this requires custom code and lots of expertise. Azure App Services is designed to host a monolith rather than a set of interconnected services. This is where platforms such as Kubernetes come in handy – they cover all the underlying layers responsible for common tasks such as ingress, partitioning, and intra-service communication, and allow you to focus on building your ecosystem in line with your business requirements. In this section, you will learn about basic Kubernetes concepts and the features of managed clusters.
Kubernetes and managed cluster basics
Kubernetes itself is a cloud-agnostic tool, which can also be run using an on-premises infrastructure. So, if you have access to a set of virtual or physical machines, you can use them to run a Kubernetes cluster. The high-level architecture of such a cluster may look like this:
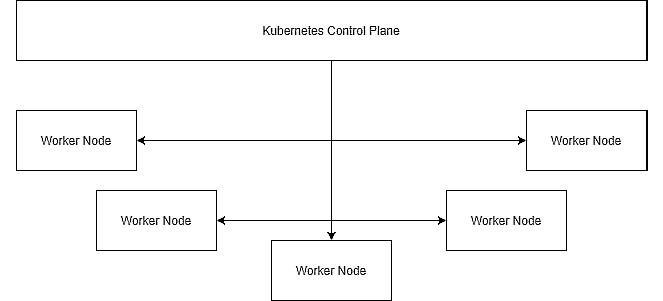
Figure 3.18 – High-level Kubernetes architecture
A standard Kubernetes installation consists of a control plane and a set of worker nodes. The control plane is responsible for controlling the whole cluster – the availability and connectivity of worker nodes, scaling the cluster up and down, and the management tasks. Worker nodes are the actual workers in your cluster – they run your application code and scale services as per their definitions. This setup comes with a few things to consider:
- If you want to have a highly available cluster, you must replicate your control plane. Worker nodes do not have to be replicated as they are only used to run application code and it is up to the application's definition to decide how many copies of it should be available.
- Control plane configuration and management operations are critical for the stability of your cluster. If you do not have experience with that, you may easily render the whole cluster unavailable.
- The security of the control plane is crucial so that all applications can run in a safe environment. Again, this requires prior knowledge and experience and it is better if it is done by Kubernetes experts.
Because of all the things mentioned, it is easier (and safer) to use a managed installation of Kubernetes such as Azure Kubernetes Service.
Note
Bare metal and unmanaged installations of Kubernetes are still viable for all applications, which require a higher level of security, isolation, or very strict networking policies. If you do not want to use managed Kubernetes in Azure, you can use a fully customized installation on Azure Virtual Machines or aks-engine as a way to provision a self-managed cluster.
In Azure Kubernetes Service, responsibility for the control plane is moved to your cloud provider:
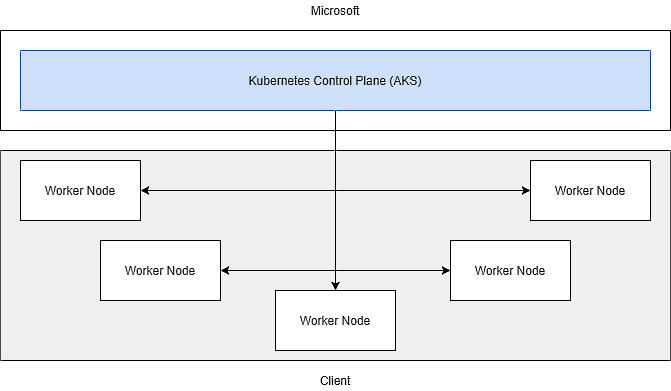
Figure 3.19 – Azure Kubernetes Service responsibilities
Your responsibility will be the management of worker nodes. The control plane will still be available to you, but not physically – you can manage it via tools such as kubectl, but cannot alter anything regarding its infrastructure. Also, the only way of scaling your cluster will be adding or removing worker nodes – you do not have access to change the number of nodes used by the control plane.
Note
In Azure Kubernetes Service, you pay only for your worker nodes – the pricing for that service does not include the cost of the control plane, which is free of charge.
Let's now see how to set up your first cluster and deploy an application to it.
Azure Kubernetes Service deployment
To deploy a cluster, we will use the Azure portal to describe all the steps in detail. In the portal, click the + Create a resource button and search for Kubernetes service, as shown in the following screenshot:
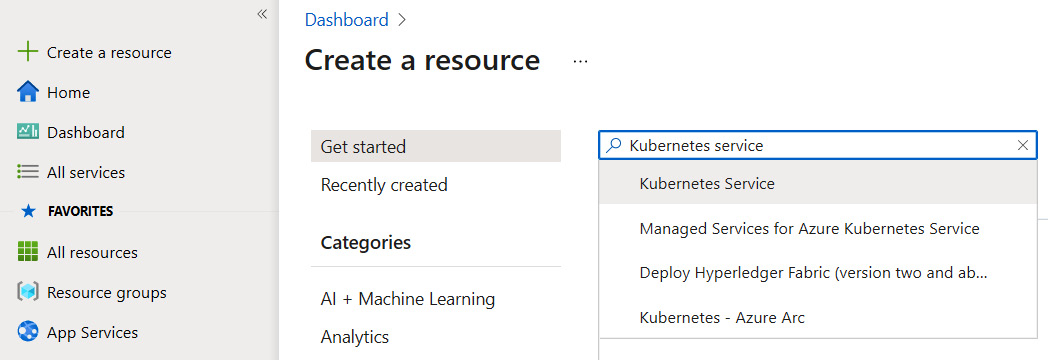
Figure 3.20 – Searching for Kubernetes service in Azure Marketplace
Click on the highlighted position and then proceed to the resource creation wizard. You will see a common resource creation layout, where we can enter all the required parameters. In the Project details section, enter the subscription and resource group, which will be used as the landing zone for our Kubernetes cluster:
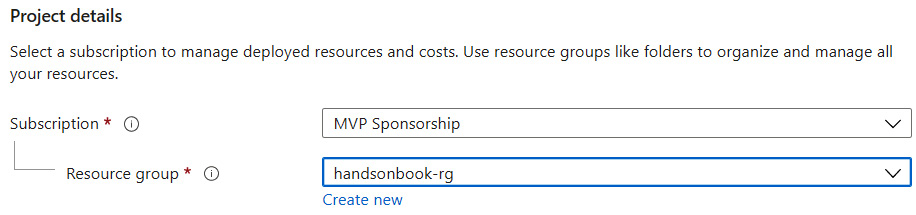
Figure 3.21 – Project details
Now, in the Cluster details section, click on View all preset configurations. This will display a screen that can be used to quickly configure the most common settings:

Figure 3.22 – Preset configurations
From the displayed list, select Dev/Test and click the Apply button. We do not need additional features of the rest of the available presets for now – you can learn more about them later by reading the Azure Kubernetes Service documentation:

Figure 3.23 – Selecting the Dev/Test preset
Selecting a preset will set most of the parameters to some default values. The only thing left here is entering our cluster's location and its name. Here you can find my configurations:

Figure 3.24 – Cluster configuration
Now go and click the Review + create button for the final confirmation and complete it by clicking on Create. This will initialize the process of cluster creation, which may take a few minutes.
Note
To keep things simple, we are not diving into the more advanced configuration parameters of Azure Kubernetes Service and are skipping most of the non-default settings. To learn more about those service capabilities, look at the Further reading section at the end of this chapter.
Once our cluster is provisioned, we can prepare our application for deployment.
Application deployment
To deploy an application to the Kubernetes cluster, we will need a bunch of things:
- Application code
- Dockerfile
- Azure Container Registry (or any other kind of registry that can be integrated with Kubernetes)
- Application definition for Kubernetes
For the sake of this chapter, we will focus on describing the steps required to build your application configuration and all the deployment components. We will use a simple static HTML page to display hello text for a user.
Here is the code for our static HTML page:
<!DOCTYPE html>
<head>
    <title>HandsOnBook 2.0</title>
</head>
<body>
    Hello from AKS!
</body>
As you can see, once deployed, it should display Hello from AKS! as our welcome text. Save it as index.html for further use. To host such a static website, we will need a web server. There are plenty of different options available (which one you choose depends on your technology stack, experience, and technical requirements) and in fact, most of them can handle our page. To keep things simple, we will go for NGINX.
As Azure Kubernetes Service hosts containerized applications, we will prepare a Dockerfile, which should allow us to build an image running the NGINX server with our static HTML file attached to it. Our Dockerfile will be as simple as this:
FROM nginx:alpine
COPY . /usr/share/nginx/html
As you can see, it will perform two steps:
- Build an image from a base NGINX image
- Copy all the files from the working directory to the appropriate NGINX directory
Now, let me remind you how to utilize such an image and push it to Azure Container Registry. To do that, we need a compiled image prefixed with our Azure Container Registry login server.
Tip
If you do not remember how to find your login server, take a look at the Azure App Service – a web app for containers section earlier in this chapter.
Let's use the Docker CLI to build a Docker image using a tag, which will allow us to push it to our registry:

Figure 3.25 – Building a Docker image with a prefixed login server
Now, we can use the following command to test our web server locally:
> docker run -d -p 80:80 <your-tag>
With the preceding command executed, you should be able to access the local server using the http://localhost:80 address in your internet browser. Note that, here, we have two ports – one is for the machine where a container is run, while the other is for the container itself. In other words, the command tells Docker to expose container port 80 using port 80 on the local machine (the first port is related to the container). Once you access the link, seeing our welcome text means everything is correct:

Figure 3.26 – NGINX working locally
Let's finish our container image setup by pushing it to our Azure Container Registry instance:
> docker push <your-tag>
After a moment, your image should be pushed to your registry and be available for further use:

Figure 3.27 – A successfully pushed container image
Note
While pushing, if you get an authentication required error, ensure you are logged in to your registry by using the az acr login command.
The last step before pushing our application to Azure Kubernetes Service is to build its Kubernetes definition. We will need two components here:
- Deployment, describing what we are trying to host
- Service, which will expose our application to public access
We will combine the whole definition in a single file called aks.yaml. Here you can find how it should look:
apiVersion: apps/v1
kind: Deployment
metadata:
  name: handsonazure-html
spec:
  replicas: 1
  selector:
    matchLabels:
      app: handsonazure-html
  strategy:
    rollingUpdate:
      maxSurge: 1
      maxUnavailable: 1
  minReadySeconds: 5
  template:
    metadata:
      labels:
        app: handsonazure-html
    spec:
      nodeSelector:
        "beta.kubernetes.io/os": linux
      containers:
      - name: handsonazure-html
        image: handsonbookacr.azurecr.io/handsonhtml
        ports:
        - containerPort: 80
        resources:
          requests:
            cpu: 250m
          limits:
            cpu: 500m
---
apiVersion: v1
kind: Service
metadata:
  name: handsonazure-html
spec:
  type: LoadBalancer
  ports:
  - port: 80
  selector:
    app: handsonazure-html
To deploy it, we will use the kubectl tool, but there is one additional step required here to finish our exercise. kubectl is based on a cluster context to authenticate with a control plane – unfortunately, we do not have any context yet for our Azure Kubernetes Service cluster. To get it, use the following command:
> az aks get-credentials -g <resource-group> -n <aks-cluster-name>
The result of running it will look like this:
Figure 3.28 – Getting a cluster context
Now let's use kubectl to deploy our application:

Figure 3.29 – Deploying the definition using kubectl
While the deployment is orchestrated right away, getting a public IP address for your service may take a while. To see its configuration, use the following command:

Figure 3.30 – Getting a Kubernetes service using the –watch switch
Using –watch will give you updates each time a new value is added to the service. Wait until the EXTERNAL-IP column shows a value. Once you get it, you can use it to access your application. However, it is quite possible that you may get no response from those addresses. This is caused by the fact that Azure Kubernetes Service is unable to authenticate to Azure Container Registry. The easiest way to fix that is by updating your cluster with your registry name:
az aks update --name <your-aks-name> --resource-group <resource-group> --attach-acr <acr-name>
Running it will add a new role to your registry level for your cluster so it is able to pull images from it.
Note
You may face some issues when using the above command related to your Azure permissions. If you lack authorization for managing roles, the command will probably end with an error. In that scenario, either elevate your permissions or ask your Azure administrator for help.
Once the update is ready, run your deployment once again to restart your Pod. Now you should be able to access your application:

Figure 3.31 – Static HTML site with NGINX running on Kubernetes
As you can see, deploying and running a simple web application is a piece of cake in Azure when using a managed Kubernetes cluster. Of course, it was just a demo – Kubernetes was made to run much more advanced workloads and we just scratched the surface of that service. There are many additional objects to learn about and configurations to do if you want to have a cluster that is production-ready. To learn more about all the other features of Azure Kubernetes Service, look at the Further reading section.
Summary
As you saw, when working with containers in Azure, you can focus on the delivery and shape of your application rather than the configuration or maintenance. Of course, available features are not limited to those we covered in this chapter—you can also leverage functionalities such as continuous deployment, networking, or data volumes. Nonetheless, containers are one of the most popular topics of recent months and it is quite possible that building and evolving that skill will help you in your future projects.
In the next chapter, you will learn a bit about another service that allows you to build your very own search engine – Azure Cognitive Search.
Questions
- What are the options for hosting containerized applications in Azure?
- Can you run your own Kubernetes cluster in Azure?
- Are you paying for the control plane in Azure Kubernetes Service?
- How can you push an image to Azure Container Registry from your computer?
- What do you have to do if AKS cannot authenticate to your instance of Azure Container Registry?
Further reading
- Azure Kubernetes Service documentation: https://docs.microsoft.com/en-us/azure/aks/.
- Configuring a custom container in Azure App Service: https://docs.microsoft.com/en-us/azure/app-service/configure-custom-container?pivots=container-linux.
- Kubernetes documentation: https://kubernetes.io/.