
Chapter 2. Version control in brownfield applications
- Preparing your app for version control
- Learning the check-in dance
- Working effectively with version control
In chapter 1, we defined a brownfield application and discussed the various challenges you’ll face. Now it’s time to review your project’s ecosystem for pain points and see what you can do to address them. To that end, we’re starting with a seemingly basic topic: version control.
Let’s begin with a quick look at the worst source control system you’re likely to encounter when you tackle a brownfield project.
You: I’m excited to be furthering the development of your tremendously popular website. How may I gain access to the source control repository?
Your client: Give me a second.
<ding! – You’ve got mail! – sourcecode.zip>
Amusing as this anecdote is, a zipped copy of the code is technically a viable method of version control, though it’s far more common than it ought to be.
Chances are you already have a version control system (a source control system) of some form in place and are using it daily. Indeed, most developers have a good handle on how version control systems work. Our intent isn’t to walk you through the details of checking in and checking out code. Rather, we’re using this chapter as a launching pad for one of our underlying goals: to encourage you to take a critical look at your process and see where it can be improved.
In this chapter, we’ll consider a brownfield project that either doesn’t use version control or has outgrown its existing mechanism and is now looking at switching to a new one. Even if you’ve already got one, this is a good time to take stock of your system. Is it easy to get code out and put it back in? Does it regularly lose code or history? Are you taking full advantage of it? Later in this chapter, we’ll discuss some ways you can use your version control system more effectively.
To get started, let’s see where it hurts.
2.1. Pain points
As you recall from the previous chapter, we defined a pain point as any aspect of your project that causes you or your client problems. In brownfield apps, pain points often define your initial agenda as you work on the code. Pain deriving from inadequate use of version control can take many forms. We’ll start with an anecdote derived from experience.
2.1.1. Missing references and assemblies
Lewis scanned the readme file for the application he was about to start working on. In it were instructions for downloading the latest version of the code from the version control system. He located the application’s solution file, opened it, and tried to compile. Almost immediately, he was met with a dozen errors, all along the same line (see figure 2.1): the type or namespace name couldn’t be found (with messages like “are you missing a using directive or an assembly reference?”).
Figure 2.1. Many brownfield applications will give reference errors when first downloading them from version control.

Lewis reviewed a couple of the errors and discovered several projects had missing references to certain assemblies (see figure 2.2).
Figure 2.2. Often, reference errors are due to missing assemblies. The developer must hunt down all the dependencies for the project.

They all appeared to be third-party assemblies that Lewis clearly didn’t have on his computer. Sighing to himself, he set about asking his coworkers where to find them. Some he gathered from other machines; others required him to download and run an installation package from the internet. One even required Lewis to map a network drive to a specific location on the network. It was early afternoon before he was able to compile the application.
2.1.2. Files locked for checkout
To familiarize himself with the code, Lewis found a simple bug from the defect-tracking system and set about trying to fix it. Quickly, he found the file he needed to change. “Ah!” he said to himself. “It’s only my first day and I’m already picking off bugs.” Feeling rather smug, he started editing the file. Or at least he tried to edit it...
As soon as Lewis started typing, he was greeted by a message: “TwilightStarsDB.cs is checked out by user (martind) and cannot be edited.” Lewis looked at the message dejectedly until Huey walked into his office. He took one look at the dialog and said, “Oh, I get that all the time. Martin went on vacation last week and I’m not sure what he’s been working on. I’ve just been putting my changes up in the user interface project for now and hitting the database straight from there. We can go back and change it when he gets back on Friday and checks in his code... Why are you shuddering? Do you need me to turn the heat up in here?”
2.1.3. Maintaining production code
Later that week, Lewis got an email about a bug in the production version of the application. Unfortunately, the team had already made considerable changes to the app since then for the next release. He tracked down Huey again to find out what to do about the bug. Once again, Huey had a quick answer. “Oh, we get those all the time. Every time we deploy the application, we store a copy of it on Martin’s machine. Schedule some time with him to fix it and we can do another deploy from there when it’s done.”
Lewis thought for a moment. “What about the current version of the app?” he asked. Huey looked at him, confused. “What about it?” “Well...” started Lewis slowly, “don’t we need to fix the bug in the current version, too?” Huey considered this for a second. “That’s a good idea. Be sure you make the same changes to the current app.
That will be a bit of a pain having to do the same thing in both places, but I guess we don’t want the same bug biting us again in the future.”
Version control is ubiquitous in the industry. You’d be hard-pressed to find a project without it. Most developers are familiar with its obvious advantages:
- Acts as a central location for the current version of the application
- Protects against accidental deletions
- Allows you to roll back changes
But version control isn’t always as cut and dried as it first seems, and we don’t always take full advantage of its capabilities. Or it’s configured in a way that hinders your team’s productivity. In our first example, even after getting the latest version of the code from the version control system, Lewis still had a lot of work to do before he was productive. When he was able to start working, the software threw up roadblocks by not allowing him to edit the file he wanted to, leading him to find a workaround. Very often, brownfield applications are rife with these workarounds.
In addition, the scenario where a bug needs to be fixed in two different places is all too common in brownfield projects. Not only that, often they aren’t even viewed as pain points. Many people simply accept them as a fact of the industry without ever wondering if there’s a better way.
These types of pain points can be fixed by pausing and taking stock of your version control system to make sure it’s working for you. For the remainder of the chapter, we’ll take a hard look at version control systems and how you can remove related roadblocks from your brownfield application.
But before we do that, we’d like to go back to the basics. Version control is one of those topics that everyone seems to take for granted, but there’s value in examining the characteristics of a good version control system before we continue.
2.2. What’s in a version control system?
Ultimately, the mechanics of a version control system (VCS) are the same for brown-field and greenfield applications. But when an app has been developed without a VCS, or the system in place has been used improperly, unnecessary problems due to disorganization can be a source of code contamination. If you’re working in an environment that doesn’t have a VCS in place, or if you’re looking at replacing an existing system, knowing what products are currently on the market will help you choose the right one for your situation. Each product brings its own list of features to the table. In this section, we’ll look at which features should be required in any system, as well as some that, although not mandatory, may reduce friction in your team.
2.2.1. Required features
First we’ll discuss the three features that you should always demand in a VCS. But don’t expect the discussion to trim down your options when shopping for one. Most, if not all, VCS products include the following in their list of features. That said, it’s handy to review it as we’ll talk about some of these features later in the chapter.
Retain File History
A VCS must be able to store old versions of files. This feature relates back to our poor developer who toiled away for several hours on code that eventually needed to be thrown away and reverted to an earlier version.
Also implied is that the previous versions must be easily accessible. Having different versions of a file is of no use if you can’t retrieve them. On top of that, you must be able to retrieve the history of files that were deleted. Just because you think you don’t need the file now doesn’t meant that you won’t need to reference it at some point in the future.
And although it’s not a strict requirement, most VCS products offer the ability to label different versions of files so that you can more easily locate the one you want (provided you’re using labels). You should be able to effectively stamp the existing state of the application with a label so that the current version of the files is associated with that label. The reciprocal is that you should be able to later retrieve the application associated with a particular label. We’ll discuss labeling (also known as tagging) later in section 2.5.2.
Connectivity
All your developers must have to connect to the VCS to access the code. Your VCS is going to be the single point of access for your code. If someone asks for the latest version of the code, your VCS is it. It’s important that developers be able to use it as such.
Atomic Transactions
If you want to make changes to a group of individual files as a single unit, the files should all be updated entirely or none of them should be updated. If there’s a failure when updating one file in the group, the entire transaction should be aborted. Without this criterion there’s potential for your code to be left in an unstable state after files are checked in.
Note
You’ll often run into the concept of a changeset: the list of files and associated meta-information that form a single commit or check-in. Some VCS products will store the file history as a list of changesets rather than entire copies of the application. Others will store reverse diffs (they store the current versions of files entirely and then keep track of the differences going backward). Reverse diffs have the advantage of keeping the source code repository small. But the file history is usually stored in a proprietary format that’s accessible only by the VCS. Our opinion: this concern is not a deal-breaker when shopping for a VCS.
Examining the Criteria
When evaluating a VCS, assume the three features we just discussed are mandatory. Immediately remove from consideration any products that don’t offer them. You’ll find that almost all products do offer these features at a bare minimum. Any other features you require will vary from project to project and from team to team.
In the opening anecdote, you got your source code via an email attachment. Based on the criteria outlined here, this could be a valid version control system. Using file system timestamps or a folder naming convention that segregates each past check-in, you can determine the sequencing of the archived code. And because your code is stored on a centralized file system share, it’s easily accessible to the developers. Furthermore, using a compression utility would almost certainly ensure that all files were included in each of the archived versions, thereby ensuring atomicity when you check in.
But this method of version control imposes a lot of friction on the developers. It doesn’t solve one of our pain points described in section 2.1: how could two people work on the code at the same time? Someone still needs to manually merge changes into another codebase (in the case where two people update the “latest version” in the same timeframe). In addition, each developer must create the archive file manually and store it on the central file share in the appropriate location—again, manually.
The common theme in this theory is that it’s manual. Any time something has to be done manually it’s usually much slower and it’s almost certainly much more error prone. Neither are features that any software development process wants to add to its list of selling points. So let’s see what we can do to make the process smoother.
2.2.2. Greasing the wheels
What our manual example illustrates is that you need something that not only provides the basic requirements of a version control system but also reduces the friction of the development process.
Note
Recall from chapter 1 that friction is any process that impedes the forward motion of a developer and keeps her from working on code. If you find yourself working in a way that causes friction, the process should be rethought, reworked, replaced, or simply eliminated. Friction will be a recurring theme throughout this book.
A robust VCS will remove impediments and should answer basic questions each time you check in code to the repository:
- Who made the change?
- What files changed?
- Why were the files changed?
Beyond these, the VCS should provide a few other capabilities to help reduce friction. We’ll explore these capabilities next.
Compare File Versions
Although retaining the history of a file is key, being able to compare two versions, as well as compare with a local version on your file system, is of particular interest in brownfield applications. Such a comparison may be the only way you can trace how a file has deteriorated over time. This knowledge can be invaluable when you’re working on defects (see chapter 6).
Whether or not your VCS includes this feature natively, text comparison tools are available that do an excellent job of visually displaying differences. Two tools we currently like are Scooter Software’s Beyond Compare and the open source WinMerge.
Ease of Use
Many developers may not consider ease of use when using a VCS. Most of the time, that’s because they’re used to interacting with it from within Visual Studio. Two Microsoft products, SourceSafe and Team Foundation Server, offer Visual Studio integration, and many developers have started with one of these products and never looked into alternatives.
But there are two other common ways of interacting with your VCS:
- Through Windows Explorer
- Via command-line and/or stand-alone applications
Challenge your assumptions: Life outside the IDE
Many developers are hesitant when you suggest they perform some development-related action outside of Visual Studio, especially when there are perfectly viable alternatives inside it. We aren’t suggesting you abandon the IDE altogether in favor of Notepad (mostly because there are better text editors than Notepad). But don’t automatically discount the idea of, say, checking in code from Windows Explorer or building the application from the command line in a build script (more on this in chapter 3). Often, it can be useful to edit a file and check it in without having to open Visual Studio.
In many cases, more than one of these options will apply, and with some VCS products, third-party utilities or applications that bridge the gap may be available. For example, one popular VCS is Subversion, a command-line application. But third-party applications exist that allow Subversion to integrate with Windows Explorer (such as TortoiseSVN) as well as integrate with Visual Studio (such as AnkhSVN and VisualSVN).
How users work with the VCS is generally a personal preference. Some development teams will be more comfortable, and more productive, if the VCS fully integrates into the IDE. Others may be accustomed to command-line utilities and the flexibility afforded them, especially when used in conjunction with PowerShell.
These features of a VCS aren’t strictly required and you can get by without them. But when you join a brownfield project, it’s imperative that you look for as many ways as possible to keep your developers focused on code and not process.
Another key topic when discussing VCSs is how they manage files that are checked out. We’ll look at the two models of doing this next.
2.2.3. File management
Another point that factors into how a developer makes use of a VCS is the file management model. There are two models: file locking and version merging.
File Locking
The premise of the file-locking model (also known as the lock-edit-commit model) is that when a developer is editing a file, it’s locked and the VCS prevents anyone else from modifying that file. Figure 2.3 shows an example.
Figure 2.3. Editing a file with a VCS that uses file locking. Note that while Dean has the file checked out, no other developer can edit the file.

The advantage to this model is that it’s intuitive and easy to understand. Checking code into the VCS is simple and code conflicts are rare.
The downside is that developers are often fighting over file resources. This conflict is more detrimental than it may seem. Imagine working on a fairly complex piece of code. You edit a Customer class to handle some new feature, and then update an application service that retrieves it from the data layer. Next, you move on to the data layer itself and find out that someone else has checked out the file you need to complete your task.
All of a sudden, your momentum grinds to a halt. You have two avenues available to you:
- Stop working and wait for the file to become available
- Find some other location to put your code
Tales from the trenches: Dispensing with friction
Early in the life of one project, we encountered development friction due to our chosen VCS. At first, adhering to the corporate standard, we had three developers working on the software. As we got started, it took less than a week for the locking-based VCS to block each other’s work process. A developer would start a development task and add a new software artifact. In Visual Studio, this means the project file was exclusively checked out to that developer. At the same time, other developers needed to add their own classes but couldn’t.
Four days into the development effort, we had one or two developers idle at various times due to constraints imposed by the style of VCS. Rather than allow that friction to impede our development velocity, we took the time to implement and train developers on a different VCS, one that followed the edit-merge-commit method. Although there were some up-front costs due to training and teething issues, the couple of dozen hours it took to address such issues were far cheaper than to use a system that blocked developers from working.
Neither of these options is palatable, to say the least. Project managers and clients don’t like portions of their development team sitting idle, and putting code in whatever file is available is a perfect recipe for creating technical debt—something that probably led your application into the mess you’re trying to get out of.
The end result is that file locking is often a source of friction to many developers. Luckily, there is another model.
Version Merging
In the version merging model (also known as the edit-merge-commit model), any developer can edit any file at any time. In fact, with many VCS products that use this method, you don’t even need to explicitly check out a file; you simply start editing it and the file is checked out to you automatically.
This approach can seem like the road to chaos at first because it inevitably leads to instances where a file has been modified by another person while you were making changes to the same file. The VCS gets around this problem by adding another step to the process of checking in: if the file you’re checking in has changed since you last retrieved it, you must merge your changes with the current version of the file. Figure 2.4 illustrates this.
Figure 2.4. Editing a file with a VCS that uses version merging. Both Dean and Martin are able to make changes to version 1 of the file. But because Dean checks in his changes first, Martin must merge those changes into his version before checking in.

At first glance, many people might dismiss such a notion outright, thinking that the seemingly manual merge step will be too cumbersome. In practice, it’s not an onerous task. Most VCS products that follow this model provide tools that make it easy to compare your version of the file with the current version. Often, the changes you make are in entirely different areas of the file than the ones that have been modified since you retrieved the latest version, making the merge process easy. Many VCS products automate the merge in simple cases.
Tales from the trenches: The fear of merging
Any time a project team suggests moving to an edit-merge-commit version control system, it’s almost certain that someone will raise concerns about the merging portion of the process. We had this happen to us on a project recently. The developers who had never worked in this manner were terrified of the potential effort that merging required when they committed their code.
Our only remedy was to sit down with the team and train them on the use of common scenarios they’d encounter. This training took about 4 hours, and as each scenario was simulated and discussed, the team became more comfortable with the process. In the end, the combination of the training, strong adherence to the single responsibility principle (see chapter 7), and a culture of checking in fast and often (multiple times per day in our case) meant that a manual merge situation arose only a couple of times per month. By the end of the project, all of the early detractors of the edit-merge-commit style of the version control system had been converted into advocates.
Another way to reduce the pain of merges is to follow a couple of simple guidelines. One is to check in more often (which we talk about later in section 2.5.1). Another is to use the single responsibility principle more often. We’ll discuss this principle in detail in chapter 7 (and subsequent chapters), but the general idea is that you ensure each class does one thing and one thing only. That way, when you need to change functionality you typically don’t work on the same classes as someone else. By sticking to these guidelines, you’ll find that merge conflicts are rare and easily solved by a quick scan.
Which One is Right?
Both models have advantages and disadvantages, and each team is different. You’ll have to decide if your team is capable of handling merge scenarios, if you want to avoid them altogether, or if you want to ease away from locking toward merging.
Note
We are always in favor of solutions that reduce friction, which makes our personal preference the version merging model. We find that version merging doesn’t get in the way of your team’s momentum as often as file locking. And in our experience, the potential issues caused by manually resolving occasional merge conflicts is less painful and intrusive than having developers locking files and preventing others from working.
You may need to analyze your codebase to decide if it’s written in a way that will cause merge conflicts often. If you have a lot of coupling between your classes and they’re generally large, it may be more beneficial to start with a file-locking mechanism and ease into a merging system as you break out dependencies.
But we’re getting ahead of ourselves. It’s still far too early to start looking at code. We haven’t finished evaluating features for our VCS. Next on our list is branching.
2.2.4. Branching
Branching, in version control terminology, is when you fork the code down two or more paths. Starting from a common codebase, you “branch” the code essentially into two projects. It’s similar to copying a file and having two people work on it in tandem, though most VCSs will use some more-efficient storage mechanisms to handle branching. The process is shown in figure 2.5.
Figure 2.5. The branching process. Each node represents a check-in.

The idea behind branching is that, on occasion, you need to take your codebase in a different direction. We’ve already discussed one scenario in section 2.1 where a major bug was discovered in the production version of the code but the team has already started on a new version. We want to release a fix for this bug but we don’t want to include any other changes we’ve made to the code since it was released to production. So we’d like to branch the production code in another direction while work continues along its original path.
Another common scenario is the spike. You want to experiment on the current codebase without affecting other developers. Perhaps you’re testing a new UI component, or you want to switch the unit-testing framework used by your application and want to test the effects of such a change without committing to it fully.
Code spikes
The term spike comes from the agile software development community and is defined as a means of describing work that can’t be estimated without first exploring the solution. It’s not uncommon to hear this term used on a regular basis in the development community for this purpose.
Often, a developer will be working on a task in which he doesn’t fully understand the technical implementation requirements. In an effort to better understand the work that lies ahead, he will put in a limited amount of time attempting to learn as much about it as possible. Usually this effort is conducted in a throwaway side project or an isolated branch in the VCS.
There are two key points to a spike. First, the work must be time boxed. Time boxing is the process of setting a maximum amount of time that you’ll spend on the task. If enough information or understanding hasn’t been gathered at the end of that time box, another spike should be requested. Time boxing is done to limit the effort outlay in the event that the spike proves the task unachievable.
The second key point is that the spike effort should be considered throwaway. When working in spike code, it’s common and acceptable not to use best practices and project standards. As a result, any code that’s generated can be difficult or impossible to reintegrate with the main development effort.
Remember, we want to learn from the spike, not create something deployable.
Both of these situations illustrate the need to branch the code. In the first case, we want to start from a previous version of the code (the version released to production) and branch it. We want to start working on the previous version as if it were a separate project altogether. In the second case, we branch off from the current version of the code. In both cases, development continues off the main codebase (often called the trunk) as if the branch doesn’t exist. In effect, you’re working on two different versions of the application.
Figure 2.5 (earlier) shows two common scenarios related to branching. Notice that the first branch continues for a short time, and then merges back into the trunk. For example, take the case where you’ve branched the code to fix a bug. Say you’ve built a patch to fix the bug and have tested it thoroughly. Naturally, you’ll want to apply this patch to the main codebase so you don’t reintroduce the bug. Or in the case of our spike, maybe it was a successful test and now you want to incorporate it into the trunk.
But there are also cases when a branch will never be merged back into the trunk. This case is depicted by the second branch in figure 2.5. One example is common in open source projects. When a new version of the .NET Framework is available, the project may upgrade to the new version to take advantage of new language features. A branch is still maintained on the old framework for backward compatibility for a period of time. Eventually, development on the branch stops without ever merging the changes back into the trunk.
Challenge your assumptions: Frequent branching
Usually teams that are employing branching are doing so based on large piece of work. These may be major refactorings, new versions of the application, or areas to test theories. Although these are valid and commendable reasons to branch your code, there can be benefits to creating branches more frequently.
One option is to branch per feature. Instead of all developers working off one branch, or the trunk, each feature being developed has its own isolated work area. This approach is the ultimate in isolation because each branch has but a single developer working in it. On the downside, it puts more pressure on the team when it comes time to integrate multiple branches into the trunk. This strategy also requires that the team have strong and open communication about the efforts occurring in the branches. Neither of these issues is insurmountable, as successful teams that are trying branch-per-feature development can attest.
Another development model that involves frequent branching is branch per defect. Instead of working on all defects in one location (a defects branch or—shudder—the trunk), each defect being resolved is allocated its own branch. Once the defect has been completed and tested, it’s integrated back into the appropriate development or maintenance branch. As with branch per feature, you get the benefit of working in isolation. But this approach also gives you more latitude when fixing defects, a process that can often take a relatively long time. With a branch per defect, you can have that work stall (for whatever process, technical, personnel, or other reasons) without affecting the efforts being invested in other defects.
Consider both options as techniques for solving problems of code changes impeding development or release progress. Branching isn’t something to be feared. Use it as a tool that can solve problems by providing change isolation.
It’s up to the team to decide whether branching and merging is a feature you’ll use in your VCS. But consider that branches aren’t usually planned for; they come about from unforeseen circumstances (as in our two scenarios earlier).
That wraps up our discussion on VCSs. Some of it may have been old hat to you, but it helps to examine things from the beginning with a brownfield application. Before we can start effecting real change in a brownfield project, we need to ensure our VCS is working effectively. Now that we’ve evaluated the characteristics of a good one, we’ll provide tips on how to get the most from your VCS.
2.3. Organizing your project for version control
Now that we’ve looked at some obvious and not-so-obvious features of a VCS, we’ll get down to the important part: adding your brownfield project to the system.
Typically, this process involves more than simply adding your solution folder to the VCS—that’s the easy part. Here are some things you’ll need to consider before you can start adding files to the repository:
- Does your solution reference any third-party assemblies?
- Is your solution folder structure stable?
- Are there any files/folders in the solution that do not need to be versioned?
These are some of the questions you’ll need to ask before making the first check-in to the VCS.
Note
We talk in this section about what to do before your first check-in. But the concepts also apply if your solution is already in a VCS. For example, the previous questions apply just as well to an existing code repository as they do to one that isn’t yet versioned.
In this section, we’ll look at alternative methods for reorganizing your project’s folder structure. The first step, and a low-hanging fruit in this process, is to address one of the pain points from the beginning of this chapter. Specifically, how do we deal with third-party dependencies?
2.3.1. Dealing with third-party dependencies
The underlying goal of this section is simple: a developer should be able to retrieve the latest version of the code at any time and it should work out of the box. The steps required for a new developer to get up and running on a base development machine should be as follows:
1.
2.
Open the solution (.sln file) in Visual Studio.
3.
Compile and run the application.
These steps are outlined in figure 2.6.
Figure 2.6. New developers should be able to follow these simple steps to start being productive on a brownfield application. Anything else will result in friction and lost productivity.

Where many projects fail in this process is the last step. Like Lewis from our opening discussion of pain points, a new developer is often met with a sea of broken references to external libraries or third-party components because
- The required components or libraries haven’t been installed on the developer’s machine yet.
- The required components or libraries have been installed in a location other than one that was expected.
- Someone has installed an incorrect version.
The solution to this problem is not to rely on developers to install these libraries and components. Include them in your application’s folder structure.
Let’s say your application’s UI project has a reference to a third-party control library, such as DevExpress or Infragistics. You could require each developer to navigate to a central location download and install the product. And you could mandate that it be installed in a specific location.
Tip
If you absolutely have to force developers to formally install a third-party product to run the application, don’t rely on them to download it from the internet. You never know when the version you’re using will become unavailable for download. Instead, make the installation package available to your developers on a central location (a subfolder in your project’s VCS, for instance). And make sure it’s crystal clear that the developer must go to that location to install the product in order to continue working.
In our opinion, requiring developers to perform the installation adds unnecessary overhead to a developer’s process. A better solution is to take the files that are referenced by your application (and any other supporting files), copy them into your application’s folder structure, and reference them at that location.
Tip
Be sure to make all project references relative, not absolute. Not every developer will use the same base folder for all of her projects.
Now your solution is self-contained. All files needed to build and run the application are included in your folder structure. A new developer starting on the project (or an existing developer wishing to test the build process on a fresh version of the code) can get everything they need from one place. No separate installation and no referring to a readme file. You can be assured that all the references work because everything that’s being referenced is included in your folder structure.
In addition, you’re now insulated against versioning issues with third-party libraries. Even if newer versions of libraries become available, you don’t need to upgrade to them until you’re ready. As long as you keep a version of it them your VCS, you can guard against backward incompatibilities.
Challenge your assumptions: Include third-party libraries in your solution
It may seem counterintuitive, but including a copy of all third-party libraries used by your application (either to execute it or as part of the build process) in your solution tree is a clean way to make sure developers can get up and running fast. This strategy also protects you from versioning issues if later versions of a library become available.
In short: developer friction is greatly reduced by including copies of third-party libraries in your solution. Sure, a bit of hard drive space is lost to duplication, and it’s potentially more difficult to upgrade an entire suite of applications to the latest version of a third-party utility. The key word in that last sentence is potentially.
But let’s examine the benefits. By including copies of all external libraries in your solution, you maintain control over when and if they’re upgraded. Your application won’t suddenly break one day because someone in another team decided to upgrade a grid control somewhere in a centralized code repository that you were referencing.
In addition, as we’ve already mentioned, you have the benefit of developers being able to download the code at any time and be up and running without first having to install another package or retrieve the latest version of another project.
This benefit doesn’t apply just to new developers. You’ll find that existing developers will have no qualms with simply deleting their solution folder and retrieving the latest version of the code should the need arise. And if they can do this with confidence, you’ll be surprised at how often the need does arise.
Keep in mind that this guideline is a suggestion, not a rigid life tenet. There may be cases where third-party libraries have dependencies on registry settings or license files in order to be used in a development environment. If you do run into such a library, don’t waste time trying to figure out how to incorporate it into your source code repository. A well-crafted readme file at the root of your solution folder is the next best thing.
Next, we’ll see if we can organize your folder structure a little better.
2.3.2. The folder structure
Because you’re working on a brownfield application, you’ll obviously have a folder structure already in place for the application. And your first intuition will be to use that as the root of your code’s repository in the VCS.
It very well could be a good candidate for the root folder. But consider that there may be other code artifacts that you should include in the solution:
- External libraries (as described in section 2.3.1)
- Documents
- Configuration and build files used for deployment and testing
- Other tools and utilities
So before we check in, let’s take a look at one alternative folder structure in figure 2.7, one that includes both the source code and all other code artifacts.
Figure 2.7. A sample folder structure to facilitate getting developers up and running quickly
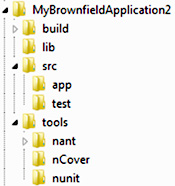
Figure 2.7 shows one suggested folder structure for your application before you put it into source control for the first time. Note that the source code makes up only one part of it. Table 2.1 describes each folder.
Table 2.1. Description of folders in the folder structure
|
Folder name |
Description |
|---|---|
|
Build |
Contains artifacts related to the automated build process. We’ll discuss this folder’s purpose in more detail in chapter 3. |
|
Docs |
Stores any documents directly related to the code. All other documents should be kept in some form of content management system outside the application’s code repository. |
|
Lib |
Contains all third-party libraries required to run the application itself (as described in section 2.3.1). |
|
Src |
app—Contains the source code for the application. test—Contains source code for your test projects. Don’t worry if you don’t have any yet. We’ll talk about this in chapter 4. |
|
Tools |
Stores any third-party tools or utilities that aren’t required to run the application but that are necessary for the build process. Examples include unit-testing frameworks, automated build tools, and utilities that provide statistics on code coverage and other metrics (these tools will become clearer in the next few chapters). |
Tip
In section 2.3.1, we talked about including third-party libraries with your code in the VCS. These libraries should reside in the lib folder. But simply copying them into this folder isn’t going to be sufficient. You’ll also need to update your project files so that they reference the libraries in the new location.
Keep in mind that this folder structure is merely a suggestion and is meant as a means to get your team discussing potential issues with your current structure. If your solution already contains test projects in a structure that works for you, by all means don’t deviate from something that’s working. But if you’re considering changing your layout, we’ll cover some tips on doing so. And now is the time to do it because moving folders in a VCS can often have repercussions.
Tip
Moving folders and files within a VCS isn’t always an easy thing to accomplish. If your code is already in a VCS and you’d like to change the structure to match this one, consider detaching the code from the VCS, modifying the folder structure, and then reattaching it. If you decide to go this route, be sure to test whether your VCS will maintain the file/folder history after the detachment and reattachment.
In this structure, your application’s source code would reside in the app subfolder within the src root folder.
At this point, the easiest thing to do would be to copy the code wholesale into this folder. We prefer the solution (.sln) file in the root folder and updating the references to the projects within it. As we add more noncode artifacts to the solution in later chapters, it will make more sense to have the solution file at the root. Also, having the file at the root makes it easier for developers to find and it works better with some services, such as Team Foundation Server.
A Final Note on the Tools Folder
As mentioned earlier, the tools folder should contain utilities and applications that are used as part of your build process. This folder isn’t the same as the lib folder. The key differentiating question as to whether a utility or library is a lib or a tool is this: will it be deployed with the application? If the answer is yes, it’s a lib; otherwise, it’s a tool. Table 2.2 can help you grasp this concept.
Table 2.2. Distinction between the tools folder and the lib folder
|
Candidates for the tools folder |
Candidates for the lib folder |
|---|---|
|
Automated build products (such as NAnt) Unit-testing frameworks (such as NUnit, MbUnit, xUnit) Mocking frameworks (such as Rhino Mocks, TypeMock, Moq, Autofac) Code coverage/metrics analysis tools (such as NCover, NDepend) |
UI components (such as DevExpress, Infragistics, Telerik) Inversion of control containers (such as Castle Windsor, StructureMap, Spring.NET) Logging frameworks (such as log4net) Object-relational mappers (such as NHibernate, LLBLGen Pro) Common internal libraries developed by your organization |
Tip
If your company makes use of internally developed libraries that are used by more than your application, treat them as you would any other third-party library: reference them as binaries rather than with a direct reference to the project itself. Including direct project references to them often leads to versioning and compatibility problems. Direct project linking forces you to integrate any time that that team decides to commit code to the repository. Ideally, you’d rather be committing code based on a schedule that you determine for yourself.
That’s enough on your project’s folder structure. Now let’s look at the corresponding folder structure within the VCS itself.
2.3.3. The VCS folder structure
Now that you’ve created the ideal folder structure (and updated any assembly references if necessary), you’re almost ready to check in for the first time. But first, we need to prep your VCS by creating a similar folder structure within it manually.
Note
Even if your VCS allows you to add a project to the code repository directly from Visual Studio, you should still do it manually. As we saw in the previous section, the source code is only part of what goes into the repository. And if you add single items to the VCS directly from Visual Studio, you could potentially be creating a version of the code that won’t compile for another developer. Committing noncompiling code isn’t something that you want to do. All changes made should be committed at the same time so that other developers will get them as a package when they update from the VCS.
As a general rule, and as figure 2.8 illustrates, your VCS folder structure should match the physical folder structure. But if your VCS supports branching, you may want to consider adding another folder level at the root of your project in the VCS.
Figure 2.8. Example of maintaining the same physical file structure in the VCS as you have on a local working folder

Let’s consider an example to explain further. At your company, you have three projects you’ll be adding to source control:
- MyBrownfieldApp
- YourBrownfieldApp
- TheirBrownfieldApp
In this case, the root level of the VCS will contain three folders, one for each project. Each project folder will contain two folders: branches and trunk. And the trunk folder of each project will store the folder structure described in section 2.3.2.
Note
A convention for one popular VCS product, Subversion, is to also create a folder called tags at the same level of branches and trunk. This folder provides support for Subversion’s mechanism for labeling code. CVS, another product on which Subversion is based, uses the same convention. Figure 2.8 shows this convention in use.
Later, when you’ve added your code to the repository for the first time, you’ll be able to start accessing it through Visual Studio (if the VCS supports it), but the initial structure should be created manually. How you accomplish this depends on the VCS. Typically, there will be some sort of interface to the VCS that will let you browse the repository and create new folders (or projects, as they’re referred to in some products).
One of our earlier questions was to ask what should not be included in version control. We’ll tackle that next.
2.3.4. What not to include in the repository
The last thing we need to talk about before we check in code to the new structure is which files to exclude from the repository.
By default, compiling a project in Visual Studio will create two subfolders in the project folder: bin and obj. Neither of these folders should be included in the VCS repository.
There are two reasons for this:
- They’re both created by Visual Studio when you compile the application. They can be generated at any time on demand and there’s no reason to include them in the repository.
- Because they change every time you rebuild the application, they’d constantly be checked in and out. In a file-locking VCS, the generation of these files could even prevent you from compiling.
Other candidates for exclusion:
- Developer-specific user settings (such as *.suo, *.csproj.user, and *.vbproj.user files)
- Files added by productivity add-ins for Visual Studio (such as CodeRush or ReSharper files)
There may be an exception to the last item. Some productivity add-ins include settings you want to be applied project-wide to ensure consistency. In this case, you may need to include these files in your VCS repository.
How do you ensure these files and folders are excluded from your repository? The good news is you probably don’t need to worry about it. Most VCS products are aware of the common files and folders that should be ignored (such as bin and obj folders), and they’ll do so automatically when you check in the code. Figure 2.9 shows a screenshot of the feature from TortoiseSVN.
Figure 2.9. TortoiseSVN, like many VCS tools, allows for ignoring patterns and files.

You can add to this list on a global or application-specific basis, depending on your VCS.
Warning
Sometimes third-party libraries will include a bin folder (such as log4net, a .NET logging utility). By default, it won’t be included in version control. The lack of inclusion can lead to bugs that aren’t obvious at first because they don’t appear on every developer’s machine. In these cases, you must override the global pattern and include the bin folder for the library explicitly. Better yet, include the third-party contents of the bin folder in your project’s lib folder if possible.
Phew! Seems like a lot of work to get your code properly prepared for version control. Although it is, in our experience, this work pays off quickly and several times over for a brownfield project. For instance, now that we’ve done all this work, the actual check-in process should be a snap. Let’s get the code checked in and verified.
2.3.5. The first check-in and verification
Okay, you now have a folder structure you like, all your dependencies are included in it and appropriately referenced, and you’ve configured your VCS to ignore any files that aren’t user specific. You’re ready to add the code back into your VCS.
How your code is checked in depends largely on the VCS you’re using. But if you’ve followed along with our discussion, the act of checking in should be straightforward.
If you’re using a VCS product that allows you to work outside Visual Studio, we recommend using it for the first check-in. You’re more likely to include the noncode artifacts and any libraries that live outside your source code. Regardless, when checking in be sure to review the list of files being added to your repository to ensure you’ve caught everything you want and nothing you don’t. Also, make sure the files being committed to the VCS are being added to the appropriate location in the VCS repository itself.
If something doesn’t look right, stop and think before proceeding. Is your VCS trying to add a file you don’t want to include? Maybe you need to cancel the check-in and update your ignore pattern. Are the lib and tools folders not appearing in the list? Perhaps you aren’t checking in from the real root of your application.
The underlying message is this: don’t just check in the code blindly thinking you’ll work out any problems later. Because we see the check-in dialog box so often in a VCS, developers often become numb to the information in it. Pay attention to this dialog box, at least this once. Don’t be afraid to cancel the check-in until you’ve had a chance to review your structure or settings.
Once you’re satisfied with the structure and settings and have checked in, you still aren’t done. You need to verify that the code will work out of the box. A new developer should be able to retrieve the code from source control, and it should compile and run with minimal effort.
The best way to verify is to actually do it, preferably on a different workstation (virtual or physical) than the one you’re working on. Just getting the code isn’t enough; you also need to verify that the code compiles in the integrated development environment (IDE), that all projects load in the IDE, and that any automated build scripts succeed (if you have any). If so, pat yourself on the back. If not, make a note of any errors and tweak your version control implementation as necessary.
Warning
Remember, this process is all about reducing developer friction, not causing pain points. Keep a practical eye on the clock while you tweak the process. If you’re spending hours trying to automate some element of the “new developer checkout” procedure, consider the tried-and-true readme file instead.
We’ve provided some tips on getting your brownfield project into a state that reduces developer friction on your team going forward. But we’re not done yet. Getting set up is only the first step. You still need to be able to check in code effortlessly. For that, we’re going to learn to dance.
2.4. The check-in dance
Now that you’re all checked in, it’s time to start working with the versioned code. Although you may be familiar with the process of checking in and checking out, it helps to formalize the process somewhat. Working with a VCS is generally universal to any project, whether it’s brownfield, greenfield, or legacy, so this section is applicable to any project.
Even if you’re new to using version control, the process may seem intuitive at first. The steps are outlined here and summarized in figure 2.10:
1.
Check out the file(s) you wish to modify.
2.
Make your changes.
3.
Ensure the application compiles and runs as expected.
4.
Check in your changes.
Figure 2.10. The steps of the check-in dance for a file-locking VCS

Chances are, if you use this process, you’re using a file-locking VCS (see section 2.2.3). The reason this version of the dance is so straightforward relates to the restrictive nature of file locking. Because no one else can modify your files while you’re editing them, checking in the code is fairly benign.
However, there’s a problem inherent in this process. Even though your files have been locked for editing by other developers, that doesn’t mean the rest of the application is stagnant. While you work on your changes, the rest of the team is changing other files. The changes they make may be inconsistent with yours. For example, you may have changed the name of a property and another developer has created a new class that uses that property during the time you were changing it. Because it’s a new class, you wouldn’t know about it to change it yourself while you were working. When you check in your changes with the new property name, the next person to get the latest code won’t be able to compile.
To counter this scenario, we need to add two more steps to the process:
1.
Check out the file(s) you wish to modify.
2.
Make your changes.
3.
Ensure the application compiles and runs as expected.
4.
Get the latest version of the application.
5.
Ensure again that the application compiles and runs as expected.
6.
Check in your changes.
Figure 2.11 shows the same process with the two new steps.
Figure 2.11. The steps of the check-in dance for a version-merging VCS

Congratulations on learning to dance.
The new steps, 4 and 5, are included specifically to handle instances when code has changed during step 2, when you’re making your changes.
Consider what happens if you omit steps 4 and 5. You check in code that potentially leaves the application in an unstable state. Anyone who retrieves the latest version of the code won’t be able to compile.
And that’s just unacceptable. Your VCS is the heart of your application. It’s the only true source for your code and at any given moment; you have to be absolutely certain that the code in it works. (In upcoming chapters, we’ll refine the definition of what it means for an application to work; for now, it means the application should at least compile.)
In short, a codebase in your VCS that doesn’t compile should be considered the ultimate failure in your process. And worse, if we omit steps 4 and 5 of the check-in dance, we’ve put the onus on the next person to discover (and potentially fix) any problems that arise. All that person did was get the latest version of the code, and now he’s stuck trying to fix someone else’s problem before he can even begin to work on his own bugs or features.
So we include steps 4 and 5 for two reasons:
- To ensure that the code in your VCS is (almost) always in a stable state
- So the developer who causes the conflicts is the one who fixes them
We’ve been discussing the check-in dance with a file-locking VCS. If you’ve configured your VCS to use the version-merging model, there’s a slight modification that’s necessary. Here are the steps with the change in bold:
1.
2.
Make your changes.
3.
Ensure the application compiles and runs as expected.
4.
Get the latest version of the application and merge your changes into it.
5.
Ensure again that the application compiles and runs as expected.
6.
Check in your changes.
Notice the additional instruction in step 4. Remember that with a version-merging VCS, anyone could be modifying any file at the same time. While you’re working away on Customer.cs, another developer may be modifying it as well. Plus, they may have checked in their changes while you were making your own.
So when you retrieve the latest version of the application to see if it still compiles and runs, you may have a bit of extra work to do. You may have to merge your changes in with the changes made by another developer to the same file. This ensures that the code you check in is stable for the next developer who retrieves the latest version of it.
We’ll revisit the check-in dance in the next two chapters when we add continuous integration and automated testing to the mix. For now, let’s move on to some more tips on making your VCS work harder for your brownfield application.
2.5. Tips for working with version control
In the final section of this chapter, we’ll discuss some quick tips on how to use source control effectively at this stage. As we add tests and a continuous integration process, we’ll have more to say on this topic. Until then, we have two final tips on working with version control:
- Check in often.
- Decide on a labeling/tagging strategy.
We expand on each of these tips next.
2.5.1. Check in often
One of the thoughts that may have occurred to you during the discussion on the check-in dance is “What if I’ve made a lot of changes over several days? Won’t it take a lot of effort to merge those into the appropriate trunk or branch?”
Yes, it will. And as your doctor might tell you, if it hurts when you bend your arm like that, don’t bend your arm like that. If it’s too much work to merge so many changes when you check in, don’t make so many changes each time you check in.
If you’re used to hunkering down for a few days to complete a feature, checking in often may require a slight shift in what constitutes “check-in-able” code. Don’t wait until you’re feature complete before finally checking in. Rather, check in as soon as you have a new piece of code that does something useful. This approach will minimize the amount of merging you need to do when you do need to merge.
The advantages of this practice will become more apparent when we discuss unit tests in chapter 4.
But I really can’t check in this feature half-finished
Real life doesn’t always work out the way you want. In a brownfield application, while you’re still working out the kinks of your new ecosystem, it may not be practical to check in code as often as you would like. Perhaps the new feature you’re working on will break existing code, for example.
In these cases, consider branching your code for the new feature. Branch the code off the trunk and add the new feature there rather than on the main trunk.
There’s a great big caveat for this practice: eventually, you’ll want this feature incorporated into the trunk. When you do, be prepared for a painful merge. Because of this issue, consider carefully before undertaking a feature branch. Very often, you can still pick apart the code into chunks that can be checked in as a unit.
That said, we still prefer feature branching to going days without a single check-in, if only to make use of the normal benefits of a VCS.
2.5.2. Decide on a labeling/tagging strategy
Labeling your codebase at regular intervals can be useful. At the very least, you should label every time you deploy to a new environment. That way, if bugs occur you can always retrieve the same version of the code that you deployed, even if you’ve made changes since then.
Here are some possible options:
- On every check-in (very likely, this is overkill)
- Every night (useful if you create an automated release every night)
- When a particular feature is complete
- When you’re about to undertake a large-scale refactoring
- When the major or minor version number of the application changes
In the next chapter, we’ll return to labeling when we discuss methods for configuring your continuous integration process to label your codebase and the advantages this practice can have. For now, it’s useful to at least sit down as a team and decide if and how you plan to make use of labels in your VCS.
These two tips should get you on your way to making the most of your VCS. Our overarching goal in this section (and indeed, the entire chapter) is to start you down the road of looking for ways to improve your process, starting with version control. In the next chapter, we’ll continue the theme and explore how we can smooth out the wrinkles in your build process.
2.6. Summary
Although VCSs would appear to be a mandatory feature on all software development projects, you’ll still encounter projects where a VCS isn’t in place. Still other projects will have VCSs that don’t offer the capabilities that you need to operate in your environment or development style.
In this chapter, we’ve started improving your ecosystem by examining your VCS. Here are some of the recommendations we made:
- Ensure you have an efficient way of comparing different versions of a file.
- Examine alternative ways of interacting with your VCS.
- Review how your VCS handles checked-out files and consider moving toward a version-merging model instead of a file-locking model.
- Include any file dependencies your application has with the code in the VCS.
- Restructure the folders in your VCS to account for the fact that it contains more than just code.
- Perform the check-in dance every time you check in code.
- Break down your code changes so that you can check in more often.
- Develop an appropriate labeling strategy for your team.
The short form of this list is simple: examine how you work with your VCS and eliminate any friction your developers have. Don’t accept cumbersome processes because you believe no alternatives exist.
Version control systems are the heart of the construction portion of any software development project. In this chapter we provided you with a lot of techniques and ideas that you can implement on your brownfield projects as you grow and improve them. In the next chapter we’ll look at tying the VCS into a process that continually builds and verifies your application.