
Chapter 14. Bean routing and remoting
- Routing using annotations on beans
- Using remoting and hiding middleware
In this chapter, we’ll show you a couple of extra features in Camel that allow you to hide Camel APIs from users and developers. Hiding these APIs is sometimes necessary when you want to limit dependence on Camel. These techniques also provide approaches to solving integration problems that complement approaches we’ve discussed throughout this book.
First, you’ll learn to use Camel’s annotation-based routing, which allows regular Java beans to be used for routing. This allows you to access all of Camel’s components and not write a single line of DSL code. You sacrifice many of the routing abilities that are provided in Camel’s DSLs, but this isn’t a problem for simple use cases.
When using the routing annotations, you still have to code against Camel APIs, just not the Camel DSL. We’ll take this a step further in the last part of the chapter and discuss the art of hiding middleware. By hiding middleware, you allow users of your Camel application to only see the business interfaces; the complexity of remote transports and Camel APIs are hidden behind a clean client API.
Let’s get started by looking at how to route messages using Camel’s messaging annotations.
14.1. Using beans for routing
Throughout this book, you’ve seen how Camel’s unique and powerful DSLs can be used to easily create complex integration applications. But in order to take advantage of this power, you need to learn a Camel DSL and its intricacies. Using a DSL also means that your application—at least the integration and routing portion—is tied to Camel. An alternative approach is to create simple integration applications. By using annotations, you can produce and consume (send and receive) messages to and from Camel endpoints by using a regular Java bean.
In this way, you don’t need to learn much about Camel at all. You can write your application as you normally would in plain Java, and when you want to connect it to an external service, you can use an annotation from Camel. It sounds pretty simple because it is.
This approach of using Camel is only recommended for simple integration scenarios or when you can’t invest the time to learn the Camel DSLs. We’ll discuss when to use this approach in more detail in section 14.1.4.
First, let’s see where this approach would be useful, and then we’ll dive into the details of the messaging annotations.
14.1.1. Inventory update at Rider Auto Parts
Back in chapter 10, we looked at how Rider Auto Parts keeps an inventory of all the parts its suppliers currently have in stock. It was kept up to date by the suppliers periodically sending updates to Rider Auto Parts. Storing this information locally within Rider Auto Parts means the business can operate without being dependent on expensive online integrations with all the suppliers.
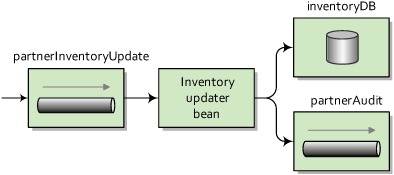
Suppose that you want this automated update to happen over JMS, because it has built-in reliable messaging, among other things. The updates will come in from multiple suppliers and enter through a single queue named partnerInventoryUpdate. Messages on this queue are then used to update the inventoryDB database. Figure 14.1 illustrates this flow.
Figure 14.1. Business partners send inventory updates to the partnerInventoryUpdate queue. These updates are then used to update the internal inventory database.

Let’s also suppose you have a Java class already available that can write this inventory update into a database. Here’s the class.
Listing 14.1. A Java class that can update the inventory database

This class has an updateInventory method that accepts a single parameter, an Inventory object, which contains details about the partner and the inventory that’s being updated. This data is then fed into the inventory database.
We’ll look at how the business partner sends to Rider Auto Parts in section 14.2, but for now we’ll look at how this inventory service will be implemented on the Rider Auto Parts side.
14.1.2. Receiving messages with @Consume
Inventory messages are arriving at the JMS partnerInventoryUpdate queue, so you need to figure out how to consume them and feed them into the database. You also want to reuse the InventoryUpdater class shown in listing 14.1 as much as possible.
If you know how to create a route in one of Camel’s DSLs, a solution may seem pretty obvious. You could set up a JMS consumer, as discussed in chapter 7, and then call the InventoryUpdater class using the bean component, as shown in chapter 4. Omitting the JMS component and bean setup, the route builder would look something like this:
public class InventoryUpdaterRoute extends RouteBuilder {
   @Override
    public void configure() throws Exception {
        from("jms:partnerInventoryUpdate")
            .to("bean:inventoryHelperInstance");
    }
}
To seasoned Camel users this will be simple to understand. But how can we do this without using Camel’s DSLs?
The answer is, “through the @Consume annotation.” By using the @Consume annotation in the InventoryUpdater bean, you can hook the partnerInventoryUpdate queue directly to the updateInventory method. Here’s how this is done.
Listing 14.2. InventoryUpdater class connected to JMS queue by @Consume

Adding this simple annotation tells Camel to consume messages from the partnerInventoryUpdate queue and invoke the updateInventory method with the contents. The @Consume annotation accepts any Camel endpoint URI, so you can easily hook up a method to anything that Camel supports!
To see this example in action, go to the chapter14/pojo-messaging directory in the book’s source and run this Maven command:
mvn clean test
The test case will send a message to the partnerInventoryUpdate queue and check that the update makes it into the database.
You may be wondering how you get from a JMS message to an Inventory object. Just because you aren’t using a RouteBuilder doesn’t mean that automatic type conversion won’t take place. In this case, Camel’s type converters automatically convert the body of the JMS message to an Inventory object, which is the parameter of the invoked method. You may recall from chapter 4 that, by default, Camel assumes that if there is a single parameter in a method being called on a bean, the body of the message needs to be converted to match that type. You can also use any of the parameter-binding annotations mentioned in section 4.5.3 to define more precisely what data to map from the incoming message.
Loading Annotated Classes into Camel
Getting access to all of Camel’s components through a simple annotation may seem like a bit of magic. As you may have guessed, there’s a little more setup required to use these annotations.
The first thing you’ll need to set up are the required dependencies: camel-core and camel-spring. You’ll also need to use a SpringCamelContext as the base application—a plain DefaultCamelContext from camel-core won’t do. That’s because when you create a SpringCamelContext in your Spring XML file, like so,
<camelContext id="camel" xmlns="http://camel.apache.org/schema/spring" />
it also registers a CamelBeanPostProcessor with the Spring application context. The CamelBeanPostProcessor is a Spring BeanPostProcessor that checks each new bean registered in the Spring application context for the @Consume and @Produce annotations. If it finds these annotations, it connects the bean to the specified Camel endpoints for you.
Note
We’ll be discussing the @Produce annotation, which is used to send messages to a Camel endpoint, in section 14.1.3.
So all you have to do to use these annotations is create a SpringCamelContext and then create your bean within the Spring XML file, as follows:
<bean class="camelinaction.InventoryUpdater"/>
Referencing a Shared Endpoint
If you have multiple beans consuming from the same endpoint URI, you may find it useful to define the endpoint once and reference it from each bean. This way, if the URI changes, you only have to change it in one place.
For example, you can set up a Camel endpoint in the context so it can be accessed from any bean:
<camelContext id="camel" xmlns="http://camel.apache.org/schema/spring">
  <endpoint id="inventoryQueue" uri="jms:partnerInventoryUpdate"/>
</camelContext>
Now you can reference the inventoryQueue endpoint within the @Consume annotation as follows:
@Consume(ref = "inventoryQueue")
public void updateInventory(Inventory inventory) {
    jdbc.execute(toSql(inventory));
}
This will have the same end result as if you were specifying the endpoint URI in the annotation. The only difference is that Camel won’t have to resolve the endpoint instance (or create a new instance on the fly) because it’s referencing an available instance.
Specifying What Camelcontext to Use
If you have two CamelContext elements defined within one Spring XML file, you’ll need to take extra care in making sure the @Consume annotation specifies which CamelContext it should apply to. Why is this? When you create a SpringCamelContext, a BeanPostProcessor is used to inspect each newly created bean and create consumers on the fly for the specified Camel endpoint. The problem with this is that you’ll get a new consumer for each CamelContext defined! This may not be what you want to happen.
To get around this, you can specify the CamelContext id in the annotation definition. Suppose you have two CamelContext elements defined as follows:
<camelContext id="camel-1" xmlns="http://camel.apache.org/schema/spring" />
<camelContext id="camel-2" xmlns="http://camel.apache.org/schema/spring" />
When you use the @Consume annotation in your bean, you can specify the context by using the context attribute. For example, to reference the context with ID equal to camel-1, you could do the following:
@Consume(uri = "jms:partnerInventoryUpdate", context = "camel-1")
public void updateInventory(Inventory inventory) {
    jdbc.execute(toSql(inventory));
}
You now know all the details necessary for consuming messages from Camel endpoints using the @Consume annotation. We mentioned before that you can similarly use annotations for producing messages to Camel endpoints. We’ll look at the @Produce annotation that does this next.
14.1.3. Sending messages with @Produce
You now have a new requirement for the InventoryUpdater bean. When you receive an inventory update from a partner, in addition to updating the database, you must send the update to the JMS partnerAudit queue for processing. Rider Auto Parts has added a new system that keeps track of how often partners send updates, whether updates had errors, and so on. Figure 14.2 illustrates this process.
Figure 14.2. When an inventory update comes in, it’s used to update the inventory database and it’s also sent to the partnerAudit queue for auditing.
This addition would be dead simple if you were using a Camel DSL route already, but you need to add this to your existing InventoryUpdater bean. You can do this by using the @Produce annotation.
Like the @Consume annotation described in the previous section, the @Produce annotation allows you to access any Camel endpoint without using one of Camel’s DSLs. The difference is that the @Produce annotation doesn’t attach to a method within a class; it attaches to a field or property setter within a class. This field can be either a ProducerTemplate or an interface you use in your business logic. In the case of a ProducerTemplate, Camel will simply inject a new ProducerTemplate that points to the URI you specify. If a plain interface is supplied, Camel has to do some extra work by injecting a proxy object. We’ll look at both approaches next.
Injecting a ProducerTemplate
The ProducerTemplate class is a natural way of sending messages to Camel endpoints. You’ve seen it used in previous chapters, so its use should be familiar. A complete discussion of the ProducerTemplate is given in appendix C.
You can use the @Produce annotation to set up a ProducerTemplate for a particular endpoint URI.
Listing 14.3. Using the @Produce annotation to set up a ProducerTemplate

The @Produce annotation ![]() takes the endpoint URI jms:partnerAudit and creates a new ProducerTemplate for that URI. At any other point in the bean’s use, you can then send messages to that endpoint using the ProducerTemplate that was created
takes the endpoint URI jms:partnerAudit and creates a new ProducerTemplate for that URI. At any other point in the bean’s use, you can then send messages to that endpoint using the ProducerTemplate that was created ![]() .
.
You can also specify an endpoint reference or CamelContext to use for the @Produce annotation, as was described in the previous section for the @Consume annotation.
Injecting a Proxy Producer
It’s also possible to send messages without using the ProducerTemplate at all. Camel allows you to specify an interface as the frontend for the endpoint specified. This approach allows you to eliminate the dependence on more Camel APIs, like the ProducerTemplate.
Tip
If you don’t care about depending on Camel APIs, we recommend using the ProducerTemplate described in the previous section because it has less overhead than the solution we’ll be describing next.
So how can you use a plain interface as the frontend for an endpoint? The short answer is that Camel creates an instance of the interface—a smart proxy object. This proxy object converts method calls into objects to be passed to the Camel endpoint. The whole process is described in more detail in section 14.2.2.
Suppose you define an interface for your backend audit processing systems as follows:
public interface PartnerAudit {
    public void audit(Inventory inventory);
}
The single audit method is intended to mean that the Inventory object passed in should be audited. The interface can then replace the ProducerTemplate, as shown here.
Listing 14.4. Using the @Produce annotation to set up a producer on an interface

The bean looks much like before, except that now there’s no use of ProducerTemplate. Instead, you use the PartnerAudit interface as the binding point for the @Produce annotation ![]() . This annotation will now tell Camel that a smart proxy object must be created that extends from PartnerAudit and passes on a message to the partnerAudit JMS queue. Then, when you call the audit method on the interface
. This annotation will now tell Camel that a smart proxy object must be created that extends from PartnerAudit and passes on a message to the partnerAudit JMS queue. Then, when you call the audit method on the interface ![]() , Camel sends a message to the endpoint specified in the @Produce annotation.
, Camel sends a message to the endpoint specified in the @Produce annotation.
14.1.4. When to use beans for routing
You may be wondering when you should use the messaging annotations rather than one of Camel’s DSLs. There’s no clear-cut answer to the question, but we can give you some guidelines to make your decision easier.
In general, we recommend that you use one of Camel’s DSLs if at all possible. They have built-in functionality for setting up common integration scenarios and will most likely make your life a lot easier. But they involve the added burden of learning more concepts.
You may want to use the messaging annotations in the following situations:
- You have a simple message flow where there is a single well-defined input or output URI. If you require a more dynamic bean when using annotations, see the @RecipientList annotation discussed in section 2.5.4.
- You would rather not learn about Camel’s DSLs.
- You have a use case so simple that you have no need for EIPs.
- You just want to access Camel’s library of components.
We want to stress that for complex integration scenarios, you should use one of Camel’s DSLs. Trying to design a complex integration with the messaging annotations could lead to a messy solution—they were not designed for complex routings.
You’ve seen how you can reduce your dependence on Camel’s DSLs with these annotations. Let’s now take a look at how you can take that a step further and completely hide Camel from users of your application.
14.2. Hiding middleware
Middleware is defined as the software layer that lies between an operating system and an application. Middleware is used for interoperability among applications that are running in a coherent distributed system. Examples include Enterprise Application Integration (EAI), enterprise service buses (ESBs), and message queuing software (such as Apache ActiveMQ).
Camel is also used for integrating and providing interoperability among applications that may run in a coherent distributed system. You could potentially view Camel as middleware software, but that isn’t entirely accurate, because Camel leverages third-party software where appropriate. For example, you can have Camel sitting on top of Apache ActiveMQ, and together they’re middleware software.
An important aspect of writing software these days is trying to write business logic that focuses on the domain concepts as much as possible. You want your business logic to deal with the business domain rather than with the myriad of technology stacks out there, such as SOAP, REST, JMS, FTP, and XMPP.
One way to avoid this situation is to decouple as much middleware from your business logic as possible—to hide the middleware. By keeping your business logic hidden from the middleware, your application will be much more flexible and easy to change. This also makes the lives of clients who access the business logic easier, because they only have to deal with the business domain.
To demonstrate this, we’ll cover a use case from Rider Auto Parts. You and your team have developed a starter kit, which is a piece of software new business partners can use to more easily integrate with Rider Auto Parts.
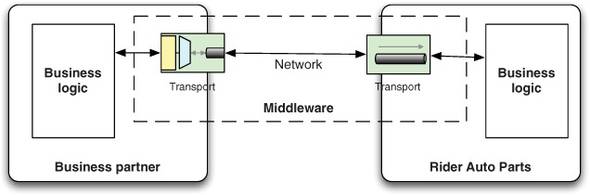
The situation without the starter kit is two businesses needing to integrate their business logic. Because the business logic is distributed, the logic of one partner needs to communicate over the network in order to interact with the other partner’s logic. That means the business logic needs to know about and use the transport. You want to hide the complexity of transports, which you can depict by labeling it as middleware, as shown in figure 14.3.
Figure 14.3. Each part of the business logic leverages middleware when communicating with the other parts.
The starter kit is middleware software based on Camel and a selected third-party technology for the transport. The transport must support networking to transfer data from one machine to another. Such a transport could, for example, be HTTP- or messaging-based. The transport technology that best fits the situation should be chosen. For this example, the transport technology is messaging using Apache ActiveMQ.
The business partner deploys the starter kit in their infrastructure and uses it to communicate with Rider Auto Parts, as shown in figure 14.4.
Figure 14.4. The starter kit is used by business partners to hide the middleware and easily communicate with Rider Auto Parts.
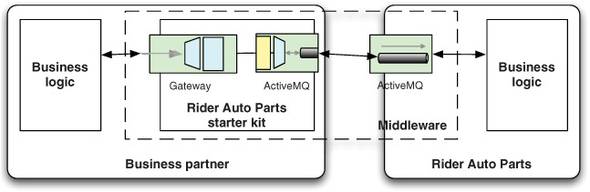
In this example, the starter kit takes care of all the complexity involved in sending messages over the network using Apache ActiveMQ. All the business partner should focus on is a single client interface that defines the API they need to use.
In this section, you’ll learn how to develop such a starter kit. We’ll start by defining the client API and creating a simple test that runs in a single JVM. Then you’ll learn how to change the middleware to switch transports without requiring any changes in the client. In section 14.2.2, we’ll let the communication happen remotely between two JVMs using JMS as the transport, which is what you might use in a real-life situation.
14.2.1. Introducing the starter kit
The starter kit is a Camel application that defines a single interface for business partners to use when integrating their businesses with Rider Auto Parts. To keep the use case simple, the interface will provide the following two methods:
public interface RiderService {
    void updateInventory(Inventory inventory);
    List<ShippingDetail> shipInventory(String supplierId, String partId);
}
The first method is used by clients to send updated inventory information to Rider Auto Parts. This allows Rider Auto Parts to maintain current information about its suppliers’ inventory situation, with all data being stored in a datastore within Rider Auto Parts. The second method is used by suppliers to find out which of the many Rider Auto Parts retail stores inventory should be shipped to.
The Domain
In this example, the information on the domain objects is kept simple and limited, as the following code snippets show (we’ve omitted the getters and setters):
public class Inventory implements Serializable {
    private String supplierId;
    private String partId;
    private String name;
    private String amount;
    ...
}
Here’s the ShippingDetail domain object:
public class ShippingDetail implements Serializable {
    private String address;
    private String zip;
    private String country;
    private String amount;
    ...
}
Using the RiderService interface, it should be easy for business partners to send inventory information to Rider Auto Parts, as the following code example shows:
private void updateInventory(RiderService rider) {
    Inventory inventory = new Inventory("1234", "4444");
    inventory.setName("Bumper");
    inventory.setAmount("57");

rider.updateInventory(inventory);
}
This example demonstrates the concept of decoupling business logic from the middleware. The example is pure business logic, focusing on assembling inventory information and sending it to Rider Auto Parts using the RiderService API. The example has no middleware logic; there’s no logic present to indicate how the data is actually sent. In this case, Camel is the middleware, and the example doesn’t use any Camel APIs at all. You’ve fully decoupled your business logic from the integration logic.
With the domain in place, let’s turn our attention to setting up Camel. First you’ll want to create a test that runs on a single JVM.
Setting Up Camel
In Camel, you need to set up two things to implement your first test. You need a mocked RiderService that can act as Rider Auto Parts and return dummy data. This is easy to do—all it involves is implementing the RiderService interface.
Listing 14.5. Simulating Rider Auto Parts
public class RiderAutoPartsMock implements RiderService {
    private static Log LOG = LogFactory.getLog(RiderAutoPartsMock.class);

    public void updateInventory(Inventory inventory) {
        LOG.info("Updating inventory " + inventory);
    }

    public List<ShippingDetail> shipInventory(String supplierId,
                                              String partId) {
        LOG.info("Shipping to Rider Road 66 and Ocean View 123");

        ShippingDetail detail = new ShippingDetail();
        detail.setAddress("Rider Road 66");
        detail.setCountry("USA");
        detail.setZip("90210");
        detail.setAmount("89");

        ShippingDetail detail2 = new ShippingDetail();
        detail2.setAddress("Ocean View 123");
        detail2.setCountry("USA");
        detail2.setZip("89103");
        detail2.setAmount("45");

        List<ShippingDetail> answer = new ArrayList<ShippingDetail>();
        answer.add(detail);
        answer.add(detail2);
        return answer;
     }
}
You then need to create a Spring XML file.
Listing 14.6. Spring XML setting up Camel
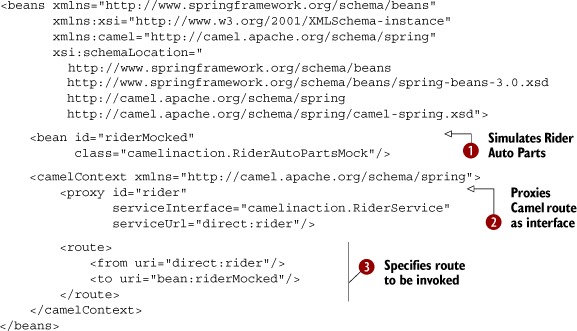
First you have to define a Spring bean, riderMocked ![]() (the class from listing 14.5), which is used to simulate the Rider Auto Parts business.
(the class from listing 14.5), which is used to simulate the Rider Auto Parts business.
The next part is the interesting part—it’s the mechanism that decouples the business logic from the middleware. This is done
by proxying ![]() the RiderService interface and having its method invocations proxied by sending a message to the given endpoint. We’ll cover this in much
more detail in section 14.2.2.
the RiderService interface and having its method invocations proxied by sending a message to the given endpoint. We’ll cover this in much
more detail in section 14.2.2.
What remains is to define a route ![]() that sends the messages to Rider Auto Parts. In this example, you route the message to the mocked bean that simulates Rider
Auto Parts.
that sends the messages to Rider Auto Parts. In this example, you route the message to the mocked bean that simulates Rider
Auto Parts.
The source code for the book contains this example in the chapter14/starterkit directory. You can run this example by using the following Maven goal:
mvn test -Dtest=StarterKitMockedTest
When you run the example, you should see the following lines, among others, on the console:
[main] INFO - Sending inventory
[main] INFO - Updating inventory 1234, 4444, Bumper, 57
[main] INFO - Shipping to Rider Road 66 and Ocean View 123
[main] INFO - Received shipping details
If you check the source code for the camelinaction.StarterKitMockedTest class, you should notice that it’s not using any Camel code to execute the business logic.
In the introduction to this section, we said that Camel can hide the middleware, allowing you to decouple your business logic from the transport. You’ll now see this in action as you change the transport from direct to the SEDA component without requiring any changes in the business logic.
Changing the Transport to SEDA
Changing the transport to SEDA is easily done in the Spring XML file, as follows:
<camelContext xmlns="http://camel.apache.org/schema/spring">
    <proxy id="rider"
           serviceInterface="camelinaction.RiderService"
           serviceUrl="seda:rider "/>
    <route>
        <from uri="seda:rider"/>
        <to uri="bean:riderMocked"/>
    </route>
</camelContext>
You can run this example using the following Maven goal:
mvn test -Dtest=StarterKitMockedSedaTest
When you run the example, you should see the following lines on the console:
[        main] INFO - Sending inventory
[seda://rider] INFO - Updating inventory 1234, 4444, Bumper, 57
[seda://rider] INFO - Shipping to Rider Road 66 and Ocean View 123
[        main] INFO - Received shipping details
The difference between this example and the previous one is that by using SEDA you let another thread process the route (indicated by the [seda://rider] in the console output).
Listing 14.6 uses a Camel proxy to hide the middleware, by using the <proxy/> tag. We’ll now look at how this works.
14.2.2. Using Spring remoting and Camel proxies
Using a Camel proxy is similar to using Spring remoting, which is a feature in the Spring Framework that offers remoting support for various technologies, making it easier to remote-enable services. Spring has a limited set of technologies that can be used. Camel takes this a big step forward by remote-enabling all of the Camel components.
To understand how a Camel proxy works, let’s start by adding a log in the route from listing 14.6 that will output information about the actual messages sent by the Camel proxy:
<route>
    <from uri="direct:rider"/>
<to uri="log:rider"/>
    <to uri="bean:riderMocked"/>
</route>
The console outputs the following:
[main] INFO rider - Exchange[ExchangePattern:InOut,
BodyType:org.apache.camel.component.bean.BeanInvocation,
Body:BeanInvocation public abstract void
  camelinaction.RiderService.updateInventory(camelinaction.Inventory)
  with [1234, 4444, Bumper, 57]]]
As you can see from the output, Camel uses a BeanInvocation type in the message body. The purpose of the BeanInvocation is to hold information about a bean invocation. It indicates that the updateInventory method is to be invoked with these parameters.
Because BeanInvocation is serializable, it’s possible to send it over a remote network and have it invoked on the remote side. Let’s try this using JMS as the transport and using two JVMs.
Using JMS as the Transport
Next, we’ll look at a client and server each in separate JVMs, using JMS as the transport. First we’ll discuss the server and how to start it. Then we’ll look at the client and run it to see it in action.
Here’s the Spring XML file you use to define the server.
Listing 14.7. Server with ActiveMQ broker

On the server you embed an Apache ActiveMQ broker that uses TCP as the transport on port 61616 ![]() . As you have two JVMs, you need a remote protocol, which in this case is TCP. In the route, you consume messages from the
ActiveMQ rider queue
. As you have two JVMs, you need a remote protocol, which in this case is TCP. In the route, you consume messages from the
ActiveMQ rider queue ![]() , which is the destination where the client will send the messages. Because you use an embedded ActiveMQ broker, you don’t
need to define an ActiveMQ component because Camel can leverage an intra-VM connection.
, which is the destination where the client will send the messages. Because you use an embedded ActiveMQ broker, you don’t
need to define an ActiveMQ component because Camel can leverage an intra-VM connection.
You can start the server using the following Maven command in the chapter14/starterkit directory:
mvn compile exec:java -PServer
The client is simple. All you need to do is define the proxy and configure the ActiveMQ transport, as follows:
<bean id="activemq"
      class="org.apache.activemq.camel.component.ActiveMQComponent">
    <property name="brokerURL" value="tcp://localhost:61616"/>
</bean>

<camelContext xmlns="http://camel.apache.org/schema/spring">
    <proxy id="rider"
           serviceInterface="camelinaction.RiderService"
           serviceUrl="activemq:queue:rider"/>
</camelContext>
You can run the client using the following Maven command in the chapter14/starterkit directory:
mvn test -Dtest=StarterKitClientTest
When the client is run, you should see activity in both the client and server consoles. The server should log the message received, which is similar to what you saw previously when JMS wasn’t used as the transport:
12:34:07 - Exchange[ExchangePattern:InOut,BodyType:org.apache.camel.component.bean.BeanInvocation,
12:34:07 - Updating inventory 1234, 4444, Bumper, 57
Now you’ve seen how to decouple your business logic from the middleware and change the transport without any code changes to the business logic. With that, it’s time to look under the hood at how this works.
How Camel Proxies Work
The code for creating Camel proxies is located in camel-core as the org.apache.camel.component.bean.ProxyHelper class, and it has various methods for proxying an interface with a Camel endpoint. In fact the <proxy/> tag you used in Spring XML is a facade that leverages the ProxyHelper class.
Figure 14.5 is a sequence diagram that depicts what happens at runtime when a client invokes the shipInventory method on a proxied RiderService interface.
Figure 14.5. A sequence diagram showing how a Camel proxy works under the covers, sending a BeanInvocation message to a remote endpoint and waiting for the reply, which eventually is returned to the caller

In this figure, a client invokes the shipInventory method on RiderService. This is proxied with the help of java.lang.reflect.Proxy, which invokes the CamelInvocationHandler. This handler creates a BeanInvocation that contains information about the method (and its parameters) invoked on the proxy. Then the BeanInvocation is sent to the endpoint using a Camel Producer, which waits for the response to come back. The response is then adapted to the RiderService by converting it to the same type as the return type on the method.
Note
Camel proxies will, by default, always use request-response messaging style (InOut) when a proxied method is invoked. This also applies to methods that don’t return a value (whose return type is void). You can enforce a method to use the fire-and-forget messaging style (InOnly) by adding the @InOnly annotation to the method definition in the interface. But keep in mind that when using @InOnly, the method call will be fully asynchronous, so you won’t know if the receiver processed the message successfully. For example, exceptions thrown by the receiver won’t be propagated back to the method call.
When using a Camel proxy, there’s a single rule that must be adhered to.
Rule When Using a Camel Proxy
Camel proxies use a BeanInvocation as the message body sent to the endpoint. If the endpoint is representing a remote destination, the message body must be serialized so it can be sent over the wire. This is why the information stored in BeanInvocation must be serializable. For Camel end users, that means the parameters you pass to the proxied interface must be serializable.
For example, if you look at the updateInventory method in the RiderService interface, you can see that it uses an Inventory object as a parameter.
public interface RiderService {
    void updateInventory(Inventory inventory);
    List<ShippingDetail> shipInventory(String supplierId, String partId);
}
When you invoke the updateInventory method, as shown in the following test snippet, the Inventory object must be serializable.
public void testStarterKitUpdateInventory() throws Exception {
    RiderService rider = context.getRegistry().lookup("rider",
                                 RiderService.class);

    Inventory inventory = new Inventory("1234", "4444");
    inventory.setName("Bumper");
    inventory.setAmount("57");

rider.updateInventory(inventory);
}
This is done by implementing the java.io.Serializable interface on the Inventory class:
public class Inventory implements Serializable {
    ...
}
The same rule applies to data being returned, so the shipInventory method must also return serializable data, which is ensured by letting the ShippingDetail class implement java.io.Serializable.
Using a Camel Proxy from the Java DSL
You can also create a proxy in Java code. For example, the following example from Spring XML,
<camelContext xmlns="http://camel.apache.org/schema/spring">
    <proxy id="rider"
           serviceInterface="camelinaction.RiderService"
           serviceUrl="activemq:queue:rider"/>
</camelContext>
can be rewritten in Java code using org.apache.camel.builder.ProxyBuilder as follows:
RiderService rider = new ProxyBuilder(context).endpoint("seda:rider")
                             .build(RiderService.class);
The source code for the book contains an example in the chapter14/starterkit directory. You can try it with the following Maven goal:
mvn test -Dtest=StarterKitJavaProxyBuilderTest
You’ve now learned how to decouple your business logic from the integration logic by hiding the middleware with help from Camel proxies.
14.3. Summary and best practices
In this last chapter of Camel in Action, we’ve shown you ways of using Camel that minimize your dependence on Camel APIs and completely hide Camel from your application’s users. These abilities are considered extra features of Camel, rather than core pieces. They add functionality that experienced Camel users, which you now are, can appreciate.
There are a few things you should take away from this chapter:
- The messaging annotations are great for simple use cases. When all you want to do is hook up a bean to a transport supported by Camel, the messaging annotations are an easy way to go. There is little learning overhead with these, compared to using the Camel DSLs. We still recommend the Camel DSLs for more complex scenarios.
- Use hiding middleware principles when you don’t want to expose your transports. In some cases, you may not want clients of your service to know what transport you’re using to communicate with the backend. For instance, you may want to change the transport in the future without changing the client’s code.
You’ve now made it through many Camel and general enterprise integration concepts; you have the knowledge to tackle complex integration problems with Camel.
As a final suggestion, try to keep in touch with the Camel community. It’s a busy and exciting place, and we’d love to hear from you there. Hope you’ve enjoyed the ride!