Your personal computer can do more than just compute. It can also serve as a fully functional audio/video playback center!
That's right, you can use your PC to listen to your favorite audio CDs and to watch the latest movies on DVD. And you do all of this with a software program called Windows Media Player included free with your new PC!
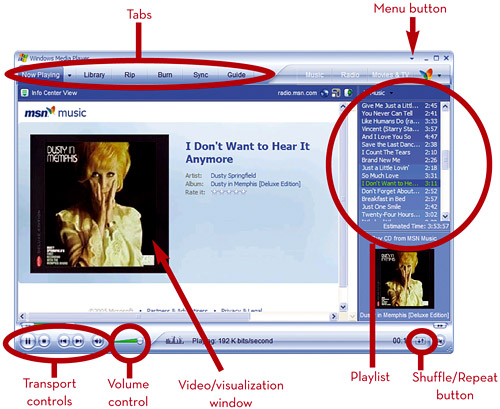
You play audio CDs using your PC's CD-ROM drive and Windows Media Player (WMP). You can also use WMP to play songs you've downloaded to your PC from the Internet and (if your PC has a DVD drive) to play DVD movies.

 Insert a CD into your PC's CD-ROM drive.
 Windows will ask what you want to do; double-click Play Audio CD Using Windows Media Player.
TIP

Online Music Stores
You can buy downloadable music at many online music stores, including the iTunes Music Store (www.apple.com/itunes/store/), MSN Music (music.msn.com), and Napster (www.napster.com). Most stores charge 99¢ per song.
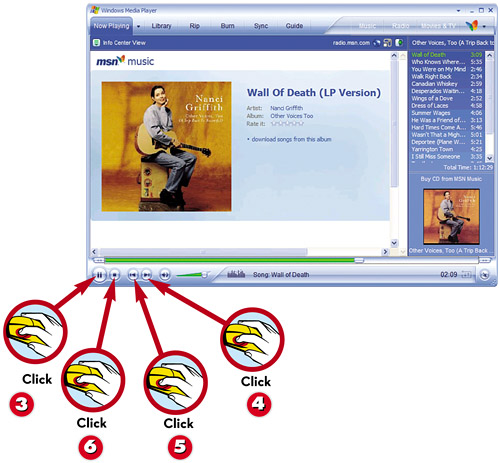
 The CD should start playing automatically; to pause the CD, click the Pause button and then click Play to resume playback.
 To skip to the next track, click the Next button.
 To replay the last track, click the Previous button.
TIP
Download the Latest Version
This book covers Windows Media Player version 10. To download the latest version of Windows Media Player, go to www.microsoft.com/windows/windowsmedia/.
Windows Media Player lets you copy music from your CDs to your PC's hard drive. You can then listen to these digital audio files on your computer, transfer the files to a portable music player, or burn your own custom mix CDs. This process of copying files from a CD to your hard disk is called ripping.
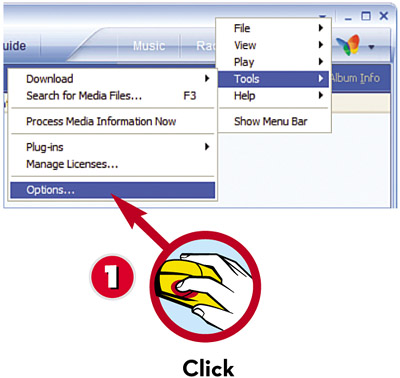
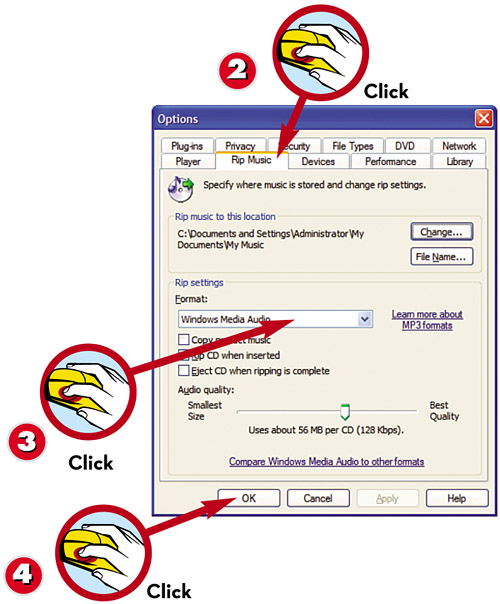
- Before you rip a CD, you have to set the recording quality level. Pull down the Tools menu and select Options.
- When the Options dialog box appears, click the Rip Music tab.
- Pull down the Format list and select the file format and recording quality you want.

- Insert the CD you want to rip into your PC's CD-ROM drive.
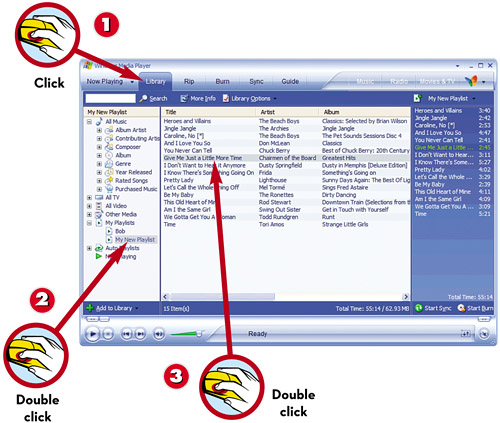
 In WMP, click the Rip tab to show the contents of the CD.
 Put a check mark by the tracks you want to copy.
 When you've selected which tracks to rip, click the Rip Music button.
Files in your Windows Media Player library can be combined into playlists. You can create playlists from the files you have stored on your hard disk, in any order you want just like listening to a radio station's playlist.


If you have a recordable CD drive (called a CD burner) in your PC, you can make your own audio mix CDs. You can take any combination of songs on your hard disk; “burn” them onto a blank CD; and then play that CD in your home, car, or portable CD player.


To use the iPod with your PC, you first have to install Apple's iTunes software, which comes on the accompanying CD. When you connect your iPod to your PC, your computer automatically launches the iTunes software and transfers any new songs and playlists you've added since the last time you connected.

The key to managing the music on your iPod is mastering Apple's iTunes software. To transfer songs to your iPod, all you have to do is check them. The next time you connect your iPod, all the checked songs in your Library will be downloaded.

You can store thousands of songs on your iPod, which makes it a little difficult to find the music you want. One way to organize your music is to create playlists of your favorite songs. Smart playlists let you select songs by artist, album, genre, and so on.


You can connect any brand of portable music player to your PC. For most non-iPod players, you can use Windows Media Player to transfer music from your PC to your portable device.

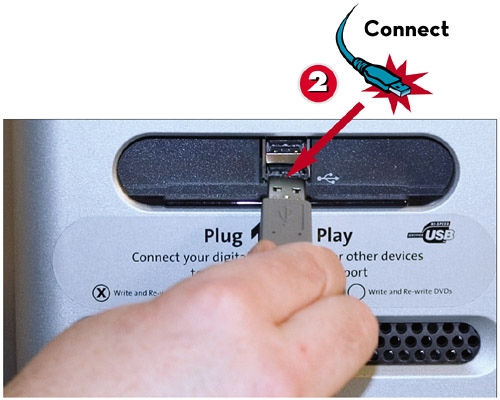
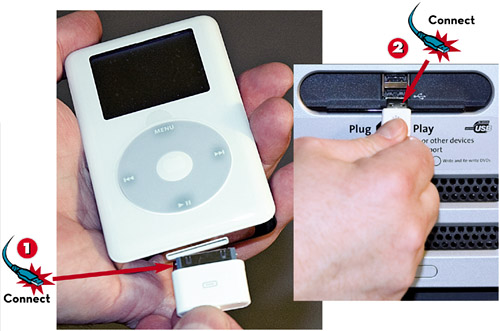
- Connect one end of the USB cable to your portable music player.
- Connect the other end of the USB cable to a USB port on your PC's system unit.
NOTE

MP3 Players
Portable music players especially those that store songs in flash memory are often generically called MP3 players, after the popular MP3 file format.
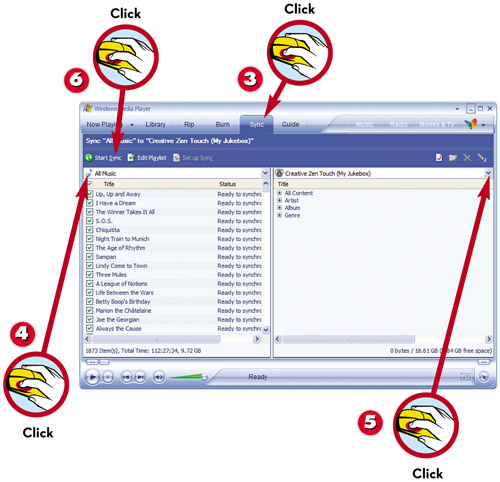
- In Windows Media Player, click the Sync tab.
- Pull down the Sync list (on the left side) and select either All Music or a specific playlist; then check those songs you want to transfer to your music player.
- Pull down the Device list (on the right side) and select your portable audio player.
- Click the Start Sync button to transfer the selected files to your portable audio player.
If your PC has a DVD drive, you can use your PC to watch prerecorded DVD movies. When you insert a DVD in your DVD drive, your PC should sense the presence of the DVD, launch Windows Media Player, and start playing the movie. (You can also initiate playback from within WMP by pulling down the Play menu and selecting DVD.)
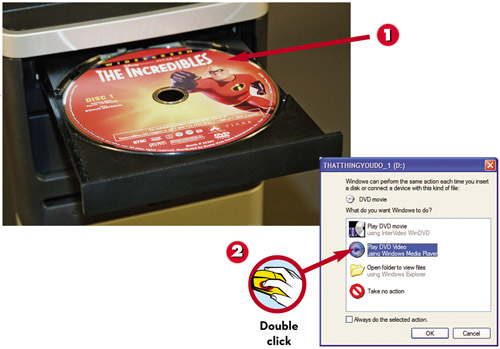
- Insert the DVD into your PC's DVD drive.
- Double-click Play DVD Video Using Windows Media Player.
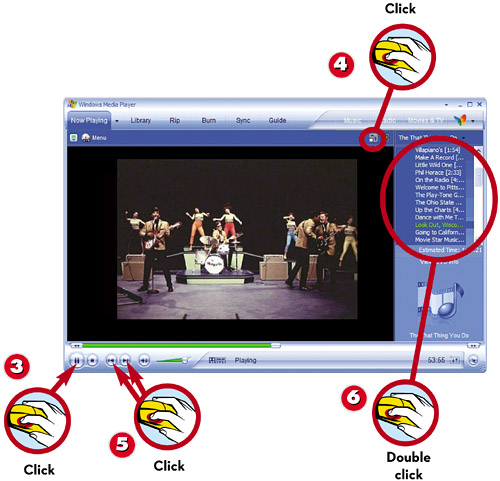
- The movie should start playing automatically. To pause the movie, click the Pause button; then click Play to resume playback.
- To view the movie full-screen, click the Full Screen button; press Esc to return to normal viewing mode.
- Click the Next button to go to the next chapter on the DVD, or click the Previous button to go to the previous chapter.
- Go to any specific chapter by double-clicking the chapter name.