Chapter 3. Tutorial Introduction
Getting started often proves to be one of the biggest challenges. In particular, given the tutorial nature of the next dozen or so chapters, understanding the goals of the tutorial and ensuring that you have a reasonable development setup are crucial to having an enjoyable learning experience.
This chapter is designed to set the scene and show you
• An overview of the tutorial content and evolution
• How to set up for Eclipse RCP development
• How to get, compare, and manage the sample code
• Some tips for using the Eclipse IDE for exploring code
3.1 What Is Hyperbola?
Hyperbola is an instant messaging chat client developed expressly for this book. The instant messaging domain is compelling because it is simple and easy to understand. In fact, you most likely have used an instant messaging client at some point. Whether it’s Google Talk, Yahoo! Messenger, AOL Instant Messenger, MSN Messenger, or Lotus Sametime, the idea is basically the same—the client connects to a server, which routes messages from one client to another.
What’s so interesting about writing yet another chat client? Even though the idea is straightforward, instant messaging clients themselves are rich in challenges and feature needs. Enumerated here are a few of the challenges of putting together a full-featured chat client:
Third-party libraries—Writing a messaging library is challenging at best. Rather than writing your own, most prefer to use one crafted by experts. Hyperbola is no different—it is based on the Smack API which uses the Extensible Messaging and Presence Protocol (XMPP) under the covers to enable messaging.
Extensibility—Simple instant messaging is quite straightforward. Hyperbola, however, is based on the Internet Engineering Task Force’s (IETF’s) XMPP messaging standard, which evolved out of the Jabber protocols. Remember, the X in XMPP is for “eXtensible.” And it certainly is that. There are XMPP extensions for multiuser chat (MUC), file transfer, Extensible Hypertext Markup Language (XHTML) messaging, user location, and so on. This implies that a full-featured chat client must also be extensible.
Varied execution environments—Instant messaging is pervasive. People use it from their desktops, handhelds, and cell phones and integrate it with other applications. Servers and other machines use it to alert administrators. The challenge is to write a client that is useful in as many of these environments as possible.
Provisioning—Given that the domain is so extensible, the ability to update a deployed chat application’s existing capabilities and add new capabilities is crucial. Updating should happen with minimal intrusion on the use of the running client.
Complex workflows—The domain is simple, but it gives rise to some interesting work and execution flows. Even simple things like logging on can be complex, and messaging is inherently asynchronous and decoupled.
Customization—Chat clients seem to be quite personal. Everyone likes to customize them. Whether you are the end user or the product designer, customizing the look and feel is becoming mandatory.
Generic—Perhaps the most compelling part of the instant messaging domain as an example is that many of the challenges just described are relatively generic—you have probably identified with at least some of these as you read the list.
Stepping back and looking at these challenges, you should notice that they are driven by the richness of the domain rather than the details of the infrastructure—that is, the Hyperbola example highlights that RCP is easy; it’s the domain that is hard.
3.2 The Evolution of Hyperbola
Over the course of the tutorial chapters, we develop Hyperbola through the series of prototypes enumerated below. Each of the prototypes is set up to reach some level of application functionality and illustrate a coherent set of Eclipse RCP features and functions as well as Eclipse development environment functions. Each prototype is covered in a series of chapters, and the code added or changed in each chapter is supplied to you. You can follow along and do the steps yourself, jump around and start in the middle, just browse the code, or simply read the text.
Hello, Hyperbola (Chapter 4)—The tutorial starts off with an empty workspace and walks you through the basic elements of creating RCP applications and plug-ins, the structure and control flow of a simple Hyperbola shell, and the running and debugging of applications. By the end of this initial prototype, Hyperbola is just a simple shell, but it runs and you know how to run it! The code for this chapter is entirely generated by templates in Eclipse.
UI sketch (Chapters 5–7)—This prototype focuses on filling out the UI of Hyperbola. The realities and details of messaging are ignored as we introduce UI concepts such as views, editors, actions, and perspectives as well as some common user features like system tray integration. The prototype finishes with a realistic-looking Hyperbola chat client prototype without the chatting function.
Branded and packaged (Chapters 8–9)—We take a break from coding and the chat domain to address the somewhat generic issues of branding and packaging. Branding Hyperbola by adding a splash screen, window images, and About information completes its look and feel. Packaging it allows you to distribute it to friends and colleagues and get their feedback. The branded and packaged Hyperbola is fully stand-alone.
Messaging (Chapters 10–12)—The main goal of this prototype is to put the “chat” in “chat client.” Here we add the Smack messaging library to get real messaging capabilities. This prototype also refines Hyperbola to have key bindings, preferences, and a login dialog.
Well-rounded (Chapters 13–14)—The last prototype rounds out Hyperbola by adding Help and Update support. These are important capabilities for real-world applications. Their addition here sets the stage for the integration of further functionality. By the end of this prototype, Hyperbola is a complete XMPP-based chat client that has a number of bells and whistles, but we will still have only scratched the surface of what is possible with the Eclipse RCP.
3.3 Development Environment Installation
The first thing you need for the tutorial is a set of tools to write the code. The Eclipse SDK has a full set of Java development tooling (JDT), complete with a comprehensive Plug-in Development Environment (PDE). The code in this book has been developed and tested using the Galileo SR2 release of Eclipse (also known as Eclipse 3.5.2). You can download the release from http://eclipse.org/downloads.
The Eclipse downloads site contains a vast array of downloads, but the Eclipse Classic (SDK) is the most popular and should be highlighted on the site. This book details functionality that was new to Eclipse in Galileo SR2, the latest release as the book went to press. You must be using the released version of Galileo SR2 or later to follow the exercises. Be sure to get the appropriate download for your machine (OS, window system, and processor).
Once you have downloaded the file, expand it in some convenient location (say, c:ide on Windows). In the examples we assume that you have extracted it to c:ide.
Note
The Eclipse downloads do not include a JRE or Java SDK. Many systems include an acceptable JRE. If yours does not, http://eclipse.org/downloads/moreinfo/jre.php provides information on getting a suitable JRE.
For the work in this book, it is convenient to have a Java SDK (sometimes called a JDK), as it includes much of the Java source, convenient for debugging, and a couple of handy tools such as jarsigner.
Now you are set to run the IDE. Double-click on the launcher (eclipse.exe or eclipse, depending on your operating system). When Eclipse starts up, it asks for a workspace location. The workspace is the place where development artifacts such as projects and code are stored. It is typically a good idea to locate the workspace somewhere separate from the IDE install. This simplifies the management of multiple workspaces as well as changing versions of the Eclipse IDE. By default, Eclipse suggests a location in your user directory (e.g., c:Documents and Settingsyouworkspace). This is a fine choice.
After you select a workspace location, Eclipse continues to start and shows the welcome page. Feel free to play around with the information there. When you are ready to continue, go to the Workbench by clicking on the arrow at the top right corner.
3.4 Sample Code
As mentioned earlier, the code and resources added in each chapter are available from the book’s Web site, http://eclipsercp.org. It turns out that managing a dozen different versions of the same plug-ins is quite complicated. Ideally, we would have just named the projects differently and allowed you to load them all at once. Unfortunately, all of the variations on that approach proved to be problematic in one way or another. In the end, we wrote a Samples Manager tool to help you both manage the chapter code and move from chapter to chapter.
The example code in the Samples Manager is the final state of Hyperbola after all steps outlined in the corresponding chapter have been completed. So, to get the starting state for Chapter N, you should load the final state for Chapter N-1 into your workspace.
To install the Samples Manager, follow these steps:
• Open the Software Updates dialog using Help > Install New Software....
• On the Available Software page click the Add... button to add a new software site.
• In the dialog enter http://eclipsercp.org, the location of the book’s software site, and click OK.
• Expand the tree for the RCP book site and select the Samples Manager. Pick version 2.0.0 or later to get the code for the second edition of this book.
• Click OK and go through the following pages of the wizard, carefully reading and accepting the licenses and warnings. After the Samples Manager is installed, a restart dialog appears. Select Yes to restart.
3.4.1 Moving from Chapter to Chapter
With the Samples Manager installed, there should be an RCP Book menu on the main menu bar. Open the tool by selecting RCP Book > Samples Manager. You should see a view that lists all the chapters of the book that have associated sample code. Select a chapter and click Import to load all related projects into the workspace. After importing a chapter, the Samples Manager highlights the chapter to remind you what is in the workspace. The tool’s Help content includes the most up-to-date instructions and tips for using the tool.
3.4.2 Comparing
The Samples Manager also supports comparing the current workspace to the set of projects for a chapter. For example, if your workspace contains the projects for Chapter 5, you can see all the changes required for Chapter 6 by selecting Chapter 6 in the list and clicking Compare. This gives you a standard Eclipse compare editor that you can use to browse the changes or load them into the workspace.
This is extremely useful when following the tutorial steps. For example, while doing Chapter 6, you may find that something is not working or the steps are unclear. Comparing the current workspace to the Chapter 6 project tells you what is left to do or where your setup is different from the expected outcome.
Several chapters require sets of resources or large chunks of code that you are not expected to create on your own. The Samples Manager’s comparison tool has a Copy into Workspace action, as shown in Figure 3-1, that allows you to select files and folders in the comparison and copy them into the workspace.
Figure 3-1 Comparing Chapter 4 to Chapter 9
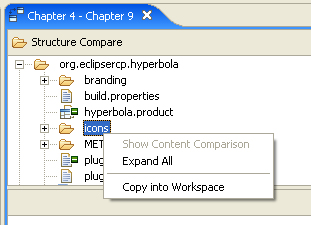
To distinguish between files that are changes and those that exist only in one location, the compare editor shows a minus sign (-) if a file does not exist in the workspace but does exist in the comparison chapter. Conversely, a plus sign (+) is shown if a file exists only in the workspace.
3.5 Target Platform Setup
Before starting development, you need to set up the target platform. The target is the set of plug-ins on which your application is based, that is, everything except the plug-ins you are writing. The target is distinct from the bundles that happen to make up your Eclipse tooling. In our case the target will include mostly RCP bundles needed to implement Hyperbola. We can add and remove bundles in the target without affecting the tools.
Targeting the IDE
By default PDE uses your Eclipse IDE bundles as the target platform. This is convenient and sufficient for the initial stages of Hyperbola but will quickly become unwieldy. As such, we recommend using a distinct target platform.
PDE includes comprehensive support for defining and managing target platforms. The Samples Manager you installed also includes a predefined target suitable for the examples in this book. To get up and running quickly, you can load that target, or you can start from scratch and assemble your own target definition. We describe both workflows in the following sections.
The target should have all the supporting bundles required for these activities. Broadly speaking, you need two main things:
RCP SDK—The basic set of plug-ins upon which all RCP applications, including Hyperbola, are built.
Delta pack—Eclipse supports many different hardware and OS platforms. The binary executable and graphical libraries are platform-specific. To ease consumption, the Eclipse team has put together a delta pack that contains all of the parts of the basic Eclipse infrastructure that are platform-specific. This is of use to Hyperbola when exporting and building.
3.5.1 The Predefined Target
The Samples Manager comes with a handy target that includes all of the components listed above. Carry out the following steps to load the predefined target:
• Use RCP Book > Load Target or open the Samples Manager and click on the Load Target button. This should show a progress dialog while the target contents are copied. When it completes, there will be a project called org.eclipsercp.hyperbola.target in the workspace.
• Open the Target Platform preferences page (Window > Preferences > Plug-in Development > Target Platform) and look for the entry called Hyperbola Target. Select the check box beside that entry and click Apply or OK to use the Hyperbola target.
Warning About the Target Editor
Targets are defined in .target files. The Hyperbola target file is called hyperbola.target and is located in the org.eclipsercp.hyperbola.target project. We will talk about editing this file in the next section, but here you should be aware of a bug in the PDE tooling as of Galileo SR1 (September 2009).
When a target file is opened, the target editor attempts to resolve its contents. Do not click on the Set as target platform link in the target editor while the editor is resolving. Doing this causes a race condition that ultimately prevents the target definition from loading.
If you do this by mistake, you will see a dialog reporting a locking or synchronization error. When this happens, close the target editor and restart Eclipse. Then follow the steps above using the target preferences, or open the editor and wait for it to complete resolving before clicking the link.
3.5.2 Defining Target Platforms
Even if you use the predefined target from the previous section, at some point you will have to define your own. This section describes how that is done. If you are up and running with the predefined target, skip this section and treat it as a reference to come back to.
A target platform is just a list of bundles and features from various locations. Sources of content include
Directories—Specifying a directory adds to the target all bundles and features found in that directory. Directories of bundles can be acquired by downloading archives from the Web, for example, from eclipse.org.
Installations—Pointing the target at an existing Eclipse install adds all elements of the install to the target platform. This includes linked folders, drop-ins, and any other bundles and features that make up the install.
Features—Adding features is similar to adding a directory but with the added ability to select a subset of features found in the directory. All bundles indicated by the selected features are also added to the target.
Software sites—There are many software repositories around the world. Adding a software site allows you to identify a repository from which bundles and features are loaded.
The predefined Hyperbola target uses directories and software sites in its definition. Below we walk you through the steps we used to create the target platform. In a sidebar in the previous section we talked about having targets in the workspace. We will illustrate that approach here. If you would rather not, you can put the target content wherever you like, but the target definition file still has to go somewhere in the workspace.
• Create a simple project using File > New > Project... > General > Project.
• Create a target platform definition using File > New > Plug-in Development > Target Definition wizard.
• Enter a name for the target file and situate it in the new project.
• Notice that at the bottom of the wizard there are several options for initializing your new target. Select the Nothing option as we are building this target from scratch. In other scenarios you may wish to prime your new target with content listed elsewhere.
• Click Finish to complete the wizard and open the target editor on the new target definition, as shown in Figure 3-2.
Figure 3-2 The target definition editor

In the editor you can fill in a useful name for the target definition, but the really interesting part is the Locations section. For the Hyperbola target we will need to add a directory for the delta pack and a software site for the RCP SDK. Let’s do the delta pack first.
• Get the delta pack by downloading it from the Eclipse project download site, http://download.eclipse.org/eclipse. Choose the Latest Release from the options given. As of this writing it is 3.5.2.
• On the subsequent download page select Delta Pack on the left navigation bar. This scrolls the page to the delta pack download link. Notice that there is only one link, since by definition it is all the pieces that are platform-dependent. Select the link and save the archive to a convenient spot on your local drive.
• When the download is complete, create a new folder called delta.pack in the target project and import the downloaded content into the folder using File > Import... > General > Archive File.
• In the target editor’s Definition page click Add... and select Directory. Click Next.
• In the Add Content dialog click Variables... and select workspace_loc from the list. Now append the workspace path to the delta pack content. For example, the location should look like the following, assuming you called your project HyperbolaTarget:
${workspace_loc}/HyperbolaTarget/delta.pack
Next we’ll add a software site and get the RCP SDK:
• In the target editor’s Definition page click Add... and select Software Site. Click Next.
• On the subsequent Add Software Site wizard page, choose Galileo in the Work with drop-down. If there is a more recent release repository available, feel free to choose it. If the site you want is not listed, click the Add... button and enter the Name and URL Location for the site. For example, the Galileo site is at http://download.eclipse.org/releases/galileo.
• Once the site is selected, the content area of the wizard should fill in as shown in Figure 3-3. Uncheck the Group by Category box under the content area and then type RCP in the filter area. Select Eclipse RCP SDK to add the RCP SDK.
Figure 3-3 Galileo software site content

• Important! You must uncheck the Include required software box at the bottom left of the wizard. Failure to do this will result in a bloated target that may not work for the Hyperbola scenario.
• Click Finish.
After clicking Finish, PDE resolves the target. This may take some time as the content is downloaded from the software site. Once the resolution is complete, take a look at the Content page of the target editor. You should see something similar to the editor in Figure 3-4.
Figure 3-4 Hyperbola target content

3.6 Learning by Example
One of the most efficient and effective ways of figuring out how to program a system is by browsing examples. We can’t emphasize this enough. Eclipse itself is one huge example. It can be overwhelming, but there are various shortcuts and mechanisms you can use to help follow the code. Here is a short list of the workspace navigation operations we use on a day-to-day basis:
Navigate > Open Type... (Ctrl+Shift+T)—Opens the Java type with the name you enter. Wildcards are supported. This is a fine way of discovering where a type is or if it exists.
Navigate > Open Resource... (Ctrl+Shift+R)—Opens a resource with the name you enter. Wildcards and case-sensitive acronyms, CamelCasing, are supported. Use this to discover resources and their location.
Navigate > Quick Type Hierarchy (Ctrl+T)—Pops up a type hierarchy rooted by the type associated with the selection in the current Java editor. For example, if the selection is on a type, a normal type hierarchy is opened. If the selection is on or in a method, all implementers of that method in the hierarchy are shown. Press Ctrl+T again to invert the hierarchy.
Search > References > Workspace (Ctrl+Shift+G)—Searches for references to the selected Java element (e.g., type, method, field) in the current Java editor. Ctrl+Shift+U does the same search but local to the current file.
Navigate > Open Declaration (F3)—Opens the declaration of the Java element selected in the current Java editor.
Navigate > Open Plug-in Artifact (Ctrl+Shift+A)—Opens the plug-in artifact with the name you enter. Wildcards are supported. This is a good way to quickly search all plug-ins within your workspace and target platform.
Ctrl-3—Presents a condensed list of commands, views, preferences, and other facilities. Simply type some words related to what you need and the list is filtered. For example, typing targ finds the target preference page.
Alt+Shift+F1—Presents a Plug-in Spy based on the current selection when the command is issued. The spy shows useful plug-in development-related information such as implementing class and contributing plug-ins. This is a great way to find implementation classes of views you use within Eclipse.
Since Eclipse is so decoupled, it can be hard to figure out how the various pieces interact. PDE offers various tools and mechanisms for navigating these interconnections. The Plug-in Development perspective (Window > Open Perspective > Other... > Plug-in Development) includes a Plug-ins view. From this you can easily navigate the dependencies and references. From the PDE plug-in editor you can discover the extension-to-extension-point interconnections, navigate to the classes defined in various extensions, and browse extension point documentation.
Tip
In the Plug-ins view select all plug-ins and use the Add to Java Search context menu entry to add all known plug-ins to the Java search scope. This is helpful because Java search looks only in projects in the workspace and their dependent projects. This means that if you open an empty workspace and try to open a type, say, using Ctrl+Shift+T, the dialog will be empty. By adding all plug-ins in your target platform to the search, you can more easily navigate example code and classes that you do not reference from your projects.
3.7 Summary
Once set up, Eclipse and PDE make it easy to create and run applications. The setup detailed here is robust in that you can use the IDE to work on many different workspaces, the target platform can be updated independently of the IDE or the workspaces, and the IDE itself can be updated without affecting the workspaces or the target platform.
By adding Samples Manager support, you can jump to any chapter and set up your workspace in seconds. You can also validate the tutorial steps as you go and get quick summaries of all the changes done so far and those that are left to do.
3.8 Pointers
• The first stop if you have a question about Eclipse should be the Eclipse Community Forums at http://eclipse.org/forums.