

Capturing application events
This chapter shows how to use the CICS Explorer to create, deploy, and verify an example event that is captured from a CICS application by using the shopping scenario.
This chapter includes the following topics:
The steps that are described in these topics can be used as a basis to create the event bindings and event adapters that are used in the shopping scenario.
6.1 Create the CICS bundle project
Complete the following steps to create a CICS bundle project by using the CICS Explorer:
1. Switch to the Resource perspective.
2. Click the Create CICS Bundle Project icon, as shown in Figure 6-1. Alternatively, select File → New Wizards → Other → CICS Resources → CICIS Bundle Project → Next.

Figure 6-1 Starting the Create Bundle Project wizard
3. Enter the project name ShoppingEventBundle, as shown in Figure 6-2, then click Finish. This project contains an event binding and event adapter for the shopping application.

Figure 6-2 Creating the ShoppingEventBundle bundle project
6.2 Creating the event binding
Complete the following steps to create the event binding:
1. In the Project Explorer view, right-click the ShoppingEventBundle project, then select New → CICS Event Binding.
2. Enter the file name ShoppingEventBinding, as shown in Figure 6-3, then click Finish. The event binding editor starts automatically.

Figure 6-3 Creating the ShoppingEventBinding event binding
|
Important: An error appears in the Problems view (see Figure 6-4 on page 110) because the event binding does not yet have an event specification. The event binding and CICS bundle also have error markers (a red box with a white X) to denote there is a problem. This error is resolved after the event specification is added.
|

Figure 6-4 Problem shown after creating an event binding
3. In the event binding editor in the Event Binding tab, enter the description The Shopping Event Binding, as shown in Figure 6-5.

Figure 6-5 Adding the QueryStock binding specification
4. Click Add to add an event specification, and enter the name QueryStock and description Query stock event specification, as shown in Figure 6-6 on page 111. Click OK.
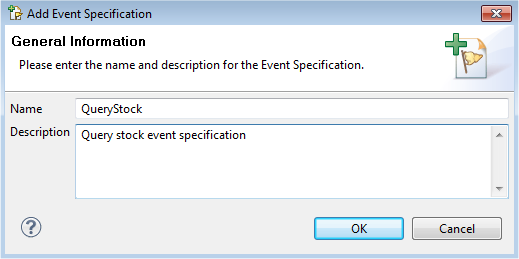
Figure 6-6 Naming the QueryStock event specification
5. Click Edit Details to edit the event specification.
6. To emit the customer number and stock identification with the event, they must be added in the Emitted Business Information section. Click Add to add the first information item.
7. The Emitted Business Information window opens, as shown in Figure 6-7 on page 112. Enter the following values and click OK:
– Name : CustomerNumber
– Type : Numeric
– Length: 6
– Precision: 0
– Description: The customer number

Figure 6-7 Adding the CustomerNumber business information
8. Select Add again, and in the Emitted Business Information window, enter the following values and click OK:
– Name : StockId
– Type : Numeric
– Length: 6
– Precision: 0
– Description: The stock identification
9. In the Specifications tab shown in Figure 6-8 on page 113, select Add a Capture Specification. This is where to indicate when and how an event should be captured from the application.

Figure 6-8 Adding the CaptureQueryEvent capture specification
10. In the Add Capture Specification window, enter the following values and click OK:
– Name: CaptureQueryEvent
– Description: Capture the Query Event
11. Select CaptureQueryEvent in the tree on the left side. The editor shows the capture specification, including the tabs Capture Point, Filtering, and Information Sources.
12. In the Capture Point section, select PROGRAM INIT, as shown in Figure 6-9. This captures the event when the program is initialized by CICS, and before the program is run.

Figure 6-9 Selecting the PROGRAM INIT capture point
13. Select the Filtering tab. The Application Event window opens.
14. Set the program name predicate by setting the PROGRAM operator to Equals, and Value to QUERY in the Event Options section, as shown in Figure 6-10 on page 115. This filters the Program initiation that is performed by CICS to capture only those where the program name is QUERY.
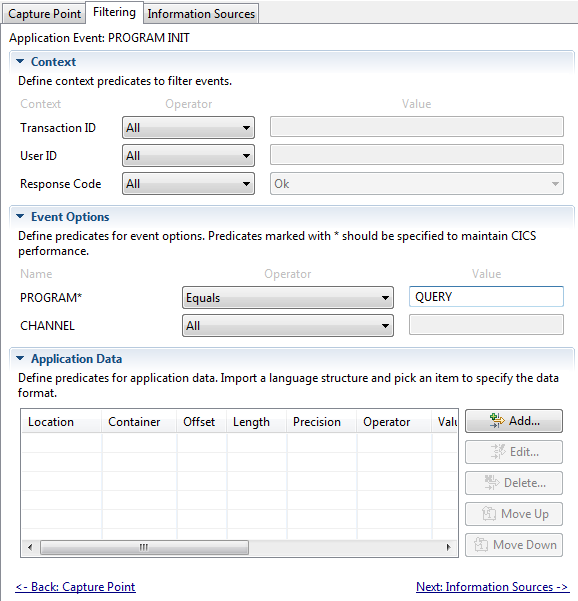
Figure 6-10 Adding the application context predicates
15. When the QUERY program is initiated it expects the DISP-STOCK-ITEM container to exists for stock inquiries. To create a predicate for this situation, select Add in the Application Data section.
16. In the Application Data Predicate window, enter the following values as shown in Figure 6-11 on page 116 and click OK:
– Operator: Exists
– Location: CHANNEL
– Container: DISP-STOCK-ITEM

Figure 6-11 Adding the DISP-STOCK-ITEM container application data predicate
|
Tip: Application data predicates are evaluated by CICS in the order they are defined here. For best performance, place those predicates that filter out the largest number of unwanted events before others. Use the Move Up and Move Down buttons to change the order.
|
17. Select the Information Sources tab to define how CICS should capture the data that is required by the emitted business information that is shown in Figure 6-12 as CustomerNumber and StockId. The table is pre-filled with the items that were specified in the Emitted Business Information section of the Event Binding Editor.

Figure 6-12 Defining where emitted business information items should be captured from
18. Select the CustomerNumber item, then click Edit.
19. In the Information Source for CustomerNumber window, select CHANNEL. Enter the following values as shown in Figure 6-13 on page 118 and click OK:
– Container : CUSTOMER-NO
– Type: Packed Decimal
– Offset: 0
– Length: 3
– Precision: 0
|
Important: The emitted business information source is stored as a COBOL packed decimal data type and has a length of three bytes, whereas the emitted business information is string format and has a length of six bytes. CICS converts data between these data types.
|

Figure 6-13 Defining the information source for customerNumber
|
Tip: If you have the copy book describe the data in the container, you can use Select from imported language structure to import the copy book and select the field. The type, offset, length, and precision is then automatically set. In addition, the variable name, structure name, and file name for the imported field is recorded for later use by the CICS Explorer search facility.
|
20. Repeat the previous step for StockId with the following values and click OK:
– Container : DISP-STOCK-ITEM
– Type: Packed Decimal
– Offset: 0
– Length: 3
– Precision: 0
The event specification is now complete.
6.2.1 Referencing the TS Queue adapter
For test purposes, the event is emitted to a temporary storage queue by using the TS Queue EP adapter. This EP adapter is useful to quickly verify that only the wanted events are emitted; for example, the capture point and filtering are correctly defined. It is also useful to ensure the event contains the correct information; for example, the emitted business information items, information sources, and formatting are correctly defined.
Rather than define the EP adapter in the event binding, the following steps add a reference to an independent EP adapter that is defined in 6.3, “Creating the TS Queue adapter” on page 120. This enables the EP adapter to be reused and the event binding to target a different EP adapter after initial testing is complete:
1. Select the Adapter tab in the event binding editor.
2. Select Use a predefined EPADAPTER resource.

Figure 6-14 Adding a reference to the EP adapter that will emit the event
4. Select File → Save, or press Ctrl+S to save the event binding.
6.3 Creating the TS Queue adapter
Complete the following steps to create the TS Queue adapter:
1. In the Project Explorer view, right-click the ShoppingEventBundle project then select New → CICS Event Processing Adapter.
2. Enter the File name TSQ, then select Finish.
3. In the Adapter section, enter the following information, as shown in Figure 6-15:
– Description: Emit events to the temporary storage queue QueryEventTSQ in XML format.
– For Adapter, select TS Queue.
– Queue Name: QueryEventTSQ
– Data Format: WebSphere Business Events (XML)

Figure 6-15 Specifying the TS Queue event adapter
4. Select File → Save to save the event adapter.
6.3.1 Exporting the event specification
The event is emitted in the data format that is specified in the event adapter; in this case, the format is WebSphere Business Events (XML).
Complete the following steps to create the schema for this XML document. The schema can be imported by IBM Operational Decision Manager tooling so it understands what information is in the events it uses:
1. Create a directory on your workstation for the event specifications, such as C:ExportedEventSpecifications.
2. Double-click the ShoppingEventBinding.evbind file to open the event binding editor.
3. Select the Adapter tab.
4. In the Resource section, select Export Event Specification.

Figure 6-16 Exporting the schema for the event
6. A window opens that confirms the QueryStock.xsd file was created. Select OK. The contents of this file are shown in Example 6-1 on page 122. Note the CustomerNumber and StockId elements and several others that CICS automatically includes.
Example 6-1 QueryStock.xsd
<?xml version="1.0" encoding="UTF-8" ?>
<xsd:schema xmlns:xsd="http://www.w3.org/2001/XMLSchema" elementFormDefault="qualified" attributeFormDefault="qualified"
targetNamespace="http://cics.ibm.com/QueryStock" xmlns:tns="http://wbe.ibm.com/6.2/Event/QueryStock">
<xsd:element name="QueryStock">
<xsd:complexType>
<xsd:sequence>
<xsd:element maxOccurs="unbounded" minOccurs="0" name="QueryStock_Context">
<xsd:complexType>
<xsd:sequence>
<xsd:element minOccurs="0" maxOccurs="1" name="Binding user tag" type="xsd:string" />
<xsd:element minOccurs="0" maxOccurs="1" name="Network UOWID" type="xsd:string" />
<xsd:element minOccurs="0" maxOccurs="1" name="businessevent" type="xsd:string" />
<xsd:element minOccurs="0" maxOccurs="1" name="Capture Spec Name" type="xsd:string" />
</xsd:sequence>
</xsd:complexType>
</xsd:element>
<xsd:element maxOccurs="unbounded" minOccurs="0" name="QueryStock_Data">
<xsd:complexType>
<xsd:sequence>
<xsd:element minOccurs="0" maxOccurs="1" name="CustomerNumber" type="xsd:decimal" />
<xsd:element minOccurs="0" maxOccurs="1" name="StockId" type="xsd:decimal" />
</xsd:sequence>
</xsd:complexType>
</xsd:element>
</xsd:sequence>
</xsd:complexType>
</xsd:element>
</xsd:schema>
7. You can close the event binding editor by right-clicking the Editor tab, or pressing Ctrl-W.
|
Important: CICS also supports other XML schemas and the CICS Flattened Event format (a non-XML binary format). The CICS Flattened Event is a language structure that is suitable when the event is going to be used by a program that is written in COBOL, C, or PL/I.
|
6.4 Exporting the CICS bundle project
For CICS to access the bundle project, it first must be exported from the Eclipse workspace on your workstation to a directory on zFS. Complete the following steps to export the project:
1. In the Project Explorer view, right-click the ShoppingEventBundle project and click Export Bundle Project to z/OS UNIX File System, as shown in Figure 6-17.
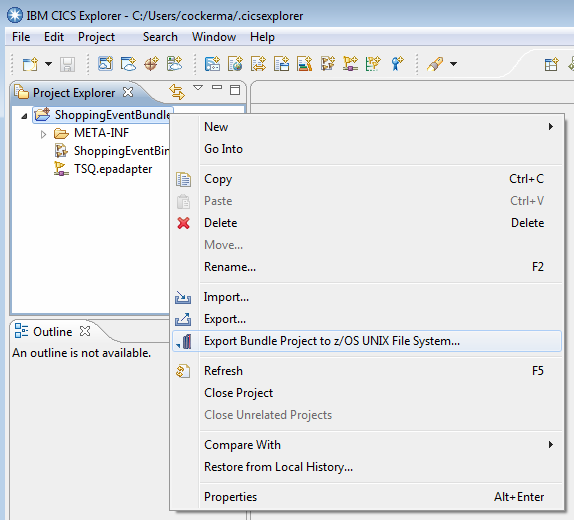
Figure 6-17 Starting the export bundle project wizard
2. In the Export to z/OS UNIX File System window, select Export to a specific location in the file system, then select Next.
3. Select a suitable connection; for example, wtsc66:21 as shown in Figure 6-18 on page 124. If you have not recently signed on, the Signon window opens. Enter your z/OS user ID and password, then click OK.

Figure 6-18 Exporting the bundle project ShoppingEventBundle to zFS
4. Enter the parent directory /u/cicsrs2/bundles, or use the tree to browse to it.
5. Select Clear existing contents of Bundle directory to remove existing files in the parent directory.
6. Click Finish.
7. To view the exported project files, switch to the z/OS perspective and display the z/OS UNIX FIles view. Change the path to /u/cicsrs2/bundles, as shown in Figure 6-19 on page 125.

Figure 6-19 Exported ShoppingEventBundle bundle
6.5 Installing the CICS bundle
Complete the following steps to install the new version of the CICS bundle into the CICS system by creating and installing a CICS BUNDLE resource:
1. In CICS Explorer, switch to the CICS SM perspective.
2. In the CICSplex Explorer view, select EPREDA01, which is the applid of the CICS system. This sets the scope for other views in this perspective.
3. To view the installed BUNDLE definitions, select Operations → Bundles. The Bundles view opens.
4. If the SHOPEVE resource is shown, you must disable and then discard it as follows:
a. Right-click the SHOPEVE bundle, then select Disable → OK.
b. Right-click the SHOPEVE bundle, then select Discard → OK.
5. To install the new SHOPEVE bundle, select Definitions → Bundle Definitions. The Bundles view opens.
6. Define the SHOPEVE bundle, as described in 5.3.1, “Creating a new CICS bundle definition” on page 89.
7. Right-click the SHOPEVE bundle, then select Install. Select the CICS region EPREDA01, then click OK.
8. To verify the state of the bundle, select Operations → Bundles. Figure 6-20 shows the installed SHOPEVE bundle resource.

Figure 6-20 Bundles view to show installed BUNDLE resources
6.6 Testing the shopping application
You can test to see whether a customer query on a stock item in the shopping application causes a QueryStock event to be emitted.
Complete the following steps to test the shopping application:
1. On a CICS terminal, enter the transaction ID MENU and press Enter. Enter the customer number 00005, as shown in Figure 6-21. Press PF1 to query an item.
|
Order application
Customer Number: . . . . . 00005
PF1 Query Item
PF2 Order Item
PF4 fulfill Order
PF5 Ship Order
Exit = PF3
|
Figure 6-21 Shopping application MENU transaction to query stock
|
Query List
Customer Number: 00005
S ID Description
- ----- --------------------------------------
00001 STOCK1
00002 STOCK2
00003 STOCK3
00004 STOCK4
00005 STOCK5
S 00006 STOCK6
|
Figure 6-22 Selecting stock item to query
The result is shown in Figure 6-23.
|
Query Item
Customer Number: 00005
Stock ID: 00006
Description: STOCK6
Value: 6.99
Stock Level: 00600
|
Figure 6-23 Query stock item result
6.6.1 Verifying the event was emitted
Complete the following steps to verify that the event was captured and emitted to the QueryEventTSQ:
1. To show the event was captured, open the Capture Specifications view by selecting Operations → Event Processing → Capture Specifications.
For the CaptureQueryEvent entry, the Events Captured column has a value of 1, as shown in Figure 6-24 on page 128.
For the CaptureQueryEvent entry, the Events Captured column has a value of 1, as shown in Figure 6-24 on page 128.

Figure 6-24 Verifying the number of captured events
2. To show that an event was emitted, open the TS Queues window by selecting Operations → Queues → TS. For the QueryEventTSQ entry, the Item Count column has a value of 1, as shown in Figure 6-25.

Figure 6-25 Verifying the number of emitted events on the TS queue
3. To display the contents of QueryEventTSQ, log on to CICS and use the CEBR QueryEventTSQ command.
|
Important: This CEBR command requires the terminal to have automatic uppercase translation turned off. This can be done with the CEOT NOUCTRAN command.
|
4. The output from CEBR is shown in Example 6-2. The text “..” is substituted for the carriage return and line feed characters. Press PF9 to scroll right to view the rest of the event.
Example 6-2 CECI READQ TS command
CEBR TSQ QueryEventTSQ SYSID EA01 REC 1 OF 1 COL 1 OF 677
ENTER COMMAND ===>
************************** TOP OF QUEUE *******************************
00001 <?xml version="1.0" standalone="yes"?>..<connector name="ShoppingEventBin
************************* BOTTOM OF QUEUE *****************************
6.7 Completing the shopping scenario
So far in this chapter, the ShoppingEventBundle contains the ShoppingEventBinding.evbind and TSQ.epadapter. To complete the scenario that is described in 4.3, “Sample scenarios” on page 73, create the following event bindings and event adapters within the ShoppingEventBundle:
•ShoppingEventBundle
– QueryVsSale.evbind
• Contains an event capture specification for when a stock item is queried.
• Contains an event capture specification for when an order is placed.
• References the event adapter wodm.epadapter for event emission.
– LowStock.evbind
• Contains an event capture specification for when the stock level is low.
• References the event adapter BM.epadapter for event emission.
– ShippedOrder.evbind
• Contains an event capture specification for when an order is shipped.
• References the event adapter BM.epadapter for event emission.
– HighValueOrder.evbind
• Contains an event capture specification for when a high value order is shipped.
• Contains an adapter specification that uses BM.epadapter for event emission.
– WODM.epadapter
• An HTTP adapter to emit events to the IBM Operational Decision Manager system.
• References the URIMAP WODM.urimap.
– WODM.urimap
A URIMAP resource definition that specifies TCP/IP connection details to the IBM Operational Decision Manager system.
– BM.epadapter
• An HTTP adapter to emit events to the IBM Business Monitor system.
• References the URIMAP BM.urimap.
– BM.urimap
A URIMAP resource definition that specifies TCP/IP connection details to the IBM Business Monitor system.
– TSQ.epadapter
A TS queue adapter to emit events to a temporary storage queue for testing.
For more information, see Chapter 10, “IBM Business Monitor” on page 201.
..................Content has been hidden....................
You can't read the all page of ebook, please click here login for view all page.