
IBM Business Monitor
This chapter shows how to use the IBM CICS Explorer to create events and even processing (EP) adapters in the Event Binding Editor that are used by IBM Business Monitor. These events then can be exported as event schemas. After these schemas are imported into the IBM Integration Designer tool, they can be used to generate Monitor Models to be run in IBM Business Monitor.
This chapter includes the following topics:
10.1 Scenario overview
We use the following scenarios that are described in the Shopping sample application:
•Stock Low, which is described in section 4.3.2, “Scenario: Stock low” on page 74.
•Shipped order meets service level agreements, which are described in section 4.3.3, “Scenario: Shipped order meets service level agreements” on page 75.
The following process is used to create and emit events to IBM Business Monitor:
1. The event specification is created by using the CICS event binding editor in IBM CICS Explorer. The event specification describes the event and defines the business data that should be captured in the event. The configuration of the event binding specifies an appropriate EP adapter. In our examples, we use the following EP adapters:
– WebSphere MQ Queue adapter with a Common Base Events format
– HTTP adapter with a Common Base Event REST format
2. After the event binding is complete, it is saved as an XML event binding file in a CICS bundle.
3. The schemas for CICS events are exported from the adapter tab in the CICS event binding editor. The XML schema files that are created describe the event payload.
4. An IBM Business Monitor developer imports the XML schema files that were exported from the CICS event binding editor and creates a Monitor Model Application. The developer configures the Monitor Model to include the data that was captured in the event.
5. The Monitor Model is then deployed to the IBM Business Monitor server.
6. A CICS system programmer deploys the CICS bundle resource that contains the event binding to the CICS system so that the events can be detected and captured during run time.
7. When there is a match for the set of conditions that were defined in an event specification, an event is emitted and sent over the chosen EP adapter to the IBM Business Monitor server. The Monitor Model Application then processes the event.
8. A Business Space is opened and the dashboard that can be used to show the captured data is reviewed.
10.2 WebSphere MQ set up on z/OS
The steps that are described in this section are one-time setup steps that must be completed the first time the IBM Business Monitor server is configured to use CICS events through WebSphere MQ.
In our shopping application, we use the WebSphere MQ EP adapter to format and process our events.
Figure 10-1 shows how to add the WebSphere MQ loadlibs to the CICS STEPLIB and DFHRPL concatenations in our CICS startup job control language (JCL).

Figure 10-1 JCL showing WebSphere MQ loadlibs included
Put MQCONN=YES in the CICS SIT. This ensures that the MQCONN resource is installed at startup, as shown in Figure 10-2.

Figure 10-2 CICS SIT showing MQCONN
We use an RDO MQCONN definition, as shown in Figure 10-3 on page 204.

Figure 10-3 MQCONN definition
For more information about IBM Business Monitor and how to set it up for receiving WebSphere MQ messages, see the Information Center at this website:
Select IBM Business Monitor, V8.0.1 → Administering your monitoring environment → Integrating with event emitters.
10.3 Stock Level low scenario that uses WebSphere MQ EP adapter
Complete the following steps to create the StockLow event in IBM CICS Explorer:
1. Switch to the Resource perspective.
2. Create a CICS bundle project by using the steps described in 6.1, “Create the CICS bundle project” on page 108 and name it StockLowBundle, as shown in Figure 10-4.

Figure 10-4 StockLowBundle
3. In the Project Explorer view, right-click the StockLowBundle project, then select New → CICS Event Binding.
4. Enter the file name StockLowBinding (as shown in Figure 10-5), then click Finish. The event binding editor automatically starts.

Figure 10-5 StockLowBinding
5. In the event binding editor in the Event Binding tab, enter the description Stock below 50, as shown in Figure 10-6 on page 206.

Figure 10-6 Adding the StockLowBinding specification
6. Click Add to add an event specification and enter the name StockLow and description Stock Level Low event specification, as shown in Figure 10-7. Click OK.
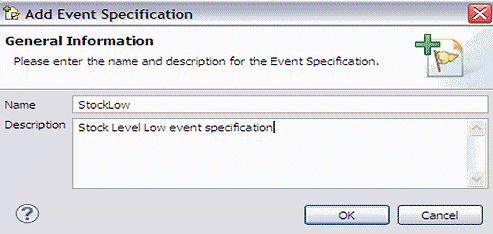
Figure 10-7 Naming the StockLow event specification
7. Click Edit Details to edit the event specification.
8. To emit the Stock ID, Old Stock level, and New Stock level in the event, add them in the Emitted Business Information section. Click Add.
9. In the Emitted Business Information window that is shown in Figure 10-8, enter the following values and click OK:
– Name: StockId
– Type: Numeric
– Length: 6
– Precision: 0
– Description: The Stock ID

Figure 10-8 Adding the StockId business information
If you select the Automatic option, the length is set to 0, a length of 0 means capture up to the end of the data area or container. This value is useful when emitting, for example, the contents of a container regardless of its length.
10. Select Add again. In the Emitted Business Information window, enter the following values and click OK:
– Name: OldStock
– Type: Numeric
– Length: 6
– Precision: 0
– Description: The Old Stock level
11. Select Add again. In the Emitted Business Information window enter the following values and click OK:
– Name: NewStock
– Type: Numeric
– Length: 6
– Precision: 0
– Description: The New Stock level
12. In the Specifications tab that is shown in Figure 10-9, select Add a Capture Specification. In the next steps, we indicate when and how an event should be captured.
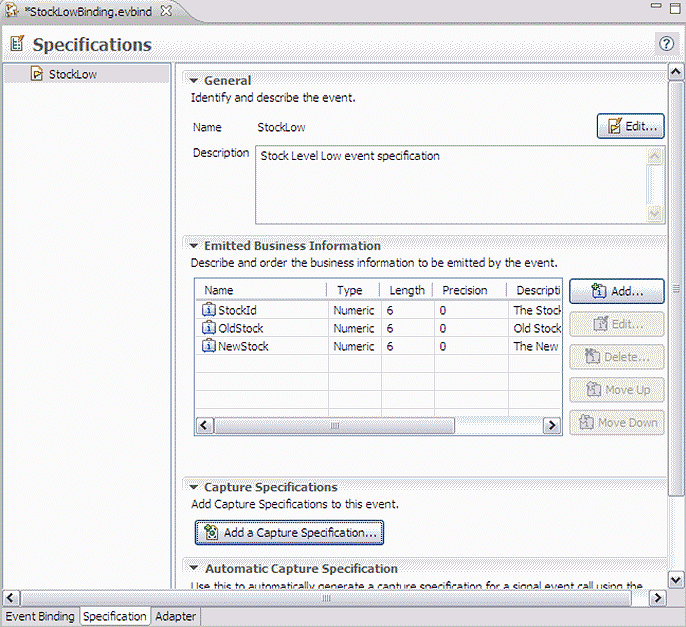
Figure 10-9 Adding the StockLow event capture specification
13. In the Add Capture Specification window, enter the following values and click OK:
– Name: CaptureStockLow
– Description: Capture the Stock Low event
14. Select CaptureStockLow in the tree on the left side. The editor shows the capture specification, including the tabs Capture Point, Filtering, and Information Sources.
15. In the Capture Point section, select PUT CONTAINER.
16. Select the Filtering tab. The Application Event details are shown. In the Application Context section, enter the following values:
– Context: Current Program
– Operator: Equals
– Value: UPDSTOCK
17. In the Event Options section, enter the following values:
– Name: Container
– Operator: Equals
– Value: OUTPUT
18. In the Application Data part, select Add, enter the following values, and click OK:
– Operator: Less Than
– Value: 50
– Location: From
– Offset: 13
– Length: 5

Figure 10-10 Information Sources panel
20. On the Edit Information Sources panel (as shown in Figure 10-11), select Application Data: From and then click Select from imported language structure.

Figure 10-11 Edit Information Sources panel
21. In the Choose Source Code panel (as shown in Figure 10-12), select COBOL for Source Language and then click Choose Language Structure File.

Figure 10-12 Choose Source Code panel
22. Browse to the COBOL copy book updstoco.cpy and select it, click Open, and back on the Choose Source Code click OK.
23. In the Obtain data format from imported language structure panel (as shown in Figure 10-13 on page 212), click sid and then OK. Click OK again. Repeat the steps for OldStock and NewStock, where we set the following values:
– OldStock: old_value
– NewStock: new_value

Figure 10-13 Obtain data format from imported language structure panel
24. Press Ctrl+S to save the changes. See Figure 10-14.

Figure 10-14 The saved StockLowBinding
10.3.1 Specifying the EP adapter
Complete the following steps to specify the EP adapter that we use:
1. In the event binding editor, select Next: Adapter or the adapter tab in the lower left corner of the editor.
2. Select Use a predefined EPADAPTER resource.

Figure 10-15 Adding a reference to the EP adapter
4. Press Ctrl+S to save the event binding.
10.3.2 Creating the WebSphere MQ adapter
Complete the following steps to create the WebSphere MQ adapter:
1. Right-click StockLowBundle project, then select New → CICS Event Processing adapter.

Figure 10-16 Create CICS EP adapter Configuration panel
3. In the adapter section, enter the following information as shown in Figure 10-17 on page 215, and press Ctrl+S to save:
– Description: WebSphere MQ adapter
– Adapter: WebSphere MQ Queue
– Queue Name: WBM.QUEUE
– Data Format: Common Base Event (XML)
The queue names WBM.QUEUE is defined as a Remote Queue definition, which points to the destination on the system where the IBM Business Monitor is.

Figure 10-17 The adapter editor panel
10.3.3 Exporting the event specification
Complete the following steps to export the event specification that creates a schema that can be imported into the tooling for IBM Business Monitor:
1. Double-click the StockLowBinding.evbind file to open the event binding editor.
When a WebSphere MQ EP adapter is used, the events are in the Common Base Event format. When an HTTP EP adapter is used, they are in Common Base Event REST (CBER) format. These formats include the following parts:
– Context and environment information (known as the static schema portion)
– Information that is specific to the event (the business information, which is known as the dynamic schema portion)
The static schema is shipped with CICS and is available on zFS along with the other supplied schemas (such as the event binding schemas) at /usr/lpp/cists51/schemas/eventprocessing/eventformats/cics_cbe_static.xsd. The dynamic schema is exported from the Event Binding Editor.
2. Select the adapter tab. In the resource section, select Export Event Specifications and select an existing directory to export the file to (see Figure 10-18), and select OK.
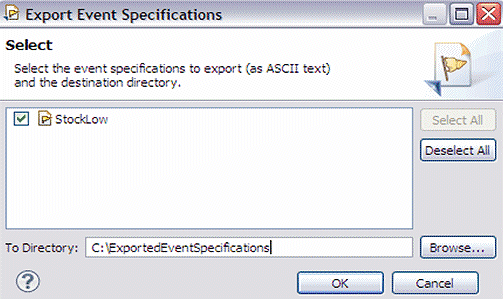
Figure 10-18 Export Event Specifications panel
If an embedded EP adapter is used (which is defined in the event binding), or the EP adapter is available in the local workspace, a schema is exported in the specified event format. If the EP adapter information is unavailable, a window offers a choice of event formats, as shown in Figure 10-19 on page 217.

Figure 10-19 Export Event Specifications panel
3. A window displays a message that indicated Export completed, click OK. The file StockLow.xsd was created. The contents are shown in Example 10-1.
Example 10-1 StockLow.xsd
<?xml version="1.0" encoding="UTF-8" ?>
<schema targetNamespace="http://www.ibm.com/prod/cics/StockLow" xmlns:tns="http://www.ibm.com/prod/cics/StockLow" elementFormDefault="qualified" attributeFormDefault="qualified" xmlns="http://www.w3.org/2001/XMLSchema">
<element name="payload">
<complexType>
<sequence>
<element type="string" name="StockId"/>
<element type="string" name="OldStock"/>
<element type="string" name="NewStock"/>
</sequence>
</complexType>
</element>
</schema>
4. Export the CICS Bundle project to the z/OS UNIX File System by using the process that is described in section 6.4, “Exporting the CICS bundle project” on page 123.
5. Install the CICS Bundle in CICS by using the process that is described in section 6.5, “Installing the CICS bundle” on page 125.
6. In the IBM CICS Explorer toolbar, click Operations → Event Processing → Event Bindings view to see the Event binding in CICS, as shown in Figure 10-20.

Figure 10-20 Opening the Event Bindings in the IBM CICS Explorer
The Event Binding is shown in Figure 10-21.

Figure 10-21 The Event Binding
7. In the IBM CICS Explorer toolbar, click Operations → Event Processing → EP adapters view to see the EP adapter in CICS, as shown in Figure 10-22 on page 219.

Figure 10-22 Opening the EP adapters in the IBM CICS Explorer
8. The Event Adapter is shown in Figure 10-23. Notice the data format is Common Base Event.

Figure 10-23 The EP adapter
10.3.4 Testing the shopping application
Complete the following steps to test the shopping application:
1. On a CICS terminal, enter the transaction ID menu and press Enter.
2. Enter the customer number 00005 and press PF2 to order an item, as shown in see Figure 10-24 on page 220.

Figure 10-24 Transaction menu
3. Enter the following information, as shown in Figure 10-25, and press Enter:
– Item number: 00010
– Quantity: 1

Figure 10-25 Order Item panel
The Order Confirmation panel opens, as shown in Figure 10-26.

Figure 10-26 Order Confirmation panel
4. Press PF3 to return to the main menu panel.

Figure 10-27 Order application panel
6. The message Number of orders fulfilled=00001 is shown, as shown in Figure 10-28 on page 222.

Figure 10-28 Order Fulfilled message
7. To verify the event was emitted, use the process that is described in 6.6.1, “Verifying the event was emitted” on page 127.
8. To see the events that re-hitting the IBM Business Monitor, switch to the System where the IBM Business Monitor is installed. Enable Event Recording and verify that the event reached the Monitor, as shown in Figure 10-29.

Figure 10-29 The emitted event
Now switch to the IBM Integration Designer to generate Monitor Models. For more information about how to generate Monitor Models, see this website:
10.4 Scenario: Shipped order meets service level agreements by using HTTP EP adapter
In this scenario, the shipped order meets service level agreements by using the HTTP EP adapter.
10.4.1 Creating the ServiceLevelAgreement event
Complete the following steps to create the ServiceLevelAgreement event in IBM CICS Explorer:
1. Switch to the Resource perspective.
2. Create a CICS bundle project by using the process that is described in section 6.1, “Create the CICS bundle project” on page 108. Name it ServiceLevelAgreementBundle, as shown in Figure 10-30.

Figure 10-30 ServiceLevelAgreementBundle
3. In the Project Explorer view, right-click StockLowBundle, then select New → CICS Event Binding.
4. Enter the file name ServiceLevelAgreementBinding, as shown in Figure 10-31 on page 224. Click Finish. The event binding editor automatically starts.

Figure 10-31 ServiceLevelAgreementBinding
5. In the event binding editor in the Event Binding tab (see Figure 10-32 on page 225), enter the description Service Level Agreement.

Figure 10-32 Adding the ServiceLevelAgreementBinding specification
6. Click Add to add an event specification. Enter the name Order, enter the description Order Event Specification, as shown in Figure 10-33. Click OK.
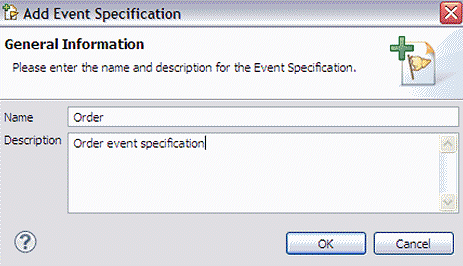
Figure 10-33 Add Event Specification
7. Click Edit Details to edit the event specification.
8. To emit the business information, add them in the Emitted Business Information section, as shown in Table 10-1 and Figure 10-34.
Table 10-1 Emitted Business Information
|
Name
|
Type
|
Length
|
Precision
|
Description
|
|
CustomerNumber
|
Numeric
|
6
|
0
|
The customer number
|
|
OrderNumber
|
Numeric
|
6
|
0
|
The order number
|
|
StockId
|
Numeric
|
6
|
0
|
The stock ID
|
|
Quantity
|
Numeric
|
6
|
0
|
The quantity
|

Figure 10-34 Added Business Information
9. Click Add a Capture Specification. In the Add Capture Specification window (see Figure 10-35 on page 227), enter the following values:
– Name: CaptureOrder
– Description: Capture order specification
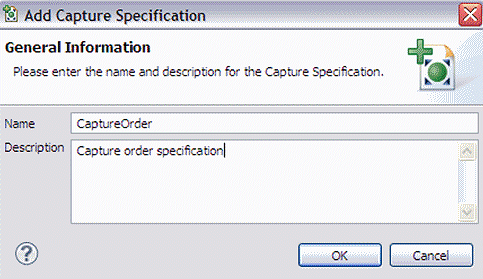
Figure 10-35 Add Capture Specification
10. Click OK.
11. Select CaptureOrder in the tree on the left side. The editor shows the capture specification, including the tabs Capture Point, Filtering, and Information Sources.
12. In the Capture Point section, select LINK PROGRAM. Make sure the Capture After is selected.
13. Select the Filtering tab, as shown in Figure 10-36 on page 228. In the Event Options section, set the PROGRAM to the following values:
– Operator: Equals
– Value: SENDORDR

Figure 10-36 Set filtering
14. Click the Information Sources tab. In the Information Sources panel, click the information sources individually and click Edit. On the Edit information sources panel, click CHANNEL and enter the values that are shown in Table 10-2.
Table 10-2 CaptureOrder Information sources
|
Business Information
|
Container
|
Type
|
Offset
|
Length
|
Precision
|
|
CustomerNumber
|
EPRED-CONTAINER3
|
Zoned Decimal
|
0
|
5
|
0
|
|
OrderNumber
|
EPRED-CONTAINER3
|
Packed Decimal
|
15
|
3
|
0
|
|
StockId
|
EPRED-CONTAINER3
|
Zoned Decimal
|
5
|
5
|
0
|
|
Quantity
|
EPRED-CONTAINER3
|
Zoned Decimal
|
10
|
5
|
0
|
The result is shown in Figure 10-37 on page 229.

Figure 10-37 Setting information sources
15. Press Ctrl+S to save the work.
10.4.2 Defining the Ship Event specification
Complete the following steps to define the Ship Even specification:
1. Repeat step 6 on page 225 - step 14 on page 228 in the section 10.4.1, “Creating the ServiceLevelAgreement event” on page 223. Complete the following steps:
a. On the Add Event Specification, enter the following specifications:
• Name: Ship
• Description: Ship event specification
b. Click Edit Details to edit the event specification.
c. To emit the business information, add them in the Emitted Business Information section, as shown in Table 10-3.
Table 10-3 Ship emitted business information
|
Name
|
Type
|
Length
|
Precision
|
Description
|
|
CustomerNumber
|
Numeric
|
6
|
0
|
The customer number
|
|
OrderNumber
|
Numeric
|
6
|
0
|
The order number
|
|
StockId
|
Numeric
|
6
|
0
|
The stock ID
|
|
Quantity
|
Numeric
|
6
|
0
|
The quantity
|
d. Click Add Capture Specification and specify the following information:
• Name: CaptureShip
• Description: Capture Ship specification
e. On the Capture Point tab, set the Capture Point to REWRITE.
f. On the Filtering tab in the Context section, set the following values:
• Context: Current Program
• Operator: Equals
• Value: SHIP
• Context: Response Code
• Operator: Equals
• Value: OK
g. In the Event Options section, set the following values:
• Name: FILE
• Operator: Equals
• Value: ORDER
h. In the Application Data section, click Add and add following values:
• Source: From
• Offset: 75
• Length: 1
• Operator: Equals
• Value: S
Click OK.
i. On the Information Sources tab, select the sources individually and click Edit. In the Available Data' section select FROM and click Select from imported language structure. Select Choose Language Structure File and find the ORDER copy book. Select COBOL as the Source Language, click OK, and select the following options:
• CustomerNumber: cid
• OrderNumber: oid
• StockId: sid
• Quantity: item-count
j. Press Ctrl+S to save the changes.
2. In this scenario, we use an HTTP adapter to send the events to IBM Business Monitor. In the event binding editor, select Next: Adapter or the adapter tab in the lower left corner of the editor. On the adapter panel, select Use a predefined EPDAPTER resource and enter HTTP as the name, as shown in Figure 10-38 on page 231.

Figure 10-38 Specify EP adapter
3. Press Ctrl+S to save the event binding.
10.4.3 Creating the HTTP adapter
Complete the following steps to create the HTTP adapter:
1. Right-click the ServiceLevelAgreementBundle project, select New → CICS Event Processing adapter. Name the adapter HTTP and click Finish. See Figure 10-39 on page 232.

Figure 10-39 Create CICS EP adapter Configuration panel
2. In the adapter section, enter the following information as shown in Figure 10-40 on page 233, and press Ctrl+S to save:
– Description: HTTP adapter
– Adapter: HTTP
– Queue Name: WBMURI
– Data Format: Common Base Event REST (XML)

Figure 10-40 The adapter editor panel
10.4.4 Exporting the event specification
Complete the following steps to export the even specification, which creates a schema that can be imported into the tooling for IBM Business Monitor:
1. Double-click the ServiceLevelAgreement.evbind file to open the event binding editor.
2. Select the adapter tab. In the Resource section, select Export Event Specifications, as shown in see Figure 10-41.

Figure 10-41 Export the event specification
3. In the next window that opens, select an existing directory to which to export the file (see Figure 10-42 on page 234). Select OK.

Figure 10-42 Select where to export the event specification
4. A window shows an export completed message. Click OK. The files Order.xsd and Ship.xsd are created. The contents is shown in Example 10-2 and Example 10-3.
Example 10-2 Order.xsd
<?xml version="1.0" encoding="UTF-8" ?>
<schema targetNamespace="http://www.ibm.com/prod/cics/Order" xmlns:tns="http://www.ibm.com/prod/cics/Order" elementFormDefault="qualified" attributeFormDefault="qualified" xmlns="http://www.w3.org/2001/XMLSchema">
<element name="payload">
<complexType>
<sequence>
<element type="string" name="CustomerNumber"/>
<element type="string" name="OrderNumber"/>
<element type="string" name="StockId"/>
<element type="string" name="Quantity"/>
</sequence>
</complexType>
</element>
</schema>
Example 10-3 Ship.xsd
<?xml version="1.0" encoding="UTF-8" ?>
<schema targetNamespace="http://www.ibm.com/prod/cics/Ship" xmlns:tns="http://www.ibm.com/prod/cics/Ship" elementFormDefault="qualified" attributeFormDefault="qualified" xmlns="http://www.w3.org/2001/XMLSchema">
<element name="payload">
<complexType>
<sequence>
<element type="string" name="OrderNumber"/>
<element type="string" name="CustomerNumber"/>
<element type="string" name="StockId"/>
<element type="string" name="Quantity"/>
</sequence>
</complexType>
</element>
</schema>
5. Export the CICS Bundle project to the z/OS UNIX File System by using the process that is described in section 6.4, “Exporting the CICS bundle project” on page 123.
6. Install the CICS Bundle in CICS by using the process that is described in section 6.5, “Installing the CICS bundle” on page 125.
7. To see the event binding in CICS, use the process that is described in section 10.3, “Stock Level low scenario that uses WebSphere MQ EP adapter” on page 204 step Figure 6 on page 218.
The Event Binding is shown in Figure 10-43.

Figure 10-43 Event binding
8. Use the same method that is described in section 10.3, “Stock Level low scenario that uses WebSphere MQ EP adapter” on page 204 and Figure 6 on page 218 to see the EP adapter in CICS.
The event adapter is shown in Figure 10-44. Notice the data format is CBER.

Figure 10-44 The EP adapter
9. Define the URIMAP called WBMURI that is used in the HTTP adapter, and install it (see Figure 10-45). Set other URIMAP attributes as required, such as specifying the SOCKETCLOSE parameter to use pooled HTTP connections.

Figure 10-45 Define URIMAP for HTTP to IBM Business Monitor
10. Run the test by using the MENU transaction, as described in 10.3, “Stock Level low scenario that uses WebSphere MQ EP adapter” on page 204. Complete steps 1 - 6 in 10.3.4, “Testing the shopping application” on page 219. After step 6, press PF5 to ship the order, as shown in Figure 10-46 on page 237.
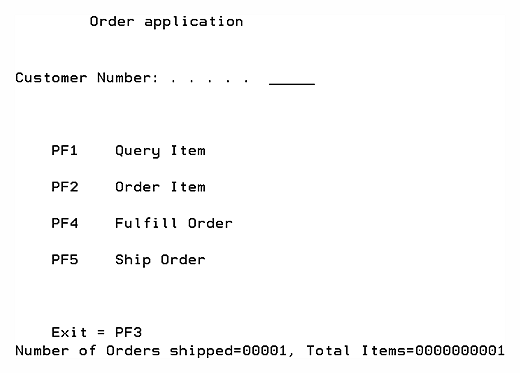
Figure 10-46 Ship Order message
To verify that the event was emitted, use the process that is described in section 6.6.1, “Verifying the event was emitted” on page 127.
11. To see the events that are hitting the IBM Business Monitor, switch to the System where the IBM Business Monitor is installed. Enable Event Recording and verify that the event reached the Monitor, as shown in Figure 10-47.

Figure 10-47 Sample of the emitted event
12. Switch to the IBM Integration Designer to generate Monitor Models.
A monitor model is an application that is used for monitoring events that are emitted by applications or processes. Monitor model applications are then run on IBM Business Monitor server to display business measures in the dashboard by using various dashboard widgets. The Monitor model editor is an editor that you use to create monitor models. It is provided as a selectable feature in IBM Integration Designer. The Monitor model can be based on BPEL processes, process applications, or any other application that can be instrumented to emit events.
For more information about how to generate Monitor Models, see this website:
..................Content has been hidden....................
You can't read the all page of ebook, please click here login for view all page.
