
Chapter 10: Automating Workflows with GitHub Actions
Have you ever been part of a project that required the completion of routine, monotonous tasks? Have you ever sat down to release software and read over the project wiki page, only to find 15 manual steps that you needed to cut, paste, and pray? What did it feel like when it was your turn to complete those tasks?
Tasks such as these are referred to as toil – slow and difficult. This kind of work reduces our teams' development velocity and, just as critically, grinds away the morale of the DevOps or Site-Reliability Engineering (SRE) team over time. Toilsome tasks are manual, and by their nature, manual tasks are error-prone. If we don't try to replace these tasks with appropriate automation, more will accumulate, worsening the situation.
As a DevOps engineer, you are the anti-entropy force driving automation and reducing toilsome work. In this chapter, we will learn how to use GitHub Actions to automate workflows to reduce toil and increase project velocity.
GitHub Actions provides a powerful platform for creating customizable automation workflows and is free for any open source project. GitHub Actions pairs a robust, customizable workflow engine with an equally powerful event model to trigger automation. The patterns and practices used in this chapter will leverage GitHub Actions but are transferable to many other developer workflow automation tools such as Jenkins and GitLab CI. The choice to use GitHub Actions is driven by the ubiquitous access for open source developers and the access to a wide community of contributed actions that amplify productivity.
In this chapter, you will start off by learning the basics of GitHub Actions. You will use these skills to build a continuous integration workflow to validate a pull request. Then, you will extend the workflow to add release automation to publish GitHub releases. Finally, you will build your own custom GitHub Action using Go and publish it to GitHub Marketplace.
We will cover the following topics in this chapter:
- Understanding the basics of GitHub Actions
- Building a continuous integration workflow
- Building a release workflow
- Creating a custom GitHub Action using Go
- Publishing a custom Go GitHub Action
Technical requirements
In this chapter, you need to have Docker, Git, and the Go tools installed on your machine. The code for this chapter is located at https://github.com/PacktPublishing/B18275-09-Automating-Workflows-with-GitHub-Actions-Code-Files.
The code files for this chapter can be downloaded from https://github.com/PacktPublishing/Go-for-DevOps/tree/rev0/chapter/10
Let's get started building our first GitHub Action.
Understanding the basics of GitHub Actions
GitHub Actions are event-driven automation tasks that live within a GitHub repository. An event like a pull request can trigger a set of tasks to be executed. An example is a pull request triggering a set of tasks to clone the Git repository and execute go test to run Go tests.
GitHub Actions is extremely flexible, enabling developers to author a wide variety of automations, even some that you might not normally associate with a traditional continuous integration/release pipeline. Actions are also composable, enabling groups of tasks to be packaged together as a published action and used in workflows together with other actions.
In this section, you will learn about the components of a GitHub Action: workflows, events, context and expressions, jobs, steps, and actions. After you have been introduced to these components, we'll build and trigger our first GitHub Action.
Exploring the components of a GitHub Action
Understanding the components of a GitHub Action, their relationships, and how they interact is the key to understanding how to compose your own automation. Let's get started with exploring the components of an action.
Workflows
A workflow is an automation file written in YAML that lives in a GitHub repository in the ./github/workflows/ folder. A workflow consists of one or more jobs and can be scheduled or triggered by an event. A workflow is the highest-level component of a GitHub Action.
Workflow syntax
Workflows require a developer to specify the events that will trigger automation via the on key and the jobs that automation will execute when it is triggered by the jobs key. Often, a name is also specified by the name keyword. Otherwise, the workflow will take the short name of the file that contains the workflow YAML. For example, the workflow defined in ./github/workflows/foo.yaml will have the default name of foo.
An example of a workflow structure
The following is an example of a named workflow with the minimum set of keys defined. However, this is not a valid workflow, as we have not yet defined any events to trigger the workflow, nor any jobs to be executed once triggered:
name: my-workflow # (optional) The name of your workflow;
# defaults to the file name.
on: # Events that will trigger the workflow
jobs: # Jobs to run when the event is triggered
Next, let's discuss how to trigger workflows.
Events
An event is a trigger that causes a workflow to start executing. Events come in a variety of flavors: webhook events, scheduled events, and manually dispatched events.
Webhook events can originate from an activity within the repository. Examples of triggering activities are pushing a commit, creating a pull request, or creating a new issue. Events raised from repository interactions are the most common triggers for workflows. Webhook events can also be created through external systems and relayed to GitHub through the repository dispatch Webhook.
Scheduled events are similar to cron jobs. These events trigger workflows on a defined schedule. Schedule events are a way to automate repetitive tasks, such as performing issue maintenance on older issues in GitHub or running a nightly reporting job.
Manual dispatch events are not triggered through repository activities but rather manually. For example, a project may have a Twitter account associated with it, and project maintainers may want to be able to send a tweet about a new feature but do not want to share the Twitter authentication secrets. An ad hoc event would enable automation to send out the tweet on behalf of the project.
Event syntax
Events require a developer to specify the type of events for the on: key in the workflow. Event types generally have child key-value pairs that define their behavior.
A single event example
A single event can be specified to trigger automation:
# the workflow will be triggered when a commit
# is pushed to any branch
on: push
on: push
A multiple events example
Multiple events can be specified to trigger automation:
# the workflow will execute when a commit is pushed
# to any branch or pull request is opened
on: [push, pull_request]
A scheduled event example
Scheduled event schedules are specified using Portable Operating System Interface (POSIX) cron syntax:
on:
scheduled:
- cron: '0,1,*,*,*' # run every day at 01:00:00
A manual event example
Manual events are triggered through user interaction and can include input fields:
# a manually triggered event with a
# single "message" user input field
on:
workflow_dispatch:
inputs:
message:
description: 'message you want to tweet'
Context and expressions
GitHub Actions exposes a rich set of context variables, expressions, functions, and conditionals to provide expressiveness in your workflows. This will not be an exhaustive study of all of these items, but we will highlight the most critical items.
Context variables
Context variables provide a way to access information about workflow runs, environment, steps, secrets, and so on. The most common context variables are github, env, secrets, and matrix. These variables are treated as maps and can be indexed using variable names and property names. For example, env['foo'] resolves to the value of the foo environment key.
The github context variable provides information about the workflow run and contains information such as the ref that the workflow is executing on. This is useful if you would like to use that information to inject a version into an application at build time. You can access this information by indexing the github variable with github['ref'] or github.ref.
The env context variable contains environment variables specified for the workflow run. The values can be accessed by using the index syntax.
The secrets context variable contains the secrets available for the workflow run. These values can also be accessed by the index syntax. Note that these values will be redacted in the logs, so the secret values will not be exposed.
The matrix context variable contains information about the matrix parameters you configure for the current job. For example, if you want to run a build on multiple operating systems with multiple versions of Go, the matrix variable allows you to specify the list of each one, which can be used to execute a set of concurrent job executions using each combination of operating system and Go version. We will go into more detail about this when we talk about jobs.
Expressions
The syntax used for an expression is ${{ expression }}. Expressions consist of variables, literals, operators, and functions. Let's examine the following example:
jobs:
job_with_secrets:
if: contains(github.event.pull_request.labels.*.name, 'safe to test')
The preceding job will only execute if the pull request is labeled with safe to test. The if conditional will evaluate the github.event.pull_request.labels.*.name context variable and verify that one of the labels on the pull request is named safe to test. This is useful if you want to ensure that a workflow only executes after a repository maintainer has had an opportunity to verify that the pull request is safe.
Expressions can also be used as input. Let's examine the following example:
env:
GIT_SHA: ${{ github.sha }}
The snippet of YAML shows how to set an environment variable called GIT_SHA to the value of the github.sha context variable. The GIT_SHA environment variable will now be available to all actions running within the job. Using context variables for input is useful for customizing the execution of scripts or actions executed in a workflow.
Jobs
A job is a collection of steps that run on an individual compute instance, or runner. You can think of a runner as a virtual machine for running your job. Jobs, by default, execute concurrently, so if a workflow defines multiple jobs, they will execute concurrently if enough runners are available. Jobs have the concept of dependency where a job can be dependent on another job, which will ensure the jobs execute sequentially rather than concurrently.
Job syntax
Jobs require a developer to specify an ID of the job, the type of runner the job will execute on using the runs-on: key, and a sequence of steps the job will execute using the steps: key. The runs-on: key is particularly interesting to us, as it is useful for executing a job on different operating system (OS) platforms such as multiple versions of Ubuntu, macOS, and Windows.
With the runs-on: key, a job is able to run on a specified platform, but that does not allow us to make a matrix of jobs to run on multiple platforms concurrently. To enable a job to execute in a matrix of configurations, one must use the strategy: key and expressions. By configuring the strategy, we can build a matrix of jobs executing the same job configuration. You will find an example of this configuration in the following example.
There are many other options to customize the execution of the job and the environment that the job executes within, but we will not dive deeply into them.
Executing jobs on multiple platforms
This example shows two jobs named job_one and job_two. Here, job_one is a matrix job that will run six concurrent templated jobs on the latest versions of Ubuntu, macOS, and Windows, which will each echo 1.17 and 1.16. Running on Ubuntu 18.04, job_two will run concurrently with job_one and echo "hello world!":
jobs:
job_one:
strategy:
matrix:
os: [ubuntu-latest, macos-latest, windows-latest]
go_version: [1.17, 1.16]
runs_on: ${{ matrix.os }}
steps:
- run: echo "${{ matrix.go_version }}"
job_two:
runs_on: ubuntu-18.04
steps:
Steps
Steps are tasks that run in the context of a job and execute in the context of the job's associated runner. Steps can consist of a shell command or an action. Since steps execute in the same runner, they can share data between each of the steps. For example, if you create a file on the filesystem of the runner in a previous step, subsequent steps will be able to access that file. You can think of a step running within its own process and that any changes to environment variables will not carry over to the next step.
Steps syntax
Steps require a developer to specify an action with the uses: key or specify the shell commands to run with the run: key. Optional input allows you to customize the environment variables using the env: key and the working directory using the working-directory: key, and also to change the name that appears in the GitHub user interface for the step by using the name key. There are a wide variety of other options to customize the execution of steps, but we will not go into great depth about these.
Step for installing Go using an action
This example shows a step with no name that uses the v2 version of actions/setup-go to install version 1.17.0 or higher of Go. This action can be found at https://github.com/actions/setup-go. This is a great example of a publicly available action that you can use to add functionality to your automation. You can find actions for nearly any task at https://github.com/marketplace?type=actions. In a later section, we'll discuss how to build your own action and publish it to the GitHub Marketplace:
steps:
- uses: actions/setup-go@v2
with:
go-version: '^1.17.0'
A step with a multiple line command
In this example, we've extended the previous one and added a Run go mod download and test step that runs the go tool, which was installed by actions/setup-go@v2. The run command uses | in the first line to indicate the start of a multiline string in YAML:
steps:
- uses: actions/setup-go@v2
with:
go-version: '^1.17.0'
- name: Run go mod download and test
run: |
go test
Actions
An action is a reusable combination of a set of steps formed into a single command, which can also have input and output. For example, the actions/setup-go action is used to execute a series of steps to install a version of Go on a runner. The Go toolchain can then be used within subsequent steps within the same job.
GitHub Actions is aptly named, as actions are the superpower of GitHub Actions. Actions are often published publicly and enable developers to leverage existing recipes to build complex automation quickly. Actions are similar to open source Go libraries, which enable developers to build Go applications quicker. As we build our own actions, you will quickly see the power of this feature.
If you are interested in seeing the source code for actions/setup-go, visit https://github.com/actions/setup-go. Later in this chapter, we will build our own Go action and publish it to the GitHub Marketplace.
How to build and trigger your first GitHub Action
Now that we have a general understanding of what the components of an action are, let's build one and explore how the components are structured and interact.
Creating and cloning a GitHub repository
If this is your first time creating and cloning a repository, you may find the following links useful:
- https://docs.github.com/en/get-started/quickstart/create-a-repo
- https://docs.github.com/en/github/creating-cloning-and-archiving-repositories/cloning-a-repository-from-github/cloning-a-repository
When creating the repository, I normally add README.md, .gitignore, and an Massachusetts Institute of Technology (MIT) license file. Once you have created and cloned your repository, you should have a local directory for your project, as shown in the following:
$ tree . -a -I '.git'
.
├── LICENSE
└── README.md
Creating your first workflow
Remember that workflows live in the .github/workflows directory. The first step is to create that directory. The next step is to create the workflow file within the .github/workflows directory:
mkdir -p .github/workflows
touch .github/workflows/first.yaml
Open .github/workflows/first.yaml in your favorite editor and add the following workflow YAML:
name: first-workflow
on: push
jobs:
echo:
runs-on: ubuntu-latest
steps:
- name: echo step
run: echo 'hello world!'
The preceding workflow is named first-workflow. It will execute a single job called echo on the latest version of Ubuntu and execute a single step that will echo hello world! using the system's default shell. You can also specify the shell you would like with the shell: key.
Save .github/workflows/first.yaml. Commit and push the workflow to GitHub:
git add .
git commit -am 'my first action'
git push origin main
Normally, you'd create a branch first and then open a pull request before committing and pushing directly to the main branch, but for your first workflow, this will be the quickest way to see your results.
After you push your commit, you should be able to open your GitHub repository in your browser and click on the Actions tab. You should be greeted with a view of your first workflow having successfully executed. It should look like the following:
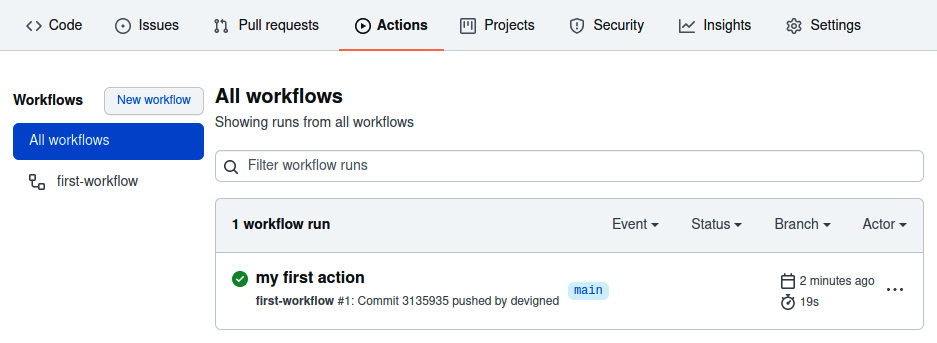
Figure 10.1 – The All workflows view
Note the list of workflows on the left and that there is one workflow named first-workflow. We can see that the first run of the workflow was for our commit with the my first action message.
If you click on the workflow run for my first action, you should see the following:
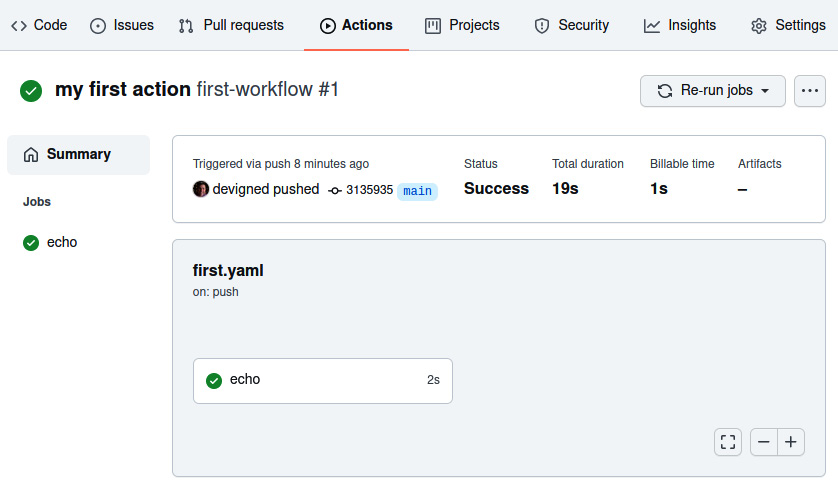
Figure 10.2 – The workflow job view
Note the Jobs list on the left with the echo job marked with a green check, signifying the successful execution of the job. On the right, you can see the details of the execution.
You can click on the echo job to see output from it and the steps that were executed:

Figure 10.3 – The echo job output view
Note the job setup, which provides details about the runner and the environment the job executed within. Also, note the echo step single step executed a echo 'Hello World!' single shell command and echoed the "Hello World!" string to the console log. Finally, the job completed successfully due to echo step returning a 0 error code upon completion.
In this section, you have learned the basics of GitHub Actions and created your first simple automation. You now have the tools needed to start building more complex automation that will eliminate the toilsome tasks we discussed earlier in the chapter. In the upcoming sections, you will learn how to use these skills to build continuous integration and release workflows and, later, your own custom action written in Go.
Building a continuous integration workflow
In this section, we will use GitHub Actions to execute continuous integration automation when a pull request is opened or when code is pushed to a repository. If you are unfamiliar with continuous integration, it is the practice of automating the integration of code changes from multiple contributors into a code repository. Continuous integration automation tasks include cloning the repository at a specific commit, linting, building, and testing code, and evaluating changes to test coverage. The goal of continuous integration automation is to provide a guard against code changes that will lower the quality of a project or violate the rules codified in automation.
In this section, you will learn how to create a continuous integration workflow. In your continuous integration workflow, you will learn to execute jobs across multiple operating systems concurrently. You will install build tools onto the job executors, which you will use to build the software project. You will clone the source code for the project using an action. Finally, you will enforce passing tests and code quality by running a code linter and executing unit tests.
Introducing the tweeter command-line tool
You cannot have a continuous integration workflow without a software project to run the workflow upon. We will be using a simple Go command-line tool called tweeter. The source code for the project can be found at https://github.com/PacktPublishing/B18275-08-Automating-Workflows-with-GitHub-Actions-Code-Files.
Tweeter is a simple Go command-line tool that will send tweets to Twitter. The source code consists of two packages, main and tweeter. The tweeter package contains Go tests that will be executed by our continuous integration workflow.
Cloning and testing tweeter
Create a new repository from the template at https://github.com/PacktPublishing/B18275-08-Automating-Workflows-with-GitHub-Actions-Code-Files by clicking the Use this template button in the repository. This will create a copy of the repository in your account. Run the following commands to clone and test tweeter (replace {your-account} with your account name):
git clone https://github.com/{your-account}/B18275-08-Automating-Workflows-with-GitHub-Actions-Code-Files
cd B18275-08-Automating-Workflows-with-GitHub-Actions-Code-Files
go test ./...
Executing tweeter with the -h argument will provide usage documentation:
$ go run . -h
Usage of /tmp/go-build3731631588/b001/exe/github-actions:
--accessToken string twitter access token
--accessTokenSecret string twitter access token secret
--apiKey string twitter api key
--apiKeySecret string twitter api key secret
--dryRun if true or if env var DRY_RUN=true, then a tweet will not be sent
--message string message you'd like to send to twitter
--version output the version of tweeter
exit status 2
Twitter usage is not required
If you are not inclined to use social media, tweeter also allows users to simulate sending a tweet. When --dryRun is specified, the message value will be output to STDOUT, rather than being sent to Twitter as a tweet.
Next, we will build a continuous integration workflow to test tweeter.
Goals of the tweeter continuous integration workflow
Before building a continuous integration workflow, you should consider what you want to accomplish with the workflow. For the tweeter workflow, our goals are the following:
- Trigger on pushes to main and tags formatted as a semantic version – for example, v1.2.3 must build and validate.
- Pull requests against the main branch must build and validate.
- Tweeter must build and validate on Ubuntu, macOS, and Windows concurrently.
- Tweeter must build and validate using Go 1.16 and 1.17 concurrently.
- Tweeter source code must pass a code-linting quality check.
Continuous integration workflow for tweeter
With our goals for the tweeter continuous integration workflow specified, we can construct a workflow to achieve those goals. The following is a continuous integration workflow that achieves each goal:
name: tweeter-automation
on:
push:
tags:
- 'v[0-9]+.[0-9]+.*'
branches:
- main
pull_request:
branches:
- main
jobs:
test:
strategy:
matrix:
go-version: [ 1.16.x, 1.17.x ]
os: [ ubuntu-latest, macos-latest, windows-latest ]
runs-on: ${{ matrix.os }}
steps:
- name: install go
uses: actions/setup-go@v2
with:
go-version: ${{ matrix.go-version }}
- uses: actions/checkout@v2
- name: lint with golangci-lint
uses: golangci/golangci-lint-action@v2
- name: run go test
run: go test ./...
The preceding workflow is a lot to absorb initially. However, if we break down the workflow, the behavior will become clear.
Triggering the workflow
The first two goals for the tweeter continuous integration workflow are as follows:
- Pushes to main and tags matching v[0-9]+.[0-9]+.* must build and validate.
- Pull requests against the main branch must build and validate.
These goals are accomplished by specifying the following event triggers:
on:
push:
tags:
- 'v[0-9]+.[0-9]+.*'
branches:
- main
pull_request:
branches:
- main
The push: trigger will execute the workflow if a tag is pushed matching v[0-9]+.[0-9]+.* – for example, v1.2.3 would match the pattern. The push: trigger will also execute the workflow if a commit is pushed to main. The pull_request trigger will execute the workflow on any changes to a pull request targeting the main branch.
Note that using the pull_request trigger will allow us to update the workflow and see the changes to the workflow each time the changes are pushed in a pull request. This is the desired behavior when developing a workflow, but it does open automation to malicious actors. For example, a malicious actor can open a new pull request, mutating the workflow to exfiltrate secrets exposed in it. There are multiple mitigations to prevent this, which can be applied independently or together, depending on the security preferences of a given project:
- Only allow maintainers to trigger workflows.
- Use the pull_request_target event to trigger, which will use workflows defined in the base of the pull request without regard to workflow changes in the pull request.
- Add a label guard for executing a workflow so that it will only execute if a maintainer adds the label to the pull request. For example, a pull request can be reviewed by a maintainer, and then if the user and code changes are safe, the maintainer will apply a safe-to-test label, allowing the job to proceed.
Next, we'll extend automation to include multiple platforms and Go versions.
Entering the matrix
The next two goals for the tweeter continuous integration workflow are as follows:
- Tweeter must build and validate on Ubuntu, macOS, and Windows concurrently.
- Tweeter must build and validate using Go 1.16 and 1.17 concurrently.
These goals are accomplished by specifying the following matrix configuration:
jobs:
test:
strategy:
matrix:
go-version: [ 1.16.x, 1.17.x ]
os: [ ubuntu-latest, macos-latest, windows-latest ]
runs-on: ${{ matrix.os }}
steps:
- name: install go
uses: actions/setup-go@v2
with:
go-version: ${{ matrix.go-version }}
The test job specifies a matrix strategy with two dimensions, go-version and os. There are two Go versions and three OSs specified. This variable combinations will create six concurrent jobs, [(ubuntu-latest, 1.16.x), (ubuntu-latest, 1.17.x), (macos-latest, 1.16.x), (macos-latest, 1.17.x), (windows-latest, 1.16.x), and (windows-latest, 1.17.x)]. The values of the matrix will be substituted in runs-on: and go-version: to execute a concurrent job, satisfying the goals of running on each combination of platform and Go version:

Figure 10.4 – A pull request showing matrix builds
In the preceding figure, you can see each matrix job executing concurrently. Note that each job specifies the name of the job, test, and the matrix variables for the job.
Building, testing, and linting
There is an overlap of build, testing, and linting in the last three goals:
- Tweeter must build and validate on Ubuntu, macOS, and Windows concurrently.
- Tweeter must build and validate using Go 1.16 and 1.17 concurrently.
- The Tweeter source code must pass a code-linting quality check.
The following steps will satisfy these requirements:
steps:
- name: install go
uses: actions/setup-go@v2
with:
go-version: ${{ matrix.go-version }}
- uses: actions/checkout@v2
- name: lint with golangci-lint
uses: golangci/golangci-lint-action@v2
- name: run go test
run: go test ./...
In the preceding steps, the following occurs:
- Go is installed with the actions/setup-go@v2 action using the matrix-specified Go version. This action is available to all GitHub users and is published through the GitHub Marketplace. There are numerous actions available in the Marketplace that can simplify workflow authoring.
- The source code for the current ref is cloned with the actions/checkout@v2 action in the current working directory. Note that the action is not named. For commonly used actions, it is idiomatic to not provide a name.
- Linting is run with the golangci/golangci-lint-action@v2, which installs and executes the golangci-lint tool on the source of the repository, satisfying the goal of ensuring that the code passes a lint quality check. This particular action includes several sub-linters that run a rigorous check of common Go performance and stylistic errors.
- The code is functionally validated by running an ad hoc go test ./... script, which tests the packages recursively in the repository. Note that in a previous step, the Go tools have been installed and are available for use in subsequent steps.
With the preceding steps, we have satisfied the goals of our continuous integration workflow. With the preceding workflow, we executed a matrix of concurrent jobs, installed build tools, cloned source code, linted, and tested the change set. In this example, we learned to build a continuous integration workflow for a Go project, but any language and set of tools can be used to create a continuous integration workflow.
In the next section, we will build a release workflow that will automate the process of building and releasing new versions of the tweeter project.
Building a release workflow
In this section, we will take the manual, toilsome process of publishing a new release and transform it into GitHub workflow automation, triggered by pushing a tag to the repository. This automation will result in a GitHub release containing build notes and release artifacts for a tagged, semantic version of the tweeter command-line tool. Automating manual processes such as releases reduces the possibility of manual errors and increases the productivity of project maintainers.
In this section, you will learn how to create a release automation workflow. You will learn how to trigger automation to run after the successful completion of dependent automation. You will learn how to build binaries targeting multiple platforms. Finally, you will automate the creation of a GitHub release, including automatically generated release notes.
GitHub releases
GitHub releases are deployable software iterations for a repository that are based on Git tags. A release declares to the world that a new version of the software is available. A release is composed of a title, an optional description, and an optional set of artifacts. The title provides a name for the release. The description is used to provide insight into what is contained in the release – for example, what new features or pull requests were included in the release, and which GitHub contributors contributed to the release. The description is formatted in GitHub Markdown. Release artifacts are files associated with the release that users can download – for example, a command-line application might publish compiled binaries ready for download and use.
Git tags
A Git tag is a named pointer to a specific reference in the Git repository and are often formatted as semantic versions, such as v1.2.3. Semantic versioning is a convention for naming tags that provides some insight into the significance of a new release. A semantic version tag is formatted as Major.Minor.Patch. The following behavior is expressed by incrementing the individual field:
- Major: Increment when incompatible API changes occur, such as breaking changes.
- Minor: Increment when functionality is added in a backward-compatible manner, such as new features.
- Patch: Increment when making backward-compatible bug fixes.
Release automation for tweeter
In the Continuous integration workflow for tweeter section, we created a CI automation for the tweeter command-line tool. We will build upon the CI automation and add release automation for tweeter.
Goals for automation
In our release automation, we are going to accomplish the following goals:
- Trigger automation when the repository is tagged with a semantic version
- Run unit tests and validation prior to creating the release
- Inject the semantic version of the release into the tweeter application
- Build cross-platform versions of the tweeter application
- Generate release notes from the pull requests in the release
- Tag the contributors in the release
- Create a GitHub release containing the following:
- A title containing the semantic version of the release
- A description containing the generated release notes
- Artifacts consisting of the cross-platform binaries
Next, we will create release automation to satisfy these requirements.
Creating the release automation
With our goals for the tweeter release automation specified, we are ready to extend the existing continuous integration workflow that we built in the previous section and add a release job to achieve those goals. The release job is longer than the continuous integration workflow, so we'll approach it one piece at a time.
Triggering the automation
The first goal for the tweeter release workflow is triggering the automation when the repository is tagged with a semantic version:
name: tweeter-automation
on:
push:
tags:
- 'v[0-9]+.[0-9]+.*'
branches:
- main
pull_request:
branches:
- main
The preceding snippet of YAML is unchanged from the continuous integration workflow. It will trigger the workflow with any tag matching the semantic version in the form of v1.2.3. However, the workflow will also trigger on pull requests and pushes. We want the continuous integration workflow to execute on pull requests and pushes, but we do not want to execute a release each time. We will need to restrict execution of the release job to only when executing on a tag push.
Restricting release execution
The first and second goal for the tweeter release workflow is as follows:
- Triggering the automation when the repository is tagged with a semantic version
- Running unit tests and validation prior to creating the release
Let's make sure the release job only executes when the repository is tagged:
jobs:
test:
# continuous integration job omitted for brevity
release:
needs: test
if: startsWith(github.ref, 'refs/tags/v')
runs-on: ubuntu-latest
steps:
The preceding job definition completes the first goal of only running the release when a tag starting with v is pushed by specifying an if statement to verify that the github.ref context variable starts with refs/tags/v. The second goal of ensuring the test job executes successfully before attempting to execute the release job is achieved by specifying needs: test. If needs: test was not specified on the release job, both jobs will execute concurrently, which can cause a release to be created without passing validation.
Workspace and environmental setup
To achieve the rest of the automation goals, we will need to set up the workspace:
# Previous config of the release job omitted for brevity
steps:
- uses: actions/checkout@v2
- name: Set RELEASE_VERSION ENV var
run: echo "RELEASE_VERSION=${GITHUB_REF:10}" >> $GITHUB_ENV
- name: install go
uses: actions/setup-go@v2
with:
go-version: 1.17.x
The preceding code does the following:
- Checks out the source at the Git ref associated with the tag
- Creates a RELEASE_VERSION environment variable with the tag, such as v1.2.3
- Installs Go 1.17 tools
Building cross-platform binaries and version injection
The third and fourth goals of the tweeter release flow are as follows:
- Inject the semantic version of the release into the tweeter application.
- Build cross-platform versions of the tweeter application.
Let's get started by injecting the semantic version of the release into the compiled binary:
steps:
# Previous steps of the release job omitted for brevity
- name: install gox
run: go install github.com/mitchellh/[email protected]
- name: build cross-platform binaries
env:
PLATFORMS: darwin/amd64 darwin/arm64 windows/amd64 linux/amd64 linux/arm64
VERSION_INJECT: github.com/devopsforgo/github-actions/pkg/tweeter.Version
OUTPUT_PATH_FORMAT: ./bin/${{ env.RELEASE_VERSION }}/{{.OS}}/{{.Arch}}/tweeter
run: |
gox -osarch="${PLATFORMS}" -ldflags "-X
${VERSION_INJECT}=${RELEASE_VERSION}" -output
"${OUTPUT_PATH_FORMAT}"
The preceding steps do the following:
- Install the gox command-line tool for simplifying Go cross-compilation.
- Build cross-platform binaries for each specified platform/architecture while injecting the RELEASE_VERSION environment variable into a Go ldflag. The ldflag -X replaces the default value of the Version variable in the github.com/devopsforgo/github-actions/pkg/tweeter package with the semantic version tag of the build. The output of gox is structured by OUTPUT_PATH_FORMAT – for example, the output directory looks like the following:
$ tree ./bin/
./bin/
└── v1.0.0
├── darwin
│ ├── amd64
│ │ └── tweeter
│ └── arm64
│ └── tweeter
└── linux
└── amd64
└── tweeter
One of the most compelling reasons to use Golang for building applications is the relative ease of building cross-platform, statically linked binaries. With a couple of steps, we can build versions of tweeter for Linux, Windows, macOS targeting AMD64 and ARM64, as well as many other platforms and architectures. These small, statically linked binaries are simple to distribute and execute across platforms and architectures.
With the preceding steps, the release job has compiled the semantic version of the release into the platform and architecture-specific, statically linked binaries. In the next step, we will use the semantic version to generate release notes.
Generating release notes
We have the following goals associated with generating release notes:
- Generate release notes from the pull requests in the release.
- Tag the contributors in the release.
- Create a GitHub release containing the following:
- A description containing the generated release notes
Here's some great news! With a bit of configuration and tagging, release note generation is automatically handled by GitHub. We'll start by adding a new file to the repository, ./.github/release.yml, with the following content:
changelog:
exclude:
labels:
- ignore-for-release
categories:
- title: Breaking Changes
labels:
- breaking-change
- title: New Features
labels:
- enhancement
- title: Bug Fixes
labels:
- bug-fix
- title: Other Changes
labels:
- "*"
The preceding release configuration will tell GitHub to filter and categorize pull requests based on the applied labels. For example, pull requests labeled with ignore-for-release will be excluded from the release notes, but a pull request labeled with enhancement will be grouped under the New Features header in the release notes:
steps:
# Previous steps of the release job omitted for brevity
- name: generate release notes
env:
GITHUB_TOKEN: ${{ secrets.GITHUB_TOKEN }}
run: |
gh api -X POST 'repos/{owner}/{repo}/releases/generate-notes'
-F commitish=${{ env.RELEASE_VERSION }}
-F tag_name=${{ env.RELEASE_VERSION }}
> tmp-release-notes.json
The preceding step generates release notes. The step executes an API call to the GitHub API to generate the release notes for the given tag. The command captures the JSON body of the response in a tmp-release-notes.json filename. Note that gh requires a GitHub token to interact with the GitHub APIs. The GitHub secret is passed into the GITHUB_TOKEN environment variable and is used by gh to authenticate.
The following is an example of JSON returned from the generate-notes API call:
{
"name": "name of the release",
"body": "markdown body containing the release notes"
}
We will use tmp-release-notes.json to create the release in the next step.
Creating the GitHub release
The final goal of creating the release automation is as follows:
- A title containing the semantic version of the release
- A description containing the generated release notes
- Artifacts consisting of the cross-platform binaries
Let's get started creating our release automation:
steps:
# Previous steps of the release job omitted for brevity
- name: gzip the bins
env:
DARWIN_BASE: ./bin/${{ env.RELEASE_VERSION }}/darwin
WIN_BASE: ./bin/${{ env.RELEASE_VERSION }}/windows
LINUX_BASE: ./bin/${{ env.RELEASE_VERSION }}/linux
run: |
tar -czvf "${DARWIN_BASE}/amd64/tweeter_darwin_amd64.tar.gz" -C "${DARWIN_BASE}/amd64" tweeter
tar -czvf "${DARWIN_BASE}/arm64/tweeter_darwin_arm64.tar.gz" -C "${DARWIN_BASE}/arm64" tweeter
tar -czvf "${WIN_BASE}/amd64/tweeter_windows_amd64.tar.gz" -C "${WIN_BASE}/amd64" tweeter.exe
tar -czvf "${LINUX_BASE}/amd64/tweeter_linux_amd64.tar.gz" -C "${LINUX_BASE}/amd64" tweeter
tar -czvf "${LINUX_BASE}/arm64/tweeter_linux_arm64.tar.gz" -C "${LINUX_BASE}/arm64" tweeter
- name: create release
env:
OUT_BASE: ./bin/${{ env.RELEASE_VERSION }}
GITHUB_TOKEN: ${{ secrets.GITHUB_TOKEN }}
run: |
jq -r .body tmp-release-notes.json > tmp-release-notes.md
gh release create ${{ env.RELEASE_VERSION }}
-t "$(jq -r .name tmp-release-notes.json)"
-F tmp-release-notes.md
"${OUT_BASE}/darwin/amd64/tweeter_darwin_amd64.tar.gz#tweeter_osx_amd64"
"${OUT_BASE}/darwin/arm64/tweeter_darwin_arm64.tar.gz#tweeter_osx_arm64"
"${OUT_BASE}/windows/amd64/tweeter_windows_amd64.tar.gz#tweeter_windows_amd64"
"${OUT_BASE}/linux/amd64/tweeter_linux_amd64.tar.gz#tweeter_linux_amd64"
"${OUT_BASE}/linux/arm64/tweeter_linux_arm64.tar.gz#tweeter_linux_arm64"
The preceding steps do the following:
- Execute tar and gzip on the binaries. With Go 1.17, tweeter bins are roughly 6.5 MB. After gzip, each artifact is less than 4 MB.
- Create a GitHub release using the gh command-line tool, which is available on all GitHub job executors. gh requires a GitHub token to interact with the GitHub APIs. The GitHub secret is passed into the GITHUB_TOKEN environment variable and is used by gh to authenticate. gh release create creates a release and uploads each of the files specified after the arguments. Each file uploaded becomes an artifact on the release. Note # after each artifact file path. The text after # is the name that the artifact will display, as in the GitHub UI. We also specify the title and the release notes using the captured tmp-release-notes.json and jq to parse and select the JSON content.
At this point, we have a created release targeting multiple platforms and architectures, satisfying all our goals for automation. Let's kick off a release and see the results.
Creating a release of tweeter
Now that we have built a release job that will automate the releases of tweeter, we can now tag the repository and release a version of the application. To start the release automation, we are going to create and push the v0.0.1 tag to the repository by executing the following:
git tag v0.0.1
git push origin v0.0.1
After the tag is pushed, you should be able to go to the Actions tab on your GitHub repository and see the tag workflow executing. If you navigate to the workflow, you should see something like the following:
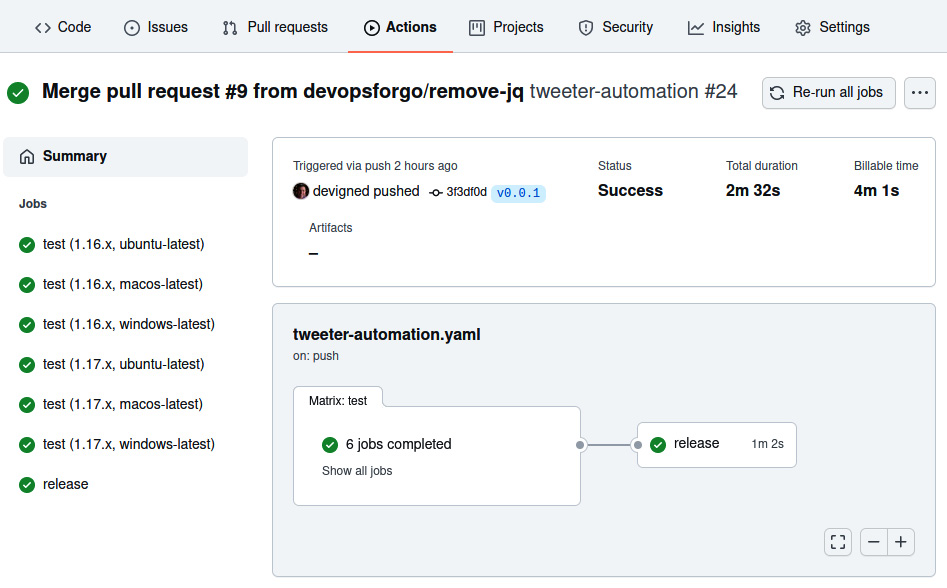
Figure 10.5 – The workflow job view showing dependent test and release jobs
As you can see in the preceding figure, the tests have been executed and, subsequently, the release job has been too. If you navigate to the release job, you should see something like the following:

Figure 10.6 – The release job output view
As you can see in the preceding figure, the release job has successfully executed each of the steps and the release was created. If you go to the landing page of the repository, you should see that a new release has been created. If you click on that release, you should see something like the following:

Figure 10.7 – The release view, containing assets, the release note, and the semantic version title
In the preceding figure, you can see that the release named v0.0.1 has been autogenerated with categorized release notes that link to the pull requests, the contributor, and artifacts for each platform/architecture combination.
With the preceding steps, we have satisfied the goals of our release automation job. We triggered the release job after the tests executed to ensure a release will always pass our validations before being published. We built statically linked binaries for each of the specified platform/architecture combinations using gox. We leveraged GitHub release notes autogeneration to create beautifully formatted release notes. And finally, we created a release with the generated notes and artifacts from the build.
In this example, we learned to build a release automation job for a Go project, but any language and set of tools can be used in a similar manner to create release automation for any language.
We have no more manual toil to release the tweeter project. All that needs to be done is to push a tag to the repository. Our use of open source actions has enhanced our ability to author these automations. In the next section, we will learn to create our own packaged action that will allow others to use an action we author.
Creating a custom GitHub Action using Go
In this section, we will extend upon our work by turning the tweeter command line into a GitHub Action. This will allow anyone on GitHub building automation to use tweeter to tweet from their own pipeline. Furthermore, we'll use our tweeter action to tweet when we release new versions of tweeter by extending the release job to use our new action.
In this section, you will learn the basics of authoring GitHub Actions. You will create a custom GitHub Action using Go. You will then optimize the start up time of your custom action by creating a container image.
Basics of custom actions
Custom actions are individual tasks that wrap a collection of related tasks. Custom actions can be executed as individual tasks in workflows and can be shared with the GitHub community.
Types of actions
There are three types of actions: container, JavaScript, and composite actions. Container-based actions use a Dockerfile or a container image reference as the entry point, the starting point of execution for the action, and are useful if you want to author an action in anything but JavaScript or existing actions. Container-based actions offer flexibility in customizing the execution environment of an action, but it comes at the cost of start up time. If a container-based action depends on a large container image or a slow-building Dockerfile, then the action start up time will be adversely affected. JavaScript actions can run directly on the runner machine and are the native expression of an action. JavaScript actions start up quickly and can leverage the GitHub Actions Toolkit, a set of JavaScript packages to make creating actions easier. Composite actions are a collection of steps within a wrapper action. They enable an author to combine a set of disparate steps into a higher-order behavior.
Action metadata
To define an action, you must create an action.yaml file in a GitHub repository. If the action is to be shared publicly, the action.yaml file should be created in the root of the repository. If the action is not to be shared publicly, it is recommended to create the action.yaml file in ./.github/{name-of-action}/action.yaml where {name-of-action} should be substituted with the name of the action. For example, if the tweeter action was only to be used internally, the path of the action metadata would be ./.github/tweeter/action.yaml:
name: Name of the Action
author: @author
description: Description of your action
branding:
icon: message-circle
color: blue
inputs:
sample:
description: sample description
required: true
outputs:
sampleOutput:
description: some sample output
runs:
using: docker
image: Dockerfile
args:
- --sample
- "${{ inputs.sample }}"
The preceding action.yaml defines the following:
- The name of the action that will be shown in the GitHub UI
- The author of the action
- The description of the action
- Branding that will be used for the action in the GitHub UI
- Input the action will accept
- Output the action will return
- The runs section, which describes how the action will be executed
In this example, we are using a Dockerfile, which will build a container from the Dockerfile and execute the container entry point with the specified arguments. Note how the inputs.sample context variable is used to map input to command-line arguments.
The preceding action can be executed with the following step:
jobs:
sample-job:
runs-on: ubuntu-latest
steps:
- name: Sample action step
id: sample
uses: devopsforgo/sample-action@v1
with:
sample: 'Hello from the sample!'
# Use the output from the `sample` step
- name: Get the sample message
run: echo "The message is ${{
steps.sample.outputs.sampleOutput }}"
The preceding sample execution does the following:
- Executes a step using the sample action with the assumption that the action is tagged with v1 in the devopsforgo/sample-action repository, with action.yaml at the root of that repository, and specifies the required input variable sample.
- Echoes the sampleOutput variable.
Next, we will discuss how to tag action releases.
Action release management
In all of our examples of using actions in our workflows, the uses: value for the action has always included the version of the action. For example, in the preceding sample, we used devopsforgo/sample-action@v1 to specify that we wanted to use the action at the Git tag of v1. By specifying that version, we are telling the workflow to use the action at the Git reference pointed to by that tag. By convention, the v1 tag of an action can point to any Git reference that is tagged in the semantic version range of v1.x.x. That means that the v1 tag is a floating tag and not static, and will advance as new releases in the v1.x.x range are released. Recall from the description of semantic versions earlier in this chapter that increments of the major version indicate breaking changes. The author of the action is making a promise to users that anything tagged with v1 will not include breaking changes.
The conventions used for versioning actions can cause friction when an action is included in the same repository as another versioned software project. It is advised to consider the implications of action versioning, and consider creating a repository dedicated to an action rather than creating it within a repository containing other versioned projects.
Goals for the tweeter custom GitHub Action
In our custom GitHub Action for tweeter, we are going to accomplish the following:
- Build a Dockerfile for building and running the tweeter command-line tool.
- Create an action metadata file for the custom action.
- Extend the continuous integration job to test the action.
- Create an image release workflow for publishing the tweeter container image.
- Optimize the tweeter custom action by using the published container image.
Next, we will create a custom Go action using a Dockerfile.
Creating the tweeter action
With our goals for the tweeter custom action specified, we are ready to create the Dockerfile required to run tweeter, define the metadata for the action to map input and output from the tweeter command-line tool, extend our continuous integration job to test the action, and finally, optimize the start time for the action by using a pre-built container image in the custom action. We will break down each step and create our custom Go action.
Defining a Dockerfile
The first goal for the tweeter custom GitHub Action is building a Dockerfile for building and running the tweeter command-line tool.
Let's get started by building a Dockerfile in the root of the tweeter repository that we will use to build a container image:
FROM golang:1.17 as builder
WORKDIR /workspace
# Copy the Go Modules manifests
COPY go.mod go.mod
COPY go.sum go.sum
# Cache deps before building and copying source
# so that we don't need to re-download as much
# and so that source changes don't invalidate
# our downloaded layer
RUN go mod download
# Copy the sources
COPY ./ ./
RUN CGO_ENABLED=0 GOOS=linux GOARCH=amd64
go build -a -ldflags '-extldflags "-static"'
-o tweeter .
# Copy the action into a thin image
FROM gcr.io/distroless/static:latest
WORKDIR /
COPY --from=builder /workspace/tweeter .
ENTRYPOINT ["/tweeter"]
The preceding Dockerfile does the following:
- Uses the golang:1.17 image as an intermediate builder container, which contains the Go build tools needed to compile the tweeter command-line tool. Using the builder pattern creates an intermediate container, containing build tools and source code that will not be needed in the end product. It allows us a scratch area to build a statically linked Go application that can be added to a slimmed-down container at the end of the build process. This enables the final container to only contain the Go application and nothing more.
- The build then copies in go.mod and go.sum, and then downloads the Go dependencies for the tweeter application.
- The source for the tweeter application is copied into the builder container and then compiled as a statically linked binary.
- The production image is created from the gcr.io/distroless/static:latest base image, and the tweeter application is copied from the intermediate builder container.
- Finally, the default entry point is set to the tweeter binary, which will enable us to run the container and directly execute the tweeter application.
To build and then execute the preceding Dockerfile, you can run the following:
$ docker build . -t tweeter
# output from the docker build
$ docker run tweeter -h
pflag: help requested
Usage of /tweeter:
--accessToken string twitter access token
# More help text removed for brevity.
The preceding script does the following:
- Builds the Dockerfile and tags it with the name tweeter
- Runs the tagged tweeter container image, passing the tweeter application the -h argument, causing the tweeter application to print the help text
Now that we have a working Dockerfile, we can use that to define a custom container action defined in action.yaml.
Creating action metadata
The second goal for the tweeter custom GitHub Action is creating an action metadata file for the custom action.
Now that we have defined the Dockerfile, we can author a Docker action with the following action metadata in an action.yaml file in the root of the repository:
name: Tweeter Action
author: DevOps for Go
description: Action to send a tweet via a GitHub Action.
inputs:
message:
description: 'message you want to tweet'
required: true
apiKey:
description: 'api key for Twitter api'
required: true
apiKeySecret:
description: 'api key secret for Twitter api'
required: true
accessToken:
description: 'access token for Twitter api'
required: true
accessTokenSecret:
description: 'access token secret for Twitter api'
required: true
outputs:
errorMessage:
description: 'if something went wrong, the error message'
sentMessage:
description: 'the message sent to Twitter'
runs:
using: docker
image: Dockerfile
args:
- --message
- "${{ inputs.message }}"
- --apiKey
- ${{ inputs.apiKey }}
- --apiKeySecret
- ${{ inputs.apiKeySecret }}
- --accessToken
- ${{ inputs.accessToken }}
- --accessTokenSecret
- ${{ inputs.accessTokenSecret }}
The preceding action metadata does the following:
- Defines the action name, author, and description metadata
- Defines the expected input to the action
- Defines the output variable for the action
- Executes the Dockerfile, mapping the input of the action to the args of the tweeter application
How the input variables map to the tweeter args command line is apparent due to the mapping of the input to the arguments, but it is not clear how the output variables are mapped. The output variables are mapped by specially encoding the variables in STDOUT in the Go application:
func printOutput(key, message string) {
fmt.Printf("::set-output name=%s::%s ", key, message)
}
The preceding function prints to STDOUT the key and the message for an output variable. To return the sentMessage output variable, the Go application calls printOutput("sendMessage", message). The action runtime will read STDOUT, recognize the encoding, and then populate the context variable for steps.{action.id}.outputs.sentMessage.
With our action metadata defined, we are now ready to test our action by extending the tweeter continuous integration workflow to execute the action in the local repository.
Testing the action
The third goal of the tweeter custom GitHub Action is to extend the continuous integration job to test the action.
With the action.yaml file authored, we can add a workflow job to test the action:
test-action:
runs-on: ubuntu-latest
steps:
- uses: actions/checkout@v2
- name: test the tweeter action in DRY_RUN
id: tweeterAction
env:
DRY_RUN: true
uses: ./
with:
message: hello world!
accessToken: fake
accessTokenSecret: fake
apiKey: fake
apiKeySecret: fake
- run: echo ${{ steps.tweeterAction.outputs.sentMessage
}} from dry run test
The preceding test-action job does the following:
- Checks out the code to the local workspace
- Executes the local action, specifying all required input and setting the DRY_RUN environment variable to true so that the action will not try to send the message to Twitter
- Runs an echo command, fetching the echoed output from the action
Let's see what happens when we trigger this workflow:
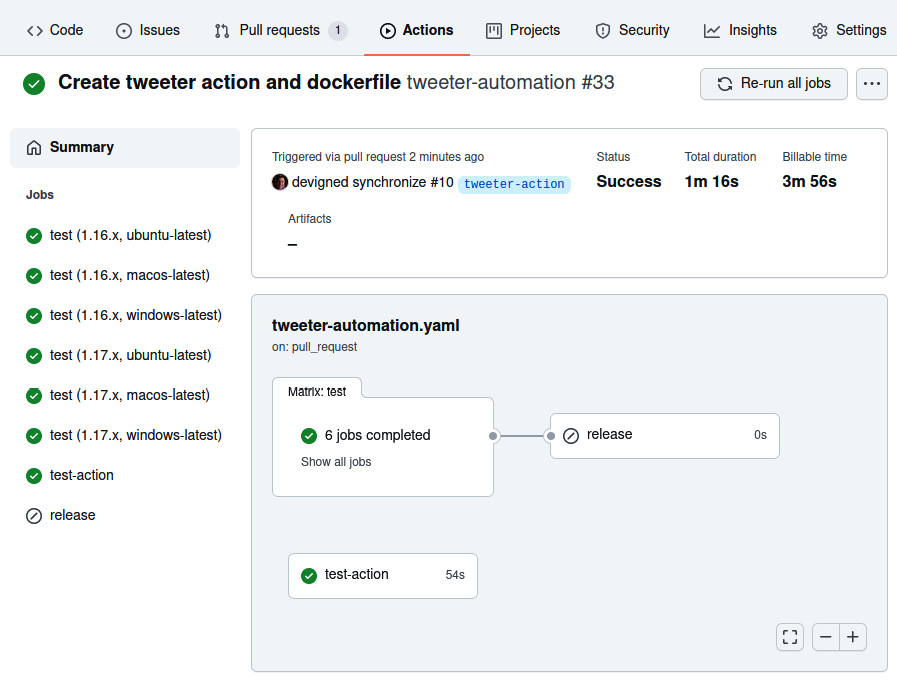
Figure 10.8 – The workflow run with the new test-action job
In the preceding screenshot, you can see that the test-action job is now part of the tweeter automation that will validate the action. Note the runtime of 54 seconds for executing the job. It seems like a long time to call a command-line application:
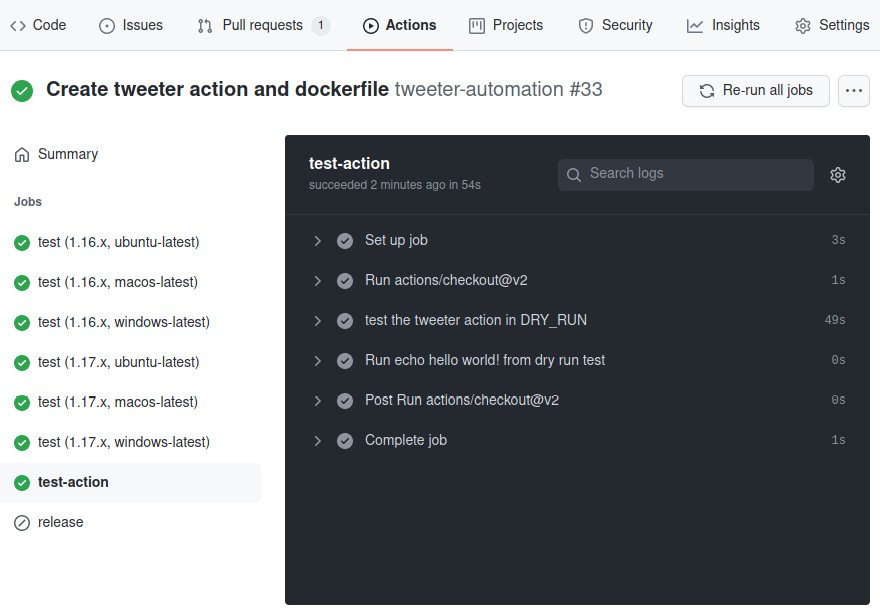
Figure 10.9 – The test-action job output
In the preceding screenshot, you can see that the test for the tweeter action took 49 seconds out of the total job runtime of 54 seconds. That is the vast majority of the time it took to execute the job. Most of that time was spent compiling tweeter and building the docker image prior to executing the action. In the next part, we'll optimize the action execution time by referencing a pre-built version of the tweeter container image.
Creating a container image release workflow
The fourth goal of the tweeter custom GitHub Action is creating an image release workflow for publishing the tweeter container image.
As we saw in the previous section, the amount of time to build the Dockerfile was significant. There is little reason to do that for every execution of an action, which can be avoided by publishing the container image to a container registry and then using the registry image in place of the Dockerfile:
name: release image
on:
# push events for tags matching image-v for version
(image-v1.0, etc)
push:
tags:
- 'image-v*'
permissions:
contents: read
packages: write
jobs:
image:
runs-on: ubuntu-latest
steps:
- uses: actions/checkout@v2
- name: set env
# refs/tags/image-v1.0.0 substring starting at 1.0.0
run: echo "RELEASE_VERSION=${GITHUB_REF:17}" >> $GITHUB_ENV
- name: setup buildx
uses: docker/setup-buildx-action@v1
- name: login to GitHub container registry
uses: docker/login-action@v1
with:
registry: ghcr.io
username: ${{ github.repository_owner }}
password: ${{ secrets.GITHUB_TOKEN }}
- name: build and push
uses: docker/build-push-action@v2
with:
push: true
tags: |
ghcr.io/devopsforgo/tweeter:${{ env.RELEASE_VERSION }}
ghcr.io/devopsforgo/tweeter:latest
The preceding workflow definition does the following:
- Triggers only when tags starting with image-v are pushed
- Requests permissions to write to the ghcr.io image repository and read the Git repository
- Contains a single container image build and steps to publish the image.
- Checks out the repository
- Builds the RELEASE_VERSION environment variable based on the tag format
- Sets up buildx for building the container image
- Logs in to ghcr.io, the GitHub container registry
- Builds and pushes the container image tagged with both the release version and the latest version
With the preceding workflow in place, we can tag the repository with the following commands and have the container image published to the GitHub container registry for use in the tweeter action:
git tag image-v1.0.0
git push origin image-v1.0.0
Let's see the result of our image release workflow:

Figure 10.10 – The workflow job view for the image-release job
The preceding screenshot shows the release image workflow that was triggered by pushing the image-v1.0.0 tag. The following screenshot details the results of each step of the release image workflow:

Figure 10.11 – The image release job output
The result of the preceding workflow is that we now have a container image pushed to ghcr.io/devopsforgo/tweeter, tagged with v1.0.0 and latest. We can now update the action metadata to use the tagged image version.
Optimizing the custom Go action
The final goal of this section is optimizing the tweeter custom action by using the published container image.
Now that we have the image published to ghcr.io, we can replace the Dockerfile with the reference to the published image:
# omitted the previous portion of the action.yaml
runs:
using: docker
image: docker://ghcr.io/devopsforgo/tweeter:1.0.0
# omitted the subsequent portion of the action.yaml
The preceding portion of the action.yaml file illustrates replacing the Dockerfile with the published tweeter container image. Now that the Dockerfile has been replaced, let's run the workflow and see the performance optimization in action:

Figure 10.12 – The workflow view showing the speed increase of the test-action job
The preceding screenshot illustrates the gains from using a pre-built container image. Recall, when using a Dockerfile, that the workflow execution was 54 seconds. Now, using the tweeter container image from the registry, the workflow executes in 11 seconds. This is a significant optimization and should be used when possible.
In this section, we learned to build custom actions using Go, which enables a DevOps engineer to build complex actions and package them in easily accessible units of automation. We also learned how to test and optimize these actions locally, ensuring that when custom actions are published, they function as intended.
In the next section, we will build upon the ability to author custom actions and publish an action to the entire GitHub community. By publishing an action to the GitHub marketplace, an action can become a key tool for other DevOps engineers authoring automation.
Publishing a custom Go GitHub Action
The superpower of GitHub Actions is the community and the actions that the community publishes to the GitHub Marketplace. Think about how much more work we would have had to do in the previous sections if we didn't have community actions available for use. Our workflows would have had to start from first principles, involving authoring long, tedious scripts to complete tasks that we were able to express in a handful of YAML instead.
Open source software is not only about having access to free software but also about giving back to the community. We are going to learn how to give back to the GitHub Actions community through publishing an action to GitHub Marketplace. This will enable the entire user community of GitHub to benefit from it.
In this section, you will learn how to publish a custom action to the GitHub Marketplace. You will learn the basics of publishing actions. After covering the basics, you will learn how to automate versioning for a published action. You will learn how to use the tweeter action to tweet an announcement of new releases to tweeter. Finally, you will learn how to publish your action to the GitHub Marketplace so that it can be used by the rest of the GitHub community across the world.
The basics of publishing actions
Publishing an action to the GitHub Marketplace adds some requirements and best practices that, for a local action, as we built in the previous section, do not apply. For example, the readme for the repository will be the landing page for the action in the marketplace, so you'd want to provide a description and usage guidance for the repository readme.
The following are the requirements for publishing an action to the GitHub Marketplace:
- The action must be in a public GitHub repository.
- In the root of the repository must be a single action named action.yaml or action.yml.
- The name of the action in action.yaml must be unique to the marketplace. The name may not overlap with any GitHub features or products, or any other names that GitHub reserves.
- A public action should follow v1 and v1.2.3 semantic version guidance so that users of the action can specify a full semantic version, or simply v1 to denote the latest in the v1 major semantic version series.
Goals for publishing the tweeter custom action
The following are goals for publishing the tweeter custom action:
- Set up a release-triggered workflow that will handle semantic version management.
- Publish the tweeter action to the GitHub Marketplace.
Managing action semantic versioning
The first and second goals of publishing the tweeter custom action to the marketplace are as follows:
- Set up a release-triggered workflow that will handle semantic version management.
- Use the action to tweet an announcement of the new release of the action.
We are going to build a workflow to update the major version tag – for example, v1 – to point to the latest release in the v1.x.x series of semantic versions. The workflow will also be responsible for creating new major version tags as new major semantic versions are released:
name: Release new tweeter version
on:
release:
types: [released]
workflow_dispatch:
inputs:
TAG_NAME:
description: 'Tag name that the major tag will point to'
required: true
permissions:
contents: write
env:
TAG_NAME: ${{ github.event.inputs.TAG_NAME || github.event.release.tag_name }}
jobs:
update_tag:
name: Update the major tag to include the ${{ env.TAG_NAME }} changes
runs-on: ubuntu-latest
steps:
- name: Update the ${{ env.TAG_NAME }} tag
uses: actions/[email protected]
with:
source-tag: ${{ env.TAG_NAME }}
- uses: actions/checkout@v2
- name: Tweet about the release
uses: ./
with:
message: Hey folks, we just released the ${{ env.TAG_NAME }} for the tweeter GitHub Action!!
accessToken: ${{ secrets.ACCESS_TOKEN }}
accessTokenSecret: ${{ secrets.ACCESS_TOKEN_SECRET }}
apiKey: ${{ secrets.API_KEY }}
apiKeySecret: ${{ secrets.API_KEY_SECRET }}
The preceding workflow does the following:
- Triggers on a release being published or on a manual UI submission. This means that a project maintainer can trigger the workflow via the GitHub UI if ad hoc execution was required.
- Declares that the workflow requires rights to write to the repository. This is used to write tags.
- Declares the TAG_NAME environment variable, which is either the ad hoc job input or the tag of the release.
- The update_tag takes the tag in v1.2.3 format and updates the tag's major semantic version tag to the latest version within that major semantic version. For example, if the new release tag is v1.2.3, then the v1 tag will point to the same Git ref as v1.2.3.
- Clones the source code using actions/checkout@v2.
- Tweets about the new release using Twitter developer credentials embedded in GitHub repository secrets. To set up Twitter developer credentials, see https://developer.twitter.com/en/portal/dashboard and set up an account and application. After you gather the secrets, you can add them to the repository secrets under the Settings tab, as shown in the following screenshot:
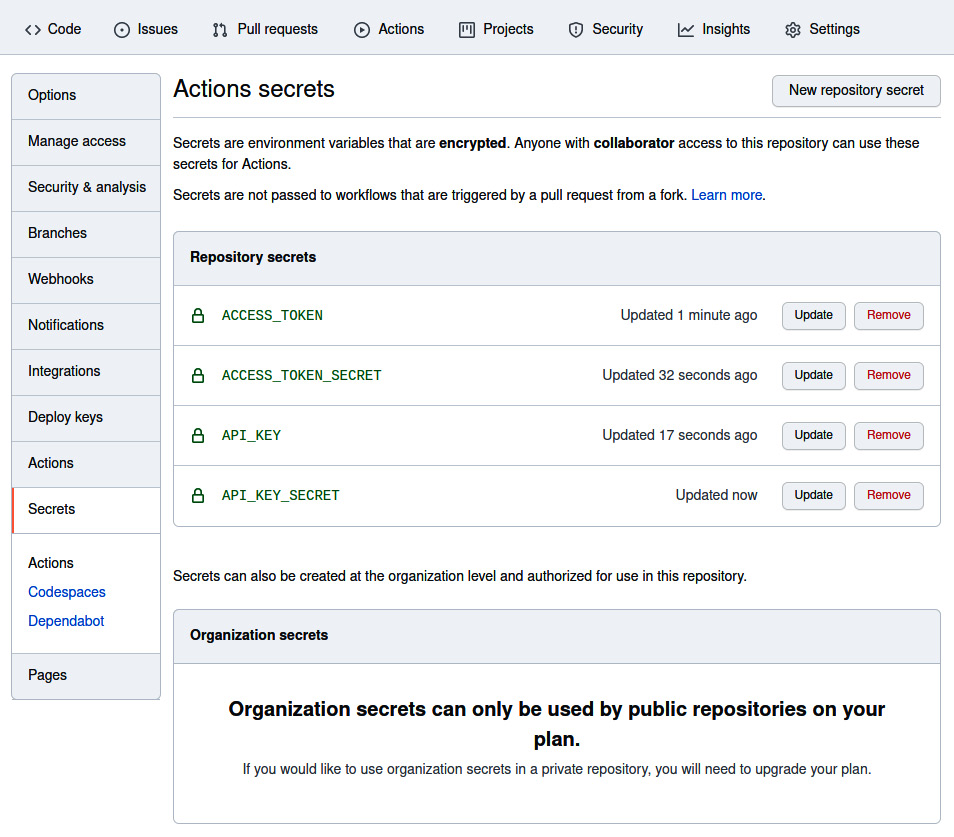
Figure 10.13 – Repository secrets
With the preceding workflow, when we apply a tag – for example, v1.2.3 – the repository will also be tagged at the same Git ref with v1. After the tags are set, the tweeter action will execute, announcing the release to the world.
Recall from the previous section that when we tag the tweeter repository with a semantic version, the release workflow will trigger, causing a new release to be created. This workflow will then trigger the action version update release workflow, which will tag the action with the major version and announce through Twitter that the action release is available.
All that is left to do is to release the action to the GitHub Marketplace. This only needs to be done the first time the action is released.
Publishing the tweeter action to the GitHub Marketplace
The final goal of publishing the tweeter custom action is to publish the tweeter action to the GitHub Marketplace. The first publication of your GitHub Action is a manual process and can be accomplished by following the guide here: https://docs.github.com/en/actions/creating-actions/publishing-actions-in-github-marketplace. After taking this first set of manual steps, they will not need to be repeated for future releases.
Summary
GitHub Actions is a powerful system for project maintainers to automate toilsome processes, enabling greater developer satisfaction and increased project velocity. We targeted Go in this chapter as the language of choice for GitHub Actions due to its type safety, low memory overhead, and speed. We believe that it is the best choice for writing GitHub Actions. However, many of the skills taught here are transferable to other languages. Each of the patterns, continuous integration, release pipelines, semantic versioning, and action creation can be applied to any project that you come into contact with.
The key to the chapter is to understand the impact of community contributions in the GitHub Marketplace. By using, building, and contributing to the marketplace, an engineer can make their automation more composable and empower community members to solve more complex problems through the contributions of the community.
We learned the basics of GitHub Actions with a focus on its features, which enable us to be functional quickly. With these basic skills, we were able to build a continuous integration automation workflow to clone, build, lint, and test the tweeter project. We extended the continuous integration automation to create a release pipeline trigger from Git tags. The release pipeline transformed manual tasks such as authoring release notes and made them an automated part of the release workflow. Finally, we created and published a custom Go GitHub Action that can be used by the entire community.
I hope that at the end of this chapter you feel confident in your ability to create automation to eliminate toilsome tasks that burdened your team's day. Remember that if you can automate a task that happens once a week and takes an hour, you are saving a full week of work from one of your team members! That is time that is likely better spent adding value to your business.
In the next chapter, we are going to learn about ChatOps. You will learn how to use chat applications such as Slack to trigger automation and alerts when events occur, providing you and your team an interactive robotic DevOps partner.