
Chapter 11: Using ChatOps to Increase Efficiency
As DevOps engineers, we often work as part of a team of engineers that help manage a network, service infrastructure, and public-facing services. This means there are a lot of moving parts and communication that needs to occur, especially in an emergency.
ChatOps provides teams with a central interface to tooling to ask questions about current states and to interact with other DevOps tools while recording those interactions for posterity. This can improve feedback loops and real-time communication between teams and help manage incidents effectively.
One of our colleagues, Sarah Murphy, has a saying – Don't talk to the bus driver. As a release engineer for Facebook in the early days, she was responsible for releasing Facebook across their data centers. This was a high-stress and detail-oriented job that required her complete attention. Many of the engineers wanted to know if their feature or patch was being included in the current release and, of course, asked the release engineer.
As any engineer who does high-impact rollouts will tell you, you need to focus. Having hundreds of engineers ping you about the status of their particular patch is not ideal. This is where ChatOps comes into play. Instrumenting ChatOps can allow a central place where questions about rollout status and what revision is in a release can stave off those hundreds of questions. It certainly did for Sarah.
In this chapter, we will dive into how to build a ChatOps bot for Slack. We will show how we can use that bot to ask the status of a service. We will show how we can use a bot to get deployment information. And finally, we will show how we can use the bot to deploy our software.
We will cover the following topics in this chapter:
- Environment architecture
- Using an Ops service
- Building a basic chatbot
- Creating event handlers
- Creating our Slack application
Technical requirements
The following are the prerequisites for this chapter:
- A Slack user account: Create a Slack user if you do not have one by following the instructions here: https://slack.com/get-started#/createnew.
- A Slack workspace to experiment: Instructions for creating a Slack workspace can be found here: https://slack.com/help/articles/206845317-Create-a-Slack-workspace.
- Creation of a Slack application.
It is highly suggested that you use a workspace you control instead of using a corporate one. That process requires approval by admins for your corporate Slack.
You will also need to create a Slack application, but this is covered in a later section.
The code files for this chapter can be downloaded from https://github.com/PacktPublishing/Go-for-DevOps/tree/rev0/chapter/11
Environment architecture
Our example ChatOps program will need to interact with several services to provide information to users.
To enable this, we have built a more robust version of the Petstore application that we built in our previous chapters. This version does the following:
- Implements create, read, update and delete (CRUD).
- Is gRPC based.
- Has deeper Open Telemetry tracing that flows through RPC calls and records events.
- Deeper metrics that can be used to inform Prometheus alarms.
- Replaces logging with tracing events.
- All errors are automatically added to traces.
- Traces can be turned on by a client.
- Traces are sampled by default but can be changed via an RPC.
You can find this new Petstore here: https://github.com/PacktPublishing/Go-for-DevOps/tree/rev0/chapter/11/petstore. There is a README file that details the architecture if you want to dive into the details, but you do not need to for this chapter.
Our new Petstore is more capable and will allow us to show some of the power ChatOps can provide by combining our other lessons from this chapter.
The following is what our service architecture would look like:

Figure 11.1 – ChatOps and Petstore architecture
Attribution
Poodle dog vector created by gstudioimagen - www.freepik.com
Gophers by Egon Elbe: github.com/egonelbre/gophers
There are two services we will concentrate on creating here:
- Ops service: The Ops service does the real work, such as talking to Jaeger, Prometheus, running jobs, or anything else that is needed. This allows us to have multiple ChatOps services running in parallel (which might be needed if your company migrates from Slack to Microsoft Teams, for example).
This architecture has the benefit of allowing other teams to write tools using these functions in any language they choose.
- ChatOps service: The ChatOps service acts as the glue between Slack and the Ops service. It interprets messages sent to the Slack bot, which are forwarded to our ChatOps service, and makes requests to the Ops service. It uses the open source slack-go package, which can be found at https://github.com/slack-go/slack.
Let's jump into the basic details of the Ops service.
Using an Ops service
We are not going to go into complete detail about this service, as we have covered how gRPC works in previous chapters. As this service just makes gRPC or REST calls to other services, let's talk about the calls that need to be implemented.
The protocol buffer service definition is as follows:
service Ops {
rpc ListTraces(ListTracesReq) returns (ListTracesResp) {};
rpc ShowTrace(ShowTraceReq) returns (ShowTraceResp) {};
rpc ChangeSampling(ChangeSamplingReq) returns (ChangeSamplingResp) {};
rpc DeployedVersion(DeployedVersionReq) returns (DeployedVersionResp) {};
rpc Alerts(AlertsReq) returns (AlertsResp) {};
}
For our example service, these RPCs are targeted at a single deployed instance, but in a production environment, this would work on multiple entities that exist on a site.
This allows users to get some information quickly, such as the following:
- See the traces we have in a certain time period, and the ability to filter by tags (such as error).
- Retrieve basic trace data and the Jaeger URL of a trace given a trace ID.
- Change the sampling type and rate for traces in the service.
- Tell us what version has been deployed according to Prometheus.
- Display any alerts that Prometheus shows are firing.
You can read the code on how this is implemented here: https://github.com/PacktPublishing/Go-for-DevOps/tree/rev0/chapter/11/ops.
We include a README file that goes over the basic architecture, but it is your standard gRPC service that makes calls using gRPC to the Petstore service/Jaeger and REST calls to Prometheus.
Now, let's jump into something new, writing the basic Slack bot.
Building a basic chatbot
Go has a few clients that can interact with popular chat services such as Slack, either as a general Slack client or as a ChatOps-focused bot.
We have found that it is best to have an architecture that separates the bot from the operations that you want to perform. This allows other tooling in other languages to access the capabilities.
By keeping the chatbot separate, you can focus on a single type of chat service and use all its features, instead of only features shared by each chat service client.
For this reason, we will use the slack-go package to interact with Slack.
Our bot will be basic, simply listening to when someone mentions our bot in a message. This is called an AppMention event. Slack supports other events and has events specifically for commands that you can install. In our case, we just want to answer whenever we are mentioned, but slack-go has many other capabilities we will not explore.
Let's create a package called bot and add some imports:
package bot
import (
"log"
"context"
"regexp"
"encoding/json"
"github.com/slack-go/slack"
"github.com/slack-go/slack/slackevents"
"github.com/slack-go/slack/socketmode"
)
Details on our third-party package are as follows:
- slack is what is used to build a basic client.
- slackevents details the various events we can receive.
- socketmode provides a method of connecting to Slack from a bot that is behind a firewall.
Let's create a type that can handle an event we receive:
type HandleFunc func(ctx context.Context, m Message)
type register struct{
r *regexp.Regexp
h HandleFunc
}
HandleFunc receives a message that can be used to write to channels and get information about the message that was received.
We have also defined a register type that is used to register a HandleFunc with a regular expression (regex). The regex will be used to determine whether the message should be handled by that specific HandleFunc.
Let's define the Message type:
type Message struct {
User *slack.User
AppMention *slackevents.AppMentionEvent
Text string
}
This contains information about the Slack user who sent the message, information about the AppMention event, and the cleaned-up text that the user sent (removes the @User text and leading/trailing spaces).
Now, let's define our Bot type and its constructor:
type Bot struct {
api *slack.Client
client *socketmode.Client
ctx context.Context
cancel context.CancelFunc
defaultHandler HandleFunc
reg []register
}
func New(api *slack.Client, client *socketmode.Client) (*Bot, error) {
b := &Bot{
api: api,
client: client,
ctx: ctx,
cancel: cancel,
}
return b, nil
}
This code contains our clients that will be used to interact with Slack, a context for canceling our bot's goroutines, defaultHandler for handling the case where no regex matches happen, and a list of registrations that we check on any message receipt.
We now need some methods to start and stop our bot:
func (b *Bot) Start() {
b.ctx, b.cancel = context.WithCancel(context.Background())
go b.loop()
b.client.RunContext(b.ctx)
}
func (b *Bot) Stop() {
b.cancel()
b.ctx = nil
b.cancel = nil
}
This simply starts our event loop and calls RunContext to listen to our event stream. We cancel our bot using the supplied context.Bot. Start() blocks until Stop() is called.
Our next method will allow us to register our regexes and their handlers:
func (b *Bot) Register(r *regexp.Regexp, h HandleFunc) {
if h == nil {
panic("HandleFunc cannot be nil")
}
if r == nil {
if b.defaultHandle != nil {
panic("cannot add two default handles")
}
b.defaultHandle = h
return
}
b.reg = append(b.reg, register{r, h})
}
In this code, if we don't supply a regex, then HandleFunc is used as the default handler when no regexes match. You can only have one default handler. When the bot checks a message, it matches regexes in the order they are added; the first match wins.
Now, let's look at our event loop:
func (b *Bot) loop() {
for {
select {
case <-b.ctx.Done():
return
case evt := <-b.client.Events:
switch evt.Type {
case socketmode.EventTypeConnectionError:
log.Println("connection failed. Retrying later...")
case socketmode.EventTypeEventsAPI:
data, ok := evt.Data.(slackevents.EventsAPIEvent)
if !ok {
log.Println("bug: got type(%v) which should be a slackevents.EventsAPIEvent, was %T", evt.Data)
continue
}
b.client.Ack(*evt.Request)
go b.appMentioned(data)
}
}
}
}
Here, we pull events off the socketmode client. We switch on the type of event. For our purposes, we are only interested in two types of events:
- Error connecting to the WebSocket
- An EventTypeEventsAPI event
An EventTypeEventsAPI type is an interface that we turn into its concrete type, slackevents.EventsAPIEvent. We acknowledge receipt of the event and send the event to be handled by a method called appMentioned().
There are other events you might be interested in. You can find a list of the official events supported by Slack here: https://api.slack.com/events.
The Go package event support may be slightly different and can be found here: https://pkg.go.dev/github.com/slack-go/slack/slackevents#pkg-constants.
Now, let's build appMentioned():
func (b *Bot) appMentioned(ctx context.Context, data slackevents.EventsAPIEvent) {
switch data.Type {
case slackevents.CallbackEvent:
callback := data.Data.(*slackevents.EventsAPICallbackEvent)
switch ev := data.InnerEvent.Data.(type) {
case *slackevents.AppMentionEvent:
msg, err := b.makeMsg(ev)
if err != nil {
log.Println(err)
return
}
for _, reg := range b.reg {
if reg.r.MatchString(m.Text){
reg.h(ctx, b.api, b.client, m)
return
}
}
if b.defaultHandler != nil {
b.defaultHandler(ctx, m)
}
}
default:
b.client.Debugf("unsupported Events API event received")
}
Slack events are events wrapped inside events, so it takes a little decoding to get to the information you need. This code looks at the event data type and uses that information to know what type to decode.
For appMentioned(), this should always be slackevents.CallbackEvent, which decodes its .Data field into a *slackevents.EventsAPICallbackEvent type.
That has .InnerEvent, which can decode into a few other event types. We are only interested if it decodes to *slackevents.AppMentionEvent.
If it does, we call another internal method called makeMsg() that returns the message type we defined earlier. We are going to skip the makeMsg() implementation, as it has some deep JSON data conversions that, due to the nature of JSON, are a little convoluted and uninteresting. You can just lift it from the linked code.
We then loop through our regexes looking for a match. If we find one, we call HandleFunc on that message and stop processing. If we don't find a match, we call defaultHandler, if it exists.
Now, we have a bot that can listen for when it is mentioned in a message and dispatch the message to a handler. Let's tie that into making some calls to our Ops service.
Creating event handlers
The HandleFunc type we defined in the last sections handles the core of our functionality. This is also where we decide on how we want to turn a bunch of text into a command to run.
There are a few ways to interpret raw text:
- Regexes via the regexp package
- String manipulation via the strings package
- Designing or using a lexer and parser
Regexes and string manipulation are the fastest ways for an application of this type where we have single lines of text.
Lexers and parsers are great when you need to deal with complex inputs or multi-line text and cannot afford mistakes. This is the method that compilers use to read your textual code into instructions that eventually lead to a compiled binary. Rob Pike has a great talk on writing one in Go that you can view here: https://www.youtube.com/watch?v=HxaD_trXwRE. The downside is that they are tedious to build and hard to train new people on. If you need to watch that video a few times to get the concept, you are not alone.
Case Study – Regexes versus Lexer and Parser
One of the biggest jobs for network automation is getting information out of different devices made by different vendors. Some vendors provide information via the Simple Network Management Protocol (SNMP), but for many types of information or debugging, you have to go to the CLI to get information.
On newer platforms, this can come in the form of JSON or XML. Many platforms don't have structured output, and sometimes, the XML is so badly formed that it is easier to use unstructured data.
At Google, we started with writing tools that used regexes. Regexes were buried in every individual tool, which lead to multiple implementations of data wrangling for the same data. This was a huge waste of effort and introduced different bugs to different tools.
Router output can be complex, so eventually, a special regex engine was made to deal with these complex multi-line regexes and a central repository was created where command output regexes could be found.
Unfortunately, we were trying to use a tool that wasn't suited for the job. That package was so complex that it required its own debugger for development. More importantly, it would fail silently, inputting zero values in fields when a vendor would change the output slightly on new OS releases. This caused a few not-so-minor issues in production.
We eventually moved to a lexer and parser that would always detect when the output was not as expected. We didn't want it to be quite as complex as a full lexer and parser, so we wrote a package that allowed very limited regex usage and validation of many of the data fields.
There is a certain amount of love/hate for that package when you have to interpret new data with it. The great thing is it doesn't fail silently on changes, it is lightning fast, requires minimal effort to update, and uses minimal memory.
But it does take a while to get your brain around the concepts and it takes a lot longer to write the matches. There is a public version I recreated after I left Google called the Half-Pike that you can find here: https://github.com/johnsiilver/halfpike.
For our first handler, we want to return a list of traces to the user. The main command is list traces followed by optional arguments. For options, we want the following:
- operation=<operation name>
- start=<mm/dd/yyyy-hh:mm>
- end=<mm/dd/yyyy-hh:mm, now>
- limit=<number of items>
- tags=<[tag1,tag2]>
These options allow us to limit what traces we see. Maybe we only want to see traces for some certain period and only want the ones we tagged with error. This allows us to do filtered diagnostics.
A quick example of using this command would be as follows:
list traces operation=AddPets() limit=25
All of our handlers will be talking to the Ops service via gRPC. We will create a type that can hold all the HandlFunc types we define and the clients they will need to access our Ops service and Slack:
type Ops struct {
OpsClient *client.Ops
API *slack.Client
SMClient *socketmode.Client
}
func (o Ops) write(m bot.Message, s string, i ...interface{}) error {
_, _, err := o.API.PostMessage(
m.AppMention.Channel,
slack.MsgOptionText(fmt.Sprintf(s, i...), false),
)
return err
}
This defines our basic type that will hold a single client to our Ops service. We will attach methods that implement the HandleFunc type. It also defines a write() method for writing text back to the user in Slack.
Now, we need to define a package level variable for the regex we need to tease apart our options. We define it at the package level so that we only need to compile it once:
var listTracesRE = regexp.MustCompile(`(S+)=(?:(S+))`)
type opt struct {
key string
val string
}
You can see how our regex matches a key/value pair separated by =. The opt type is meant to hold our option key and value once we tease it apart with the regex.
Now for the handler that lists the traces we specify with our filters:
func (o Ops) ListTraces(ctx context.Context, m bot.Message) {
sp := strings.Split(m.Text, "list traces")
if len(sp) != 2 {
o.write(m, "The 'list traces' command is malformed")
return
}
t := strings.TrimSpace(sp[1])
kvOpts := []opt{}
matches := listTracesRE.FindAllStringSubmatch(t, -1)
for _, match := range matches {
kvOpts = append(
kvOpts,
opt{
strings.TrimSpace(match[1]),
strings.TrimSpace(match[2]),
},
)
}
ListTraces implements the HandleFunc type we created earlier. We split the list traces text from Message.Text that the user sent and remove any excess space at the beginning or end using strings.TrimSpace(). We then use our regex to create all our options.
Now, we need to process those options so we can send them to the Ops server:
options := []client.CallOption{}
for _, opt := range kvOpts {
switch opt.key {
case "operation":
options = append(
options,
client.WithOperation(opt.val),
)
case "start":
t, err := time.Parse(
`01/02/2006-15:04:05`, opt.val,
)
if err != nil {
o.write(m, "The start option must be in the form `01/02/2006-15:04:05` for UTC")
return
}
options = append(options, client.WithStart(t))
case "end":
if opt.val == "now" {
continue
}
t, err := time.Parse(
`01/02/2006-15:04:05`, opt.val,
)
if err != nil {
o.write(m, "The end option must be in the form `01/02/2006-15:04:05` for UTC")
return
}
options = append(options, client.WithEnd(t))
case "limit":
i, err := strconv.Atoi(opt.val)
if err != nil {
o.write(m, "The limit option must be an integer")
return
}
if i > 100 {
o.write(m, "Cannot request more than 100 traces")
return
}
options = append(options, client.WithLimit(int32(i)))
case "tags":
tags, err := convertList(opt.val)
if err != nil {
o.write(m, "tags: must enclosed in [], like tags=[tag,tag2]")
return
}
options = append(options, client.WithLabels(tags))
default:
o.write(m, "don't understand an option type(%s)", opt.key)
return
}
}
This code loops through the options we teased from the command and appends call options for sending to the Ops service. If there are any errors, we write to Slack to let them know there was a problem.
Finally, let's make our gRPC call to the Ops service:
traces, err := o.OpsClient.ListTraces(ctx, options...)
if err != nil {
o.write(m, "Ops server had an error: %s", err)
return
}
b := strings.Builder{}
b.WriteString("Here are the traces you requested: ")
table := tablewriter.NewWriter(&b)
table.SetHeader([]string{"Start Time(UTC)", "Trace ID"})
for _, item := range traces {
table.Append(
[]string{
item.Start.Format("01/02/2006 04:05"),
"http://127.0.0.1:16686/trace/" + item.ID,
},
)
}
table.Render()
o.write(m, b.String())
}
This code uses our Ops service client to get a list of traces with the options that we passed. We use an ASCII table writing package (github.com/olekukonko/tablewriter) to write out our traces table.
But how do users know what commands they can send? This is handled by providing a help handler for the bot. We will create a map that will hold our various help messages and another variable that will hold a list of all commands in alphabetical order:
var help = map[string]string{
"list traces": `
list traces <opt1=val1 op2=val2>
Ex: list traces operation=AddPets() limit=5
...
`,
}
var cmdList string
func init() {
cmds := []string{}
for k := range help {
cmds = append(cmds, k)
}
sort.Strings(cmds)
b := strings.Builder{}
for _, cmd := range cmds {
b.WriteString(cmd + " ")
}
b.WriteString("You can get more help by saying `help <cmd>` with a command from above. ")
cmdList = b.String()
}
Our help text is indexed in our help map. init() sets up a complete list of commands in cmdList during program initialization.
Now, let's use those commands in a handler that provides help text if a user passed help to our bot:
func (o Ops) Help(ctx context.Context, m bot.Message) {
sp := strings.Split(m.Text, "help")
if len(sp) < 2 {
o.write(m, "%s, You have to give me a command you want help with", m.User.Name)
return
}
cmd := strings.TrimSpace(strings.Join(sp[1:], ""))
if cmd == "" {
o.write(m, "Here are all the commands that I can help you with: %s", cmdList)
return
}
if v, ok := help[cmd]; ok {
o.write(m, "I can help you with that: %s", v)
return
}
o.write(m, "%s, I don't know what %q is to give you help", m.User.Name, cmd)
}
This code receives as input the command they want help with and outputs the help text if it exists. If they don't pass a command, it simply prints the list of commands we support.
If we don't have a handler to handle a particular command (maybe they misspelled the command), we need a handler as the last resort:
func (o Ops) lastResort(ctx context.Context, m bot.Message) {
o.write(m, "%s, I don't have anything that handles what you sent. Try the 'help' command", m.User.Name)
}
This simply informs the user that we don't know what they want, as it is not something we support.
We have a minimum set of handlers, but we still need to have a way to register it with the bot:
func (o Ops) Register(b *bot.Bot) {
b.Register(regexp.MustCompile(`^s*help`), o.Help)
b.Register(regexp.MustCompile(`^s*list traces`), o.ListTraces)
b.Register(nil, o.lastResort)
}
This takes in a bot and registers our three handlers with regexes that will are used to determine which handler to use.
Now, it's time for our main() function:
func main() {
... // Other setup like slack client init
b, err := bot.New(api, client)
if err != nil {
panic(err)
}
h := handlers.Ops{
OpsClient: opsClient,
API: api,
SMClient: smClient,
}
h.Register(b)
b.Start()
}
This creates our Ops object and registers any HandleFunc types we created with our bot. You can find the full code for the ChatOps bot here: https://github.com/PacktPublishing/Go-for-DevOps/tree/rev0/chapter/11/chatbot/.
Now that we've seen the foundation of writing our bot, let’s setup our Slack application and run our example code.
Creating our Slack application
For the bot to interact with Slack, we need to set up a Slack application:
- Navigate to https://api.slack.com/apps on your browser.
Here, you will need to click on the following button:

Figure 11.2 – Create New App button
You will then be presented with the following dialog box:

Figure 11.3 – Create an app options
- Choose the From an app manifest option. This will present the following:

Figure 11.4 – Choosing a workspace
- Choose the workspace you created at the beginning of this section and then press Create App. Click the Next button.
- Copy the text from the file present at https://github.com/PacktPublishing/Go-for-DevOps/tree/rev0/chapter/11/chatbot/slack.manifest and paste it onto the screen that is shown as follows as YAML:
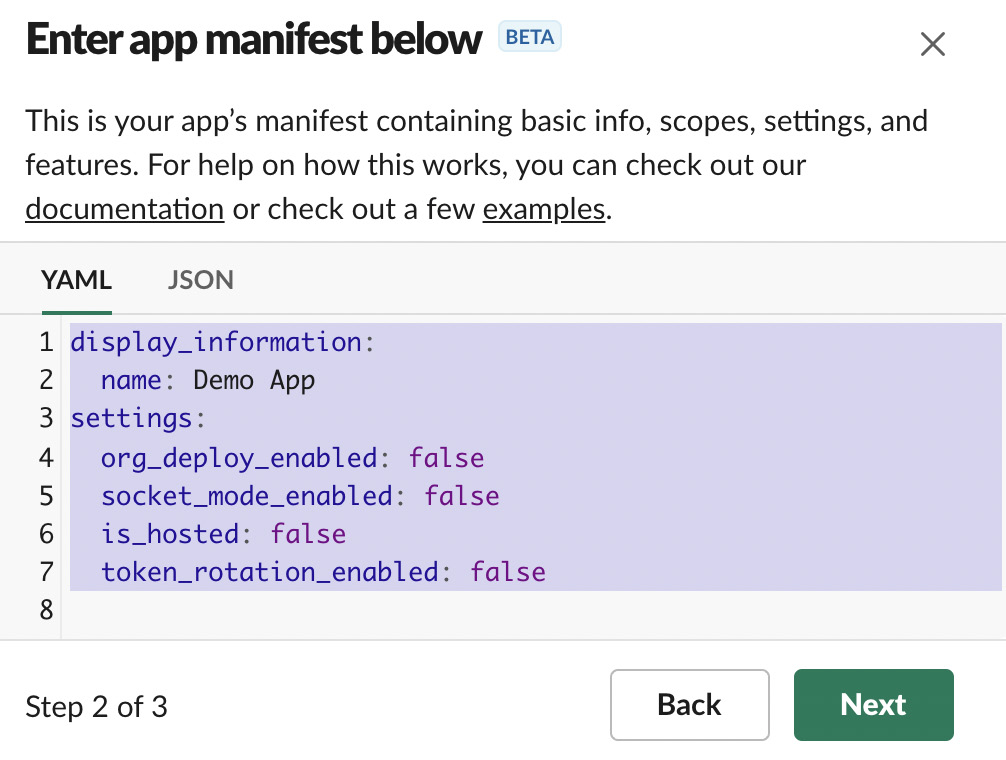
Figure 11.5 – App manifest configuration
- The text you see in the preceding figure should be replaced with the text from the file. Click the Next button.
You will be presented with a summary of the bots permissions, shown as follows:

Figure 11.6 – Bot creation summary
- Click the Create button.
- This will move you to a page that is called Basic Information. Scroll down the page until you get to App-Level Tokens, as can be seen in the following figure:

Figure 11.7 – App-level token list

Figure 11.8 – App token creation
- Set the token name to petstore-bot.
- Provide these scopes in the Scope field – connections:write and authorizations:read. Now, click Generate.
- On the next screen, you will receive an app-level token. You will need to hit the Copy button and put the token somewhere for the time being.

Figure 11.9 – App token information
In a production environment, you want to put this in some type of secure key store, such as Azure Key Vault or AWS Key Management Service. You will need to put it in a file called the .env file that you should never check into a repository. We will cover making this file in the Running the applications section.
Note
The key here is for a bot that was deleted right after this screenshot.
- Click the Done button.
- In the left menu pane, choose OAuth and Permissions. On the screen that looks like the following, click Install to Workspace:

Figure 11.10 – Install tokens in your workspace
- There is a dialog box that asks for a channel to post as an app. Choose any channel you like and hit Allow.
You are now back to OAuth and Permissions, but you will see your bot's auth token listed. Hit the Copy button and store this where you stored the app token from earlier.
Running the applications
Here, we are going to use Docker Compose to turn up our Open Telemetry services, Jaeger, Prometheus, and our Petstore application. Once those are running we will use Go to compile and run our ChatOps service that implements the chatbot connected to Slack:
- In the Go-for-DevOps repository (https://github.com/PacktPublishing/Go-for-DevOps/), go to the chapter/11 directory.
- Turn up the Docker containers:
docker-compose up -d
- Once the environment is running, change to the chapter/11/chatops directory.
- You will need to create a .env file in this directory that contains the following:
AUTH_TOKEN=xoxb-[the rest of the token]
APP_TOKEN=xapp-[the rest of the token]
These were generated when we set up the Slack app.
- Run the ChatOps server with the following command:
go run chatbot.go
- You should be able to see the following message printed to standard output:
Bot started
In the background, there is a demonstration client that is adding pets to the pet store and doing searches for pets (some searches will cause errors). The service is set to Float sampling, so not every call will generate a trace.
In another terminal, you can interact with the pet store by using the CLI application. This will let you add your own pets, delete pets, and search for pets with a filter. That client can be found here: chapter/11/petstore/client/cli/petstore. You can find instructions on its use by running the following:
go run go run petstore.go --help
Traces can be observed at http://127.0.0.1:16686/search.
Prometheus metrics can be queried at http://127.0.0.1:9090/graph.
To interact with our ChatOps bot, you need to open Slack and add the bot to a channel. You can do this simply by doing a @PetStore mention in a channel. Slack will ask if you would like to add the bot to the channel.
Once that happens, you can try out various operations. Start by asking the bot for help, as follows:

Figure 11.11 – Basic help command output
Let's ask for some help on how we can list some traces:

Figure 11.12 – Help output for the list traces command
How about we ask the system to give us five recent traces:

Figure 11.13 – Output from a command to list the last five traces
We can also ask about a particular trace:
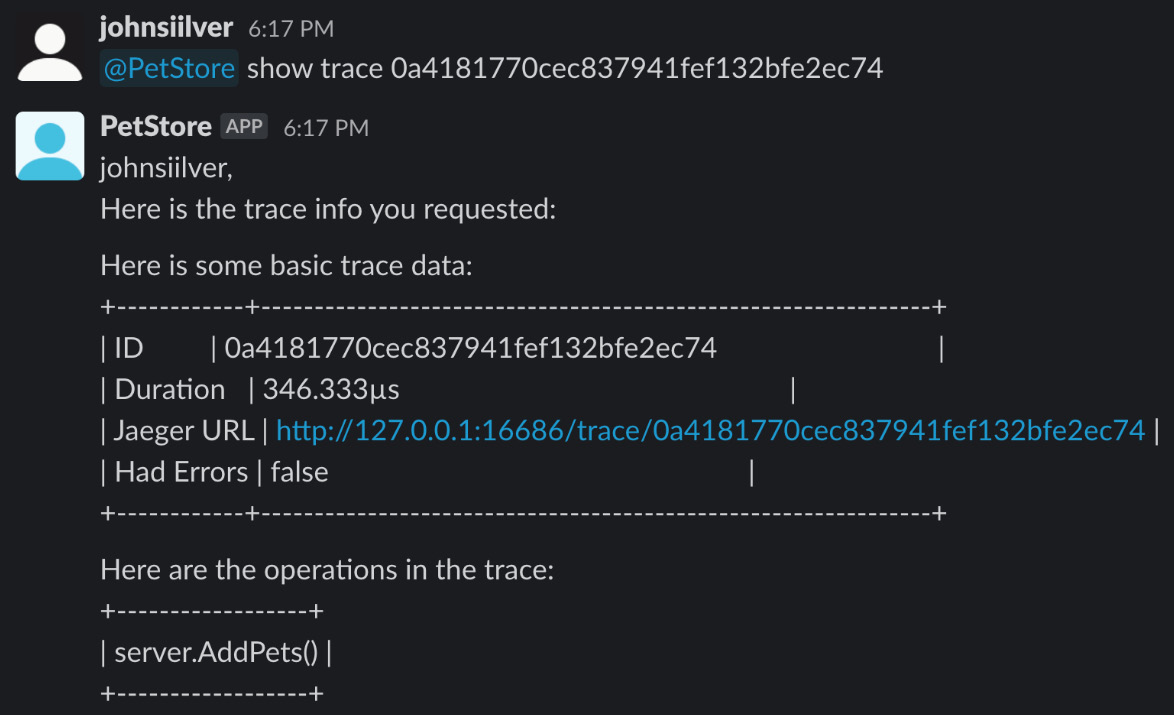
Figure 11.14 – Output showing a specific trace's data
Note
You cannot directly paste a trace ID copied from list traces. This is because those are hyperlinks; you need to remove the rich text from an ID if you want to directly paste it for show trace.
There are more options for you to play with in the bot. Give them a try.
This ChatOps application is just the tip of the iceberg. You can make the ChatOps application more powerful than the one we have here. You can have it display graphs, grab profile information from a pprof dump from the service and give you a link to view it, have it deploy new versions of your application, or roll a version back. Push files to the service by simply dragging them into the Slack window (such as a configuration change). Important events such as alerts can be broadcast to people who are on call by having the Ops service send messages to the ChatOps service, and the use of ChatOps increases observability of what your service is doing and what operations are being done against the service.
And as a side effect, unlike tools that must be run on a laptop or desktop, Slack and many other chat applications have mobile versions, so you can interact or do emergency operations with your cell phone with no extra cost in development.
Summary
In Chapter 9, Observability with OpenTelemetry, we explored how using Open Telemetry can provide observability into your application and the applications it depends on. We discussed how to set up telemetry for your application using the two most popular backends: Jaeger and Prometheus, which are both written in Go. In Chapter 10, Automating Workflows with GitHub Actions, we showed how you can use GitHub actions to automate your code deployments and how to add custom actions using Go. Finally, in this chapter, we looked at the architecture for interacting with a service. We built an interaction layer using Slack to do operations such as filtering traces, getting the currently deployed version, and showing alerts.
In the next set of chapters, we will talk about how to use Go, and tools written in Go, to ease the burden of working in the cloud. This will cover building standard images that can be deployed to VMs or other node infrastructure. We will show how you can extend Kubernetes, the most popular container orchestration system on the market today. Finally, we will guide you on how you can design DevOps workflows and systems to protect yourself from the chaos that is inherent in running operations against infrastructure.