Chapter 13. Griffon in front, Grails in the back
- Building a Grails server application
- Building a Griffon UI
- Connecting Grails and Griffon via REST
It’s hard to find a web developer these days who hasn’t come across an Ajax- or RIA-powered website. These technologies have become so ubiquitous that we can’t go back to the times when Web 2.0 didn’t exist. There are myriad options for building a web application that has Ajax built in or that presents a rich interface, in both the frontend and backend tiers. Grails happens to be one of the front runners when dealing with the JVM.
We’ve mentioned Grails a few times already in this book. If you’re a developer working on web applications and you haven’t given Grails a try, you owe it to yourself to do so. We can guarantee you won’t be disappointed.
Grails is a full-stack web development platform whose foundations lie in Spring and Hibernate, so it shouldn’t be hard for a Java developer to pick it up and get to work. But what really makes it revolutionary is its choice of default development language: Groovy, the same as in Griffon.
Grails has another ace up its sleeve: a ready-for-business command tool that’s also extensible via plugins. It’s thanks to this plugin system that building a Grails application is a breeze. Need a way to search through your data? Install the Searchable plugin. Your requirements ask for CouchDB instead of a traditional SQL store? No problem, install the CouchDB plugin. What’s that? You need to protect certain parts of an application using security realms? The Shiro plugin is here to help. You get the idea.
Out of the immense set of Grails plugins (by the team’s current count, it’s over 500), you’ll find a good number that deal with Ajax and RIAs. They’re pretty good. But no matter which one you pick, there will be times when you require a feature that can’t be implemented because of a browser limitation. That’s when it’s time to look outside of the browser window at the space that allows you to run the browser. Yes, that’s your computer’s desktop environment. This is where Griffon comes in.
In this chapter, you’ll see how to take advantage of Grails’ powerful features to build a backend, in literally minutes, followed up by building a frontend with Griffon. The trick is finding a proper way to communicate between the two ends. We’ll show you one of the many options you can use to connect a Grails server application with a Griffon desktop application.
First, though, you need to set up your environment, starting with Grails.
13.1. Getting started with Grails
Setting up Grails is as easy as setting up Griffon:
- Point your browser to http://grails.org/Download, pick the latest stable release zip, and unpack it in the directory of your choice.
- Set an environment variable called GRAILS_HOME, pointing to your Grails installation folder.
- Add GRAILS_HOME/bin to your path. In OS X and Linux this is normally done by editing your shell configuration file (such as
~/.profile) by adding the following lines:
export GRAILS_HOME=/opt/grails
export PATH=$PATH:$GRAILS_HOME/bin In Windows you’ll need to go into the System Properties window to define a GRAILS_HOME variable and update your path settings.
Done? Perfect. You can verify that Grails has been installed correctly by typing grails help in your command prompt. This should display a list of available Grails commands, similar to the following:
$ grails help
| Environment set to development.....

Usage (optionals marked with *):
grails [environment]* [target] [arguments]*

Examples:
grails dev run-app
grails create-app books
This will confirm that your GRAILS_HOME has been set correctly and that the grails command is available on your path.
With installation out of the way, you’re ready to start building a Grails application.
13.2. Building the Grails server application
We’ll pick the familiar book/author domain because of its simplicity. Creating a Bookstore application is done with a simple command:
$ grails create-app bookstore
This command will create the application’s structure and download a minimum set of plugins if you’re running Grails for the first time.
That command looks oddly similar to Griffon’s, doesn’t it? Remember that Griffon was born as a fork of the Grails codebase. You’ll put that claim to the test now. Besides some unique concepts to Grails and Griffon, almost all commands found in both frameworks provide the same behavior.
You can run the application now, but because it’s empty you won’t see anything of use. Next you’ll fill it up a bit.
13.2.1. Creating domain classes
Domain classes reveal some of the differences between Grails and Griffon. One of the big differences is that Grails domain classes have access to Grails’ object relational mapping (GORM) implementation, and Griffon doesn’t provide that functionality by default.
Create two domain classes: Book and Author. Make sure you’re in the application’s directory before invoking the following commands:
$ grails create-domain-class Author
$ grails create-domain-class Book
This set of commands creates a pair of files under grails-app/domain/bookstore, aptly named Author.groovy and Book.groovy. These two classes each represent a domain object of your domain model. They both are empty at the moment. By contrast, Griffon doesn’t support domain classes out of the box. This is a concern that’s left to plug-ins, as domain classes aren’t a generic attribute of all Griffon applications.
Go ahead and open the two classes in your favorite editor, or, if you prefer, in your favorite IDE. Grails isn’t picky and will gladly work with any IDE or editor you throw at it. Make sure that the contents of the Author and Book domain classes match the ones in the following listings.
First, let’s look at the Grails Author domain (grails-app/domain/bookstore/Author.groovy):

Now let’s look at the Grails Book domain (grails-app/domain/bookstore/Book.groovy):
package bookstore
class Book {
    static belongsTo = Author
    static constraints = {
        title(unique: true)
    }

    String title
    Author author

    String toString() { title }
}
Without going into much detail, the Author and Book classes define a pair of entities that can be persisted to the default data store. If this is the first time you’ve encountered a Grails domain class, don’t worry, they don’t bite. Besides the simple properties in each class, you’ll notice that there’s a one-to-many relationship from Author to Book. You could make it a many-to-many relationship to more closely reflect the real world, but let’s keep things simple for the moment.
There’s another step that must be performed before you attempt to run the application for the first time. You must expose the domain classes to the user in some way.
13.2.2. Creating the controllers
With a framework other than Grails, you’d need to write HTML or use some other templating mechanism to expose your domain classes. With Grails you can let the framework take over, as long as you stick to the conventions. If you only create a pair of controller classes, one per domain class, nothing else needs to be done. Hurray for scaffolding!
Go back to your command prompt, and type the following:
$ grails create-controller Author
$ grails create-controller Book
Locate each controller under grails-app/controllers/bookstore and edit it, carefully copying the following code into the appropriate file.
First, here’s the Grails Author controller (grails-app/controllers/AuthorController.groovy):
package bookstore
class AuthorController {
    static scaffold = true
}
Next, the Grails Book controller (grails-app/controllers/BookController.groovy):
package bookstore
class BookController {
    static scaffold = true
}
That’s all you need for now. Don’t be fooled, though—there’s a full-blown Spring MVC-powered component behind each of these controllers.
Perfect. You’re good to go.
13.2.3. Running the Bookstore application
Run the application with the following command:
$ grails run-app
After a few seconds, during which the command compiles and packages the application, you’ll be instructed to visit the following address: http://localhost:8080/bookstore. Use your favorite browser to navigate to that URL. You should see a page that looks like the one in figure 13.1.
Figure 13.1. Bookstore webpage

You’ll see a default page listing some internal details of the application, like the currently installed plugins and their versions. You’ll also notice a pair of links that point to the controller you wrote.
Click the AuthorController link. You’re now on the starting page for all create, read, update, and delete (CRUD) operations that affect an author. How is this possible? This is the power of conventions. When you instructed each controller that a domain class should be scaffolded, it generated (at compile time) the minimum required code and templates to achieve basic CRUD operations on that specific domain class.
You can play around with authors and books now. Try creating and removing some. You may end up with a screen that resembles figure 13.2.
Figure 13.2. The Bookstore application showing a list of two authors that were created by clicking on the New Author link and filling in the generated form

Now that you’ve mastered the basics, let’s step it up a notch and expose the domain classes to the outside world using a REST API. This is where picking up a good remoting strategy to interface with the Griffon frontend pays off.
13.3. To REST or not
There’s no shortage of options for exposing data to the wild. You could go with a binary protocol like RMI or Hessian, or you could pick a SOAP-based alternative. We’d argue that a REST style is perhaps the simplest one. It doesn’t hurt that many Web 2.0 sites have chosen this style (or variants of it) to give developers access to the services they provide. As you’ll see in just a few moments, exposing domain classes in a RESTful way with Grails is a piece of cake.
13.3.1. Adding controller operations
Love it or hate it, XML is a popular choice among Java developers for externalizing data. Another format that gained momentum in Web 2.0 is JSON. There are a couple of ways to produce and consume both formats in Grails, but let’s pick JSON for its simplicity.
What you want to do is expose each domain class with three operations:
- List— Returns a collection of all instances of the domain available in the data store
- Show— Returns a single instance that can be found with a specific identifier
- Search— Returns a collection of all domain instances that match certain criteria
All the results will be returned in JSON format.
Go back to AuthorController, and make the necessary edits so that it looks like the following listing.
Listing 13.1. RESTful implementation of AuthorController
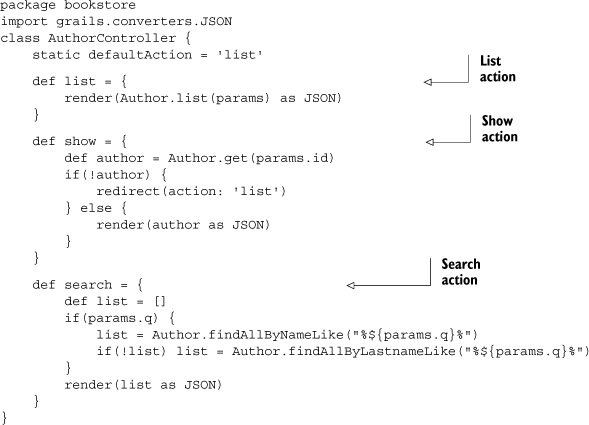
Gone is the default scaffolding, which has been replaced by specific actions that match the operations you want to expose to the outside world. The code is pretty straightforward, but you’ll notice that there are calls to static methods on the Author class that aren’t defined. These methods are added by the framework.
Remember we spoke about Groovy’s metaprogramming capabilities? Well, here’s proof that they’re put to good use. All Grails domain classes possess the ability to invoke dynamic finder methods that magically match their own properties. For example, in the search action, you can look up all authors using a like query on its name or lastname property. These dynamic finder methods closely follow the operators and rules that you find in SQL.
One last point is that all results are returned in JSON format by using a type conversion. Grails will figure out the proper content type to send to the client by inspecting the format and data.
The updated BookController class looks similar to the author class, as shown in the next listing.
Listing 13.2. RESTful implementation of BookController

Here, too, you’ll find a dynamic finder on the Book class ![]() . This one operates on the book’s title property. Summarizing the added behavior, you can search authors by name and lastname, and books can be searched by title. Both domain instances can be listed in their entirety and looked up by a particular identifier.
. This one operates on the book’s title property. Summarizing the added behavior, you can search authors by name and lastname, and books can be searched by title. Both domain instances can be listed in their entirety and looked up by a particular identifier.
You must perform one final change before you can test the application.
13.3.2. Pointing to resources via URL
The REST style states that resources (domain info) should be available via a URL naming convention. There are many variations on the original guidelines, because REST doesn’t impose strict rules on the conventions, so we’ll pick one that’s easily recognizable. The root of the URL path must be the application name; Grails takes care of that. The next element in the path will be the name of the domain class, followed by the action you want to invoke, with optional parameters. Here are some examples for the Author domain:
/author -> default action, which in our case lists all entities
/author/search -> calls the search action on authors
/author/42 -> fetches the author with id = 42
With these examples in mind, look for a file named UrlMappings.groovy located in grails-app/conf. Copy the contents of the following snippet into that file:
class UrlMappings {
    static mappings = {
        "/author/"(controller: 'author', action: 'list')
        "/author/search"(controller: 'author', action: 'search')
        "/author/list"(controller: 'author', action: 'list')
        "/author/$id"(controller: 'author', action: 'show')
        "/book/"(controller: 'book', action: 'list')
        "/book/search"(controller: 'book', action: 'search')
        "/book/list"(controller: 'book', action: 'list')
        "/book/$id"(controller: 'book', action: 'show')
        "/"(view:"/index")
        "500"(view:'/error')
    }
}
Given that you’ll use the application as the data provider for the desktop application, it makes sense to start with some predefined domain instances, don’t you think? Locate BootStrap.groovy, also located in grails-app/conf, and fill it with the contents of the following listing.
Listing 13.3. Adding some initial data to the application via Bootstrap.groovy
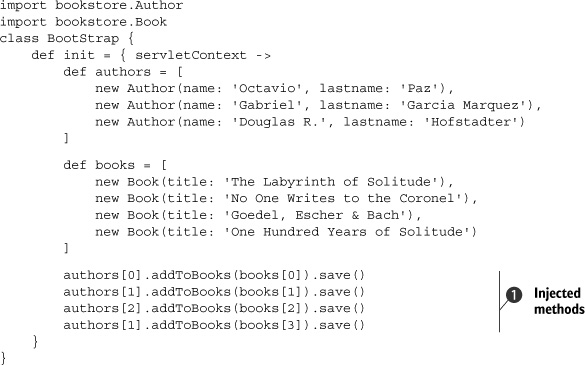
You can appreciate a pair of new methods ![]() that you needn’t write; the compiler and the Grails framework can inject them for you.
that you needn’t write; the compiler and the Grails framework can inject them for you.
You can run the application now, but don’t use your browser to navigate to the various URLs. Use a command-line browser like curl or Lynx, which makes for quicker debugging, or you could fire up groovysh if you don’t have a command-line browser.
For example, the following command
$ curl http://localhost:8080/bookstore/author/1
results in the following output (formatted here for clarity):
{
    "class":"bookstore.Author",
    "id":1,
    "books":[{"class":"Book","id":1}],
    "lastname":"Paz",
    "name":"Octavio"
}
This command
$ curl http://localhost:8080/bookstore/book/search?q=Solitude
should give you the following results (also formatted for clarity):
[
    {
        "class":"bookstore.Book",
        "id":1,
        "author":{"class":"Author","id":1},
        "title":"The Labyrinth of Solitude"
    },{
        "class":"bookstore.Book",
        "id":4,
        "author":{"class":"Author","id":2},
        "title":"One Hundred Years of Solitude"
    }
]
Tip
We highly recommend you pick up a Grails book, like the excellent Grails in Action by Glen Smith and Peter Ledbrook (Manning, 2009), if you found any of the steps so far to be a bit confusing. Those guys packed a lot of tips and tricks into that book, and it can help you get up to speed with Grails in no time.
You’re done with the server side of the application. Time to look at the other half.
13.4. Building the Griffon frontend
You’re back on familiar ground. Your target is to build an application that resembles what figures 13.3 and 13.4 depict. The first shows a tabbed view of the application’s domain classes.
Figure 13.3. A tabbed view of all instances of Author domain classes after querying the Grails backend. The Books tab does the same for Book domain classes.

Figure 13.4. The Search tab for the Bookclient application. Users can search the bookstore backend by querying Authors or Books.
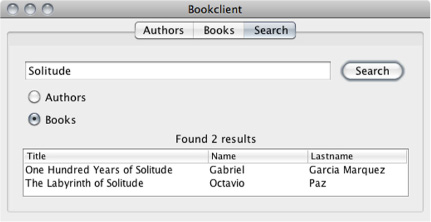
Figure 13.5. Griffon Bookstore client calling Grails Bookstore
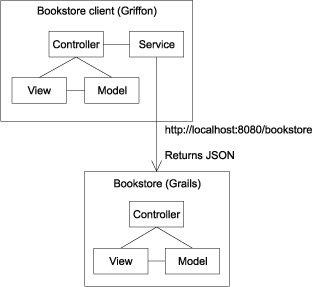
Figure 13.4 displays an elaborate search screen. A text box captures the search string, a check box specifies which domain the search will act upon, and a table displays the search results.
Let’s get started. First create an application named bookclient—you already know the drill:
$ griffon create-app bookclient
This gives you a shell of an application. Now you’ll spruce up the views.
13.4.1. Setting up the view
Swing is a vast toolkit—you know that already. You can do many things with it, or you can frustrate yourself by using it alone. The Swing classes found in the JDK are good as a starting point, but they fall short of providing a modern user experience. And let’s not talk about layouts, especially GridBagLayout (http://madbean.com/anim/totallygridbag). You’ll install a few plugins right away.
MigLayout (http://miglayout.com) is the first on the list. It’s been said that using this layout is like using CSS to position elements on a page.
Next on the list is Glazed Lists (http://publicobject.com/glazedlists), which simplifies working with lists, tables, and trees. It does so by providing a missing key from the JDK’s List class: a List that produces events whenever its contents change.
You can install all of these plugins with the following commands:
$ griffon install-plugin miglayout
$ griffon install-plugin glazedlists
While you’re installing plugins, you can install one that will allow you to query the server side via a REST client. The plugin is aptly named rest:
$ griffon install-plugin rest
Now let’s turn back to the view script and modify it to make it look like the screens shown in figures 13.3 and 13.4. The next listing contains all the code that you need to write to get the UI working.
Listing 13.4. The view in all its glory


Recall that you can define any Groovy construct within a view script, because a view script is also a valid Groovy script.
That’s why you’ll spot a closure at the beginning ![]() . This closure will be used to build the first two tabs
. This closure will be used to build the first two tabs ![]() , as their construction is identical; they only differ in the data source that feeds them. The third tab is a bit more elaborate
than the other two.
, as their construction is identical; they only differ in the data source that feeds them. The third tab is a bit more elaborate
than the other two.
Every child node of a tabbedPane must have a title property; that’s how the tabbedPane knows what name should be used for the tab. You can easily spot the title properties on each tab and their values (Authors, Books, and Search). The first and second tabs make use of nodes provided
by the Glazed Lists plugin ![]() .
.
These nodes build a TableModel out of some sort of data source (which will be revealed to be a List that produces events, also from Glazed Lists). The model is then added to its parent table. Finally, a sorting element is added to the table. Clicking on the table headers will sort the data accordingly.
Onward to the third tab. The main node is a panel whose title is Search. Inside this panel is a migLayout definition. All elements inside the panel will be attached to it using MigLayout’s settings. The six visible elements inside this panel are listed in table 13.1.
Table 13.1. The Search tab’s visible elements
|
Element |
Purpose |
|---|---|
| Text field | The text property is bound to a model property named query. |
| Button | Triggers the controller’s search action. |
| Two radio buttons | Specifies on which domain the search should be performed. |
| Label | The text is bound to a model property named status. |
| Table wrapped in a scrollPane | Displays search results. |
The second table also relies on nodes ![]() provided by the Glazed Lists support found in Griffon. These nodes operate by following a naming convention to name the properties
in each element of the source list that feeds the table. We’ll soon come back to how these conventions are put to work. For
now, make a mental note of the names of the columns used to build each of the tableFormat nodes.
provided by the Glazed Lists support found in Griffon. These nodes operate by following a naming convention to name the properties
in each element of the source list that feeds the table. We’ll soon come back to how these conventions are put to work. For
now, make a mental note of the names of the columns used to build each of the tableFormat nodes.
You can’t run the application just now. You’re missing a few properties on the model and the definition of the search action on the controller. You’ll get a nasty runtime exception if you attempt running the application at this stage. You’ll fill those holes next.
13.4.2. Updating the model
You might have noticed in listing 13.4 that the view expects a couple of properties to be available in the model. A pair of constants must be defined in it as well. Some of those properties are expected to be some kind of list. But not any list implementation will do—you need a special one. An observable list, to be exact.
We mentioned earlier that the Glazed Lists base building block is a List implementation that can trigger events whenever its contents change in some way. Those events aren’t only triggered when an element is added or removed from the list, but also when an existing element is updated internally. How cool is that?
The following listing shows all the code that you must write to get the model ready for this application.
Listing 13.5. The model with all the properties required by the view

The model contains three lists, as expected. They will hold authors, books, and the search results ![]() . There are also other properties needed for the bindings. You might remember the @PropertyListener annotation from previous chapters. If not, here’s a quick reminder of its function: it’s an AST transformation that generates
a Property-ChangeListener around a closure or a closure field. In this case
. There are also other properties needed for the bindings. You might remember the @PropertyListener annotation from previous chapters. If not, here’s a quick reminder of its function: it’s an AST transformation that generates
a Property-ChangeListener around a closure or a closure field. In this case ![]() , it turns out to be a private field found on the same class. Whenever the query property changes value, the enabler listener
will be called.
, it turns out to be a private field found on the same class. Whenever the query property changes value, the enabler listener
will be called.
You’re almost done. The next and last step is to finish up the logic.
13.5. Querying the Grails backend
You’ve reached the point where you can connect the Griffon frontend with the Grails backend. It’s the job of the controller (and perhaps of a helper service) to send REST calls to Grails in order to get a list of each domain class type and to execute the search queries that the user types.
Let’s encapsulate all the network-related code—the REST calls—in a service.
13.5.1. Creating a service
Implementing the REST calls in a service allows you to keep the controller as a simple entity that collects data from the model and updates the view with new data obtained from the service and saved once more in the model. Type the following at your command prompt:
$ griffon create-service bookstore
This will create a service class named BookstoreService inside griffon-app/services/bookstoreclient (see the following listing). But you knew this already, didn’t you? For a quick refresh on Griffon services, feel free to look back at chapter 5.
Listing 13.6. Bookstore client with all required REST calls
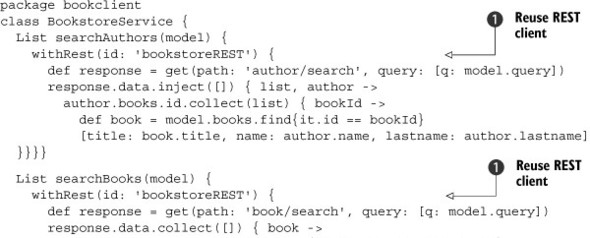
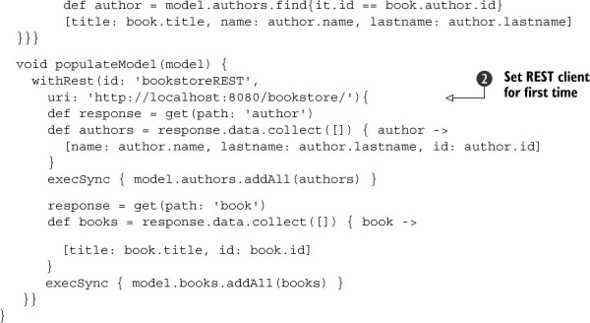
There are three service methods in this class. The first two ![]() will be used to search each of the domains given certain search criteria. If you recall from what you set up in the view,
the user enters the search criteria on a text field, which is bound to a model property. In the implementation of each of
the service methods is a call to a method named withRest that isn’t defined by you. This method is provided by the REST plugin, and it’s responsible for executing REST calls. The
contents of this method are bound to an instance of HTTPBuilder, another handy builder that provides a higher-level API over Apache’s HTTPClient. The third method
will be used to search each of the domains given certain search criteria. If you recall from what you set up in the view,
the user enters the search criteria on a text field, which is bound to a model property. In the implementation of each of
the service methods is a call to a method named withRest that isn’t defined by you. This method is provided by the REST plugin, and it’s responsible for executing REST calls. The
contents of this method are bound to an instance of HTTPBuilder, another handy builder that provides a higher-level API over Apache’s HTTPClient. The third method ![]() will be used to populate the initial data during application startup.
will be used to populate the initial data during application startup.
You’ll notice that the third method defines a URL that points to the server running the Grails app, whereas the other methods don’t. It’s your intention to call the third method first in order to set up the HTTPBuilder object and later reuse it for any subsequent queries. That’s why there’s an id property defined as well. When the id property is present, it means that a reference to the internal HTTPBuilder will be saved in an in-memory storage managed by the REST plugin. There’s no need to pay a penalty for setting up a new HTTPBuilder for each query made, is there?
Finally, we can look at the controller now.
13.5.2. Injecting an instance of the service
The following listing shows all that there is to it. The controller relies on an injected instance of the service you just defined.
Listing 13.7. The controller and service working in unison
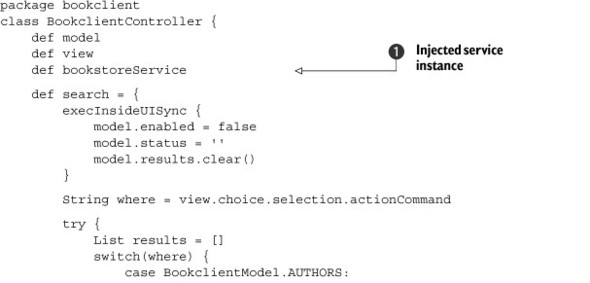

All the pieces are finally coming together. And we don’t mean just the Grails and Griffon part, but everything else that you’ve learned so far along the journey.
As a quick reminder of what we discussed in chapter 5, all services are automatically handled by Griffon as singletons, even if the Spring plugin isn’t installed. These services
will be automatically injected into MVC members by following a naming convention on the properties they expose. In this case,
the controller has a property whose name matches the logical name of the service ![]() .
.
Once the MVC group has been created, the application will switch from the startup to the ready phase. The controller reacts
to that change by listening to an event ![]() . During the handling of the event, it tells the service to load the data. This loading will occur outside of the UI thread,
but the model will be updated inside the UI thread—the service has code to handle the latter case.
. During the handling of the event, it tells the service to load the data. This loading will occur outside of the UI thread,
but the model will be updated inside the UI thread—the service has code to handle the latter case.
The controller’s search action will be triggered once the user enters a query and clicks the Search button in the view. The
query will be sent to the server outside of the UI thread once more, because that’s the default setting for controller actions,
as you might remember from chapter 7. Once the results come back, the controller updates the view via the model back inside the UI thread ![]() .
.
Even though the description of the whole application takes a fair number of pages, the code takes just a few pages.
Now for the last piece you need to get this application running on its own.
13.5.3. Configuring the Bookstore application
The REST plugin will add dynamic methods to all controllers by default; after all, that’s how it’s configured. But you need those dynamic methods to be added to services instead. What can you do?
Back in the first chapter, we mentioned that Griffon encourages convention over configuration. This doesn’t mean that configuration is completely gone. You can alter both the build-time and runtime configuration of a Griffon application. In chapter 2 we discussed the options at your disposal for configuration. Now’s the time to put those claims to the test.
Locate the file Config.grooy inside griffon-app/conf. When you open it in an editor, you’ll find logging configuration by means of a Log4j DSL. Add the following line to the file:
griffon.rest.injectInto = ['controller', 'service']
With this change, all REST dynamic methods should be added to both controllers and services alike. Go ahead, give it a whirl! Remember to have Grails running in the background; otherwise the REST calls will fail at startup. The following commands are enough to get the Grails backend running:
$ cd bookstore
$ grails run-app
Wait a few seconds, and then invoke the following commands at another command prompt:
$ cd bookclient
$ griffon run-app
Voilà! Run the application again, and you should be able to see the list of authors and books. You should also be able to query authors by name and last name. Feel free to play around with both applications. Maybe you feel like adding another search term or a third element to the domain model, like a publisher.
When the time is right, you’ll need to package the applications and deliver them to your customers. Packaging in Grails is similar to Griffon—there’s a specialized command that takes care of all the details. A Grails application can be packaged in a WAR file and then dropped into any JEE-compliant application server.
The command to be executed is aptly named war, and can be invoked like this:
$ grails war
Yes, it’s that easy. After a while, you should see a WAR file that matches the name and version of the application stored in the default location, the target directory located at the root of the application’s codebase. You might remember the command for packaging a Griffon application that you saw in chapter 10. Here it is again in its short form:
$ griffon package
This command will generate four packages: zip, jar, applet, and webstart. Pick whichever you think is best for your customers. Also remember that the Installer plugin is just a command invocation away; it provides more packaging targets that could be better for your needs.
That was quite a whirlwind ride, wasn’t it? You might remember that we decided on a REST approach for these applications because of its simplicity, and we hope you agree that we accomplished the goal of keeping both applications simple. But REST is just one of the many options you have at your disposal. Perhaps the most common would be a SOAP-based web service, as SOAP also facilitates communication between heterogeneous systems.
13.6. Alternative networking options
If SOAP is your game, you’re in luck. Both Grails and Griffon have excellent support for SOAP! You only need to install the corresponding plugin and tweak the sources.
In the case of Grails, the recommended plugin is called xfire (http://grails.org/plugin/xfire). This plugin can expose a service using Apache XFire as the workhorse. The following snippet shows a simple example of its usage:
class SampleService {
    static expose = ['xfire']

    boolean myServiceMethod(String someValue) {
        someValue * 2
    }
}
The key to make this service available through a SOAP interface is in the static expose property. Notice that it takes a list of strings as its value. Though you only specified xfire as the single element for the time being, it’s important to remember that you can define more values; you’ll see when and why in a bit.
The Griffon plugin counterpart is Wsclient (http://artifacts.griffon-framework.org/plugin/wsclient). Like the REST plugin, this one will add dynamic methods that let components send a SOAP request. These methods are added by default to controllers, but you can change this preference via configuration in the same way you did before. Here’s an example of how a Griffon controller could query the service:
String url = 'http://localhost:8080/exporter/services/sample?wsdl'
def result = withWs(wsdl: url) {
    myServiceMethod('griffon')
}
assert result == 'griffongriffon'
And that’s all there is to it.
But your options don’t stop with REST and SOAP. There are other formats and protocols for performing data exchange. Table 13.2 enumerates the plugins in both Grails and Griffon that can cover some of these additional options.
Table 13.2. Additional communication protocols supported by both Grails and Griffon
|
Grails |
Griffon |
Description |
|---|---|---|
| remoting | rmi | Java RMI protocol |
| remoting | hessian | Hessian/Burlap protocols by Caucho |
| xmlrpc | xmlrpc | XML-based RPC |
| protobuf | protobuf | Google’s protocol buffers |
Griffon goes a little further by supporting the following protocols and binary formats: Jabber, Avro, and Thrift.
13.7. Summary
Grails is by far the best option for building web applications in the JVM, enabling you to use features that can be found in popular Java libraries and features only found in the Groovy language. Griffon follows in Grails’ footsteps and aims to provide the same productivity gains but in the desktop space. The two can be combined to build applications that touch desktop and server with the same approach to development: an approach aimed at high productivity and making programming fun again.
REST APIs are but one of the many options you can pick to allow both sides to collaborate with each other. Grails has other plugins that can expose domain objects and services via SOAP or remoting. Griffon similarly has plugins that can consume SOAP and remoting.
You got a good look at all the features offered by Griffon with a sample Bookstore application. We touched every default artifact provided by the framework. You installed a handful of plugins that enhanced the application’s capabilities, either by providing new nodes to be used on views or dynamic methods ready to be called from controllers and services.
The application’s life cycle made an appearance too, and you saw how to handle one of the many events it can trigger. You also tweaked the runtime configuration by editing one of the standard configuration files found in every application.
This exercise showed how closely related Griffon is to Grails, even though they target disparate running environments, such as desktop and web.
Now that you’ve had a taste of a more elaborate application, it’s likely that the notion of tool support has come to mind. We’ve left the best for last: productivity tools and IDE integration will be the topics of the last stop on our journey.
