
Chapter 14. Productivity tools
- Setting up popular IDEs and Griffon
- Additional command-line tools
The poet John Donne once wrote, “No man is an island,” reflecting on the fact that all of humanity is interconnected. The same reflection can be applied to our software tools and frameworks. In order to be really productive with one tool, you have to reach out to others. The Griffon framework is no different, and it’s for that reason that it provides hooks for popular Java and Groovy tools to help you write, build, and deploy applications as part of a much larger ecosystem.
In this chapter, we’ll look at popular software development tools such as IDEs. These tools let developers write, refactor, and debug applications. They even include build and deployment facilities. Not to be outdone by their visual brethren, command-line tools are more than adequate to build, package applications in specific environments, such as continuous integration servers, and even deploy such applications in a continuous delivery fashion.
We’ll start with perhaps the most ubiquitous kind of tool that a Java developer will come across: IDEs.
14.1. Getting set up in popular IDEs
In the Java world, few start developing an application without the aid of an integrated development environment (IDE) or even a power editor. The advantages of such tools are clear to Java developers: the ability to refactor code without breaking the build, file history management, syntax highlighting, code completion and code suggestion, expandable macros, testing facilities, you name it. The bottom line is that IDEs make working with Java a less painful experience.
Because Groovy is closely related to Java, sometimes even being a substitute, you’d expect a similar degree of support for it in the same Java IDEs, which is the case, to varying degrees. At the time of writing, Groovy is on a clear path to becoming a first-class citizen in popular IDEs, such as Eclipse, IntelliJ IDEA, and NetBeans IDE. Power editors, such as jEdit and TextMate, aren’t left behind. The latter is a popular choice for developers who like a certain fruity computer brand; it allows you to edit Groovy code and even manage Groovy-powered applications.
Let’s begin with Eclipse.
14.1.1. Griffon and Eclipse
We’ll discuss Eclipse first because it’s the dominant IDE on the market by a large margin, judging by its install base. We’ll cover the basic steps involved in getting a Griffon application up and running. The first step is installing the Groovy Eclipse Plugin.
Installing the Groovy Eclipse plugin
The home page for this plugin can be found at http://groovy.codehaus.org/Eclipse+Plugin. You’ll require this plugin if you’re running a vanilla version of Eclipse or some other distribution that doesn’t bundle the plugin.
Note
If you happen to have SpringSource Tool Suite (www.springsource.com/developer/sts), chances are that the Groovy plugin has already been configured in your settings. You can check the status of the Groovy plugin by bringing up the STS dashboard.
The plugin’s documentation page provides a quick overview of what you need in order to install the plugin and what steps you need to perform. In most cases it’s a simple matter of pointing your Eclipse instance to an update site, letting Eclipse figure out if additional dependencies must be met, and letting it download and install the plugin. You should be able to compile and run Groovy projects after a quick restart.
If that approach doesn’t work for some reason, you can install the plugin the manual way. Locate the manual installation zip file on the Eclipse page, download it, and expand it inside the plugins directory in your Eclipse install directory.
Once that’s done, you’re ready to proceed with the next step—configuring your Groovy environment.
Setting Up Groovy and Griffon
You must configure some environment settings in order to resolve classpath dependencies that point to your Griffon installation. Go to the Preferences window found on your Eclipse application. In the Java section locate Build Path and then Classpath Variables, as shown in figure 14.1. You must define two more variables: USER_HOME and GRIFFON_HOME. USER_HOME should point to the directory where your user account is located. For example, if your account name is joecool, the value should be similar to /home/joecool (Linux), /Users/joecool (Mac OS X), or C:Documents and Settings joecool (Windows). The GRIFFON_HOME variable should point to your Griffon installation directory.
Figure 14.1. The Classpath Variables preferences dialog box, showing the configured variables after adding values for USER_HOME and GRIFFON_HOME

You’re all set up now for the next step: importing your Griffon application into Eclipse.
Importing a Griffon Application
Importing a Griffon application is a three-step process.
First you must generate a pair of files that allows Eclipse to treat a Griffon project as an Eclipse one. In other words, you need to integrate the project with Eclipse. Fortunately, there’s a Griffon command that relieves you of the burden of generating those files. Type the following at your command prompt to complete the first step, making sure your command prompt is already placed in the project’s directory:
$ griffon integrate-with -eclipse
This generates a pair of files: .project and .classpath. The first identifies the project as an Eclipse project, whereas the second defines compile paths and libraries required by the project.
The second step is to install a plugin that allows you to keep the .classpath file up to date. Go back to your command prompt and type the following command:
$ griffon install-plugin eclipse-support
Now the .classpath file will be up to date every time you install or uninstall a plugin. Remember to refresh the project inside Eclipse to get the latest version every time you install or uninstall a plugin.
Finally, the third step: importing the project into Eclipse. Bring up the Import dialog box and select the Existing Projects into Workspace option, as shown in figure 14.2.
Figure 14.2. The Import dialog box showing the recommended option for importing a Griffon project into Eclipse

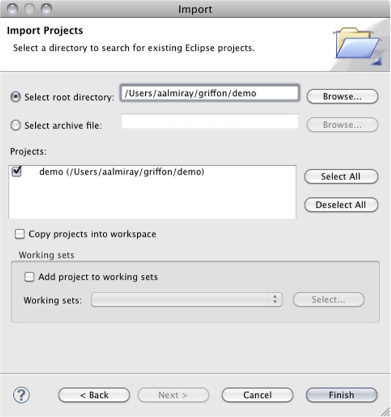
Click the Next button and you’ll be presented with the Import Projects page, as shown in figure 14.3. Type in or browse to select the directory that contains your Griffon application. You’ll use a newly created application, named demo, as an example here. Figure 14.3 shows the page’s state after typing in the root directory of a freshly created application with the name demo.
Figure 14.3. The last step for importing a Griffon project into an Eclipse workspace
After this, nothing else needs to be configured. You can click the Finish button and let the wizard figure out the rest.
At this point, your Griffon application should be visible in the project explorer.
Running a Griffon Application Inside Eclipse
All your Groovy sources will automatically benefit from the Groovy support provided by the Groovy Eclipse plugin. This means you’ll be able to see the structure of a Groovy class or script, block folding, syntax highlighting, and even call basic refactoring operations, as shown in figure 14.4.
Figure 14.4. Eclipse, showing the structure of a Griffon application in the project explorer, as well as the class structure of the DemoController

All of this is great, but you’ll surely want to test drive your Griffon application. You’ll rely on Eclipse’s Ant support, because at the time of writing there’s no explicit Griffon support in Eclipse—this may change in the future.
The trick is letting Eclipse know about the Ant build file that should be located in your application’s main directory. Hold on a second, there’s no Ant build file yet! No worries—you can generate a suitable one by invoking the following command at the command prompt:
$ griffon integrate-with -ant
Now go back to Eclipse, and don’t forget to refresh the project’s contents! Open the Ant view if you don’t have it open already: go to Window > Show Views > Ant. On that view, right-click to display a contextual menu, select the Add Buildfile option, locate your application’s build file, and voilà! You should see a list of available targets in the Ant view, as shown in figure 14.5. Without further ado, double-click on any target, such as the run-app one, and after a few seconds your application should pop up. Notice that the target’s output will be displayed in the Console view.
Figure 14.5. An Ant view of the application’s targets, as shown by Eclipse’s Ant support

You’re free now to explore what can be done with Eclipse. Remember that the Ant build file contains just a small selection of the targets that can be called. You can tweak it to meet your own needs.
We’ll cover NetBeans next.
14.1.2. Griffon and NetBeans IDE
NetBeans IDE is another popular choice among Java developers. Though it was a latecomer in terms of Groovy support, that didn’t prevent the NetBeans team from gaining ground at a tremendous pace, to the point where this IDE can be considered the second best when it comes to working with Groovy (and no, Eclipse isn’t first on that list, yet).
Unlike Eclipse, a Groovy editor is a standard part of NetBeans IDE if you install the full version, meaning that you don’t need to install any plugins to use Groovy in Net-Beans IDE. In addition, there’s a plugin that integrates the Griffon commands into NetBeans IDE, allowing you to create new Griffon applications right inside NetBeans IDE.
Installing Groovy and Griffon in NetBeans IDE
From the NetBeans IDE download page (http://netbeans.org/downloads/index.html), download and install the latest version of NetBeans IDE, making sure that you get either the Java or the All download bundle. Once you’ve finished, you’ll have an installation of NetBeans IDE that includes a Groovy editor, support for Grails, and many other features. If you have the Java edition, make sure you install the Groovy and Grails plugin before continuing with the next step.
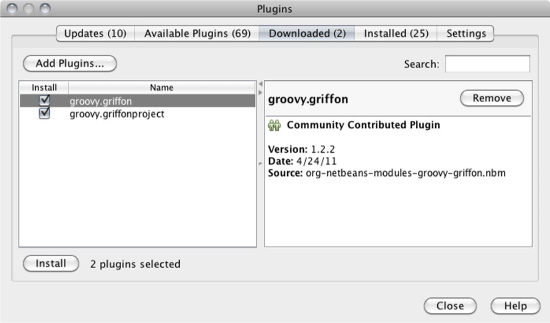
Next, you need to install the Griffon plugin. This task is similar to what we described for Eclipse: you must tell the Plugin Manager to locate and install the Griffon plugin. To do so, first browse to http://mng.bz/48M6 and download the zip file with the latest version of the Griffon plugin. Back in NetBeans, go to Tools > Plugins. When the Plugins dialog box comes up, switch to the Downloaded tab and install all of the NBM files that are contained in the zip file you downloaded in previously. Figure 14.6 gives you an overview of what the Plugins dialog box should look like before the installation is finished.
Figure 14.6. Both Griffon NetBeans modules are selected for installation.
Click on the Install button and, without needing to restart NetBeans IDE, you should be ready for business with Griffon in NetBeans IDE.
Now you’re ready to create an application.
Creating a Griffon Application
Unlike Eclipse, creating a Griffon application in NetBeans requires no previous configuration. Bring up the New Project dialog box, which has a Groovy category containing a Griffon Application project, as shown in figure 14.7.
Figure 14.7. NetBeans’ New Project wizard page with a project template selected, which is required for setting up a Griffon application

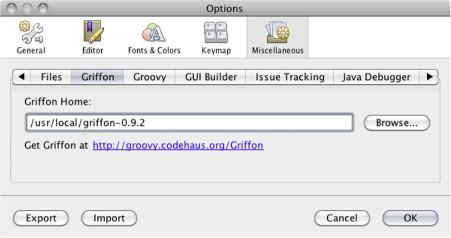
On the next wizard page, you’ll be asked for the location of your Griffon application. Type in or browse to select your application’s main directory. If Griffon Home isn’t set, you’ll be able to set it in the wizard, as shown in figures 14.8 and 14.9.
Figure 14.8. The second step of the New Griffon Application wizard

Figure 14.9. Configuring Griffon Home
From here you should be able to edit all your source files to your heart’s content, using the outline view in the Projects window to work with your new Griffon application.
NetBeans’ Griffon plugin is aware of the Griffon conventions, so it shows each artifact in its own place, as you can see in figure 14.10.
Figure 14.10. Project view with artifacts properly identified

The last bit of getting acquainted with NetBeans is running your application.
Running a Griffon Application inside NetBeans
We’ve already given away the ending of this story. Switch back to the Projects tab, right-click the project, and choose one of the Run commands. Or select the project and click on the green arrow button on the toolbar. That was easy, wasn’t it?
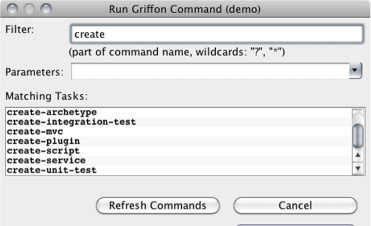
You can even call any Griffon command target available to the application by selecting Run Griffon Command from the context menu. This should pop up a dialog box that gives you a few choices. It even provides command name autocompletion—sweet! Figure 14.11 shows what the dialog box looks like after typing “create” in the command field.
Figure 14.11. The Run Griffon Command dialog box, containing a list of suggestions based on what was typed in the Filter text field
A great thing about NetBeans’ Griffon support is that it’s able to open a Griffon project from the get-go. There’s no need to generate integration files at all!
We’re now up to the last IDE, which is IntelliJ IDEA. If you’re wondering which Groovy IDE is the best around, you should look at this one.
14.1.3. Griffon and IDEA
IntelliJ IDEA is without a doubt the best Groovy IDE out there. JetBrains did a good job of quickly supporting Groovy, and they update it quite often. You can download a copy of IntelliJ IDEA from http://www.jetbrains.com/idea.
Since IDEA release 7 chances are that Groovy support is already included in the default set of plugins that come bundled in IDEA. Just to be sure, check that the Jet-Groovy plugin is installed by looking at the Plugin Manager. Make sure you have the Griffon plugin installed as well.
Creating a Griffon Application
Once IDEA and the plugins are installed, you can safely invoke the New Project wizard, shown in figure 14.12. You’ll observe that the last choice allows you to import an existing Griffon project, which is great! Don’t be fooled, though—this option also allows you to create a brand new Griffon project, which is exactly what you’re going to do.
Figure 14.12. IDEA’s New Project wizard showing several options. The Griffon one is the last in the list.

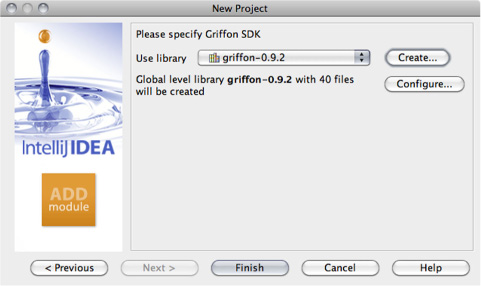
The next page of the wizard asks for the project name and its location. It also prompts you to select the Griffon SDK to use. If none are configured yet, you’ll be asked to create one. Figure 14.13 shows the second wizard page, and figure 14.14 depicts the configuration of a Griffon SDK.
Figure 14.13. Configuring the demo application

Figure 14.14. Selecting a Griffon SDK to be used with the demo application
Click the Finish button once you’ve finished configuring the settings to your liking. IDEA should present a view similar to the one shown in figure 14.15. There you can see that each artifact has been identified by type, just as it happened in NetBeans.
Figure 14.15. A Griffon project, as shown in IDEA’s Griffon view

The Groovy editor provides syntax highlighting, code suggestions, and refactoring options, exactly what you’d expect from an IDE.
Running a Griffon Application inside IDEA
Running a Griffon application in IDEA is a trivial task. See the green arrow at the center of the top toolbar, next to the project’s name and the Griffon logo? Click on it, and the application will be launched in standalone mode, just as if you invoked the runapp command. In fact, IDEA invokes the run-app command for you, as you can verify by looking at the messages that appear in the output console.
IDEA also gives you the option to invoke any command. Right-click on the project name and select the Run Griffon Command option. This should bring up a dialog box similar to the one shown in figure 14.16. This dialog box prompts you for the command name and any arguments it may take. It even remembers previous invocations.
Figure 14.16. The dialog box for running any Griffon command. It takes the name of the command and any optional arguments as input.

In summary, all three major IDEs have good support for developing Griffon applications. Expect such support to be improved in each of these IDEs as new releases are published.
There’s one more tool we’ll cover, and though it’s not a Java IDE per se, it’s a powerful text editor, and a very popular one with Mac OS X users. Yes, we’re referring to TextMate.
14.1.4. Griffon and TextMate
TextMate is a well-known text editor for Mac OS X, produced by MacroMates. You can download it directly from http://macromates.com. TextMate’s functionality can by extended by installing new bundles. There are several bundles to be found out there, and there are a few ways to install them.
Installing the Griffon Bundle
Follow these instructions to install the Griffon bundle.
First, you need to create a directory where the bundle will reside. Go to your command prompt and execute the following command:
$ mkdir -p /Library/Application Support/TextMate/Bundles
The next step is easy if you have git installed. The popular GitHub website has some pointers on how to get it done; see http://help.github.com/ for reference. This step will also let you update the bundle effortlessly whenever a new version becomes available. Change into the directory you just created, and clone the bundle’s repository using git, like this:
$ cd /Library/Application Support/TextMate/Bundles
$ git clone https://github.com/griffon/griffon.tmbundle.git
The bundle is now available. You can keep the bundle up to date by pulling the latest changes from the repository, as you’d do with any git repository:
$ cd /Library/Application Support/TextMate/Bundles
$ git update
If you don’t have git installed on your system, there’s an alternative. Point your browser to https://github.com/griffon/griffon.tmbundle. You’ll notice that there’s a button close to the top that lets you download a copy of the Griffon bundle repository in zip format; click on it. A file named something like griffon-griffon.tmbundle-749a7b6.zip should be downloaded. Don’t worry if the numbers don’t match—they’re a reference to the last commit made to the repository. What’s important is that now you have a snapshot of the whole bundle.
Now all you need to do is change into the bundle directory you created in the first step, unpack the file, and rename the directory created by unpacking it:
$ cd /Library/Application Support/TextMate/Bundles
$ unzip griffon-griffon.tmbundle-749a7b6.zip
$ mv griffon-griffon.tmbundle-749a7b6.zip griffon.tmbundle
Either way, you should now have a working Griffon bundle. Open TextMate, and inspect the Bundle menu: Groovy Griffon should appear in the list.
Follow the same steps to install the Groovy bundle. More details can be found at http://groovy.codehaus.org/TextMate.
Setting Up the Environment
Before you attempt to use the bundle, you must fix the path environment settings used by TextMate. Go to the Preferences menu, choose the Advanced options, and select the Shell Variables tab. Locate the entry named PATH and update its value. Make sure you enter the full path to the Griffon binaries. Figure 14.17 shows a typical setup.
Figure 14.17. The PATH configuration, showing the full path of a Griffon installation being added at the beginning of the variable’s value

It’s time to give the bundle a try. Open any Griffon application, such as the demo application you used before. Figure 14.18 shows how TextMate presents the view and the rest of the project’s contents in a sidebar.
Figure 14.18. The view of the demo application. Notice that TextMate provides a detailed list of all files in a sidebar.

The Groovy bundle provides syntax highlighting for all Groovy source files, as well as other features such as macros and code snippets that should let you write code in aflash.
Running a Griffon Application inside TextMate
The main job of the Griffon bundle is to deliver a set of commands that can be invoked when the sources opened in the editor belong to a Griffon application.
Look at the Bundles menu again. Search for the Groovy Griffon menu item, and then select Commands. There are a few familiar names there, aren’t there? You can run the application in any of the three development modes. Furthermore, there’s an option to run any Griffon command available, including those provided by plugins and the application itself. You can also clean compiled artifacts or install a plugin from the editor.
Figure 14.19 shows the default commands that the bundle provided at the time of writing.
Figure 14.19. A list of default commands provided by the bundle. This list might be updated in future versions of the bundle.

Select the Run App command. A new dialog box should pop up. It gives a view of the command output—output that should be familiar to you as it’s the invocation of the run-app command applied to your application. Figure 14.20 shows a typical run of this command.
Figure 14.20. The output of invoking the Run App command from within the bundle. Notice that the output is the same as you’d get when invoking the command by regular means.

That’s all the visual aids for now. But if command-line tools happen to be your cup of coffee, then no worries. We’ve got you covered with the next section.
14.2. Command-line tools
Way before Java IDEs and other visual tools emerged from the minds of their creators, we had the command line. This simple interface is the common denominator in all platforms. Tools that target the command line can be useful in situations where visual aids aren’t reliable, might get in the way, or are too slow to get the job done. The following sections describe some of the common tools you’ll encounter when dealing with the command line.
14.2.1. Griffon and Ant
Ant (http://ant.apache.org/) is perhaps the best-known command-line tool in the Java space, besides the Java compiler itself from the Java SDK. It’s been around for many years now, and chances are that you’ve encountered an Ant build file sometime during your career. Despite its old age, some organizations still rely on Ant to do the job.
What happens if you’re working with a team that relies on Ant for its build, and you must integrate a Griffon application into the mix? No problem, simply integrate it. You see, Griffon is aware of Ant’s existence, and it understands Ant’s conventions. Naturally it provides a way to generate a build script suitable for Ant.
If you read the Eclipse section earlier in this chapter, then you know what’s going to happen. Execute the following command to integrate a Griffon application into an Ant build:
$ griffon integrate-with -ant
This command will generate a build.xml file with some Ant targets already configured. Running the ant command with the -p flag enabled will list all of the available targets, like this:
$ ant -p
Buildfile: /Users/aalmiray/demo/build.xml

Main targets:

 clean         --> Cleans a Griffon application
 debug-app     --> Run a Griffon application in standalone mode with debugging turned on
 dist          --> Packages up Griffon artifacts in the Production Environment
 run-app       --> Run a Griffon application in standalone mode
 run-applet    --> Run a Griffon application in applet mode
 run-webstart  --> Run a Griffon application in webstart mode
 test          --> Run a Griffon applications unit tests
Default target: run-app
Each one of those targets is backed by a specific Griffon command. For example, invoking ant run-app would be the same as invoking griffon run-app. Sweet!
You can create new Griffon-aware tasks too. Open the build file in your favorite editor, and paste in the following snippet:
<target name="zip" description="--> Zips the application">
  <griffon>
    <arg value="package"/>
    <arg value="zip"/>
  </griffon>
</target>
The new target should package the application using the zip deployment mode. Now, go back to your command prompt and invoke it:
$ ant zip
A few moments later, you should have the application packaged in zip mode, as expected. Be mindful that this setup requires you to have a valid JDK installed and a JAVA_HOME environment variable that points to the installation directory. The same rule applies for a Griffon installation and a GRIFFON_HOME variable.
14.2.2. Griffon and Gradle
Gradle (http://gradle.org/) is a newcomer compared to Ant, but it builds on the lessons Ant and Maven have learned. Gradle provides many advantages over Ant. For example, it has a full-blown object model of your project. Gradle can discern with 100% accuracy which tasks should be invoked and which can be skipped, for example. This decreases build time dramatically, as the tool won’t waste time computing outputs for tasks that need not be run.
Gradle also follows the convention-over-configuration paradigm, meaning that a build file will contain only the configuration that deviates from the conventions set forth by the tool and any plugins applied to it. Furthermore, Gradle uses a real programming language (Groovy, in this case) instead of XML to describe what the build should do.
In order to integrate Griffon with Gradle, you need to use the Gradle Griffon plugin. You can either integrate an existing application or create a new one from the get-go.
Integrating an Existing Application
The process for integrating an existing application with Gradle is almost identical to the process for integrating an application with Ant. You’ll use the same command, but with a different argument this time:
$ griffon integrate-with -gradle
The output of this command is a build.gradle file that contains the minimal setup required by Gradle to build and run the application. At the moment of writing, the generated file looks like the following listing.
Listing 14.1. A default Gradle build file created by the Griffon command
buildscript {
    repositories {
        mavenCentral()
        mavenRepo url: 'http://repository.codehaus.org/'
        mavenRepo url: 'http://repo.grails.org/grails/core/'
        mavenRepo url: 'http://repository.springsource.com/maven/bundles/
     release'
        mavenRepo url: 'http://download.java.net/maven/2/'
     }

    dependencies {
        classpath('org.codehaus.griffon:griffon-gradle-plugin:1.1.0')
        classpath('org.codehaus.griffon:griffon-scripts:0.9.5')
     }
}
griffonVersion = '0.9.5'
version = '0.1'

apply plugin: 'griffon'

repositories {
    mavenCentral()
    mavenRepo url: 'http://repository.codehaus.org/'
}

dependencies {
    compile "org.codehaus.griffon:griffon-rt:$griffonVersion"
}
It’s quite possible that by the time you give it a try, the template used to create this file will have been updated with additional tasks. Go ahead; take it for a spin by calling the clean command:
$ gradle clean
:clean
Resolving dependencies...
Dependencies resolved in 366ms.
Running pre-compiled script
Environment set to development
   [delete] Deleting directory /Users/aalmiray/demo/build/classes
   [delete] Deleting directory /Users/aalmiray/demo/build/plugin-classes
   [delete] Deleting directory /Users/aalmiray/demo/build/resources
   [delete] Deleting directory /Users/aalmiray/demo/build/test-classes
   [delete] Deleting directory /Users/aalmiray/demo/build/test-resources
   [delete] Deleting directory /Users/aalmiray/demo/staging

BUILD SUCCESSFUL
Good, it works. The plugin lets you invoke any Griffon command by prefixing griffon- in front of the command name. Say you’d like to run the application using Gradle—simply type the following at your command prompt:
$ gradle griffon-run-app
It’s useful as it is, but the Gradle support is in its early stages as we write this. It’s likely that you’ll experience better integration when you try it.
Creating a New Application
We almost forgot to cover the other case regarding Gradle integration. You can bootstrap a new application by starting with just a Gradle build. See the code in listing 14.1? Save it in a new build.gradle build file, and call the following command:
$ gradle init
This will create the initial structure for a Griffon application. Of course, you shouldn’t call it in an already existing application, lest you overwrite some files.
14.2.3. Griffon and Maven
What about Maven? It’s also a very popular build tool among Java developers. Unfortunately, the Griffon team hasn’t come up with definite support for Maven at the time of writing. It’s possible that a Maven plugin providing Griffon integration will soon find its way into the Griffon toolbox. Keep your eyes peeled at the official Griffon website and mailing lists to find out more.
The tools we’ve reviewed so far have a wide range of features and differ in many areas, but they have one common attribute: they must be installed on your system before you can use them. What if you don’t have the tool installed, not even Griffon, and you still want to build an application? Don’t fret, there’s an answer for that: the Griffon wrapper.
14.3. The Griffon wrapper
Quick question: How do you make use of a tool without having the tool at your disposal? You rely on another tool to reach the first, of course.
Imagine the following scenario. Bob and Alice are working on the same project, which happens to be a Griffon application. Alice has followed due diligence and has installed Griffon on her system and created the initial structure of the application, committed the source to a code repository, and sent a message to Bob letting him know he can grab a copy and continue the work.
Bob decided to skip setting up Griffon on his machine because he didn’t want to mess with his environment settings. How will he be able to build the application? Alice, being a dutiful developer, made sure to include a few files that the create-app command added by default when the application was created. These are the files:
- griffonw
- griffonw.bat
- wrapper/griffon-wrapper.jar
- wrapper/griffon-wrapper.properties
The first two are script files, and the last two are a binary and a configuration file. Combined, they form the Griffon wrapper. The wrapper lets you call any Griffon command as if you had a local Griffon distribution configured. As a matter of fact, one will be configured for this particular project. With this tool, Bob is able to compile the application by typing the following at his command prompt:
$ ./griffonw compile
Next, he must create a new MVC group for the application. What should he do now? The answer is to invoke the create-mvc command target using the wrapper again:
$ ./griffonw create-mvc viewer
Excellent! Every command becomes available to Bob, thanks to the wrapper. Now extrapolate this scenario to a continuous integration server. You usually require administrative access to the server that hosts the CI environment in order to install a new tool. If you don’t have the right access permissions, you might have to wait for IT to resolve the matter, which may take some time. But if your CI software lets you invoke an arbitrary command on the same sources you’re about to build, then it’s only a matter of configuring the Griffon wrapper. Your only requirement is to have a working JDK installed in the CI server, which should be there from the start.
14.4. Summary
Griffon provides its own toolchain by offering a command-line tool that has been discussed throughout this book. But there are other tools that can make a Java developer very productive when building applications. IDEs, visual editors, and additional command-line tools are among the most common choices.
Popular Java IDEs such as Eclipse, NetBeans IDE, and IntelliJ IDEA provide support for Griffon in various degrees. Most of them have an easy-to-follow setup. Once any of these tools has been configured, a developer should be able to move code around much faster, apply refactoring techniques, and invoke Griffon commands from within the IDE.
There are also other command tools, such as Ant and Gradle, that when used in combination can extend the reach of a particular build. These tools can permit a Griffon application to participate in a much larger build, for example.
Then there’s the Griffon wrapper, the ultimate command-line tool for building Griffon applications without even having an existing Griffon distribution locally installed.
We’re glad you stayed with us for the long ride. We hope you have enjoyed the journey as much as we did. We also hope you come back to these chapters when you need a quick recap of a particular feature or setting. And keep in mind that the Griffon framework continues to grow by means of its plugin system, not just by the features added to its core. Keep an eye on the plugin community.
There’s no place on the desktop that Griffon can’t reach. The sky is the limit!