Chapter 4. Gameplay Tricks
Hacks 30–39: Introduction
Halo tricks can range from the ridiculous to the essential. This chapter includes a sampling of some of the most useful and also some of the most entertaining tricks. The difference between these hacks and the ones in Chapter 5, is that these are not generally considered to be problems—they are simply interesting ways to interact with the Halo 2 universe. For more information about Halo tricks, see http://www.highimpacthalo.org and http://halo.bungie.org.
Change Split Screen View
Switch between vertical and horizontal split screen mode.
Some people find the split screen display to be disorienting. If this is a problem for you, you might want to try altering the presentation mode. The multiplayer split screen type is determined by the video settings on the Xbox dashboard. To adjust this setting, start your Xbox without a DVD in the drive. From the main menu, choose Settings and then Video. For horizontal split screen, the Xbox must be in normal mode (see Figure 4-1). For vertical split screen, the Xbox must be in widescreen mode (see Figure 4-2).
Try both settings and see which works best for your television or display. The reason that the widescreen setting controls the orientation of the split screen is that most people with wide screens prefer the vertical split. However, you can try it out and decide for yourself.

Revert to Multiple Checkpoints
Move backward through the level.
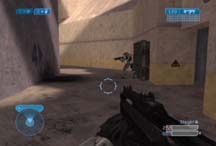
In the single-player campaign options, Halo 2 allows players to revert to the last checkpoint (see Figure 4-3).

However, by repeatedly committing suicide, you can force yourself back through more than one checkpoint. You’ll know if you were successful simply because you’ll start further back than you would using the Revert to Last Checkpoint option.
It is likely that this behavior is meant to save someone from being stuck at a point where he is constantly being defeated, but the feature can be manipulated such that players can move back through extra checkpoints.
Standing on a grenade or sticking a grenade to your foot is always a good way to quickly frag yourself (see Figure 4-4).
Note that you won’t be able to move back through major loading points or levels. In addition, this trick doesn’t always work—I’ve seen it fail once and it often works for only one extra checkpoint. Even with these limitations, it can be extremely useful. For example, when exploring maps, you may want to go back through checkpoints to cover the same ground more than once.
Get Out of Outskirts
Get onto the rooftops and circumvent Sniper Alley.
This level is interesting because the rooftops allow for a great deal of movement. By moving above this urban level, you can find skulls, skip battles, and move around the level quickly. There are many options for getting onto the Outskirts rooftops.
Tip
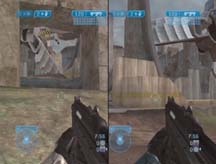
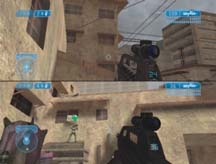
Figures 4-5, 4-6, 4-7, 4-8 through 4-9 use a two-player split screen to demonstrate the action.
One method is to use the awnings in Sniper Alley (see Figures 4-5 and 4-6).

However, an easier option is to use a grenade jump right at the beginning of the level. The first doorway in the level gives you access to the roof. This is the same technique that is used to find the Blind skull [Hack #8] .
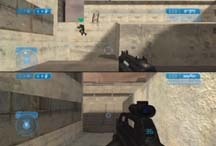
The first step is to crouch jump [Hack #1] onto a light fixture; then another crouch jump gets you onto the roof (see Figure 4-7).
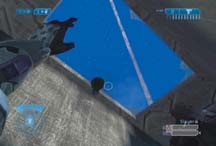
Once you have made it to the roof, turn around and jump across to the adjacent roof (see Figure 4-8).
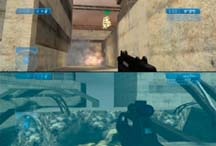
From this area, you can easily grenade jump [Hack #2] to the next level and get free reign around the map (see Figure 4-9).
If you want to skip Sniper Alley, you can simply run across the roofs and then down to the Zanzibar hotel. Have fun exploring!

Get Above Delta Halo
The Delta Halo level offers some of the best views that I have seen in Halo. Using this hack is also a great way to speed up the process of getting the Envy skull [Hack #13] .
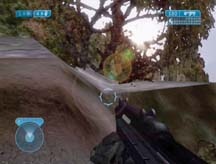
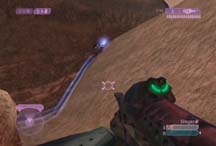
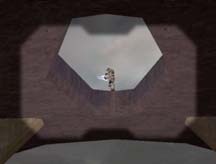
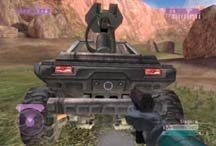
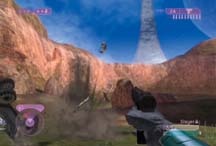
Right at the beginning of the level, take out a couple of turrets and then head for the rock overhang. All you have to do is run up the hill and go under the rock overhang—the ledge will be right in front of you (see Figure 4-10).

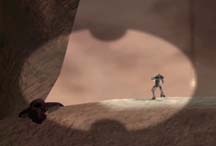
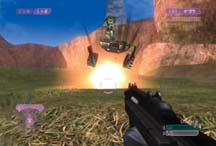
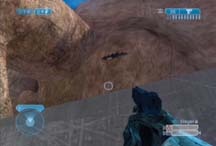
Once on the other side, you will be able to jump up the side of the cliff and get above the map (see Figures 4-11 and 4-12).

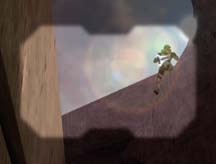
Once you are above the map, you can choose to skip some fights or just enjoy the view (see Figure 4-13). Making it to the top of the map will give you a true appreciation for the vast Delta Halo level.

Get Out of Burial Mounds
Go above the map and snipe your friends.
Burial Mounds is one of the most interesting maps for multiplayer sword–flying. However, Bungie has fixed the multiplayer sword glitch through an update that was sent automatically over Xbox Live. Unless you have an Xbox that has not connected to Xbox Live, you won’t be able to use the multiplayer sword-flying trick without first deleting the update.
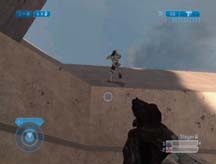
Even if you can’t use the sword-flying glitch, you will be able to get on top of the cliff opposite the base side of the level. Sniping from this cliff can be fun. To do this, you just need to grab a Ghost and ride your way up the side of the map (see Figure 4-14).
Once you are at the top, jump out of the Ghost and you’ll be able to walk along the side of the map (see Figure 4-15)
This same trick can be used near the Blue flag. Again, use a Ghost to drive up the side of the cliff and then jump out. This one is a little bit trickier because you will have to start on the left (to get the Ghost to climb) and then make your way to the right (see Figure 4-16).
Now that you’re on top of the map, you can snipe to your heart’s content (see Figure 4-17)


Jump Out of Foundation
Explore the roof of the Foundation map.
There are a few ways to get onto the roof of the Foundation level. My favorite involves using a pallet and a grenade jump [Hack #2] . This move allows you to get onto one of the roof’s supports.
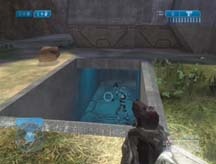
First, you need to move the pallet into position (see Figure 4-18)—you can use grenades, pushing, and melees to move the pallet into place. The area just outside the Foundation rooms is perfect for placing the pallet. Simply push it up to the wall opposite the doorway (i.e., against the one with the numbers). Then use a grenade to blow it into the air and catch it against the wall behind you.
While the pallet is flying, simply back up and you will trap the pallet against the wall with your back (see Figure 4-19). Once you have the pallet in place, you can crouch jump [Hack #1] to the ledge above the doorway (see Figure 4-20).


Once you have made it onto the support pillar, you can then grenade (or rocket) jump [Hack #2] up to the top of the roof (see Figure 4-21). This method will allow you to move to the middle of the roof (see Figure 4-22).
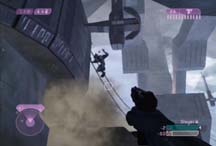
Another method for getting onto the Foundation roof is to use the fan room. Once again, you need to enlist the help of a pallet. The hardest part of this maneuver is getting the pallet into place. Once you are ready, grenade jump to the ledge below the fan and then use another grenade jump to get up to the roof (see Figures 4-23, 4-24, and 4-25).
Getting on top of Foundation using the fan room doesn’t allow you to run to the top of the roof. However, you can move around the outside of the map. In addition, you can have some fun walking in midair—an invisible wall prevents you from falling down into the map (see Figure 4-26).


Get on Top of Lockout
Get to the ultimate Lockout sniper perch.
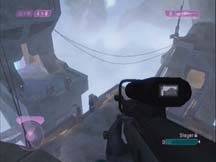
Lockout is a small map so it doesn’t offer the same sort of options as a level like Outskirts. Having said this, there are some interesting jumping tricks that can be performed on Lockout. For example, it is possible to grenade jump to the top of the Lockout sniper tower. Once above the map, you’ll be able to cover a great deal of the map with a rifle.
Drop a grenade and jump up [Hack #2] to a small ledge that sticks out from the side of the sniper tower (see Figures 4-27, 4-28, and 4-29). This small ledge supports a large aerial antenna—maybe the Forerunners enjoyed FM?

After you have made it to the aerial platform, you will need to use another grenade jump to make it to the roof of the tower (see Figures 4-30 and 4-31).

It’s a difficult jump, but once you are on top of Lockout, no one will be able to compete with your Sniper Rifle.
Get on Top of Zanzibar
Get on top of the Zanzibar base.
Although Zanzibar doesn’t offer the scenic panorama of Delta Halo [Hack #33] , there are some options for getting to the upper regions of the level. One of the interesting ones is jumping to the top of the Zanzibar base.
To perform this maneuver, run up to the top of the base stairs. You will see a ledge above the staircase. Hop onto the ledge and face away from your landing point. Now drop a sticky grenade at your feet as you jump backward. You’ll need to use a crouch jump [Hack #1] with some backward momentum (see Figure 4-32).
Once above the base, you’ll be free to move around and even jump into the mechanism (see Figure 4-33). Just remember that you’re still a good target for snipers while you’re up there.

Warthog Trampoline
Use the Warthog to blast yourself into the air.
This trick allows you to use the Warthog to toss yourself into the air. Since Bungie has fixed the multiplayer sword-flying glitch, this method is seen as the new way to gain altitude on the multiplayer maps.
The best way to do this is to have two people and at least three players in the game. One player just needs to sit in the Warthog, so no one needs to control his movement. The reason for having someone in the Warthog is that the jeep can withstand more damage if someone is actually in it.
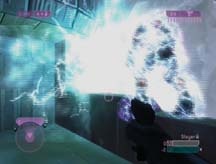
One player should jump onto the back of the Warthog—but don’t actually board the vehicle. When you are ready, have your friend throw a grenade under the Warthog’s bumper (under the gunner seat). It’s best to aim for a small area that slants downward—this causes the grenade to bounce just right (see Figure 4-34).
Right before the grenade explodes, crouch jump [Hack #1] into the air (see Figure 4-35).
The combination of the grenade explosion and the Warthog flipping will launch you high into the air (see Figure 4-36).
This is currently the best known method for high-jumping at any arbitrary point on a multiplayer map.
While practicing this maneuver, we noticed a funny side effect. Quite often, the player in the Warthog will actually land on the overturned ‘hog (see Figure 4-37).

The Easy Way to the Beaver Creek Launcher
Get the SPANKr the sneaky way.
This is one of those rare tricks that could actually help you in an Xbox Live game. Using these two techniques, you can grab the Beaver Creek Rocket Launcher (RL) without making the dangerous run up the stone ramp.
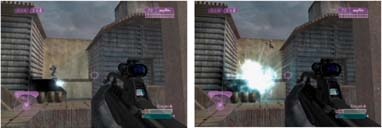
Both techniques involve throwing a precisely aimed grenade such that the explosion blows the RL to a convenient location. The first method is an easier throw. Stand on the ramp (see Figure 4-38) that leads to the lower area of the Blue base (from the creek side) and aim according to Figure 4-39.
This grenade will bounce off the cliff and land next to the RL. Once the grenade explodes, it will blow the RL into the air. The RL will land right in front of you and you can easily run out to collect it (see Figure 4-40).

The other method requires a more difficult toss. Using this technique, you can stay inside the Blue base while you throw your grenade.
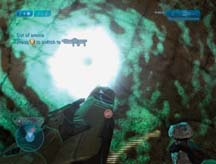
Stand on the ledge next to the Battle Rifle and look out the window above your head (see the roof window through which you can see rock in Figure 4-41). You are going to aim near the brightest star in the sky (see Figure 4-42). This will give you the magic bounce.
Once you have thrown the grenade, go up the ramp toward the main base exit (on ground level). The RL lands against the base and will almost be hidden—right next to the door. If you have not received the Version 1.1 autoupdate, you will be able to grab the RL through the wall (see Figure 4-43).
However, people who play on Xbox Live will have the update that prohibits retrieving weapons through walls. These people will have to run outside to get the launcher as it rests against the doorway (see Figure 4-44).
These two techniques could give you a significant advantage on the Beaver Creek map.