Chapter 2. Halo 2 Skulls
Hacks 6–20: Introduction
In video game terminology, Easter egg refers to a treat added by game developers. Easter eggs come in many flavors. Of all the ones that I have seen, the Halo 2 skulls are the most impressive. If it wasn’t jammed under my helmet, I’d tip my cap to Microsoft’s Bungie developers and their system of Halo 2 skulls.
The skulls are objects hidden throughout the single-player campaign. They resemble a human skull—the Halo 2 multiplayer Oddball game type uses the same object as its “ball.” The skulls are impressive for a number of reasons: they are difficult to find, each has its own unique effect, and there is a cloud of mystery surrounding them. In addition, by including the skulls, the developers added a new dimension to the single-player campaign. Instead of facing the restriction of playing out the same scenes repeatedly, Halo 2 gamers can choose to add a twist by activating one of the many skulls. For example, a hardcore Halo fan may choose to activate the Assassins skull [Hack #14] and play the entire game against cloaked enemies. Some of the skulls make the campaign easier, while others make it a great deal more difficult. Which skulls you activate is entirely up to you.
Skulls have no effect on multiplayer games—so don’t expect to be able to use the Envy skull [Hack #13] in your Slayer games. All but one of the skulls require that you activate them on the Legendary difficulty setting. They either will not spawn on the other settings or simply will not work. The exception to this rule is the Blind skull [Hack #8] which will spawn, and is useable, on any difficulty setting. For this reason, the Blind skull is one of the easiest skulls to find.
To activate most skulls, hold the X button and pick them up. However, this is not always the way it’s done. For example, the “I would have been your daddy” skull [Hack #9] will not activate until you have defeated many waves of attacking Elites.
To maintain the effect of the skull, you aren’t required to hold the skull or complete the campaign in a linear fashion. The skull’s ability will last until you turn off your Xbox. The effects carry over into new campaign games and once activated, work on all difficulties. This allows you to activate one skull and then switch levels to go for another. The effects will also carry over to other profiles, so you are able to sign in as a different user and still take advantage of the skull. If you want to play a good trick on someone, activate the Assassins skull [Hack #14] and then let him resume his campaign game. To deactivate a skull, simply restart your Xbox.
The Conspiracy of the Skulls
Most likely, curious Halo 2 gamers simply stumbled on the first few skulls. Since that time, a number of people have posted intricate theories about the skulls. One such theory is that Bungie hid information about the skulls in the official Halo 2 game guide.
If you look at the last page of the Halo 2 guide, you will see the title "INDEX.” Above each letter is a small number. People have theorized that the numbers are a clue to some special outcome if someone were to activate all of the skulls in a certain sequence. If this were the case, the E in “INDEX” would correspond to the Envy skull and a gamer should activate that one first. While this wild theory is interesting, Bungie’s weekly update (on http://www.bungie.net) has shot down the idea that something magical will happen if the skulls are activated in a certain order.
As for the number of skulls, there is evidence to suggest that the Halo community has discovered all of the skulls. Bungie is famous for hiding acronyms in interesting places. The acronym EGATFIBGBCSIMAW appears on the Halo 2 original soundtrack packaging. If you compare these letters with the names of the skulls, this apparent matching appears:
| E = Envy |
| G = Grunt Birthday Party |
| A = Assassins |
| T = Thunderstorm |
| F = Famine |
| I = I Would Have Been Your Daddy |
| B = Blind |
| G = Ghost |
| B = Black Eye |
| C = Catch |
| S = Sputnik |
| I = Iron |
| M = Mythic |
| A = Angry |
The W at the end was a mystery until some Xbox modders noticed clues embedded in some of the Halo 2 files. When Halo 2 is loaded, the game copies these temporary files onto the Xbox hard drive. For example, this is a hexadecimal snippet from the Halo 2 file mainmenu.map:
	00EA:5B5D 45 6E 76 79 00 47 72 75 6E 74 20 42 69 72 74 68 Envy.Grunt Birth
	00EA:5B6D 64 61 79 20 50 61 72 74 79 00 41 73 73 61 73 73 day Party.Assass
	00EA:5B7D 69 6E 73 00 54 68 75 6E 64 65 72 73 74 6F 72 6D ins.Thunderstorm
	00EA:5B8D 00 46 61 6D 69 6E 65 00 49 20 57 6F 75 6C 64 20 .Famine.I Would
	00EA:5B9D 48 61 76 65 20 42 65 65 6E 20 59 6F 75 72 20 44 Have Been Your D
	00EA:5BAD 61 64 64 79 00 42 6C 69 6E 64 00 47 68 6F 73 74 addy.Blind.Ghost
	00EA:5BBD 00 42 6C 61 63 6B 20 45 79 65 00 43 61 74 63 68 .Black Eye.Catch
	00EA:5BCD 00 53 70 75 74 6E 69 6B 00 49 72 6F 6E 00 4D 79 .Sputnik.Iron.My
	00EA:5BDD 74 68 69 63 00 41 6E 67 72 79 00 43 6F 77 20 42 thic.Angry.Cow B
	00EA:5BED 65 6C 6C 00 54 68 61 74 27 73 20 4A 75 73 74 2E ell.That's Just.
	00EA:5BFD 2E 2E 20 57 72 6F 6E 67 .. Wrong
On the right side, you can see the name of Halo 2 skulls. In fact, this text follows the same order of the Halo 2 soundtrack acronym. If this is the case, the “W” in the soundtrack acronym would stand for “Wrong.”
This is a snippet of text from the file cache002.map:
	Envy.Grunt Birthday Party.Assassins.Thunderstorm.Famine.I Would Have Been
	Your Daddy.Blind.Ghost.Black Eye.Catch.Sputnik.Ice Cream.Mythic.Angry.
	Whuppopotamus.ASSASSINS.JUGGERNAUT.NOSFERATU.SAY WHAT?.HUDLESS.DISEMBODIED
	SOUL.MAKEOVER.Watch your back, the Covenant are having a sale on Active
	Camo..Brace yourself for baddies with overshields and boomsticks..Sure
	you're tough, but now you must suck to survive..Be poised if other emotional
	scenes tend to errupt..Go commando! Clear your screen of pesky status
	indicators..Experience the miserable existence of the Disembodied Soul..
	Who says the Masterchief always has to wear green?.
This text seems to list the Halo 2 skulls, but some of the references remain a mystery. Is the Unnamed skull [Hack #6] actually the “Whuppopotamus” skull? What does the reference to “Ice Cream” mean? Could this be an undiscovered skull?
The Fastest Way to Collect All of the Skulls
Remember that you need to be playing on the Legendary setting to activate almost all of the skulls. This means that you must work your way through the skull’s level on the most difficult setting. You cannot advance to the correct checkpoint and then switch to Legendary mode—Halo 2 does not offer this option. However, some things will speed up your skull retrieval adventures:
To get to the right level, play through the campaign on any difficulty setting. For example, you could play through the whole campaign on Easy, and then go back and start the level that contains the skull that you want to find. Using an Xbox memory unit, you can then make numerous copies of this profile—just copy it to the memory unit, rename it on the Xbox, and then copy the original back to the Xbox.
Before you try for the other skulls, activate the Envy skull [Hack #13] or the Grunt Birthday Party skull [Hack #11] . Having these skulls active gives you a tremendous advantage as you try to activate your next skull.
Play in co-op mode. As most Halo players have found, two can get through the campaign much faster than one.
If you know that you’ll be going for a number of skulls, it will be worth your time to save a profile at the point where you pick up one of the helpful skulls (e.g., Envy skull [Hack #13] or the Grunt Birthday Party skull [Hack #11] ). Since I knew that I would be going for all the skulls, I took the time to create a special profile called Envy. I played this profile until I reached the Envy skull. Once at the skull’s spawn spot, I saved the game. Now I can quickly pick up the skull anytime I want. It took some effort upfront, but it saved me considerable time as I went after all of the skulls. This also allows me to quickly use the Infinite AC hack [Hack #42] .
If you have a modded Xbox, you can search the Internet for game saves already set up to get the skulls.
Finding the Skulls
To help you with your search for the skulls, I have gathered detailed information from the Halo community. This data generally includes the campaign level, the mission objective, screenshots, and a description of the spawn location. Using this information, you should be able to find the right section of the level. Once there, the screenshots will help you figure out exactly where the skull spawns. If this information isn’t sufficient, or you want to watch for updates on the saga of the Halo 2 skulls, refer to http://www.highimpacthalo.org/showskull.php, which includes links to videos that show the location of each skull.
Many skulls require that you use crouch jumps [Hack #1] and some require that you use a grenade jump [Hack #2] . To perform a crouch jump, you simply crouch at the apex of a regular jump. This lifts your feet and allows you to jump a little bit higher than normal. To perform a grenade jump, you need to jump up just as a grenade explodes beneath you. The explosion will take you higher than normal—but it will also lower your shields. For more information about Halo jumping techniques, refer to Chapter 1.
Find Your First Skull
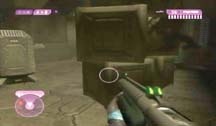
The Unnamed skull tells your enemies that you’re looking for trouble.
This skull requires that you advance through the Armory level until you read the mission objective: “Follow Sgt. Johnson to the tramcar.” This is the only known skull that does not cause any text to appear onscreen when you pick it up. Make sure that you are playing on the Legendary setting when you search for this Easter egg.
This is the easiest skull to retrieve—if you’re looking for a “starter skull,” this is the one to choose. Although you must be on the Legendary setting for this skull to spawn, you will not need to engage a single enemy to find it.
Since no notification text appears, this skull is referred to as the "Unnamed skull.” However, there is a good chance that this skull might actually be called the “Cowbell skull.” Since the effect of the Unnamed skull is that it makes enemies more aware of your position, some argue that this is like having a cowbell around your neck.
At the beginning of the Armory level, you are required to test the recharge function of your shields. After this test, Sgt. Johnson arrives on an elevator. Wait in the room until Sgt. Johnson starts berating you, telling you to get into the elevator. You must wait for him to say, “Would it help if I said please?” If you enter the elevator before he says this phrase, the skull will not spawn.
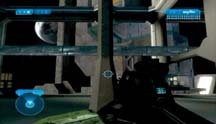
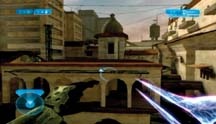
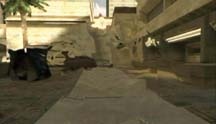
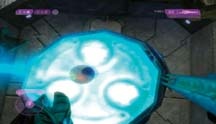
It will take a while for Sgt. Johnson to say this, so be patient. First, he will go on about how you’re going to be late and how you need to get your “shiny green posterior” into the elevator. Once he says “please,” get in the elevator and go down to the tram. Board the tram and face toward the inside of the building—the side with the open atriums. Move right up against the tram’s glass doors and hold down the X button. As the tram moves along, you will pick up the skull. It rests on a stack of green crates that are located midway along the ride (see Figure 2-1).
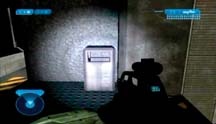
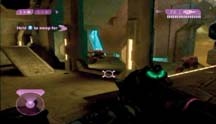
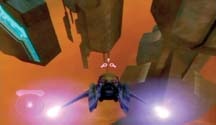
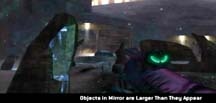
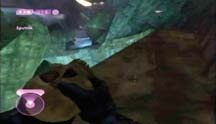
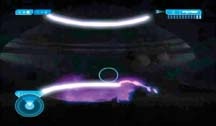
After you collect the skull, the tram will continue and you can use the skull as a clubbing weapon (see Figures 2-2 and 2-3).


Fight the Elite of the Elites
Activate the Thunderstorm skull to transform all Covenant to Special Operations troops.
This skull is located on the Cairo Station level. You will need to play on Legendary until you reach the mission objective “Find the Covenant bomb.” When you activate the skull, the notification "Thunderstorm” will appear.
Once you activate this Easter egg, all Covenant troops are Special Operations troops (Spec. Ops.). If you like the game play of the campaign but want it to be harder, then this is a good choice. The skull doesn’t change the abilities of you or your enemies; it just pits you against the toughest of the Covenant troops.
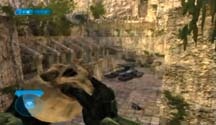
After you clear the second room of Covenant boarders, you will reach the “priority shift” portion of the Cairo Station level. In this stage, you will go to an armory where you have to fight a couple of Elites. The next room is “Commons B.01”—the name of the room appears in large letters near the ceiling. The skull hides in an upper corner of this room.
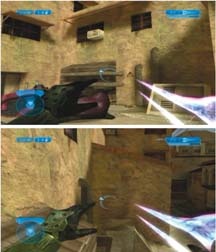
Once in the room, clear out all of the enemies on the ground floor and the Grunts that are operating the plasma turret on the mezzanine. After you have secured the room, look outside—literally out into space. You should see some diagonal supports holding up the dual tram tracks. You’ll also note that the diagonal supports in the center are close together. One of those supports goes down the side of the wall beside one of the glass railings. You can jump on the glass railing post and then jump onto the diagonal railing (see Figure 2-4; the skull is in the right corner). From the support beam, jump to the tram track and follow it all the way down toward the door that you used to enter the room.
You should see a landing with a trash can; the skull is in this can (see Figure 2-5). Simply walk up to the can and hold X to pick up the skull. When you activate the skull, you will hear the sound of a thunderstorm. Figure 2-6 shows you what it looks like from where you grab the skull.

Eliminate the HUD
The Blind skull will clean up your view and allow you to get great screenshots.
The Blind skull has a few advantages over the other skulls. For example, you can activate it on any difficulty setting, and it’s right at the beginning of the Outskirts level. When you pick up this skull, the message “Blind” will appear onscreen and your Heads Up Display (HUD) will disappear.
This skull is Bungie’s non-modded gift to Halo 2 screenshots (the modded version is Aztec’s Spectator Mod [Hack #87] ). Instead of the busy look of the HUD, this skull allows you to hide all of that information. The downside of the clean look is that you won’t have the benefit of information such as your reticle or your motion detector. In fact, you won’t even know how much ammo you have or how many grenades you are holding. Although it makes playing the game harder, the Blind skull is a real treat for those of us who take Halo screenshots (see Figure 2-7).
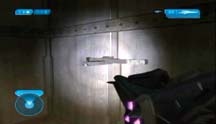
At the beginning of the Outskirts level, your vision is blurry but clears up shortly. When you are able to see clearly, you will notice a flashing light coming from a hallway in front of you. Enter the hallway and look up.

Ahead of you, there will be the flashing light fixture (see Figure 2-8). Jump up to the light fixture and then turn left. You will now be facing toward the courtyard where the Covenant troops are waiting. From here, you are able to crouch jump [Hack #1] to the roof.
Once on the roof, turn left toward a long, dark passage (see Figure 2-9). At the end of the passage, there are a few grenades, some ammo boxes, and the Blind skull. As soon as you’ve activated it, your HUD disappears, giving you a clean look but taking away a lot of useful information.


Find the Most Difficult Skull.
The “I Would Have Been Your Daddy” skull is the most difficult Easter egg to activate.
This skull alters the Marines’ dialogue. It’s on the Outskirts level and requires that you play in Legendary mode. The mission objective to watch for is entitled “Find the marines from second downed Pelican.” When you complete the activation for this skull, the notification “I would have been your daddy” appears onscreen.
Some of these interesting audio tidbits have been recorded. For example, one of the marines has been recorded saying:
As long as we’re standing here, I may as well write my old lady a letter. Cortana? Do you take dictation? Take this down:
Dear Mary, I miss you so much, stop. Will be home soon? stop. How is the dog? stop. Have you learned to cook yet? stop. Love Sergeant. P.S. I’ve met someone. Will be home soon for divorce. Bye bye. P.S. Do you think I could take the dog? Maybe not…think about it…write back.
Got that, Cortana?
Finding the Skull
The “I would have been your daddy” (IWHBYD) skull is in a room on a balcony, so you will need to get onto the rooftops to access the secret area. The room contains a Sniper Rifle and Sniper ammo, and if you’re lucky (see “Spawning the Skull,” later in this hack), it will contain the skull.
At the end of Sniper Alley, there is a way to get up onto the rooftops (see Figure 2-10). Use this structure to crouch jump [Hack #1] onto a low orange roof.
Once on this roof, you will be able to crouch jump over to the other side of Sniper Alley. It looks like an impossible jump, but the Master Chief will make it across (see Figure 2-11).
When you have made it to the other side of Sniper Alley, run across the roof and head to the right. Most likely, you will need to take out a sniper hiding on the left side—just below your level. Jump across a couple of rooftops and turn to your left. You will see a balcony with a laundry line (see Figure 2-12). Jump across and you will find the room that contains the IWHBYD skull. Even if the skull is not there, you can tell that you’re in the right place because there will be posters with a skull and the numbers one and seven.

Spawning the Skull
The IWHBYD skull is still clouded in mystery. In fact, it seems to be the most hotly discussed and disputed Halo 2 Easter egg. The problem is that no one (as of the time of writing) has discovered the exact spawn algorithm. There are many theories, but for most people, whether or not the skull appears is still a matter of luck. Without knowing the exact steps involved, getting this skull is simply a matter of trying until you get it to work. Finding the spawn spot is actually quite straightforward—getting the skull to spawn is not. At the time of writing, a video [Hack #77] is available that demonstrates a method that is often successful (http://halo.bungie.org/oldnews.html?item=12071).
Halo 2 hackers have claimed that hex files show three triggers for the IWHBYD skull. Most likely, two of these are Sgt. Johnson boarding the pelican and the invisible Elites appearing in Sniper Alley. However, the third trigger remains a mystery. Bungie has suggested that there is a clue in the room where the skull spawns. People have suggested that the numbers one and seven on the posters in the skull’s room represent the seven waves of Elites that attack anyone who picks up the skull. However, user E-Slayer posted (in the http://www.highimpacthalo.com forum) another theory about these numbers. He suggests that they indicate a checkpoint that occurs 17 seconds after Sgt. Johnson leaves on the Pelican. Based on this theory (and a post by user Twelve Large to the same forums), here is a complete guide to spawning the skull:
Begin the level by grabbing Sgt. Johnson’s Sniper Rifle. Next, jump up to the roof, as if you were going to get the Blind skull [Hack #8] . However, instead of running toward the skull, head in the other direction (the direction of the hidden Plasma Sword [Hack #27] ). To do this, jump across a small gap and then grenade jump [Hack #2] to the next level. Continue to run forward and jump over the gap—you’ll come to a small hump with a stretched texture. Jump on this ledge, and then jump onto the roof on your left.
This roof overlooks the area where the Pelican drops off marines. Turn 90 degrees to your left, then run and jump to the smaller building. Next, make your way across the scaffold. You’ll probably have to grenade jump over it. At this point, you should jump down to the broken highway. You don’t need to grenade jump off it, just drop down onto the large ramp. When you get on the highway, you should take out the Jackal armed with a Beam Rifle. From the top of the ramp, it’s easy to pick off the Grunt and Elite on the street. You’re so far away that they won’t even shoot back.
After you have tagged those targets, drop off the ramp, and then turn left and head for Sniper Alley. When you arrive, there won’t be any enemies, but you need to pass through this area to trigger a checkpoint. After this checkpoint, head toward the Pelican landing site, but turn around as soon as you reach the checkpoint. This is the theoretical 17-second checkpoint. If you get to the skull room within 17 seconds of this checkpoint, the skull will spawn.
Once you get the checkpoint, turn around and head to the skull. There will be one jackal patrolling Sniper Alley, so take him out.
Normally, the next checkpoint will activate, and the IWHBYD skull will spawn. However, if you take a few shots at the Elites below the skull room, the game won’t give you a checkpoint, but the skull will still spawn. This way, if you die during the waves of Elites that appear after you pick up the skull, you will be back on the red roof, and you can just go grab the skull again. If it spawned the first time and you didn’t get the checkpoint, it will always be there.
Activating the Skull
An interesting issue with the IWHBYD skull is that finding it isn’t enough to complete the activation. To activate the skull, you must survive an onslaught of angry Elites. After you pick up the skull, you will be teleported to the ground level. Not only will you have to survive seven waves of Spec. Ops. Elites, but you will also lose the weapons that you were holding when you picked up the skull. When you appear on the ground, you will only have a Plasma Pistol. Each wave of Elites has more soldiers than the previous one. The first wave has one Elite, the second has two, etc. To give yourself an edge in the battle, you may want to use the Infinite AC hack [Hack #42] before you try for the IWHBYD skull.
Defeating the last Elite will activate the skull. If the Elites take you down, and your checkpoint no longer spawns the skull, move back a checkpoint [Hack #31] so that you can try again. The skull should spawn, and you can try the fight again.
People have come up with a number of ways to deal with the challenging skull activation fight. One option is to use the crates on the ground to build a barricade. This will slow down the advancing Elites. However, you can also hop up onto the balcony with a Battle Rifle and Plasma Pistol. This combo will allow you to take out the Elites from a safe distance.
According to some information that Cody Miller posted in a forum at http://bungie.org, the Elites spawn in regular positions and they assume you are in the balcony facing the street below. An Elite with the Battle Rifle will spawn on the ledge to your right, a Plasma Sword Elite on the left, and a Beam Rifle Elite on the street below you on the right. Make sure that you take out the Elite with the Beam Rifle as soon as you can; he’s a monster. These three are the most important enemies to watch. After a wave spawns, check the right side first for a Battle Rifle Elite, then the left side for the Plasma Sword. After that, look for the Elite with the Beam Rifle.
Having a fully charged plasma pistol is essential. When there is only one Elite remaining, find a way to drop your Battle Rifle on the balcony (either by swapping it with the Plasma Sword up there, or by using dual wielding to bring another weapon to the balcony). Next, run along the balcony away from the street. You’ll be teleported down with a fully charged plasma pistol, but you’ll lose the other weapon. Once this happens, quickly get back onto the balcony and retrieve your Battle Rifle. Repeat this procedure for each of the seven waves.
It’s always fun to smack the very last Elite with your Battle Rifle. Who’s your daddy now?
Receive the Gift of Grenades
The Catch skull encourages your enemies to throw more grenades.
If you’re looking for a relatively modest way to make the campaign more difficult, try the Catch skull. It isn’t as insanely difficult as trying to play with the Assassins skull [Hack #14] active, and it doesn’t interfere with your display like the Blind skull [Hack #8] . This skull simply allows your (non-Flood) enemies to throw more grenades at you.
This skull requires that you play the Metropolis level—on Legendary—until you reach the mission objective entitled “Regroup with Marine forces in the city-center.” The notification text for this skull is “Catch.”
The Catch skull is located in a section of Metropolis called “This Town Ain’t Big Enough for Both of Us.” To get to this stage, you will need to take the Scorpion across a large bridge and then make your way through an underground highway. Near the end of the underground section, you will come to what appears to be a dead end for the Scorpion. Some marines will join you in a Warthog and one will offer you a shotgun. Despite how it may appear, it is possible to drive the Scorpion around the barrier. Driving up and around the barrier allows a player to keep the Scorpion for a little bit longer. This makes the next section much easier to complete.
After you exit from the underground highway, you come to a large open-air room filled with Jackal snipers, Grunts, and some Elites. Clear this area so that you aren’t disturbed while retrieving the Catch skull. As usual, having the Envy skull [Hack #13] will help you progress faster than normal.
Once you have defeated the enemy, move around the left side of the room and then onto the center platform (see Figure 2-13). You will see a large semicircular beam going from the ground to the top of two matching towers. Do a grenade jump [Hack #2] at the bottom of this beam and walk all the way to the top.

Next, jump over to the ledge on the left side. Continue around the left side of the ledge and you will find the Catch skull’s spawn spot (see Figure 2-14). Be careful not to fall down from this platform; you will not survive the fall. Now get ready to run like you’ve never run before; a shower of grenades awaits you around every corner!

Throw a Grunt Birthday Party
Turn every headshot into an explosion with the Grunt Birthday Party skull.
You will find this skull on The Arbiter level. When you reach the mission objective “Pursue the heretic leader,” you will know that you are close to the skull. Once activated, the skull will cause the text “Grunt Birthday Party” to appear on your screen.
This is a fun skull—and useful. When the Grunt Birthday Party skull is active, a headshot will cause your foes to explode. Along with the Envy skull [Hack #13] , I like to have this one whenever I need to move quickly through a level. I’ve used this skull so often that I’ve almost memorized the script for the level: “We are the arm of the prophets, Arbiter, and you are the blade…”
The headshot effect will only work for weapons that feature a headshot bonus (i.e., Magnum, Battle Rifle, Covenant Carbine, Sniper Rifle, and the Covenant Beam Rifle). This sounds like a fantastic advantage but headshots are already fatal. In addition, the headshot bonus does not work through shields, so you’ll still have to fight to make a shielded attacker vulnerable. To make the most of this skull, you need to score headshots while enemies are close to one another. Instead of getting just one frag, you may be able to take out a group.
When active on Master Chief levels, the skull’s power also applies to any Marines who are fighting on your side. This means that there are plenty of explosions happening during battles; you’ll have to be careful how close you get to any targets.
Midway through The Arbiter level, you will need to grab a Banshee from an outdoor platform. In Figure 2-15, the Banshees are on the other side of the large windows.
As soon as you take off, fly down toward the far side of the large structure. Your path will take you down and to the right (see Figure 2-16).
There is enough space to land under the large support structures. When you investigate the far support, you should be able to see the glowing methane tanks of a group of Grunts. After you land, it will be clear that—in the darkness—there is actually a circle of dancing Grunts. In the middle of the circle is the Grunt Birthday Party skull (see Figure 2-17). Pick it up and let the party begin!

Activate the Ammunition Handicap
Play the campaign with less ammunition.
To activate this skull, you will need to play the Oracle level on Legendary difficulty until you reach the mission objective “Escape the Infested labs.” The notification text for this skull is "Famine.”
The spawn spot for this skull boasts the most disturbing imagery in Halo 2. Like a scene from CSI, there are mutilated bodies all over the place.
The Famine skull is relatively easy to get. However, it becomes much easier if you first activate the Grunt Birthday Party skull [Hack #11] . The Flood combat forms do not have shields, so a single Carbine headshot will cause them to explode. You just need to find the Flood equivalent of “head.”
Near the beginning of the Oracle level, you will ride a descending platform. After reaching the bottom, you will come to a hallway where you’ll see a handful of dead bodies. Continue into the next room, and you will find yourself on the second floor of a chamber that has many large windows. From this vantage point, you can look across at the far portion of the room’s upper level (see Figure 2-18). If you look down, you will see two platforms in the middle of the room. Four tall posts surround each platform.

If you have not yet cleared the room, turn on your Active Camouflage and then leap to the center platform. From the platform, jump up onto one of the posts on the far side of the room (see Figure 2-19). Once you are standing on the post, you can hop to the column between the windows. Shoot out one of the windows and then jump up to the far platform.

Once you have jumped to the platform on the other side of the room, turn to your left. A hallway mirrors the one that you used to enter the area. Walk all the way to the end of the hallway and you’ll find four Flood Elites writhing on the floor. The Famine skull is in the middle of these poor souls (see Figure 2-20). Once you activate this skull, all the weapons you find will have less ammunition, so aim carefully!

Camouflage the Master Chief
Give the Master Chief access to the Arbiter’s Active Camouflage.
In terms of actually going through Campaign mode, this is probably the most useful skull. It gives you the ability to play all of the levels with the Arbiter’s Active Camouflage (AC) ability. AC is a huge advantage because it allows you to sneak up on enemies from behind. Instead of wasting ammo, you can simply melee your targets. In addition, getting the Envy skull is the first step toward Infinite AC [Hack #42] .
To activate this skull, you must play the Delta Halo level—on Legendary— until you reach the mission objective entitled “Push through the Covenant-held ruins.” When you pick up this skull, the notification text “Envy” will appear.
The skull is quite far into the Delta Halo level, but the good news is that you can get through most of the required area using the Scorpion main battle tank. In addition, if you use the Grunt Birthday Party skull [Hack #11] or the Getting Above Delta Halo hack [Hack #33] , you will find the first section much easier to complete.
After you drive the Scorpion tank through a maze of caves, you will come to the last area accessible to this large tank—you’ll need to proceed on foot from there. That open area has a large central structure surrounded by columns (see Figures 2-21 and 2-23).

To get to the skull, go up the ramp on the left side of the area. Once you’re on this ramp, continue up until you are on the landing where there are some plasma turrets. Follow this landing all the way to the far side and you’ll see a large stone that is blocking a small opening in the wall (see Figure 2-22). Jump on top of the stone, and jump again to get onto a thin ledge. From this small ledge, turn left and crouch jump [Hack #1] up to the top of the wall. This jump will take you over a tree trunk and bring you to the side of the cliff.
Once you’re on this platform, go to where the wall meets the hillside. Jump onto the dirt, and follow the stone wall all the way to the top. When you’re on the top of this wall, you can look down toward the center and you might see two cloaked Elites facing one another—the Envy skull is between them. Note that the skull and the Elites are often invisible until you jump down to the skull’s resting place (see Figure 2-23). Activate this skull and prepare to fade into the woodwork.

Give All Enemies Active Camouflage
If Legendary is too easy for you, use the Assassins skull to activate the most challenging way to play Halo 2.
This skull is located in the “Pass through the submerged structures” portion of the Regret level. To activate this skull, you will need to play through the level on the Legendary setting. Once activated, the skull will cause the notification text "Assassins” to appear. The effect of the Assassins skull is that all enemies have permanent Active Camouflage (see Figure 2-24; note that the Blind skull [Hack #8] is also active; therefore, there is no visible HUD).
This skull is for those Halo 2 gamers out there who feel that Legendary mode is just too easy. Personally, I can’t imagine anything worse than invisible sniper Jackals.
This hack gets a medium rating because you will need to play through a lot of the level to get to the skull. In addition, this skull requires that you defeat a considerable number of Jackal snipers. For this reason, I suggest that you first retrieve the Envy skull [Hack #13] . When I first went for this skull, I had Grunt Birthday Party skull [Hack #11] active. I thought that it would help me get through the Covenant in no time. However, there are quite a few Jackal snipers on this level. The problem with snipers is not killing them; they are relatively weak. The key is to see them before they see you. For this reason, Active Camouflage is invaluable on the Regret level.
The only issue with using the Envy skull is that it will make finding a hidden ledge much more difficult, since that skull replaces your flashlight with the Active Camouflage. You may want to use Envy to get to a checkpoint near the right room and then restart your Xbox. After you restart the box, the Envy skull will no longer be active and you will have your flashlight back.
Move through the Regret level until you find the gondola and defeat the Hunters (see Figure 2-25). Immediately after the gondola ride, there is a building with two turrets on it.

When you first enter the building, you are in a small dark room with a slab of stone in the middle (see Figure 2-26).
Jump onto the stone and turn to face the light fixture on your left (see Figure 2-27). Jump onto the light fixture. From the light fixture, you need to jump to a small ledge.

The ledge is tough to see, so use your flashlight (see Figure 2-28). Even with the light, it may not be immediately visible. This is why it’s easier to find the ledge if you don’t have the Envy skull active. Without your flashlight, you will have considerable trouble seeing anything. Of course, you could just ump in all four directions and hope for the best.

The ledge leads to an opening that allows you to get up onto the roof of the structure. Once outside, you will be near the two turrets. From this area, use jumps and crouch jumps [Hack #1] to follow the right perimeter of the building. You won’t need to use any grenades if you use a small lip on the right side of the turret level. When you have gone as far as you can go, look down the side of the building. Just below you, there will be a small grassy area. If you’re in the right place, you will see two cloaked Elites dancing on either side of the Assassins skull (see Figure 2-29). Activate the skull, and get ready for a world of hurt that you won’t even see coming!
Make All Enemies Tougher
Toughen up the enemy with this skull.
The Mythic skull activation requires that you play the Sacred Icon level on Legendary difficulty. When you reach the mission objective “Make your way through the Flood-infested wall,” you will be close to the skull. Not surprisingly, the notification for this skull is "Mythic.” When you activate this skull, your weapons will inflict less damage.
This skull doesn’t involve any jumping tricks or complicated triggers—getting through the level is your only concern.
Moving through the Sacred Icon level, you will come to a series of partially enclosed rooms (see Figure 2-30). There is a Forerunner Enforcer robot in front of each one.
Go past this area and down the piston shaft. When you reach the bottom, you will find yourself in a dark and dank Flood-infested area. There is a tall stack of boxes as you enter the room (see Figure 2-31). Use the boxes to jump to a ledge that runs along the side of the room.
On the ledge’s right side, there are some openings. Move forward until you get to the third alcove; the skull is floating inside (see Figure 2-32). Grab the skull and pray for more ammo!

Change the Laws of Physics
Change the physics of Halo 2 with the most dramatic Easter egg in the game.
The Sputnik skull hides within the Quarantine Zone level. You don’t have to worry about looking for the correct mission objective—it is the first one for the level: “Push through the Quarantine-Zone toward the Library.” To activate this skull, you will have to play the level on the Legendary difficulty setting. When activated, the notification text "Sputnik” appears onscreen.
This one is fun—probably the most humorous of the Easter eggs. The skull changes the physics of the game by lowering the mass of some objects. Consequently, they fly much farther when hit or propelled by an explosion. This is extremely useful when it comes to grenade jumping [Hack #2] —you can get much more air with the Sputnik skull active. Of course, if you just want to see some dramatic explosions, then this skull is for you (see Figure 2-33).

At the start of Quarantine Zone (see Figure 2-34), turn directly around, and you should see a tunnel. Finding this narrow tunnel is the key to finding the path to the skull. Head into the tunnel and go straight through to the other side.
Once you have gone through the tunnel, make your way straight across the open area, and you’ll come across a broken pipe on your right. Straight in front of you, you should see a small ledge running across the wall, above the green pit. Carefully get onto that small ledge and walk all the way to the end of the ledge to find the Sputnik skull (see Figures 2-35 and 2-36). Activate the skull, and watch the pieces of your foes fly a little higher.

Make the Grunts a Little Tougher
Give Grunts a fair chance.
To find this Easter egg, play the Gravemind level until you reach the mission objective “Follow the Prophet of Truth to the far tower.” Make sure that you play the level on the Legendary setting. Once you activate this skull, the text "Angry” will appear on screen.
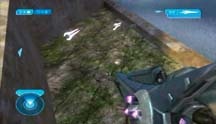
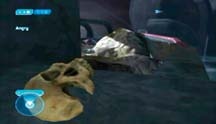
Fight all the way through the Covenant city until you reach an outdoor area. As soon as you are outside, turn right. You will see some Covenant crates next to a rock ledge. Get on top of the crates and then jump to the rock ledge (see Figure 2-37).
Walk up the rocky hill—to your right you will see a large red girder. Jump onto the girder and follow it back toward the complex (see Figures 2-38 and 2-39).
When you get near the end of this dark ledge, you will run into an invisible grunt wielding a Fuel Rod Cannon. Kill the grunt and continue to the end of the girder. Once there, you will see the Angry skull floating above a small gravity lift.


The Angry skull causes Grunts to fire faster than normal. However, the Angry skull does have a positive feature; it is also the only known skull that can be cycled through. This means that you are able to use the skull as a third weapon. It may just be a club, but it’s fun (see Figure 2-40).

Teach Your Enemies to Take a Punch
Give the Covenant an iron jaw with Ghost mode.
You will find the Ghost skull within the Uprising level. It is located within the “Raze the Brute encampment” objective. The notification text of this skull is “Ghost.” The effect of this egg is that enemies and allies are no longer stunned by melee attacks—or by being shot. This is in line with the guideline that the positive skulls have obvious effects, whereas the negative skulls often have subtle effects.
You will need to play through a significant portion of the level to reach this skull—and yes, there will be Jackal snipers. Furthermore, Uprising is an Arbiter level so you will not have the option of using the Infinite AC hack [Hack #42] .
While working your way through a picturesque canyon, you will come to the Brute strongholds. After you defeat some Jackal snipers and Brutes, you will enter a series of rooms that the Brutes excavated out of the mountain. The skull spawns in an L-shaped room that is right after the armory.
To reach the skull, which spawns on top of the light fixture (see Figure 2-41), you can use a few different techniques, such as a grenade jump, arranging objects to climb on, or grabbing it from below.
If you would like to try a straight grenade jump [Hack #2] , you can, but there are ways to make it easier. Why not use some of the many objects in the armory to aid your jump (e.g., the blue Carbine holder)? Moving these objects around with explosives is quick, but be sure to stand back if you fire in the armory—things in there tend to explode. I like to use the Rocket Launcher to whack the blue Carbine holder on the left side of the room out the door. By hitting it, you can prevent it from falling over—using its full height makes for an easier grenade jump (see Figure 2-42).

Another option is to grenade jump off a jacked Ghost. If you don’t have a Ghost, continue past the Wraiths and some Ghost riders will happily join you.
Once you grenade jump up to the light fixture, you will find the skull lying in the dark (see Figures 2-43 and 2-44).

Although the grenade jumping method will work, there is another way to get at the Ghost skull. Instead of grenade jumping, walk underneath the skull and look to your left or right—you will see a short ledge on the wall.

Jump on this, and then you can jump toward the skull platform. If you look at the platform, and hold X, you will grab the skull as you jump underneath it. If you’re not a fan of grenade jumping, this option could be the one for you.
One final piece of advice: the jump for this skull is a little tricky, and you are likely to open the door of the room accidentally. Therefore, before you try the jump, open the door and blow up the two snipers waiting on the other side. If you ignore them, they will probably tag you if you accidentally open the door (see Figure 2-45).

After you’ve activated the skull, watch out—you will no longer have those brief seconds where you can take advantage of a stunned enemy.
Make Co-op Harder
Increase the difficulty of co-op games.
Play the High Charity level on Legendary to find this skull. You’ll be close when you reach the mission objective “Find a way onto the Forerunner Ship.” When you pick up this skull, the text "Iron” will appear. The effect of this skull is that co-op mode becomes more difficult. If either player dies, the game restarts at your last checkpoint instead of continuing as it normally would.
Many Halo gamers find co-operative mode too easy. For example, if you get into a tough situation, you can simply stick your buddy with a Plasma Grenade and have him walk up to the toughest of foes—as long as one of you survives, you will not lose any ground. The Iron skull is one way to balance the co-op mode so that it is a bit more like single player mode.
This skull is deep within the level. You will need to advance along some horizontal gravity slides and go up two long vertical gravity lifts (see Figure 2-46).
When you enter the second tall gravity lift, look up toward the top of the lift; you will quickly approach the Iron skull (see Figure 2-47).

To grab hold of it, make sure that you start holding X before you actually pass it (see Figures 2-48 and 2-49). Activate the skull, and steel yourself for a more challenging game.


Add a Twist to Your Shields
To activate your shield recharge, you must melee your enemies.
To find the interesting Black Eye skull, play the Great Journey level on Legendary difficulty. The mission objective to watch for is entitled “Enter the Control Room, and deal with Tartarus”—it’s the final checkpoint in the game. When this Skull is active, your shield will not charge normally. To charge your shields you must melee an enemy. If you melee enough targets, you can charge your shields into the overcharge range. You will know that the skull is active when you see the notification text "Black Eye.”
In some situations, this skull is reasonably manageable to use. However, in other cases, it’s extremely difficult to recharge your shields. For example, on The Great Journey level, a large number of your opponents are Brutes. Unless you’re using active camouflage (AC), it’s tough to melee a Brute and survive the experience.
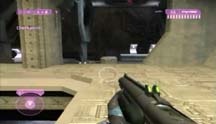
To find the skull, play The Great Journey level. Eventually, you have to escort Sgt. Johnson, who is in a Scarab. Follow him until you see a huge compound in front of you (see Figure 2-50). This structure houses the control room. At this point, you can let the Scarab worry about the Wraiths; focus your attention on the Banshees.

This is also the point where Sgt. Johnson will use the Scarab to destroy the main door. Directly above the demolished door, there is a long angled beam. Land your Banshee on this beam and walk to the top (see Figure 2-51). Once at the apex, look down and to your left; you will see a circular angled wall. Jump onto this wall and walk as high as possible. You can follow along the right side of this area.

Next, you need to jump over a small beam in front of you (see Figure 2-52). Continue walking straight until you come to a grassy area. Once there, walk up the grassy hill until you can jump onto the angled support for the tower.

Jump onto the support and walk up as far as you can (see Figure 2-53). It’s a steep climb, so you may want to speed things up by jumping while you walk. At the first landing, you will see the Black Eye skull. It will be resting on a glowing white panel in the floor. Activate this skull and let the clubbing commence (see Figure 2-54).

