Chapter 5. Halo 2 Glitches
Hacks 40–49: Introduction
The Halo 2 engine is a remarkably complex system. The physics engine is intricate, the environments are enormous, and the artificial intelligence (AI) is advanced. A system such as this is bound to run into problems; it’s simply not possible to test every scenario before releasing the game.
There is an excellent online article about the scale of the Halo 1 level The Pillar of Autumn (http://nikon.bungie.org/misc/sloftus_poaconundrum/). A Halo fan painstakingly explores whether the level actually fits into the physical confines of the fictional vessel (his conclusion is that it doesn’t). This sort of thing makes it obvious that Bungie is under considerable pressure to produce games that can withstand the investigation of the community microscope. This, it seems, is part of the price of the success of Halo.
I think it’s great that the community is expecting quality work from game developers. Halo clearly set a new bar when it comes to the quality of the engine. Speaking as a fan, I am not offended by the fact that the level designers deviated from the technical specs of the Pillar of Autumn; just like fiction writers, I believe that they should have the artistic liberty to mold their virtual world to suit their needs. I certainly didn’t know that anything was awry when I played Halo, so I’m fine with the developers’ choices. After all, they are the experts.
Having said that, it’s also an awful lot of fun to mess around with glitches in the game. This chapter is all about finding and experimenting with problems that the Halo community has discovered.
Fly Like a Bird
Soar high in the air with the single player sword-flying trick.
Dark Helmet’s "Learning to Fly” video (http://files.mythica.org/halo/darkhelmet/learningtofly.wmv) is one of the most popular Halo 2 tutorial videos ever produced. This video shows a tutorial of single-player sword flying. If you want to see a video before you try this hack, I suggest that you watch it online.
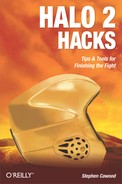
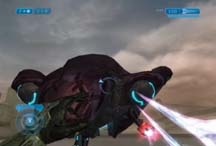
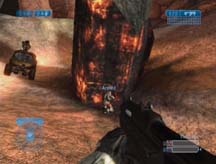
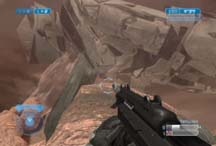
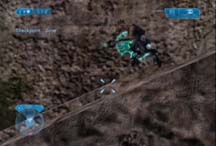
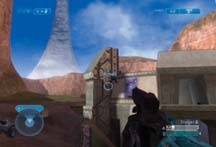
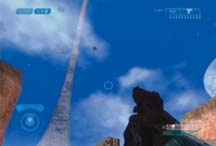
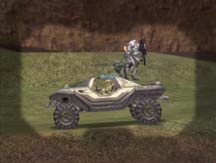
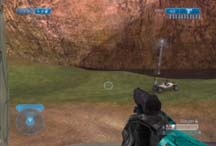
To try out the glitch for yourself, start a campaign game on the Outskirts level. First, grab a Plasma Sword. The easiest way to get a sword is to retrieve the hidden sword on Outskirts [Hack #27] . Once you have a blade, play through the game until you reach the beach and find a Warthog. Park the Warthog where the Phantom lands to drop Ghosts or Wraiths (see Figure 5-1). Get in the passenger seat and point your reticle at the Phantom’s gun (see Figure 5-2).

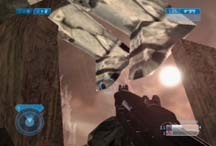
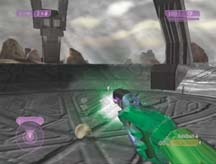
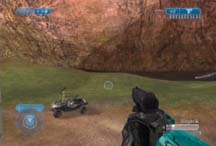
Remember that when you’re in the passenger seat, you won’t be able to look in all directions; you’ll have to plan your position carefully. When the reticle turns red, pull the trigger and then exit the vehicle (see Figure 5-3).
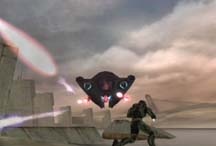
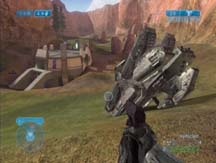
Since you were locked on to the Phantom, you will be hurled into the air. Once you’re in the air, you’ll be able to fly (see Figure 5-4). You can control your direction by looking the way that you want to go—just don’t look too high or you will fall.

Note that you have to be careful how close you fly to the Phantom. If you’re too close, it will shoot at you (see Figure 5-5).
If you overshoot the Phantom when exiting the ‘hog, try to exit sooner. For best results, exit the ‘hog while looking across at the driver’s seat and as high as possible.
If you have a modded Xbox, there is an easier way to get airborne [Hack #87] .
Create a Giant Phantom MC
Use this glitch to create an enormous Master Chief corpse.
This is an amazing glitch. By forcing a player through the Burial Mounds fiery pillar, you are able to create a monstrous incarnation of a Master Chief (MC) corpse.
To reproduce this behavior, you will need to set up a multiplayer game on Burial Mounds and add the Covenant Wraith tank as the heavy vehicle. (You may want to make a custom game variant.) Enter the game with at least two players, one of whom must be a Spartan.
Position the Spartan player near where the Plasma Pistol spawns. This puts him right up against the big burning pillar (see Figure 5-6). Bring the Wraith to the pillar and have the Spartan crouch. Finally, boost into the Spartan so that you ram him into the pillar—this will force the Spartan player out of the map (see Figure 5-7). Generally, the most successful method is for the person in the Wraith to tap forward and then hold forward while boosting.
When the player falls through the map, there are two indications that you have reproduced the glitch correctly. The first indication is that after a second of falling it appears as though the player comes to rest and then falls again. This may sound confusing, but it is easily noticeable. The other indication is that the physics engine goes crazy and the corpse looks like it’s break dancing.
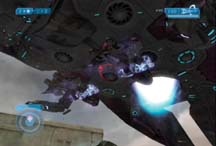
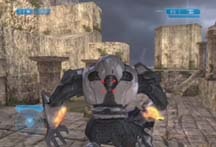
If one of these two things happens, when the Spartan re-spawns there should be a giant corpse looming over some part of the level. Normally, the phantom appears in the sky above the pillar (see Figure 5-8).

The orientation of the crouching player will determine the orientation of the giant phantom. If the player faces the pillar, you will be able to see less of the corpse (see Figure 5-9).
You’re probably wondering how such a strange glitch is possible. Under the fire pillar, there is a sphere. No one in the community seems to know why it is located there instead of some other place, but it’s there. The purpose of this sphere is to project the sky textures. When you get an MC corpse near the sphere, it projects the body into the sky.
Give Yourself Infinite Camouflage
Play any Master Chief level with unlimited Active Camouflage.
This is probably one of the most useful glitches that has been discovered for the Halo 2 campaign. The irony is that this glitch is enabled by an Easter egg. Hopefully, the Program Managers at Bungie recognize that the skulls are really cool and won’t get too down on Easter eggs because of this glitch.
This hack allows you to play any Master Chief level with unlimited Active Camouflage (AC). Not only does this allow you to simply walk through much of the campaign, but it is also extremely useful when doing things like collecting skulls, exploring maps, or making movies of allies and enemies fighting (without winding up in the middle of the fight). However, infinite AC is probably most useful for players trying to get the IWHBYD skull [Hack #9] , as the activation fight for that skull is daunting.
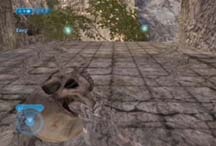
To reproduce the glitch, collect the Envy skull [Hack #13] (see Figure 5-10) and go through any checkpoint while in AC mode.
This means that you must turn on your AC (using the white button) before you reach the checkpoint. When the checkpoint notification appears, you must already be invisible (see Figure 5-11).
To be safe, use the “Revert to Last Checkpoint” option and make sure that did it correctly. If you have the AC activated when you revert, then you know that you have done it right. Next, you should save your game and quit. Turning off your Xbox will remove the Envy mode. However, when you reload the same profile, you will find yourself with unlimited AC (see Figure 5-12).
Regardless of whether you turn off your Xbox again, you will have infinite AC for that profile. However, there are some limitations. The glitch is limited to the current level—when the next map loads, you lose the unlimited AC. This means that you’ll have to repeat these steps for each level that you want to play with infinite AC. In addition, the Envy skull only works for the Master Chief, so the Arbiter cannot use unlimited AC.
Note that enemies will not be able to see you, but if you get too close (especially on Legendary) they will shoot towards your general location.
To remove the infinite AC, you can start a new map, beat the map you’re on, or select the “Restart level” option.
Overload the Game Engine
Use object overloading to create dramatic glitches.
This isn’t a difficult glitch to reproduce, but it does take some time. When too many objects crowd into a small space, strange things can happen to the Halo 2 engine. For example, objects that would normally spawn may simply not appear.
In addition, you can use this glitch to create a dazzling effect that encompasses multiple explosions. A gamer named ZombiePt2 accidentally reproduced the glitch while attempting to amass a large pile of grenades. He was actually trying to reproduce the effects shown in Randall Glass’ famous Warthog Jump video (http://www.oz.net/~rglass/warthog/).
To try out the glitch yourself, start any level (with grenades) in co-op mode. In this example, I use the Metropolis level. Reproducing this glitch involves fragging close to 70 players in the same location.
Probably the quickest way to do this with one person is to create a split screen campaign game with two players. Put both of players in a Warthog and drive to the soccer ball building [Hack #26] . Next, put one player in the gunner seat. If you are by yourself, you can hold down the trigger for the Warthog gun by putting an elastic band around your controller. To create the gory pile of bodies, repeatedly walk the other player into the path of fire. When I tried this glitch, it took 68 bodies to reproduce the object overload behavior. You will know when you have reached the limit when the second player fails to spawn.
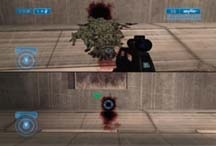
At this point, you should slowly turn the Warthog gunner until some object goes out of view. When the object is no longer visible, the engine will clean it up and the player will spawn (see Figure 5-13).

Next, leave the gunner in the Warthog (i.e., with all the dead Chiefs in view), and go for a short walk to get a checkpoint. During this stroll, you will notice all sorts of odd behavior (see Figures 5-14 and 5-15).

By getting a checkpoint, you will guarantee that you can try the grenade toss many times. It’s important that the gunner does not move during this time. If the pile of bodies and objects goes out of view of both players, it will immediately disappear.
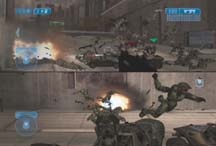
Once you reach a checkpoint, you can step back, toss a grenade into the pile and enjoy the fireworks.
Theoretically, the reason you are able to create multiple explosions is that Halo 2 begins to layer objects when there are too many in the same location. This would explain why it is possible to produce multiple explosions from a single pile of objects. The first layer blows up, followed by the second layer and so forth until the entire pile is gone (see Figure 5-16). For greater effect, you could try reproducing this glitch with the Sputnik skull [Hack #16] active.
Find the Mysterious Super Jump
Fly without any help whatsoever.
This glitch is strange but impressive. There are some mysterious spots on Halo 2 maps that will hurl you into the air. To reproduce this behavior on the Coagulation map, simply walk up to a base and follow these instructions. This glitch works on both the Red and Blue bases.
At either base, find the Plasma Pistol spawn spot—it’s behind the base. Now, while on the ramp, look to your left, you will see a cubbyhole of sorts (see Figures 5-17 and 5-18). In order to reach this cubbyhole—this is the tricky part—you must run off the edge of the ramp while still facing the cubby, and then crouch in midair.

Now, once you are in the cubby, locate the corner of the base directly in front of you. Get this corner in the middle of your weapon reticle (see Figure 5-19).

Start walking forward and after approximately five seconds, tap the A button. This will cause you to fall. While falling, continue to hold your joystick forward. If done correctly, you will go soaring into the air (see Figure 5-20).
If you want to attempt something a little more complex, you can try performing a double bounce. Before you attempt this variation, you should have already mastered the single bounce technique.
To bounce a second time, you must land in the teleporter on top of the base. This is not as easy as it sounds; you have to land exactly in the middle of the teleporter. If you are able to stick the landing you will teleport as usual, but upon exiting the transit you will go flying into the air. This second bounce sends you even higher and at a greater speed than the single bounce.
If you experiment with the jump at the Red base, you will find that upon exiting the teleporter, you have a chance to land on some trees. This can prove to be an effective sniper perch.
Get Unlimited Sword Energy
Take advantage of a glitch that allows you to carry a sword with unlimited energy.
This is another glitch that significantly affects the single player campaign. Normally, the Plasma Sword has an energy level that is depleted with every use. Eventually, the sword becomes useless for anything other than a melee attack. This hack allows you to add an unlimited Plasma Sword to your arsenal.
To activate the glitch, all you have to do is complete a level with an empty Plasma Sword. After the cut scene finishes, and the next level loads, you will have a zero energy sword. However, it will function just like a charged sword. As you would expect from an empty Plasma Sword, you cannot see the blade of your unlimited energy weapon—but it delivers a powerful sting.
This hack doesn’t work for every level because you are often given new weapons when the level starts. To use this hack, you must play a level that allows you to keep the sword when the next level loads. One such level is The Arbiter.
If you want to try this hack, finish The Arbiter level with an empty Plasma Sword (see Figure 5-21). At the end of the level, you will be landing a Banshee. Ensure that you have the sword in your hand right after you get out—before the cut scene begins (see Figure 5-22).


When the next level begins, you will find that you have unlimited sword energy. You will not be able to see the blade, but it will deliver its full-power wallop (see Figure 5-23).

Drop Your Weapons
Use an Oddball glitch to clean up your screen.
This hack is yet another useful way [Hack #8] to clean up your screen for screenshots. This technique allows you to run around multiplayer maps without a weapon.
To reproduce this glitch quickly, start an Oddball game with the Plasma Pistol as your primary weapon and “None” as your secondary weapon.
Overcharge the Plasma Pistol by holding down the trigger. Then, with the gun still charged, pick up the Oddball (see Figure 5-24). Next, drop the Oddball. Due to this glitch, you will actually drop your Plasma Pistol as well (see Figure 5-25).

To make sure that you don’t immediately pick up the pistol again, you may want to back up as you drop the Oddball. If you do walk over something that can be picked up, you will lose your weaponless status.
Teach a Scorpion to Fly
Use the tank spinning glitch to toss around a Scorpion Main Battle Tank.
The tank spinning method requires two Scorpion tanks. Drive the Scorpion Tank up a slope. In this example, I use a hill in the light area by the Blue base within the Coagulation level. It may not be the easiest spot to flip a tank, but the light makes it easier to see what’s happening.
When you drive the tank up the slant, make sure to drive it straight up, flipping the tank on its back. Then drive the other Scorpion tank on top of the flipped one, as shown in Figure 5-26.
With the driver of the top tank still sitting in the vehicle, have another player walk up to the bottom Scorpion and press X to flip the tank. Once you have pressed X, the bottom tank will flip over and send the top tank soaring into the air, as shown in Figure 5-27.
It is also possible to launch a Scorpion by driving it on top of a Wraith and then having the Wraith boost its engines. However, this technique is much harder to reproduce than the dual-Scorpion method.

Create a Ring of Rockets
Create a fireworks display using the Rocket Launcher.
This glitch allows you to fire rockets that go around in circles without ever hitting their intended target. To try this trick, get as many players together as possible and start a rockets game on Coagulation.
First, park a Warthog on the top of a high mound; then lock on to the Warthog and move your reticle to the side (see Figure 5-28). Since you didn’t aim at the Puma, the rocket gets stuck in a circular pattern and will simply circle the vehicle until it reaches the end of its life span.
Tip
Puma, another name for the Warthog, and comes by way of the Red Versus Blue (http://www.redvsblue.com) machinima [Hack #77] :
| Griff: Warthog? I mean, it doesn’t really look like a pig. |
| Sergeant: Say that again? |
| Griff: I think it looks more like a Puma. |

In Figure 5-29, you can see the red reticle on the side—I actually moved a bit more to the left before I fired. Since you must move the reticle quickly, turning up your look sensitivity can help you reproduce this glitch.

This glitch works with multiple rockets, so the more players the better. Having sixteen rockets—or more—flying around the Warthog would be cool (see Figure 5-30).

Slow Down Rockets
Tricks you can play with rockets.
The slow rocket homing glitch is one of the most interactive glitches discovered by the Halo community. Using this technique, you can decrease the speed of the projectile launched from the Rocket Launcher. This allows you to launch a rocket and then let it chase you around the map. Normally this would be impossible because the rocket would simply destroy you. However, this glitch allows your vehicle to outrun the rocket.
First, get a partner on the opposing team to drive a vehicle of some sort—the faster the better. As with the circling rockets hack [Hack #48] this glitch is easier to reproduce with a high look-sensitivity setting. Now with your rocket ready, lock on to the vehicle and hold the right trigger. Look directly up—at a 90-degree angle to the ground—and release the trigger (see Figures 5-31 and 5-32).
The rocket will launch at a normal speed, at which point your driver should begin accelerating as fast as possible in a straight line—it helps if you start with a nice straightaway in front of you. The rocket will loop around and follow the moving vehicle (see Figures 5-33 and 5-34). If the vehicle happens to slow down, the rocket should continue at its set pace hit the vehicle. If the vehicle turns, the rocket will follow.

If the rocket hasn’t exploded after about thirty or forty seconds, the projectile will exceed its life span and simply disappear. This glitch is most enjoyable with multiple rockets.