In this chapter
| Introduction |
| Use third-party assemblies |
| Write managed code |
| Hot swap assemblies on the server |
Complex systems, such as Microsoft Dynamics AX 2012, are often deployed in heterogeneous environments that contain several disparate systems. Often, these systems contain legacy data that might be required for running Microsoft Dynamics AX, or they might offer functionality that is vital for running the organization.
Microsoft Dynamics AX 2012 offers several ways of integrating with other systems. For example, your organization might need to harvest information from old Microsoft Excel files. To do this, you could write a simple add-on in Microsoft Visual Studio and easily integrate it with Microsoft Dynamics AX. Or your organization might have a legacy system that is physically located in a distant location that requires invoice information to be sent to it in a fail-safe manner. In this case, you could set up a message queue to perform the transfers. You could use the Microsoft .NET Framework to interact with the message queue from within Microsoft Dynamics AX.
This chapter focuses on some of the ways that you can integrate Microsoft Dynamics AX with other systems by taking advantage of managed code through X++ code. One way is to consume managed code directly from X++ code; another way is to author or extend existing business logic in managed code by using the Visual Studio environment. To facilitate this interoperability, Microsoft Dynamics AX provides the managed code with managed classes (called proxies) that represent X++ artifacts. This allows you to write managed code that uses the functionality these proxies provide in a type-safe and convenient manner.
In both cases, the .NET Framework provides access to the functionality, and this functionality is used in Microsoft Dynamics AX.
Note
You can also make Microsoft Dynamics AX functionality available to other systems by using services. For more information, see Chapter 12.
Sometimes, you can implement the functionality that you are looking to provide by using a managed component (a .NET assembly) that you purchase from a third-party vendor. Using these dynamic-link libraries (DLLs) can be—and often is—more cost effective than writing the code yourself. These components are wrapped in managed assemblies in the form of .dll files, along with their Program Database (PDB) files, which contain symbol information that is used in debugging, and their XML files, which contain documentation that is used for IntelliSense in Visual Studio. Typically, these assemblies come with an installation program that often installs the assemblies in the global assembly cache (GAC) on the computer that consumes the functionality. This computer can be either on the client tier, on the server tier, or both. Only assemblies with strong names can be installed in the GAC.
It is always a good idea to use a DLL that has a strong name, which means that the DLL is signed by the author, regardless of whether the assembly is stored in the GAC. This is true for assemblies that are installed on both the client tier and the server tier. A strong name defines the assembly’s identity by its simple text name, version number, and culture information (if provided)—plus a public key and a digital signature. Assemblies with the same strong name are expected to be identical.
Strong names satisfy the following requirements:
Guarantee name uniqueness by relying on unique key pairs. No one can generate the same assembly name that you can, because an assembly generated with one private key has a different name than an assembly generated with another private key.
Protect the version lineage of an assembly. A strong name can ensure that no one can produce a subsequent version of your assembly. Users can be sure that the version of the assembly that they are loading comes from the same publisher that created the version the application was built with.
Provide a strong integrity check. Passing the .NET Framework security checks guarantees that the contents of the assembly have not been changed since it was built. Note, however, that by themselves, strong names do not imply a level of trust such as that provided by a digital signature and supporting certificate.
When you reference a strong-named assembly, you can expect certain benefits, such as versioning and naming protection. If the strong-named assembly references an assembly with a simple name, which does not have these benefits, you lose the benefits that you derive by using a strong-named assembly and open the door to possible DLL conflicts. Therefore, strong-named assemblies can reference only other strong-named assemblies.
If the assembly that you are consuming does not have a strong name, and is therefore not installed in the GAC, you must manually copy the assembly (and the assemblies it depends on, if applicable) to a directory where the .NET Framework can find it when it needs to load the assembly for execution. It is a good practice to place the assembly in the same directory as the executable that will ultimately load it (in other words, the folder on the client or the server in which the application is located). You might also want to store the assembly in the ClientBin directory (even if it is used on the server exclusively), so that the client can pick it up and use it for IntelliSense.
Microsoft Dynamics AX 2012 does not have a built-in mechanism for bulk deployment or installation of a particular DLL on client or server computers, because each third-party DLL has its own installation process. You must do this manually by using the installation script that the vendor provides or by placing the assemblies in the appropriate folders.
After you install the assembly on the client or server computer, you must add a reference to the assembly in Microsoft Dynamics AX, so that you can program against it in X++. You do this by adding the assembly to the References node in the Application Object Tree (AOT).
To do this, right-click the References node, and then click Add Reference. A dialog box like the one shown in Figure 3-1 appears.

The top pane of the dialog box shows the assemblies that are installed in the GAC. If your assembly is installed in the GAC, click Select to add the reference to the References node. If the assembly is located in either the ClientBin or the ServerBin binary directory, click Browse. A file browser dialog box will appear where you can select your assembly. After you choose your assembly, it will appear in the bottom pane and will be added when you click OK.
After you add the assembly, you are ready to use it from X++. If you install the code in the ClientBin directory, IntelliSense features are available to help you edit the code. You can now use the managed code features of X++ to instantiate public managed classes, call methods on them, and so on. For more information, see Chapter 4.
Note that there are some limitations to what you can achieve in X++ when calling managed code. One such limitation is that you cannot easily code against generic types (or execute generic methods). Another stems from the way the X++ interpreter works. Any managed object is represented as an instance of type ClrObject, and this has some surprising manifestations. For instance, consider the following code:
static void TestClr(Args _args)
{
    if (System.Int32::Parse("0"))
    {
        print "Do not expect to get here";
    }
    pause;
}
Obviously, you wouldn’t expect the code in the if statement to execute because the result of the managed call is 0, which is interpreted as false. However, the code actually prints the string literal because the return value of the call is a ClrObject instance that is not null (in other words, true). You can solve these problems by storing results in variables before use: the assignment operator will correctly unpack the value, as shown in the following example:
static void TestClr(Args _args)
{
    int i = System.Int32::Parse("0");
    if (i)
    {
        print "Do not expect to get here";
    }
    pause;
}Sometimes your requirements cannot be satisfied by using an existing component and you have to roll up your sleeves and develop some code—in either C# or VB.NET. Microsoft Dynamics AX has great provisions for this: the integration features between Microsoft Dynamics AX and Visual Studio give you the luxury of dealing with X++ artifacts (classes, tables, and enumerations) as managed classes that behave the way that a developer of managed code would expect. The Microsoft Dynamics AX Business Connector manages the interaction between the two environments. Broadly speaking, you can create a project in Visual Studio as you normally would, and then add that project to the Visual Studio Projects node in the AOT. This section walks you through the process.
This example shows how to create managed code in C# (VB.NET could also be used) that reads the contents of an Excel spreadsheet and inserts the contents into a table in Microsoft Dynamics AX. This example is chosen to illustrate the concepts described in this chapter rather than for the functionality it provides.
Note
The example in this section requires the Microsoft.ACE.OLEDB.12.0 provider to read data from Excel. You can download the provider from http://www.microsoft.com/en-us/download/confirmation.aspx?id=23734.
The process is simple: you author the code in Visual Studio, and then add the solution to Application Explorer, which is just the name for the AOT in Visual Studio. Then, functionality from Microsoft Dynamics AX is made available for consumption by the C# code, which illustrates the proxy feature.
Assume that the Excel file contains the names of customers and the date that they registered as customers with your organization, as shown in Figure 3-2.

Also assume that you’ve defined a table (called, say, CustomersFromExcel) in the AOT that will end up containing the information, subject to further processing. You could go about reading the information from the Excel files from X++ in several ways: one is by using the Excel automation model; another is by manipulating the Office Open XML document by using the XML classes. However, because it is so easy to read the contents of Excel files by using ADO.NET, that is what you decide to do. You start Visual Studio, create a C# class library called ReadFromExcel, and then write the following code:
using System;
using System.Collections.Generic;
using System.Text;

namespace Contoso
{
    using System.Data;
    using System.Data.OleDb;
    public class ExcelReader
    {
        static public void ReadDataFromExcel(string filename)
        {
            string connectionString;
            OleDbDataAdapter adapter;
            connectionString = @"Provider=Microsoft.ACE.OLEDB.12.0;"
            + "Data Source=" + filename + ";"
            + "Extended Properties='Excel 12.0 Xml;"

            + "HDR=YES'"; // Since sheet has row with column titles

            adapter = new OleDbDataAdapter(
                "SELECT * FROM [sheet1$]",
                connectionString);
            DataSet ds = new DataSet();
            // Get the data from the spreadsheet:
            adapter.Fill(ds, "Customers");
            DataTable table = ds.Tables["Customers"];
            foreach (DataRow row in table.Rows)
            {
                string name = row["Name"] as string;
                DateTime d = (DateTime)row["Date"];
            }
        }
    }
}
The ReadDataFromExcel method reads the data from the Excel file given as a parameter, but it does not currently do anything with that data. You still need to establish a connection to the Microsoft Dynamics AX system to store the values in the table. There are several ways of doing this, but in this case, you will simply use the Microsoft Dynamics AX table from the C# code by using the proxy feature.
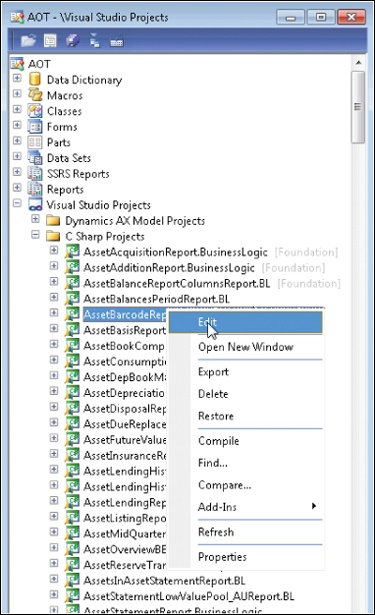
The first step is to make the Visual Studio project (that contains the code) into a Microsoft Dynamics AX “citizen.” You do this by selecting the Add ReadFromExcel To AOT menu item on the Visual Studio project. When this is done, the project is stored in the AOT and can use all of the functionality that is available for nodes in the AOT. The project can be stored in separate layers, be imported and exported, and so on. The project is stored in its entirety, and you can open Visual Studio to edit the project by clicking Edit on the context menu, as shown in Figure 3-3.
Tip
You can tell that a project has been added to the AOT because the Visual Studio project icon is updated with a small Microsoft Dynamics AX icon in the lower-left corner.
With that step out of the way, you can use the version of the AOT that is available in Application Explorer in Visual Studio to fetch the table to use in the C# code (see Figure 3-4). If the Application Explorer window is not already open, you can open it by clicking Application Explorer on the View menu.
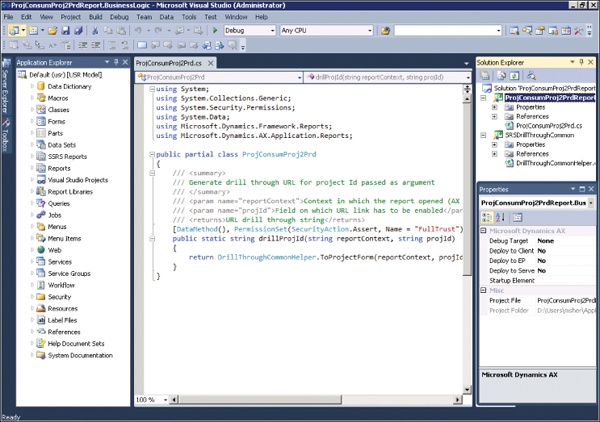
You can then create a C# representation of the table by dragging the table node from Application Explorer into the project.
After you drag the table node into the Visual Studio project, you will find an entry in the project that represents the table. The items that you drag into the project in this way are now available to code against in C#, just as though they had been written in C#. This happens because the drag operation creates a proxy for the table under the covers; this proxy takes care of the plumbing required to communicate with the Microsoft Dynamics AX system, while presenting a high-fidelity managed interface to the developer.
You can now proceed by putting the missing pieces into the C# code to write the data into the table. Modify the code as shown in the following example:
DataTable table = ds.Tables["Customers"];
var customers = new ReadFromExcel.CustomersFromExcel();
foreach (DataRow row in table.Rows)
{
    string name = row["Name"] as string;
    DateTime d = (DateTime)row["Date"];
    customers.Name = name;
    customers.Date = d;
    customers.Write();
}
Note
The table from Microsoft Dynamics AX is represented just like any other type in C#. It supports IntelliSense, and the documentation comments that were added to methods in X++ are available to guide you as you edit.
The data will be inserted into the CustomersFromExcel table as it is read from the ADO.NET table that represents the contents of the spreadsheet. However, before either the client or the server can use this code, you must deploy it. You can do this by setting the properties in the Properties window for the Microsoft Dynamics AX project in Visual Studio. In this case, the code will run on the client, so you set the Deploy to Client property to Yes. There is a catch, though: you cannot deploy the assembly to the client when the client is running, so you must close any Microsoft Dynamics AX clients prior to deployment.
To deploy the code, right-click the Visual Studio project, and then click Deploy. If all goes well, a Deploy Succeeded message will appear in the status line.
Note
You do not have to add a reference to the assembly because a reference is added implicitly to projects that you add to the AOT. You only need to add references to assemblies that are not the product of a project that has been added to the AOT.
As soon as you deploy the assembly, you can code against it in X++. The following example illustrates a simple snippet in an X++ job:
static void ReadCustomers(Args _args)
{
    ttsBegin;
    Contoso.ExcelReader::ReadDataFromExcel(@"c:Testcustomers.xlsx");
    ttsCommit;
}
When this job runs, it calls into the managed code and insert the records into the Microsoft Dynamics AX database.
To ease the process of deploying after building, Visual Studio properties let you define what happens when you run the Microsoft Dynamics AX project. You manage this by using the Debug Target and Startup Element properties. You can enter the name of an element to execute—typically, a class with a suitable main method or a job. When you start the project in Visual Studio, it will create a new instance of the client and execute the class or job. The X++ code then calls back into the C# code where breakpoints are set. For more information, see “Debugging Managed Code in Microsoft Dynamics AX” at http://msdn.microsoft.com/en-us/library/gg889265.aspx.
An alternative to using this feature is to attach the Visual Studio debugger to the running Microsoft Dynamics AX client (by using the Attach To Process menu item on the Debug menu in Visual Studio). You can then set breakpoints and use all of the functionality of the debugger that you normally would. If you are running the Application Object Server (AOS) on your own computer, you can attach to that as well, but you must have administrator privileges to do so.
As you can see, wiring up managed code to work with Microsoft Dynamics AX is quite simple because of the proxies that are generated behind the scenes to represent the Microsoft Dynamics AX tables, enumerations, and classes. In developer situations, it is standard to develop the artifacts in Microsoft Dynamics AX iteratively and then code against them in C#. This process is seamless because the proxies are regenerated by Visual Studio at build time, so that they are always synchronized with the corresponding artifacts in the AOT; in other words, the proxies never become out of date. In this way, proxies for Microsoft Dynamics AX artifacts differ from Visual Studio proxies for web services. These proxies are expected to have a stable application programming interface (API) so that the server hosting the web service is not contacted every time the project is built. Proxies are generated not only for the items that the user has chosen to drop onto the Project node as described previously. For instance, when a proxy is generated for a class, proxies will also be generated for all of its base classes, along with all artifacts that are part of the parameters for any methods, and so on.
To see what the proxies look like, place the cursor on a given proxy name in the code editor, such as CustomersFromExcel in the example, right-click, and then click Go To Definition (or use the convenient keyboard shortcut F12). All of the proxies are stored in the Obj/Debug folder for the project. If you look carefully, you will notice that the proxies use the Microsoft Dynamics AX Business Connector to do the work of interfacing with the Microsoft Dynamics AX system. The Business Connector has been completely rewritten from the previous version to support this scenario; in older versions of the product, the Business Connector invariably created a new session through which the interaction occurred. This is not the case for the new version of the Business Connector (at least when it is used as demonstrated here). That is why the transaction that was started in the job shown earlier is active when the records are inserted into the table. In fact, all aspects of the user’s session are available to the managed code. This is the crucial difference between authoring business logic in managed code and consuming the business logic from managed code. When you author business logic, the managed code becomes an extension to the X++ code, which means that you can crisscross between Microsoft Dynamics AX and managed code in a consistent environment. When consuming business logic, you are better off using the services framework that Microsoft Dynamics AX provides, and then consuming the service from your application. This has big benefits in terms of scalability and deployment flexibility.
Figure 3-5 shows how the Business Connector relates to Microsoft Dynamics AX and .NET application code.

Figure 3-5. Interoperability between Microsoft Dynamics AX and .NET code through the Business Connector.
To demonstrate the new role of the Business Connector, the following example opens a form in the client that called the code:
using System;
using System.Collections.Generic;
using System.Text;

namespace OpenFormInClient
{
    public class OpenFormClass
    {
        public void DoOpenForm(string formName)
        {
            Args a = new Args();
            a.name = formName;
            var fr = new FormRun(a);
            fr.run();
            fr.detach();
        }
    }
}
In the following example, a job is used to call managed code to open the CustTable form:
static void OpenFormFromDotNet(Args _args)
{
    OpenFormInClient.OpenFormClass opener;
    opener = new OpenFormInClient.OpenFormClass();
    opener.DoOpenForm("CustTable");
}
Note
The FormRun class in this example is a kernel class. Because only an application class is represented in Application Explorer, you cannot add this proxy by dragging and dropping as described earlier. Instead, drop any class from Application Explorer onto the Visual Studio project, and then set the file name property of the class to Class.<kernelclassname>.axproxy. In this example, the name would be Class.FormRun.axproxy.
This would not have been possible with older versions of the Business Connector because they were basically faceless clients that could not display any user interface. Now, the Business Connector is actually part of the client (or server), and therefore, it can do anything they can. In Microsoft Dynamics AX 2012 R2, you can still use the Business Connector as a stand-alone client, but that is not recommended because that functionality is now better implemented by using services (see Chapter 12). The Business Connector that is included with Microsoft Dynamics AX is built with .NET Framework 3.5. That means that it is easier to build the business logic with this version of .NET; if you cannot do that for some reason, you must add markup to the App.config file to compensate. If you are using a program that is running .NET Framework 4.0 and you need to use the Business Connector through the proxies as described, you would typically add the following markup to the App.config file for your application:
<configuration>
  <startup useLegacyV2RuntimeActivationPolicy="true">
    <supportedRuntime version="v4.0" sku=".NETFramework,Version=v4.0"/>
  </startup>
</configuration>The previous section described how to express business logic in managed code. To simplify the scenario, code running on the client was used as an example. This section describes managed code running on the server.
You designate managed code to run on the server by setting the Deploy to Server property for the project to Yes, as shown in Figure 3-6.

When you set this property as shown in Figure 3-6, the assembly is deployed to the server directory. If the server has been running for a while, it will typically have loaded the assemblies into the current application domain. If Visual Studio were to deploy a new version of an existing assembly, the deployment would fail because the assembly would already be loaded into the current application domain. To avoid this situation, the server has the option to start a new application domain in which it executes code from the new assembly. When a new client connects to the server, it will execute the updated code in a new application domain, while already connected clients continue to use the old version.
To use the hot-swapping feature, you must enable the option in the Microsoft Dynamics AX Server Configuration Utility by selecting the Allow Hot Swapping of Assemblies When The Server Is Running check box, as shown in Figure 3-7. To open the Microsoft Dynamics AX Server Configuration Utility, on the Start menu, point to Administrative Tools, and then click Microsoft Dynamics AX 2012 Server Configuration.

Note
The example in the previous section illustrated how to run and debug managed code on the client, which is safe because the code runs only on a development computer. You can debug code that is running on the server (by starting Visual Studio as a privileged user and attaching to the server process as described in the Debug managed code section). However, you should never do this on a production server because any breakpoints that are encountered will stop all of the managed code from running, essentially blocking any users who are logged on to the server and processes that are running. Another reason you should not use hot swapping in a production scenario is that calling into another application domain extracts a performance overhead. The feature is intended only for development scenarios, where the performance of the application is irrelevant.