
In this recipe, you will see how to generate the stubs for five types of JSF custom components from scratch:
- The stub for a project that will use MyFaces (including all the dependencies needed)
- The stub for a project that will use MyFaces and Facelets (including all the dependencies needed)
- The stub for a project that will use MyFaces and Portlets (including all the dependencies needed)
- The stub for a simple JSF component that will use MyFaces (including all the dependencies needed)
- The stub for a project that will use MyFaces and Trinidad (including all the dependencies needed)
For generating these stubs we will use five types of Maven Archetypes from MyFaces. Actually, we will show you how to use the MyFaces JSF Components Archetype, and it remains your task to see how to use the other four.
As we will be using Maven as the build tool (an archetype is a thing for Maven), we should have Maven 2.2.1 or higher installed in our system. This is available at http://maven.apache.org/download.html or under libraries in the code bundle for this book, in the /JSF_libs/Apache Maven 2.2.1 folder.
After download, you have to put the /bin directory of Maven distribution in CLASSPATH. For example:
SET PATH = "C:PacktJSFKitapache-maven-2.2.1in"
The MyFaces JSF Components Archetype generates a Maven multi-module project prepared for the development of custom JSF components. For this, follow the given steps:
- From an MS-DOS Command Prompt, type:
mvn archetype:generate -DarchetypeCatalog= http://myfaces.apache.org - After a few seconds, you should see something like this screenshot:
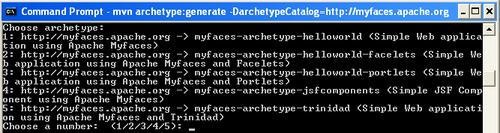
- As you can see, you can choose from five types of projects (listed previously in the recipe description). Since, we don't have enough space here to talk about each one of them, we decide to choose a Simple JSF Component using Apache MyFaces (obviously, you can try the remaining ones for yourself). Therefore, type 4, and hit the Enter key.
- Now, you must define a set of attributes, as follows (they are pretty intuitive, therefore you don't need a description):
Define value for groupId: typeJSFCustomComponent, or anything else, and hit Enter keyDefine value for artifactId: typeJSFComponentFolder, or anything else, and hit Enter keyDefine value for version: 1.0-SNAPSHOT: just hit Enter keyDefine value for package: JSFCustomComponent: typejsf.custom.component, or any other package, and hit Enter key- Hit "y" and Enter key to confirm the provided settings.
- If everything worked fine, you should see a BUILD SUCCESSFUL message, and in the current folder you should find a folder named
artifactId(in our case, it should be namedJSFComponentFolder).
This folder should have the folder structure shown in the following screenshot :

Basically, there are three main folders, as follows:
/core: This contains the source of your components (the components will be developed here)/examples: This contains the source for the examples/src: This contains potential resources
Instead of creating new components from scratch, we will take a quick look over the generated component. This is a simple component called SayHello that will print Hello <firstName> <lastName>!, which is provided to the developer.
The three main classes of SayHello custom component are:
SayHello.class
The source code for this class is in the coresrcmainjavaorgmyorganizationcomponentsayhello folder, and it defines the component as an extension of the UIOutput component. It has a getFamily method, and overrides the saveState and restoreState methods. Also, it contains the attributes for SayHello, which are firstName and lastName, as well as the getters and setters for these fields.
SayHelloRenderer.class
The source code for this class is in the coresrcmainjavaorgmyorganizationcomponentsayhello folder. This class extends javax.faces.render.Renderer and overrides the decode, encodeBegin, encodeChildren, and encodeEnd methods. The implementation is straightforward regarding the scope of this custom component.
SayHelloTag.class
The source code for this class is in the coresrcmainjavaorgmyorganizationcomponentsayhello folder. This class extends the UIComponentTag, sets the component's attributes in the setProperties method and releases the allocated resources (sets the attributes to null) in the release method.
Going forward, we have the TLD file for this component in the coresrcmain ld folder. This file contains all the tags available in our library.
Now we can build the library! The following command will generate a JAR that can be used in the JSF applications, by placing it in the application's classpath (notice that the corresponding faces-config.xml is also generated now). Navigate, from MS-DOS Command Prompt, to the /core folder and type:
mvn clean install
When you get the BUILD SUCCESSFUL message, you should find a JAR named JSFComponentFolder-core-1.0-SNAPSHOT under the core arget folder.
Now, the SayHello custom component is ready to be used! A JSP page example that uses this component is in the examplessrcmainwebapp folder and it is named sayhello.jsp (calling mvn clean install from the
oot folder (JSFComponentFolder), the library and the examples WAR will be built). Of course, you are free to test it in any other JSF project.
As you have seen, the component generated by MyFaces JSF Components Archetype is not alien. We deal with a normal custom component that respects the main steps of creating a JSF custom component. Therefore, it should be a piece of cake to go ahead and create your own components, based on Maven Archetypes from MyFaces.