
In this recipe, you will see how to implement a JSF application for uploading multiple files with AJAX support. To accomplish this task we will use a dedicated component developed under the RichFaces project.
We developed this recipe with NetBeans 6.8, JSF 2.0, and GlassFish v3. The JSF 2.0 classes were obtained from the NetBeans JSF 2.0 bundled library. In addition, we have used RichFaces 3.3.3.BETA1, which provides support for JSF 2.0. You can download this distribution from http://www.jboss.org/richfaces. The RichFaces libraries (including necessary dependencies) are in the book code bundle, under the /JSF_libs/RichFaces JSF 2.0 folder.
As you know, RichFaces provides us with a set of amazing JSF-AJAX-based components. Since the upload is an important aspect in a web application, RichFaces reserves a special component for it named fileUpload. This component is designed to perform Ajax-ed file upload to the server. The main features of this component are:
- Progress bar shows the status of uploads
- Restriction on file type, file size, and number of files to be uploaded
- Multiple file upload support
- Embedded Flash module
- Possible to cancel the request
- One request for every upload
- Automatic uploads
- Supports standard JSF internationalization
- Highly customizable look and feel
- Disablement support
Now, let's see what the main attributes of this component are (this is cut from the official javadoc of the rich:fileUpload component):
|
Name |
Required |
Description |
|---|---|---|
|
|
No |
Files type allowed to uploaded. |
|
|
No |
Attribute that allows the component to use the flash module that provides file upload functionality |
|
|
No |
|
|
|
No |
Defines max file count allowed for upload (optional). Default value is "1". |
|
|
No |
If this attribute is |
|
|
No |
Defines max size in bytes of the uploaded files. |
|
|
No |
Indicates whether the uploaded files are stored in temporary files or available in the listener just as |
Now, based on the description of the attributes, we have configured the fileUpload tag next:
<rich:fileUpload fileUploadListener="#{fileUploadBean.listener}"
maxFilesQuantity="5"
immediateUpload="false"
acceptedTypes="png, bmp, jpg"
allowFlash="false">
</rich:fileUpload>
Next let's focus on the fileUploadListener attribute. This attribute indicates a bean responsible for the upload process. The fileUploadedListener is called at the server side after every file uploaded and used to save files from the temporary folder or RAM. We have implemented this bean as shown next:
package uploadpkg;
import java.io.File;
import org.richfaces.event.UploadEvent;
import org.richfaces.model.UploadItem;
public class FileUploadBean {
public void listener(UploadEvent event){
UploadItem item = event.getUploadItem();
System.out.println("File : '" + item.getFileName()
+ "' was uploaded");
if (item.isTempFile()) {
File file = item.getFile();
System.out.println("Absolute Path : '" +
file.getAbsolutePath() + "'!");
//file.delete();
}else {
try {
byte[] bytes = item.getData();
int numberOfBytes = 256;
if (bytes.length > numberOfBytes) {
System.out.println("First " + numberOfBytes + "
bytes of uploaded file:");
System.out.println(new String(bytes, 0,
numberOfBytes));
} else {
System.out.println("Uploaded file contents:");
System.out.println(new String(bytes, 0,
bytes.length));
}
} catch (Exception e) {
// TODO: handle exception
}
}
}
}
There are three methods that access the uploaded files, as follows:
getUploadItems: Returns a list of the uploaded files.getUploadItem: Returns the first element of the uploaded files list.isMultiUpload: Returnstrueif several files have been uploaded.
The collection of files uploaded is defined by the uploadData attribute, as shown next:
... <rich:fileUpload uploadData="#{bean.data}"/> ...
The following screenshot is a potential output:
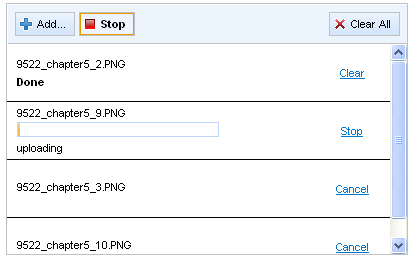
The files to be uploaded are specified using the Add button. You can add files until maxFilesQuantity is reached and only the acceptedTypes will be added to the upload list. When the list is ready to be submitted, you should press the Upload button, and you will see how each upload is monitored by a progress bar. After upload, the list can be cleared by pressing the Clear link, next to each file in the list, or by pressing the Clear All button. The uploaded files can be found later in a temporary folder or in RAM.
The uploaded files can be stored in a temporary folder or in RAM:
- in the temporary folder (depends on operating system)—if the value of the
createTempFileparameter inAjax4jsffilter (inweb.xml) section istrue(by default):<init-param> <param-name>createTempFiles</param-name> <param-value>true</param-value> </init-param>
- in the RAM—if the value of the
createTempFileparameter inAjax4jsffilter section isfalse. This is a better way for storing small-sized files.
On file size, use the maxRequestSize parameter (value in bytes) inside the Ajax4jsf filter section in web.xml:
<init-param>
<param-name>maxRequestSize</param-name>
<param-value>1000000</param-value>
</init-param>