
In this recipe you will see how to use a great PrimeFaces 2.0 component for multi-file upload with PPR support. Notice that PrimeFaces offers four types of upload as follows:
We developed this recipe with NetBeans 6.8, JSF 2.0, and GlassFish v3. The JSF 2.0 classes were obtained from the NetBeans JSF 2.0 bundled library. In addition, we have used PrimeFaces 2.0, which provides support for JSF 2.0. You can download this distribution from http://www.primefaces.org/. The PrimeFaces libraries (including necessary dependencies) are in the book code bundle, under the /JSF_libs/PrimeFaces JSF 2.0 folder.
PrimeFaces offers these four upload types through a single component named p:fileUpload, and configured through its attributes as follows:
- For a single upload the
multipleattribute is set tofalse. - For multiple uploads the
multipleattribute is set totrue. - For auto upload the
autoattribute is set totrue. - For PPR integration effect, the
updateattribute should indicate theidof the JSF component to be updated after a file has been uploaded successfully or not.
Now, we wrote a JSF form that integrates the fileUpload component with the following characteristics:
Now, the p:fileUpload complete tag reference is available at http://primefaces.prime.com.tr/docs/tag/. You will be pleased to find out that you can customize this component exactly as you want.
Now, let's see code of JSF page for our upload:
…
<h:form enctype="multipart/form-data" prependId="false">
<p:growl id="messages" showSummary="true" showDetail="true" />
<p:fileUpload fileUploadListener="#{uploadBean.handleFileUpload}"
update="messages" sizeLimit="1073741824"
multiple="true" label="choose"
allowTypes="*.jpg;*.png;*

;"
description="Images"/>
</h:form>
…
Note
The PrimeFaces p:growl component "brings the Mac's growl widget to JSF with the ability of displaying FacesMessages. Growl simply replaces h:messages component."
Now, the UploadBean implements the hadleFileUpload method like this:
public class UploadBean {
private static final int BUFFER_SIZE = 6124;
/** Creates a new instance of UploadBean */
public UploadBean() {
}
public void handleFileUpload(FileUploadEvent event) {
ExternalContext extContext = FacesContext.getCurrentInstance().
getExternalContext();
File result = new File(extContext.getRealPath
("//WEB-INF//upload") + "//" + event.getFile().getFileName());
try {
FileOutputStream fileOutputStream = new
FileOutputStream(result);
byte[] buffer = new byte[BUFFER_SIZE];
int bulk;
InputStream inputStream = event.getFile().getInputstream();
while (true) {
bulk = inputStream.read(buffer);
if (bulk < 0) {
break;
}
fileOutputStream.write(buffer, 0, bulk);
fileOutputStream.flush();
}
fileOutputStream.close();
inputStream.close();
FacesMessage msg = new FacesMessage("Succesful",
event.getFile().getFileName() + " is uploaded.");
FacesContext.getCurrentInstance().addMessage(null, msg);
} catch (IOException e) {
e.printStackTrace();
FacesMessage error = new FacesMessage("The files were
not uploaded!");
FacesContext.getCurrentInstance().addMessage(null, error);
}
}
}
The upload example is ready, but we still need to add some configuration in the web.xml descriptor (these configurations do not alter the PrimeFaces default configurations). These are specific to upload process and they are listed next:
- Set the
javax.faces.STATE_SAVING_METHODcontext param to server:<context-param> <param-name>javax.faces.STATE_SAVING_METHOD</param-name> <param-value>server</param-value> </context-param>
- Optionally, you may specify a temporary folder for storing the uploaded files, like this:
<init-param>
<param-name>uploadDirectory</param-name>
<param-value>/tmp/fileUpload</param-value>
</init-param>
- Add the
PrimeFaces FileUpload Filteras a filter for the Faces Servlet (keep in mind that this should be the first filter inweb.xml, if you have more):<filter> <filter-name>PrimeFaces FileUpload Filter</filter-name> <filter-class> org.primefaces.webapp.filter.FileUploadFilter </filter-class> <init-param> <param-name>thresholdSize</param-name> <param-value>51200</param-value> </init-param> </filter> <filter-mapping> <filter-name>PrimeFaces FileUpload Filter</filter-name> <servlet-name>Faces Servlet</servlet-name> </filter-mapping>
Now, if you test our upload you will see something like in the following screenshot:
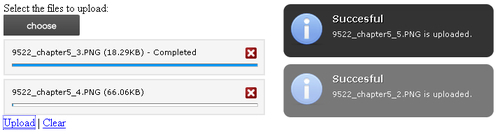
As you can see the PrimeFaces upload is based on a filter and on a listener. The filter intercepts requests in front of the Faces Servlet and detects the upload requests, while the listener requires an FileUploadEvent object, which extends the javax.faces.event.FacesEvent. The upload process is configured in the JSF page through the p:uploadFile component, and it is controlled by the developer in the listener implemented in a managed bean, like you just saw.