
Chapter 2
Linux Kernel Configuration
THE FOLLOWING LINUX PROFESSIONAL INSTITUTE OBJECTIVES ARE COVERED IN THIS CHAPTER:
- 201.1 Kernel Components (weight: 2)
- 201.2 Compiling a kernel (weight: 2)
- 201.3 Patching a kernel (weight: 1)
- 201.4 Customize, build, and install a custom kernel and kernel modules (weight: 2)
- 201.5 Manage/query kernel and kernel modules at runtime (weight: 3)
 Modern operating systems are built up in layers, starting from the kernel—a piece of software that serves as a gatekeeper between the hardware and other software, that doles out memory and CPU time, that manages filesystems and network access, and that otherwise performs critical low-level tasks. On a Linux computer, the kernel is known as Linux—technically, that word applies only to the kernel. Everything else you might think of as being part of Linux, such as bash, the X Window System, or the Samba file server, is in fact not technically part of Linux. Most such tools, including all three just mentioned, are available on many other OSs, such as FreeBSD and Solaris.
Because the kernel handles low-level hardware and other critical tasks, its use and configuration are unusually important. This chapter covers these tasks, starting with obtaining and installing updated precompiled kernels. Linux's open source nature enables you to compile your own kernel from source code. This task is similar to compiling other programs' binaries, as described in Chapter 1, “System Startup and Advanced System Management”; however, the kernel is a complex enough piece of software, with enough options, that it deserves special consideration. This chapter concludes with a look at kernel modules—pieces of the kernel that can be loaded and unloaded on a running system. Many Linux hardware drivers take the form of kernel modules. Managing modules enables you to adjust how Linux treats your hardware and the availability of other kernel-level features, such as filesystems.
Understanding the Kernel
Most Linux systems work well with the default binary kernel provided by the distribution maintainer. Even when using such a kernel, though, you should understand certain kernel features, such as whether you're using a stable or development kernel, what drivers and other features a particular kernel provides, and what the kernel file is called.
Obtaining and Installing a Kernel
The home site for Linux kernels is the Linux Kernel Archives (http://www.kernel.org); however, if you're using a precompiled kernel provided with your distribution, chances are you obtained it with your distribution's installation medium or by downloading it from your distribution's package site using APT, YUM, or some other package maintenance tool.
Either way, Linux kernels have three or four dot-separated numbers, as in 2.6.35 or 2.6.35.4. In the past, kernels came in two forms: stable and unstable (or development). Stable kernels were intended to be usable for day-to-day work on production server and desktop systems, whereas unstable kernels contained experimental code to support new hardware or implement new features. Stable kernels had even second numbers (such as 2.4.x), whereas unstable kernels had odd second numbers (such as 2.5.x).
With the release of the 2.6.x series, the old stable/unstable distinction has become much blurrier. Some individuals and groups have created what they term “stable” kernel branches based on specific kernel versions, such as 2.6.16 and 2.6.27; however, in terms of mainstream development, numbering is no longer a clear guide to what is stable and what is not. The Linux Kernel Archives site provides a prominent link on the main page to enable users to download the latest stable kernel. If you want to run an unstable kernel, you'll need to dig through the links to the extended listing of all kernel files. In the current numbering system, changes to the third number represent kernels with major new features, while increments to the fourth number indicate bug fixes on this feature set.
Kernels provided by distribution maintainers often add another revision number to the main kernel number in order to track patches applied by the distribution maintainer rather than applied as part of the standard Linux kernel. How these additional revision numbers are applied varies from one distribution to another.
If you want to obtain the source for the kernel you're currently running, you can use the uname command, which returns information on the current kernel and architecture. Typing uname -r returns the current kernel number, and typing uname -a returns more information, including various details about your CPU, when the kernel was compiled, and so on.
The kernels supplied on the Linux Kernel Archives site come as source tarballs; you must compile them yourself, as described later in this chapter in “Preparing a Kernel” and “Compiling a Kernel.” If you don't need to customize your kernel, you can probably use the kernel provided by your distribution maintainer. If you need to upgrade this kernel, the process is usually as simple as upgrading any other software package, using yum, apt-get, or some other package management tool. These installation tools often run scripts to update your boot loader configuration to use the new kernel; however, in some cases you may need to adjust your boot loader configuration, as described in “Adding a Kernel to GRUB.” After upgrading a kernel, you must normally reboot your computer to use it.
![]() If you manage a system that can't afford any downtime at all, you can upgrade your kernel without rebooting by employing a tool known as Ksplice (http://www.ksplice.com). This software freezes the execution of the programs that the kernel manages, swaps a new kernel into memory, and then resumes program operation. This process is transparent to the programs that are running.
If you manage a system that can't afford any downtime at all, you can upgrade your kernel without rebooting by employing a tool known as Ksplice (http://www.ksplice.com). This software freezes the execution of the programs that the kernel manages, swaps a new kernel into memory, and then resumes program operation. This process is transparent to the programs that are running.
Even if you don't want to compile your kernel from source code, you may want to have the kernel source code available for a couple of reasons. First, the source code includes a documentation directory, described shortly, that can help you discover hardware-specific options or deal with obscure kernel features. Second, some programs rely on header files contained in the kernel source tree to compile. Thus, you may need to have an installed kernel, or at least these critical header files, to compile some non-kernel software.
You can download and unpack the Linux kernel source code much as you would any other source code tarball, as described in Chapter 1. Download the linux-version.tar.gz or linux-version.tar.bz2 file, where version is the version number. The patch-version.gz and patch-version.bz2 files are patch files, which you can use to upgrade an immediately preceding version of the kernel to the latest version. The upcoming section “Applying Kernel Patches” describes how to patch a kernel.
Traditionally, the Linux kernel source code resides in /usr/src/linux-version, where version is the version number, such as 2.6.35.4. A few distributions place their kernels in the /usr/src/kernels/linux-version directory. A symbolic link from /usr/src/linux should point to the current kernel source directory. This way, you can have several source trees available, but when a source code file references something in /usr/src/linux, it will find what it needs. If you unpack the source tarball, this symbolic link won't be created automatically, so you should do so by typing:
# rm /usr/src/linux
# ln -s /usr/src/linux-version /usr/src/linux
![]() It's best to verify that /usr/src/linux is a symbolic link before doing anything with it. You can do this by typing ls -ld /usr/src/linux, which displays the current file as either a directory or a symbolic link, with an expansion of the symbolic link, if that's what it is, so that you can see to which directory it links. If you find that /usr/src/linux is a directory, you can rename it with mv rather than delete it with rm.
It's best to verify that /usr/src/linux is a symbolic link before doing anything with it. You can do this by typing ls -ld /usr/src/linux, which displays the current file as either a directory or a symbolic link, with an expansion of the symbolic link, if that's what it is, so that you can see to which directory it links. If you find that /usr/src/linux is a directory, you can rename it with mv rather than delete it with rm.
If you want to use kernel source that exactly matches that used by your distribution, you can install it using your package manager. Look for a package called linux-source, kernel-devel, or something similar. A package called linux-headers, kernel-headers, or something similar contains just the headers necessary to compile software.
Reading Kernel Documentation
Before upgrading a kernel, it's advisable to read the documentation for the new kernel. You can read /usr/src/linux/README for an overview of the kernel, including compilation instructions. Documentation on specific drivers and kernel subsystems is in the /usr/src/linux/Documentation directory tree. Unfortunately, the kernel is big enough that this directory tree is a bit cluttered. The 00-INDEX file contains an overview of what each file and subdirectory contains, so you may want to peruse this file before doing anything else.
Most of the kernel documentation is highly technical. Some of it is written for programmers and will be quite mysterious to non-programmers. Other kernel documentation, though, can be useful to system administrators. This type of documentation often specifies options that can be passed to kernel modules at load time or to the kernel itself when it boots.
Locating Kernel Binaries
Like many other programs, the kernel source code by itself is of limited use. Once it's compiled, the kernel yields quite a few files, the most important of which fall into two categories:
The Main Kernel File This file holds the core parts of the kernel. It's loaded by the boot loader when the computer boots, and it is therefore very critical to the system's functioning.
Kernel Modules Kernel modules reside outside the main kernel file, typically in the /lib/modules directory tree. (Subdirectories in this directory correspond to different kernel versions.) Kernel modules can be loaded and unloaded after the system has booted, as described later in “Managing Kernel Modules at Runtime.”
The main kernel file usually resides in /boot, but sometimes it's placed in the root directory (/). It can have any of several names, as detailed in Table 2.1. Sometimes the names in Table 2.1 are altered by adding on a kernel version, as in bzImage-2.6.35.4. This practice enables you to keep multiple kernel versions ready on a computer, which is useful if you're not sure whether a new kernel will work correctly—you can install the new kernel without destroying the old one, giving you a fallback in case of problems.
| Name | Explanation |
| vmlinux | An uncompressed version of the Linux kernel file; usually generated as an intermediate step and not copied to /boot. This form of the kernel is not directly bootable, since it's missing a few features. |
| vmlinuz | A variant of vmlinux that's been compressed with any of several tools and rendered bootable by adding some features. Linux distribution providers typically use vmlinuz as the name for their precompiled binary kernels. |
| zImage | A largely obsolete format similar to the vmlinuz format. In the past, locally compiled kernels were traditionally given this name. As the kernel grew in size, though, zImage became inadequate on x86 systems, because zImage is limited in size to 512 KiB. |
| bzImage | A compressed version of the Linux kernel, similar to vmlinuz. It was created to overcome technical limitations of the zImage format. Locally compiled kernels are often given this name. |
| kernel | A generic name that's used on some systems that employ the GRUB 2 boot loader. It's typically a bzImage-style binary. |
Preparing a Kernel
If you want to compile your own kernel, you must first engage in a couple of preparatory steps. The first of these, which is not always necessary, is to patch the kernel to add new features or upgrade its version. The second step, which is critical, is to configure the kernel for your hardware.
Applying Kernel Patches
Patching a kernel enables you to make changes to the kernel source you have. One reason to patch a kernel is to save on download time: You can obtain a patch-version.gz or patch-version.bz2 file from the Linux Kernel Archives site and apply it to a Linux source code directory you already have. Because patch files are much smaller than full kernel tarballs, this practice can save time and network bandwidth. You must, however, apply the correct patch file or files to the correct kernel version. Mainstream patches from the Linux Kernel Archives site are applied to the immediately preceding base kernel version. For instance, you could apply either the patch-2.6.35.4.bz2 or patch-2.6.36.bz2 patch file to a 2.6.35 kernel source tree (with three, not four, dot-separated version numbers).
Another reason to apply a patch is to use a third-party or experimental driver, bug fix, or feature. Such code may eventually find its way into the kernel, but if you need it now, patching a kernel may be the only way to go. When applying such a patch, be sure to read the author's documentation; it's possible that the procedure will vary slightly (or significantly!) from the one described here.
To apply a patch, you should change into the current Linux source directory and type one of the following two commands, depending on which file you downloaded:
# gzip -cd ../patch-version.gz | patch -p1
# bzip2 -dc ../patch-version.bz2 | patch -p1
Adjust the path to the patch file, if necessary. Instead of doing this work manually, you can use the patch-kernel script in /usr/src/linux/scripts:
# /usr/src/linux/scripts/patch-kernel linux
This command looks for patch files in the current directory and applies them to the kernel found in the directory you specify (linux in this example). Monitor the output of the command carefully; it should report that various files have been changed or added. If you see messages that certain files couldn't be changed, then something is wrong—perhaps you're trying to apply a patch against an inappropriate kernel version, or you might be using an incorrect option to the patch command.
If a patch operation doesn't succeed, you can undo it by including the -R (--reverse) option to patch, as in patch -p1 -R as part of the complete commands shown previously.
![]() If you have a kernel with fixes (say, 2.6.35.4) and want to upgrade to patch the kernel to another version (say, 2.6.35.6 or 2.6.36), you can apply the patch for the version you have in reverse, using the -R option, and then apply the patch for the version you want without the -R option. The first step “downgrades” the kernel to the base version, and the second step patches the kernel to the version you want. If you want to upgrade by more than one version in the third position (say, 2.6.34 to 2.6.36), you will have to apply multiple patch files.
If you have a kernel with fixes (say, 2.6.35.4) and want to upgrade to patch the kernel to another version (say, 2.6.35.6 or 2.6.36), you can apply the patch for the version you have in reverse, using the -R option, and then apply the patch for the version you want without the -R option. The first step “downgrades” the kernel to the base version, and the second step patches the kernel to the version you want. If you want to upgrade by more than one version in the third position (say, 2.6.34 to 2.6.36), you will have to apply multiple patch files.
Assuming the patch process completes successfully, you should be able to proceed with configuring and building the kernel. If you've applied a third-party patch, be sure to pay attention to any configuration options related to that patch, as described in the patch's documentation.
As a practical matter, applying patches can be a modest time-saver; however, sloppy application of patches can cause problems. If you apply the wrong patch file, and especially if you don't properly fix this problem, you can end up with your kernel source code in a hopelessly inconsistent state. If you run into troubles, you can download the full kernel source tree and unpack it to start fresh.
Configuring the Kernel Source
Configuring the kernel can be a daunting task because of the vast number of kernel options available—2,994, as of version 2.6.35.4. If you're starting from your distribution's version of the kernel, though, chances are most of the options won't need to be changed; you should be able to home in on whatever options you want to change to achieve your goal in recompiling the kernel and leave the rest alone. If you're starting with a stock kernel, though, you'll have to be very careful, since there are many types of configuration options that, if set incorrectly, can lead to an unbootable kernel. You may need to know a great deal about your computer's hardware, and particularly its disk subsystem, to ensure the system can boot.
Investigating Your Hardware
Before you fire up the Linux kernel configuration utilities, you should learn something about the hardware on your system so that you'll know which hardware modules to install. You should also know what filesystems and other kernel-level features your system uses so that you can be sure to compile the necessary support into your new kernel.
![]() If in doubt, compile a driver or feature as a module. Unnecessarily compiling a module adds a fraction of a second to several seconds to the kernel compile time and consumes some disk space but won't usually cause other problems. An unused kernel module consumes no memory or CPU time on a running system.
If in doubt, compile a driver or feature as a module. Unnecessarily compiling a module adds a fraction of a second to several seconds to the kernel compile time and consumes some disk space but won't usually cause other problems. An unused kernel module consumes no memory or CPU time on a running system.
For the most part, the kernel includes drivers for hardware by the chipset it uses. The chipset is one or more chips that provide the functionality for the subsystem in question. The chipset is often manufactured by a company other than the one whose name appears on the product's box, which can make identifying your hardware difficult in some cases. Several approaches exist to solving this problem:
Using Hardware Manuals Documentation for your hardware, or even advertising on its box, may identify the chipset it uses. Pay attention to both the manufacturer and model number; sometimes a manufacturer produces several products, each of which requires a different Linux driver. One problem with this approach is that the same device may go by several names or model numbers. If the manufacturer uses one name in a manual and another name is used in the kernel configuration, you might miss the importance of the device.
Checking PCI Devices If you type lspci at a Linux shell prompt, you'll see a list of all the Peripheral Component Interconnect (PCI) and PCI Express (PCIe) devices on the computer. Most of the critical devices on a computer use the PCI or PCIe bus, so this can be a good way to identify what's on your computer.
Checking USB Devices Typing lsusb reveals Universal Serial Bus (USB) devices connected to your computer. This command will work properly only if there's support for the USB hardware built into the motherboard or plugged into the motherboard.
Checking Loaded Modules If you type lsmod at a Linux shell prompt, you'll see a list of the kernel modules that are currently loaded. Since most Linux distributions build as much hardware support as modules as is possible, this list is likely to be close to complete for your system; however, the module names (in the first column of output) can sometimes be cryptic. What is the r8169 driver, for instance? (It's a driver for a type of Ethernet card.) The driver names are referenced in the kernel configuration, but you need to know where to look for them. Also, if drivers are built directly into the kernel, they won't show up in the lsmod output, but they may be critical for normal system functioning.
Using a Working Kernel as a Model If you have the kernel configuration file (.config in the kernel source directory) for a working kernel, you can use that file as a model. The next section, “Using Kernel make Targets,” describes this approach in more detail.
Visual Inspection You can sometimes tell what drivers you need by looking at the hardware. This usually requires opening the computer and examining the names and model numbers stamped on the large chips on the motherboard and any plug-in hardware. Unfortunately, such identifying information is sometimes obscured by stickers or heat sinks. Between this problem and the need to open the computer, this method of identifying hardware is usually one of last resort.
You should pay particular attention to the drivers for the hard disk controller, Ethernet adapter, USB controller, and video adapter used by your computer. Support for sound hardware, printers, and scanners is usually less critical, since the computer will boot and do its most important functions even if support for these devices is missing. Hard disks, optical drives, keyboards, mice, network hubs, and broadband modems seldom need special drivers, although there are exceptions to this rule.
Some devices, including video hardware, printers, and scanners, employ drivers outside of the kernel. In the case of video hardware, kernel drivers exist to enable changes to the size and style of text-mode fonts or for certain non-X graphical programs; however, the most important video drivers are used by the X server, not the kernel. Printers and scanners both require kernel drivers for the interface hardware (such as a USB or parallel port), but drivers for the specific model device reside outside the kernel—in Ghostscript and the Common Unix Printing System (CUPS) for printers or in the Scanner Access Now Easy (SANE) or other scanning software for scanners.
The computer's role can be important in deciding on what drivers to build. For instance, a desktop system is likely to require drivers for sound hardware, advanced video devices, and so on; but such drivers are likely to be unimportant for a server.
Using Kernel make Targets
Once you've identified your major hardware components, you can begin configuring the kernel. This is done with the help of one or more make targets, as detailed in Table 2.2. A few other obscure options are available; see the /usr/src/linux/README file for details. Additional make targets, described in later sections of this chapter, actually build the kernel and help you install it.
TABLE 2.2 Common Linux kernel configuration make targets
| Target | Explanation |
| mrproper | Removes old configuration and temporary files. |
| oldconfig | Updates an old configuration file, updating only those items that are new. |
| silentoldconfig | Similar to oldconfig but reduces screen clutter. |
| defconfig | Creates a configuration file using default values for your platform. |
| allmodconfig | Creates a configuration file that uses modular configuration as much as possible. |
| config | Configures every item in the kernel using a text-based interface. Sluggish and impractical with modern kernels. |
| menuconfig | Configures the kernel using a text-based menu system. Adequate when using a text-based console. |
| xconfig | Similar to menuconfig, but configuration is done using a Qt-based GUI environment. |
| gconfig | Similar to xconfig but uses a GTK-based GUI environment. |
![]() Typing make help in the kernel source tree produces a list of make targets and brief descriptions of each one. This list includes much more than the configuration targets summarized in Table 2.2.
Typing make help in the kernel source tree produces a list of make targets and brief descriptions of each one. This list includes much more than the configuration targets summarized in Table 2.2.
If you want to be sure that the kernel source tree is in a pristine state, you should begin by typing make mrproper. This action cleans out all the old temporary and configuration files. If you're building a new kernel and have the source code for a working one available, you can copy the hidden .config file (which holds the kernel configuration) from a working kernel's source directory to the current directory and then type make oldconfig or make silentoldconfig. The program will then prompt you about various new features, such as:
Prompt for development and/or incomplete code/drivers (EXPERIMENTAL) [Y/n/?] y
Cross-compiler tool prefix (CROSS_COMPILE) [] (NEW)
If you don't know how to respond to certain queries, using the default answer (which is capitalized in most cases) is usually the best approach. Most features accept yes (y) and no (n) answers to their configuration prompts. Many features can be built as modules; you type m to implement modular compilation. A few features, such as the cross-compiler one in the preceding example, require free-form responses. Pressing the Enter key specifies the default, which is usually acceptable.
If you have no working kernel source as a model, you might want to start by typing make allmodconfig. The result, if you were to build the kernel immediately thereafter, would be a kernel that compiles as many components as modules as possible. Given an appropriate initial RAM disk (described later, in “Preparing an Initial RAM Disk”), such a kernel will work on most computers; but it may not be optimal. It will also take longer to compile than an optimized kernel, since you'll be compiling modules for huge numbers of hardware devices you don't have on your computer.
Setting Kernel Configuration Options
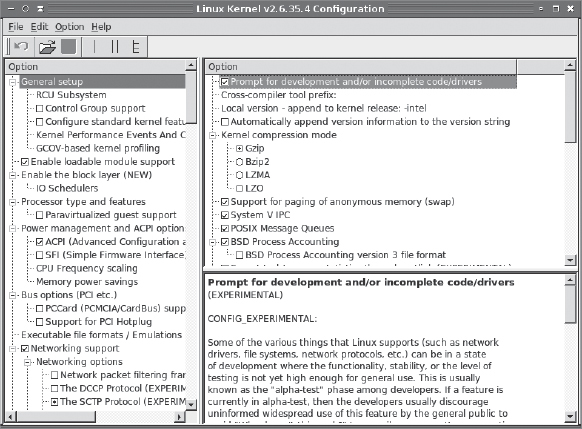
At this point, you should probably optimize your configuration further by using the menuconfig, xconfig, or gconfig target. Figure 2.1 shows the display created by typing make xconfig. Kernel options are arranged in a hierarchical fashion. In Figure 2.1, the main categories are shown in the left panel, while the top-right panel displays sub-options for whatever main category you've selected. Confusingly, the highest-level categories have sub-categories that expand below them in the left panel, as well as sub-options that are accessible in the top-right panel. Explanatory notes on the options appear in the bottom-right panel. You can select options by clicking them. A check mark means that an option will be compiled directly into the kernel, while a dot means that the option will be compiled as a module. (The gconfig target doesn't support this feature; you must check for a Y, M, or N character to the right of the option selection area. The text-based menuconfig uses a similar convention.) Not all options can be compiled as modules; some just don't work that way, and some options control features that aren't meaningful as modules. Such features give Y or N options, but not M.
FIGURE 2.1 A general kernel configuration target, such as xconfig, enables you to view and adjust all your compile-time kernel options.
The kernel configuration options change fairly frequently with kernel development, and the huge number of options precludes describing them all. The major categories change relatively infrequently, though. As of the 2.6.35.4 kernel, they are:
General Setup Miscellaneous and fairly high-level options appear in this category, including many that relate to how the system boots and what standards it supports.
Enable the Block Layer This short category includes some obscure options related to disk devices and how the kernel manages input/output (I/O) scheduling. Select the default options unless you have specific reason to do otherwise.
Processor Type and Features This section includes options that control how Linux manages the CPU, including several options that are CPU-specific. The Paravirtualized Guest Support subsection includes options that are important if you want to run certain types of virtualization software, which enables you to run another OS within your Linux system. (See also the Virtualization section, described shortly.)
Power Management and ACPI Options Options in this area relate to hardware features designed to minimize power use, including support for suspend-to-RAM and suspend-to-disk (or hibernation) features that are particularly important on laptop computers.
Bus Options (PCI, etc.) Over the course of Linux's history, several computer busses have been popular and then faded away. Old busses include the Industry Standard Architecture (ISA), the Extended ISA (EISA), the VESA Local Bus (VLB), Micro Channel Architecture (MCA), and NuBus. Depending on your platform, many of these obsolete busses may be available. You can trim your kernel size by removing them, if you're certain your hardware doesn't use them. This section also includes options related to PC Card (commonly used on laptops).
Executable File Formats/Emulations Your kernel should almost certainly support the Executable and Linkable Format (ELF) file format for binaries. Support for the older a.out format is seldom necessary today unless you have some extremely old binary programs you need to run. Including support for miscellaneous binaries is usually a good idea. On x86-64 systems, including support for IA32 is usually wise.
Networking Support This kernel configuration area is huge and includes a large number of options that can be confusing to the uninitiated. Note that low-level network hardware drivers do not reside in this area, but in the next one. You can usually greatly reduce compilation time and kernel (or at least module) size by perusing the options and removing unnecessary features. For instance, you're unlikely to need obscure networking stacks such as AppleTalk, DECnet, or IPX. On the other hand, if your local network uses one of these protocols, be sure it's installed!
Device Drivers This configuration area is enormous. It includes options to support most of the hardware devices managed directly by the kernel, including hard disk controllers, network hardware drivers, multimedia devices (TV tuner cards and Webcams), video card framebuffer drivers, sound cards, and low-level USB devices. Many other options in this area relate to obscure or obsolete hardware. Follow the recommendations for specific devices or elect to compile the driver, at least as a module, if you're uncertain what to do.
File Systems This category is extremely important, since it provides support for the filesystem used on your Linux boot device. Be sure to activate the appropriate filesystem, which is typically ext2fs, ext3fs, ext4fs, ReiserFS, XFS, JFS, or Btrfs on modern systems. CD-ROM, non-Linux, and other miscellaneous filesystems are listed in their own subcategories. The Partition Types subcategory is also important, since it controls what partitioning systems the kernel supports. On most systems, the PC BIOS (MS-DOS Partition Tables) Support option is most critical; this activates support for the Master Boot Record (MBR) system used on most x86 and x86-64 systems. The EFI GUID Partition Support option is important on Intel-based Macintoshes and is becoming important on other systems.
Kernel Hacking You can set options that are mostly of interest to kernel developers in this section. Occasionally even a non-developer will need to adjust options in this area, particularly if you're using an older kernel patch. (The Enable __deprecated Logic option, for instance, is required by some third-party drivers.)
Security Options A handful of security features can be controlled in this area.
Cryptographic API Some kernel features and non-kernel software require cryptographic modules to be present in the kernel. You can enable or disable them here.
Virtualization This category provides support for certain virtualization features, used to run another OS while Linux is running on the system.
Library Routines This section includes a handful of features that are used by other kernel modules or by user-space programs. Stick with the default settings unless you know they should be changed.
A few kernel features are particularly important and therefore deserve special mention:
General Setup ![]() Local Version You can add a string to the kernel version number using this option. This feature can be handy if you need to experiment with kernel options; you can build different kernels with different local version strings to signify different feature sets, thus keeping the kernels' module directories separated and producing different kernel identifiers when using uname or similar utilities.
Local Version You can add a string to the kernel version number using this option. This feature can be handy if you need to experiment with kernel options; you can build different kernels with different local version strings to signify different feature sets, thus keeping the kernels' module directories separated and producing different kernel identifiers when using uname or similar utilities.
General Setup ![]() Initial RAM Filesystem and RAM Disk (initramfs/initrd) Support Be sure to activate this support if you intend to use an initial RAM disk (described shortly, in “Preparing an Initial RAM Disk”).
Initial RAM Filesystem and RAM Disk (initramfs/initrd) Support Be sure to activate this support if you intend to use an initial RAM disk (described shortly, in “Preparing an Initial RAM Disk”).
General Setup ![]() Enable Loadable Module Support Be sure this option is enabled, unless you intend to build a kernel with nothing but built-in drivers—a strange configuration with serious drawbacks on typical desktop or server configurations today.
Enable Loadable Module Support Be sure this option is enabled, unless you intend to build a kernel with nothing but built-in drivers—a strange configuration with serious drawbacks on typical desktop or server configurations today.
Processor Type and Features ![]() Symmetric Multi-Processing Support This option enables support for more than one CPU or CPU core. Most modern computers have two or more cores, so activating this support makes sense unless you're certain that your CPU has just one core.
Symmetric Multi-Processing Support This option enables support for more than one CPU or CPU core. Most modern computers have two or more cores, so activating this support makes sense unless you're certain that your CPU has just one core.
Processor Type and Features ![]() Processor Family If you're building a kernel for a specific computer, or for a set of identical computers, you can eke out a bit of extra performance by setting the correct CPU model in this option.
Processor Family If you're building a kernel for a specific computer, or for a set of identical computers, you can eke out a bit of extra performance by setting the correct CPU model in this option.
Processor Type and Features ![]() High Memory Support This option is available for x86 CPUs, but not for x86-64 CPUs. You can use it to optimize performance based on how much RAM your computer has. If you have less than 1 GiB of RAM, select Off; if you have between 1 GiB and 4 GiB of RAM, select 4GB; and if you have more than 4 GiB of RAM, select 64GB. An incorrect selection can result in an inability to use all your system's memory.
High Memory Support This option is available for x86 CPUs, but not for x86-64 CPUs. You can use it to optimize performance based on how much RAM your computer has. If you have less than 1 GiB of RAM, select Off; if you have between 1 GiB and 4 GiB of RAM, select 4GB; and if you have more than 4 GiB of RAM, select 64GB. An incorrect selection can result in an inability to use all your system's memory.
![]() Most modern computers have 64-bit x86-64 CPUs. On such computers, it's best to run a 64-bit version of Linux, particularly if the computer has more than 4 GiB of RAM. Although Linux can support up to 64 GiB of RAM on a 32-bit x86 CPU, this configuration imposes extra work on the kernel and creates some subtle limitations for applications. A 64-bit CPU, by contrast, directly supports much more memory, which is why the High Memory Support option isn't present when compiling a 64-bit kernel—it's needed only as a workaround for older 32-bit CPUs.
Most modern computers have 64-bit x86-64 CPUs. On such computers, it's best to run a 64-bit version of Linux, particularly if the computer has more than 4 GiB of RAM. Although Linux can support up to 64 GiB of RAM on a 32-bit x86 CPU, this configuration imposes extra work on the kernel and creates some subtle limitations for applications. A 64-bit CPU, by contrast, directly supports much more memory, which is why the High Memory Support option isn't present when compiling a 64-bit kernel—it's needed only as a workaround for older 32-bit CPUs.
Networking Support ![]() Networking Options
Networking Options ![]() TCP/IP Networking Almost all modern computers need this option, since the Transmission Control Protocol/Internet Protocol (TCP/IP) is the basis of the Internet. This option contains a large number of suboptions. Peruse them and follow the suggestions or your judgment based on your knowledge of your local network and the computer's role in it. Note in particular the IPv6 Protocol suboption, which controls support for the next-generation version of TCP/IP, which is becoming a necessity in some areas.
TCP/IP Networking Almost all modern computers need this option, since the Transmission Control Protocol/Internet Protocol (TCP/IP) is the basis of the Internet. This option contains a large number of suboptions. Peruse them and follow the suggestions or your judgment based on your knowledge of your local network and the computer's role in it. Note in particular the IPv6 Protocol suboption, which controls support for the next-generation version of TCP/IP, which is becoming a necessity in some areas.
Networking Support ![]() Networking Options
Networking Options ![]() Network Packet Filtering Framework This option is critical if you want to configure a router or enable firewall rules on your computer.
Network Packet Filtering Framework This option is critical if you want to configure a router or enable firewall rules on your computer.
Networking Support ![]() Networking Options
Networking Options ![]() Wireless Be sure to enable this option if your computer uses a wireless network adapter.
Wireless Be sure to enable this option if your computer uses a wireless network adapter.
Device Drivers ![]() SCSI Device Support The Small Computer Systems Interface (SCSI) standard is a high-end disk interface. (It's also used by some scanners, printers, and other devices.) Although it's rare in modern computers, Linux uses a SCSI emulation layer for many devices, including drivers for the more common Serial Advanced Technology Attachment (SATA) disk interface and USB storage devices. Therefore, you must enable SCSI support, including support for SCSI disks and, usually, SCSI CD-ROMs, on most systems. If your system lacks true SCSI devices, though, you can usually uncheck the SCSI Low-Level Drivers section, omitting the large number of SCSI drivers from your build.
SCSI Device Support The Small Computer Systems Interface (SCSI) standard is a high-end disk interface. (It's also used by some scanners, printers, and other devices.) Although it's rare in modern computers, Linux uses a SCSI emulation layer for many devices, including drivers for the more common Serial Advanced Technology Attachment (SATA) disk interface and USB storage devices. Therefore, you must enable SCSI support, including support for SCSI disks and, usually, SCSI CD-ROMs, on most systems. If your system lacks true SCSI devices, though, you can usually uncheck the SCSI Low-Level Drivers section, omitting the large number of SCSI drivers from your build.
Device Drivers ![]() Serial ATA and Parallel ATA Drivers This section includes drivers for most modern and many older SATA and PATA disk controllers. Enable the overall section and peruse it until you find your disk controller. Note that many controller chipsets include both SATA and PATA support, but these are often listed separately in this driver section. Thus, you may need to enable both SATA and PATA drivers. If you're building a kernel for a specific computer with a known chipset, I recommend building these drivers directly into the kernel, rather than as modules.
Serial ATA and Parallel ATA Drivers This section includes drivers for most modern and many older SATA and PATA disk controllers. Enable the overall section and peruse it until you find your disk controller. Note that many controller chipsets include both SATA and PATA support, but these are often listed separately in this driver section. Thus, you may need to enable both SATA and PATA drivers. If you're building a kernel for a specific computer with a known chipset, I recommend building these drivers directly into the kernel, rather than as modules.
Device Drivers ![]() Multiple Devices Driver Support This section includes options for Redundant Array of Independent Disks (RAID) and Logical Volume Manager (LVM) configurations, which are advanced disk management tools described in Chapter 4, “Advanced Disk Management.”
Multiple Devices Driver Support This section includes options for Redundant Array of Independent Disks (RAID) and Logical Volume Manager (LVM) configurations, which are advanced disk management tools described in Chapter 4, “Advanced Disk Management.”
Device Drivers ![]() Graphics Support On most x86 and x86-64 systems, the features in this section are optional; however, enabling framebuffer support for your video chipset and framebuffer console support will provide you with advanced options for adjusting text-mode consoles. On some other platforms, you must include framebuffer support to get a text-mode console, and sometimes even for X.
Graphics Support On most x86 and x86-64 systems, the features in this section are optional; however, enabling framebuffer support for your video chipset and framebuffer console support will provide you with advanced options for adjusting text-mode consoles. On some other platforms, you must include framebuffer support to get a text-mode console, and sometimes even for X.
![]() Proprietary X Window System video drivers from AMD and nVidia include kernel modules that are compiled separately from the kernel. The standard kernel framebuffer drivers are incompatible with at least some proprietary X drivers, so be cautious about compiling the framebuffer drivers directly into the kernel if you intend to use the proprietary drivers. (Compiling the framebuffer drivers as modules should be safe, though.) You should consult the proprietary driver's documentation for details.
Proprietary X Window System video drivers from AMD and nVidia include kernel modules that are compiled separately from the kernel. The standard kernel framebuffer drivers are incompatible with at least some proprietary X drivers, so be cautious about compiling the framebuffer drivers directly into the kernel if you intend to use the proprietary drivers. (Compiling the framebuffer drivers as modules should be safe, though.) You should consult the proprietary driver's documentation for details.
Device Drivers ![]() USB Support This area includes both drivers for low-level USB hardware (typically built into the motherboard or on a plug-in card) and for a few USB devices or device categories, such as USB Mass Storage Support, which is used to interface with USB flash drives and other plug-in media. Many USB devices require support in other areas of the kernel, too.
USB Support This area includes both drivers for low-level USB hardware (typically built into the motherboard or on a plug-in card) and for a few USB devices or device categories, such as USB Mass Storage Support, which is used to interface with USB flash drives and other plug-in media. Many USB devices require support in other areas of the kernel, too.
Once you've checked all the kernel options you care to examine, you can exit from the configuration tool. It will save a new .config file, which will then guide make in determining what kernel features to compile.
Compiling a Kernel
With configuration out of the way, you can compile your kernel and prepare the system to use it. The build process is fairly straightforward, but you must then copy the kernel file to /boot, install kernel modules, prepare an initial RAM disk, and modify your GRUB configuration to point to the new kernel. You may also want to prepare a package file in some situations.
Building a Kernel
To build a kernel, type make in the kernel's source directory. Assuming you have the necessary development tools installed and that your kernel configuration contains no glaring errors, the build process will proceed smoothly. This process requires no additional input from you, but it will take a while—several minutes to more than an hour, depending on the speed of the computer and how many kernel features you're compiling. As the process proceeds, you'll see summary lines displayed on the screen:
CC kernel/time/tick-sched.o
LD kernel/time/built-in.o
CC kernel/futex.o
These lines summarize what's being done in the process. For the most part, you need only be concerned that the compilation is proceeding. If the output ceases, something may be wrong—or perhaps the file being compiled is unusually large.
![]() The default make target for the Linux kernel builds both the main kernel file and all the separate kernel modules. This is equivalent to typing make all. You can build the kernel and modules separately by typing make bzImage to build the kernel or make modules to build the modules. On some platforms, you can type make zImage instead of make bzImage.
The default make target for the Linux kernel builds both the main kernel file and all the separate kernel modules. This is equivalent to typing make all. You can build the kernel and modules separately by typing make bzImage to build the kernel or make modules to build the modules. On some platforms, you can type make zImage instead of make bzImage.
On rare occasions, compilation will fail and you'll see an error message. This can happen because you're using a newer or older compiler than the Linux kernel developers expect or because of a glitch in the configuration. There are no certain rules for how to proceed, but you can try several approaches to fix the problem:
- If the error occurred when compiling a feature that's not absolutely necessary for your system, you can go back into the configuration tool and remove it.
- If the feature is required, you might get better results changing it from being built as a module to being built into the kernel, or vice versa.
- Sometimes you'll need to track down a feature upon which the failed one depends; normally the developers correctly flag such dependencies, but on occasion something gets overlooked.
- If you've patched the kernel, review your patching procedure. Be sure you applied the patch to the correct kernel version, and double-check that the patch was applied successfully. You might try compiling an unpatched version of the kernel for comparison.
- If you have more than one version of the GNU Compiler Collection (GCC) installed, try using a different version to compile the kernel.
- Try compiling a different version of the kernel. Even if you need a specific version, you might find a clue to the source of the problem when you compile another kernel.
![]() You can pipe make's output through grep to search for the string error, as in make | grep -iw “error”, to reduce the clutter of make's output and view only error messages.
You can pipe make's output through grep to search for the string error, as in make | grep -iw “error”, to reduce the clutter of make's output and view only error messages.
A successful kernel compilation terminates with no error messages. If you typed make bzImage, you should see a message similar to the following:
Kernel: arch/x86/boot/bzImage is ready (#1)
If you typed make to build both the main kernel file and all modules, that message will be buried quite a way up in the output, and the final lines will likely be simple status messages relating to the compilation of the last few kernel modules.
Installing a Kernel Binary
With the kernel compiled, you can install it. In other words, you can copy it from its location in the kernel source tree to the /boot directory. On most platforms, the compiled and ready-to-use kernel binary is called bzImage, but it could have another name on some platforms. (Consult Table 2.1 for details.) If you're compiling a kernel for an x86 or x86-64 system, it will be in the arch/x86/boot subdirectory of the kernel source tree, as specified near the end of the compilation messages. On other platforms, the location should be similar, although the x86 portion will reflect your CPU architecture.
![]() Some distributions and administrators maintain a separate /boot partition and keep it unmounted most of the time in order to prevent accidental damage to critical boot files. If this is true of your system, be sure to mount the /boot partition before you copy your new kernel there. If you don't, the kernel won't reside where it should and your system won't boot correctly.
Some distributions and administrators maintain a separate /boot partition and keep it unmounted most of the time in order to prevent accidental damage to critical boot files. If this is true of your system, be sure to mount the /boot partition before you copy your new kernel there. If you don't, the kernel won't reside where it should and your system won't boot correctly.
You can copy the bzImage file to /boot just as you would any other file, although you must normally be root to do the job. You may want to rename the file, adding its version number so as to enable multiple kernels to coexist:
# cp arch/x86/boot/bzImage /boot/bzImage-2.6.35.4
Remember the filename you give to the kernel file, since you'll need it later, when you add the kernel to your GRUB configuration.
In addition to the kernel file, you may want to copy the System.map file. This file contains pointers to functions in the kernel and is used for debugging kernel problems. Thus, copying it isn't critical, but it can be helpful. Once the system is running, /boot/System.map should be a symbolic link to the current System.map file. Thus, completely copying and setting up this file takes three commands:
# cp System.map /boot/System.map-2.6.35.4
# rm /boot/System.map
# ln -s /boot/System.map-2.6.35.4 /boot/System.map
You can put off these commands until after you've booted into your new kernel, if you like.
Typing make install serves as a shortcut for copying the kernel file, copying the System.map file, and often creating an initial RAM disk and modifying the GRUB configuration for the new kernel. The details vary from one distribution to another, though, since the install target relies on the installkernel script, which many distribution providers customize. This option can be a useful way to minimize kernel preparation effort; however, if you need to customize your installation or if you're not sure what your distribution's scripts do, you may prefer to perform the individual tasks manually instead.
Installing Kernel Modules
Installing kernel modules is easy: As root, type make modules_install. The make utility will create a subdirectory in /lib/modules named after the kernel version number, such as /lib/modules/2.6.35.4, and then copy the kernel modules into this subdirectory, creating additional levels of subdirectories for certain sets of modules.
![]() If you forget to install the kernel modules, the computer might not boot into the new kernel. If the computer does boot, any hardware or other feature managed by a modular driver won't work.
If you forget to install the kernel modules, the computer might not boot into the new kernel. If the computer does boot, any hardware or other feature managed by a modular driver won't work.
In operation, Linux requires information on the dependencies between kernel modules. These dependencies are stored in a file called modules.dep, which is stored in the kernel modules directory. You can regenerate this file for the currently running kernel by typing depmod as root. As part of the module installation process, depmod is called to generate a modules.dep file for the new kernel modules.
![]() Objective 201.4 refers to a depmod target to make. Such a target does not exist, as of the 2.6.35.4 kernel; however, as just noted, the modules_install target does call the depmod utility.
Objective 201.4 refers to a depmod target to make. Such a target does not exist, as of the 2.6.35.4 kernel; however, as just noted, the modules_install target does call the depmod utility.
Preparing an Initial RAM Disk
An initial RAM disk (aka an initial RAM filesystem) is a collection of critical kernel modules and a handful of system utilities that the boot loader reads from disk and passes to the kernel at boot time. The kernel accesses them in memory as if they were on disk, loading modules and running scripts and programs from the RAM disk in order to mount the root filesystem. Thereafter, additional tools can be accessed from the hard disk using the drivers that are built into the kernel or that the kernel loaded from the RAM disk.
When Should You Prepare an Initial RAM Disk?
If your kernel includes all the drivers it needs to boot within the main kernel file, an initial RAM disk isn't usually necessary; however, it's easy to overlook a critical module. If your system uses an advanced disk management system, such as a software RAID or LVM configuration, or a storage area network (SAN), an initial RAM disk may also be required to fully activate these subsystems.
![]() Support for an initial RAM disk must be built into the kernel, as described earlier in “Setting Kernel Configuration Options.” You can specify a cpio archive to use as an initial RAM disk when you build the kernel, but it's more common to pass the filename to the kernel via a GRUB menu entry, as described later in “Adding a Kernel to GRUB.”
Support for an initial RAM disk must be built into the kernel, as described earlier in “Setting Kernel Configuration Options.” You can specify a cpio archive to use as an initial RAM disk when you build the kernel, but it's more common to pass the filename to the kernel via a GRUB menu entry, as described later in “Adding a Kernel to GRUB.”
Unfortunately, the tools and procedures needed to build an initial RAM disk vary from one distribution to another, so there is no one procedure that works on all systems. Two tools are common, though: mkinitrd and mkinitramfs. Some distributions ship with still other tools, some of which are built atop these. For instance, Gentoo Linux provides a tool called genkernel, which can help automate various kernel generation steps. Typing genkernel initramfs builds an initial RAM disk for the current kernel (that is, the one to which /usr/src/linux points).
Using mkinitrd
The mkinitrd program is common on Red Hat, Fedora, and related distributions. To use it, you must pass it an initial RAM disk image name and a kernel version number, as in:
# mkinitrd /boot/initrd-2.6.35.4.img 2.6.35.4
This command creates the /boot/initrd-2.6.35.4.img file using kernel modules for the 2.6.35.4 kernel. The mkinitrd utility supports a number of options, which are summarized in Table 2.3.
| Option | Explanation |
| --version | Displays the mkinitrd version number. |
| -v | Displays verbose information on actions as they're being performed. |
| --preload=module | Loads the module before the SCSI modules on system boot. This option may be repeated for as many modules as desired. |
| --with=module | Loads the module after the SCSI modules on system boot. This option may be repeated for as many modules as desired. |
| --builtin=module | Causes mkinitrd to behave as if the specified module were built into the kernel, even if it isn't. |
| -f | Enables overwriting an existing image file. Ordinarily, mkinitrd aborts its operation if an image file of the specified name exists. |
| --fstab=filename | Probes filename to determine what filesystem support is necessary. If this option is omitted, /etc/fstab is used. |
| --image-version | Appends the kernel version number to the initrd image path before the image is created. |
| --nocompress | Causes the image file to be uncompressed. (Normally, it's compressed with gzip.) |
| --nopivot | Causes the image to not use the pivot_root system call in the initial RAM disk. This enables the system to work with old 2.2.x kernels, but some filesystems (such as ext3fs) won't work. This option is scheduled to be removed in the future. |
| --omit-lvm-modules | Omits LVM modules from the image, even if /etc/fstab makes them seem necessary. |
| --omit-raid-modules | Omits RAID modules from the image, even if /etc/fstab makes them seem necessary. |
| --omit-scsi-modules | Omits SCSI modules from the image. |
Using mkinitramfs
If your system doesn't include mkinitrd, it may rely on the similar mkinitramfs. It works in a similar way, except that you must use -o to specify the output filename for the RAM disk file:
# mkinitramfs -o /boot/initramfs-2.6.35.4.img 2.6.35.4
As with mkinitrd, various options are available that can modify the program's actions. These are summarized in Table 2.4.
TABLE 2.4 Options to mkinitramfs
| Option | Explanation |
| -d confdir | Sets the configuration file directory for the program. The default is /etc/initramfs-tools. |
| -k | Causes the program to retain the temporary directory used to create the image. (This directory is normally deleted after image creation.) |
| -o outfile | Sets the output image filename. |
| -r root | Sets the Linux system's root partition. This is normally passed by the boot loader. |
| -v | Creates verbose output of actions as mkinitrd performs them. |
| --supported-host-version=version | Queries if the program can create a RAM disk image for a running kernel of the specified version. |
| --supported-target-version=version | Queries if the program can create a RAM disk image for a kernel of the specified version. |
| version | Sets the kernel version number; 2.6.35.4 in the preceding example. If this option is omitted, the currently running kernel version is used. |
Preparing a Kernel Package
If you maintain many Linux systems, you might want to prepare a kernel once for all of them. To simplify maintenance, you may then want to package your kernel into an RPM Package Manager (RPM) or Debian package. These tasks can be accomplished with the rpm-pkg, binrpm-pkg, and deb-pkg targets to make in the Linux kernel source directory. These targets create a source and binary RPM, a binary RPM only, and a Debian binary package, respectively. These targets require that the computer have the appropriate package tools installed, of course. The packages built in this way will be available in your usual RPM build directory for the RPM build targets or in the /usr/src directory for the Debian target.
You can copy the binary package to any computer with a compatible architecture and hardware and install it just as you'd install a binary kernel package provided by the distribution maintainer. You should be sure, however, that the kernel includes all the necessary drivers and features used by all of the computers on which you intend to install it. If you're maintaining many identical computers, this task isn't too hard; you can test the kernel on one system and then, if it works, package it up for the others. The task of ensuring compatibility is harder if you're maintaining computers with different motherboards, video cards, network interfaces, and other features. In this case, it's entirely possible that the kernel will work fine on one computer but fail completely on another.
![]() On an RPM-based system, install a new kernel with the -i option to rpm, rather than -U. Using -i installs the new kernel without replacing the old one. If you use -U, the old kernel will be removed, which can result in an unbootable system if the new kernel lacks a key driver.
On an RPM-based system, install a new kernel with the -i option to rpm, rather than -U. Using -i installs the new kernel without replacing the old one. If you use -U, the old kernel will be removed, which can result in an unbootable system if the new kernel lacks a key driver.
Adding a Kernel to GRUB
With your new kernel built and all its files in place, it's time to add your new kernel to your boot loader configuration. Chapter 1 describes both the GRUB Legacy and GRUB 2 boot loader configuration process, so you should consult if for details of what the various boot options mean.
If you installed a kernel in binary form from a distribution's package manager, chances are you won't need to explicitly edit your boot loader configuration. Binary installations of this type typically update your GRUB configuration automatically. If you built your kernel yourself, though, you will almost certainly have to edit your boot loader configuration to include the new kernel.
Adding a Kernel to GRUB Legacy
As a general rule, the easiest way to add a new kernel to a GRUB Legacy configuration is to copy an existing entry and then modify it for your new kernel. A typical configuration looks something like this:
title Fedora (2.6.32)
   root (hd0,0)
   kernel /vmlinuz-2.6.32 ro root=/dev/sda5
   initrd /initrd-2.6.32
To add a new kernel, you should first copy this entry and then modify it. Pay particular attention to three details:
- Change the title line so that you can uniquely identify your new kernel.
- Change the kernel filename listed on the kernel line to match your new kernel. Remember that the kernel filename is specified relative to the partition's root, not the Linux filesystem's root. In this example, the kernel is probably located on a separate /boot partition.
- If the new kernel uses an initial RAM disk, adjust the initrd line to point to the new file, or add an initrd line if it isn't present in the original entry. If the new kernel does not use an initial RAM disk, be sure to remove any initrd line that's present in the model entry.
The GRUB entries provided by distribution maintainers often include additional options on the kernel line or other features. In most cases, it's best to keep those additional features in place in your copy of the entry. Sometimes removing an option you don't understand won't do any real harm; however, sometimes it's critical to making the system boot.
![]() You can research options passed to the kernel on the kernel line using the Linux kernel documentation, as described previously in “Reading Kernel Documentation.”
You can research options passed to the kernel on the kernel line using the Linux kernel documentation, as described previously in “Reading Kernel Documentation.”
As described in Chapter 1, GRUB Legacy uses a default line to specify which kernel to boot by default. When you add your new kernel, you can place it before or after your existing kernel configuration, as you see fit. You may then want to modify the default line to point to the new kernel; however, if you do this and the new kernel doesn't work properly, you'll have to manually select another kernel when you reboot to fix the problem.
![]() Do not replace your most recent working kernel entry when you first create your new kernel entry! If the new kernel doesn't work and there are no other options, your system will be difficult to recover. If you want to keep your boot options uncluttered, you can remove old kernel entries from the configuration, but you should wait until after you've tested your new kernel before doing so.
Do not replace your most recent working kernel entry when you first create your new kernel entry! If the new kernel doesn't work and there are no other options, your system will be difficult to recover. If you want to keep your boot options uncluttered, you can remove old kernel entries from the configuration, but you should wait until after you've tested your new kernel before doing so.
Adding a Kernel to GRUB 2
Before you proceed with any GRUB 2 reconfiguration, I recommend backing up /boot/grub/grub.cfg. If you encounter serious problems booting your new system, you can use an emergency boot disc to restore the old but working file over the new but broken one.
In some cases, adding a kernel to GRUB 2 is easier than adding one to GRUB Legacy. This is because GRUB 2 includes system probe scripts, such as update-grub or grub-mkconfig, to scan the computer for Linux kernels and non-Linux OSs and to update the actual boot-time GRUB configuration file (/boot/grub/grub.cfg). Thus, after you create and install a new kernel, you should type update-grub as root. (If grub-mkconfig is present, you can try it if update-grub doesn't work.) Check the output of this script, or the /boot/grub/grub.cfg file, for references to your new kernel. If they're present, chances are these entries will work, so you can reboot and try the new system.
If the automatic scripts don't detect your kernel, sometimes you can overcome the problem by renaming the kernel in a way that the script will understand. Sometimes the scripts look only for kernels with names that begin with vmlinuz or kernel, so you can try renaming your kernel to match that pattern and try again. If that doesn't work or if you prefer to create a custom GRUB 2 configuration by hand, you can edit the /etc/grub.d/40_custom file and create an entry for your new kernel, as described in Chapter 1. An example entry looks like this:
menuentry “Fedora (2.6.35.4)” {
   set root=(hd0,1)
   linux /vmlinuz-2.6.35.4 ro root=/dev/sda5
   initrd /initrd-2.6.35.4
}
If your existing /etc/grub.d/40_custom file already contains such an entry, use it as a model; copy it and modify the menuentry name, the kernel filename on the linux line, and the initial RAM disk filename on the initrd line—the same three critical details you must modify when adapting a GRUB Legacy entry (although GRUB 2 changes two of the keywords used to identify these items).
If your system lacks a /etc/grub.d/40_custom file or if it contains no entries, you can use the preceding example as a bare-bones model, or you can peruse /etc/grub/grub.cfg for models. The latter is likely to provide more complex models with additional options, which may or may not work better than the simple example shown here. If in doubt, you can create two or more entries and try each one, then delete any non-functional or unnecessary entries once you've determined what works best.
To change the default kernel, you must edit the /etc/default/grub file and change the GRUB_DEFAULT entry:
GRUB_DEFAULT=0
Unfortunately, the number of the default entry can be difficult to determine until you've generated a /boot/grub/grub.cfg file by typing update-grub or grub-mkconfig. Thus, you may need to type this command, then count the entries in the final file to determine which one you want to use as a default, then modify /etc/default/grub, and finally type update-grub or grub-mkconfig again. Alternatively, you can locate the default entry in /boot/grub/grub.cfg and modify it directly:
set default=“0”
This change will not, however, be retained when you (or some automated script) rebuild the /boot/grub/grub.cfg file.
Managing Kernel Modules at Runtime
Early Linux kernels consisted of a single file, which was loaded into memory by the boot loader. Although modern kernels still use this primary kernel file, Linux has supported kernel modules for several years. Placing most drivers in modules helps keep the size of the main kernel file down, enables the use of a single “generic” kernel on many computers without bloating the kernel's size too much, and gives users control over when and how drivers are loaded. This approach does require learning something about how modules are controlled, though. To begin, you must know how to obtain information on your kernel version and the modules that are currently loaded. Loading modules is also important for their use, and this task can be accomplished both by configuring boot files for modules you want to be used frequently and by using one-off commands. Similarly, unloading kernel modules can be important in some cases. Finally, some tools can help you maintain your kernel modules, such as changing default options and updating system information about available modules.
Obtaining Information About the Kernel and Its Modules
Before tweaking your kernel modules, you should know something about the kernel and the already installed modules. This information can be helpful because it can inform your decision of whether loading a new module is necessary, what modules are being used by other modules, and so on.
Learning About the Kernel
You can obtain the most important information about the kernel via the uname command:
$ uname -a
Linux nessus 2.6.35.4 #3 SMP PREEMPT Sun Sep 26 23:32:11 EDT 2010 x86_64
AMD Athlon(tm) 64 X2 Dual Core Processor 5400+ AuthenticAMD GNU/Linux
This program provides several types of information, and you can tell it what information to provide with various options, as summarized in Table 2.5.

![]() Some of these options may seem odd. After all, you probably know perfectly well that you're running Linux, so why use a -k or -o option? The uname tool is available on non-Linux Unix-like OSs, though, and so it's a handy way for cross-platform scripts to learn something about the OS on which they're running. The scripts can then adjust themselves to work correctly on Linux, FreeBSD, Solaris, Mac OS X, or other environments. If you write such a script, be aware that some OSs support only the long forms of the options (say, --operating-system rather than -o), so you should use the long form in scripts that might run on non-Linux systems.
Some of these options may seem odd. After all, you probably know perfectly well that you're running Linux, so why use a -k or -o option? The uname tool is available on non-Linux Unix-like OSs, though, and so it's a handy way for cross-platform scripts to learn something about the OS on which they're running. The scripts can then adjust themselves to work correctly on Linux, FreeBSD, Solaris, Mac OS X, or other environments. If you write such a script, be aware that some OSs support only the long forms of the options (say, --operating-system rather than -o), so you should use the long form in scripts that might run on non-Linux systems.
For your own use, the kernel release information is likely to be the most important. Some third-party kernel modules come in precompiled forms that work only with certain kernels, so if your kernel version doesn't match, you may need to rebuild the right version, as described earlier in “Compiling a Kernel.” The architecture and CPU data can also be important if you don't already know this information. Some programs work only with certain CPUs, and if you need to evaluate the speed of a system you've not used before, this can provide you with some important basic data. Precompiled kernel modules also typically work only with one type of CPU. For instance, you couldn't load a binary module for an x86 CPU on an x86-64 kernel such as the one that produced the preceding example output.

Kernel Information and Control
The /proc directory houses a variety of files that provide information on, and enable control of, many different Linux subsystems. This directory isn't an ordinary disk directory; it's a virtual filesystem, meaning that it's generated on the fly as a means of interfacing with programs and users. (The /dev and /sys directories are two other examples of virtual filesystems in Linux.)
Of particular interest to the kernel is the /proc/sys/kernel subdirectory, which contains a large number of files that enable you to view and adjust kernel settings. As a practical matter, you're unlikely to need to use this directory very often, since command-line tools provide a more convenient interface. For instance, uname provides access to various files in this directory, such as /proc/sys/kernel/ostype (uname -s) and /proc/sys/kernel/version (uname -v).
Learning About the Kernel Modules
You can learn about the modules that are currently loaded on your system by using lsmod, which takes no options and produces output like this:
$ lsmod
Module              Size Used by
usblp               9283 0
e100               26134 0
r8169              31795 0
bridge             40462 0
snd_hda_intel      17848 2
sr_mod             10922 0
cdrom              28375 1 sr_mod
dm_mirror          10907 0
dm_region_hash      6280 1 dm_mirror
dm_log              7344 2 dm_mirror,dm_region_hash
![]() This output has been edited for brevity. Although outputs this short are possible with certain configurations, they're rare.
This output has been edited for brevity. Although outputs this short are possible with certain configurations, they're rare.
The most important column in this output is the first one, labeled Module; this column specifies the names of all the modules that are currently loaded. You can learn more about these modules with modinfo, as described shortly, but sometimes their purpose is fairly obvious. For instance, the cdrom module provides access to the CD-ROM (or other optical disc) drive.
The Used by column of the lsmod output describes what's using the module. All the entries have a number, which indicates the number of other modules or processes that are using the module. For instance, in the preceding example, the usblp module (used to access USB printers) is not currently in use, as revealed by its 0 value, but the snd_hda_intel module (used to access sound hardware) is being used, as shown by its value of 2. If one of the modules is being used by another module, the using module's name appears in the Used by column. For instance, the sr_mod module relies on the cdrom module, so the latter module's Used by column includes the sr_mod module name. This information can be useful when managing modules. For instance, if your system produced the preceding output, you couldn't directly remove the cdrom module because it's being used by the sr_mod module, but you could remove the sr_mod module, and after doing so you could remove the cdrom module. (Both modules would need to be added back to read optical discs, though.)
![]() The lsmod command only displays information on kernel modules, not on drivers that are compiled directly into the Linux kernel. For this reason, a module might need to be loaded on one system but not on another to use the same hardware because the second system might compile the relevant driver directly into the kernel.
The lsmod command only displays information on kernel modules, not on drivers that are compiled directly into the Linux kernel. For this reason, a module might need to be loaded on one system but not on another to use the same hardware because the second system might compile the relevant driver directly into the kernel.
You can learn still more about kernel modules with the help of the modinfo command. Normally, you type this command followed by the name of the module in which you're interested:
$ modinfo sr_mod
filename:       /lib/modules/2.6.35.4/kernel/drivers/scsi/sr_mod.ko
license:        GPL
alias:          scsi:t-0x04*
alias:          scsi:t-0x05*
alias:          block-major-11-*
license:        GPL
description:    SCSI cdrom (sr) driver
srcversion:     8B17EBCB6C3BD4B1608CC70
depends:        cdrom
vermagic:       2.6.35.4 SMP preempt mod_unload modversions
parm: xa_test:int
The information returned usually includes the filename, its license name, aliases by which it's known, a brief description, the names of any modules upon which it depends, some kernel version information, and parameters that can be passed to the module. The exact information returned depends on the module, though; some omit some of these fields or add others. If you're interested in only one field, you can specify it with the -F fieldname option, as in modinfo -F description sr_mod to obtain the description for the sr_mod module.
The modinfo utility is most useful for learning a bit about modules you've seen in lsmod output that you can't readily identify. Unfortunately, many modules lack the helpful description field, so in practice, modinfo is often less helpful than it might be.
Loading Kernel Modules
Linux enables you to load kernel modules with two programs: insmod and modprobe. The insmod program inserts a single module into the kernel. This process requires that any modules upon which the module you're loading relies are already loaded. The modprobe program, by contrast, automatically loads any depended-on modules and so is generally the preferred way to do the job.
![]() In practice, you may not need to use insmod or modprobe to load modules because Linux can load them automatically. This ability relies on the kernel's module auto-loader feature, which must be compiled into the kernel, and on various configuration files, which are also required for modprobe and some other tools. Using insmod and modprobe can be useful for testing new modules or for working around problems with the auto-loader, though.
In practice, you may not need to use insmod or modprobe to load modules because Linux can load them automatically. This ability relies on the kernel's module auto-loader feature, which must be compiled into the kernel, and on various configuration files, which are also required for modprobe and some other tools. Using insmod and modprobe can be useful for testing new modules or for working around problems with the auto-loader, though.
In practice, insmod is a fairly straightforward program to use; you type it followed by the module filename:
# insmod /lib/modules/2.6.35.4/kernel/drivers/cdrom/cdrom.ko
This command loads the cdrom.ko module, which you must specify by filename. Modules have module names, too, which are usually the same as the filename but without the extension, as in cdrom for the cdrom.ko file. Unfortunately, insmod requires the full module filename, which can be tedious to type—or even to locate the file!
You can pass additional module options to the module by adding them to the command line. Module options are highly module-specific, so you must consult the documentation for the module to learn what to pass. Examples include options to tell an RS-232 serial port driver what interrupt to use to access the hardware or to tell a video card framebuffer driver what screen resolution to use.
Some modules depend on other modules. In these cases, if you attempt to load a module that depends on others and those other modules aren't loaded, insmod will fail. When this happens, you must either track down and manually load the depended-upon modules or use modprobe. In the simplest case, you can use modprobe just as you use insmod, by passing it a module name:
# modprobe cdrom
As with insmod, you can add kernel options to the end of the command line. Unlike insmod, you specify a module by its module name rather than its module filename when you use modprobe. Generally speaking, this helps make modprobe easier to use, as does the fact that modprobe automatically loads dependencies. This greater convenience means that modprobe relies on configuration files, as described shortly in “Maintaining Kernel Modules.” It also means that you can use options (placed between the command name and the module name) to modify modprobe's behavior, as summarized in Table 2.6.
TABLE 2.6 Common options to modprobe


![]() Table 2.6's list of options is incomplete. The others are relatively obscure, so you're not likely to need them often. Consult modprobe's man page for more information.
Table 2.6's list of options is incomplete. The others are relatively obscure, so you're not likely to need them often. Consult modprobe's man page for more information.
Removing Kernel Modules
In most cases, you can leave modules loaded indefinitely; the only harm that a module does when it's loaded but not used is to consume a small amount of memory. (The lsmod program shows how much memory each module consumes.) Sometimes, though, you might want to remove a loaded module. Reasons include reclaiming that tiny amount of memory, unloading an old module so that you can load an updated replacement module, and removing a module that you suspect is unreliable.
The actual work of unloading a kernel module is done by the rmmod command, which is something of the opposite of insmod. The rmmod command takes a module name as an option, though, rather than a module filename:
# rmmod cdrom
This example command unloads the cdrom module. You can modify the behavior of rmmod in various ways, as summarized in Table 2.7.

Like insmod, rmmod operates on a single module. If you try to unload a module that's depended upon by other modules or is in use, rmmod will return an error message. (The -w option modifies this behavior, as just described.) If the module is depended upon by other modules, those modules are listed, so you can decide whether to unload them. If you want to unload an entire module stack—that is, a module and all those upon which it depends—you can use the modprobe command and its -r option, as described previously in “Loading Kernel Modules.”
Managing Kernel Modules
To learn about kernel modules, it's helpful to experiment. This exercise will give you some hands-on experience. It assumes you have a computer in which the cdrom driver is compiled as a module. If your computer's optical disc drivers are built directly into the kernel, or if you have no optical disc drive, you may have to select a different module for experimentation.
Before you begin, you should locate a data disc. Any data disc (CD-ROM, CD-R, DVD, or Blu-Ray, depending on your hardware's capabilities) will do. Music CDs will not work with this procedure as written. With the disc in hand, follow these steps:
- Insert the disc in the drive and wait for the access light to go out.
- Acquire root privileges by logging in as root or by typing su and entering the root password. You must type all the following commands as root.
- Mount the disc by typing mount /dev/cdrom /mnt/cdrom as root. You may need to change the device filename or mount point, depending on your computer's configuration. Also, some Linux systems are configured to auto-mount optical discs, so this step may be unnecessary.
- Type lsmod | grep cdrom to view the lsmod output related to the cdrom module, which should be in use unless the driver was compiled into the main kernel file. This command will also reveal the bus-specific driver associated with the optical disc device—typically sr_mod or ide_cd_mod.
- Type rmmod cdrom. The program will reply that cdrom is in use by the bus-specific driver.
- Type rmmod sr_mod (or change sr_mod to ide_cd_mod or whatever module was identified in step #5). The program will reply that the module is in use, but it won't say by what. This is because the module is in use by a non-module subsystem.
- Type umount /mnt/cdrom (changing the mount point, if necessary).
- Repeat steps #5 and #6. This time, step #6 will succeed. You can then type rmmod cdrom to unload that module, and it will succeed. This step illustrates removing a module stack the long way, by using rmmod on each individual module.
- Type modprobe -v sr_mod to load the optical disc module stack again. (Change sr_mod, if necessary, for your system.) Both the sr_mod and cdrom modules will be loaded, as revealed by the output that the -v option generates.
- Mount your optical disc again and check its contents with ls to verify that it's working.
- Type umount /mnt/cdrom to unmount the optical disc.
- Type modprobe -v -r sr_mod (changing sr_mod, if necessary). This action will unload both sr_mod and cdrom, illustrating unloading a module stack the quick way. In principle, other modules might be unloaded, as well, if they were used by sr_mod or cdrom and not by anything else.
- Verify that cdrom is unloaded by typing lsmod | grep cdrom; the output will be empty.
- Type modprobe sr_mod to restore the optical disc module stack to ensure that it works properly when you're finished with this exercise.
You can, of course, experiment with additional kernel modules; however, be cautious: Some modules are necessary for normal system operation and so should never be removed. In most such cases, neither rmmod nor modprobe will permit you to remove the module, so the risk is low. Sometimes, though, you'll remove a module only to discover that it's needed by something that's not immediately obvious. For instance, if you remove usblp, you might not notice a problem immediately, but if you subsequently attempt to print to a USB printer, the attempt may fail. In a worst-case scenario, rebooting the computer should restore it to normal functioning. Less radical steps, such as reloading the module and restarting any service that relies on it, can usually fix the problem.
Maintaining Kernel Modules
Tools such as lsmod, modprobe, and rmmod are very useful for managing kernel modules. These tools rely on configuration files, though, and knowing how to maintain these files is important for keeping your modules operating smoothly. Most of these files, and the tools that help modify them, need only be touched after you add or remove a module to your collection. Sometimes, though, you might want to change the way a module operates by passing it kernel options; this can be done even if you've not recompiled, added, replaced, or removed a module.
Kernel Module Maintenance Tools and Files
Two files help manage some important kernel module features:
Module Dependencies Module dependencies are stored in the modules.dep file, which resides in your main modules directory, /lib/modules/version, where version is the kernel version number. (This number sometimes includes distribution-specific codes.) You don't normally edit this file directly; instead, you use depmod to work on it. Type depmod with no options as root will rebuild the modules.dep file for the modules in the current kernel's modules directory. This action also occurs automatically when you install kernel modules, as described earlier in “Installing Kernel Modules.”
Module Configuration The main module configuration file is /etc/modules.conf or /etc/modprobe.conf. This file holds module aliases (that is, alternate names for modules), module options, and more. This file's format is surprisingly complex, but most changes can be relatively simple, as described shortly in “Passing Options to Kernel Modules.” Very old distributions called this file /etc/conf.modules, but this name has fallen out of favor.
![]() Rather than use a monolithic /etc/modules.conf or /etc/modprobe.conf file, many modern distributions place smaller configuration files in the /etc/modules.d or /etc/modprobe.d directory. Sometimes a utility, such as modules-update, generates a .conf file from the directory, but other times the files in the subdirectory are used directly. If you use such a distribution and want to change your module configuration, you should do so by editing the appropriate file in /etc/modules.d or /etc/modprobe.d or by creating a new file there. If you see a modules.conf or modprobe.conf file, you should then type modules-update as root.
Rather than use a monolithic /etc/modules.conf or /etc/modprobe.conf file, many modern distributions place smaller configuration files in the /etc/modules.d or /etc/modprobe.d directory. Sometimes a utility, such as modules-update, generates a .conf file from the directory, but other times the files in the subdirectory are used directly. If you use such a distribution and want to change your module configuration, you should do so by editing the appropriate file in /etc/modules.d or /etc/modprobe.d or by creating a new file there. If you see a modules.conf or modprobe.conf file, you should then type modules-update as root.
Passing Options to Kernel Modules
You can pass options to kernel modules via insmod or modprobe; however, Linux will usually load a module automatically when it determines that you're trying to use a device. When this happens, you can't manually pass options to the kernel module. Instead, you must edit /etc/modules.conf or /etc/modprobe.conf (or a file in /etc/modules.d or/etc/modprobe.d) to tell the system about the options you want to pass. To do so, you must add an options line, such as this:
options sisfb mode=1280x1024 rate=75
This line specifies options for the sisfb module, which is the SiS framebuffer driver—that is, it handles text-based video modes for certain SiS video chipsets. (Framebuffer drivers can also be used by X via the X framebuffer driver, but X more often drives the video hardware more directly.) This example passes two options to the sisfb module: mode=1280x1024 and rate=75. These options tell the driver to run at a resolution of 1280 × 1024 with a refresh rate of 75Hz.
Unfortunately, driver options are very driver-centric. For instance, if you were to use the vesafb video driver (which works with many VESA-compatible video cards) rather than the sisfb driver, you wouldn't use mode= and rate= options; instead, you'd use a vga= option, which takes a numeric code to set the video mode. Your best bet to learn about the options you might want to use is to consult the driver's documentation, as described earlier in “Reading Kernel Documentation.” If you need to pass options to a driver that didn't ship with a standard kernel, consult the documentation that came with it.
Once you make changes to this file, you should type depmod, and if the module whose behavior you want to affect is loaded, unload it. When you reload it, the new options should take effect. A few modules, such as framebuffer video drivers, cannot be easily removed once loaded, so you might need to reboot the computer to see your changes take effect.
Summary
Linux distributions typically provide precompiled kernels that you can use without modification for most purposes; however, sometimes it's necessary to upgrade the kernel. You can do this by using a kernel from your distribution provider if you just need to obtain an update that fixes a bug; however, if you need the features of a new kernel or if you need to apply a source code patch to obtain an unusual feature, you'll have to obtain the kernel source code, compile it, and install it manually. The most difficult part of this task is kernel configuration, because of the thousands of kernel options. Fortunately, you can use a working kernel's configuration as a template, and it's often possible to disable large groups of options when you know your system doesn't use any of them. Once the kernel configuration is done, building and installing the kernel is a matter of typing a handful of commands. Adding the kernel to your GRUB configuration requires more effort; this task usually involves copying one configuration and then modifying it for the new kernel.
Once a kernel is running, it can still require management. You can identify the kernel you're using with the uname command. You can also load and unload kernel modules, which manage specific hardware devices, filesystems, and other features, using the insmod, modprobe, and rmmod commands. Modules sometimes require options to adjust how they manage their duties. These can be passed on the insmod or modprobe command line, or they can be entered into module configuration files such as /etc/modprobe.conf, /etc/modules.conf, or a file in a subdirectory called /etc/modprobe.d or /etc/modules.d.
Exam Essentials
Summarize the common names and locations of kernel binaries. Kernel binaries are usually located in /boot, although sometimes they're stored in the root (/) directory. Precompiled binaries are generally called vmlinuz or vmlinuz-version, where version is the kernel version number. Locally compiled kernels are frequently called zImage or zImage-version (on some obscure platforms or very old kernels) or bzImage or bzImage-version (on x86 and x86-64 systems). Occasionally the generic name kernel or kernel-version is used. The vmlinux file is a complete uncompressed kernel that is generated late in the build process; a few features are added, and it's compressed to create the other forms.
Describe where you can find documentation on kernel features. Kernel documentation appears in the /usr/src/linux/Documentation directory tree. Much of this documentation is highly technical programming information, but some of it describes kernel and module options of use to a system administrator. Most kernel features also include brief summary descriptions that appear when you click the relevant option in an X-based configuration tool (or by selecting the Help item when running make menuconfig). This configuration tool help is useful in deciding whether to compile a feature or set of features.
Describe why you might want to recompile your kernel. Recompiling your kernel enables you to upgrade to the latest kernel and optimize your kernel for your system. Locally compiled kernels can include precisely those drivers and other features that you need and can also be compiled with CPU features to suit your system.
Explain the function of a kernel patch file. A kernel patch file is a single file that encodes changes between two versions of a kernel. Patch files from the main kernel site enable quick and low-bandwidth downloads of changes to the kernel, should you have a recent version available and want to upgrade to a newer version. Patches from third parties enable you to add unusual or under-development drivers or features to the kernel.
Summarize the kernel compilation process. To compile a kernel, you must download the kernel source code, extract the source code, type make xconfig (or a similar command) to configure the kernel for your system, type make to build the kernel, type make modules_install to install the kernel modules, and then copy the kernel file to a convenient location (typically /boot). You must then reconfigure your boot loader to boot the new kernel and reboot the system.
Describe the common make targets for the Linux kernel. The mrproper target removes all temporary and configuration files, while clean removes only the temporary files. The oldconfig target updates a .config file you've copied from an old build to include options for the current kernel. The config, menuconfig, xconfig, and gconfig options enable you to adjust the kernel options that will be built. The zImage and bzImage targets build the kernel itself, while modules build kernel modules. The modules_install target installs the kernel modules in /lib/modules.
Explain how you can create an initial RAM disk. Initial RAM disks can be created using mkinitrd, mkinitramfs, or a similar utility. You must pass the RAM disk's filename and the kernel version number to the utility, and optionally other command-line options to control the program's activities.
Summarize the tools used to load and unload kernel modules. The insmod and modprobe tools load kernel modules. The insmod tool loads a single kernel module by filename, while modprobe loads a module and all those upon which it depends by module name. The rmmod command removes a single kernel module, provided it's not in use, while modprobe can remove a module stack if it's called with its -r option.
Describe how to learn what options a module accepts. You can use the modinfo tool, as in modinfo cdrom, to obtain technical information on a module, including the options it accepts. The parameters listed by this tool may be a bit cryptic, though. For a clearer explanation, you should look for documentation in /usr/src/linux/Documentation.
Explain how to learn what modules are installed on your system. The lsmod command displays information on the currently loaded modules, including their names, memory consumed, whether they're in use, and what other modules rely on them. Note that drivers built directly into the kernel do not appear in this list!
Review Questions
- What is the conventional name for a locally compiled, bootable Linux kernel on an x86 system?
A. /boot/vmlinux-version
B. /boot/vmlinuz
C. /boot/bzImage-version
D. /usr/src/linux-version
- Which of the following statements about /usr/src/linux is usually true?
A. It is a symbolic link to a directory holding the system's current kernel source code, or the version currently being prepared.
B. It holds subdirectories, each of which contains the source code for a different version of the Linux kernel.
C. It contains kernel binaries for x86, x86-64, PowerPC, Alpha, and several other CPU architectures.
D. Because of its sensitive contents, it should never be accessed by anybody but the system's superuser (root).
- In what directory might you look for information on options that can be applied to your computer's Ethernet driver module?
A. /usr/src/linux/Documentation
B. /lib/modules/options
C. /usr/share/doc/modules
D. /etc/modules.conf
- Which type of kernel image has been largely abandoned on x86 computers in favor of the bzImage format?
A. vmlinux
B. zImage
C. initramfs
D. initrd
- Which of the following commands, when typed in /usr/src/linux after configuring the kernel, compile the main Linux kernel file and its modules?
A. make bzImage
B. make modules
C. make xconfig
D. make
- Which two of the following kernel features should you compile into the main kernel file of a regular disk-based x86-64 installation to simplify booting the system? (Select two.)
A. Drivers for your boot disk's ATA controller or SCSI host adapter
B. Support for your root (/) filesystem
C. Drivers for your USB port
D. Framebuffer drivers for your video card
- You've compiled and installed a new kernel, of version 2.6.35.4. You now want to prepare an initial RAM disk. Which two of the following commands will do so, depending on your distribution? (Select two options.)
A. mkinitrd -o /boot/initrd-2.6.35.4 2.6.35.4
B. mkinitrd /boot/initrd-2.6.35.4 2.6.35.4
C. mkinitramfs /boot/initramfs-2.6.35.4 2.6.35.4
D. mkinitramfs -o /boot/initramfs-2.6.35.4 2.6.35.4
- Which of the following commands might you type while in /usr/src/linux, after copying the configuration file from an old kernel, to use the old kernel's options and update the configuration for new options in the new kernel?
A. make config
B. make allmodconfig
C. make oldconfig
D. make mrproper
- In which of the following circumstances would it make the least sense to patch a kernel?
A. You have recent stable kernel source code and you need to add support for a new kernel feature that's not in that version.
B. You have recent kernel source, but it has a buggy driver. A fix is available in a later kernel and is available as a patch for your current kernel.
C. You have the 2.6.36 kernel source and you want to upgrade to a 2.6.36.1 kernel.
D. You have kernel source from your distribution maintainer and you want to compile a “generic” kernel for your system.
- You've downloaded the patch-2.6.35.4.bz2 file. What program will you use as part of the patch operation to handle this file's compression?
A. bunzip2
B. gunzip
C. tar
D. cpio
- Which of the following commands would you type to configure a Linux kernel using an interactive text-mode tool?
A. make xconfig
B. make menuconfig
C. make config
D. make textconfig
- You've configured and compiled your new kernel, version 2.6.35.4. You now type make modules_install. Where can you expect to find the module files?
A. /lib/modules/modules-2.6.35.4
B. /usr/src/linux/2.6.35.4
C. /lib/modules/2.6.35.4
D. /usr/lib/2.6.35.4
- In what file in the Linux kernel source tree are configuration options stored?
A. kernel.conf
B. configure
C. .config
D. linux.conf
- After copying an existing GRUB Legacy configuration entry, what three features are most important to alter to get the new entry to work with a new kernel?
A. The title, the kernel filename, and the initrd filename
B. The title, the kernel filename, and the kernel's root entry
C. The kernel options, the initrd filename, and the initrd options.
D. The kernel filename, the kernel options, and the initrd options.
- What would you expect to see if you type uname -a?
A. Information on the username of the current user, including the user's real name
B. Information on the running system, such as the OS, the kernel version, and the CPU type
C. Information on the computer's hostname, as it's defined locally
D. Information on the loaded kernel modules, including the modules upon which they depend
- What is the most important practical difference between insmod and modprobe?
A. insmod unloads a single module, whereas modprobe loads a single module.
B. insmod loads a single module, whereas modprobe loads a module and all those upon which it depends.
C. insmod isn't a real Linux command, but modprobe loads a module and all those upon which it depends.
D. insmod loads a single module, whereas modprobe displays information about modules.
- You type the command rmmod ide_core, but the system responds with the message ERROR: Module ide_core is in use by via82cxxx,ide_cd,ide_disk. What is the meaning of this response?
A. The via82cxxx, ide_cd, and ide_disk modules all rely on ide_core, so ide_core can't be unloaded without first unloading these other modules.
B. The ide_core module relies on via82cxxx, ide_cd, and ide_disk modules, so they can't be unloaded without first unloading ide_core.
C. The ide_core module is a core module, meaning that it can never be unloaded once it's loaded.
D. The ide_core module is buggy or the rmmod utility is broken; it should never return an error message.
- What file or files might you edit to change the options that are automatically passed to kernel modules? (Select all that apply.)
A. Files in the /etc/modules.d directory
B. modules.dep in the modules directory
C. .config in the kernel directory
D. /etc/modules.conf
- You have two computers, both of which have identical motherboards and DVD drives. Both run the 2.6.35.4 kernel, which was configured and compiled independently on each system. On one (computera), typing lsmod produces output that includes the cdrom module. On the other (computerb), typing lsmod does not produce output that includes a module called cdrom, even when the DVD drive is in use. What might account for this difference?
A. The cdrom driver is used to access CD-ROM devices, not DVD drives, so its presence on computera but not computerb is unimportant.
B. The “DVD” drive in computera is clearly a counterfeit, since its use should not trigger loading of the cdrom driver.
C. The cdrom driver is built as a module on computera, but it's built into the main kernel file on computerb.
D. You must type insmod cdrom before using the drive on computerb, else data transfers will be corrupted.
- Which of the following files contains the same information as can be obtained by typing uname -v?
A. /usr/src/linux/Documentation/variables
B. /lib/modules/verbose
C. /etc/kernel/verbose
D. /proc/sys/kernel/version
Answers to Review Questions
- C. Locally compiled Linux kernels are usually called /boot/bzImage or /boot/bzImage-version, where version is the version number. The vmlinux file is a complete but unbootable kernel image used to generate other image file formats, so option A is incorrect. The /boot/vmlinuz or /boot/vmlinuz-version file is the stock distribution's kernel, not a locally compiled kernel, so option B is incorrect. The /usr/src/linux-version name is held by the Linux kernel source directory, not a compile kernel file, so option D is incorrect.
- A. Option A correctly describes the usual state of /usr/src/linux. Option B is incorrect because /usr/src/linux usually points to just one version of the Linux kernel. Option B might be true of /usr/src, though. Option C is incorrect because, although the Linux kernel source tree can be used to build binaries for a wide range of CPUs, it's rare to build them all on one computer. Option D is incorrect because the kernel source tree is readily available from the Internet; there's nothing particularly sensitive about it or about the intermediate files or final binaries produced. Furthermore, access to some kernel header files is required by ordinary users who need to compile software.
- A. The /usr/src/linux/Documentation directory tree holds files that describe the features of many Linux kernel subsystems and modules, including Ethernet drives. Thus, this directory is a good place to look for the specified information. Options B and C both describe fictitious locations. Option D is one common name for a modules configuration file. Although you might find your system's current Ethernet options in this file, they might not be well documented. Furthermore, the question asks for a directory, and /etc/modules.conf is a file. Thus, option D is incorrect.
- B. The zImage format was once common on x86 computers but has largely been abandoned on that platform, as the question specifies. Option A, vmlinux, is the name used by a complete but unbootable form of the Linux kernel generated as an intermediate step in preparing other kernel formats. Options C and D are names given to initial RAM disks, not kernel images.
- D. Typing make alone will build both the main kernel file and all the kernel modules, so option D is correct. Alternatively, you could type the commands specified by both options A and B; however, these options build the kernel file and the modules alone, respectively, so neither one alone is adequate and both options are incorrect. Option C specifies one of several kernel configuration commands; it won't build a kernel or its modules and so is incorrect.
- A, B. The Linux kernel needs to be able to access your hard disk to continue past the most basic boot stage, so it needs drivers for your hard disk's ATA controller or SCSI host adapter as well as support for whatever filesystem you use on your root (/) partition in the kernel itself. Alternatively, these drivers can be placed on an initial RAM disk, but this configuration requires more work. The USB port isn't needed during the boot process, so option C is incorrect. (CD-ROM drivers are, of course, needed for CD-ROM-based distributions, but the question specified a hard-disk-based installation.) Although video card support is required by most installations, basic text-mode video support is standard, and drivers in the X Window System handle GUI video. The framebuffer drivers specified in option D are definitely optional on the x86 and x86-64 platforms, making option D incorrect.
- B, D. The mkinitrd and mkinitramfs utilities both generate initial RAM disks. The four options use each of these two commands, varying in which ones use a -o parameter prior to the initial RAM disk filename and which ones do not. Since the mkinitrd command does not use a -o parameter but mkinitramfs does require this parameter, that makes options B and D correct, while options A and C are incorrect.
- C. In the Linux kernel, the oldconfig target to make does as the question specifies, so option C is correct. Option A is used to query the user in text mode about every kernel option. This differs from the action of the oldconfig option in that oldconfig omits options that are already present in the old configuration file, greatly shortening the configuration process. Option B is incorrect because it discards the old configuration file and builds a new one with as many options being specified as modular build as possible. Option D causes all the intermediate files and configuration files to be deleted.
- D. Kernel source code from distribution maintainers is usually heavily patched, making application of new patches to create a “generic” kernel difficult. Thus, option D is a poor choice for patching; it's probably better to download the desired kernel version directly in this case. Options A and B both describe cases in which patching is reasonable: You must apply a third-party patch for a new kernel feature (option A) or an updated driver (option B). In the case of option B, you could elect to upgrade to the newer kernel (by downloading the whole thing or by applying a patch) or simply apply the patch for the fix, but a patch is a reasonable approach in any case. Option C describes a good candidate for patching; you're upgrading over a very small version difference, which is likely to be an easy patch to apply.
- A. The .bz2 filename extension indicates that the patch file is compressed with bzip2. Such files can be uncompressed with bunzip2, as option A specifies. Option B's gunzip program is used to uncompress files compressed with gzip; such files typically have .gz extensions, so this option is incorrect. The tar and cpio programs specified by options C and D handle archive files, but patch files are not archive files, so these options are both incorrect.
- B. The make menuconfig kernel configuration command starts a text-based interactive menu configuration tool. This tool provides the same capabilities as the X-based tool that's started by make xconfig. Both of these tools are more flexible than the bare-bones text-mode make config. There is no make textconfig target.
- C. Option C specifies the usual location for kernel modules for the 2.6.35.4 kernel. (If you use the General Setup
 Local Version option, the version number, and hence the directory name in /lib/modules, may be expanded.) Since there is no modules- prefix to the kernel version number in the modules directory name, option A is incorrect. Although the individual module files can be found in the Linux source tree as well as in the installed file location, these files do not appear in a subdirectory named after the kernel version, so option B is incorrect. Linux kernel modules do not normally appear anywhere in the /usr/lib directory tree, so option D is incorrect.
 - C. The .config file holds configuration options for the kernel. Options A, B, and D all describe fictitious files. (Note that many non-kernel packages include a configure file, but this is a script that's used to configure the software for your system.)
- A. The title should be changed so that you can identify the new kernel when you reboot and the filenames for both the kernel and the initrd file (if present) must be changed to boot the correct kernel with the correct RAM disk image. Thus, option A is correct. Some of these three items are repeated in options B, C, and D, but none of these options includes them all, and each includes items that do not normally need to be changed. The kernel's root entry and other options don't normally need adjusting, and the initrd entry doesn't normally have options, aside from the RAM disk image's filename.
- B. The uname command displays system information, and the -a option to that command causes it to display all the information it's designed to summarize. Options A, C, and D are all incorrect, although other utilities will produce these results: whoami, hostname, and lsmod do the jobs described by options A, C, and D, respectively.
- B. Option B correctly summarizes the main actions of both of these commands. Option A states that modprobe loads a single module. This is only partially correct; modprobe loads the module you specify and those upon which it depends. Option A also states that insmod unloads a module, when in fact it loads a module. Option C says that insmod isn't a real command, but it is. Option D says that modprobe displays information about modules, but it doesn't; that function is handled by modinfo.
- A. The rmmod utility can only remove modules that are not being used by other modules or by other system software. The error message in this case indicates that the other specified modules rely on ide_core, so you can't unload ide_core until that dependency is broken by unloading these other modules. Option B specifies this dependency backwards. Although some modules are hard to remove once loaded, they aren't called “core modules,” as option C specifies. The rmmod utility can and does return error messages when you ask it to do something it can't do, contrary to what option D says.
- A, D. The /etc/modules.conf file controls automatic module loading and options passed to modules automatically. On most distributions, you edit this file directly; however, some require you to edit files in /etc/modules.d and then type modules-update to have the system update modules.conf itself. The modules.dep file referred to in option B specifies module dependencies, not module options passed to the modules. The kernel's .config file controls what kernel features are compiled; it doesn't specify options passed to the modules.
- C. The lsmod command displays information on kernel modules, but not on drivers that are built into the kernel file. Given the evidence presented in the question, it's safe to conclude that the cdrom driver is built into the main kernel file used by computerb, as option C states. The cdrom driver is used to access both CD-ROM and DVD drives, contrary to options A and B. Although typing insmod cdrom, as option D suggests, might be required in some situations, the question specified that the drive was in use, so this clearly was not necessary on computerb. Furthermore, failure to type insmod cdrom, if it's necessary, will result in a failure to access the drive, not data corruption.
- D. The /proc/sys/kernel directory tree holds information on many critical kernel features. Many of these features are accessible or changeable via specialized utilities, including uname, and the specified command displays the contents of the file specified in option D. The files specified in options A, B, and C are all fictitious.