
Chapter 7
Advanced Network Configuration
THE FOLLOWING LINUX PROFESSIONAL INSTITUTE OBJECTIVES ARE COVERED IN THIS CHAPTER:
- 210.1 DHCP configuration (weight: 2)
- 210.3 LDAP client usage (weight: 2)
- 212.1 Configuring a router (weight: 3)
- 212.3 Secure shell (weight: 4)
 Previous chapters have touched upon Linux's role as a network server platform; in fact, Chapter 6, “DNS Server Configuration,” is devoted to one important network server package that Linux can run. This chapter begins an examination of other advanced networking tasks that Linux can perform. One of these, running Dynamic Host Configuration Protocol (DHCP) server software, is often paired with the Domain Name Service (DNS) role described in Chapter 6. The Lightweight Directory Access Protocol (LDAP) is a network-enabled tool for managing data, and Linux can access an LDAP server to manage its users, so that topic is next. As touched upon in Chapter 5, “Networking Configuration,” Linux can function as a router, and this chapter expands on this topic by examining Linux router configuration in more detail. Finally, this chapter looks at the Secure Shell (SSH) server, which is a text-mode login protocol that includes encryption capabilities and the ability to tunnel other protocols.
Configuring a DHCP Server
Chapter 5 describes the use of DHCP to configure a Linux system's networking options. If you want to use DHCP in this way, consult that chapter. This section is devoted to the other side of the coin—configuring Linux to deliver IP addresses to other computers.
Before embarking on setting up a DHCP server, you should know when it is and is not appropriate to use one. If you've decided to use the server, you must know where to find it and how to install it. You can then set general network-wide options. You must also tell the server what IP addresses it can deliver. The easiest configuration is to deliver dynamic IP addresses, meaning that clients aren't guaranteed the same IP address time after time. If necessary, you can also configure your DHCP server to deliver fixed IP addresses, meaning that any given client receives the same IP address whenever it asks for one. (This contrasts with static assignment, which is done without DHCP. If a computer can function with either a truly static address or a fixed address assigned via DHCP, I use the term fixed. Be aware that these terms are not entirely standardized.) If your network spans multiple network segments, you may need to take extra steps to ensure that DHCP works on all those segments.
![]() Small office and home networks often use broadband routers. These devices are small boxes that include simple Network Address Translation (NAT) routers, switches, and often additional functionality in small and easy-to-configure packages. These devices can usually function as DHCP servers. Using them for this purpose can result in easier DHCP administration than is possible with a Linux DHCP server. On the other hand, a Linux DHCP server is far more flexible than the DHCP servers that come with small broadband routers.
Small office and home networks often use broadband routers. These devices are small boxes that include simple Network Address Translation (NAT) routers, switches, and often additional functionality in small and easy-to-configure packages. These devices can usually function as DHCP servers. Using them for this purpose can result in easier DHCP administration than is possible with a Linux DHCP server. On the other hand, a Linux DHCP server is far more flexible than the DHCP servers that come with small broadband routers.
When to Use DHCP
Chapter 5's description of DHCP advised using that protocol for configuring computers' network settings if your network uses DHCP—that is, if a DHCP server is available. In turn, the question of whether to run a DHCP server is answered by whether you want to use DHCP to configure most of your computers' networking features. This logic is somewhat circular, though, and the way to break out of the cycle is to consider the network as a whole. Which is better, configuring each computer's IP address and related information individually or setting up an extra server to handle the job?
One of the considerations in determining DHCP's value is the amount of effort invested in administering systems. All other things being equal, the break-even point for setting up a DHCP server is somewhere between half a dozen and a dozen computers. Less than that number, it's generally simpler to use static IP addresses. More than that number, the effort invested in DHCP configuration is less than the extra effort of maintaining static IP addresses. Of course, other issues can intervene. Factors that tend to favor DHCP include ordinary users maintaining their computers' network settings, high turnover rates in computers or the OSs installed on them (such as networks with lots of laptops or OS reinstallations), the presence of multiboot systems, a network with odd or tricky configurations, and a network dominated by clients that don't need fixed IP addresses. Static IP address assignment is most useful when your network includes many servers that operate best on fixed IP addresses. Some factors can swing either way. For instance, consider a network with a diverse population of OSs. Maintaining such a system with static IP addresses can be tricky because you must know how to assign static IP addresses to each OS, including any quirks each OS has in this respect. DHCP can help simplify this configuration, although perhaps not dramatically—you must still know how to tell each OS to use DHCP, after all. On the downside, specific DHCP clients and servers may have interactive quirks, so you might run into problems configuring some of the more exotic OSs using DHCP. (In my experience, though, Linux's standard DHCP server works without problems with every client OS I've used.)
![]() If your network includes some systems that must operate with fixed IP addresses and some that don't need fixed addresses, you have three choices. You can assign all IP addresses statically, you can assign some addresses via DHCP and assign others statically, or you can use DHCP for all computers and configure the DHCP server to provide fixed addresses to at least some clients. Mixing DHCP and static IP addresses isn't a problem; you must simply use a range of addresses for static IP addresses that DHCP won't try to assign. In fact, the DHCP server itself is likely to be assigned a static IP address.
If your network includes some systems that must operate with fixed IP addresses and some that don't need fixed addresses, you have three choices. You can assign all IP addresses statically, you can assign some addresses via DHCP and assign others statically, or you can use DHCP for all computers and configure the DHCP server to provide fixed addresses to at least some clients. Mixing DHCP and static IP addresses isn't a problem; you must simply use a range of addresses for static IP addresses that DHCP won't try to assign. In fact, the DHCP server itself is likely to be assigned a static IP address.
Basic DHCP Installation
The main DHCP server package for Linux is written by the Internet Software Consortium (ISC; http://www.isc.org/software/dhcp). This server usually ships in a package called dhcp, dhcp-server, or dhcp3-server. (At press time, the latest DHCP server version is 4.2.0; however, most Linux distributions still ship with 3.x versions of the server.) ISC also makes available a DHCP client, dhcpcd, which ships with many Linux distributions. The client, though, doesn't have the dominant position in the Linux world that the ISC dhcpd server holds. Other DHCP clients, most notably dhclient, run on many systems. The ISC dhcpd server works with these non-ISC DHCP clients, as well as with DHCP clients on other OSs.
![]() ISC's DHCP server is not the only one available. One notable alternative is Dnsmasq (http://freshmeat.net/projects/dnsmasq/), which combines DHCP and DNS functionality in one package. Dnsmasq isn't as full-featured as either the ISC DHCP server or the BIND DNS server described in Chapter 6; however, it is easier to configure and is a good choice for a small network with simple needs.
ISC's DHCP server is not the only one available. One notable alternative is Dnsmasq (http://freshmeat.net/projects/dnsmasq/), which combines DHCP and DNS functionality in one package. Dnsmasq isn't as full-featured as either the ISC DHCP server or the BIND DNS server described in Chapter 6; however, it is easier to configure and is a good choice for a small network with simple needs.
In addition to handling DHCP clients, the ISC DHCP server handles the older Bootstrap Protocol (BOOTP). No additional configuration is required to handle BOOTP, although some options are relevant only for DHCP.
Typically, a DHCP server has a static IP address itself. When it comes time to declare a range of IP addresses the server should deliver, you must be careful to exclude the server's own IP address from this range.
If you compile your own kernel, as described in Chapter 2, “Linux Kernel Configuration,” you should be aware of one kernel feature required by the DHCP server: the Packet Socket option, which is accessible from the Networking Options submenu when configuring the kernel. This submenu is accessed from the Networking Support menu, as shown in Figure 7.1 for a 2.6.35.4 kernel.
FIGURE 7.1 You must enable certain kernel options to run a recent DHCP server

The DHCP server configuration file is dhcpd.conf, which is likely to be in /etc or /etc/dhcp3. This file can contain comments, denoted by a leading hash mark (#). Lines that aren't comments are either parameters, which describe general configuration features, or declarations, which describe the network's computers and the IP addresses the server can deliver to those computers. The upcoming section “Setting Network-Wide Options” describes parameters in more detail. The following two sections, “Configuring Delivery of Dynamic Addresses” and “Configuring Delivery of Fixed Addresses,” describe declarations in more detail. Some declarations are fairly complex and include parameters within them. These declarations indicate their multiline nature by using curly braces ({}) to surround the multiline material.
Some DHCP clients (particularly some Windows systems) require responses from the DHCP server to be addressed to 255.255.255.255. Unfortunately, Linux sometimes changes such replies to have a return address corresponding to your network's broadcast address, such as 172.27.255.255 for the 172.27.0.0/16 network. If some of your clients don't seem to pick up network configurations when you use DHCP, you can change the Linux server's behavior by adding an appropriate route for the 255.255.255.255 address:
# route add -host 255.255.255.255 dev eth0
Of course, you should adjust this command if the device isn't eth0. This problem is particularly likely to occur if your DHCP server has multiple network interfaces. Some DHCP configurations add this route by default. If yours doesn't, you can modify the DHCP startup script or add the command to a local startup script. You can verify whether this route is present by typing route -n. If the route is present, it should appear at the top of the output, as follows:
Destination      Gateway     Genmask          Flags  Metric Ref Use Iface
255.255.255.255  0.0.0.0     255.255.255.255  UH     0      0     0 eth0
Setting Network-Wide Options
Most DHCP configuration files begin with a series of parameters that set global options. Listing 7.1 shows a typical small dhcpd.conf file, including many of the global options you might use. Many, but not all, of these global options begin with the keyword option. Whether or not a parameter begins with this keyword, most are followed by a value. This value may be an IP address, a hostname, a number, a Boolean keyword (true or false), or some other data.
Listing 7.1: Sample dhcpd.conf file
default-lease-time 86400;
max-lease-time 172800;
option subnet-mask 255.255.255.0;
option routers 172.27.15.1;
option domain-name-servers 172.27.15.2,10.72.81.2;
option domain-name “example.com”;
option netbios-name-servers 172.27.15.2;
option netbios-node-type 8;
get-lease-hostnames true;

subnet 172.27.15.0 netmask 255.255.255.0 {
   range 172.27.15.50 172.27.15.254;
}
Table 7.1 summarizes some of the more common global options you might want to set. Many of these options are demonstrated in Listing 7.1. All parameter lines end with semicolons (;). Some parameters take more than one value. For instance, the option domain-name-servers line in Listing 7.1 provides two IP addresses, separated by a comma. In most cases, you can substitute hostnames for IP addresses. Doing so puts your server at the mercy of the DNS server, though; if it goes down or is compromised, your DHCP server may be unable to provide the information, or it may provide incorrect information.
TABLE 7.1 Common global DHCP server parameters


![]() Table 7.1 is far from complete, but it describes the most common options. For information on more options, consult the dhcp-options and dhcp-eval man pages. Some of the options, such as the NetBIOS options in Table 7.1, set values that many DHCP clients ignore.
Table 7.1 is far from complete, but it describes the most common options. For information on more options, consult the dhcp-options and dhcp-eval man pages. Some of the options, such as the NetBIOS options in Table 7.1, set values that many DHCP clients ignore.
Notably absent from Table 7.1 is any method of setting the IP address that clients are to receive. This option does appear in Listing 7.1, though, as part of the subnet declaration. The next two sections cover options for assigning IP addresses in more detail.
Configuring Delivery of Dynamic Addresses
Listing 7.1 is adequate for assigning dynamic IP addresses to no more than 205 computers. The lines that accomplish this task are the final three lines of the listing:
subnet 172.27.15.0 netmask 255.255.255.0 {
   range 172.27.15.50 172.27.15.254;
}
These lines make up a declaration. In this case, the declaration applies to the 172.27.15.0/24 network, as defined on the first line of the declaration. The parameters that appear between the curly braces apply only to machines in that block of addresses. You can create multiple subnet declarations if you like, and in some cases you might need to do this. For instance, the server might have multiple network interfaces and need to assign different IP addresses to machines on different physical subnets. For a network with a single physical subnet, a declaration similar to the one in Listing 7.1 should work just fine. This declaration's second line, consisting of a range parameter, defines the IP address range that the server delivers: 172.27.15.50 to 172.27.15.254. When you boot a DHCP client computer, it might receive any address in this range, depending on which addresses the server has already assigned. If you have more computers than this range permits, then you should expand it (if possible) or create another subnet declaration that provides additional addresses. If you need significantly more than 205 addresses, expanding the declaration will probably require changing the netmask. For instance, using a netmask of 255.255.240.0 enables you to assign addresses ranging from 172.27.0.1 through 172.27.15.254. (You'd specify a subnet of 172.27.0.0 rather than 172.27.15.0 in this case.) Of course, you must have the right to use whatever addresses you pick.
![]() If possible, define a range that's substantially larger than the number of computers on your network. Doing so will give your network room to grow, and it will provide a buffer against addresses being claimed and not released, thereby consuming a lease unnecessarily.
If possible, define a range that's substantially larger than the number of computers on your network. Doing so will give your network room to grow, and it will provide a buffer against addresses being claimed and not released, thereby consuming a lease unnecessarily.
Given the 172.27.15.0/24 network block, Listing 7.1's reservation of only 205 IP addresses means that the first 49 addresses are available for static assignment. Typically, at least one of these addresses will be assigned to the network's router (172.27.15.1 in Listing 7.1), and one will go to the DHCP server itself. Others might go to a name server, mail server, or other servers that are best run with static IP addresses. Alternatively, you can run some of these servers using DHCP and assign them fixed addresses, as described in the next section.
![]() An address with a machine portion, in binary, of all 0s or all 1s has special meaning in TCP/IP addressing. All-0 addresses refer to the network itself, and all-1 addresses are used for broadcasts. You should never attempt to assign such an address using DHCP, nor should you attempt to assign it statically for that matter.
An address with a machine portion, in binary, of all 0s or all 1s has special meaning in TCP/IP addressing. All-0 addresses refer to the network itself, and all-1 addresses are used for broadcasts. You should never attempt to assign such an address using DHCP, nor should you attempt to assign it statically for that matter.
Configuring Delivery of Fixed Addresses
If you want to run servers but configure them to acquire their IP addresses and other information via DHCP, you can do so. This practice normally requires that you do one of two things, though:
- Link your network's DHCP and DNS servers so that the DNS server delivers the correct IP address for a given hostname. This practice may be reasonably reliable on a local network, but it may not be reliable if your systems should be accessible from the outside world, because your DNS server's entries will be cached by clients' DNS servers. Clients may, therefore, end up using an out-of-date DNS entry. Even if you configure the DNS server with a short lifetime for these entries, some DNS servers may ignore this information, possibly resulting in mismatched hostnames and IP addresses. This configuration also requires making intricate changes to both the DHCP and DNS servers' configurations. For these reasons, I don't describe this approach in this book.
- Configure your DHCP server to assign an unchanging IP address to the server computers. This goal can be achieved in several ways. The method I describe in this section involves using the Media Access Control (MAC) address, aka the hardware address, of the DHCP client computer to identify that system and enable the DHCP server to assign a fixed IP address to that system each time it boots. This is also sometimes called a reserved address.
Locating the MAC Address
The first step in providing a fixed address, at least when using the MAC address approach described here, is to locate the DHCP client's MAC address. For Ethernet devices, this address is a 6-byte number that's usually expressed in hexadecimal (base 16), typically with colons, dashes, or some other punctuation separating bytes. You can locate the MAC address in several ways:
Hardware Stickers Some network interface cards (NICs) have stickers affixed to them with MAC addresses. Similar stickers may exist on the external case of computers that ship with built-in Ethernet interfaces. Locating the MAC address in this way is straightforward if you haven't yet installed the NIC, but it may not be convenient if it's already buried inside a computer. Many NICs also lack this sticker.
Linux DHCP Clients On a Linux client, you can type ifconfig eth0 (changing eth0 to another interface name, if appropriate). This command produces information on the network interface, including the hardware address (labeled HWaddr) on the first line of the output. This command requires that the interface be activated, although it need not be assigned an IP address.
Windows DHCP Clients Windows provides a tool similar to Linux's ifconfig for displaying information about the network interface. Type IPCONFIG /ALL in a Command Prompt window to learn about your interfaces. A line labeled Physical Address should reveal the MAC address.
Mac OS DHCP Clients Mac OS X provides an ifconfig command that's similar to Linux's command of this name, although it's not identical. Nonetheless, you can open an OS X Terminal application and type ifconfig. The hardware address will probably appear in the section for en0 and will be labeled ether; however, this might not always be the case, particularly for WiFi hardware.
Using GUI Tools Most modern OSs provide a way to find the hardware address via their GUI configuration tools. The exact method varies with the OS. As an example, in Windows 7, go to Control Panel ![]() Network And Internet
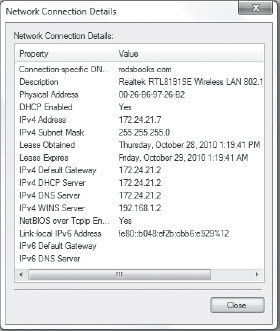
Network And Internet ![]() Network And Sharing Center, and then click the name of your connection near the right side of the window. The result is a dialog box showing the status of a network connection. Click the Details button to obtain a Network Connection Details dialog box, similar to the one in Figure 7.2. The MAC address appears as the Physical Address line in this dialog box.
Network And Sharing Center, and then click the name of your connection near the right side of the window. The result is a dialog box showing the status of a network connection. Click the Details button to obtain a Network Connection Details dialog box, similar to the one in Figure 7.2. The MAC address appears as the Physical Address line in this dialog box.
FIGURE 7.2 Most OSs provide GUI tools that can display a computer's hardware address
Locating the Address from the DHCP Server No matter what OS the client uses, you can locate the MAC address from the DHCP server in several ways. One method is to configure the DHCP client to use DHCP and then activate its network interface. Assuming the server is configured to deliver addresses as described in the earlier section “Configuring Delivery of Dynamic Addresses,” the DHCP client should pick up an address. You can then examine the DHCP server's logs for evidence of a lease granted for that address. The DHCP leases file (typically /var/lib/dhcp/dhcpd.leases) should include a multiline entry identifying the IP address and MAC address. Typing grep dhcpd /var/log/messages | tail -n 1 or grep dhcpd /var/log/daemon.log | tail -n 1 as root should also reveal an entry with the IP address and MAC address in question. (If some other DHCP activity occurs between the target system's lease being granted and you typing this command, though, that activity will show up instead. Increase the number from 1 to 2 or higher to reveal earlier entries.) Finally, you can type ping -c 1 ip.addr; /sbin/arp ip.addr, where ip.addr is the IP address, to learn the MAC address of the computer. This last approach will also work if you temporarily configure the future DHCP client with a static IP address.
DHCP Server Fixed Address Options
Once you have the MAC address of a DHCP client, you can add an entry to the DHCP server's dhcpd.conf file for that client. This entry can go within the subnet declaration, as shown in Listing 7.1, or the entry can go after the subnet declaration. Either way, the entry looks like this:
host calvin.example.com {
   hardware ethernet 00:80:C6:F9:3B:BA;
   fixed-address 172.27.15.2;
}
The host declaration tells the server that you're defining parameters for a specific computer. Place the computer's hostname after the keyword host, and end the line with an open curly brace. Lines between this one and the closing curly brace that defines the end of the declaration apply only to this host.
The hardware parameter provides a means for the server to identify the host. This parameter is followed by a keyword for the hardware type (ethernet in this example, but token-ring is also valid) and the MAC address, using colons (:) to separate bytes of the address. The fixed-address line, of course, defines the IP address that's to be given to this host. Be sure that the address is not also specified in the range line for any subnet declaration!
![]() Wireless clients are typically linked to a network by a wireless access point (WAP) or router and appear to be Ethernet devices from the DHCP server's point of view. Broadband routers invariably include their own DHCP servers, so you have a choice of using your broadband router's server or disabling it and configuring a Linux DHCP server.
Wireless clients are typically linked to a network by a wireless access point (WAP) or router and appear to be Ethernet devices from the DHCP server's point of view. Broadband routers invariably include their own DHCP servers, so you have a choice of using your broadband router's server or disabling it and configuring a Linux DHCP server.
After you add this entry and restart the server, it should begin delivering the fixed IP address you specify with the fixed-address parameter to that client. Of course, this will work only as long as the hardware address remains unchanged. If you replace a computer's NIC, you must update the hardware line to reflect the change.
Configuring a DHCP Relay Agent
If your network spans multiple network segments with routers in between the segments, you must make suitable adjustments to your DHCP configuration. Possibilities include:
Run Multiple DHCP Servers You can run a different DHCP server on each subnet. Of course, this approach increases your configuration effort; however, it might be acceptable if you can rely on an easy-to-configure DHCP server, such as one built into a broadband router, for one of the network segments.
Run the DHCP Server on the Router A DHCP server run on a router, or some other computer with interfaces on multiple networks, can serve all the networks to which the computer is connected. This solution can be fairly straightforward; however, you might not want to run a DHCP server on a router for security reasons.
Configure the Router to Route DHCP Broadcasts Some routers provide options to relay DHCP requests from one subnet to another. Cisco's ip-helper address option, for instance, does this. Consult your router's documentation for information on this approach.
Run a DHCP Relay Agent The ISC's DHCP server software includes a program, dhcrelay or dhcrelay3, that can relay DHCP broadcasts from one subnet to another one. This program must be installed on one computer on each subnet that does not have its own DHCP server computer. Note that the dhcrelay program does not need to run on a router or other computer connected to both networks.
The dhcrelay program may be included in the main DHCP package or in another one, such as dhcp3-relay. The most basic use of dhcrelay launches it using just the name or IP address of the DHCP server on a remote network:
# dhcrelay 172.27.15.2
The relay agent will then relay all the DHCP requests it receives to the specified name or IP address. You can fine-tune the software's behavior by using various options, such as -i interface to specify one or more interfaces on which to listen. (You must include both the interface on which DHCP clients exist and the interface with the DHCP server or the router to the DHCP server if the system has multiple interfaces.) Consult dhcrelay's man page for more information on its options, most of which are highly technical.
In practice, you'll probably want to have dhcrelay start automatically. To do that, you must enter the DHCP server's name or IP address, along with any other options, in a distribution-specific configuration file. In Debian and Ubuntu, for instance, the file is /etc/default/dhcp3-relay, and you edit the SERVERS option to specify the DHCP server's address; on a Fedora system, the file is /etc/sysconfig/dhcrelay, and you edit the DHCPSERVERS option. Alternatively, you can create a suitable line in a local startup script.
Managing LDAP Accounts
You should already be familiar with the concepts of Linux accounts and account management using tools such as useradd, usermod, and passwd, along with files such as /etc/passwd and /etc/shadow. These concepts, tools, and files are all part of the LPIC-1 certification. Such configurations are adequate for Linux computers with few accounts or with accounts that aren't shared with other computers on a network. In many networked environments, though, it's desirable to give a large number of users accounts on a large number of Linux (or even non-Linux) computers. Managing such environments can quickly become a challenge; any change requires replication on all the computers, which can be a logistical nightmare. The solution to this problem is to deploy a network login protocol. Several such protocols exist, LDAP being one of them. The following pages describe some fundamental LDAP principles and common LDAP account management tools.
![]() Completely configuring LDAP is not covered in the LPIC-2 objectives and is beyond the scope of this book. To completely configure LDAP, you must configure an LDAP server and adjust the configuration of every client that must use the LDAP server. A short (chapter-length) description of how to do this appears in my Linux in a Windows World (O'Reilly, 2005). You can find more thorough coverage of LDAP in LDAP-specific books, such as Matt Butcher's Mastering OpenLDAP: Configuring, Securing, and Integrating Directory Services (Packt, 2007).
Completely configuring LDAP is not covered in the LPIC-2 objectives and is beyond the scope of this book. To completely configure LDAP, you must configure an LDAP server and adjust the configuration of every client that must use the LDAP server. A short (chapter-length) description of how to do this appears in my Linux in a Windows World (O'Reilly, 2005). You can find more thorough coverage of LDAP in LDAP-specific books, such as Matt Butcher's Mastering OpenLDAP: Configuring, Securing, and Integrating Directory Services (Packt, 2007).
What Does LDAP Do?
In a network authentication scheme, one computer holds a database of account information and other computers are configured as clients of that authentication server. (Backups of the authentication server can also exist in case the main server goes down.) When a user attempts to log in to a client, that computer sends the username and password (possibly encrypted) to the server, which then tells the client whether the user is authorized. The server can also provide additional information, such as the location of the user's home directory.
Several network authentication protocols exist. These include LDAP (described here), Kerberos, Windows NT domains, and Network Information Service (NIS). The Windows Active Directory (AD) system merges features of both LDAP and Kerberos.
LDAP is a directory system, which requires elaboration. In LDAP terms, a directory is not the same as a filesystem directory, although the two concepts are similar. An LDAP directory is essentially a database, but it's a database that's organized in a hierarchical fashion and that's designed to be read more often than it is written. Like filesystem directories, LDAP directories have a root (referred to as a base in LDAP parlance), and information is stored relative to that base. In the following pages, the meaning of the word directory should be clear by context whether it refers to a filesystem directory or an LDAP directory.
When using LDAP, user accounts must be managed in a different way than on a computer with a local account database. Several utilities, which are included with the popular OpenLDAP server (http://www.openldap.org), provide substitutes for Linux account maintenance tools such as useradd, userdel, and passwd.
Preparing a System to Use LDAP Tools
You may use the LDAP account maintenance tools on any computer that's properly configured as an LDAP client. To do this, you must install the OpenLDAP software, or at least its clients, and edit the /etc/openldap/ldap.conf file. This file specifies the base of the LDAP directory, the location of the LDAP server, and an encryption key if your LDAP server uses one:
BASE        dc=pangaea,dc=edu
URI         ldaps://ldap.pangaea.edu
TLS_CACERT  /etc/openldap/ssl/certs/slapd-cert.crt
The BASE line specifies the base of the LDAP directory. It's normally derived from your Internet domain name (pangaea.edu in this example), but it can be something else. The URI line specifies the LDAP server's hostname, typically preceded by ldap:// or ldaps://, the latter denoting a server that employs encryption. If the LDAP server supports encryption, you should specify a certificate file with the TLS_CACERT line. (Alternatively, the TLS_CACERTDIR line specifies a directory in which a certificate can be found.) You must copy the certificate file from the LDAP server.
Working with LDIF Files
LDAP uses the LDAP Data Interchange Format (LDIF) as a way of transferring data, and a basic understanding of LDIF is necessary for LDAP account maintenance. An LDIF file consists of a series of attribute names and values, separated by colons. For account maintenance, these files must contain data equivalent to the entries in /etc/passwd and /etc/shadow. To maintain Linux group data, LDIF files with the equivalent of /etc/group must be available. Listings 7.2 and 7.3 show samples of password and group LDIF files, holding data on a single user and a single group, respectively.
Listing 7.2: Sample LDIF file holding user data
dn: uid=maryann,ou=People,dc=pangaea,dc=edu
uid: maryann
cn: maryann
objectClass: account
objectClass: posixAccount
objectClass: top
objectClass: shadowAccount
userPassword: {SSHA}dUR1zOPZslHC6AGhGxAhcIYHpa7lqRGn
shadowLastChange: 14262
shadowMax: 99999
shadowWarning: 7
loginShell: /bin/bash
gecos: Maryann
uidNumber: 1010
gidNumber: 100
homeDirectory: /home/maryann
![]() The uid value in Listing 7.2 corresponds to a Linux username; the Linux UID value appears on the uidNumber line.
The uid value in Listing 7.2 corresponds to a Linux username; the Linux UID value appears on the uidNumber line.
Listing 7.3: Sample LDIF file holding group data
dn: cn=users,ou=Group,dc=pangaea,dc=edu
objectClass: posixGroup
objectClass: top
cn: users
userPassword: {crypt}x
gidNumber: 100
memberUid: maryann
To add or modify accounts or groups, you should have suitable LDIF files. (Alternatively, you can type the information directly, but it's usually easier to have the data in a file.) Each file can hold multiple entries, so you can add several users at once by creating a single file that defines several users. Ensure that a blank line separates entries for different accounts.
Special attention is required for the userPassword entry in the user data file. This entry is typically encrypted using any of several encryption schemes. In Listing 7.2, SSHA encryption was used. You can create an encrypted password by typing slappasswd, which prompts you for a password (you must enter it twice) and displays a string that you can then cut and paste into the LDIF file. Additional slappasswd options are described shortly, in “Modifying Accounts.”
If the account directory is new, you must initialize it by using two special entries:
dn: dc=pangaea,dc=edu
objectClass: domain
dc: pangaea

dn: ou=People,dc=pangaea,dc=edu
objectClass: organizationalUnit
ou: People
You can place these two entries at the start of the first LDIF file you use to create accounts, or you can enter them in their own separate file. Of course, you should modify them to reflect your own configuration by changing references to pangaea and edu to your own site's equivalents. A similar entry is required to initialize the groups directory:
dn: ou=Group,dc=pangaea,dc=edu
objectClass: organizationalUnit
ou: Group

Migrating a User Database to LDAP
If you have a computer with an existing user database and you want to migrate it to LDAP, a set of scripts to convert the standard Linux files to LDIF format can help. Such scripts exist at http://www.padl.com/OSS/MigrationTools.html. The bulk of that Web page describes the meanings of various variables used by the scripts. Download links appear at the end of the page; scroll down and click to download a tarball containing the scripts.
After you've downloaded and extracted the scripts, you must edit the migrate_common.ph file for your site. Change the $DEFAULT_MAIL_DOMAIN and $DEFAULT_BASE variables to refer to your DNS mail domain name and LDAP base, respectively.
With suitable customization in place, you can type the following commands, from within the script directory, to create LDIF files for accounts and groups:
# ./migrate_passwd.pl /etc/passwd passwd.ldif
# ./migrate_group.pl /etc/group group.ldif
The resulting passwd.ldif and group.ldif files contain LDIF equivalents of your /etc/passwd and /etc/group files. You should edit these files to remove non-login system accounts and groups, as well as any users you don't want to authenticate via LDAP. With your final edited files in hand, you can add them to the LDAP directory, as described next.
Adding Accounts
With basic configuration out of the way, you can begin account maintenance tasks. If the LDAP directory is empty, a good place to start is with adding users. Prepare one or more LDIF files for users and groups, and then add each one using ldapadd:
$ ldapadd -D cn=manager,dc=pangaea,dc=edu -W -f acct.ldif
![]() Ordinary users may run ldapadd and other LDAP administrative tools; LDAP relies on its own authentication, rather than the local login security, to provide proper security.
Ordinary users may run ldapadd and other LDAP administrative tools; LDAP relies on its own authentication, rather than the local login security, to provide proper security.
This example adds the accounts specified in acct.ldif to the LDAP server specified in the /etc/openldap/ldap.conf file. The option to -D is a distinguished name (DN) that refers to an administrative account on the LDAP server; you must know this DN and its associated password to be able to add accounts. Several other options passed to ldapadd are important, as summarized in Table 7.2. Consult ldapadd's man page for additional options.
TABLE 7.2 Important ldapadd options
Modifying Accounts
To modify an account, you use the ldapmodify command, which works much like ldapadd. (In fact, one command is a symbolic link to the other on many systems.) Thus, the options to Table 7.2 apply to ldapmodify as well. Ordinarily, though, you use ldapmodify to modify an existing account. You can edit an existing LDIF file and then pass it back via ldapmodify to change the account.
One important account setting you're likely to need to change from time to time is the password. If you want to store passwords in a hashed (one-way encrypted) form, you'll need to encrypt them in some way when you modify the LDIF file. As noted earlier, the slappasswd utility can do this job. Type its name, and you'll be prompted to enter a password twice (it doesn't echo), whereupon the utility prints the hashed password:
$ slappasswd
New password:
Re-enter new password:
{SSHA}2UtAPbD+/juSg5k2vK3mY3ECtqsDRkkT
Cut and paste the displayed password value into the LDIF file and then run it through ldapmodify to change the password.
Various options to slappasswd modify its operation, as summarized in Table 7.3. A few more obscure options exist, as well; consult the program's man page for details.
TABLE 7.3 Important slappasswd options
| Option | Description |
| -v | Displays verbose output. |
| -s password | Creates a hash of the specified password. |
| -T file | Creates a hash from the contents of file. |
| -h scheme | Uses the specified scheme to hash the password. Valid options for scheme are {CRYPT}, {MD5}, {SMD5}, {SSHA}, and {SHA}, with {SSHA} being the default. |
Although you can change a user's password with slappasswd and ldapmodify, a simplified approach is to use ldappasswd, which effectively combines both commands in one, obviating the need to deal with an intermediary LDIF file:
This example changes the password for maryann. A quirk is that the user must enter the manager's password after entering the user's new password. Many variants of this command are possible; for instance, by substituting the user's DN for the manager's DN, users may change their own passwords.
With the exception of -C, -S, -f, and -P, the options in Table 7.2 apply to ldappasswd. In addition, Table 7.4 summarizes options unique to ldappasswd. Consult the program's man page for still more options.
TABLE 7.4 Important ldappasswd options (see also Table 7.2)
In most cases, users can change their own passwords using passwd on an LDAP client system, just as if the account database were local. This ability depends on the configuration of the Pluggable Authentication Modules (PAM) system on the client, though. Given the simplicity of passwd compared to ldappasswd, using passwd is preferable for most users.
Deleting Accounts
Of course, from time to time you may need to delete accounts. You can do so with the ldapdelete command, which can be used to delete a single account like this:
$ ldapdelete -D cn=manager,dc=pangaea,dc=edu -W cn=nemo,dc=pangaea,dc=edu
This command will delete the nemo user (or, more precisely, the account with the canonical name that matches cn=nemo,dc=pangaea,dc=edu) from the directory, providing of course that the user typing this command has the correct password!
The ldapdelete command works with all the same options described in Table 7.2 except for -S and -C. The meaning of -f is slightly different, as well; the file specified by -f contains a list of DNs that are to be deleted. Consult the man page for ldapdelete for information on additional options.
Querying a Server About Accounts
Several tools can provide information about LDAP accounts. One very convenient tool is getent. You pass the string passwd or group to getent to see a list of accounts or groups, respectively. You can also add the account or group name to obtain information on a particular account or group:
$ getent passwd maryann
maryann:x:1010:100:Maryann:/home/maryann:/bin/bash
This output verifies that the maryann account exists, and it displays various information about the account in the same format that the /etc/passwd file uses. The getent utility returns information from various sources, though, including local account databases; and it works only if the client is properly configured to use LDAP for account management. Using the -s ldap option restricts the search to LDAP sources.
An LDAP-specific tool is ldapsearch. Using this utility, you can search for data using any field in the database. Typically, you don't need much in the way of authentication to use it, either. For instance, you can search for data on the user maryann by typing this:
$ ldapsearch uid=maryann
The program will display any matching directory entries one after another. Of course, in this case there will probably be just one matching entry; however, you could search for members of a particular group, users who use a particular shell, or other non-unique features to obtain information on all such users.
The ldapsearch utility searches on criteria, or filters, defined in the Request For Comments (RFC) 4515 document (http://www.rfc-editor.org/rfc/rfc4515.txt, among other locations). The RFC 4515 filters can be quite complex. They're conceptually similar to regular expressions, which are used by several other Linux tools; but the syntax of RFC 4515 filters is quite different. For instance, consider the following filter:
(&(uid=maryann)(!(ou=Accounting)))
The filter will find users with an account name of maryann who are not members of the Accounting department (the exclamation mark serves a negation function). Such a search might be useful if your LDAP server hosts separate account databases for different departments or other groups. In such a configuration, the same username might be used by two people, much like two files can have the same name in two filesystem directories and yet be distinct. In most cases a much simpler search filter will suffice, though. If you need to use more complex search filters, you should consult RFC 4515.
As with other LDAP maintenance tools, various options are available in ldapsearch. The options listed in Table 7.2 are all supported; in addition, Table 7.5 summarizes some additional options. The -f option specifies a file in which a series of search criteria appear. Still more options are available; consult the program's man page for details.
TABLE 7.5 Important ldapsearch options (see also Table 7.2)
| Option | Description |
| -A | Retrieves the attribute but not its value |
| -L | Displays results as LDIF records |
| -S attribute | Sorts the results based on the specified attribute |
| -b base | Searches the directory from the specified base rather than from the default |
| -z number | Retrieves at most number entries, with 0 meaning no limit |
Configuring a Router
Chapter 5 describes basic network configuration, including the use of the route command and the most basic router configuration options. This chapter expands on this topic, focusing on Network Address Translation (NAT), firewall configurations, and automatic routing maintenance. These tools can help keep your network safe from unwanted attack—and just as importantly, they can keep your own network from becoming a source of unwanted attacks on others!
Understanding Types of Routing
Small computer networks enable computers to communicate more or less directly with one another. On such networks, computers can address each others' hardware using media access control (MAC) addresses, aka hardware addresses, as described in Chapter 5. This approach works fine for a small office network; however, such a configuration doesn't scale well to the sizes needed for large organizations, much less for the globe-spanning Internet. At such scales, it's necessary to link multiple small networks, each of which is known as a network segment, using special computers—routers.
At its core, a router is simply a computer that can transfer network data packets between two or more network segments. Depending upon the router's configuration, though, it may perform additional tasks, some of which are described in other chapters of this book:
VPN A virtual private network (VPN) router encapsulates packets for transmission over an encrypted network link over an untrusted network. VPN configuration is described in Chapter 5.
Firewall A firewall is a computer or software configuration that selectively rejects certain types of network traffic. Firewalls can block traffic based on a variety of criteria, including source IP address, destination IP address, source port number, and destination port number. Not all firewalls are routers, though; firewalls can protect isolated computers. Likewise, not all routers run firewalls. Many routers do run firewall software, though. Such routers typically employ packet-filter firewall configurations, meaning that the firewall uses low-level packet-based rules to determine what data to pass, as opposed to higher-level protocol-based rules. The upcoming section “Configuring Firewall Rules” describes Linux packet-filter firewall configuration.
NAT Network Address Translation (NAT), aka IP masquerading, enables a router to “hide” one network from another while still enabling the hidden network to access the other one. This is a very useful security tool for small private networks that can run with new or no externally accessible servers; the protected network can run internal servers with little risk that an outsider can access those servers. NAT can also stretch the limited supply of IPv4 addresses; an organization can give a dozen, a hundred, or more computers access to the Internet while consuming just one IP address. The upcoming section “Configuring NAT” describes Linux's NAT capabilities.
It's important to realize that not every computer that links two networks is a router. Some computers have two network interfaces and can even run the same server on both networks, but by itself, such a configuration does not transfer data between the networks, except perhaps in a limited way, depending on the server's configuration. Some setups can employ a proxy server, which is a way for the system to relay data for a limited number of protocols, but a proxy server is not a router because a router relays packets for a wide variety of protocols.
Activating Routing
To use a computer as a router, you must first configure it to use two or more network interfaces, as described in Chapter 5. You must then link those interfaces by placing the value 1 in the /proc/sys/net/ipv4/ip_forward pseudo-file:
# echo “1” > /proc/sys/net/ipv4/ip_forward
![]() The /proc/sys/net/ipv4 pseudo-directory contains a large number of pseudo-files that control many low-level features of your IPv4 network connections. Most of these pseudo-files should not be adjusted unless you fully understand their purpose and function. On rare occasion, adjusting one can be helpful to improve performance or enable a feature. Placing a 1 value in the ip_forward pseudo-file on a router is one such occasion.
The /proc/sys/net/ipv4 pseudo-directory contains a large number of pseudo-files that control many low-level features of your IPv4 network connections. Most of these pseudo-files should not be adjusted unless you fully understand their purpose and function. On rare occasion, adjusting one can be helpful to improve performance or enable a feature. Placing a 1 value in the ip_forward pseudo-file on a router is one such occasion.
With this change in place, the computer is configured as a router. Of course, computers on both of its networks must know of its router status—that is, the Linux router must be listed as a gateway in the routing tables of at least one computer on each network interface.
Configuring Firewall Rules
Linux's packet-filter firewall rules are implemented using a tool known as iptables. This program enables you to describe criteria that can match packets based on addresses, port numbers, and so on. Packets that match the criteria you specify are passed, and others are rejected, or vice versa, depending on your defaults. In the following pages, I describe basic iptables principles, summarize how to check the existing configuration, explain the syntax of the iptables utility, and present a sample configuration.
![]() Linux kernel versions 2.4.x and 2.6.x use iptables. The earlier 2.0.x and 2.2.x kernel series used tools known as ipfwadm and ipchains, respectively. If your system uses IPv6, you must use the ip6tables tool. These programs are similar in principle to iptables, but they differ in many details. The ipfwadm and ipchains tools, in particular, are less powerful than iptables.
Linux kernel versions 2.4.x and 2.6.x use iptables. The earlier 2.0.x and 2.2.x kernel series used tools known as ipfwadm and ipchains, respectively. If your system uses IPv6, you must use the ip6tables tool. These programs are similar in principle to iptables, but they differ in many details. The ipfwadm and ipchains tools, in particular, are less powerful than iptables.
Basics of iptables
The Linux kernel uses a series of rules to determine what to do with any given packet it receives or that's generated by local processes. These rules are arranged in chains, which provide a series of patterns and actions to be taken should a packet match the pattern. The first rule to match a pattern determines what the system does with the packet—accept it, reject it, or pass it to another chain. The chains are in turn organized into tables, with relationships between them. The most important table is the filter table, which is illustrated in Figure 7.3. In this table, the INPUT chain processes packets destined for local programs, the FORWARD chain processes packets that the system is to forward (as in a router), and the OUTPUT chain processes packets that originate locally and are destined for outside systems. Any given packet passes through just one of these chains. Other standard tables include the nat table, which handles Network Address Translation (NAT), and the mangle table, which modifies packets in specialized ways.
FIGURE 7.3 Linux uses a series of rules, which are defined in chains that are called at various points during processing, to determine the fate of network packets

To create a packet-filter firewall, you must design a series of rules for specific tables and chains. For instance, you might tell the INPUT chain to discard any packets directed at port 80 (the Web server port) that don't originate from the local network. Another set of rules might tell the OUTPUT chain to block all outgoing packets from local processes destined for port 25 (the SMTP mail server) except for those directed at your network's mail server computer. A router is likely to include a number of special rules for the FORWARD chain, as well, in order to control routing features independently of local programs' accesses.
Linux provides the iptables utility for manipulating firewall rules. This program relies on the presence of assorted options in the Linux kernel. Most importantly, you must enable the Networking Support ![]() Networking Options
Networking Options ![]() Network Packet Filtering Framework (Netfilter) option. Once you've done this, you can activate various options in the IP: Netfilter Configuration submenu, most notably the IP Tables Support option, as shown in Figure 7.4. I recommend you build just about everything else, as well, at least as modules. Most Linux distributions ship with most of these options compiled as modules.
Network Packet Filtering Framework (Netfilter) option. Once you've done this, you can activate various options in the IP: Netfilter Configuration submenu, most notably the IP Tables Support option, as shown in Figure 7.4. I recommend you build just about everything else, as well, at least as modules. Most Linux distributions ship with most of these options compiled as modules.
FIGURE 7.4 Linux kernel options must be enabled before a packet filter firewall can be built

The iptables tool accepts a number of table and command options, the most important of which are summarized in Table 7.6. (Options related to rules are described later in “Using iptables.”) Additional options are described in the man page for iptables.
TABLE 7.6 Common iptables table and command options

Checking the Configuration
The iptables program responds to the -L parameter by displaying a list of the rules that make up a given table. You may optionally pass a table name by using the -t parameter. For instance, Listing 7.4 shows how to view the current filter table.
Listing 7.4: Sample use of iptables to view firewall configuration
# iptables -L -t filter
Chain INPUT (policy ACCEPT)
target     prot opt source         destination
DROP       all  --  172.24.0.0/16  anywhere

Chain FORWARD (policy DROP)
target     prot opt source      destination

Chain OUTPUT (policy ACCEPT)
target     prot opt source      destination
The default table is filter, so omitting -t filter from this command produces the same output. The table summarized by this output is nearly empty; the FORWARD and OUTPUT chains have no rules, and the INPUT chain has just one rule—it drops all input from the 172.24.0.0/16 network. Although the format of information presented by iptables -L isn't exactly equivalent to what you use when you create a rule, the similarities are strong enough that you should be able to interpret the output once you know how to create rules.
Setting the Default Policy
One critically important consideration when designing a firewall is the default policy, which is what the firewall does with packets that don't match any rules in a chain. In fact, in the standard filter table, there are three default policies, one each for the INPUT, FORWARD, and OUTPUT chains. The default policy corresponds to an action that the system can take. Three options are common, as described in Table 7.7, although only two may be used as a default rule.
TABLE 7.7 Common firewall policies
| Policy | Description |
| ACCEPT | An ACCEPT action causes the system to accept the packet and pass it on to the next chain or system. For instance, if the INPUT chain's default policy is ACCEPT, any packet that doesn't match a rule is passed to the target program (assuming one is using the specified port). |
| DROP | This action causes the system to ignore the packet—to “drop it on the floor,” as it were. To the system that sends the packet (which could be a remote computer or a local program, depending on the chain involved), it appears that the packet was lost due to a routing error or the like. |
| REJECT | This action is much like DROP, except that the kernel returns a code to the calling computer or program indicating that the packet has been rejected. This behavior is similar to what would happen if no program were using the target port. This action requires that you compile explicit support for it into the kernel, either in the main kernel file or as a module. Unfortunately, REJECT doesn't work as a default policy, but you can use it as a target for more specific rules. |
Typing iptables -L reveals the default policy, as shown in Listing 7.4—in that example, the INPUT and OUTPUT chains have a default policy of ACCEPT, whereas the FORWARD chain has a default policy of DROP. To change the default policy, you should first flush the chain of all its rules by passing the -F parameter and the chain name to iptables. You can then pass the -P parameter to iptables, along with the policy name. In both cases, you can optionally include -t and the table name:
# iptables -t filter -F FORWARD
# iptables -F INPUT
# iptables -P FORWARD DROP
# iptables -t filter -P INPUT DROP
As a general rule, the safest default policy is a closed one—that is, to use DROP. When you use such a default policy, you must explicitly open ports with firewall rules. This means that if a server is running on your computer without your knowledge, it doesn't pose a security risk because packets can't reach it and it can't send packets. Likewise, if you close outgoing ports, malicious software or individuals may not be able to launch attacks on others unless they use the protocols you've approved for use. Using DROP as a default policy for the FORWARD chain on a router means your network will be very well protected and will be unable to serve as a base for outgoing attacks, as well. On the other hand, a default closed policy means you must design your firewall rules very carefully; an oversight can cause an important client or server to stop working.
![]() Although you cannot set the default policy to REJECT, you can achieve much the same end by other means. Specifically, you can insert a rule at the end of the chain that uses REJECT on all packets not matched by previous rules. If you do this, the default policy as set via the -P option to iptables becomes irrelevant. The next section, “Using iptables,” describes how to create individual rules.
Although you cannot set the default policy to REJECT, you can achieve much the same end by other means. Specifically, you can insert a rule at the end of the chain that uses REJECT on all packets not matched by previous rules. If you do this, the default policy as set via the -P option to iptables becomes irrelevant. The next section, “Using iptables,” describes how to create individual rules.
If you want a default closed policy, you must decide between using DROP (directly) and REJECT (via a workaround as described in the previous tip). There are good arguments to be made in favor of both rules. DROP is the “stealthy” option. If you were to use DROP on every port and protocol, many network scanners would fail to detect your computer at all; it would appear not to exist. Of course, such an extreme policy would make the network useless; in practice, you must let some traffic through, and this frequently gives information to crackers. For instance, if a system drops everything but port-80 accesses, the cracker knows you're running a Web server (or something else) on port 80. Because computers don't normally drop packets, though, the cracker also knows you're running a firewall with a default DROP policy. By contrast, REJECT does a poorer job of hiding your system's presence from casual scans, but once a cracker has found your system, it's less obvious that you're running a firewall.
On occasion, these different policies can have an effect on protocols. Specifically, many protocols are designed to keep trying to make connections if packets are lost. This behavior can sometimes result in connection delays for related protocols if you use a default DROP policy. For instance, a server might try contacting your computer's port 113, which is used by the ident (aka auth) server. This server provides information about who on your system is making connection requests to servers, the goal being to provide a trail in log files to help track abuse back to its source. (TCP Wrappers can also use an ident server as an authorization tool.) If your system uses an INPUT chain DROP rule on port 113, the result can be connection delays if a remote server tries to use your ident server. Of course, you can overcome such problems on a case-by-case basis by adding ordinary rules to the offending chain, overriding the default DROP rule with a REJECT rule, or perhaps even overriding an ACCEPT rule.
![]() If your computer has two network interfaces but it should not function as a router, use a DROP default policy on the FORWARD chain. Doing so will prevent the computer from functioning as a router, even if you inadvertently configure it to forward packets in another way.
If your computer has two network interfaces but it should not function as a router, use a DROP default policy on the FORWARD chain. Doing so will prevent the computer from functioning as a router, even if you inadvertently configure it to forward packets in another way.
Using iptables
To add a rule to a chain, you call iptables with a command such as this:
# iptables -A CHAIN selection-criteria -j TARGET
The CHAIN in this command is the chain name—INPUT, OUTPUT, or FORWARD for the filter table. The TARGET is the firewall target that's to process the packet, such as ACCEPT, REJECT, or DROP. You can also specify a LOG target, which logs information about the packet and then tries to match the next rule. Various other targets are also available; consult the iptables documentation for details.
The tricky part of this command is in the selection-criteria component. You can specify many different criteria to match different features of a packet. If you specify more than one criterion, all of them must match in order for a rule to apply. Some of the possible criteria are summarized in Table 7.8. Many additional matching rules are available; consult the man page for iptables for more information.
TABLE 7.8 Common iptables matching criteria

![]() All Linux computers use a loopback or localhost interface, identified as lo, for certain local network activity. You can create a filter using the -i or -o option and this interface name to enable your system to talk to itself, which is necessary for certain tools, such as X servers and print queues, to work.
All Linux computers use a loopback or localhost interface, identified as lo, for certain local network activity. You can create a filter using the -i or -o option and this interface name to enable your system to talk to itself, which is necessary for certain tools, such as X servers and print queues, to work.
Many of these options are used in pairs that match packets traveling in opposite directions. You must remember that most networking connections involve two-way communications. One side sends a packet or a stream of packets to the other side, and the second side replies. Therefore, with a default DENY policy, it's not enough to simply unblock, say, packets directed at your Web server (with the --destination-port and possibly other options) on your INPUT chain. You must also unblock packets coming from the Web server (with the --source-port and possibly other options) on the OUTPUT chain. If you reverse the chains with which these rules are associated, you affect the ability of clients to communicate.
A Sample Configuration
The options described in the preceding section may seem complex, and indeed they enable you to create a sophisticated set of firewall rules. To better understand these rules, consider Listing 7.5, which shows a simple firewall rule set as a bash script. This script is a minimal one that might be run on a workstation or server. Aside from flushing and setting the default policy, this script doesn't touch the FORWARD chain. To configure a router as a firewall, you'd have to create rules for the FORWARD chain reflecting the types of traffic you want to pass between networks.
Listing 7.5: A sample iptables firewall script
#!/bin/bash
iptables -F INPUT
iptables -F FORWARD
iptables -F OUTPUT

iptables -P INPUT DROP
iptables -P FORWARD DROP
iptables -P OUTPUT DROP

# Let traffic on the loopback interface pass
iptables -A OUTPUT -d 127.0.0.1 -o lo -j ACCEPT
iptables -A INPUT -s 127.0.0.1 -i lo -j ACCEPT

# Let DNS traffic pass
iptables -A OUTPUT -p udp --dport 53 -j ACCEPT
iptables -A INPUT -p udp --sport 53 -j ACCEPT

# Let clients' TCP traffic pass
iptables -A OUTPUT -p tcp --sport 1024:65535 -m state
         --state NEW,ESTABLISHED,RELATED -j ACCEPT

iptables -A INPUT -p tcp --dport 1024:65535 -m state
         --state ESTABLISHED,RELATED -j ACCEPT

# Let local connections to local SSH server pass
iptables -A OUTPUT -p tcp --sport 22 -d 172.24.1.0/24 -m state
         --state ESTABLISHED,RELATED -j ACCEPT
iptables -A INPUT -p tcp --dport 22 -s 172.24.1.0/24 -m state
         --state NEW,ESTABLISHED,RELATED -j ACCEPT
Listing 7.5 begins with a series of six calls to iptables that flush the firewall rule chain and set the default policy. These lines ensure that when you run this script, you won't add to an existing rule set, which could bloat the chains, thereby degrading performance and causing unexpected effects. The remaining lines are broken into four parts, each of which has two iptables calls. These parts set rules relating to specific types of traffic:
Loopback Interface Traffic The two lines that refer to 127.0.0.1 allow the computer to communicate with itself over the loopback interface (lo). The references to 127.0.0.1 and the associated -d and -s parameters are arguably a bit paranoid; anything coming over the lo interface should come from this address.
DNS Queries Most systems rely on a DNS server to translate hostnames to IP addresses. To keep this system working, you must enable access to and from remote DNS servers, which run on UDP port 53. The DNS rules in Listing 7.5 are actually rather permissive, because they enable traffic to or from any DNS server to pass. In theory, a miscreant could run something other than a DNS server on UDP port 53 to use this rule to bypass your security. In practice, though, such abuse would be unlikely to work, because it would require something other than DNS on the local system to use the oddly configured external client or server. If you like, you could add IP address restrictions to these lines to improve the security.
Client Traffic The next two calls to iptables create a broad set of acceptance conditions. Network clients generally use high TCP ports—those numbered between 1024 and 65535. These rules, therefore, open those ports to access in both directions but with a twist: These rules use stateful packet inspection to ensure that NEW packets are allowed only on outgoing connections. The omission of the NEW state from the INPUT chain means that a server run on a high port (as an ordinary user might try in an attempt to get around your system's security) won't be able to accept connections. Both rules also omit the INVALID state, which can reduce the chance of a miscreant intercepting and “hijacking” an established connection.
Local SSH Server Traffic The final two calls to iptables open a hole in the firewall to enable local computers to make connections to the SSH server. This server runs on port 22, so traffic to and from that port and originating from or destined to the local (172.24.1.0/24) network is accepted. As with the client traffic rules, these rules employ stateful inspection as an added precaution. INVALID packets are rejected in both directions, and NEW packets are accepted only on input packets.
Many firewall scripts define variables that contain the host machine's IP address and the address for the local network, and then they refer to these variables, rather than using them directly, as Listing 7.5 does. This practice greatly simplifies changing the script if your IP address changes or if the script is to run on multiple computers.
Configuring NAT
As described earlier, NAT is a useful tool for protecting a network and for stretching a limited budget of IP addresses. Once you've decided to use NAT, you can enable NAT features using iptables. That done, you may want to investigate port redirection options, which enable you to overcome some of NAT's limitations.
Enabling NAT Features
NAT configuration is surprisingly simple. A single iptables command enables NAT features:
# iptables -t nat -A POSTROUTING -o eth0 -j MASQUERADE
This line tells the kernel to route traffic such that data passed through eth0 is masqueraded. That is, eth0 should normally be connected to the Internet, whereas eth1 (or other interfaces) should be connected to the private network you want to protect. Of course, you can change the network specification in this command, if necessary.
To be useful, NAT also requires normal router configuration—that is, you must store the value 1 in /proc/sys/net/ipv4/ip_forward, as described earlier in “Activating Routing.”
Redirecting Ports
Ordinarily, one of the big advantages of NAT is that computers on the Internet cannot initiate contact with computers protected by the NAT router. Sometimes, though, this advantage can be a problem. Suppose, for instance, that you need to access just one computer on your network. The NAT router now becomes an obstacle to be overcome.
One solution to this problem is to use the NAT router as an intermediary system. For instance, you could use SSH to log into the NAT router and then access the target computer from the NAT router. This approach can be acceptable in some situations, but it may be awkward or downright unacceptable in others. In such cases, a solution known as port forwarding is available. This technique enables traffic directed at one port to be forwarded to another port, another computer, or another port on another computer. Port forwarding is accomplished with the --jump (-j) iptables rule, using the DNAT target, as in this example:
To understand this command, try breaking it down piece by piece:
- The -t nat directive tells the program to work on the nat table. Although port forwarding can be done on computers that don't function as NAT routers, it uses the nat table.
- Although most NAT operations occur after routing in the kernel, port forwarding occurs before routing, which is the reason for the -A PREROUTING option.
- This particular example forwards a TCP port (-p tcp); however, port forwarding can be done on other port types.
- Packets directed at eth0 (-i eth0) are to be forwarded. If this computer were the same one configured in “Enabling NAT Features,” this rule would redirect traffic directed at the NAT router's external interface.
- Ports directed at port 22 (--dport 22), the SSH port, will be redirected.
- The -j DNAT option tells the kernel to perform NAT on the destination (DNAT) rather than the source (SNAT) address. The NAT operations are then restricted according to the other rules.
- The --to-destination option specifies where packets that meet the other criteria are to be redirected—in this case, to port 22 on 192.168.107.64.
The net effect of this example is that any attempt to reach the NAT router by SSH from its external address will instead reach 192.168.107.64's SSH port. You can write several such rules, effectively enabling as many internal computers as you like to function as servers on the Internet at large. One important limitation, though, is that you can still have only one server on each external port. (Advanced load balancing tools can provide some relief from this limitation but are beyond the scope of this book.) If you need to access, say, two different computers' SSH servers, you must forward data for one from a non-standard external port number.
Automatic Routing Configuration
The preceding descriptions rely on one-time commands or, in the case of Listing 7.5, a single script to implement firewall and other router features. This isn't always convenient, though. In particular, it's usually desirable to have a computer set up its firewall rules automatically whenever it boots. This can be done by implementing your firewall rules as a startup script, and many distributions have facilities to do this by default. You may also want to investigate a tool called routed, which helps automate the maintenance of routing tables on a full-fledged Internet router.
Restoring Routing Rules Automatically
The iptables utility is a flexible tool for creating packet-filter firewalls, NAT configurations, and port forwarding; however, individual iptables commands typically do just a small fraction of the entire job you want done. Therefore, it's usually best to create a script to set up your desired configuration. (You might even create two or three scripts, each one handling part of the job, such as separating port forwarding from firewall configurations.) Listing 7.5 is an example of such a script, albeit a simple one.
The simplest way to have your firewall scripts run automatically is usually to call them from system startup scripts. Common names for these local startup scripts include /etc/rc.local (used by Debian, Ubuntu, and related distributions), /etc/rc.d/rc.local (used by Red Hat, Fedora, and related distributions), /etc/init.d/boot.local (used by OpenSUSE), and /etc/conf.d/local.start (used by Gentoo). Place a call to your firewall script in the local startup script for your distribution, and it will run automatically whenever you start the computer.
Another method of launching your firewall script is to create a custom SysV or Upstart script for it. These scripts are described in Chapter 1; however, creating a new script is more difficult than modifying an existing one. The main advantage to doing it this way rather than calling your firewall script in a local startup script is that you gain flexibility; you can add support for start, stop, restart, or other options (each of which may require its own supporting firewall script), and you can have the firewall start in only some runlevels. You can also have the firewall start up immediately after the network, thus reducing the narrow window of vulnerability between the time when the network becomes active and the firewall begins protecting the computer.
Many distributions provide their own firewall scripts and typically configuration tools to go with them. For instance, typing system-config-firewall in a Fedora system launches its GUI firewall configuration utility. Enabling the firewall activates it when you reboot. Tools such as this can be convenient shortcuts and are often adequate; however, writing your own rules with iptables is almost certain to be more flexible and may be necessary if you need to use exotic features or create an unusual configuration.
![]() Distributions' firewall tools and your own custom iptables scripts can conflict with one another. If you write your own iptables script and find that a completely different firewall configuration is active when you reboot, it's likely that the distribution's firewall tool has replaced your custom script's settings. Try to track down your distribution's tool and either disable it or use it to create your desired configuration. If you do the latter, be sure to disable your original script to avoid confusion in the future.
Distributions' firewall tools and your own custom iptables scripts can conflict with one another. If you write your own iptables script and find that a completely different firewall configuration is active when you reboot, it's likely that the distribution's firewall tool has replaced your custom script's settings. Try to track down your distribution's tool and either disable it or use it to create your desired configuration. If you do the latter, be sure to disable your original script to avoid confusion in the future.
Using routed
Most of this chapter's router information is concerned with firewalls, NAT, port forwarding, and related topics; however, one other routing topic requires mention: routing path determination. Consider Figure 7.5, which depicts a network at a mid-sized company. This network contains five departments, each with its own subnet and a router that connects to two other networks in a ring arrangement. Suppose that a user on the R&D network needs to access a computer on the Personnel network. Assuming equally good connections between the routers, the optimum route traverses the Marketing router; however, if that router goes down, the connection can still be made via the Manufacturing and Customer Support routers. The trouble, however, is that the R&D router is likely to specify only one route to Personnel—probably via Marketing. Thus, when the Marketing router goes down, so will the connection to Personnel, even though another route does exist.
FIGURE 7.5 In a mid-sized network, multiple paths between two subnets are often possible

The solution to this problem lies in a routing protocol, which enables routers to communicate among themselves to discover the optimum route and to adjust routing tables appropriately. Several routing protocols exist, but the one described here is the Routing Information Protocol (RIP), which detects the number of routers between a source and a destination and adjusts the routing table to minimize this number for any given destination. RIP is a fairly simple routing protocol that's most often used on small and mid-sized networks, such as those in corporations and universities; its technical limitations make it unsuitable for use on the Internet as a whole.
In Linux, RIP is implemented via the routed daemon, which can be installed via a package of the same name. This program normally requires no configuration; it can be launched by a system startup script, and thereafter it adjusts network routing tables on all interfaces automatically. It does this by using RIP broadcasts and adjusting the computer's routing table according to the replies it receives.
Keep in mind that routed relies on the presence of other RIP servers on the routers to which it connects. In Figure 7.5, all five of the routers depicted must be running routed (or some other RIP server) to obtain the full benefit of this protocol.
Configuring SSH
In the past, Telnet has been the remote text-mode login protocol of choice on Linux and Unix systems. Unfortunately, Telnet is severely lacking in security features. Thus, in recent years SSH has grown in popularity, and it is in fact the preferred remote login tool. SSH can also handle file transfer tasks similar to those of the File Transfer Protocol (FTP). For these reasons, knowing how to configure SSH can be helpful. This task requires knowing a bit about SSH generally and about the SSH configuration file under Linux. I conclude the look at SSH with information about the security implications of running the server.
![]() SSH is complex enough that I can't cover more than its basics in this chapter. Consult OpenSSH's documentation or a book on the topic, such as SSH, The Secure Shell: The Definitive Guide, Second Edition, by Daniel J. Barrett, Richard Silverman, and Robert G. Byrnes (O'Reilly, 2005), or Implementing SSH: Strategies for Optimizing the Secure Shell, by Himanshu Dwivedi (Wiley, 2003), for more details.
SSH is complex enough that I can't cover more than its basics in this chapter. Consult OpenSSH's documentation or a book on the topic, such as SSH, The Secure Shell: The Definitive Guide, Second Edition, by Daniel J. Barrett, Richard Silverman, and Robert G. Byrnes (O'Reilly, 2005), or Implementing SSH: Strategies for Optimizing the Secure Shell, by Himanshu Dwivedi (Wiley, 2003), for more details.
SSH Basics
Linux supports remote login access through several different servers, including Telnet, Virtual Network Computing (VNC), and even X. Unfortunately, most of these methods suffer from a major drawback: They transfer most or all data over the network in unencrypted form. This fact means anybody who can monitor network traffic can easily snatch sensitive data, often including passwords. (VNC and a few other protocols encrypt passwords but not other data.) This limitation puts a serious dent in the utility of these remote login tools; after all, if using a remote access protocol means you'll be giving away sensitive data or compromising your entire computer, it's not a very useful protocol.
![]() Non-encrypting remote access tools are particularly risky for performing work as root, either by logging in directly as root or by logging in as an ordinary user and then using su, sudo, or other tools to acquire root privileges.
Non-encrypting remote access tools are particularly risky for performing work as root, either by logging in directly as root or by logging in as an ordinary user and then using su, sudo, or other tools to acquire root privileges.
SSH was designed to close this potentially major security hole by employing strong encryption techniques for all parts of the network connection. SSH encrypts the password exchange and all subsequent data transfers, making it a much safer protocol for remote access.
In addition to encryption, SSH provides file transfer features and the ability to tunnel other network protocols—that is, to enable non-encrypted protocols to piggyback their data over an SSH connection, thus delivering SSH's encryption advantages to other protocols. This feature is frequently employed in conjunction with X, enabling encrypted remote GUI access, but it can be used with other protocols, as well.
Of course, SSH's advantages don't come without a price. The main drawback of SSH is that the encryption and decryption consume CPU time. This fact slows down SSH connections compared to those of direct connections and can degrade overall system performance. This effect is modest, though, particularly for plain text-mode connections. If you tunnel a protocol that transfers much more data, such as X, you may see a greater performance drop when using SSH. Even in this case, the improved security is generally worth the slight speed cost.
Several SSH servers are available for Linux, but the most popular by far is the OpenSSH server (http://www.openssh.org). This program was one of the first open source implementations of the SSH protocol, which was developed by the commercial SSH Communications Security, now known as Tectia (http://www.tectia.com), whose server is sold under the name SSH Tectia. OpenSSH, SSH Tectia, and other SSH products can interoperate with one another, assuming they're all configured to support at least one common level of the SSH protocol. OpenSSH 5.6, the latest version as I write, supports SSH levels 1.3, 1.5, and 2.0, with 2.0 being the preferred level because of known vulnerabilities in the earlier versions.
OpenSSH may be launched via either a super server (inetd or xinetd) or a system startup script (SysV or Upstart). The latter method is preferred, because the server may need to perform CPU-intensive tasks upon starting, so if it's started from a super server, OpenSSH may be sluggish to respond to connection requests, particularly on systems with weaker CPUs. Most distributions deliver SysV startup scripts with their SSH packages. If you make changes to your SSH configuration, you may need to pass the reload or restart option to the startup script, as in /etc/init.d/sshd reload. (Chapter 1 covers startup scripts in more detail.) However it's launched, the OpenSSH server binary name is sshd—the same as the binary name for SSH Tectia.
Setting SSH Options for Your System
For the most part, SSH works reasonably well when it's first installed, so you may not need to make any changes to its configuration. If you do need to make changes, though, these are mostly handled through the main SSH configuration file, /etc/ssh/sshd_config. You can also edit some additional files to limit access to the SSH server or to change how SSH manages the login process.
Configuring Basic SSH Features
The /etc/ssh/sshd_config file consists mainly of option lines that take the following form:
Option value
![]() Don't confuse the sshd_config file with the ssh_config file. The former controls the OpenSSH server, whereas the latter controls the SSH client program, ssh.
Don't confuse the sshd_config file with the ssh_config file. The former controls the OpenSSH server, whereas the latter controls the SSH client program, ssh.
In addition to configuration lines, the sshd_config file holds comments, which are denoted by hash marks (#) or semicolons (;). Most sample configuration files include a large number of SSH options that are commented out; these lines specify the default values, so uncommenting the lines by removing the comment character without otherwise changing them will have no effect. If you want to change an option, uncomment the line and change it. Most options' default values are suitable for most systems. Table 7.9 includes some that you may want to check and, perhaps, change.
TABLE 7.9 Important sshd_config options
For information about additional options, consult the man page for sshd_config. If you make changes to the SSH configuration, remember to restart it using the server's SysV startup script.
Generating SSH Keys
Part of SSH's security involves encryption keys. Each server system and each user has a unique number, or key, for identification purposes. In fact, SSH uses a security system that involves two keys: a public key and a private key. These two keys are mathematically linked in such a way that data encrypted with a particular public key may be decrypted only with the matching private key. When establishing a connection, each side sends its public key to the other. Thereafter, each side encrypts data with the other side's public key, ensuring that the data can be decrypted only by the intended recipient. In practice, this is just the first step of the process, but it's critical. What's more, SSH clients typically retain the public keys of servers they've contacted. This enables them to spot changes to the public key. Such changes can be signs of tampering.
Most OpenSSH server startup scripts include code that looks for stored public and private keys and, if they're not present, generates them. In total, four to six keys are needed: public and private keys for two or three encryption tools SSH supports. These keys are normally stored in /etc/ssh and are called ssh_host_rsa_key and ssh_host_dsa_key for private keys, with .pub filename extensions added for public keys. Some systems add ssh_host_rsa1_key and its associated public key to support SSH level 1.x. If your system doesn't have these keys and you can't get the SSH server to start up, you can generate the keys with the ssh-keygen command:
# ssh-keygen -q -t rsa1 -f /etc/ssh/ssh_host_rsa1_key -C ‘‘ -N ’’
# ssh-keygen -q -t rsa -f /etc/ssh/ssh_host_rsa_key -C ‘‘ -N ’’
# ssh-keygen -q -t dsa -f /etc/ssh/ssh_host_dsa_key -C ‘‘ -N ’’
Each of these commands generates both a private key (named in the -f parameter) and a public key (with the same name but with .pub appended).
Don't run these ssh-keygen commands if the SSH key files already exist. Replacing the working files will cause clients who've already connected to the SSH server to complain about the changed keys and possibly refuse to establish a connection.
![]() Be sure the private keys are suitably protected; if an intruder obtains one of these keys, the intruder can impersonate your system. Typically, these files should have 0600 (-rw-------) permissions and be owned by root. The public key files (with .pub filename extensions) should be readable by all users, though—typically, ownership by root and permissions of 0644 (-rw-r--r--) are appropriate.
Be sure the private keys are suitably protected; if an intruder obtains one of these keys, the intruder can impersonate your system. Typically, these files should have 0600 (-rw-------) permissions and be owned by root. The public key files (with .pub filename extensions) should be readable by all users, though—typically, ownership by root and permissions of 0644 (-rw-r--r--) are appropriate.
When you configure a client system, you may want to consider creating a global cache of host keys. As already noted, the ssh program records host keys for each individual user. (It stores these in the ~/.ssh/known_hosts file.) When you set up the client, you can populate the global ssh_known_hosts file, which is normally stored in /etc or /etc/ssh. Doing so ensures that the public key list is as accurate as the sources you use to populate the global file. It also eliminates confirmation messages when users connect to the hosts whose keys you've selected to include in the global file.
How do you create this file? One simple way is to copy the file from a user account that's been used to connect to the servers you want to include. For instance, you can type cp /home/ecernan/.ssh/known_hosts /etc/ssh/ssh_known_hosts to use ecernan's file. You may want to manually review this file before copying it. It consists of one line per host. Each line begins with a hostname, IP address, or both, and continues with the key type and the key. You can ignore most of this information, but pay attention to the hostnames and IP addresses. Ensure that the list includes all the SSH servers your client is likely to want to use and that it does not include inappropriate or unnecessary servers. You can remove lines in your text editor, if necessary. To add entries, use the account whose file you're copying to connect to the system you want to add. Chances are, ssh will display a warning about connecting to an unknown system. Confirm that you want to do so. Once you do this and reload the file, you should see an entry for the server.
![]() OpenSSH 4.0 and later support hashing of hostnames in the known hosts file; this is done by setting HashKnownHosts yes in the /etc/ssh/ssh_config file. When this feature is enabled, the hostname is encrypted using a one-way encryption algorithm and stored in this form. The idea is that you'll still be able to authenticate SSH servers to which you connect, because a hash of the typed hostname will match a hash of the stored hostname, but if an intruder steals your known hosts file, the intruder will be unable to determine the identities of the computers to which you've been connecting. One drawback to this feature is that it complicates legitimate manual editing of the known_hosts file.
OpenSSH 4.0 and later support hashing of hostnames in the known hosts file; this is done by setting HashKnownHosts yes in the /etc/ssh/ssh_config file. When this feature is enabled, the hostname is encrypted using a one-way encryption algorithm and stored in this form. The idea is that you'll still be able to authenticate SSH servers to which you connect, because a hash of the typed hostname will match a hash of the stored hostname, but if an intruder steals your known hosts file, the intruder will be unable to determine the identities of the computers to which you've been connecting. One drawback to this feature is that it complicates legitimate manual editing of the known_hosts file.
Copying Files Using SSH
Most users employ the ssh client program, which provides remote login access—type ssh othersystem to log into othersystem using the same username you're using on the client system; or add a username, as in ssh user@othersystem, to log in using another username.
SSH includes a file-copying command, too: scp. This command works much like the cp command for copying files locally; however, you must specify the target computer, and optionally the username, just before the target filename. For instance, to copy the file masterpiece.c to the lisa account on leonardo.example.com, you would type
$ scp masterpiece.c [email protected]:
The colon (:) that terminates this command is extremely important; if you omit it, you'll find that scp works like cp, and you'll end up with a file called [email protected] on the client computer. If you want to rename the file, you can do so by including the new name following the colon.
Logging In Without a Password
If you use SSH a lot or if you use it in automated tools, you'll no doubt become annoyed by the need to type a password with every connection. There is a way around this requirement: You can set up the SSH client with keys and give the public key to the server computer. With this configuration, the SSH client computer can identify itself, possibly obviating the need for you to type a password.
![]() Configuring SSH to operate without the use of passwords is convenient, but it does increase security risks. If somebody you don't trust ever gains access to your account on the SSH client system, that person will be able to log into the SSH server system as you without the benefit of your password. Thus, you should create a password-less login only from a client that's very well protected, if at all. Configuring access to the root account in this way is particularly risky.
Configuring SSH to operate without the use of passwords is convenient, but it does increase security risks. If somebody you don't trust ever gains access to your account on the SSH client system, that person will be able to log into the SSH server system as you without the benefit of your password. Thus, you should create a password-less login only from a client that's very well protected, if at all. Configuring access to the root account in this way is particularly risky.
To configure SSH to not require a password, you must generate your own SSH key on the client system using ssh-keygen, copy that key file to the server, and add it to the ~/.ssh/authorized_keys or ~/.ssh/authorized_keys2 file. Thereafter, logins from the client to the server will require no password. Exercise 7.1 walks you through this procedure in more detail.
Configuring Logins Without Passwords
This exercise guides you through the process of enabling SSH logins without passwords. You will require access to two computers, an SSH client and an SSH server. (In a pinch, you can use one computer in both roles, but this will obscure which files originate on or end up on which computer.) The SSH server must already be configured to accept logins.
- Log into the SSH client system as the user who will be performing remote access.
- Type the following command to generate a version 2 SSH key:
$ ssh-keygen -q -t rsa -f ~/.ssh/id_rsa -C ‘‘ -N ’’
- Step 2 generates two files: id_rsa and id_rsa.pub. Transfer the second of these files to the SSH server computer in any way that's convenient—via a USB flash drive, by using scp, or by any other means. Copy the file under a temporary name, such as temp.rsa, to ensure you don't accidentally overwrite a like-named file on the server.
- Log into the SSH server system. If you use SSH, you'll need to type your password.
- Add the contents of the file you've just transferred to the end of the ~/.ssh/authorized_keys file. (This file is sometimes called ~/.ssh/authorized_keys2, so you should check to see which is present. If neither is present, you may need to experiment.) Typing cat ~/temp.rsa >> ~/.ssh/authorized_keys should do this job, if you stored the original file as ~/temp.rsa.
If you omit the -N ‘‘ parameter in step 2, ssh-keygen will prompt for a passphrase. You will then need to enter this passphrase to log into the remote system; this effectively trades a client-based passphrase and SSH key exchange for a server-based password.
If you now log out of the SSH server system and try to log in again via SSH from the client, you shouldn't be prompted for a password; the two computers handle the authentication automatically. If this doesn't work, chances are the ~/.ssh/authorized_keys file needs another name, as described earlier. You may also want to check that the file includes a line matching the contents of the original public-key file on the client. Some older clients may require you to specify that you use version 2 of the SSH protocol by including the -2 option:
$ ssh -2 server
Using ssh-agent
Another SSH authentication option is to use the ssh-agent program. This program requires a password to initiate connections, so it's more secure than configuring logins without passwords; however, ssh-agent remembers your password, so you need to type it only once per local session. To use ssh-agent, follow these steps:
- Follow the procedure for enabling no-password logins described in Exercise 7.1 but with one change: Omit the -N ‘’ option from the ssh-keygen command in step 2. You'll be asked for a passphrase at this step. This passphrase will be your key for all SSH logins managed via ssh-agent.
- On the SSH client system, type ssh-agent /bin/bash. This launches ssh-agent, which in turn launches bash. You'll use this bash session for subsequent SSH logins.
- In your new shell, type ssh-add ~/.ssh/id_rsa. This adds your RSA key to the set that's managed by ssh-agent. You'll be asked to type your SSH passphrase at this time.
From this point on, whenever you use SSH to connect to a remote system to which you've given your public key, you won't need to type a password. You will, however, have to repeat steps 2 and 3 whenever you log into your computer, and the benefits will accrue only to the shell launched in step 2 or any shells you launch from that one.
If you make heavy use of this facility, you can insert ssh-agent into your normal login procedure. For instance, you can edit /etc/passwd so that ssh-agent /bin/bash is your login shell. For a GUI login, you can rename your normal GUI login script (for instance, change ~/.xsession to ~/.xsession-nossh) and create a new GUI login script that calls ssh-agent with the renamed script as its parameter. Either action inserts ssh-agent at the root of your user process tree so that any call to SSH uses ssh-agent.
Using SSH Login Scripts
Ordinarily, an SSH text-mode login session runs the user's configured shell, which runs the shell's defined login scripts. The OpenSSH server also supports its own login script, sshrc (normally stored in /etc or /etc/ssh). The OpenSSH server runs this script using /bin/sh, which is normally a symbolic link to bash, so you can treat it as an ordinary bash script.
Setting Up SSH Port Tunnels
SSH has the ability to extend its encryption capabilities to other protocols, but doing so requires extra configuration. The way this is done is known as tunneling. You can tunnel just about any protocol, but tunneling X is particularly common.
![]() SSH port tunnels are conceptually similar to VPN configurations, as described in Chapter 5. VPNs encrypt all the traffic between two computers or networks, whereas SSH is generally used to encrypt just one protocol or perhaps a small number of them. SSH's tunneling features can be stretched to create a true VPN, though, if you're so motivated. Many sites, including http://tldp.org/HOWTO/ppp-ssh/, describe ways to do this.
SSH port tunnels are conceptually similar to VPN configurations, as described in Chapter 5. VPNs encrypt all the traffic between two computers or networks, whereas SSH is generally used to encrypt just one protocol or perhaps a small number of them. SSH's tunneling features can be stretched to create a true VPN, though, if you're so motivated. Many sites, including http://tldp.org/HOWTO/ppp-ssh/, describe ways to do this.
Tunneling Arbitrary Protocols
Figure 7.6 illustrates the basic idea behind an SSH tunnel. The server computer runs two server programs: a server for the tunneled protocol (Figure 7.6 uses the Internet Mail Access Protocol [IMAP] as an example) and an SSH server. The client computer also runs two clients: one for the tunneled protocol and one for SSH. The SSH client also listens for connections for the tunneled protocol; it's effectively both a client and a server. When the SSH client receives a connection from the tunneled protocol's client, the result is that the tunneled protocol's connection is encrypted using SSH, tunneled to the SSH server, and then directed to the target server. Thus, data pass over the network in encrypted form, even if the target protocol doesn't support encryption.
FIGURE 7.6 An SSH tunnel extends SSH's encryption benefits to other protocols
Of course, all of this requires special configuration. The default configuration on the server enables tunneling; but to be sure, check the /etc/ssh/sshd_config file on the server for the following option:
AllowTcpForwarding no
If this line is present, change no to yes. If it's not present or if it's already set to yes, you shouldn't need to change your SSH server configuration.
On the client side, you must establish a special SSH connection to the server computer. You do this with the normal ssh client program, but you must pass it several parameters. An example will help illustrate this use of ssh:
# ssh -N -f -L 142:mail.luna.edu:143 [email protected]
The -N and -f options tell ssh to not execute a remote command and to execute in the background after asking for a password, respectively. These options are necessary to create a tunnel. The -L option specifies the local port on which to listen, the remote computer to which to connect, and the port on the remote computer to which to connect. This example listens on the local port 142 and connects to port 143 on mail.luna.edu. (You're likely to use the same port number on both ends; I changed the local port number in this example to more clearly distinguish between the local and remote port numbers.) The final parameter ([email protected] in this example) is the remote username and computer to which the tunnel goes. Note that this computer need not be the same as the target system specified via -L.
![]() If you want SSH on the client system to listen to a privileged port (that is, one numbered below 1024), you must execute the ssh program as root, as shown in the preceding example. If listening to a non-privileged port is acceptable, you can run the ssh client as a normal user.
If you want SSH on the client system to listen to a privileged port (that is, one numbered below 1024), you must execute the ssh program as root, as shown in the preceding example. If listening to a non-privileged port is acceptable, you can run the ssh client as a normal user.
With the tunnel established, you can use the client program to connect to the local port specified by the first number in the -L parameter (port 142 in the preceding example). For instance, this example is intended to forward IMAP traffic, so you'd configure a mail reader on the client to retrieve IMAP email from port 142 on localhost. When the email reader does this, SSH kicks in and forwards traffic to the SSH server, which then passes the data on to the local port 143, which is presumably running the real IMAP server. All of this is hidden from the email reader program; as far as it's concerned, it is retrieving email from a local IMAP server.
Tunneling X
Because an X server runs on the computer at which a user sits rather than on a remote computer, tunneling X works differently from tunneling other protocols. To tunnel X, the SSH server has to pretend to be an X server for the benefit of its X-based programs. The SSH server can then forward the X data it receives to the SSH client, which is presumably running on the same computer as the user's X server. (In fact, though, it's possible to relay X through an arbitrary number of SSH connections.)
This configuration is much simpler to manage than is tunneling most other protocols. In terms of configuration, you must ensure that the server's /etc/ssh/sshd_config file includes the following line:
X11Forwarding yes
If this line reads no rather than yes, change it to read yes.
On the client side, the /etc/ssh/ssh_config file should have the following option set:
ForwardX11 yes
This feature is less critical, though; it can be overridden on a case-by-case basis by using the -X or -x options to ssh to enable or disable, respectively, X tunneling. Setting the default in the global client configuration file is merely a convenience.
With these options set or with forwarding enabled on the server and -X used on the client, users will be able to launch X-based programs hosted on the SSH server computer from the SSH client computer, much as they would local programs.
![]() SSH can compress data, which can improve the performance of tunneled sessions. On the client side, compression is enabled by adding a -C option to the ssh command. Adding compression to the mix can greatly enhance performance when tunneling X or other data-heavy protocols. I've found speed improvements on the order of 7x when using -C with graphics-heavy X applications tunneled through SSH over the Internet. The exact amount of benefit varies with the speed of the network connection, the nature of the data being transferred, the CPU speeds of both systems, and the CPU load on both systems.
SSH can compress data, which can improve the performance of tunneled sessions. On the client side, compression is enabled by adding a -C option to the ssh command. Adding compression to the mix can greatly enhance performance when tunneling X or other data-heavy protocols. I've found speed improvements on the order of 7x when using -C with graphics-heavy X applications tunneled through SSH over the Internet. The exact amount of benefit varies with the speed of the network connection, the nature of the data being transferred, the CPU speeds of both systems, and the CPU load on both systems.
SSH Security Considerations
SSH is intended to solve security problems rather than create them. Indeed, on the whole using SSH is superior to using Telnet for remote logins, and SSH can also take over FTP-like functions and tunnel other protocols. Thus, SSH is a big security plus compared to using less-secure tools.
Like all servers, though, SSH can be a security liability if it's run unnecessarily or inappropriately. Ideally, you should configure SSH to accept only protocol level 2 connections and to refuse direct root logins. If X forwarding is unnecessary, you should disable this feature. If possible, use TCP Wrappers or a firewall to limit the machines that can contact an SSH server. As with all servers, you should keep SSH up to date; there's always the possibility of a bug causing problems.
You should consider whether you really need a remote text-mode login server. Such a server can be a great convenience—often enough to justify the modest risk involved. For extremely high-security systems, though, using the computer exclusively from the console may be an appropriate approach to security.
One unusual security issue with SSH is its keys. As noted earlier, the private-key files are extremely sensitive and should be protected from prying eyes. Remember to protect the backups of these files, as well—don't leave a system backup tape lying around where it can be easily stolen.
Summary
One of Linux's biggest strengths is in its excellent tools for networking. This chapter introduced several of these tools, starting with the ISC DHCP server, which is commonly used to configure other computers' basic network settings. Although configuring this server takes some effort, doing so can save much more effort in configuring a wide range of Linux and non-Linux computers on your network.
Linux can also function as a network login server by using LDAP or various other tools. Although a full description of LDAP configuration is beyond the scope of this chapter, several LDAP account maintenance tools were described, providing you with the knowledge to add, delete, and modify user accounts on an LDAP server. Such tools can supplement, to the point of mostly replacing, the standard Linux account maintenance tools.
Routing is another area where Linux excels; you can configure Linux as a router for a small or large network. When you do this, you may want to configure firewall rules to protect both the router computer itself and the computers on one or both sides of the connection. These rules are implemented with the iptables utility, which fine-tunes how Linux routes packets. Another routing configuration is that of a NAT router, which is commonly employed to connect a small network to the Internet as a whole, keeping that network hidden from prying eyes on the Internet as a security measure. Finally, the RIP routing protocol, implemented in Linux by the routed daemon, helps you keep your routing tables up-to-date, should your system be part of a moderately complex collection of networks.
The final miscellaneous network topic covered in this chapter was the SSH server, which is the preferred remote login protocol for most purposes today. SSH is basically a text-mode protocol that supports strong encryption. Several variant configurations, such as options to support logins without using a password, can enhance its utility. SSH can also be used to tunnel other protocols, providing SSH's security benefits to whatever protocols need it.
Exam Essentials
Provide an overview of DHCP operation. When a DHCP client boots or starts its network, it sends a broadcast to its local network segment seeking a DHCP server. If a server is present, it replies to the client, using the client's hardware address. The two computers can then communicate to negotiate a DHCP lease, which is a time-limited right to use an IP address. Before the lease expires, the client contacts the server to extend the lease. In addition to client IP address information, DHCP servers tell clients about the netmask, gateways, DNS servers, and other common network features.
Distinguish between dynamic and static DHCP leases. Dynamic DHCP leases are assigned on a first-come, first-served basis from a pool of IP addresses. DHCP clients assigned a dynamic IP address can receive a different IP address each time they boot. Static DHCP leases, by contrast, are reserved for particular computers (identified by means of a hardware address or a claimed name); recipients of such addresses should seldom or never see their IP addresses change. Such leases are often reserved for server computers to simplify name resolution.
Describe where LDAP is best deployed for account management. Networks on which many users need accounts on many computers are good candidates for LDAP account management. LDAP can centralize account management, enabling an administrator to make one change to add, delete, or modify an account on all the network's computers. Such changes can become a nightmare without LDAP when the number of computers grows too large, or even when the number of account changes grows large with just a few computers.
Summarize the important LDAP account management commands. The ldapadd command adds an account, ldapdelete deletes an account, ldapsearch searches for account information, ldapmodify modifies an existing account, and ldappasswd changes a password. The ldapadd and ldapmodify commands both operate on LDIF files, which summarize the account information in a standardized format.
Explain the significance of NAT. Network Address Translation (NAT) is a technique that enables a router to pretend to be the originating source of outgoing network traffic for an entire network, effectively “hiding” that network from the outside world. NAT is a useful security tool, since it makes it very difficult for an outsider to detect, much less attack, servers on the protected network. NAT can also stretch a limited number of IP addresses, since the protected network can exist in a private IP address space that's not officially part of the Internet.
Describe the conceptual framework behind iptables. Linux uses a series of chains to determine how to direct network traffic. The INPUT chain handles incoming traffic, the OUTPUT chain handles outgoing traffic, and the FORWARD chain handles forwarded traffic (in a router). You can use iptables to associate rules with these chains that alter the way packets with specific criteria (such as a source port number or a destination IP address) are handled; they can be blocked or modified in various ways.
Summarize how a firewall is implemented in Linux. Linux firewalls are generated by scripts that make repeated calls to iptables. Most of these calls set up one new rule to match one type of packet and alter how the system handles it. (A few calls can clear a chain of all rules, set a default policy, or otherwise act on more than one rule.) When the finished script is executed, it implements a new firewall configuration, which is retained by the kernel and used until it is altered again or the system reboots.
Explain the purpose of SSH. The Secure Shell (SSH) is fundamentally a text-mode remote login protocol that provides encryption of all data transferred. SSH's encryption makes it the preferred remote-login protocol in Linux. SSH also offers tunneling of other protocols, which can turn an insecure unencrypted protocol into a much more secure encrypted one.
Describe the SSH configuration files. The main SSH server configuration file is /etc/ssh/sshd_config. This file should not be confused with the SSH client configuration file, /etc/ssh/ssh_config. Both files consist of lines with option/value pairs that set SSH options.
Explain SSH's encryption keys. An SSH server uses a number of encryption keys, which come in private and public pairs. Private keys are secret and must be stored with limited access on the server in /etc/ssh. Public keys have the same filename as their matching private keys, but with the filename extension .pub. These keys must be readable to any SSH user, and they are distributed to SSH client systems. Similar key pairs can be generated by users to enable logins without passwords or session-based logins using ssh-agent.
Summarize SSH protocol levels. SSH levels 1.3 and 1.5 (collectively known as SSH 1.x or SSH 1) have known security problems and should be avoided whenever possible. The current version, SSH 2.0 or SSH 2, is much more secure. If your SSH server communicates only with reasonably modern clients, you can set the Protocol 2 option in /etc/ssh/sshd_config to restrict support to SSH level 2 clients, ensuring that the insecure SSH 1 is not used on your system.
Review Questions
- What is wrong with the following subnet declaration in an ISC DHCP server's /etc/dhcpd.conf file?
subnet 10.107.5.0 {
   range 10.107.5.1 10.107.5.200;
}
A. It lacks domain name data.
B. It lacks network mask data.
C. It lacks a DNS server IP address.
D. It lacks a gateway IP address.
- Where does the ISC DHCP server store data on the leases it has issued?
A. leases.conf, typically in /var/dhcp
B. leases.log, typically in /var/log/dhcp
C. dhcpd.log, typically in /var/dhcp/leases
D. dhcpd.leases, typically in /var/lib/dhcp
- You set a global max-lease-time 3600 option in the DHCP configuration file. What is the effect of this configuration?
A. DHCP clients will receive leases of at most 1 hour (3,600 seconds), even if they ask for longer leases.
B. DHCP clients will receive leases of 1 hour (3,600 seconds) unless they ask for longer or shorter leases.
C. DHCP clients will receive leases of at least 1 hour (3,600 seconds), even if they ask for shorter leases.
D. DHCP clients will receive leases at most 1 hour (3,600 seconds) unless they're configured for fixed IP addresses.
- On which of the following computers might you most plausibly run the dhcrelay program? (Select two.)
A. A computer that runs dhcpd on a subnet that links to the Internet via a NAT router
B. A computer on a completely isolated network that has no router and no DHCP server of its own
C. A router between two subnets, one of which has a DHCP server and the other of which does not
D. A computer on a subnet with no DHCP server of its own, with a DHCP server configured to serve the first subnet on a nearby subnet
- What is wrong with the following entry in an LDIF file intended for use in managing Linux accounts?
uid: tsparker
A. This entry should use the username attribute name, not uid.
B. The uid attribute name requires a full distinguished name.
C. The uid attribute requires a numeric Linux user ID (UID) value.
D. Nothing is wrong with this entry.
- You've prepared an LDIF file (newusers.ldif) with several new user definitions, and you want to add these new users to your LDAP-based account directory for example.com, using the administrative account called manager. How can you do so, assuming your system is properly configured to enable such modifications?
A. ldapadd -D [email protected] newusers.ldif
B. ldapadd cn=manager,dc=example,dc=com newusers.ldif
C. ldapadd -D [email protected] -W -f newusers.ldif
D. ldapadd -D cn=manager,dc=example,dc=com -W -f newusers.ldif
- You want to remove the Z shell (zsh) from a computer whose users are all defined via an LDAP server. Before doing so, though, you want to check that none of these users relies on zsh as the default shell. How can you check to see whether any users do so?
A. ldapmodify --search loginShell=/bin/zsh
B. ldappasswd --search loginShell=/bin/zsh
C. ldap --search loginShell=/bin/zsh
D. ldapsearch loginShell=/bin/zsh
- What is the default method of encrypting passwords in LDAP?
A. Cleartext
B. MD5
C. SSHA
D. CRYPT
- Which of the following is a disadvantage of using NAT to connect a small business's network to the Internet?
A. The business can acquire a smaller block of Internet-accessible IP addresses than might be required without NAT.
B. A buggy Web server that's accidentally left running on the internal network will be protected from miscreants on the Internet.
C. It will be difficult to run file and printer sharing servers on the internal network for use by clients on the internal network.
D. Additional configuration will be required if servers on the internal network should be accessible to the Internet.
- You want to configure a router for a small network so that external sites cannot connect to the SSH port on internal computers, but you want no such restriction for the router itself. What is the best chain to modify to accomplish this goal?
A. INPUT
B. OUTPUT
C. FORWARD
D. ACCEPT
- Which of the following is true of the DROP policy for iptables?
A. It replies as if the computer was available but running no software on the target port.
B. It ignores packets, providing the illusion of a network error between the sender and recipient.
C. It may be used only on ports that are opened by servers, not clients.
D. It may be applied as a default policy but not on a port-by-port basis.
- A firewall script includes the following two lines. What is their purpose?
iptables -A OUTPUT -d 127.0.0.1 -o lo -j ACCEPT
iptables -A INPUT -s 127.0.0.1 -i lo -j ACCEPT
A. To set the default policy for all chains to ACCEPT; subsequent rules will use DROP or REJECT
B. To enable routing of localhost traffic on a computer configured as a router
C. To enable communications over the localhost interface for local programs
D. To set the default policy for the OUTPUT and INPUT chains to ACCEPT, leaving the FORWARD chain unaffected
- Broadly speaking, how will use of iptables on a router with firewall features differ from its use on a workstation?
A. A router's iptables rules will emphasize the FORWARD chain; a workstation's will emphasize the INPUT and OUTPUT chains.
B. A router's iptables rules will most likely use a default DROP policy, whereas a workstation's will probably use a default ACCEPT policy.
C. A router's iptables rules will be activated by a script, whereas a workstation's will be configured using a GUI tool.
D. A router's iptables rules will emphasize privileged port numbers, whereas a workstation's will emphasize unprivileged port numbers.
- What program can you use to generate a key that will enable logins to remote SSH servers without using a password?
A. authorized_keys
B. ssh-keygen
C. sshpasswd
D. id_rsa
- To whom should you distribute your server's main SSH private key?
A. Only to servers with which you want to communicate
B. Only to servers that have already provided their own public keys
C. To anybody who can provide a matching SSH public key
D. None of the above
- Which of the following commands creates an encrypted login to a remote computer (neptune), definitely enabling use of X-based programs run on the remote computer and using the local computer's X server? (Assume that neptune is configured to enable X forwarding.)
A. ssh -XC neptune
B. ssh neptune
C. ssh --ForwardX11 neptune
D. ssh -x neptune
- Which two of the following servers might you consider retiring after activating an SSH server? (Select two.)
A. SMTP
B. Telnet
C. FTP
D. NFS
- You find that the ssh_host_dsa_key file in /etc/ssh has 0666 (-rw-rw-rw-) permissions. Your SSH server has been in operation for several months. Should you be concerned?
A. Yes
B. No
C. Only if the ssh_host_dsa_key.pub file is also world-readable
D. Only if you're launching SSH from a super server
- For best SSH server security, how should you set the Protocol option in /etc/ssh/sshd_config?
A. Protocol 1
B. Protocol 2
C. Protocol 1,2
D. Protocol 2,1
- Why is it unwise to allow root to log on directly using SSH?
A. Somebody with the root password but no other password can then break into the computer.
B. The root password should never be sent over a network connection; allowing root logins in this way is inviting disaster.
C. SSH stores all login information, including passwords, in a publicly readable file.
D. When logged on using SSH, root's commands can be easily intercepted and duplicated by undesirable elements.
Answers to Review Questions
- B. A subnet declaration begins with that keyword followed by a subnet number, the netmask keyword, and a network mask value. Thus, option B is correct; the network mask data should be present. Options A, C, and D are all correct observations but incorrect answers because these pieces of information may all be declared elsewhere and in fact aren't strictly necessary.
- D. DHCP lease information is stored in a file called dhcpd.leases. This file is often, but not always, stored in /var/lib/dhcp, making option D correct. Although the locations specified in options A, B, and D are all theoretically plausible, they all specify incorrect filenames and so are incorrect.
- A. Option A correctly describes the meaning of this option. (Note, however, that this option is ignored for clients that use BOOTP rather than DHCP.) Option B describes the effect of the default-lease-time option, and option C describes the effect of the min-lease-time option. Option D is incorrect because a fixed IP address configuration does not automatically override the lease time options. (A fixed IP address block could include its own max-lease-time option to override the global option, though.)
- Answers: C, D. The dhcrelay program acts as a proxy server for a DHCP server located elsewhere; dhcrelay responds to DHCP clients, but it relays the client's requests to another subnet's DHCP server and then delivers the server's responses back to the client. The dhcrelay program does not need to be on the same subnet as the DHCP server, but if it is (as, for instance, in the case of a router), it will work fine. Thus, options C and D are both valid locations for a computer running dhcrelay. Option A is incorrect because the specified computer runs a full DHCP server (dhcpd), so dhcrelay isn't likely to do any good; even if it were being used as a backup or to handle a few computers in an exotic configuration, the only computers to which it could relay traffic are isolated from the target network by a NAT router. Thus, this configuration would be bizarre at best and dangerous at worst. Option B is incorrect because dhcrelay would have no way to contact a DHCP server. If option B's network is functional, it's presumably configured using static IP addresses rather than DHCP, making dhcrelay pointless.
- D. The LDIF uid attribute name identifies a Linux username, so it can take the value of any legal Linux username. As tsparker is a legal Linux username, there is nothing wrong with this entry, making option D correct. There is no username attribute name in a Linux account management LDIF file, so option A is incorrect. Because the uid attribute is a Linux username, not a distinguished name (DN), option B is incorrect. Confusingly, the uid attribute name refers to a Linux username; Linux UID values are specified with the uidNumber attribute name, making option C incorrect.
- D. Option D presents the correct syntax for performing the task specified in the question. Options A and C both incorrectly express the distinguished name (DN) for the account used to perform administrative tasks, and options A and B both omit the -W (prompt for authentication) and -f (to pass a filename) options.
- D. The ldapsearch utility searches an LDAP directory for records matching the specified field. Option D presents the correct syntax to perform a search for accounts using /bin/zsh as the default shell. The ldapmodify and ldappasswd commands are used to submit a modified LDIF file and change a password, respectively; neither is used to search records. There is no standard utility called ldap.
- C. By default, LDAP uses SSHA for password encryption. Cleartext, MD5, and CRYPT are all valid alternatives, but none of them is the default. (Cleartext is also very inadvisable, since this refers to no encryption at all.)
- D. By its nature, NAT blocks access to the protected network's servers. This feature can be overcome by port redirection, but doing so requires extra configuration effort; thus, option D is correct. Options A and B both describe features of NAT, but these features are advantages, not disadvantages, of NAT. Option C is incorrect because NAT does not affect the ability to run servers on an internal network for use by clients on that same network; only outside access to those servers is affected.
- C. The FORWARD chain controls packets that a router forwards between networks, which is the type of action the question describes; thus, option C is correct. The INPUT and OUTPUT chains affect packets accepted by or sent by the computer, respectively, so modifying those chains would affect the router itself. (You could add rules based on IP addresses or other criteria to accomplish the stated goals using these chains, but that adds complexity, making these chains less desirable choices at best.) There is no standard ACCEPT chain, although this is a common action, meaning that a packet is to be passed.
- B. The DROP policy causes the computer to respond as described in option B. Option A describes the REJECT policy, not the DROP policy. Contrary to option C, DROP may be used on any port, whether it's used by clients or servers. Contrary to option D, DROP may be used either as a default policy or on a port-by-port basis.
- C. Linux uses the localhost (127.0.0.1) IP address for local communications; network-enabled programs use this address for communications even on one system. If your default iptables policy is DROP or REJECT, this interface will be blocked, so it's necessary to unblock it using lines like those shown in the question, making option C correct. The default policy, referenced in options A and D, is set using the -P option, as in iptables -t filter -P FORWARD DROP, so these options are incorrect. Routing of localhost traffic makes no logical sense—localhost traffic is, by definition, local and therefore is not routed—so option B is incorrect.
- A. The FORWARD chain is used for forwarding traffic, as in a router, so a router's firewall will include rules that affect the way the router forwards network traffic. A workstation doesn't normally forward traffic, so there will be few or no rules affecting the FORWARD chain on a workstation, making option A correct. Contrary to option B, both workstations and routers may use either the DROP policy or the ACCEPT policy (or the REJECT policy) as a default, although ACCEPT is the least-preferred policy. Although both scripts and GUI tools can be used to create a firewall, there is no necessary link between these tools and the type of computer, as option C suggests, so that option is incorrect. Option D is incorrect because, although the distinction between privileged and unprivileged port numbers is an important one, only the server's port numbers (which are, by and large, privileged) are fixed, so even a workstation's iptables rules will emphasize these port numbers.
- B. The ssh_keygen utility generates SSH keys, including private keys for individuals, that can be used instead of passwords for remote logins to SSH servers. (These keys must be transferred and added to appropriate files on the server; using ssh-keygen alone isn't enough to accomplish the goal.) Option A's authorized_keys is a file in which keys are stored on a server; it's not a program to generate them. Option C's sshpasswd is fictitious. Option D's id_rsa is the file in which private keys are stored on the client; it's not a program to generate them.
- D. SSH private keys are extremely sensitive, and they should not normally be distributed to anybody, since possession of another system's private key will make it easier for a miscreant to pretend to be you. Thus, option D is correct. It's safe to distribute public keys widely, as in any of the other options, and in fact SSH does this automatically; but private keys should remain just that: private.
- A. The -X option to ssh enables X forwarding on the SSH client side, and -C enables compression. Thus, option A does as the question asks. (Compression was not specified as required in the question but was also not forbidden.) Option B might work, but only if the system is configured to forward X connections by default; since the question specifies that X forwarding is definitely required, option B is not correct. Option C is incorrect because there is no --ForwardX11 option to ssh; however, ForwardX11 is a valid option in the ssh configuration file, /etc/ssh_config. A lowercase -x, as in option D, disables X forwarding, so this option is incorrect.
- Answers: B, C. SSH is most directly a replacement for Telnet, but SSH also includes file-transfer features that enable it to replace FTP in many situations. SSH is not a direct replacement for either SMTP or NFS.
- A. The ssh_host_dsa_key file holds one of three critical private keys for SSH. The fact that this key is readable (and writeable!) to the entire world is disturbing. In principle, a miscreant who has acquired this file might be able to redirect traffic and masquerade as your system, duping users into delivering passwords and other sensitive data.
- B. SSH protocol level 2 is more secure than protocol level 1; thus, option B (specifying acceptance of level 2 only) is the safest approach. Option A is the least safe approach because it precludes the use of the safer level 2. Options C and D are exactly equivalent in practice; both support both protocol levels.
- A. Allowing only normal users to log in via SSH effectively requires two passwords for any remote root maintenance, improving security. SSH encrypts all connections, so it's unlikely that the password, or commands issued during an SSH session, will be intercepted. (Nonetheless, some administrators prefer not to take even this small risk.) SSH doesn't store passwords in a file.