
Chapter 5
Networking Configuration
THE FOLLOWING LINUX PROFESSIONAL INSTITUTE OBJECTIVES ARE COVERED IN THIS CHAPTER:
- 205.1 Basic networking configuration (weight: 3)
- 205.2 Advanced network configuration and troubleshooting (weight: 4)
- 205.3 Troubleshooting network issues (weight: 5)
 Computers today are often useless without a network. People use computers to browse the Web, exchange email, store documents on remote computers, and even play games. Linux computers can be configured as network clients (which initiate connections), as servers (which respond to connection requests from clients), or both. For this reason, it's critical that you understand how to configure a network.
Network configuration begins with bringing up a network interface and assigning basic attributes. More advanced configurations involve more sophisticated diagnostics and routing configurations, including security measures that can enable users to exchange sensitive documents over insecure networks. Because network configurations often go awry, this chapter concludes with a look at network diagnostics and troubleshooting.
![]() This chapter emphasizes the Transmission Control Protocol/Internet Protocol (TCP/IP) set of networking tools. TCP/IP is the most common type of network today, and it's the basis of the world-spanning Internet. Other network types, such as AppleTalk, Internetwork Packet Exchange/Sequenced Packet Exchange (IPX/SPX), and DECnet, exist and are still used in some environments. Linux supports many of these network protocol stacks, as they're called, but they must be configured differently from the TCP/IP tools described in this chapter and elsewhere in this book.
This chapter emphasizes the Transmission Control Protocol/Internet Protocol (TCP/IP) set of networking tools. TCP/IP is the most common type of network today, and it's the basis of the world-spanning Internet. Other network types, such as AppleTalk, Internetwork Packet Exchange/Sequenced Packet Exchange (IPX/SPX), and DECnet, exist and are still used in some environments. Linux supports many of these network protocol stacks, as they're called, but they must be configured differently from the TCP/IP tools described in this chapter and elsewhere in this book.
Performing Basic Network Configuration
Several basic network features must be configured before you can proceed to the more advanced tasks, including configuring the network tools that are the reasons you're connecting a computer to a network. (Most of these tools are described in subsequent chapters of this book.) If your network employs wireless (aka Wi-Fi) protocols, the first of these tasks is making these wireless connections. (On a wired network, the equivalent task is simply plugging a cable into the computer.) Once the low-level wired or wireless hardware is configured, you can proceed to connecting to a network (using either automatic or manual IP address settings), setting basic routing options, and using higher-level network scripts.
Connecting to a Wireless Network
To use a wireless network, you must first know something about the network. This knowledge can come from your own work in setting up the network, by asking others about it, or by scanning for public networks. With this knowledge in hand, you can activate your wireless device, linking it to the local wireless network. (This action does not make networking functions completely available, though; it's merely analogous to plugging a cable into a port. Subsequent sections describe how to activate TCP/IP networking.)
Configuring or Learning About a Network
To begin the process, you must first obtain information on your wireless network's settings. If you're using a wireless network set up by somebody else, such as your employer's network or a public access point, you should be able to get the relevant information from its maintainer. If you're using a network that you maintain yourself, such as a home network or one that you've set up for your employer, you can find the information from the configuration tools provided by your WAP or broadband router. This information can often be accessed via a Web server run on the device. For instance, Figure 5.1 shows the configuration screen for one broadband router. In this model, the Wireless options screen contains several tabs, each of which provides certain data. Pay particular attention to the radio band (802.11g in Figure 5.1), service set identifier (SSID; NoWires in Figure 5.1), channel (Channel 1 in Figure 5.1), authentication type, and authentication key. (These last two items are on the Security tab, which isn't shown in Figure 5.1.)
FIGURE 5.1 WAPs and broadband routers provide configuration tools in which you set wireless options for your network.

![]() If you're configuring your own wireless network, be sure to enable the highest security level possible, Wi-Fi Protected Access 2 (WPA2). Earlier security systems, particularly Wired Equivalent Privacy (WEP), are extremely vulnerable. Using them enables anybody with modest skill to snoop on all your network traffic. Depending on your local security settings, intruders might be able to easily break into other wired or wireless computers on your network from outside your building using a notebook computer.
If you're configuring your own wireless network, be sure to enable the highest security level possible, Wi-Fi Protected Access 2 (WPA2). Earlier security systems, particularly Wired Equivalent Privacy (WEP), are extremely vulnerable. Using them enables anybody with modest skill to snoop on all your network traffic. Depending on your local security settings, intruders might be able to easily break into other wired or wireless computers on your network from outside your building using a notebook computer.
Before proceeding with network configuration, you may want to scan for the available local networks using the iwlist tool. If you've set up your own network, you should see it among the available options. If you're on the road, using wireless access provided by a coffee shop, hotel, or other party, you can use iwlist to locate the available networks. Pass the scan or scanning command to iwlist, optionally preceded by the network device (typically wlan0):
# iwlist wlan0 scan
wlan0     Scan completed :
          Cell 01 - Address: 00:27:81:A5:0C:10
                    ESSID:“NoWires”
                    Protocol:IEEE802.11N-24G
                    Mode:Master
                    Channel:11
                    Encryption key:on
                    Bit Rates:130 Mb/s
                    Extra: Rates (Mb/s): 1 2 5.5 6 9 11 12 18 24 36 48 54
                    Quality=65/100 Signal level=-58 dBm Noise level=-102 dBm
                    IE: IEEE 802.11i/WPA2 Version 1
                        Group Cipher : CCMP
                        Pairwise Ciphers (1) : CCMP
                        Authentication Suites (1) : PSK
                    Extra: Last beacon: 122ms ago
If you run this command as an ordinary user, it will only display information on the networks to which you're already connected; but if you run it as root, the iwlist output includes all the nearby networks (or cells, in iwscan parlance). As a practical matter, the ESSID value and channel are the most important settings. If encryption is on, you must know, or be able to obtain, the password for the network; but if encryption is off, you can use the network without a password.
![]() Just because you can use an open network doesn't mean that you should do so. People sometimes misconfigure their network hardware so that it doesn't use encryption. On the other hand, some public wireless networks are configured in this way deliberately. Bear in mind that any data you send over an unencrypted wireless link can be easily monitored by third parties, so you should only use such networks for non-sensitive tasks or via tools with their own encryption, such as the Secure Shell (SSH) remote login protocol.
Just because you can use an open network doesn't mean that you should do so. People sometimes misconfigure their network hardware so that it doesn't use encryption. On the other hand, some public wireless networks are configured in this way deliberately. Bear in mind that any data you send over an unencrypted wireless link can be easily monitored by third parties, so you should only use such networks for non-sensitive tasks or via tools with their own encryption, such as the Secure Shell (SSH) remote login protocol.
In addition to scanning for networks, the iwlist command can deliver information on the characteristics of a Wi-Fi network interface. To use it in this way, replace scan with another subcommand name, as summarized in Table 5.1. A few additional subcommands are available, but they either are extremely obscure or are deprecated (no longer officially supported).
TABLE 5.1 Common iwlist subcommands
| Subcommand | Function |
| scan or scanning | Lists all the available networks (or those to which the interface is already linked, when run as an ordinary user) |
| freq, frequency, or channel | Lists all the available channels for the device |
| rate, bit, or bitrate | Lists all the speeds (bitrates) supported by the device |
| keys, enc, or encryption | Lists the encryption key sizes available |
| power | Lists power management modes available |
| txpower | Lists available transmit power settings for the device |
| retry | Lists the current retry setting |
| event | Lists wireless events supported by the device |
| auth | Lists the authentication parameters that are currently set |
| wpa or wpakeys | Lists the WPA keys set in the device |
| modu or modulation | Lists the modulation used by the device |
Plugging Your Computer into a Local Wi-Fi Network
To initiate the basic connection to the local Wi-Fi network, you use the iwconfig command, passing it the relevant data using option names such as essid and channel, preceded by the wireless network device name (typically wlan0):
# iwconfig wlan0 essid NoWires channel 1 mode Managed key s:N1mP7mHNw
This example sets the options for wlan0 to use the managed network on channel 1 with the SSID of NoWires and a password of N1mP7mHNw. The password requires a few extra comments. Ordinarily, iwconfig takes a password as a string of hexadecimal values, with optional dashes between 2-byte blocks, as in 0123-4567-89AB. Often, however, the password is given as a text string. The string s: must precede the password in this case, as shown in the example.
For details on additional iwconfig options, including some highly technical ones, consult its man page.
Once you've configured a wireless interface, you can check on its settings by using iwconfig with no options or with only the interface name:
# iwconfig wlan0
wlan0     IEEE 802.11g ESSID:“NoWires”
          Mode:Managed Frequency:2.462 GHz Access Point: 08:10:74:24:1B:D4
          Bit Rate=54 Mb/s Tx-Power=27 dBm
          Retry min limit:7 RTS thr:off Fragment thr=2352 B
          Encryption key: 374E-503D-6d37-4E48-0A [2]
          Link Quality=100/100 Signal level=-32 dBm Noise level=-94 dBm
          Rx invalid nwid:0 Rx invalid crypt:0 Rx invalid frag:0
          Tx excessive retries:0 Invalid misc:0 Missed beacon:0
In addition to providing information on settings, iwconfig provides some diagnostic information, such as the link quality, received (Rx) and transmitted (Tx) errors, and so on.
Using Wicd
The iwlist and iwconfig tools can manage Wi-Fi connections, but they can also be tedious and frustrating to use—a small error in copying an option from the information you're given or discovered using iwlist to iwconfig can result in an inability to connect to the network. Although it's not mentioned in the LPI objectives, one tool that can greatly simplify the maintenance of a Wi-Fi connection is Wicd (http://wicd.sourceforge.net). This package provides both text-mode (wicd-cli and wicd-curses) and GUI (wicd-gtk) tools for managing your network connections. Figure 5.2 shows a Wicd GUI in operation. Click the Connect or Disconnect button to manage connections, or click the Properties button to adjust details for each network.
FIGURE 5.2 Wicd enables point-and-click Wi-Fi management similar to that in other OSs.
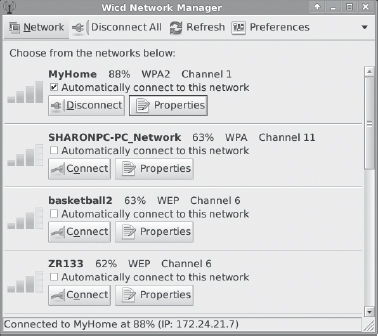
In addition to managing Wi-Fi features, Wicd can manage higher-level TCP/IP features, such as IP addresses, hostnames, and routing—the features described in the next few pages. In addition, Wicd can manage wired connections, including options that enable wired or wireless networks depending on which are available.
Connecting to a Network with DHCP
One of the easiest ways to configure a computer to use a TCP/IP network is to use the Dynamic Host Configuration Protocol (DHCP), which enables one computer on a network to manage the settings for many other computers. It works like this: When a computer running a DHCP client boots up, it sends a broadcast in search of a DHCP server. The server replies (using nothing but the client's hardware address) with the configuration information the client needs to enable it to communicate with other computers on the network—most important, the client's IP address and netmask and the network's gateway and Domain Name Service (DNS) server addresses. The DHCP server may also give the client a hostname and provide various other network details. The client then configures itself with these parameters. The IP address isn't assigned permanently; it's referred to as a DHCP lease, and if it's not renewed, the DHCP server may give the lease to another computer. Therefore, from time to time the client checks back with the DHCP server to renew its lease.
![]() Linux can function as a DHCP server as well as a DHCP client. Chapter 7, “Advanced Network Configuration,” describes DHCP server configuration.
Linux can function as a DHCP server as well as a DHCP client. Chapter 7, “Advanced Network Configuration,” describes DHCP server configuration.
Three DHCP clients are in common use on Linux: pump, dhclient, and dhcpcd (not to be confused with the DHCP server, dhcpd). Some Linux distributions ship with just one of these, but others ship with two or even all three. All distributions have a default DHCP client—the one that's installed when you tell the system you want to use DHCP at system installation time. Those that ship with multiple DHCP clients typically enable you to swap out one for another simply by removing the old package and installing the new one.
Ideally, the DHCP client runs at system bootup. This can be handled by its own SysV startup script or by an Upstart configuration file, as described in Chapter 1, “System Startup and Advanced System Management.” In other cases, the DHCP client can be run as part of the main network configuration startup file (typically a SysV startup file called network or networking). The system often uses a line in a configuration file to determine whether to run a DHCP client. For instance, Red Hat and Fedora set this option in a file called /etc/sysconfig/network-scripts/ifcfg-eth0 (this filename may differ if you use something other than a single Ethernet interface). The line in question looks like this:
BOOTPROTO=dhcp
If the BOOTPROTO variable is set to something else, changing it as shown here will configure the system to use DHCP. It's usually easier to use a GUI configuration tool to set this option, though.
Ubuntu uses the /etc/network/interfaces file for a similar purpose, but the details differ. On a system that uses DHCP, a line like the following appears:
iface eth0 inet dhcp
Details may vary, of course; for instance, the interface name (eth0) may be something else. You may prefer to use the GUI system configuration tools to adjust these options.
Once a DHCP client is configured to run when the system boots, the configuration task is done—at least, if everything works as it should. On very rare occasions, you may need to tweak DHCP settings to work around client/server incompatibilities or to have the DHCP client do something unusual. Consult the man page for your DHCP client if you need to make changes. You'll then have to modify its SysV startup script or a file to which it refers in order to change its operation.
If you need to manually run a DHCP client, you can usually do so by typing its name (as root), optionally followed by a network identifier, as in dhclient eth0 to have the DHCP client attempt to configure eth0 with the help of any DHCP server it finds on that network.
Connecting to a Network with a Static IP Address
If a network lacks a DHCP server, you must provide basic network configuration options manually. You can set these options using either configuration files or interactive commands.
Adjusting Network Configuration Files
To set a static IP address in the long term, you adjust a configuration file such as /etc/sysconfig/network-scripts/ifcfg-eth0 or /etc/network/interfaces. Listing 5.1 shows a typical ifcfg-eth0 file, configured to use a static IP address. (Note that this file's exact location and name may vary from one distribution to another.)
Listing 5.1: A sample network configuration file
DEVICE=eth0
BOOTPROTO=static
IPADDR=192.168.29.39
NETMASK=255.255.255.0
NETWORK=192.168.29.0
BROADCAST=192.168.29.255
GATEWAY=192.168.29.1
ONBOOT=yes
![]() If you want the computer to have multiple IP addresses on a single network wire, you can do so. Define the first address in the usual way, then create a new one using the name eth0:0 (or eth1:0 or whatever variant is appropriate). The second address is called an IP alias.
If you want the computer to have multiple IP addresses on a single network wire, you can do so. Define the first address in the usual way, then create a new one using the name eth0:0 (or eth1:0 or whatever variant is appropriate). The second address is called an IP alias.
Several specific items are required, or at least helpful, for static IP address configuration:
IP Address You can set the IP address manually with the ifconfig command (described in more detail shortly) or with the IPADDR item in the configuration file.
Network Mask You can set the netmask manually with the ifconfig command or with the NETMASK item in a configuration file.
Gateway Address You can manually set the gateway with the route command. To set it permanently, you need to adjust a configuration file, which may be the same configuration file that holds other options or another file, such as /etc/sysconfig/network/routes. In either case, the option is likely to be called GATEWAY. The gateway isn't necessary on a system that isn't connected to a wider network—that is, if the system works only on a local network that contains no routers.
DNS Settings For Linux to use DNS to translate between IP addresses and hostnames, you must specify at least one DNS server in the /etc/resolv.conf file. Precede the IP address of the DNS server by the keyword nameserver, as in nameserver 192.168.29.1. You can include up to three nameserver lines in this file. Adjusting this file is all you need to do to set the name server addresses; you don't have to do anything else to make the setting permanent. You can also set your computer's local domain name in this file using the domain option, as in domain luna.edu to set the domain to luna.edu.
The network configuration script may hold additional options, but most of these are related to others. For instance, Listing 5.1 has an option specifying the interface name (DEVICE=eth0), another that tells the computer to assign a static IP address (BOOTPROTO=static), and a third to bring up the interface when the computer boots (ONBOOT=yes). The NETWORK and BROADCAST items in Listing 5.1 are derived from the IPADDR and NETMASK items, but you can change them if you understand the consequences.
Unfortunately, these configuration details vary from one distribution to another. For instance, if you use Ubuntu, you would edit /etc/network/interfaces rather than /etc/sysconfig/network-scripts/ifcfg-eth0. The precise layout and formatting of information in the two files differs, but the same basic information is present in both of them. You may need to consult distribution-specific documentation to learn about these details. Alternatively, GUI tools are usually fairly easy to figure out, so you can look for these.
If you aren't sure what to enter for the basic networking values (the IP address, network mask, gateway address, and DNS server addresses), you should consult your network administrator. Do not enter random values or values you make up that are similar to those used by other systems on your network. Doing so is unlikely to work at all, and it can conceivably cause a great deal of trouble—say, if you mistakenly use an IP address that's reserved for another computer.
Using Interactive Commands
As just mentioned, the ifconfig program is critically important for setting both the IP address and the netmask. This program can also display current settings. Basic use of ifconfig to bring up a network interface resembles the following:
ifconfig interface up addr netmask mask
For instance, the following command brings up eth0 (the first Ethernet card) using the address 192.168.29.39 and the netmask 255.255.255.0:
# ifconfig eth0 up 192.168.29.39 netmask 255.255.255.0
This command links the specified IP address to the card so that the computer responds to the address and claims to be that address when sending data. It doesn't, though, set up a route for traffic beyond your current network. For that, you need to use the route command:
# route add default gw 192.168.29.1
Substitute your own gateway address for 192.168.29.1. Both ifconfig and route can display information on the current network configuration. For ifconfig, omit up and everything that follows; for route, omit add and everything that follows. For instance, to view interface configuration, you might issue the following command:
# ifconfig eth0
eth0  Link encap:Ethernet HWaddr 00:A0:CC:24:BA:02
      inet addr:192.168.29.39 Bcast:192.168.29.255 Mask:255.255.255.0
      UP BROADCAST RUNNING MULTICAST MTU:1500 Metric:1
      RX packets:10469 errors:0 dropped:0 overruns:0 frame:0
      TX packets:8557 errors:0 dropped:0 overruns:0 carrier:0
      collisions:0 txqueuelen:100
      RX bytes:1017326 (993.4 Kb) TX bytes:1084384 (1.0 Mb)
      Interrupt:10 Base address:0xc800
When configured properly, ifconfig should show a hardware address (HWaddr), an IP address (inet addr), and additional statistics. There should be few or no errors, dropped packets, or overruns for both received (RX) and transmitted (TX) packets. Ideally, few (if any) collisions should occur, but some are unavoidable if your network uses a hub rather than a switch. If collisions total more than a few percent of the total transmitted and received packets, you may want to consider replacing a hub with a switch. To use route for diagnostic purposes, you might try the following command:
# route
Kernel IP routing table
Destination  Gateway      Genmask       Flags Metric Ref Use Iface
192.168.29.0 *            255.255.255.0 U     0      0     0 eth0
127.0.0.0    *            255.0.0.0     U     0      0     0 lo
default      192.168.29.1 0.0.0.0       UG    0      0     0 eth0
![]() The -v option to route produces more verbose output. This is helpful when using route in certain ways, although it usually doesn't produce more output on a simple configuration such as the one shown in this example.
The -v option to route produces more verbose output. This is helpful when using route in certain ways, although it usually doesn't produce more output on a simple configuration such as the one shown in this example.
This command shows that data destined for 192.168.29.0 (that is, any computer with an IP address between 192.168.29.1 and 192.168.29.254) goes directly over eth0. The 127.0.0.0 network is a special interface that “loops back” to the originating computer. Linux uses this for some internal networking purposes. The last line shows the default route, which describes what to do with everything that doesn't match any other entry in the routing table. This line specifies the default route's gateway system as 192.168.29.1. If it's missing or misconfigured, some or all traffic destined for external networks, such as the Internet, won't make it beyond your local network segment.
As with DHCP configuration, it's almost always easier to use a GUI configuration tool to set up static IP addresses, at least for new administrators. The exact locations of the configuration files differ from one distribution to another, so the examples listed previously may not apply to your system.
The Coming of IPv6
The IP addresses emphasized in this chapter apply to version 4 of the IP portion of TCP/IP. This version has been current for many years. A major upgrade to IP is underway, however, and it goes by the name IPv6, for IP version 6. IPv6 adds several features and improvements to TCP/IP, including standard support for more secure connections and support for many more addresses. Check http://playground.sun.com/pub/ipng/html/ipng-main.html or http://www.ipv6forum.com for detailed information about IPv6.
TCP/IP supports a theoretical maximum of about 4 billion addresses. Although this may sound like plenty, those addresses have not been allocated as efficiently as possible. Therefore, as the Internet has expanded, the number of truly available addresses has been shrinking at a rapid rate. IPv6 raises the number of addresses to 2128, or 3.4 × 1038. This is enough to give every square millimeter of land surface on Earth 2.2 × 10¹⁸ addresses.
IPv6 is starting to emerge as a real networking force in many parts of the world. The United States, though, is lagging behind on IPv6 deployment. The Linux kernel includes IPv6 support, and most distributions now attempt to automatically configure IPv6 networking in addition to IPv4. Chances are that by the time the average office will need IPv6, it will be standard. Configuring a system for IPv6 is somewhat different from configuring it for IPv4, which is what this chapter emphasizes.
Using GUI Configuration Tools
Most distributions include their own GUI configuration tools for network interfaces. For instance, Fedora and Red Hat ship with a custom GUI tool called Network Configuration (system-config-network), and SUSE has a text-mode and GUI tool called YaST. The details of operating these programs differ, but the GUI configuration tool provides a means to enter the information described earlier.
Although the LPI exam doesn't cover GUI network configuration tools, they're generally easier to locate and use than the configuration files in which settings are stored. Thus, you may want to look for your distribution's tool and learn to use it. Once you understand the principles of network configuration (IP addresses, DHCP, and so on), you shouldn't have trouble entering the necessary information in the GUI fields.
The precise details of how to configure a Linux system using GUI tools differ from one distribution to another. For instance, SUSE's YaST doesn't lay out its options in precisely the same way as Fedora's Network Configuration tool. The basic principles are the same, though; you must choose whether to use static IP address assignment or an automatic system such as DHCP and enter a number of key options, depending on what configuration method you choose.
Using the ifup and ifdown Commands
Most Linux distributions today ship with two commands, ifup and ifdown, that combine the functions of several other network commands, most notably ifconfig and route. In their simplest forms, they bring interfaces up or shut them down based on information in whatever files your distribution uses to store network configuration data:
# ifup eth0
Determining IP information for eth0… done.
After you issue this command, eth0 will be fully configured, including all routing information, assuming you've properly configured it by using your distribution's network configuration tools or by manually editing configuration files such as /etc/network/interfaces and /etc/sysconfig/network-scripts/ifcfg-eth0. You can bring the interface down with equal ease by typing ifdown eth0.
The ifup and ifdown commands are useful for verifying that the network settings are configured properly for the next time the computer boots. They're also useful if you want to quickly take down the network or bring it back up again, because you can type fewer commands and you don't need to remember all the details of IP addresses, routes, and so on. If you need to experiment or debug a problem, though, using ifconfig and route individually is preferable, because they give you finer control over the process.
Configuring Hostnames
Computers “think” in terms of numbers, and so TCP/IP uses numbers to uniquely identify computers. Humans, though, work better with words. Thus, computers also usually have names, known as hostnames. Entire networks also have names, known as domain names. Hostnames typically appear as the first part of a fully qualified domain name (FQDN). For instance, tsiolkovsky.luna.edu is an FQDN, tsiolkovsky is the hostname, and luna.edu is the domain name.
Hostnames are configured in a couple of ways:
On DNS Your network administrator should be able to add an entry for your computer to your network's DNS server. This entry should make your computer addressable by name from other computers on your local network, and perhaps from the Internet at large. Alternatively, remote systems' /etc/hosts files can be modified to include your system.
On Your Local Computer Various local programs should know your computer's name. For instance, you may want to have your hostname displayed as part of a command prompt or entered automatically in email programs. For this task, you must set your hostname locally. Note that this is entirely independent of your DNS hostname. In theory, you can set the two to very different values, but this practice is likely to lead to confusion and perhaps even failure of some programs to operate properly.
The most basic tool for setting your hostname locally is called, appropriately enough, hostname. Type the command alone to see what your hostname is, or type it with a new name to set the system's hostname to that name:
# hostname tsiolkovsky.luna.edu
Many Linux distributions look in the /etc/hostname or /etc/HOSTNAME file for a hostname to set at boot time. Thus, if you want to set your hostname permanently, you should look for these files, and if one is present, you should edit it. Fedora uses /etc/sysconfig/network for this purpose, among others. If you can't find one of these files, consult your distribution's documentation; it's conceivable that your distribution stores its hostname in some unusual location.

Using PPP with DSL
Broadband users, particularly those with Digital Subscriber Line (DSL) connections, sometimes have to use a variant of the Point-to-Point Protocol (PPP) to make their connections. PPP is a login-based way to access the Internet—you use a PPP utility to initiate a connection to a remote computer, which includes an exchange of a username and a password. A decade ago, PPP was used in dial-up Internet access (and it's still used in this capacity), but some DSL providers have adapted PPP for their own purposes. In the case of DSL, this configuration method is called PPP over Ethernet (PPPoE).
In many cases, the simplest way to use a PPPoE configuration is to purchase a broadband router. This device attaches to the DSL modem and makes the PPPoE connection. The broadband router then works just like an ordinary Ethernet or Wi-Fi router, as far as your local computers are concerned, so you can configure Linux as you would on any other local network.
If you must connect a Linux system directly to a DSL network that uses PPPoE, you must use a Linux PPPoE client. Most Linux distributions ship with such clients; but configuration details vary from one distribution to another. Your best bet is to look for your distribution's GUI network configuration tool; chances are, you'll be able to find a set of options that are clearly labeled as applying to DSL or PPPoE.
Checking Basic Connectivity
With your network configured and initialized, you can perform a basic test of its operation using one command: ping. This command sends an Internet Control Message Protocol (ICMP) packet to the system you name (via IP address or hostname) and waits for a reply. In Linux, ping continues sending packets once every second or so until you interrupt it with a Ctrl+C keystroke. (You can instead specify a limited number of tests via the -c num option.) Here's an example of its output:
$ ping -c 4 speaker
PING speaker (192.168.1.1) 56(84) bytes of data.
64 bytes from speaker.example.com (192.168.1.1): icmp_seq=1 ttl=64 time=0.194ms
64 bytes from speaker.example.com (192.168.1.1): icmp_seq=2 ttl=64 time=0.203ms
64 bytes from speaker.example.com (192.168.1.1): icmp_seq=3 ttl=64 time=0.229ms
64 bytes from speaker.example.com (192.168.1.1): icmp_seq=4 ttl=64 time=0.217ms

--- speaker ping statistics ---
4 packets transmitted, 4 received, 0% packet loss, time 3002ms
rtt min/avg/max/mdev = 0.194/0.210/0.229/0.022 ms
This command sent four packets and waited for their return, which occurred quite quickly (in an average of 0.210 ms) because the target system was on the local network. By pinging systems on both local and remote networks, you can isolate where a network problem occurs. For instance, if you can ping local systems but not remote systems, the problem is most probably in your router configuration. If you can ping by IP address but not by name, the problem is with your DNS configuration. If you have problems, consult the upcoming section “Troubleshooting Network Issues.”
In Exercise 5.1, you'll familiarize yourself with some of the tools used to configure basic network settings. You'll use these tools both to study and to change your network configuration.
Configuring a Network Connection
In this exercise, the assumption is that the computer is correctly configured to use an IPv4 Ethernet network, including both local network access and access to a larger network (probably the Internet) via a router.
Some of the procedures in this exercise can easily break your network connectivity if something goes wrong. If this happens, typing ifdown followed by ifup is one way to recover. If this fails, rebooting the computer is almost certain to work, although it's a radical solution.
To study and modify your system's network configuration, follow these steps:
- Log into the Linux system as a normal user.
- Launch an xterm from the desktop environment's menu system, if you used a GUI login method.
- Acquire root privileges. You can do this by typing su in an xterm, by selecting Session
 New Root Console from a Konsole, or by using sudo (if it's configured) to run the commands in the following steps.
 - Type ifconfig. This command displays information about your local network settings for all your network interfaces. Most systems have both a loopback interface (lo) and an Ethernet interface (eth0). Look for a line in the Ethernet section that includes the string inet addr:. The following 4-byte number is your IP address. Write it down, as well as the value of your netmask (Mask:). Study the other information in this output, too, such as the number of received (RX) and transmitted (TX) packets, the number of errors, the number of collisions, and the Ethernet adapter's hardware address.
- Type route -n. The output is your computer's routing table information. This normally includes information about the loopback network address (127.0.0.0/24), the local network address, and a default route (identified as the route for 0.0.0.0). Some systems may display fewer or additional lines, depending on local configuration. The default route includes an IP address under the Gateway column. Write down that address.
- Use ping to test connectivity to both local and remote computers. You need the name or IP address of at least one local computer and at least one distant computer (beyond your local router). Type ping address where address is the name or IP address of each test machine. Perform this test for localhost or 127.0.0.1, your own machine (use the IP address you noted in step 4), your local router (use the IP address you noted in step 5), and a distant computer (if you're connected to the Internet, you can use an Internet-accessible site, such as www.linux.org). All of these ping tests should be successful. Note, however, that some systems are configured to ignore packets sent by ping. Thus, some of these tests may fail if you run into such systems. You can learn the configuration of local systems from their administrators, but for Internet sites, you may want to simply try another site if the first one you test fails.
- Bring down the local Ethernet connection by typing ifconfig eth0 down.
- Repeat steps 4–6. Note that the eth0 interface is no longer shown when you type ifconfig, all routes associated with it have been removed from the routing table, and pinging systems accessible from the interface no longer works. (Linux retains some information about its former Ethernet link, so you may still be able to ping the computer itself via its former eth0 address.)
- Bring the local Ethernet connection back up by typing ifconfig eth0 up address netmask mask, where address is the original IP address and mask is the original netmask, both as identified in step 4.
- Repeat steps 4–6. Note that the ifconfig command automatically added back your local network to the routing table but that the default route is still missing. As a result, you can't contact any systems that are located off the local network. If your DNS server is such a system, this means your ability to contact even local machines by name may be impaired as well.
- Restore the default route by typing route add default gw gateway, where gateway is the router address you identified in step 5.
- Repeat steps 4–6. If your network configuration is typical, all connectivity should be restored. (Some more exotic systems may still be lacking certain routes.)
Setting Additional Network Options
A typical desktop, laptop, or workstation, or even many servers, needs no more network configuration than described already. (An exception is firewall configuration, which is described in Chapter 7, “Advanced Network Configuration.”) Some additional network options, though, are useful on many computers. These include advanced routing configurations and virtual private network (VPN) configurations. You should also be familiar with some basic network-monitoring tools.
Setting Advanced Router Options
As explained earlier, routers pass traffic from one network to another. You configure your Linux system to directly contact systems on the local network. You also give the computer a router's address, which your system uses as a gateway to the Internet at large. Any traffic that's not destined for the local network is directed at this router, which passes it on to its destination. In practice, there are likely to be a dozen or more routers between you and most Internet sites. Each router has at least two network interfaces and keeps a table of rules concerning where to send data based on the destination IP address. Your own Linux computer has such a table, but it's probably very simple compared to those on major Internet routers.
In addition to routing configuration, some routing-related commands are available that can help you understand network addressing on your network.
Configuring Linux as a Router
Linux can function as a router, which means it can link two or more networks together, directing traffic between them on the basis of its routing table. This task is handled, in part, by the route command. This command can be used to do much more than specify a single gateway system, though, as described earlier. A simplified version of the route syntax is as follows:
You specify add or del along with a target (a computer or network address) and optionally other parameters. The -net and -host options force route to interpret the target as a network or computer address, respectively. The netmask option lets you set a netmask as you desire, and gw lets you specify a router through which packets to the specified target should go. (Some versions of route use gateway rather than gw.) The reject keyword installs a blocking route, which refuses all traffic destined for the specified network. (This is not a firewall, though.) Blocking routes appear in routing tables with an exclamation mark (!) under the Flags column. Finally, although route can usually figure out the interface device (for instance, eth0) on its own, you can force the issue with the dev option.
As an example, consider Figure 5.3, and particularly the two workstations in the 172.24.22.0/24 network. These computers both have a single network interface, but the network has two routers: The Linux computer in the center of Figure 5.3, which leads to the 192.168.5.0/24 network and the Internet; and the 172.24.22.1 router, which leads to the 10.10.10.0/24 network. Presumably these computers will have a default route set, as described earlier, to link to the Internet. You would then use the route command to add a second route to enable traffic to pass to the 10.10.10.0/24 network. You can set up this route with the following command:
# route add -net 10.10.10.0 netmask 255.255.255.0 gw 172.24.22.1
FIGURE 5.3 Some network configurations require unusual routing table configurations.
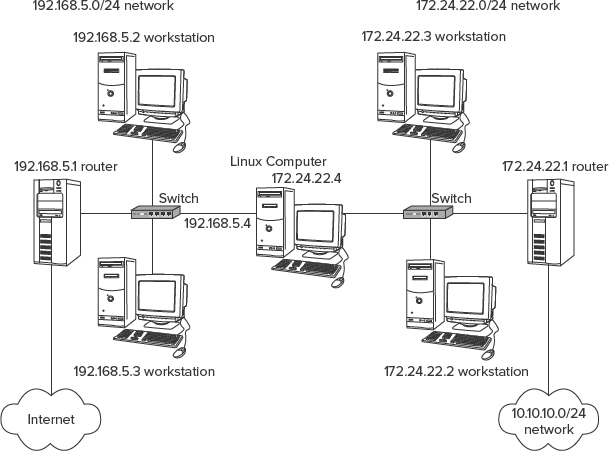
A similar configuration is desirable for the computers on the 192.168.5.0/24 network. Setting multiple routes in this way is desirable, but it's not always absolutely necessary. If the subnet's main router knows about any secondary routers on the network, the main router will send packets directed to the relevant subnets back to the secondary router. For instance, suppose the 192.168.5.1 router knows that 192.168.5.4 (the Linux computer in the center of the figure) links to the 172.24.22.0/24 and 10.10.10.0/24 networks. If one of the workstations on the 192.168.5.0/24 network sends packets for the 10.10.10.0/24 subnet, the 192.168.5.1 router will redirect the packets appropriately. The problem is that this wastes bandwidth, since the same packets will traverse the 192.168.5.0/24 network twice: once from the workstation to the main router and again from the main router to the secondary router. Thus, setting the additional routing options on the relevant computers is desirable.
![]() Incorrect routing tables can cause serious problems because some or all computers won't respond. You can examine your routing table by typing route alone and compare the results to what your routing table should be. (Consult a network administrator if you're not sure what your routing table should contain.) You can then delete incorrect routes and add new ones to replace them, if necessary. Ultimately, of course, changing your configuration files is the best solution, but typing a couple of route commands will do the trick in the short term.
Incorrect routing tables can cause serious problems because some or all computers won't respond. You can examine your routing table by typing route alone and compare the results to what your routing table should be. (Consult a network administrator if you're not sure what your routing table should contain.) You can then delete incorrect routes and add new ones to replace them, if necessary. Ultimately, of course, changing your configuration files is the best solution, but typing a couple of route commands will do the trick in the short term.
Simply adding multiple routes can be useful if a computer has multiple network interfaces but should not function as a router. This might be true of a laptop computer that has both wired and wireless network connections, particularly if the wired and wireless networks don't connect in any other way.
A Linux computer that's connected to two networks, as in the Linux computer in the center of Figure 5.3, can communicate with both of them; however, this configuration does not automatically link the two networks together. That is, computers on the 192.168.5.0/24 and 172.24.22.0/24 networks will not be able to communicate with each other unless that central Linux computer is configured as a router. To enable this feature, you must modify a key file in the /proc filesystem:
# echo “1” > /proc/sys/net/ipv4/ip_forward
This command enables IP forwarding. Permanently setting this option requires modifying a configuration file. Some distributions set it in /etc/sysctl.conf:
net.ipv4.ip_forward = 1
Other distributions use other configuration files and options, such as /etc/sysconfig/sysctl and its IP_FORWARD line. If you can't find it, try using grep to search for ip_forward or IP_FORWARD, or modify a local startup script to add the command to perform the change.
Checking Address Resolution
At a low level, TCP/IP relies on a protocol known as the Address Resolution Protocol (ARP). A Linux utility of the same name but in lowercase (arp) is used to monitor ARP activity on a single computer.
Network hardware devices, such as Ethernet cards, have built-in hardware addresses. You can determine a network interface's hardware address with ifconfig; it's on the first line of output, labeled HWaddr:
# ifconfig eth0
eth0 Link encap:Ethernet HWaddr 00:A0:CC:24:BA:02
In this example, eth0's hardware address is 00:AD:CC:24:BA:02—a sequence of six bytes expressed in hexadecimal (base 16) and separated by colons (:). Other separator characters, such as dashes, are sometimes used. The first three bytes in an Ethernet hardware address represent the hardware's manufacturer, while the last three bytes are assigned by the manufacturer in a unique manner, much like a serial number.
![]() Various Web sites, such as http://www.techzoom.net/tools/check-mac.en and http://telecom.tbi.net/ethercode.cgi, enable you to identify the manufacturer of an Ethernet device by its hardware address. This can sometimes be useful in tracking down hardware in the real world.
Various Web sites, such as http://www.techzoom.net/tools/check-mac.en and http://telecom.tbi.net/ethercode.cgi, enable you to identify the manufacturer of an Ethernet device by its hardware address. This can sometimes be useful in tracking down hardware in the real world.
When two computers on the same network segment communicate, they do so by using each others' hardware addresses. When routers are involved, the sender sends the traffic to the router's hardware address; the router then repackages the data, using the next router's hardware address.
To communicate by hardware address, though, the IP address must be translated into a hardware address. This is ARP's job. A computer can send a broadcast message (that is, one that's received by all the local computers) asking the computer with a particular IP address to reply. When the target computer replies, ARP reads its hardware address, associates it with the requested IP address, and adds the two to the ARP cache.
The arp utility enables you to examine and modify the ARP cache. Typing arp alone displays the ARP cache:
$ arp
Address                HWtype  HWaddress          Flags Mask  Iface
hindmost.example.com   ether   00:a0:c5:24:e1:4e  C           eth0
seeker.example.com     ether   00:1c:c0:b0:35:fc  C           eth0
Table 5.2 summarizes options to arp. The first two entries in Table 5.2 represent major operations to modify the ARP cache; the remaining entries can be used to tweak the output or interpretation of other options.

Why would you want to view or modify the ARP cache? Sometimes the information can be necessary to configure servers or other tools. For instance, you might need computers' hardware addresses to configure a DHCP server (described in Chapter 7). Other times, you might want to clear a specific address, or even all addresses, because of changes to the network. For instance, if you replace an Ethernet card in a computer, its hardware address will change. In such a case, you might want to clear its entry from other computers' ARP caches to ensure that traffic to the altered computer will reach its destination.
![]() Linux keeps ARP cache entries for a limited period, so scenarios such as Ethernet card swaps will disrupt network communication only briefly even if you don't explicitly clear the ARP cache.
Linux keeps ARP cache entries for a limited period, so scenarios such as Ethernet card swaps will disrupt network communication only briefly even if you don't explicitly clear the ARP cache.
Using an All-In-One Networking Tool
An alternative to the ifconfig, route, and various other commands for many purposes is ip. This is a sort of Swiss Army knife of network commands. Its syntax is deceptively simple:
ip [ OPTIONS ] OBJECT { COMMAND | help }
To understand ip, you should begin with the OBJECT, which can take any of the values shown in Table 5.3. Each of these values has its own unique set of options and commands. The number of operations that can be performed with ip is dizzying. You should consult its man page for details.
TABLE 5.3 Possible ip OBJECT values
| OBJECT name | Description |
| link | Performs actions on network hardware; similar to some ifconfig functions |
| addr | Associates or disassociates a device with an address; similar to some ifconfig functions |
| addrlabel | Displays or adjusts addresses in an IPv6 network |
| route | Displays or adjusts the routing table; similar to some route functions |
| rule | Displays or adjusts firewall table rules; similar to some iptables functions, as described in Chapter 7 |
| neigh | Displays or adjusts ARP entries |
| tunnel | Displays or adjusts tunneling features, which enables data to be transferred between networks by encapsulating many network protocols within just one protocol |
| maddr | Displays or adjusts multicast addresses, which are used to communicate with multiple computers simultaneously |
| mroute | Displays or adjusts multicast routes |
| monitor | Monitors network for activity |
As an example of ip, consider its use to display the current routing table:
$ ip route list
172.24.21.0/24 dev eth1 proto kernel scope link src 172.24.21.2
192.168.1.0/24 dev eth0 proto kernel scope link src 192.168.1.2
127.0.0.0/8 dev lo scope link
default via 192.168.1.1 dev eth0
This example reveals that the ip utility doesn't work exactly like the separate utilities that perform similar tasks—this output is different from the route output that can also reveal (or change) the routing table. As a practical matter, you might want to try ip and the many specific tools to determine which you prefer for particular tasks.
Configuring a VPN
Most networks rely, in part, on physical security to keep them safe. With an Ethernet local area network (LAN), for instance, traffic on the LAN itself cannot be intercepted without either physical access to the network wires or a compromise of a computer on the network. (Wireless access is more susceptible to attack, as described earlier.) When a network must span multiple locations using an untrusted intermediary carrier (such as the Internet), security becomes more of a problem. In these cases, a virtual private network (VPN) configuration is often employed. In a VPN, the two private network segments are linked via a router that encrypts data being sent to the remote location.
Naturally, Linux provides several VPN options. The LPIC-2 certification covers only one: OpenVPN (http://openvpn.net). This package ships with most Linux distributions, so you can probably install it using your package manager. That done, you should attend to some preliminary issues, generate keys, configure the VPN, and establish the VPN connection.
![]() As with other network protocols, OpenVPN classifies one router as a client and another as a server. In some cases, which is which may seem obvious, because one (the server) will connect to many other OpenVPN routers (the clients). In other cases, which is which can be decided arbitrarily.
As with other network protocols, OpenVPN classifies one router as a client and another as a server. In some cases, which is which may seem obvious, because one (the server) will connect to many other OpenVPN routers (the clients). In other cases, which is which can be decided arbitrarily.
Preparing for VPN Use
The networks linked by the VPN are inherently private—they should have no or limited access to the Internet as a whole. Frequently, VPNs are used to link networks that use the private addresses summarized in Table 5.4, which are defined in the Internet standards document RFC-1918. These addresses can be used by anybody, but they shouldn't be routed to the Internet except through network address translation (NAT) routers or similar means. You can link as many such networks together as you like for your own purposes, though.
TABLE 5.4 RFC-1918 private address blocks

You should ensure that the IP addresses used on all the networks linked by your VPN are unique. If two physically separate networks duplicate each others' IP addresses, problems will result. It's best to give each subnet its own unique set of addresses—for instance, 192.168.26.0/24 for one network and 192.168.27.0/24 for another. You can adjust the sizes of your subnets as necessary, keeping within the limits outlined in Table 5.4.
Managing VPN Keys
Like many encryption technologies, OpenVPN relies on keys—large numbers that can be used to encode or decode data. OpenVPN uses public key cryptography, which relies on private keys and public keys for encryption. As their names imply, private keys should be kept private (secret), whereas public keys can be distributed widely. Data encrypted by one key can be decrypted by the other. Thus, to communicate in a secure manner, two computers exchange their public keys. Each computer encrypts data using the other computer's public key; only the recipient can then decrypt the data using the matched private key.
Added to this system of public key cryptography is a certificate authority (CA), which is a computer that issues keys for other computers to use. The CA embeds identifying information in the keys and digitally signs them, thereby enabling both sides of the VPN connection to verify that the other side has obtained a key from the same CA and can therefore be trusted.
![]() For added security, the CA can be a computer that lacks network connections. This configuration guarantees that it can't be remotely compromised.
For added security, the CA can be a computer that lacks network connections. This configuration guarantees that it can't be remotely compromised.
This system is fairly complex, which means you must take extra steps to implement it. In particular, you must first configure a system as a CA. OpenVPN ships with a set of scripts to help with this task. These scripts can usually be found in the /usr/share/openvpn/easy-rsa, /usr/share/doc/packages/openvpn, or a similar directory. To prevent your customizations from being overwritten with package updates, you should copy the scripts to another location, such as /etc/openvpn.
With the scripts copied, edit the /etc/openvpn/vars file and edit the KEY_COUNTRY, KEY_PROVINCE, KEY_CITY, KEY_ORG, and KEY_EMAIL parameters to reflect your organization. You should then type the following three commands while within /etc/openvpn to configure your CA:
# ./vars
# ./clean-all
# ./build-ca
After you type the final command, you'll be asked for various pieces of information (some of which default to the values you set in the vars file). With the CA keys generated, you can generate keys for an OpenVPN server and one or more clients:
# ./build-key-server server
# ./build-key client1
# ./build-key client2
After each of these commands, you'll be prompted to enter or verify information similar to that required when building the CA. The defaults for most values will work fine. Be sure to enter unique values for each system when prompted for a Common Name. One more step will finalize key generation:
# ./build-dh
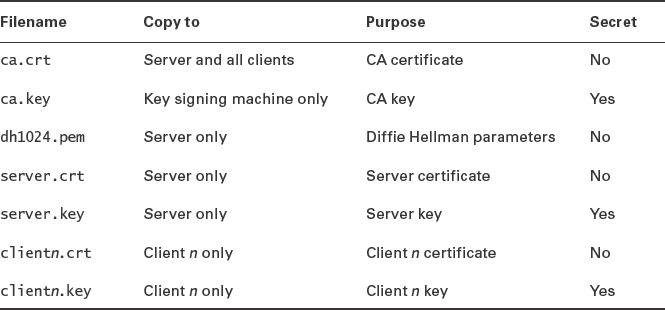
This command computes a large prime number that's used in the encryption process. With this step done, you'll find all the OpenVPN keys and related files in the keys subdirectory. Table 5.5 summarizes these keys' purposes and characteristics. You should copy the files to the computers specified under the Copy To column of Table 5.5. This task must be done using a secure method—perhaps a hand-delivered removable medium such as a USB flash drive, or a copy using scp (SSH's file-copying command). Copy the files to /etc/openvpn or a subdirectory of that directory, being sure to copy only the files that should be copied to each computer.
TABLE 5.5 OpenVPN key files and purposes
Configuring the VPN
You must edit both client and server configuration files. You can find samples at http://openvpn.net/index.php/open-source/documentation/howto.html#examples, or you may find them in a directory such as /usr/share/doc/packages/openvpn or /usr/share/doc/openvpn on your computer. The client and server configuration files should be called client.conf and server.conf, respectively, and both should be copied to /etc/openvpn. You should then edit these files, paying particular attention to the following features:
- For both clients and server, edit the ca, cert, and key parameters to point to the key files you've copied to the system being configured. You must also set the dh parameter on the server.
- If client networks should be able to communicate with each other, uncomment the client-to-client directive on the server's configuration.
- Uncomment the user nobody and group nobody directives on the server to improve security.
- On the clients, edit the remote parameter to point to the server. This line includes both a hostname and a port number (1194 by default). Change the port number only if you change it on the server using its port directive or if the server is protected by a NAT router that forwards a different port to that number on the server.
The sample configuration files are well commented, so you can peruse them to locate other options you might want to adjust for your particular configuration.
Establishing the VPN Connection
With the server and clients configured, you can now test your VPN. To launch the VPN, type openvpn config-file, where config-file is the complete path to your VPN configuration file. This path will, of course, point to the server configuration for the server and the client configuration for each of your clients. You can check the output provided by the program for any error messages. The output should conclude with the message Initialization Sequence Completed. If all seems in order, you can test basic connectivity from the client to the server:
$ ping 10.8.0.1
The 10.8.0.1 address is given to the server in the default configuration files; change it if you altered this detail yourself. If this works, you can begin expanding the configuration to enable other computers on the client and/or server sides to communicate using the VPN. Suppose the server is on the 10.66.0.0/24 network. On the server configuration, add the following line to the configuration file to enable server-side systems to use the VPN:
push “route 10.66.0.0 255.255.255.0”
Change the addresses to match your network, of course. This enables links between machines on the local network and the remote (client) network. You must also adjust the server-side network's router to include an appropriate route, for the server's VPN subnet (10.8.0.0/24 by default). This change isn't necessary if the VPN router is also the network's conventional router. Note that you do not need to route traffic to the client's local subnet; as far as other systems on the server's network are concerned, an isolated VPN client will have an address in the 10.8.0.0/24 subnet.
If you want a client to function as a VPN router, rather than just as a single computer that connects for itself, you must make more changes. On the server, you must create a directory called /etc/openvpn/ccd and set the following directives in the server's configuration file:
client-config-dir ccd
route 192.168.4.0 255.255.255.0
Adjust the IP address and network mask on the route line for your client's network. In the /etc/openvpn/ccd directory, create a configuration file with the common name given to the OpenVPN client. This file should duplicate the route line in the main configuration file but using the keyword iroute:
iroute 192.168.4.0 255.255.255.0
If you want to enable the OpenVPN server to direct traffic between VPN client networks, add the following lines to the server's configuration file (again, changing the addresses as appropriate for your network):
client-to-client
push “route 192.168.4.0 255.255.255.0”
Finally, you must make changes to the default router configuration for both the server and client networks to direct traffic for the remote networks through their respective VPN systems.
With these changes in place, restart the client and server and test your connections using ping or other tools. If you have problems, consult the OpenVPN Web site, which contains extended instructions and troubleshooting information.
Many distributions ship with startup scripts that scan the /etc/openvpn directory for client and server configuration files and launch openvpn in the appropriate mode. If your system contains such files, you can shut down the program and restart it using these tools and configure the computer to start OpenVPN automatically when it boots.
Monitoring Network Traffic
Several network monitoring tools exist that can help you verify proper network functioning, check what programs are using the network, and monitor network traffic.
Using nc
The nc utility (also known as netcat) is a very powerful general-purpose networking tool. It can send arbitrary data, monitor network ports, and more. Its basic syntax is:
nc [options] [hostname] [ports]
Table 5.6 summarizes the most important of nc's many options. Consult its man page for more details. The nc program performs fairly low-level accesses and can be scripted, which enables you to create scripts using nc to scan for available servers on a network or perform other specialized tests.
Using netstat
Another useful diagnostic tool is netstat. This is something of a Swiss Army knife of network tools because it can be used in place of several others, depending on the parameters it's passed. It can also return information that's not easily obtained in other ways. Some examples include the following:
Interface Information Pass netstat the --interface or -i parameter to obtain information about your network interfaces similar to what ifconfig returns. (Some versions of netstat return information in the same format, but others display the information differently.)
Routing Information You can use the --route or -r parameter to obtain a routing table listing similar to what the route command displays.
Masquerade Information Pass netstat the --masquerade or -M parameter to obtain information about connections mediated by Linux's NAT features, which often go by the name IP masquerading. NAT enables a Linux router to “hide” a network behind a single IP address. This can be a good way to stretch limited IPv4 addresses.
Program Use Some versions of netstat support the --program (or -p) parameter, which attempts to provide information about the programs that are using network connections. This attempt isn't always successful, but it often is, so you can see what programs are making outside connections.
Open Ports When used with various other parameters or without any parameters at all, netstat returns information about open ports and the systems to which they connect.
All Connections The --all or -a option is used in conjunction with others. It causes netstat to display information about the ports that server programs open to listen for network connections, in addition to already-open connections.
Keep in mind that netstat is a powerful tool, and its options and output aren't entirely consistent from one distribution to another. You may want to peruse its man page and experiment with it to learn what it can do. As a basic example of netstat's use, consider the following:
![]() I've trimmed most of the entries from the preceding netstat output to make it manageable as an example.
I've trimmed most of the entries from the preceding netstat output to make it manageable as an example.
The Local Address and Foreign Address columns specify the local and remote addresses, including both the hostname or IP address and the port number or associated name from /etc/services. The first of the two entries shown here isn't actively connected, so the local address, the foreign address, and the port number are all listed as asterisks (*). This entry does specify the local port, though—ftp. This line indicates that a server is running on the ftp port (TCP port 21). The State column specifies that the server is listening for a connection. The final column in this output, under the PID/Program name heading, indicates that the process with a process ID (PID) of 690 is using this port. In this case, it's inetd.
The second output line indicates that a connection has been established between teela.example.com and nessus.example.com (the second hostname is truncated). The local system (teela) is using the ssh port (TCP port 22), and port 39361 is used on the client (nessus). The process that's handling this connection on the local system is sshd, running as PID 787.
It may take some time to peruse the output of netstat, but doing so will leave you with a much-improved understanding of your system's network connections. If you spot servers listening for connections that you didn't realize were active, you should investigate the matter further. Some servers may be innocent or even necessary. Others may be pointless security risks.
![]() When you use the -p option to obtain the name and PID of the process using a port, the netstat output is wider than 80 columns. You may want to open an extra-wide xterm window to handle this output, or you may want to redirect it to a file that you can study in a text editor capable of displaying more than 80 columns. (Redirecting the output can sometimes produce a file with extra formatting characters that may be confusing, though.)
When you use the -p option to obtain the name and PID of the process using a port, the netstat output is wider than 80 columns. You may want to open an extra-wide xterm window to handle this output, or you may want to redirect it to a file that you can study in a text editor capable of displaying more than 80 columns. (Redirecting the output can sometimes produce a file with extra formatting characters that may be confusing, though.)
To quickly spot servers listening for connections, pipe the output through a grep LISTEN command to filter on the listening state. The result will show all servers that are listening for connections, omitting client connections and specific server instances that are already connected to clients.
Using tcpdump
The tcpdump utility is a packet sniffer, which is a program that can intercept network packets and log them or display them on the screen. Packet sniffers can be useful diagnostic tools because they enable you to verify that a computer is actually receiving data from other computers. They also enable you to examine the data in its raw form, which can be useful if you understand enough of the protocol's implementation details to spot problems.
![]() Although packet sniffers are useful diagnostic tools, they can also be abused. For instance, unscrupulous individuals can run packet sniffers to capture passwords that others send over the network. Depending on your network configuration, this trick can work even if the packet sniffer isn't running on either the sending or receiving computer. For this reason, many organizations have policies forbidding the use of packet sniffers except under limited circumstances. Thus, before running a packet sniffer, you should obtain written permission to use such a program from an individual who is authorized to grant such permission. Failure to do so can lead you into serious trouble, possibly up to losing your job or even being sued.
Although packet sniffers are useful diagnostic tools, they can also be abused. For instance, unscrupulous individuals can run packet sniffers to capture passwords that others send over the network. Depending on your network configuration, this trick can work even if the packet sniffer isn't running on either the sending or receiving computer. For this reason, many organizations have policies forbidding the use of packet sniffers except under limited circumstances. Thus, before running a packet sniffer, you should obtain written permission to use such a program from an individual who is authorized to grant such permission. Failure to do so can lead you into serious trouble, possibly up to losing your job or even being sued.
In its most basic form, you can use tcpdump by typing its name:
The first thing to note about this command is that you must run it as root; ordinary users aren't allowed to monitor network traffic in this way. Once it's run, tcpdump summarizes what it's doing and then begins printing lines, one for each packet it monitors. (Some of these lines can be quite long and so may take more than one line on your display.) These lines include a time stamp, a stack identifier (IP in all of these examples), the origin system name or IP address and port, the destination system name or IP address and port, and packet-specific information. Ordinarily, tcpdump keeps displaying packets indefinitely, so you must terminate it by pressing Ctrl+C. Alternatively, you can pass it the -c num option to have it display num packets and then quit.
Even this basic output can be very helpful. For instance, consider the preceding example of three packets, which was captured on nessus.example.com. This computer successfully received one broadcast packet (addressed to 192.168.1.255) from speaker.example.com's UDP port 631, sent a packet to speaker.example.com, and received a packet from that system directed at nessus.example.com rather than sent as a broadcast. This sequence verifies that at least minimal communication exists between these two computers. If you were having problems establishing a connection, you could rule out a whole range of possibilities based on this evidence, such as faulty cables or a firewall that was blocking traffic.
If you need more information, tcpdump provides several options that enhance or modify its output. These include -A to display packet contents in ASCII, -D to display a list of interfaces to which tcpdump can listen, -n to display all addresses numerically, -v (and additional -v options, up to -vvv) to display additional packet information, and -w file to write the captured packets to the specified file. Consult tcpdump's man page for more details on these options and for additional options.
Using Wireshark
Wireshark (http://www.wireshark.org), formerly known as Ethereal, is another packet sniffer. It features deep analysis of network packets, meaning that the program can help you dig into network packets to discover the meanings they carry, thus enabling you to track down network problems—for instance, is a failure to authenticate due to a mismatched protocol version, a mistyped password, packets that are going missing, or some other problem?
![]() Wireshark, just like tcpdump, can be abused. Before using it, obtain written permission from your superiors, lest you run afoul of policies forbidding the unauthorized use of packet sniffers.
Wireshark, just like tcpdump, can be abused. Before using it, obtain written permission from your superiors, lest you run afoul of policies forbidding the unauthorized use of packet sniffers.
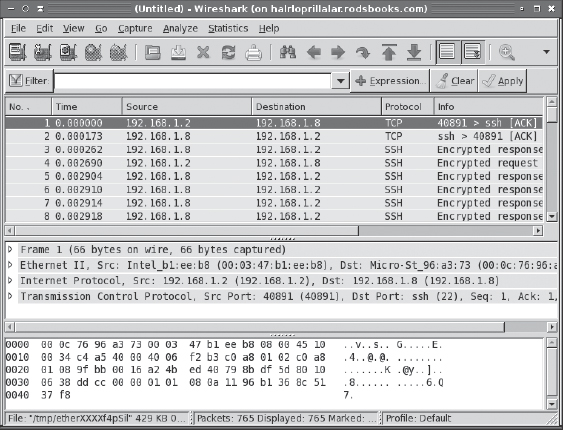
The most basic use of Wireshark is via the tshark command, which by default displays raw packet data intercepted by the program:
This example (which is truncated; real output will continue indefinitely, or until you press Ctrl+C) shows an Address Resolution Protocol (ARP) broadcast followed by two SSH packets. If you want to restrict Wireshark's output, you can do so with a wide array of tshark options. Consult its man page for details.
You'll probably find it easier to use Wireshark with its GUI, which is often installed via a separate package from the main Wireshark package. On Fedora, for instance, you must install wireshark-gnome. You can then type wireshark to launch the main Wireshark GUI program. Selecting Capture ![]() Start then begins a capture of all traffic. (You can limit what's captured by using the Capture
Start then begins a capture of all traffic. (You can limit what's captured by using the Capture ![]() Capture Filters... option.) Selecting Capture
Capture Filters... option.) Selecting Capture ![]() Stop terminates the capture operation. The result resembles Figure 5.4. This window has three panes. The top pane presents a summary of each network packet, the middle pane presents protocol-specific analysis of the packet selected in the top pane, and the bottom pane shows the raw packet data.
Stop terminates the capture operation. The result resembles Figure 5.4. This window has three panes. The top pane presents a summary of each network packet, the middle pane presents protocol-specific analysis of the packet selected in the top pane, and the bottom pane shows the raw packet data.
FIGURE 5.4 Wireshark provides a GUI that enables a point-and-click study of captured network traffic.
Using Nmap
Network scanners, such as Nmap (http://www.insecure.org/nmap/), can scan for open ports on the local computer or on other computers. This differs from a packet sniffer, such as tcpdump or Wireshark, in that a network scanner doesn't monitor traffic; it simply reports on ports that seem to accept incoming network packets.
![]() Network scanners are used by crackers for locating likely target systems, as well as by network administrators for legitimate purposes. Many organizations have policies forbidding the use of network scanners except under specific conditions. Therefore, you should check these policies and obtain explicit permission, signed and in writing, to perform a network scan. Failure to do so could cost you your job or even result in criminal charges, even if your intentions are honorable.
Network scanners are used by crackers for locating likely target systems, as well as by network administrators for legitimate purposes. Many organizations have policies forbidding the use of network scanners except under specific conditions. Therefore, you should check these policies and obtain explicit permission, signed and in writing, to perform a network scan. Failure to do so could cost you your job or even result in criminal charges, even if your intentions are honorable.
Nmap can perform a basic check for open ports. Pass the -sT parameter and the name of the target system to it, as shown here:
$ nmap -sT hindmost

Starting Nmap 5.21 ( http://nmap.org ) at 2010-10-15 10:39 EDT
Nmap scan report for hindmost (192.168.1.1)
Host is up (0.0054s latency).
rDNS record for 192.168.1.1: hindmost.example.com
Not shown: 997 filtered ports
PORT STATE SERVICE
21/tcp open ftp
23/tcp open telnet
80/tcp open http
![]() As with the output of netstat shown in “Using netstat,” the preceding output for Nmap has been trimmed for brevity's sake.
As with the output of netstat shown in “Using netstat,” the preceding output for Nmap has been trimmed for brevity's sake.
This output shows three open ports—21, 23, and 80—used by ftp, telnet, and http, respectively. If you weren't aware that these ports were active, you should log into the scanned system and investigate further, using netstat or ps to locate the programs using these ports and, if desired, shut them down. The -sT option specifies a scan of TCP ports. A few servers, though, run on UDP ports, so you need to scan them by typing nmap -sU hostname. (This usage requires root privileges, unlike scanning TCP ports.)
Nmap is capable of more sophisticated scans, including “stealth” scans that aren't likely to be noticed by most types of firewalls, ping scans to detect which hosts are active, and more. The Nmap man page provides details.
Troubleshooting Network Issues
Much of this chapter has described an idealized world in which nothing ever goes wrong: Commands work as they should, network cables are perfect, computers never crash, and every child is above average. Unfortunately, the real world isn't like this. A great deal of the task of any Linux administrator is dealing with the cases in which things do not work as they should. Therefore, the rest of this chapter is devoted to the tools and skills required to help identify and resolve problems. Specific problem areas covered include hostname issues, connectivity difficulties, routing problems, and security-related issues.
![]() Nothing can compete with real-world experience for learning about problem solving. If possible, you should set up a real network, preferably using computers that run different Linux distributions and non-Linux OSs; this will more or less guarantee you'll run into problems that you'll have to solve. If this isn't practical, try setting up a virtual network using virtualization software such as QEMU (http://wiki.qemu.org), VirtualBox (http://www.virtualbox.org), or VMware (http://www.vmware.com). Given enough RAM and disk space, you can run several virtual machines at once and link them in a virtual network, thus enabling you to run a variety of OSs and configurations.
Nothing can compete with real-world experience for learning about problem solving. If possible, you should set up a real network, preferably using computers that run different Linux distributions and non-Linux OSs; this will more or less guarantee you'll run into problems that you'll have to solve. If this isn't practical, try setting up a virtual network using virtualization software such as QEMU (http://wiki.qemu.org), VirtualBox (http://www.virtualbox.org), or VMware (http://www.vmware.com). Given enough RAM and disk space, you can run several virtual machines at once and link them in a virtual network, thus enabling you to run a variety of OSs and configurations.
Identifying Problem Spots
The first task in network problem solving is diagnosing the problem. This task can be a difficult one, because different problems can have similar symptoms. In the next few pages, I describe several tools, procedures, and rules of thumb that can help you narrow the scope of the problem to something manageable.
Localizing the Level of a Problem
Networks can be thought of as being built up in layers, from physical hardware (cables, network cards, and so on) at the lowest layers to high-level applications (Web browsers, SSH servers, and so on) at the highest layers. In-between layers include hardware drivers, kernel features that implement protocols like TCP and IP, and so on. These layers can be classified in several ways, such as the Open Systems Interconnection (OSI) model shown in Figure 5.5. TCP/IP networking is often described in a similar four-layer model consisting of the Link, Internet, Transport, and Application layers. Each layer is responsible for packing or unpacking data to or from the equivalent layer on the computer with which it's communicating, as well as communicating with the adjacent layers on its own system. In this way, data travels down the network stack from the sender and up the network stack on the recipient.
FIGURE 5.5 The OSI model describes a network stack in terms of several layers of hardware and software.

Thinking in terms of a network stack can help you isolate a problem. You needn't even know the details of what each layer does, although you do need to understand the roles of certain key subsystems, such as the hardware, drivers, network interface, name resolution, and applications. A break in a network cable, for instance, will interfere with all network traffic, whereas a failure of name resolution will affect only traffic that's addressed by hostname rather than by IP address. You can use this knowledge to perform some key tests when you discover a problem:
- Perform a test using a basic network access tool, such as ping. If the target system responds, you know that many of the lower layers work, since ping doesn't rely on servers to work. Be aware, however, that the ICMP packets used by ping are sometimes blocked by firewalls. You should try pinging several computers.
- Test both local computers (on the same physical network and using the same address block as the source system) and remote systems. If the local computers respond but the remote computers don't, the problem is likely a routing issue.
- Try accessing computers by both hostname and IP address. If hostname access fails but IP address access succeeds, chances are the problem is in name resolution.
- If possible, try using multiple high-level protocols. Sometimes a server computer will be properly configured for one protocol but not for another.
- Use the tools described earlier, in “Monitoring Network Traffic,” to isolate the problem. Wireshark can be particularly helpful, since it can help you analyze individual network packets. You can see whether a server is replying at all to your requests; if it is, the problem is most likely in a high-level setting, such as an incorrect password or configuration file option. If a server doesn't reply at all, the server might be misconfigured, you might be attempting to reach it on the wrong port, or a firewall might be blocking access.
Subsequent sections of this chapter elaborate on several of these testing strategies.
Tracing a Route
The ping command, described earlier in “Checking Basic Connectivity,” is a very useful tool in diagnosing network problems. A step up from ping is the traceroute command, which sends a series of three test packets to each computer between your system and a specified target system. The result looks something like this:
$ traceroute -n 10.1.0.43
traceroute to 10.1.0.43 (10.1.0.43), 30 hops max, 52 byte packets
 1  192.168.1.254 1.021 ms 36.519 ms 0.971 ms
 2  10.10.88.1 17.250 ms 9.959 ms 9.637 ms
 3  10.9.8.173 8.799 ms 19.501 ms 10.884 ms
 4  10.9.8.133 21.059 ms 9.231 ms 103.068 ms
 5  10.9.14.9 8.554 ms 12.982 ms 10.029 ms
 6  10.1.0.44 10.273 ms 9.987 ms 11.215 ms
 7  10.1.0.43 16.360 ms * 8.102 ms
The -n option to this command tells it to display target computers' IP addresses rather than their hostnames. This can speed up the process a bit, particularly if you're having DNS problems, and it can sometimes make the output easier to read—but you may want to know the hostnames of problem systems because that can help you pinpoint who's responsible for a problem.
This sample output shows a great deal of variability in response times. The first hop, to 192.168.1.254, is purely local; this router responded in 1.021, 36.519, and 0.971 milliseconds (ms) to its three probes. (Presumably the second probe caught the system while it was busy with something else.) Probes of most subsequent systems are in the 8–20ms range, although one is at 103.068 ms. The final system has only two times; the middle probe never returned, as the asterisk (*) on this line indicates.
Using traceroute, you can localize problems in network connectivity. Highly variable times and missing times can indicate a router that's overloaded or that has an unreliable link to the previous system on the list. If you see a dramatic jump in times, it typically means that the physical distance between two routers is great. This is common in intercontinental links. Such jumps don't necessarily signify a problem unless the two systems are close enough that a huge jump isn't expected.
What can you do with the traceroute output? Most immediately, traceroute is helpful in determining whether a problem in network connectivity exists in a network for which you're responsible. For instance, the variability in the first hop of the preceding example could indicate a problem on the local network, but the lost packet associated with the final destination most likely is not a local problem. If the trouble link is within your jurisdiction, you can check the status of the problem system, nearby systems, and the network segment in general.
![]() Some routers are configured in such a way that traceroute isn't a useful tool; these routers block all traceroute data, either to themselves only or for all packets that pass through them. If your traceroute output contains one or two lines of all asterisks but everything else seems OK, chances are you've run into such a system. If you see nothing but asterisks after a certain router but diagnostic tools such as ping still work, a router is probably blocking all traceroute operations.
Some routers are configured in such a way that traceroute isn't a useful tool; these routers block all traceroute data, either to themselves only or for all packets that pass through them. If your traceroute output contains one or two lines of all asterisks but everything else seems OK, chances are you've run into such a system. If you see nothing but asterisks after a certain router but diagnostic tools such as ping still work, a router is probably blocking all traceroute operations.
Locating Running Processes
Many problems relate to the status of locally running programs. The netstat tool, described earlier in “Using netstat,” can be useful in locating programs that are accessing the network, including identifying the ports they're using. If a server isn't responding to connection requests, you can use netstat to verify that it is in fact listening to the correct port. Because netstat's output tends to be very long, you may want to pipe it through less or grep to enable browsing or to search for specific information. For instance, suppose you want to check for the presence of a Simple Mail Transport Protocol (SMTP) server, which should be active on port 25 (identified as smtp). You could do so as follows:
# netstat -ap | grep smtp
If an SMTP server is running, the fact should be apparent in the output. If netstat is run as root, the output will include the process ID (PID) number and process name of the server.
![]() You can use the watch program to launch commands such as netstat. Doing so re-runs the program every two seconds and creates an updated display. This can be useful if you're looking for an intermittent connection.
You can use the watch program to launch commands such as netstat. Doing so re-runs the program every two seconds and creates an updated display. This can be useful if you're looking for an intermittent connection.
Another tool that's useful in locating network-using programs is lsof. This program's main purpose is to list open files; however, the program's definition of “file” includes network sockets. Therefore, it's useful for some of the same purposes as netstat. Table 5.7 summarizes lsof options that are useful in this context. The program provides many more options that can fine-tune its output or that are relevant mostly for local file searches. Consult its man page for details.
TABLE 5.7 Common lsof options related to network diagnostics
A basic use of lsof is to use it with its -i option:
This output shows two processes using the network: cupsd and ntpd. Both processes are running as root and have multiple connections or are listening for incoming connections.
![]() This output has been truncated for brevity. Be aware that lsof will display a limited list of network processes if run as an ordinary user; you must run it as root to obtain a complete list of network processes.
This output has been truncated for brevity. Be aware that lsof will display a limited list of network processes if run as an ordinary user; you must run it as root to obtain a complete list of network processes.
Examining Log Files
Log files can contain a wealth of information about networking issues. In practice, you may need to examine several log files and perhaps use tools such as grep to help you wade through the copious information stored in these files.
The first log file isn't really a file at all; it's the kernel ring buffer, which is a storage area for messages generated by the Linux kernel. You can access the kernel ring buffer by typing dmesg. The result will be a large number of messages, perhaps including some like this:
Because the kernel ring buffer contains messages from the kernel, its information usually relates to drivers and other low-level activities. This example, for instance, shows a message displayed by the r8169 driver, which has been loaded to manage an Ethernet device for a Realtek (RTL) 8168c/8111c chipset. The first line indicates that the driver has been assigned the eth0 identifier. The second line, though, indicates that the udev subsystem has renamed eth0 to eth1. Such a detail can be critical; if you're expecting to find the network managed by the Realtek device on eth0, you'll have problems. In the face of such information, you should either adjust your network configuration to use eth1 rather than eth0 or adjust your udev configuration to not rename the network device. (Chapter 3, “Basic Filesystem Management,” describes udev.)
The kernel ring buffer includes information on much more than network devices, so you may need to pipe the dmesg output through less or use grep to locate keywords. Furthermore, the kernel ring buffer has a limited size, and as messages accumulate, the earliest ones may be lost. For this reason, many distributions save a copy of the kernel ring buffer soon after the system boots in /var/log/dmesg. This file can be valuable because it can show you what happened when your hardware devices were first detected.
Several other files in /var/log can contain valuable debugging information. The /var/log/messages and /var/log/syslog files are particularly likely to be important. These files often contain messages from server programs that reflect normal server operations as well as faults, such as failed login attempts. Some servers create their own log files, or sometimes even several log files in a subdirectory. Samba and the Common Unix Printing System (CUPS), for instance, often create subdirectories called /var/log/samba and /var/log/cups, respectively.
![]() You can use the tail program and its -f option to monitor changes in log files. Typing tail -f /var/log/messages, for instance, immediately shows you the last few lines of /var/log/messages. As new messages are added, they'll appear on the screen. This is useful if you want to check for new messages as you test a networking feature.
You can use the tail program and its -f option to monitor changes in log files. Typing tail -f /var/log/messages, for instance, immediately shows you the last few lines of /var/log/messages. As new messages are added, they'll appear on the screen. This is useful if you want to check for new messages as you test a networking feature.
Resolving Hostname Problems
Hostname problems can take several forms, which in turn have several possible solutions. Previously in the section “Configuring Hostnames,” hostname configuration was described. Recall that hostnames must be set both on the local computer and on a DNS server or other means of hostname resolution. The local hostname setting affects the hostname that the computer uses for itself, such as in bash prompts or embedded in network packets the computer sends to other computers. The hostname set in your network's DNS servers, on the other hand, affects how other computers contact your system.
If these two hostnames don't match, problems can result. If your computer claims that it has a particular hostname, but if that hostname isn't present in the DNS entries for your network or if that hostname is assigned to another computer, then some network protocols might not work correctly. For instance, if an email client, using local system calls, believes its hostname is franklin.luna.edu, it may embed that address in email messages sent from your computer. If this address doesn't exist in the DNS server, though, recipients of email sent from your computer won't be able to reply. If the address exists but is associated with another computer, email intended for you may be misdirected to another computer.
You can learn your own computer's hostname, as known locally, by typing hostname. This call returns the hostname portion only; if you want to know the FQDN, use the -f, --fqdn, or --long option, as in hostname --fqdn. You can verify that this name resolves to your machine by using the host command, which performs DNS lookups:
$ hostname -f
nessus.example.com
$ host nessus.example.com
nessus.example.com has address 192.168.1.2
![]() You can combine the preceding two commands as host ‘hostname -f’. This command produces the same output as the second command, provided everything is set up correctly. Note that this command includes two back-ticks (‘), which appear to the left of the 1 key on most U.S. keyboards; these are not ordinary single-quote characters (’), which appear to the left of the Enter key on most U.S. keyboards.
You can combine the preceding two commands as host ‘hostname -f’. This command produces the same output as the second command, provided everything is set up correctly. Note that this command includes two back-ticks (‘), which appear to the left of the 1 key on most U.S. keyboards; these are not ordinary single-quote characters (’), which appear to the left of the Enter key on most U.S. keyboards.
If ifconfig shows that you have the IP address returned by host, your configuration is consistent. There are, however, some situations in which an inconsistency is normal. Examples include systems with multiple network interfaces, server farms that employ load balancing (directing traffic for one hostname to multiple servers), and different internal and external IP addresses or hostnames when a network uses NAT.
If your local DNS server handles lookups for a small private domain, you may want to verify that the global DNS network can find your hostname. To do this, pass the IP address of a remote DNS server after the hostname you want to look up with host:
$ host nessus.example.com 10.20.102.7
This example uses the DNS server at 10.20.102.7 to perform the name resolution, rather than whatever server is the currently configured default. You will have to obtain the IP address of a suitable name server, of course.
If your locally defined and DNS hostnames don't match, you have several possible recourses:
Adjust DNS or Other Network Name Resolution Systems If you believe your DNS entries are wrong, you can try to adjust them or have them adjusted for you. Unless you control the DNS server, you'll have to contact somebody else—the DNS server administrator—to have this done. (Chapter 6, “DNS Server Configuration,” covers DNS server administration.)
Adjust /etc/hosts If your computer is part of a small local network, you can edit the /etc/hosts file. This file contains mappings of IP addresses to hostnames, typically for a small number of local computers. Note that editing this file adjusts name resolution for the computer that holds this file only. Thus, if you need to fix name resolution for a computer that's unreachable by its correct name, you must adjust the /etc/hosts files on all the computers that should be able to reach the computer in question.
Change the Local Hostname You can change the computer's local hostname, typically by editing the /etc/hostname or /etc/HOSTNAME file.
Deeper DNS issues can be investigated using the dig utility. This utility queries DNS servers for information on individual hosts or entire domains. In its most basic form, it can be used much like host. To query a specific name server, add the server's IP address before the hostname, preceded by an at-sign (@):
$ dig @10.20.102.7 nessus.example.com
The output of dig is more verbose than that of host, and it's more useful when configuring or debugging DNS server configurations than for other purposes. Therefore, Chapter 6 describes dig in more detail.
If your computer doesn't seem to be resolving hostnames correctly, you can check the /etc/hosts file. If this file contains entries it shouldn't have, remove them; and if it lacks entries it should have, add them. You can also check the /etc/resolv.conf file. As described previously in “Adjusting Network Configuration Files,” this file should contain a domain line that specifies a default domain name and up to three nameserver lines that specify the IP addresses of DNS servers:
domain example.com
nameserver 192.168.1.2
nameserver 10.9.16.30
nameserver 10.9.16.25
Verify that the DNS servers are working by querying each one directly with host or dig. If one isn't working, wait a while and try again, in case the problem is temporary. If a DNS server doesn't seem to respond at all for an extended period, perhaps its entry is in error. Setting the domain correctly is important for resolving hostnames that lack the domain component. You can search additional domains by adding a search line that lists additional domains, separated by spaces or tabs.
![]() If a computer uses DHCP for network configuration, the DHCP client will rewrite /etc/resolv.conf whenever it launches or renews its lease. If you find that incorrect information keeps creeping back into this file, you may need to adjust the configuration on your network's DHCP server or contact the person who maintains this server about the problem. Chapter 7 describes DHCP server configuration.
If a computer uses DHCP for network configuration, the DHCP client will rewrite /etc/resolv.conf whenever it launches or renews its lease. If you find that incorrect information keeps creeping back into this file, you may need to adjust the configuration on your network's DHCP server or contact the person who maintains this server about the problem. Chapter 7 describes DHCP server configuration.
Resolving Connectivity Issues
Basic connectivity issues, in which a computer can't send or receive any network data, are usually caused by hardware problems (such as a disconnected cable) or incorrect basic configuration parameters. The previous sections “Connecting to a Network with DHCP” and “Connecting to a Network with a Static IP Address” describe how to configure your system using these methods.
If these methods aren't working, you should first verify that you're using the correct method—DHCP or static IP address assignment. If you're attempting to use DHCP but it's not working, you can try a few things to troubleshoot or correct the problem:
- Can other computers use the DHCP server? If not, perhaps the server is misconfigured. Consult Chapter 7 to learn about DHCP server configuration.
- Is the DHCP server configured to be selective about its clients? If the server only hands out IP addresses to computers with known hardware addresses or other characteristics, you may need to adjust the server's configuration so that it knows about your computer, or you may need to tweak your client configuration—say, by passing a particular name to the DHCP server.
- Are you on the same network segment as the DHCP server? Ordinarily, a DHCP server can only manage clients on its own physical network segment. Intervening routers usually don't pass DHCP traffic between segments.
- Try a different DHCP client. Sometimes changing clients is easier than tracking down an obscure incompatibility.
- Check your log files on both the client and the server. These files may contain clues about the problem.
Whether you're using DHCP or static IP address assignment, verify proper settings in /etc/network, /etc/sysconfig/network-scripts/, or other network configuration or script files, as described earlier in this chapter. A typo in an IP address, network mask, or other setting can prevent the system from working.
Don't overlook the possibility of hardware problems. A bad cable, a bad switch, or even a bad network card can cause untold grief. Although Linux's driver support for Ethernet devices is excellent, it's conceivable you have a card with poor support, so upgrading the driver or replacing the card with a better-supported one may be worthwhile. Unfortunately, Linux's support for Wi-Fi devices is spottier than its support for Ethernet. If you're having problems with unreliable Wi-Fi operation, you should check with the chipset manufacturer to see whether updated drivers are available. Perusing Internet forums may also lead you to updated drivers or workarounds for Wi-Fi woes.
Resolving Routing Problems
Routing problems can usually be diagnosed by traceroute, as described previously in “Tracing a Route.” If the problem lies far from your computer, it may not be solvable by you. Unfortunately, routing problems crop up from time to time, and you may have no choice but to wait for the problem to be resolved by whomever is in charge of the affected router. You can try to fix problems that are closer to home, though:
- If the problem is with a router that you believe is under your ISP's control, you can contact your ISP about it.
- You can reboot your modem and any broadband router under your control. Sometimes this clears up routing problems in the first hop or so on a broadband Internet connection.
- Check your network mask (netmask) settings. If you have an incorrect network mask, your computer may be attempting to route packets that it shouldn't route or connect directly to computers for which this is impossible.
- Check that all the necessary routes are set. If your network has multiple routers, failure to set explicit routes for all of them can degrade network performance.
- If you've configured routers yourself, ensure that they're configured correctly. Check their routing tables, their network masks, and their settings in /proc/sys/net/ipv4/ip_forward.
Resolving Security Problems
Some problems are related to security settings. One area that can cause mysterious problems is firewall settings. Chapter 7 describes firewalls in more detail; but for now, you can check your firewall settings by using the -L option to iptables:
# iptables -L
Chain INPUT (policy ACCEPT)
target   prot opt source                     destination

Chain FORWARD (policy ACCEPT)
target   prot opt source                     destination

Chain OUTPUT (policy ACCEPT)
target   prot opt source                     destination
This example shows no firewall rules defined. If you see rules specified under the INPUT or OUTPUT chains, the ability of your computer to function as a client or server for particular protocols is impaired. Likewise if any of the chains sets a default policy of DROP instead of ACCEPT. Such a configuration isn't necessarily a bad thing; the whole point of a firewall is to prevent unwanted access to or from the computer. The firewall rules must be tailored to your use of the computer, though. For instance, you wouldn't want to block the incoming SMTP port on a mail server, except perhaps in a limited way—say, to prevent outside access to a server that exists only to handle outgoing mail from local computers. The FORWARD chain affects the forwarding of packets between network interfaces on routers, so this chain will only affect computers that are configured as routers.
Another security issue that can crop up is settings in the /etc/hosts.allow and /etc/hosts.deny files. These files are used mainly by the TCP Wrappers program, which is described in detail in Chapter 10, “Security.” As with firewall rules, rules in these files can limit access to your computer; however, these files contain rules that affect servers that are configured to use TCP Wrappers. Thus, if a server isn't responding to connection requests, particularly if it's responding to some connection requests but not others, you can check these files for entries. If these files are empty except for comments, they shouldn't have any effect. If these files seem to be in use, consult Chapter 10 to learn about TCP Wrappers configuration, evaluate whether this configuration is appropriate, and change it if necessary.
![]() Do not change either firewall or TCP Wrappers configurations unless you understand them. This is particularly true if you're new to administering a system or if you share administrative responsibility with another person. Firewall and TCP Wrappers rules are typically put in place for very good reasons, so changing them or, especially, disabling them should be done only after careful consideration. That said, such rules are sometimes enacted as part of an install-time option that you might have overlooked or accidentally set at too strict a level for your needs.
Do not change either firewall or TCP Wrappers configurations unless you understand them. This is particularly true if you're new to administering a system or if you share administrative responsibility with another person. Firewall and TCP Wrappers rules are typically put in place for very good reasons, so changing them or, especially, disabling them should be done only after careful consideration. That said, such rules are sometimes enacted as part of an install-time option that you might have overlooked or accidentally set at too strict a level for your needs.
Summary
Network configuration is an extremely broad topic, ranging from setting hardware parameters to adjusting the options on dozens of different servers. This chapter covers some of the more basic network configuration topics, starting with activating the network interface. On Wi-Fi-equipped systems, this task begins with setting Wi-Fi options. On all systems, it includes using either DHCP or static IP address tools to bring up a basic configuration. Hostname configuration and checking connectivity round out this topic.
Some systems require more advanced network settings. One of these is router configuration (a topic that's revisited in Chapter 7). A secure router variant, VPN, requires even more configuration. You should also be familiar with a variety of tools, such as nmap, Wireshark, tcpdump, netstat, and nc, to display information on your network settings, on nearby computers, and on the data passing over your network ports.
Unfortunately, network configuration does not always proceed smoothly. Problems can crop up at any level, ranging from the cables connecting computers to esoteric details of server configuration. Being able to track down a problem is a skill best learned by experience, but knowing the tools and some basic rules of thumb will help you in this task.
Exam Essentials
Describe the wireless-specific tools needed to connect to a Wi-Fi network. Prior to normal network configuration, you must link a computer to a Wi-Fi network using the iwconfig program, which takes a variety of parameters to specify the radio frequency, network password, and other features of the network. The iwlist command can be useful in helping to identify nearby networks, should you need details on them before connecting.
Describe the commands used to activate a network interface. The ifconfig command does this job. Typically, you pass it an interface name, an IP address preceded by up, and a netmask preceded by netmask, as in ifconfig eth0 up 192.168.29.39 netmask 255.255.255.0. Most distributions provide a script called ifup that enables you to automatically bring up a network interface, once it's configured using distribution-specific configuration files.
Explain how routing tables are manipulated. The route command is used to display or change routing tables. You can pass the add or del option, followed by additional options to specify the route to be added or deleted. For instance, route add default gw 192.168.29.1 adds a default route using 192.168.29.1 as the gateway computer.
Summarize network address types. At the lowest level, hardware addresses identify specific network devices, such as Ethernet ports. Hardware addresses are tied to Internet Protocol (IP) addresses via the Address Resolution Protocol (ARP). IP addresses are associated with hostnames via the Domain Name System (DNS) and /etc/hosts files.
Describe tools used for testing basic network connections. The ping utility sends a series of simple packets from one computer to another; the recipient should then send a reply. This exchange can verify that basic connectivity exists. A more complex variant on ping is traceroute, which can test connection speed and reliability between all the computers that route traffic between two systems.
Explain the purpose and basic functions of a VPN. A virtual private network (VPN) is a way to connect two networks across an untrusted network while maintaining the security of data transferred in the process. VPNs employ a series of cryptographic keys to encrypt data, and they tunnel a wide variety of network protocols over a single encrypted channel. When properly configured, a VPN link looks much like any other routed link to the bulk of the systems, but data cannot be easily interpreted by intervening routers, even if they've been compromised.
Summarize tools that can analyze network traffic and the capabilities of local computers. The netstat utility can reveal what ports are open or in use on a local computer, while Nmap can scan remote computers for open ports. Wireshark and tcpdump are packet sniffers—they monitor traffic that passes over a computer's ports, which can be useful for diagnostic purposes. The nc (aka netcat) utility can send arbitrary network packets in order to test a remote system's capabilities. Many of these tools can be used legitimately or abused, so be cautious how you deploy them.
Describe how to study hostname resolution issues. The host and dig commands can be used to perform hostname lookups, thus uncovering problems in a DNS configuration. You can learn your local hostname with the hostname command. If your local hostname doesn't match the computer's DNS hostname, some protocols may not work correctly.
Summarize how to use log files to diagnose network problems. The kernel ring buffer, accessible via dmesg, contains low-level kernel messages concerning hardware devices. Several log files, most notable among them /var/log/messages and /var/log/syslog, contain information from higher-level utilities and server programs. Any of these logs may contain clues about problems, such as a failure to load a driver, a failure to obtain a network address via DHCP, or a network authentication failure.
Explain how incorrectly set security measures can interfere with networking. Firewalls, TCP Wrappers, and other security measures are all meant to keep a system safe by denying access to or from particular network ports or computers. Used properly, these measures keep out miscreants; however, if the security measures are too broadly written, they deny access to legitimate users.
Review Questions
- You try to set up a computer on a local network via a static TCP/IP configuration, but you lack a gateway address. Which of the following is true?
A. Because the gateway address is necessary, no TCP/IP networking functions will work.
B. TCP/IP networking will function, but you'll be unable to convert hostnames to IP addresses, or vice versa.
C. You'll be able to communicate with machines on your local network segment but not with other systems.
D. The computer won't be able to tell which other computers are local and which are remote.
- Which of the following types of information is returned by typing ifconfig eth0? (Choose all that apply.)
A. The names of programs that are using eth0
B. The IP address assigned to eth0
C. The hardware address of eth0
D. The hostname associated with eth0
- Under what circumstances might you use the iwconfig utility?
A. You must diagnose problems on a Token Ring network.
B. You need to bring up or shut down an Ethernet network link.
C. You need to connect a Linux system to a new wireless network.
D. You must diagnose the failure of a DHCP client on a PPP network.
- Which of the following utilities can bring up a network connection? (Choose all that apply.)
A. ifconfig
B. netstat
C. ifup
D. ping
- Which of the following commands should you use to add to host 192.168.0.10 a default gateway to 192.168.0.1?
A. route add default gw 192.168.0.10 192.168.0.1
B. route add default gw 192.168.0.1
C. route add 192.168.0.10 default 192.168.0.1
D. route 192.168.0.10 gw 192.168.0.1
- You type arp -n at a command prompt. What type of output will you see?
A. A summary of network packet errors
B. Routing table information
C. The IP address(es) of your name server(s)
D. The mapping of IP addresses to MAC addresses
- Which of the following commands might bring up an interface on eth1? (Select all that apply.)
A. Type dhclient eth1.
B. Type ifup eth1.
C. Type ifconfig eth1.
D. Type network eth1.
- What is the purpose of the -n option to route?
A. It causes no operation to be performed; route reports what it would do if -n were omitted.
B. It precedes specification of a netmask when setting the route.
C. It causes machines to be identified by IP address rather than hostname in output.
D. It forces interpretation of a provided address as a network address rather than a host address.
- Which of the following programs can monitor the network traffic coming into a computer, enabling you to analyze the packets' contents?
A. OpenVPN
B. arp
C. netstat
D. Wireshark
- What does the following command accomplish, when typed as root?
# nmap -sU router.example.com
A. It adds a default route through router.example.com to the computer on which the command is typed.
B. It watches for UDP network traffic to or from router.example.com, displaying each matching packet.
C. It maps the Wi-Fi characteristics associated with the router.example.com wireless network.
D. It scans router.example.com for open (listening) UDP ports and reports the results of this scan.
- You know that your computer is running a Web server on port 80, but you don't know what Web server program you're using. How can you discover this information?
A. Type wget localhost as an ordinary user.
B. Type lsof -i :80 as root.
C. Type ifconfig -p 80 as root.
D. Type ifconfig -q -s 80 as an ordinary user.
- You want to link four branch offices' private networks to a company's central office's private network using OpenVPN. Which of the following conditions should you ensure is met to avoid problems?
A. Each of the offices should use a different IP address range.
B. Each of the offices should use a key from a different CA.
C. Each of the offices should have approximately the same number of computers.
D. Each of the offices should use DHCP on all its computers.
- What files are used to configure TCP Wrappers?
A. /etc/hosts.allow and /etc/hosts.deny
B. Files in the /etc/tcpd directory tree
C. /etc/tcpwrap.conf and /var/spool/tcpwrap
D. Files in the /etc/tcpw.d directory tree
- How can you learn what programs are currently accessing the network on a Linux system?
A. Type ifconfig -p eth0.
B. Examine /proc/network/programs.
C. Examine /etc/xinetd.conf.
D. Type netstat -p.
- The ping utility responds normally when you use it with an IP address but not when you use it with a hostname that you're positive corresponds to this IP address. What might cause this problem? (Select all that apply.)
A. The target computer may be configured to ignore packets from ping.
B. Your computer's DNS configuration may be broken.
C. The DNS configuration on the target system may be broken.
D. The route between your computer and its DNS server may be incorrect.
- What is the purpose of /etc/hostname, if it's present on the system?
A. It holds the computer's default hostname.
B. It holds a list of servers that resolve hostnames.
C. It holds a list of IP addresses and associated hostnames.
D. It holds the hostname of the local gateway computer.
- Which of the following programs can be used to perform a DNS lookup?
A. host
B.dnslookup
C. pump
D. ifconfig
- Your computer is in the example.com domain, but you want to be able to contact the neil.tranquility.luna.edu and buzz.tranquility.luna.edu servers by typing neil or buzz as the hostnames, respectively. How can you accomplish this goal? (Choose all that apply.)
A. Add the lines host neil neil.tranquility.luna.edu and host buzz buzz.tranquility.luna.edu to your bash startup script.
B. Add entries for neil and buzz, linking them to their IP addresses, to /etc/hosts.
C. Add the line search tranquility.luna.edu to your /etc/resolv.conf file.
D. Add the line nameserver tranquility.luna.edu to your /etc/resolv.conf file.
- Which of the following entries are found in the /etc/hosts file?
A. A list of hosts allowed to remotely access this one
B. Mappings of IP addresses to hostnames
C. A list of users allowed to remotely access this host
D. Passwords for remote Web administration
- Your computer has an IP address of 192.168.21.102, with a network mask of 255.255.255.0. You're able to ping 192.168.21.7 and 192.168.21.98, but not 192.168.27.3 or 10.78.21.102. If you know that all of these addresses are valid and the computers are turned on and connected to the network, which of the following is the most probable cause of this problem?
A. The name server configuration is set incorrectly on 192.168.21.102.
B. The default route is set incorrectly on 192.168.21.102.
C. The DHCP servers must be activated on 192.168.27.3 and 10.78.21.102.
D. The netmask is set incorrectly on 192.168.21.102.
Answers to Review Questions
- C. The gateway computer is a router that transfers data between two or more network segments. As such, if a computer isn't configured to use a gateway, it won't be able to communicate beyond its local network segment. (If your DNS server is on a different network segment, name resolution via DNS won't work, although other types of name resolution, such as /etc/hosts file entries, will still work.)
- B, C. When used to display information on an interface, ifconfig shows the hardware and IP addresses of the interface, the protocols (such as TCP/IP) bound to the interface, and statistics on transmitted and received packets. This command does not return information on programs using the interface or the hostname associated with the interface.
- C. The iwconfig utility configures a Linux wireless (Wi-Fi) connection, so option C is correct. Options A, B, and D all refer to wired network hardware, for which iwconfig is useless.
- A, C. The ifconfig command is Linux's basic tool for manually bringing up a network connection using options provided on the command line, while ifup is a utility that brings up a network connection based on the contents of the network configuration files. The netstat and ping commands are both useful network diagnostic tools, but they don't bring up network connections.
- B. To add a default gateway of 192.168.0.1, the command would be route add default gw 192.168.0.1, as stated in option B. Specifying the IP address of the host system is not necessary and in fact will confuse the route command. Options A, C, and D are all distortions of the correct answer and will not work correctly.
- D. The arp utility returns data from the Address Resolution Protocol (ARP) table, which holds mappings of IP addresses to hardware (MAC) addresses. The -n option displays IP addresses as such rather than converted into hostnames. Network packet error information, as stated in option A, can be obtained, along with other information, from ifconfig but not from arp. Routing table information, as stated in option B, is usually obtained from route or netstat -r. Your name server(s) IP address(es), as in option C, are most easily obtained by displaying the contents of /etc/resolv.conf.
- A, B. The dhclient utility, if installed, attempts to configure and bring up the network(s) passed to it as options (or all networks if it's given no options) using a DHCP server for guidance. Thus, option A may work, although it won't work if no DHCP server is available. Option B applies whatever network options are configured using distribution-specific tools and brings up the network. Thus, options A and B both may work, although neither is guaranteed to work. Option C displays the network status of eth1, but it won't activate eth1 if it's not already active. There is no standard network utility in Linux. Thus, options C and D won't work.
- C. The -n option is used when you want to use route to display the current routing table, and it does as option C specifies. There is no route parameter that behaves as option A specifies. Option B describes the purpose of the netmask parameter to route. Option D describes the purpose of the -net parameter to route.
- D. Option D, Wireshark, is a packet sniffer, which means that it behaves as the question specifies. It includes sophisticated packet matching and analysis tools to help in this task. OpenVPN is a tool for connecting two networks in a secure way even over an insecure network. The arp utility enables inspection and alteration of a computer's Address Resolution Protocol (ARP) cache, which ties hardware addresses to IP addresses. The netstat utility is a general-purpose network utility that can display or change a wide variety of network data.
- D. The Nmap utility performs network port scans, and the -sU option specifies a scan of UDP ports, so option D is correct. A default route is most likely to be created by using the route utility or by editing configuration files; Nmap can't do this job, so option A is incorrect. The task described in option B is best done by a packet sniffer, such as tcpdump or Wireshark; Nmap can't do this. The discovery of Wi-Fi characteristics is done by the iwlist utility, not by Nmap, so option C is incorrect.
- B. The lsof program returns information on open files and the processes that are using them, “files” being defined in a way that includes network connections. Option B presents the correct syntax to obtain information on the process that's using port 80, including the command name of the process, so option B is correct. (You must run it as root to get the desired information.) Option A's wget command will retrieve the home page of the Web server, but it won't return information on what program is doing the serving, so this option is incorrect. The ifconfig command used in options C and D is used to inspect or manipulate a network interface, but it doesn't return information on processes using specific ports, so these options are both incorrect. (The -p and -q options to ifconfig are also both fictitious. The -s option alters the format of its display.)
- A. Once connected, computers from the offices will be able to communicate with each other (or at least all of the branches will be able to communicate with the central office) via IP address. If the IP address ranges of any two offices were to overlap, routing confusion would ensue, so option A is correct. Option B is incorrect because the easiest way to configure keys for OpenVPN is to assign all the networks' keys from a single CA. The number of computers on each network is irrelevant to OpenVPN configuration, so option C is incorrect. OpenVPN does not require the use of DHCP, so option D is incorrect.
- A. The /etc/hosts.allow and /etc/hosts.deny files are used by TCP Wrappers to control what clients may access servers that rely on TCP Wrappers; thus, option A is correct. Options B, C, and D all present fictitious filenames and directory names and so are incorrect.
- D. The netstat program produces various network statistics, including the process IDs (PIDs) and names of programs currently accessing the network when passed the -p parameter. Thus, option D is correct. The ifconfig program can't produce this information, and the -p option to this program is fictitious, so option A is incorrect. Option B's /proc/network/programs file is also fictitious. Option C's /etc/xinetd.conf file is real and may provide some information about some servers that are using the network (as described in Chapter 10); but this file won't provide information about all servers, much less about clients that are accessing the network.
- B, D. DNS problems can manifest as an ability to connect to computers using IP addresses but not using hostnames. Thus, options B and D (and various other DNS-related problems) could create the symptoms described. If the target system were configured to ignore ping packets, as described in option A, then it wouldn't respond when you identified it by IP address. The target system's DNS configuration (option C) doesn't enter into the equation, because it responds to the ping request via IP address alone.
- A. Although not all systems use /etc/hostname, option A correctly describes it for those systems that use it. Option B describes the purpose of /etc/resolv.conf. Option C describes the purpose of /etc/hosts. Option D doesn't describe any standard Linux configuration file although the gateway computer's IP address is likely to appear in a distribution-specific configuration file.
- A. The host program is a commonly used program to perform a DNS lookup. There is no standard dnslookup program, although the nslookup program is a deprecated program for performing DNS lookups. pump is a DHCP client, and ifconfig is used for configuration of networking parameters and cards.
- B, C. The /etc/hosts file contains static mappings of hostnames to IP addresses, so adding entries as specified in option B will work (although these entries will need to be changed if these servers' IP addresses ever change). Option C's solution will also work, and it will continue to work if the servers' IP addresses change, provided that their DNS server is appropriately updated. Option A won't work because the host command is a DNS lookup tool; it doesn't create hostname aliases, as option A implies. Option D confuses the search and nameserver functions of /etc/resolv.conf. The nameserver line in this file specifies a DNS name server by IP address, so option D won't work.
- B. The /etc/hosts file holds mappings of IP addresses to hostnames, on a one-line-per-mapping basis. It does not list the users or other hosts allowed to remotely access this one, nor does it affect remote administration through a Web browser.
- B. The two reachable systems are on the same network block (192.168.21.0/24), so their network traffic would not pass through a router. The two unreachable systems are on different network blocks, which means their traffic must pass through a router. This pattern suggests that there's a routing problem, as in option B. (Another possibility is that the router itself is down or misconfigured.) Since all the computers in the question were specified by IP address, name server configuration, as in option A, isn't an issue. Option C implies that DHCP servers are required to respond to ping requests, but this isn't so; DHCP servers deliver IP addresses to DHCP clients. Although a change in the netmask might plausibly enable the first system to contact 192.168.27.3, if the two systems are connected to the same physical wires, the 10.78.21.102 system is much too different in IP address to make a misconfigured netmask a plausible explanation for this problem, as option D suggests.