
Chapter 6
DNS Server Configuration
THE FOLLOWING LINUX PROFESSIONAL INSTITUTE OBJECTIVES ARE COVERED IN THIS CHAPTER:
- 207.1 Basic DNS Server Configuration (weight: 2)
- 207.2 Create and Maintain DNS Zones (weight: 2)
- 207.3 Securing a DNS Server (weight: 2)
 As described in Chapter 5, “Network Configuration,” three levels of network addresses are important: hardware addresses, Internet Protocol (IP) addresses, and hostnames. Converting between these address types is critical for the normal functioning of a network. The conversion between hardware addresses and IP addresses is accomplished by the Address Resolution Protocol (ARP), and this conversion needs no explicit configuration. (The arp utility, however, does provide the ability to monitor and change the automatic ARP activities.) The conversion between IP addresses and hostnames is most often handled by the Domain Name System (DNS), which is a worldwide distributed collection of servers. If your site is very large (and perhaps even if it's not), you may need to maintain a DNS server both for the benefit of outside sites and for internal use. This chapter therefore describes how to configure and maintain your own DNS server.
This chapter begins with a brief overview of what DNS is, including both the organization of the global DNS and an outline of how DNS configuration is split up on a Linux system. With these basics in mind, you can look at the nuts and bolts of setting up a Linux DNS server program to function in a simple caching-only mode. A more advanced configuration relies on configuration files defining multiple zones, which are collections of related computers managed by DNS. With suitable zone files enabled, a DNS server can manage name resolution for your domain. Finally, this chapter examines DNS security issues.
Understanding the Role of DNS
As described in Chapter 5, computer name resolution can be performed in a number of ways, including (but not limited to) an /etc/hosts file and DNS. An /etc/hosts file is a convenient way to manage name resolution for a small number of computers, such as a small home network with just two or three machines. Because /etc/hosts must be updated on every computer on a network whenever any machine's name or IP address changes or whenever a computer is added to or removed from the network, the viability of this approach drops rapidly as the number of computers increases.
![]() In addition to /etc/hosts and DNS, several other name resolution systems exist, including Network Information Service (NIS), Windows Internet Name Service (WINS), and more. Such configurations are fairly exotic and are not covered on the LPIC-2 exam.
In addition to /etc/hosts and DNS, several other name resolution systems exist, including Network Information Service (NIS), Windows Internet Name Service (WINS), and more. Such configurations are fairly exotic and are not covered on the LPIC-2 exam.
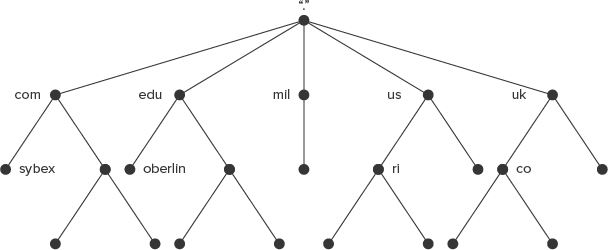
The DNS database is arranged in a hierarchical manner, as illustrated in Figure 6.1. The top of the hierarchy is referred to as the root and is written as a single dot (.). Below the root come the top-level domains (TLDs), such as .com, .edu, .mil, .us, and .uk. Some TLDs are country code TLDs, such as .us (for the United States) and .uk (for the United Kingdom). As the United States originated the Internet, some TLDs are reserved for U.S. institutions, such as .mil for the U.S. military. The popular .com, .org, and .net TLDs are effectively international in scope. TLDs are further subdivided. Sometimes these refer to individual businesses, institutions, or even people, as in sybex.com or oberlin.edu. In other cases, another layer intervenes before individual registrants can claim a domain name. For instance, the .us TLD is divided into state-level domains, such as .ri.us for Rhode Island; and the .uk TLD is divided into academic (.ac.uk), commercial (.co.uk), and other groupings. Once a domain is registered, the domain's owner may choose to subdivide it further or assign computers names directly under the domain name. One popular name is www for a Web server, so www.oberlin.edu is Oberlin College's main Web server, to name just one example.
FIGURE 6.1 DNS is organized in a hierarchical way with each individual computer (the lowermost dots) having a name in a domain that itself has additional components, up to the root of the entire DNS hierarchy.
DNS servers are arranged in a way that's conceptually similar to the arrangement of domains. In particular, every domain and subdomain must have associated with it server computers that are authoritative for the domain—that is, these servers can be relied upon by the rest of the Internet to provide accurate information about the names and IP addresses of computers within the domain and to know the IP addresses of servers that are authoritative for its subdomains. For instance, the name server associated with the .edu domain must know the IP address of the name server responsible for the oberlin.edu domain, and this name server must know the IP address of the www.oberlin.edu computer. At the top of the hierarchy are the root name servers, which dole out the addresses of the TLD name servers. Because the root of the domain name hierarchy is a dot (.), domain names and hostnames must technically end in this character, as in www.oberlin.edu.; however, standard name resolution procedures add this feature automatically, so it's usually omitted.
Thus, to look up a hostname, the process begins with a query to the root name server, as in “what is the IP address of www.oberlin.edu?” The root name server is unlikely to know the answer and so replies with the address of the .edu server. The program doing the lookup then repeats the query with this server, which again most likely defers to another system. This process continues until a server knows the address of the target computer or until some error occurs, such as if an authoritative server for the domain doesn't have the answer.
This DNS lookup process may sound complicated, but given the speed of computers, it seldom takes very long. Furthermore, there are several simplifying factors. First, server programs and user programs such as Apache and Firefox are unlikely to need to do the full lookup; these programs ask the OS, which then passes the query on to one of the DNS servers specified in the basic network configuration, as described in Chapter 5. It's this DNS server, which probably resides on a different computer, that does the full recursive DNS lookup. Second, DNS servers can cache their results, meaning that they remember the lookup results for some period of time, typically hours to days. Thus, if you regularly access a favorite Web site, your local network's DNS server will be able to return the relevant IP address without performing a full recursive lookup most of the time; only when the cached data expires will a new full recursive lookup be necessary.
Given this arrangement, there are two reasons to run a DNS server:
- To deliver authoritative data for a domain you manage
- To perform full recursive DNS lookups for computers on your own network
In some cases, one server may perform both tasks. In other cases, you need only one function. In fact, if you need only the second function, name server configuration is simplified, because you don't need to deal with the details of domain management. This caching-only configuration constitutes the most basic DNS server configuration; adding support for custom zones enables your server to become authoritative for those zones.
This chapter, like the LPIC-2 certification, emphasizes configuration of the Berkeley Internet Name Daemon (BIND) server (https://www.isc.org/software/bind), which is a powerful and popular name server on Linux. Several other name servers exist, however, and in some cases may be preferable. The dnsmasq server (http://freshmeat.net/projects/dnsmasq/), for instance, is a small combination of DNS and Dynamic Host Configuration Protocol (DHCP) server that's particularly useful on small networks. The djbdns server (http://cr.yp.to/djbdns.html) is an alternative to BIND that bills itself as being particularly security-conscious. Although BIND is a fine server, you may want to consider such alternatives before deploying a real DNS configuration. In fact, using two different server programs on two different computers can sometimes be advantageous. If a security vulnerability or other bug takes down one server, the other is likely to remain unaffected, thus minimizing disruption to your site.

You may run a DNS server on a small local network without registering a domain name. Such a configuration normally uses a made-up domain name, ideally using a top-level domain (TLD, such as .com or .edu) that's not in use (such as .not); or you can configure the system as a forwarding-only server that doesn't handle any local hostnames.
You may also run a DNS server using a registered domain. The Internet Corporation for Assigned Names and Numbers (ICANN) maintains a list of accredited registrars (http://www.icann.org/en/registrars/accredited-list.html. Check this list to locate a registrar within the TLD you want to use. You may then register a domain name, which normally costs about $10 or $15 a year, and set up a DNS server to manage that domain. You can link your own DNS server to the global DNS network by entering your server's IP address in Web forms maintained by your domain registrar, or you can have your registrar maintain your public (Internet-accessible) DNS presence and set up your own DNS server for your private network's use only. Which approach is best depends on your needs and resources. If you run a lot of servers or want to provide your users with direct access to your network's systems from off-site, running your own publicly accessible DNS server makes sense, although doing so increases your security risks. Running a private DNS server is sensible if your network is protected behind a network address translation (NAT) router or if there's no need to provide direct outside access to most of your network's computers. (Note that your computers may still be accessible via IP address even if no hostnames point directly to them, so failing to provide DNS entries is an ineffective security measure.)
Running a Caching-Only Name Server
Suppose you're managing a network that connects to the Internet. Chances are your Internet service provider (ISP) provides a DNS server that your computers can use; however, this configuration can generate more network traffic than is necessary when multiple computers on your network make the same query for lookups of hostnames that your users commonly use. Configuring your own DNS server to manage these lookups, including caching the results, can save network bandwidth. Furthermore, it can speed up the DNS lookups, since the results can be pulled from your local computer's cache rather than directed over your Internet link to your ISP's DNS server. If the DNS server you configure is not authoritative for any domain, its configuration can be relatively simple. This is referred to as a caching-only name server.
To configure a caching-only name server, you must first edit the main BIND configuration file. Although the server won't manage its own zones, you must set some basic options in the server's zone configuration files. In some cases, you may need to update configuration files from older versions. Finally, with the changes in place, you can test the server's functioning.
![]() If you need to manage your own domain, you should still begin with a caching-only DNS configuration. Managing your own domain adds to the requirements of a caching-only name server; it doesn't significantly change the fundamentals of the caching-only configuration.
If you need to manage your own domain, you should still begin with a caching-only DNS configuration. Managing your own domain adds to the requirements of a caching-only name server; it doesn't significantly change the fundamentals of the caching-only configuration.
Modifying the Main BIND Configuration File
Before proceeding, be sure that BIND is installed on your computer. This program is usually installed in a package called bind. Use your package manager to install it, if necessary; or obtain it from its Web site (http://www.isc.org/software/bind) and compile it yourself.
![]() This chapter describes the configuration of BIND 9, which is the latest non-experimental version at press time as well as the version emphasized in the LPIC-2 objectives. An experimental BIND 10 is under development. If it has become current by the time you read this, you may need to research its configuration details yourself or use the older BIND 9.
This chapter describes the configuration of BIND 9, which is the latest non-experimental version at press time as well as the version emphasized in the LPIC-2 objectives. An experimental BIND 10 is under development. If it has become current by the time you read this, you may need to research its configuration details yourself or use the older BIND 9.
The main BIND configuration file is /etc/named.conf. This file controls overall server operation, including global options (in a section that begins with the keyword options) and one or more zone sections that point to files that describe the domains the server manages. You can configure a caching-only server in one of three ways:
A Forwarding-Only Server A server is said to be forwarding-only if it forwards all the name resolution requests it receives to one or more other servers. This configuration can be an effective one if you have an ISP that provides a conventional DNS server. A forwarding-only configuration can improve DNS lookup times because it takes advantage of the outside DNS server's cache, and that server is presumably closer to other servers than yours is. (This last point isn't always true, though, or it might be true but countered by other factors, such as a heavier load on your ISP's DNS server.)
A Server That Does Full Recursive Lookups Only If your ISP doesn't provide DNS service or if that service is unreliable or slow, you can configure BIND to do a full recursive lookup for every query that can't be answered from its cache. Most DNS servers that belong to ISPs and large IT departments are configured this way. Performance can be worse than that of a forwarding-only server, but you won't be held hostage to your ISP's DNS server availability.
A Server That Does Both Forwarding and Full Recursive Lookups You can configure BIND to attempt a forwarding lookup but fall back on a full recursive lookup if that initial attempt fails. This approach is a compromise that can work well if your ISP provides a DNS server but that server is unreliable.
The options section of named.conf, as shown in Listing 6.1, defines which of these three methods BIND uses. Most lines in this file end in a semicolon (;). (Omitting the semicolon is a common error in this file.) This punctuation denotes the end of a configuration option. Comments are indicated by two leading slashes (//). Some lines in Listing 6.1 are indented for readability, but BIND ignores this detail, so you can indent lines in whatever way you like.
Listing 6.1: Sample BIND /etc/named.conf configuration
options {
        directory “/var/named”;
        forwarders {
                10.9.16.30;
                10.13.16.30;
                };
        listen-on {
                192.168.1.1;
                172.24.21.1;
        };
        allow-transfer {“none”;};
        forward first;
};
logging {
        channel default_debug {
                file “data/named.run”;
                severity dynamic;
        };
};
// Specify the root zone files
zone “.” IN {
        type hint;
        file “named.ca”;
};
include “/etc/named.rfc1912.zones”;
The key parts of this definition are the forwarders lines and the forward first line in the options section. The forwarders definition specifies the DNS servers to which BIND should forward the lookup requests it receives. This example specifies two outside systems; BIND will try each of them in turn, stopping when it receives a reply. The forward first line tells BIND that it should function as a forwarding server if possible but that it should perform full recursive lookups if that fails. If you change this line to forward only, then BIND will only attempt to get an answer from the systems specified in the forwarders area. If you omit the forward only or forward first line and also omit the forwarders section, the server will perform full recursive lookups all the time.
Listing 6.1 has a listen-on section, which tells BIND on which IP addresses it should listen. This option is most useful on server computers that have multiple network interfaces; you can have BIND respond to queries from some interfaces but not others. You can even configure BIND as a forwarding-only server for a single computer by having it listen only on the 127.0.0.1 address (the loopback address for the computer). You would then configure the computer to use this address for DNS resolution, as described in Chapter 5.
The allow-transfer section is a BIND security option. It's described in detail in “Securing Zone Transfers.”
The logging and zone sections of Listing 6.1 set logging options and define one zone. If you simply want to configure a caching-only server, you can probably leave these options alone. (The upcoming sections “Modifying Zone Files” and “Creating and Maintaining DNS Zones” describe the zone section in more detail.)
BIND is a powerful and complex program, and it supports many other options in its /etc/named.conf configuration file. Chances are your BIND package came with a sample /etc/named.conf file that uses some of these options. In some cases, these configurations are designed to provide added security in case the package is installed accidentally. For instance, you might see lines like these:
listen-on port 53 { 127.0.0.1; };
listen-on-v6 port 53 { ::1; };
allow-query { localhost; };
These lines have the effect of limiting BIND so that it's useful only to the computer on which it runs. If you want to run a server for a network, these lines must be removed.
Modifying Zone Files
A DNS zone is a collection of related computers whose name/IP address mappings are managed by an authoritative server. In some cases, zones are more-or-less synonymous with domains. In other cases, though, they aren't, as described later in “Creating and Maintaining DNS Zones.”
For a caching-only name server, chances are you'll make few or no zone file modifications. A forwarding-only server doesn't require zone file maintenance. If your system performs full recursive lookups, though, you must include a zone “.” section for the DNS root zone, as shown in Listing 6.1. Chances are the default configuration provided by your distribution will work. You might, however, need to adjust it in some situations. The file line in the zone section refers to a file in the directory specified by the directory line in the options section—normally /var/named. This zone file defines the computers in a zone, as described in the upcoming section “Creating and Maintaining DNS Zones.” You don't create or maintain the root zone, though; that's done by others. Nonetheless, your server must know the IP addresses of the root servers in order to perform a full recursive lookup. Thus, the root zone file must be kept up-to-date. Fortunately, the IP addresses of the root zone servers change rarely, so you won't need to update this file often.
If the root servers ever change, your existing configuration might not work. You can retrieve the current root zone file in various ways. One is to type the following command:
$ dig @a.root-servers.net . ns > db.cache
Alternatively, you can download db.cache from ftp://ftp.internic.net/domain/. (Note that this is an FTP site, not a Web site.) Once you've retrieved the latest zone file, you can replace the old one (named.ca in the preceding example; the filename you retrieve may not match what's used on your system) with the new file.
Updating from Older BIND Versions
BIND versions 8 and 9 both use more or less the same configuration file format, so you should have few problems if you encounter a system that runs BIND 8 but you need to update it to BIND 9.
If you happen to encounter a configuration file for the still older BIND 4, however, you'll have some challenges. (BIND numbering skipped from BIND 4 to BIND 8.) BIND 4 used the /etc/named.boot configuration file, which used a different syntax from that for BIND 8 and 9's /etc/named.conf. Most notably, in BIND 4 you can specify forwarding systems using a single punctuation-free line and forwarding options on another line:
forwarders 10.9.16.30 10.13.16.30
options forward-only
Omitting the options line but keeping the forwarders line implements a configuration similar to a BIND 9 forward first configuration. Omitting both these lines creates a full recursive lookup configuration.
Checking Changes
You can use standard SysV or Upstart utilities to start, restart, or reload your BIND configuration. Typically, the SysV keyword reload will be sufficient if you've made changes to an already-running server:
# /etc/init.d/named reload
This option causes BIND to reread its configuration and zone files and implement any changes it finds without discarding its cache or disrupting service. The restart option is more aggressive; it causes the server to shut down and start up again using the new configuration.
You can also pass the BIND server (which is typically called named) a SIGHUP signal to force it to reload its configuration files:
# killall -s SIGHUP named
You can, of course, locate the server's PID number and use kill instead:
# ps ax | grep     named
2313 ?        Ssl       0:00 /usr/sbin/named -u named
2490 pts/0    R+        0:00 grep named
# kill -s SIGHUP    2313
Once it's running, you may control the named server using the rndc utility. You pass the utility any of several commands on the command line. For instance, typing rndc reload reloads the configuration files, rndc stop terminates the server, rndc flush flushes the server's caches, and rndc status displays the server's status information. Typing rndc alone presents a complete list of the commands it accepts.
Once you've implemented your changes, you can use tools such as host and dig to ascertain whether your server is working. Both programs are described briefly in Chapter 5, and dig is described in more detail later in this chapter in “Testing Your Configuration.” Basic functionality can be tested by performing host lookups, specifying your server's IP address as the server to use:
$ host www.whitehouse.gov 192.168.1.8
Using domain server:
Name: 192.168.1.8
Address: 192.168.1.8#53
Aliases:

www.whitehouse.gov is an alias for www.whitehouse.gov.edgesuite.net.
www.whitehouse.gov.edgesuite.net is an alias for a1128.h.akamai.net.
a1128.h.akamai.net has address 72.215.224.35
a1128.h.akamai.net has address 72.215.224.75
This example illustrates a successful lookup using the server on 192.168.1.8. If you encounter error messages, it could be that your server's configuration is incorrect. You can try again, omitting the server's IP address or substituting another server's IP address, to compare the results. If necessary, review your configuration. You can also check /var/log/messages after you reload or restart the server; this file may provide hints about what's not working in your configuration.
Creating and Maintaining DNS Zones
If your DNS server needs to be authoritative for any zones, you must configure your zone files. This task entails both adding new zone definitions to /etc/named.conf and creating a file defining each new zone. You must also test your configuration.
![]() You can run an authoritative server either on the Internet at large or on a private network. In the latter case, your DNS server will be contacted only by local computers to handle name resolution on your own network.
You can run an authoritative server either on the Internet at large or on a private network. In the latter case, your DNS server will be contacted only by local computers to handle name resolution on your own network.
Adding New Zones
A default /etc/named.conf file usually includes one or more zone file references, such as the one to the root zone presented earlier. These references begin with the keyword zone, include the name of the domain to be managed, and link to a zone file in another directory (normally /var/named).
To have your system deliver IP addresses for local computers, you must create both forward and reverse zone files (as described shortly) and point your main named.conf file to your new definitions. Modifying named.conf is fairly straightforward; your changes will look something like this:
zone “pangaea.edu” {
    type master;
    file “named.pangaea.edu”;
};
zone “1.168.192.in-addr.arpa” {
    type master;
    file “named.192.168.1”;
};
The first four lines point BIND to the forward zone file, which enables the server to return IP addresses when it's fed hostnames. The final four lines point BIND to the reverse zone file, which enables the server to return hostnames when it's fed IP addresses. Both definitions should include the type master option and specify a file (normally in /var/named) in which the definition will be created. (You can also specify other types, as in type slave. Slave DNS configurations are described later in “Running a Slave Server.”) The forward zone is named after the domain name it defines—pangaea.edu in this example. The reverse zone is named after the IP address block it serves but with a couple of twists. First, the .in-addr.arpa string is added to the end of the IP address range. Second, the IP address range's numbers are reversed. For instance, if you're defining a reverse zone file for 192.168.1.0/24, you'd take the network portion of the address (192.168.1), reverse its numbers (1.168.192), and add .in-addr.arpa, resulting in 1.168.192.in-addr.arpa.
![]() It's possible for a DNS server to be authoritative for a network's forward lookups but not for its reverse lookups, or vice versa. For instance, your DNS server might handle your own domain, but that domain could be a small network on an IP address block leased from a broadband ISP. In such a case, the broadband ISP might provide the reverse DNS lookup itself. If this is the case, you won't have to configure the reverse zone, but you will have to coordinate with your ISP to provide valid reverse DNS lookups from their DNS server.
It's possible for a DNS server to be authoritative for a network's forward lookups but not for its reverse lookups, or vice versa. For instance, your DNS server might handle your own domain, but that domain could be a small network on an IP address block leased from a broadband ISP. In such a case, the broadband ISP might provide the reverse DNS lookup itself. If this is the case, you won't have to configure the reverse zone, but you will have to coordinate with your ISP to provide valid reverse DNS lookups from their DNS server.
Configuring Zone Files
Zone files are typically located in the /var/named directory, but this location is set in the /etc/named.conf file via the directory setting in the options section (see Listing 6.1). The names of the zone files are set via the file option in the relevant zone section, as just described. It's generally best to begin a new zone file by using an existing one as a template. The following pages present examples of both forward and reverse zone files, so you can use those as templates if necessary.
Configuring Forward Zones
A forward zone file creates the mapping of hostnames to IP addresses. Listing 6.2 shows an example. This file might be the named.pangaea.edu file referenced earlier.
Listing 6.2: Sample forward zone configuration file
$TTL 1D
pangaea.edu.     IN SOA dns1.  pangaea.edu. admin.pangaea.edu. (
                 2011022003 ; serial
                 3600       ; refresh
                 600        ; retry
                 604800     ; expire
                 86400      ; default_ttl
                        )
dns1.pangaea.edu.         IN A      192.168.1.1
coelophysis.pangaea.edu.  IN A      192.168.1.2
peteinosaurus             IN A      192.168.1.3
                          IN A      192.168.1.4
pangaea.edu.              IN A      192.168.1.5
dns1.wegener.pangaea.edu. IN A      172.24.25.2
www                       IN CNAME  webhosting.example.com.
ftp                       IN CNAME  plateosaurus
@                         IN MX     10 peteinosaurus
@                         IN MX     20 mail.example.com.
@                         IN NS     dns1.pangaea.edu.
wegener                   IN NS     dns1.wegener.pangaea.edu.
Most of the lines in a zone configuration file take the following form:
name IN record-type record-contents
The name is the name of the computer (or a name derived from the computer's address, in the case of reverse zone configuration files, as described shortly). You should pay careful attention to the trailing dot (.) in the fully qualified domain names (FQDNs) in Listing 6.2—the names that include both machine name and domain name portions. Technically, all DNS hostnames end in dots, although they can usually be omitted when you're using Web browsers, email clients, and most other tools. In the case of a zone file, though, the dots are mandatory when you specify a complete hostname. When a name does not end in a dot, BIND adds the current zone name—pangaea.edu. in the case of Listing 6.2. Thus, you can specify hostnames either completely (as in coelophysis.pangaea.edu.) or by host portion only (as in peteinosaurus). If you omit a name completely (as in 192.168.1.4 in Listing 6.2), the previous hostname (peteinosaurus in Listing 6.2) is linked to both IP addresses (192.168.1.3 and 192.168.1.4 in Listing 6.2). The DNS server delivers all the IP addresses that are so linked in a round-robin fashion. This can be used as a crude form of load balancing, enabling two server computers to share a load that neither alone could handle. The at-sign (@) is a stand-in for the domain itself; it's commonly used with NS and MX records, as shown in Listing 6.2.
Following the hostname comes the string IN, which stands for Internet. Next is a code for the resource record (RR) type. Several RR types are common and important:
A An address (A) record links a hostname to an IPv4 address. You may specify the hostname as an FQDN or as a hostname without its domain portion, as described earlier. You may also assign an IP address to the domain name alone (as in pangaea.edu. in Listing 6.2).
AAAA These records are the IPv6 equivalent of A records.
CNAME A canonical name (CNAME) record links a hostname to another hostname. You may specify the record-contents either as a “bare” machine name or as an FQDN. In the latter case, the target system need not be in the same domain as the one specified by the SOA record. For instance, in Listing 6.2, www links to an outside system. You can create multiple records for the same CNAME, each linking to another computer, as a crude form of load balancing.
NS A name server (NS) record provides the hostname of a DNS server for the domain. This record is used mainly by other DNS servers that are directed to yours by other systems when your DNS server functions on the Internet at large. NS records, like CNAME records, can point outside your own domain. An NS record can refer to a server for the main domain or for a subdomain if you provide the subdomain name, as in the case of the wegener.pangaea.edu. subdomain in Listing 6.2. This configuration delegates control of the subdomain to another server—dns1.wegener.pangaea.edu. in this example. One wrinkle of this configuration is that the delegated domain's DNS server computer's name must be known. To fulfill this requirement, this server has an A record in the parent domain, as in Listing 6.2.
MX A mail exchanger (MX) record points to a mail server for the domain. Remote mail servers access this record to learn how to deliver mail that's addressed to your domain. The record-contents of these records includes both a priority code (10 or 20 in Listing 6.2) and a computer name. As with CNAME and NS records, MX records can point to systems in other domains. The mail server must be configured to accept mail for the domain, though.
PTR Pointer (PTR) records are the opposite of A records; they link IP addresses to hostnames. As such, they don't exist in Listing 6.2. The upcoming section “Configuring Reverse Zones” covers this type of record in more detail.
SOA The start of authority (SOA) record is the first one in Listing 6.2. This type of record is complex enough that I describe it in more detail shortly.
TXT This record type enables you to set explanatory text associated with the domain.
Most BIND packages for Linux include one or more forward zone files, such as one for the localhost name and perhaps a rudimentary file (called named.empty or something similar) that you can use as a model for your own domain. You may also use Listing 6.2 as a model.
The SOA record is particularly complex. It provides various administrative details for the zone. The name is the domain name for the record, and this name is used as the default whenever a machine name without a trailing dot (.) appears in subsequent records. An at-sign (@) can function as a stand-in for the domain name; in that case, the zone name specified in the /etc/named.conf file is used instead.
The record-contents field of an SOA record is itself quite complex. It includes the primary name server (which should also have its own NS record), the email address of the domain's administrator but with a dot (.) instead of an at-sign (@; [email protected] would be the email for Listing 6.2), and a set of numbers within parentheses. These numbers are:
Serial Number This number is particularly important on networks that employ both master and slave DNS servers. Slave servers examine this value in zone files to determine whether to update their local versions of the zone file. If the serial number doesn't change, the slave server won't update its local file. This fact can cause confusion because if you forget to update your serial number, changes to your zone file may not propagate properly. You can use any system you like for creating serial numbers. Listing 6.2 uses a date with an appended revision number—2011022003 refers to the third change (03) on February 20, 2011. A simple incrementing number will work, too (1, then 2, then 3, and so on). Be sure your numbers increment in a strictly linear way—if you use the date, be sure to use YYYYMMDD format.
Refresh Time This value tells slave servers how often to check back with the master server to update its records. The upcoming section “Running a Slave Server” describes slave server configuration.
Retry Time This value tells slave servers how often to retry a connection to the master server in the event of a failure.
Expire Time This value tells slaves how long to keep delivering data if the slave can't connect to the master server.
Minimum TTL If a DNS client asks for information on a subdomain that doesn't exist, the server responds with a particular code (referred to as NXDOMAIN). This value tells clients how long to cache this response.
Times are specified in seconds, although you may append M, H, D, or W to specify times in minutes, hours, days, or weeks, respectively. Cache times for working domains are usually set in the range of hours to days; however, when testing a configuration, you might want to set cache times of just a minute or two. You might also want to lower the cache times on a working domain a few days prior to making major changes to your domain so that clients won't be delivering outdated information after you make your changes.
The $TTL 1D line in Listing 6.2 sets the time-to-live value for most responses. This is similar to the minimum TTL value in the SOA record, but it applies to most data delivered by the server. This option appeared in BIND 8.2 and became mandatory with BIND 9.
Configuring Reverse Zones
The utility of forward DNS lookups is obvious, but sometimes it's necessary to do the opposite: to find a hostname when given an IP address. This reverse lookup enables servers to record hostnames, rather than IP addresses, in log files. It's also used by tools such as traceroute to display routers' hostnames. In some cases, a reverse lookup can serve as a simple identity test: If a reverse lookup on the IP address followed by a forward lookup on the resulting hostname doesn't produce the client's IP address, then there's some suspicion about the client's identity. (Such problems can result from misconfiguration, though, not just from nefarious intent.) Similarly, some protocols, such as the Simple Mail Transfer Protocol (SMTP) embed hostnames in the transfers; if those don't match the reverse lookup on the client's IP address, then there's cause for suspicion. For all of these reasons, DNS supports reverse lookups.
Reverse zone files are conceptually similar to forward zone files; however, they use PTR records rather than A records, and they map IP addresses to hostnames using hostnames in the in-addr.arpa domain (or ip6.arpa in the case of IPv6 addresses) to hostnames. Reverse zone files also often lack some common features of forward zone files, such as MX listings. Listing 6.3 presents an example of a reverse DNS zone file. This listing might be used in conjunction with Listing 10.3.
Listing 6.3: Sample reverse zone configuration file
$TTL 1D
1.168.192.in-addr.arpa.     IN  SOA dns1.pangaea.edu. admin.pangaea.edu. (
                 2010022003  ; serial
                 3600        ; refresh
                 600         ; retry
                 604800      ; expire
                 86400       ; default_ttl
                         )
1.1.168.192.in-addr.arpa.   IN PTR    dns1.pangaea.edu.
2                           IN PTR    coelophysis.pangaea.edu.
3                           IN PTR    peteinosaurus.pangaea.edu.
4                           IN PTR    plateosaurus.pangaea.edu.
5                           IN PTR    pangaea.edu.
@                           IN NS     dns1.pangaea.edu.
The hostnames in reverse zone files (in the name fields of the files' entries) are based on the computers' IP addresses, as described earlier in “Adding New Zones.” Listing 6.3 provides listings for the 192.168.1.0/24 domain, so its SOA field specifies 1.168.192.in-addr.arpa. as the domain name. As with forward entries, the name field may present either a complete hostname, including a trailing dot (.), or just the part of the hostname that comes to the left of the domain portion of the name. The latter is normally the final one to three numbers in the IP address but in reverse order. The domain name in PTR records ends in either in-addr.arpa (for IPv4 addresses) or ip6.arpa (for IPv6 addresses).
The record-contents portion of a reverse zone file's entries consists of DNS hostnames, complete with the domain portion and trailing dot (.), as illustrated in Listing 6.3. If you omit the DNS hostname, the record will be misinterpreted as being part of the domain defined by the reverse zone file—1.168.192.in-addr.arpa, in the case of Listing 6.3.
Testing Your Configuration
With the /etc/named.conf file and all the zone files configured, you can launch your DNS server or tell it to reread its configuration files. You normally do this via its SysV or Upstart startup script, as described in Chapter 1, “System Startup and Advanced System Management.” This will launch the BIND server, which is normally called named. You may want to check your system log files at this point; it's not uncommon for a misconfiguration to cause the DNS server to fail to start or to misbehave in some other way. Such problems often leave traces in log files. If the server seems to be running, you can check its operation using host or dig, as described in Chapter 5 and in more detail shortly. The ns lookup utility may also be used for this purpose. Be sure to test the system using the server computer itself, another computer on the local network that's configured to use your DNS server directly, and (if applicable) a remote system. Remote computers, though, may not immediately use your DNS server, since it can take minutes, hours, or sometimes even days for DNS changes to propagate through the entire DNS network.
Using host
Basic use of host, as described in Chapter 5, can reveal the A, CNAME, and PTR records on a server, as in these examples:
$ host coelophysis.pangaea.edu 192.168.1.1
Using domain server:
Name: 192.168.1.1
Address: 192.168.1.1#53
Aliases:

coelophysis.pangaea.edu has address 192.168.1.2
$ host www.pangaea.edu 192.168.1.1
Using domain server:
Name: 192.168.1.1
Address: 192.168.1.1#53
Aliases:

www.pangaea.edu is an alias for webhosting.example.com.
webhosting.example.com is an alias for example.com.
example.com has address 10.210.120.45
example.com mail is handled by 0 example.com.
$ host 192.168.1.2 192.168.1.1
Using domain server:
Name: 192.168.1.1
Address: 192.168.1.1#53
Aliases:

2.1.168.192.in-addr.arpa domain name pointer coelophysis.pangaea.edu.
The first two forward lookups take exactly the same form, and of course without foreknowledge of the zone's configuration, you can't know whether you'll get an A record reply (as in coelophysis.pangaea.edu) or a CNAME record reply (as in www.pangaea.edu). These example outputs reveal a domain configuration that is working correctly, for both forward and reverse lookups, at least for the tested hostnames and addresses; each query returns the expected results, as defined in Listings 6.2 and 6.3. (The ultimate IP address associated with webhosting.example.com is not specified in Listing 6.2, however, since this server is in a different domain from the one defined by that zone file.)
Table 6.1 summarizes additional host options. You must provide a hostname or IP address, but the server's hostname or IP address is optional. (The utility uses the computer's default name server if you omit the server's address.) Many of these options can be used to determine whether your name server is functioning correctly; for instance, you can use -t to check for specific record types, and you can use -l to verify that a server can deliver a zone file to its slaves. Table 6.1 is not complete; a few more options relate to highly specialized setups or IPv6 options. Consult the program's man page for details.
Using nslookup
The nslookup utility has been deprecated, meaning that it's no longer officially supported and may be removed from distributions at any time. It's conceptually similar to host, but its syntax is different and it includes an interactive mode. In its most basic use, nslookup can work much like host:
$ nslookup coelophysis.pangaea.edu 192.168.1.1
   Server:      192.168.1.1
   Address:     192.168.1.1#53

   Name: coelophysis.pangaea.edu
   Address:     192.168.1.2
Options, which are summarized in Table 6.2, may be preceded by a dash (-) on the command line or entered using the keyword set in interactive mode, as in set debug to activate debugging mode. Many of these option names may be preceded by no to reverse their meaning, as in nodebug to deactivate debugging mode. (Options that take arguments are exceptions to this rule.) Unless otherwise stated, the options specified in Table 6.2 are the defaults; you should precede these names by no to change the program's behavior.
TABLE 6.2 Common nslookup options
| Option | Description |
| debug | Displays timeouts and additional debugging information. Debugging mode is disabled by default. |
| d2 | Displays an additional layer of debugging information, above and beyond that displayed by debug. This option is disabled by default. |
| defname | Adds the default domain name if a name does not end in a dot (.). |
| search | Searches each of the domains specified by the search parameter in /etc/resolv.conf if a name does not end in a dot (.). |
| recurse | Asks the server to perform a recursive search, similar to the way most clients work. Using norecurse causes nslookup to act more like a DNS server doing its own recursive search. |
| vc | Performs queries using TCP. The default behavior is to use UDP. |
| ignoretc | Causes named to ignore truncated packets rather than retry the operation using TCP. |
| port=num | Changes the port number on which named queries the server. |
| querytype=type | Sets the type of the query (A, CNAME, and so on). |
| timeout=seconds | Sets the timeout period; if the server hasn't responded in the specified time, nslookup resends the query and doubles the timeout period. |
| retry=num | Specifies the number of tries before nslookup gives up on the query. |
| root=root-server | Sets the root server used for recursive lookups. |
| domain=domain | Sets the domain used in lookups when defname is set. |
| srchlist=domains | Sets one or more domains used in lookups when search is set. |
Using dig
The dig utility, also briefly described in Chapter 5, provides greater flexibility than host, and so dig can be used to more thoroughly test a name server's configuration. Its basic syntax is:
dig [@server] [options] [name] [type] [queryopt…]
Table 6.3 summarizes common dig options. Some of these options are designed to enable dig to read lookup requests from a file, which can enable you to perform a series of tests with a single command. The type is the query type (A, MX, PTR, and so on), and queryopt is one of numerous options that fine-tunes the way the program performs its work. Consult dig's man page for details on the queryopt.
| Option | Description |
| -b address | Sets the address used to make a query. Useful mainly on hosts with multiple IP addresses. |
| -f filename | Performs batch queries, reading lookup requests from filename. Each line of this file should contain one query. |
| -p port | Accesses the specified port on the server rather than the default (53). |
| -t type | Sets the query type. Note that the -t string can often be omitted; however, it is necessary to avoid ambiguity in case of lookups of certain TLDs, which can be misinterpreted as dig option names. |
| -q name | Sets the host or domain name to be looked up. Normally, the -q portion may be omitted, but it's sometimes necessary to distinguish the name from other options. |
| -x addr | Performs a reverse lookup on the specified IP address. |
| -4 | Performs only IPv4 lookups. |
| -6 | Performs only IPv6 lookups. |
The basic dig output on a simple query of a single computer tends to be rather verbose, as illustrated by this output (with interspersed explanations):
$ dig @192.168.1.1 coelophysis.pangaea.edu

; <<>> DiG 9.4.3-P3 <<>> @192.168.1.1 coelophysis.pangaea.edu
; (1 server found)
;; global options: printcmd
These lines display the version of the dig program, repeat back the command, and summarize global options (printcmd in this example; this option is set by default).
;; Got answer:
;; ->>HEADER<<- opcode: QUERY, status: NOERROR, id: 4865
;; flags: qr rd ra; QUERY: 1, ANSWER: 1, AUTHORITY: 0, ADDITIONAL: 0
These lines provide technical details about the output. You can disable it by including the +nocomments option; however, this also disables several other comment headers.
;; QUESTION SECTION:
; coelophysis.pangaea.edu. IN A
This section summarizes the query—in this case, it's telling you that you searched for an A record corresponding to coelophysis.pangaea.edu. You can disable this output by using the +noquestion option.
;; ANSWER SECTION:
coelophysis.pangaea.edu. 15 IN A 192.168.1.2
The answer to your query appears here. The output resembles the line that defines the computer in question in the DNS zone file. You can disable this output by using the +noanswer option, although this defeats the usual purpose for running dig.
;; AUTHORITY SECTION:
pangaea.edu.          27 IN NS dns1.pangaea.edu.
In addition to the main information requested (an A record, by default), dig returns information on the name servers that are authoritative for the domain. You might use this information to query these servers directly. You can disable this output by including the +noauthority option.
;; ADDITIONAL SECTION:
dns1.pangaea.edu.       27 IN A 192.168.1.1
This section includes the IP addresses of the name servers listed in the authority section. You can disable this section by including the +noadditional option.
;; Query time: 114 msec
;; SERVER: 192.168.1.1#53(192.168.1.1)
;; WHEN: Fri Dec 17 12:38:39 2010
;; MSG SIZE rcvd: 154
Finally, dig returns some statistics on the query itself, including the time it took, the server name, the date, and the size of the returned data packet. You can disable this information by including the +nostats option.
If a query doesn't return a section you're interested in, you might be able to get it to appear by including the option used to disable it but minus the no part—for instance +additional to make the additional section appear. As noted earlier, you can specify the query type to obtain special record types—MX for a domain's MX records, for instance.
Running a Slave Server
Many sites run multiple DNS servers. This practice helps spread the load and provides redundancy—if one server goes down, the other can still handle the critical task of managing name resolution. If the two servers are connected to the Internet via different routes, the domain's name resolution can continue to function even if one route goes down entirely.
The problem with running multiple DNS servers is keeping them synchronized—it's a nuisance, at best, to have to reconfigure zone files on multiple servers. Therefore, the DNS protocols provide a way to handle this task automatically. One server, known as the master, holds the zone files that you edit whenever you need to make changes. One or more additional servers, known as slaves, periodically check with the master and transfer the master's zone files, should that be necessary. To implement this configuration, you must configure the slave server. You may also need to tweak the configuration to improve the security of your DNS servers.
Configuring a Slave Server
To configure a slave server, you set up its /etc/named.conf file much like a master server; however, you change the zone section to identify it as a slave:
zone “pangaea.edu” {
       type slave;
       file “named.pangaea.edu”;
       masters { 192.168.1.1; }
};
This configuration tells BIND that it's to function as a slave server for the pangaea.edu zone and that it's to retrieve the zone file from 192.168.1.1. You can specify several servers, separated by semicolons (;), to which the slave will synchronize; in fact, one slave can synchronize against another (the masters keyword is still used in this case). The zone file will be retrieved and placed in the directory specified by the directory directive (see Listing 6.1).
If the server is to function as a slave for multiple zones, you must include separate zone definitions for each zone. Each zone can synchronize against a different master.
If you administer your own reverse DNS zones, remember to include them in your slave configuration. You should not, however, set up a slave configuration for the DNS root zones or for localhost reverse lookups (which are usually included in default BIND configurations).
![]() A BIND server may function as a master for some zones and a slave for others. This type of configuration is sometimes employed by small sites that agree to serve as slaves for each others' domains. Such arrangements can satisfy the need to have two or more DNS servers for a domain, with the added benefit of placing the DNS servers on different networks for improved reliability.
A BIND server may function as a master for some zones and a slave for others. This type of configuration is sometimes employed by small sites that agree to serve as slaves for each others' domains. Such arrangements can satisfy the need to have two or more DNS servers for a domain, with the added benefit of placing the DNS servers on different networks for improved reliability.
Securing Zone Transfers
Security is an issue for DNS zone transfers. Suppose a master server accepts zone transfer requests from any computer. A would-be attacker could then request such a transfer and obtain the hostnames and IP addresses of all the computers in the zone. This information could make the attacker's job easier, or it might be used in other nefarious endeavors, such as social engineering attacks—the miscreant could call somebody in your organization and claim to need information on the network. Knowledge of the computer names could help trick the victim into believing the attacker.
For this reason, BIND provides the allow-transfers directive, which was used in Listing 6.1 to deny all zone transfers:
allow-transfer {“none”;};
If you want your DNS server to transfer data to slaves, you can change this option to something less restrictive by specifying the IP addresses to which the server will deliver its zone files:
allow-transfer {192.168.23.1; 172.24.21.1;);
This configuration allows the specified computers to retrieve zone files. You can include this directive in a zone section, in which case it applies only to that zone and overrides the global setting.
Restricting zone transfers in this way is a good policy; however, for still better security, you can employ DNS Security Extensions (DNSSEC). This technology defends against DNS cache poisoning, in which fake data can be inserted into a DNS server's cache of other domains' IP addresses. Using cache poisoning, a miscreant can redirect traffic intended for one domain to another one, enabling the attacker to impersonate a Web merchant, bank, or other site that users trust with sensitive data.
To create a zone configuration using DNSSEC, you must first change into the directory in which the original zone files exist (typically /var/named). You can then generate a key and sign your zone files with that key. The key generation is accomplished with the dnssec-keygen command, as in:
$ dnssec-keygen -a RSASHA1 -b 768 -n ZONE pangaea.edu.
This command generates two files, Kpangaea.edu.+005+nnnnn.key and Kpangaea.edu.+005+nnnnn.private, where nnnnn is a numerical value. The first file is a public key that can (and must) be distributed to other servers, while the second file is a private key file that's used to sign your zone files using the dnssec-signzone program:
The output is a single file, called zone.pangaea.edu.signed, based on the original named.pangaea.edu zone file. You should use this file as the zone file for the domain, rather than the original zone file.
Making Additional Security Improvements
A couple of miscellaneous security features deserve attention. These are running BIND in a chroot jail, which can help keep a buggy or compromised server from damaging the rest of your system, and using a split DNS configuration, in which DNS resolution can vary depending on the client's location in the network.
Running BIND in a Jail
A security feature that's often employed with BIND is to run it in a chroot jail. The chroot command's name stands for change root, and the idea is to run the program so that it believes the computer's root directory (/) is something other than what the root directory really is. The result is that the server can only access files in this alternate directory tree, reducing the risk that a compromised server can be used to modify files that aren't related to the server itself.
![]() Some distributions ship with BIND startup scripts that automatically or optionally run the server in a chroot jail. If you're using such a distribution, you should consult its documentation; chances are you can run the server in a chroot jail with less effort than is described here.
Some distributions ship with BIND startup scripts that automatically or optionally run the server in a chroot jail. If you're using such a distribution, you should consult its documentation; chances are you can run the server in a chroot jail with less effort than is described here.
To begin with this configuration, you should first ensure that a suitable account exists on your system. Check your /etc/passwd file for an entry for named. If one doesn't exist, create it. It should look something like this:
named:x:200:200:Nameserver:/chroot/named:/bin/false
The key point for this account is that it's specific to the named server and that it's a system account. User accounts should not be used; nor should the nobody account, which runs many other miscellaneous programs. Ensure that the user ID (UID) and group ID (GID) values are unique. The user directory (/chroot/named in this example) must exist; it will become the chroot jail environment. Finally, the default shell must be something that provides no access to the system—/bin/false is used in this example.
To prepare the chroot directory (such as /chroot/named), you must create several subdirectories and files that mirror part of the structure of the standard Linux filesystem, but within the jail directory. To begin, you should create the chroot environment, including the etc/namedb/slave and var/run subdirectories within it:
# mkdir -p /chroot/named
# cd /chroot/named
# mkdir -p dev etc/namedb/slave var/run
Note that you do not include leading slashes (/) in the final command's directory specifications, since you want to create these directories within the chroot environment. You must then copy a few configuration files to the new environment and adjust their ownership for the new account you've created:
# cp -p /etc/named.conf /chroot/named/etc/
# cp -a /var/named/* /chroot/named/etc/namedb/
# cp /etc/localtime /chroot/named/etc/
# chown -R named:named /chroot/named/etc/namedb/slave
# chown named:named /chroot/named/var/run
Finally, BIND uses the /dev/null and /dev/random device nodes, so you need to create duplicates of these nodes in the chroot environment and give them appropriate permissions:
# mknod /chroot/named/dev/null c 1 3
# mknod /chroot/named/dev/random c 1 8
# chmod 666 /chroot/named/dev/{null,random}
You must now modify the configuration file to launch named with the -t /chroot/named option; this will cause it to lock itself into its jail as soon as it's launched. You should be able to modify your SysV or Upstart startup scripts to perform this task.
Configuring Split DNS
A split DNS (also known as split horizon or dual horizon DNS) configuration is often used on networks with separate heavily protected and public sections. In some cases, both parts of the network use the same global IP address space, and the goal is to prevent information on the internal names and IP addresses from becoming widely known. In other cases, the internal network might be part of a private address space and might either have no direct connection to the Internet or be linked via a Network Address Translation (NAT) configuration.
In either case, a split DNS configuration involves setting up two DNS servers. One server, on the external network, is configured as a normal authoritative server for the domain. Despite its being an authoritative server, however, this system has information on the publicly-accessible computers only; its zone files omit the names and IP addresses of the computers on the private network.
![]() Delivering IP addresses from the reserved private address spaces on the Internet at large can have negative and confusing consequences. If a remote client happens to be behind a NAT firewall on another private network that uses the same address space as your own network, your hostnames will resolve into IP addresses that, to the remote client, are on the local network. This will be confusing at best.
Delivering IP addresses from the reserved private address spaces on the Internet at large can have negative and confusing consequences. If a remote client happens to be behind a NAT firewall on another private network that uses the same address space as your own network, your hostnames will resolve into IP addresses that, to the remote client, are on the local network. This will be confusing at best.
The internal server's configuration will typically point to the external server as a forwarder, as described earlier in “Running a Caching-Only Name Server”; however, the internal server will also claim to be authoritative for the domain, or at least for whatever subdomains you use internally. Internal clients using the internal server will therefore be able to resolve regular Internet hostnames, and they will be able to resolve the names of those internal systems that aren't resolvable from outside.
Summary
DNS is one of the most fundamental protocols upon which the Internet is based, and Linux is an excellent platform for running DNS servers. One of the most popular and influential of these is BIND. This server can be configured as a caching-only server, in which the server is not authoritative for its own domains but only caches DNS accesses from your local network in order to improve performance. Adding to this role, BIND can become authoritative for one or more zones, meaning that other servers (as well as clients) refer to your server as the final arbiter of information on the zones for which it is authoritative.
If BIND (or any other DNS server) functions as an authoritative server for a domain, you must maintain the appropriate zone files. These files come in two varieties: forward and reverse. Forward zone files enable the server to deliver IP addresses when a client asks about names, while reverse zone files provide data about the opposite relationship.
Like any server, BIND poses security challenges, and special configurations can be used to reduce BIND's risks. One of the challenges relates to slave configuration; you can restrict BIND to deliver full zone data only to authorized slave computers. A second challenge is that of DNS cache poisoning, which can be countered by implementing DNSSEC encryption and authentication. Finally, you can minimize the risks posed by a compromised server by running it in a chroot jail.
Exam Essentials
Summarize the main BIND configuration files. The /etc/named.conf file controls the overall BIND configuration. Typically, files in /var/named hold zone files; however, this location can be altered by changing the directory option in /etc/named.conf.
Describe methods of reloading altered zone files. Most SysV startup scripts enable reloading zone files by passing the reload option. The restart option will also work but is more disruptive. The rndc utility can also be used for this function; typing rndc reload does the job. Passing the SIGHUP signal via kill or killall can also reload zone files.
Explain DNS forwarding options. DNS forwarding refers to BIND's ability to query another DNS server as if BIND were an ordinary client program, rather than perform a full recursive lookup of its own. BIND may perform full recursive lookups (no forwarding), it may attempt to forward a query and then perform a full recursive lookup if that fails (forward first), or it may function as a forwarding server only (forward only).
Explain the difference between forward and reverse zones. Forward zones enable a server to return IP addresses when fed hostnames; reverse zones enable a server to return hostnames when fed IP addresses. Both zone types are critical to normal functioning of the Internet, although any given server might not handle both forward and reverse zones for a given set of computers.
Summarize common zone file resource record types. A records provide hostname-to-IPv4-address lookups, AAAA records provide hostname-to-IPv6-address lookups, MX records return mail server information for a domain, PTR records provide IP address to hostname lookups, CNAME records define hostname “aliases”—duplicate names for a computer, NS records point to a domain's name servers, TXT records provide miscellaneous information, and SOA records define the zone as a whole.
Describe three tools for performing DNS queries. The host, nslookup, and dig utilities can all perform DNS queries. The host utility is commonly used to perform simple lookups, but it has some advanced features. The nslookup utility is deprecated but has some unique features that keep it in service, such as an interactive mode. The dig utility can perform more advanced DNS lookups.
Explain the function of a chroot jail. A chroot jail can isolate a server from most of the computer's filesystem, minimizing the risk that a buggy or compromised server will be able to damage anything but its own configuration. BIND can be run in a chroot jail.
Describe the purpose of DNSSEC. The DNS Security Extensions (DNSSEC) provides protocols designed to enhance the security of the worldwide DNS network as a whole. They employ cryptographic keys to reduce the risk of miscreants injecting forged data into servers' DNS caches, a practice that can enable the miscreants to impersonate sites they don't control.
Review Questions
- A Linux system administrator types rndc flush at a root command prompt on a computer that's running a DNS server. What will be the effect?
A. The DNS server program will restart.
B. All the DNS server's zone files will be emptied.
C. The DNS server's caches will be cleared.
D. The DNS server computer will restart.
- In which directory are DNS zone files typically stored on a system that runs the popular Linux DNS server, named?
A. /etc/dns
B. /var/dns
C. /etc/named
D. /var/named
- Which of the following is an advantage of a forwarding-only DNS server configuration vs. a full recursive lookup configuration?
A. A forwarding-only configuration will operate even if your ISP's DNS server becomes unresponsive.
B. A forwarding-only configuration can cache DNS data for local access.
C. A forwarding-only configuration eliminates the need for an ISP.
D. A forwarding-only configuration is often faster than a full-recursive configuration.
- What is the effect of the following line, found within the options section of a /etc/named.conf file?
directory “/home/sam/bind”;
A. It tells BIND to look in the /home/sam/bind directory for its zone files.
B. It guarantees that the user sam will be able to edit the BIND configuration.
C. It configures BIND to run as the user sam, thus improving the server's security.
D. It locks BIND in a chroot jail located at /home/sam/bind.
- How can you use the kill command to cause BIND to reload its configuration files? Assume the server's PID is 2798.
A. kill 2798
B. kill -9 2798
C. kill -s SIGHUP 2798
D. kill -s SIGTERM 2798
- What is the effect of the following /etc/named.conf lines?
listen-on port 53 { 127.0.0.1; };
listen-on-v6 port 53 { ::1; };
A. The server can be accessed only from the computer on which it's running.
B. The server will run using a firewall on port 53.
C. The server will be available to remote computers via both IPv4 and IPv6.
D. The server will be available to remote computers via IPv6 only.
- Which of the following is a problem that a caching-only DNS server can help solve?
A. Your ISP's DNS server is reliable but sluggish.
B. You need to manage the hostnames of 150 computers.
C. You need to provide a second DNS server for your domain.
D. Your entire network connection frequently goes down.
- What is the purpose of the following lines in /etc/named.conf?
zone “1.168.192.in-addr.arpa” {
    type master;
    file “named.192.168.1”;
};
A. It tells the DNS server to use the file named.192.168.1 to look up IP addresses for names in the in-addr.arpa domain.
B. It tells the DNS server to use the file named.192.168.1 to look up hostnames when given IP addresses.
C. It tells the DNS server to ignore (“zone out”) requests in the 192.168.1.x IP address block.
D. It tells the DNS server to retrieve the file named.192.168.1 from the master server for the domain in question.
- Which of the following tools provides an interactive mode for performing DNS lookups?
A. named
B. nslookup
C. dig
D. host
- Which of the following are legal record types in a DNS zone file? (Choose all that apply.)
A. MX
B. DNS
C. ZF
D. CNAME
- Which of the following options is true of the following DNS zone file entry?
example.net. IN SOA dns.pangaea.edu. fred.example.com. (
              7        ; serial
              3600     ; refresh
              600      ; retry
              604800   ; expire
              86400    ; default_ttl
                    )
A. The serial number (7) is invalid; this number must be a date-based code, such as 2011071101.
B. The primary DNS server entry (dns.pangaea.edu) is invalid; this server must exist within the main (example.net) domain.
C. You should send email to [email protected] concerning any DNS-related problems with the example.net domain.
D. This domain has precisely two DNS servers: dns.pangaea.edu and fred.example.com.
- You want to enable users to access the computer with the IP address of 192.168.17.198 as linus.example.com. What line would you place in the zone file for example.com to accomplish this task?
A. linus IN A 192.168.17.198
B. linus IN MX 192.168.17.198
C. 198 IN TXT linus.example.com.
D. 198 IN PTR linus.example.com.
- What is the effect of the following two DNS zone file entries?
tycho.luna.edu. IN A     192.168.23.5
www             IN CNAME tycho
A. The same computer (192.168.23.5) may be accessed as either tycho.luna.edu or www.tycho.luna.edu.
B. The same computer (192.168.23.5) may be accessed as either tycho.luna.edu or www.luna.edu.
C. Email sent to the www.luna.edu domain is delivered to tycho.luna.edu.
D. The server will fail to start, since a stray dot (.) appears at the end of the hostname tycho.luna.edu.
- The zone file for the luna.edu domain includes the following line:
imbrium IN NS dns1.imbrium.luna.edu.
What other information must also appear in this zone file to make this line legal?
A. A CNAME record for dns1.imbrium.luna.edu.
B. An MX record for imbrium.luna.edu.
C. A PTR record for imbium.luna.edu.
D. An A record for dns1.imbrium.luna.edu.
- What is the safest account to use for running BIND?
A. The nobody account
B. An ordinary login user account
C. A server-specific system account
D. The root account
- Which of the following security problems does DNSSEC most directly address?
A. Intruders on the server
B. Unauthorized zone transfers
C. Cache poisoning
D. Social engineering
- What is a characteristic of a split DNS configuration?
A. Name resolution can be different for computers depending on their locations.
B. Full recursive lookups occur only if a forwarding lookup fails.
C. Hostname-to-IP address and IP address-to-hostname lookups occur on different servers.
D. Hostnames can resolve to IP addresses, but not the other way around.
- Which of the following is an advantage of running BIND in a chroot jail?
A. BIND encrypts the transfer of data to and from all its clients.
B. If BIND malfunctions or is compromised, it is less likely to damage other parts of the computer.
C. BIND can authenticate itself to other servers, reducing the chances of cache poisoning.
D. The server refuses to transfer complete zone files except to slaves on a short list.
- What program must you run to create a key for DNSSEC purposes?
A. keygen-dnssec
B. genkey-dnssec
C. dnssec-keygen
D. dnssec-genkey
- Assuming it's properly configured, what can you say about a BIND server that has the following line in its /etc/named.conf file?
allow-transfer {10.23.98.102; 10.202.79.121;);A. It's a slave that transfers data from two other computers.
B. It's a master or slave that allows zone transfers to two other computers.
C. It's a slave that transfers data to two other computers.
D. It's a master that transfers data on two Ethernet interfaces.
Answers to Review Questions
- C. The rndc program provides a control interface for the DNS server program, named. The flush option to rndc clears (flushes) the cache of recent DNS lookups, so option C is correct. None of the remaining options describes anything that rndc can do, although the reload option will cause named to reload its zone files, which is partway to option A.
- D. The /var/named directory holds DNS zone files on a typical Linux DNS server that runs named. Options A, B, and C are all fictitious; these locations don't normally exist.
- D. By pushing the full recursive lookup's activities to your (usually better-connected) ISP's DNS server, overall speed is usually improved by using a forwarding-only configuration, so option D is correct. Option A has it backward; by relying on your ISP's DNS server, a forwarding-only configuration ensures that DNS lookups will fail if your ISP's DNS server becomes unresponsive. Both forwarding-only and full recursive configurations can cache DNS data, so option B is incorrect. Neither type of configuration eliminates the need for an Internet service provider (ISP), so option C is incorrect.
- A. The directory option tells BIND where to look for its zone files, so option A is correct. (This is, of course, a highly unusual location for BIND's zone files and is probably a poor choice for this location.) Option B is incorrect because the /home/sam/bind directory, and the files it contains, might or might not be owned, and therefore be editable, by sam. Although running BIND as a non-root user is a useful security option, a normal user account is normally not used for this purpose, and the specified line does not tell BIND to run as sam, making option C incorrect. This line does not lock BIND in a chroot jail, so option D is incorrect.
- C. Passing a SIGHUP signal to BIND causes it to reread its configuration files, making option C correct. None of the other options passes a SIGHUP signal to the server, so they're all wrong.
- A. These two lines tell the server to listen for connections only via the IPv4 and IPv6 localhost addresses, effectively limiting access to the local computer only, as option A describes. These options do not create a firewall on any port, so option B is incorrect. Options C and D are both incorrect because the lines ensure that remote computers will not be able to access the server, whether by IPv4 or IPv6.
- A. A caching-only DNS server can help speed up DNS lookups by storing previous lookup requests for a period and optionally bypassing an ISP's DNS server to perform its own recursive lookups. Both features can help overcome the problem described in option A. Option B describes a problem that can be solved by a DNS server that's authoritative for one or more domains, not a caching-only server. Option C requires a second authoritative server, possibly configured as a slave, not a caching-only server. Although a caching-only server can work around a sluggish or unreliable ISP-provided DNS server, it won't help much if the entire network goes down, since real Internet accesses rely on protocols not cached by a DNS server, so option D is incorrect.
- B. Zone file definitions in /etc/named.conf tell the DNS server where to look to find mappings of IP addresses to hostnames, or vice versa. The in-addr.arpa pseudo-domain is reserved for reverse DNS lookups—the server returns hostnames when given IP addresses. The file directive points the server to the file that holds the mappings. Thus, option B is correct. Option A is incorrect because reverse DNS lookups return hostnames, not IP addresses. A zone directive is not an instruction to ignore a domain or address block, contrary to option C. The type master line in the example tells the server that it is the master DNS server for this zone, not to retrieve a file from another master server, so option D is incorrect.
- B. The nslookup tool, although deprecated, provides a flexible interactive mode. The BIND server's executable is called named; this is a DNS server, not a user DNS client. The dig utility can perform complex DNS lookup tasks, but it lacks an interactive mode. The host utility is generally considered the successor to nslookup, but it lacks an interactive mode.
- A, D. Mail exchanger (MX) and canonical name (CNAME) records are common in forward zone files. There are no such thing as DNS and ZF records. Other common record types include Address (A), Name Server (NS), Pointer (PTR), and Start of Authority (SOA) records. (PTR records are used in reverse zone files.)
- C. Option C is correct; an administrative contact email address is embedded in the SOA record, but with the at-sign (@) replaced by a dot (.). Option A is incorrect because the serial number need not be date-based, although date-based serial numbers are common. Option B is incorrect because the primary DNS server for a domain need not be part of the domain it serves. Option D is incorrect because the SOA record identifies only one DNS server; others may be specified via separate NS records.
- A. The question is asking for an address (A) record entry for the forward zone file, and option A presents such an entry. Option B presents a valid mail exchanger (MX) record, but that's not what the question asked for. Option C presents a text (TXT) record that might appear in a reverse zone file, but it's a somewhat odd one. Option D presents a correct pointer (PTR) record for the reverse zone file, but that's not what the question asked for.
- B. A canonical name (CNAME) record creates a sort of alias, enabling a second name to access a computer that already has a hostname. Option B correctly describes the effect of the CNAME record in this example, given the address (A) record that also appears in this example. The CNAME entry shown does not create a name of www.tycho.luna.edu, contrary to option A. Email delivery to a domain can be adjusted via an MX record, but the example includes no such record; and even if the second record were an MX record rather than a CNAME record, option C would not describe its effect. The dot at the end of tycho.luna.edu in the first entry identifies a complete hostname; either it's required or the domain name portion of the name must be omitted (as in www on the second line), contrary to option D.
- D. The specific configuration is part of a domain delegation; dns1.imbrium.luna.edu handles DNS lookups for the imbrium subdomain of luna.edu. For this line to be meaningful, though, the luna.edu DNS server must have the IP address for dns1.imbrium.luna.edu, and this requires an A record for that FQDN to appear in the luna.edu zone file, as option D specifies. A CNAME record for this hostname would be useless, an MX record for the subdomain is not required, and a PTR record for the subdomain makes no sense.
- C. BIND is best run using a system account that's used only by BIND; thus, option C is correct. Although the nobody account is low in privilege, many other programs use it, making security breaches possible when using it. Ordinary login users should not run BIND, for similar reasons. Running BIND as root is extremely dangerous, given root's power.
- C. DNSSEC provides a way for servers to authenticate themselves, thus reducing the risk of cache poisoning, in which an attacker inserts false data into the DNS cache of non-authoritative servers. Thus, option C is correct. DNSSEC doesn't directly prevent intruders from breaking into the computer, so option A is incorrect. Zone transfers are usually restricted by means of IP address restrictions on who may transfer zone data, not by DNSSEC; thus, option B is incorrect. Social engineering is a technique in which an attacker assumes a false identity or otherwise tricks a human being into giving up critical information. DNSSEC does little or nothing to address social engineering attacks.
- A. Option A correctly summarizes the meaning of a split DNS configuration. Option B describes the effect of a forward-first policy on a name server configured to use forwarding, but this is not called split DNS. Option C describes a common way for DNS to be organized, but this system is not known as split DNS. Option D describes what happens if only forward zones are defined but no matching reverse zone exists, but this is not called split DNS.
- B. Option B correctly summarizes one of the advantages of running BIND (or any server) in a chroot jail. Option B is essentially fictitious. Option C describes the action of DNSSEC. Option D describes the effect of restricting zone file transfers using the allow-transfer option.
- B. Option B is the correct program; the other options are scramblings of this program's name.
- B. The allow-transfer option tells BIND which other computers may access its zone files. Although masters typically transfer data to slaves, slaves can exchange data between themselves, so this line could appear in either a master or a slave computer. Thus, option B is correct. Option A is incorrect because slaves use the masters option, not allow-transfer, to specify the computers from which they retrieve data. Although the computer could be a slave, this isn't certain so option C is correct. Option D is incorrect because the listen-on option, not the allow-transfer option, specifies the Ethernet ports on which BIND listens.