
Chapter 10
Security
THE FOLLOWING LINUX PROFESSIONAL INSTITUTE OBJECTIVES ARE COVERED IN THIS CHAPTER:
- 210.2 PAM Authentication (weight: 3)
- 212.4 TCP Wrapper (weight: 1)
- 212.5 Security tasks (weight: 3)
 The Internet is a dangerous place. Although Linux is immune to many of the dangers that threaten Windows computers, other dangers await the unwary Linux system administrator. This chapter describes some of the features Linux provides to help you deal with these problems.
First up is the Pluggable Authentication Modules (PAM) subsystem, which enables you to change the way Linux authenticates users. PAM has been referred to earlier, most notably with respect to the Lightweight Directory Access Protocol (LDAP), described in Chapter 7, “Advanced Network Configuration.” A second topic is TCP Wrappers, which enables you to limit the computers that may access a wide variety of Linux servers, thus protecting them from broad classes of unauthorized systems. This chapter also covers how to monitor your network ports and network data on a low level. Finally, you should know how to look for signs of intrusion and where to go to keep up-to-date with security issues.
![]() Security is an extremely important and complex topic. This chapter covers only a handful of security issues. Other security issues are described throughout this book, with reference to specific servers and Linux subsystems. Books such as Michael Bauer's Linux Server Security (O'Reilly, 2005) provide a deeper look at this important topic. Even more specialized books, such as Michael Rash's Linux Firewalls: Attack Detection and Response with iptables, psad, and fwsnort (No Starch Press, 2007) and Mayer, MacMillan, and Caplan's SELinux by Example: Using Security Enhanced Linux (Prentice Hall, 2006), provide extended details on more specialized security tools or topics.
Security is an extremely important and complex topic. This chapter covers only a handful of security issues. Other security issues are described throughout this book, with reference to specific servers and Linux subsystems. Books such as Michael Bauer's Linux Server Security (O'Reilly, 2005) provide a deeper look at this important topic. Even more specialized books, such as Michael Rash's Linux Firewalls: Attack Detection and Response with iptables, psad, and fwsnort (No Starch Press, 2007) and Mayer, MacMillan, and Caplan's SELinux by Example: Using Security Enhanced Linux (Prentice Hall, 2006), provide extended details on more specialized security tools or topics.
Authenticating Users with PAM
PAM provides you with a flexible means of configuring authentication. A standard Linux installation typically authenticates users in a more or less standard way, typically by using accounts described in /etc/passwd and passwords stored in /etc/shadow. Using PAM, you can extend this system to use a network password server, biometric hardware, or other tools. To make full use of PAM, you must first understand the principles it uses. You can then build a new PAM stack. Because PAM configuration can be confusing in the abstract, I present a few examples to help you see how it works. Finally, you may need to adjust a related tool, the Name Service Switch (NSS), which is less complex than PAM but equally important to Linux authentication.
Understanding PAM Principles
In Linux's early days, every program that authenticated users did so by directly reading the /etc/passwd file, which in those days contained both the account information and the hashed password. Although this approach was simple to implement, it had a number of problems, such as exposing the hashed password to the entire system (thus making it possible for miscreants with local access to crack passwords by using brute-force dictionary-based attacks) and necessitating changes to every login program whenever a change to the authentication mechanism was desired.
The solution to these problems was PAM, which sits between the login programs and the account database (/etc/passwd and /etc/shadow in a default configuration). PAM is the usual way to implement shadow passwords, in which password hashes are stored in the more secure /etc/shadow file, reducing the risk of their being cracked. Once common login programs, such as the text-mode login utility, GUI X Display Manager (XDM) programs, the su command, and others, were converted to use PAM, all such programs could easily take advantage of new login tools simply by changing PAM. Because PAM is modular in nature, it can be expanded by adding new libraries to the computer and referencing those libraries in the PAM configuration files.
To configure PAM, you must modify one or more files in the main PAM configuration directory, /etc/pam.d. This file contains configuration files for every program that uses PAM, telling it what PAM modules to use and in what way. Most of the files in this directory are named after specific login tools; for instance, /etc/pam.d/login manages the text-mode login program, and /etc/pam.d/gdm manages the GNOME Display Manager (GDM) GUI login program.
![]() Some very old Linux distributions used a single file called /etc/pam.conf rather than separate files in the /etc/pam.d directory. This file held the equivalent of all the files in /etc/pam.d. Each entry in the pam.conf file, however, began with a service name, which is omitted from the /etc/pam.d files' lines, as described shortly.
Some very old Linux distributions used a single file called /etc/pam.conf rather than separate files in the /etc/pam.d directory. This file held the equivalent of all the files in /etc/pam.d. Each entry in the pam.conf file, however, began with a service name, which is omitted from the /etc/pam.d files' lines, as described shortly.
Commonly, files whose names begin with common, system, or config, such as common-auth and common-session, are called by the service-specific files. You can change all of your login services by editing these files, or you can change a subset of your login services by editing their files individually.
PAM configuration files consist of a series of lines, each of which can be a comment that begins with a hash mark (#) or a line that describes a specific PAM module and how it's to be used. The latter type of line takes the following format:
management_group control_flag module [options]
Each field has a particular meaning:
management_group PAM defines four management groups, each of which controls an aspect of account authentication or security: authentication (auth), account management (account), session management (session), and password management (password). Different types of tasks that PAM performs require using different management groups, as described in detail shortly.
control_flag When a module is called, it may succeed or fail in its task. (For instance, a password might be correct or incorrect.) This field tells PAM how to react to these successes and failures, as described in more detail shortly in “Setting Control Flags.” For now, know that four control flags are valid: requisite, required, sufficient, and optional. Alternatively, a more complex syntax permits setting values and actions using the syntax [value=action [value=action...]]. In addition, the include flag tells PAM to include the lines in another configuration file. (Two other methods of doing the same thing are described in subsequent sections.)
module The module specification identifies the PAM module file. This specification may include the complete path or be relative to the PAM modules directory (typically /lib/security).
options Many PAM modules accept options that can influence how they work. Some options are recognized by many modules, but others are highly module-specific, as described shortly.
Editing a PAM Stack
Modifying a PAM configuration requires editing one or more PAM stacks, which are sets of modules that are called to perform specific tasks. Once you understand how PAM stacks are built, you can create new stacks—or more likely, modify your distribution's existing stacks. Each configuration file in /etc/pam.d consists of one or more PAM stacks to perform the actions needed by the associated program.
![]() Before proceeding, start a text-mode root login session and back up the configuration files you plan to change. If you err in your PAM configuration, the result can be an inability to log into the computer. Having an open root session and backups of your original configuration guarantee that you'll be able to back out of any unfortunate changes. The alternative is to reboot the computer using a rescue CD and edit the main installation's configuration.
Before proceeding, start a text-mode root login session and back up the configuration files you plan to change. If you err in your PAM configuration, the result can be an inability to log into the computer. Having an open root session and backups of your original configuration guarantee that you'll be able to back out of any unfortunate changes. The alternative is to reboot the computer using a rescue CD and edit the main installation's configuration.
What Is a PAM Stack?
For any given login service, each management group has its own stack—that is, there's one stack for account management (using the account stack), another for authentication (using the auth stack), and so on. Individual PAM-using tools can call these stacks for particular tasks, but certain tools are likely to use different stacks or use them in different ways. For instance, a login tool such as login or XDM is designed to authenticate users and so will make heavy use of the auth stack but may do very little with the password stack; but the passwd program may require both of these stacks. The purpose of each management group is as follows:
account This management group performs account management based on features other than user authentication. For instance, it might limit access to the account based on the time of day or available system resources.
auth This management group handles authentication, typically via a username/password pair. It can also assign group membership to a user.
password This management group handles password (or other authentication type) updates.
session This management group sets up a user's login session and then cleans up when the user logs out. It might verify or even create a user's home directory, mount partitions, and so on.
When a program calls a PAM stack, PAM executes each of the modules in that stack in sequence. Each module can return a success or a failure code, which PAM can then use to decide whether to execute the next module in the stack and, if the next module is executed, how to combine the results of each module.
The end result is that the PAM stack as a whole succeeds or fails, which means success or failure for the login operation, password change, or other authentication task at hand.
Several tools exist to enable one file to refer to another. One of these is to use include as the control flag, as described earlier. Another is to use the @include directive, which takes the name of a file to be included, as a single line of the file, as in:
@include common-auth
Such a line may be used instead of or in addition to the standard lines in a PAM stack. (Of course, the included file must specify a valid stack itself, particularly if the main file doesn't!) One more method of including external files is described in “Choosing Modules.”
Setting Control Flags
As noted earlier, there are four control flags that determine how the success or failure of the module will affect stack execution. The various possibilities are laid out in Table 10.1.
TABLE 10.1 Control flags and the consequences of module termination

When designing a stack, you must be very careful to consider all the possible outcomes of each module's success or failure. For instance, consider the following two lines:
auth required pam_unix.so try_first_pass
auth sufficient pam_ldap.so try_first_pass
With these two modules and two possible outcomes (success or failure) for each module, there are four possible outcomes for this mini-stack, as summarized in Table 10.2. If pam_unix.so succeeds, the stack as a whole succeeds, whether or not pam_ldap.so fails, since the former module is required and the latter is merely sufficient. If pam_unix.so fails, by contrast, the stack as a whole also fails, since pam_unix.so is required. Chances are this was not what was intended; this stack will work as well with the pam_ldap.so line removed.
TABLE 10.2 Possible outcomes in the sample stack

Consider, though, what happens when one reverses these two lines:
auth sufficient pam_ldap.so try_first_pass
auth required pam_unix.so try_first_pass
In this case, because a sufficient flag causes the stack to cease execution if the module succeeds, the stack will succeed when either module succeeds and will fail only if neither module succeeds. (If the stack contained subsequent lines, though, those lines would be bypassed if pam_ldap.so were to succeed.)
The more complex control flag format, involving a bracketed list of value/action pairs, uses one or more values from a long list, such as success, open_err, buf_err, and bad_item. (Consult the man page for pam.d for details.) You can use these values to test for specific types of failure. You can then set an action (ignore, bad, die, ok, done, reset, or an integer value) to have the stack take a particular action if the module returns the specified value. This type of configuration obviously creates the possibility of extreme complexity. If you need this level of complexity, you should consult the PAM man pages and other documentation. If you encounter rules in your default configuration that use this mechanism, you can try to ascertain their meaning to add to them, or you can replace them with a simpler mechanism derived from another distribution's settings or from some other source.
Choosing Modules
Some PAM modules ship with the main PAM package, and others ship with ancillary packages, such as LDAP software. Whatever the source of the modules, you can add them to your PAM stack to change how PAM operates. Table 10.3 summarizes some common PAM modules, but of course you may run across others as well. It's important to recognize that not all of the modules called in a PAM stack are intended to help with the stack's primary task. A module might be called to perform some ancillary task, such as display the message of the day (MOTD) on the terminal when a user logs in.
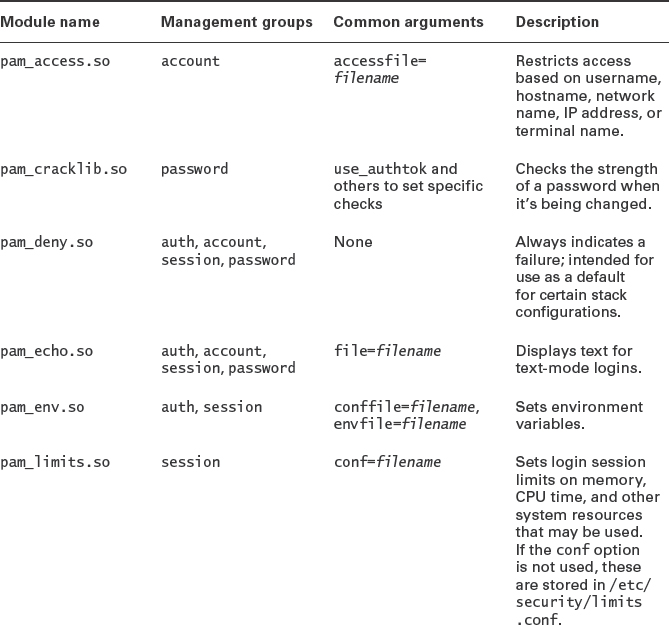


![]() Table 10.3 is far from complete, but it includes the most commonly used modules, along with several that are uncommon on standard installations but that are very useful. You can find information on more standard modules in the /usr/share/doc/pam-version/Linux-PAM_SAG.pdf file on most distributions, where version is the installed PAM version number. Additional modules are available in various software packages to add support for additional authentication tools, such as using an LDAP server for authentication.
Table 10.3 is far from complete, but it includes the most commonly used modules, along with several that are uncommon on standard installations but that are very useful. You can find information on more standard modules in the /usr/share/doc/pam-version/Linux-PAM_SAG.pdf file on most distributions, where version is the installed PAM version number. Additional modules are available in various software packages to add support for additional authentication tools, such as using an LDAP server for authentication.
Typically, changing a PAM stack entails selecting one or more modules you want to add to the existing configuration and adding a line referencing that module. In some cases, though, you may want to remove a module, change its order in the stack, or change its options.
Setting Options
Many options are unique to just one module. Others, though, are used by several modules. This is particularly true of a few options that influence how authentication modules share passwords among themselves or deal with unusual passwords. Table 10.4 summarizes some of these options.
TABLE 10.4 Options used by several modules
Examining Example Configurations
PAM provides multiple ways for a Linux distribution to authenticate users, change passwords, and so on. Thus, it shouldn't be surprising to learn that different Linux distributions use different—often radically different—default PAM configurations. This fact can make it difficult to provide advice about how to alter your configuration, since a change that works well for one distribution may ruin another one.
Most distributions today provide core stacks in files called common-type, system-type, or something similar, where type is a name for the stack type, such as auth or login. You can edit these files if you intend to alter the way PAM works for all the relevant services. For instance, if you want local text-mode console users, local GUI login users, remote SSH users, users of an IMAP server, and so on, to all use an altered authentication tool, you can edit the relevant common-type or system-type file. If, on the other hand, you want to target just a few login services, such as local text-mode and GUI logins, while omitting others, such as SSH users, you should edit the files that are specific to the services you want to modify.
Listing 10.1 presents a sample configuration, taken from the /etc/pam.d/system-auth file on a Gentoo Linux system. This example uses all four management groups, so it provides the core features required by all authentication operations—logging in, changing passwords, and so on. A console or XDM-based login will typically use the account, auth, and session stacks; a password-change operation will typically use the account, auth, and password stacks.
Listing 10.1: A sample PAM configuration file
auth required pam_env.so auth required pam_unix.so try_first_pass likeauth nullok account required pam_unix.so password required pam_cracklib.so difok=2 minlen=8 dcredit=2Consider authenticating a user for a login operation. This task requires using the auth stack, which in this example consists of two modules: pam_env.so and pam_unix.so. The first of these modules isn't very interesting; it merely sets environment variables and should not normally fail. The pam_unix.so module, however, includes a number of options, at least one of which (try_first_pass) may seem unnecessary; however, if you were to edit a file that calls this system-auth file and place a call to another authentication module before system-auth is included, try_first_pass could be useful.
Consider now the task of adding support for LDAP authentication, which uses the pam_ldap.so module. (This module is not a standard part of PAM but comes with various LDAP packages.) You would want to add a reference to pam_ldap.so to the same stacks that use pam_unix.so—that is, to all four of them. The location of this new reference is important, as noted earlier in “Setting Control Flags.” Because this example uses required control flags, one easy way to do the job is to add the pam_ldap.so module before the pam_unix.so and to give the new module a sufficient control flag. This configuration will work, but it will have a characteristic that might be undesirable: It will check with the LDAP server before trying to authenticate users against the local password database. This might increase the load on the LDAP server, and it will also mean that your root password will be delivered to the LDAP server with every root authentication attempt. If you want to authenticate against your own local files first, you should add the pam_ldap.so module after the pam_unix.so module. This configuration will, however, require additional changes. One way is to make the first module (now pam_unix.so) sufficient and make the second module (pam_ldap.so) required.
Consider an alternative to the auth stack from Listing 10.1, taken from a CentOS system:
auth         required       pam_env.so
auth         sufficient     pam_unix.so nullok try_first_pass
auth         requisite      pam_succeed_if.so uid >= 500 quiet
auth         required       pam_deny.so
In this example, the critical pam_unix.so module is sufficient, meaning that the stack ceases execution and succeeds if the user enters a correct password but continues execution and leaves the stack success indeterminate if the user fails to enter a correct password. This works, though, because the stack ends with pam_deny.so, which always fails—that is, if no other module has validated the user, the stack as a whole fails. Such a stack can be modified by adding another sufficient rule for any module you want to add.
Adjusting the Name Service Switch
Although PAM handles the bulk of authentication work, another system, the Name Service Switch (NSS), handles a related task: NSS provides system tools with lists of users and groups, maps user ID (UID) numbers to usernames, identifies users' home directories, and so on. If you add another authentication tool, such as LDAP, to your system, you must adjust the NSS configuration to use this tool. To do so, you must edit the /etc/nsswitch.conf file. This file should contain lines similar to the following:
passwd:        compat
group:         compat
shadow:        compat
Some distributions use files rather than compat, and other entries can also be present. To use a new tool, such as LDAP, you should add the correct code for it (such as ldap) after the existing entries:
passwd:        compat ldap
group:         compat ldap
shadow:        compat ldap
The order in which the entries appear controls the order in which the relevant subsystems are checked for data. Thus, placing ldap after compat or files ensures that local account definitions take precedence over those on the LDAP server. This can be important for accounts that should be defined locally, such as root; their local definitions should take precedence over definitions on a remote server.

Creating Good Passwords
Whether you use locally stored passwords or a network password server, creating good passwords is important. Surveys have shown that an astonishing number of people pick very poor passwords, such as their own usernames.
Unfortunately, good passwords tend to be hard to remember, since they resemble random sets of letters (in mixed case), numbers, and punctuation. One possible way to generate a good password that's easy to remember is as follows:
- Select two unrelated words, such as bun and pen, and combine them together (bunpen); or generate an acronym based on a phrase that's meaningful to you, such as yiwttd, for yesterday I went to the dentist. This is the base for the password. An acronym arguably makes a superior base, so long as it is not itself a dictionary word. (Of course, you should not use either bunpen or yiwttd as your base, since these are both published examples.)
- In the case of a base derived from two words, reverse the letter order of one of the words. This might produce bunnep as the word-derived base.
- Change the case of some of the letters. This might yield bUnNep or YiwTTd.
- Insert at least one digit and at least one punctuation symbol. This might produce bU4nN%ep or Y>iwT7Td. This is your final password.
A password generated in this way should be easy enough for the user who created it to remember while being far enough away from any real word or guessable string to foil most attempts to break it. Of course, you must relay this advice to your users, since in most environments users generate their own passwords!
Enabling TCP Wrappers
You can adjust your PAM configuration to change the way Linux authenticates users or to add various non-authentication restrictions on logins. Another approach to security is to block access to network servers based on port numbers and IP addresses. A common tool to perform such tasks is TCP Wrappers (aka tcpd, the software's filename; or implemented via the libwrap library). This software is often used in conjunction with the inetd super server; however, some software, such as the NFS server, can use TCP Wrappers directly.
If you recall the description of iptables in Chapter 7, you may be thinking that TCP Wrappers sounds like it fills the same role. In many ways, this is true, and in fact TCP Wrappers is less flexible than a packet-filter firewall in many respects. For example, TCP Wrappers can't block access to servers that aren't launched from a super server or that use TCP Wrappers more directly, and it can't intercept traffic targeted at or sent by clients. Nonetheless, TCP Wrappers can do a few things that packet-filter firewalls can't do, such as log and restrict access based on the remote user's username (if the remote system is running identd or an equivalent server). For these reasons and because system security is best implemented in layers, you may want to use TCP Wrappers instead of or in addition to iptables. The following pages describe the basic principles of TCP Wrappers, how to restrict access with TCP Wrappers, how to call TCP Wrappers, and similar functionality provided by the xinetd super server.
Understanding TCP Wrappers Principles
The most common use of TCP Wrappers is in conjunction with inetd, which is a super server. Like all super servers, inetd runs as a daemon and listens for connections to a potentially large number of ports. When a connection arrives, inetd performs some basic checks, launches the appropriate server, and hands the connection over to the target server. This configuration can save memory on computers that run a large number of seldom-used servers, and it also enables the servers to take advantage of the extra checks performed by the super server, including TCP Wrappers protections. Using a super server can slow down network connections, though; the extra checks and the need to launch the target server for each connection both add time to the initial server connection.
When using TCP Wrappers, inetd calls TCP Wrappers (via its tcpd executable) instead of the target server and passes tcpd the name of the ultimate server program, along with any parameters it needs. TCP Wrappers can then study the incoming connection and decide whether to accept it. If the connection is refused, TCP Wrappers doesn't even call the server; it just drops the connection. If TCP Wrappers accepts the connection, it launches the server and hands it the connection.
To configure TCP Wrappers, you provide criteria for accepting or rejecting connections in two files: /etc/hosts.allow and /etc/hosts.deny. The first of these files defines computers that should be granted access to the server; the second specifies clients that should not be allowed to connect. If a computer is listed in both files, hosts.allow takes precedence. If neither file lists a computer, TCP Wrappers allows it to connect.
![]() To run a system with the tightest possible TCP Wrappers security, include a line reading ALL : ALL in /etc/hosts.deny. This line blocks all incoming accesses handled by TCP Wrappers. You can then open individual servers for specific client systems in /etc/hosts.allow.
To run a system with the tightest possible TCP Wrappers security, include a line reading ALL : ALL in /etc/hosts.deny. This line blocks all incoming accesses handled by TCP Wrappers. You can then open individual servers for specific client systems in /etc/hosts.allow.
To use TCP Wrappers, you refer to a server by its filename, which may not be the same as its service name in /etc/services. For instance, an FTP server might be referred to as in.ftpd, vsftpd, proftpd, or various other names. When you use TCP Wrappers in conjunction with inetd, the server's filename appears immediately after the call to tcpd on the /etc/inetd.conf line for the server. Ordinarily, the server must reside somewhere on tcpd's path. If you need to include the complete path to the server in your /etc/inetd.conf file, TCP Wrappers' restrictions may not work correctly. If necessary, you can create a symbolic link from a directory on your path to the actual server executable.
Restricting Access with TCP Wrappers
The formats for both /etc/hosts.allow and /etc/hosts.deny are identical, although the same entry has opposite effects in the two control files. The general format for these entries is as follows:
service-names : client-list [: shell-command ]
The service-names may be one server name, such as in.ftpd or in.telnetd; or it may be several names, separated by commas or spaces. In either event, the name is the name of the server's process (as revealed by ps or similar tools), not its protocol name (as shown in /etc/services). You can also use the ALL keyword, which stands for all services. The optional shell-command is a command you can run when access is attempted. You can use this feature to mail a notification to an address, present a failure message on the port, or take some other action.
The client-list is potentially much more complex than the service-names. As with the service-names, the client-list may be a single entry or many entries separated by commas or spaces. You can specify clients in any of several different ways:
IP Address You can provide a single IP address, such as 172.24.45.102, to block or allow access from that IP address.
IP Address Range If you want to block or allow access by an entire network based on its IP address range, you can do so. The simplest approach is to provide a partial IP address (ending in a dot), such as 172.24.45., which matches all systems in the 172.24.45.0/24 subnet. You can also provide the complete network address and add the number of bits or a complete netmask after a slash, as in 172.24.45.0/24 or 172.24.45.0/255.255.255.0.
Hostname If you don't want to use IP addresses, you can block or authorize an individual computer by providing its hostname, as in trex.pangaea.edu. This approach is riskier than using an IP address, though, because it relies on a successful and accurate DNS lookup. If a cracker compromises your (or potentially even somebody else's) DNS server or if your DNS server goes down, the TCP Wrappers rules may not work as you expect.
![]() In the popular media, the term hacker is frequently applied to criminals who break into computers. This word has an older meaning, though: It refers to people who are skilled with computers, particularly at computer programming, and who use those skills for productive purposes. Many Linux programmers consider themselves hackers in this positive sense. Therefore, I use the term cracker to refer to computer criminals. In the context of computers, this term unambiguously refers to people who break into or otherwise disrupt computers and computer networks.
In the popular media, the term hacker is frequently applied to criminals who break into computers. This word has an older meaning, though: It refers to people who are skilled with computers, particularly at computer programming, and who use those skills for productive purposes. Many Linux programmers consider themselves hackers in this positive sense. Therefore, I use the term cracker to refer to computer criminals. In the context of computers, this term unambiguously refers to people who break into or otherwise disrupt computers and computer networks.
Domain Name To block or authorize access based on a domain name, you list the domain name preceded by a dot. For instance, .pangaea.edu blocks or authorizes all computers in the pangaea.edu domain. As with hostname authentication, this approach is dependent upon accurate and reliable DNS resolution.
NIS Netgroup Name If your network runs a Network Information Services (NIS) netgroup server, you can specify an NIS netgroup name by preceding it with an at sign (@). As with hostname and domain name specifications, this approach puts your system at the mercy of another system—in this case, the NIS server.
Wildcards You can use any of several wildcards that match particular groups of computers. Examples of wildcards include ALL (all computers), LOCAL (all computers whose hostnames resolve without dots—normally those on the same domain as the server), UNKNOWN (computers whose hostnames or IP addresses aren't known, or users whose names can't be verified via identd), KNOWN (hostnames whose hostnames and IP addresses are known, and users whose names are returned by a client's identd server), and PARANOID (systems whose hostnames and IP addresses don't match). All of these options except for ALL are somewhat risky because they depend upon proper DNS functioning.
Usernames You can match individual users by preceding a hostname or IP address by the username and an at sign (@), as in [email protected]. This feature requires that the client be running an identd (aka authd) server, and it relies on that server's veracity.
In addition to these rules, you can use the EXCEPT keyword to create a list with exceptions. For instance, 172.24.45.0/24 EXCEPT 172.24.45.72 excludes 172.24.45.72 from the client list.
As an example of several of these rules in operation, consider Listing 10.2, which shows a sample /etc/hosts.allow file. This file should be used in conjunction with a /etc/hosts.deny file that restricts access for some or all servers. If Listing 10.2 were used with an empty hosts.deny file, it would have no effect, because no systems would be denied access.
Listing 10.2: A sample /etc/hosts.allow file
in.telnetd : 172.24.45.2 trex.pangaea.edu
vsftpd : 172.24.45. EXCEPT 172.24.45.1
imapd : .pangaea.edu EXCEPT router.pangaea.edu
ipop3d : [email protected]
![]() Many inetd and TCP Wrappers examples use obscure older servers because the trend in recent years has been away from using these tools. For instance, modern Linux installations are likely to use OpenSSH (described in Chapter 7) rather than Telnet, since SSH is much more secure than Telnet. SSH servers are also usually launched directly rather than via a super server.
Many inetd and TCP Wrappers examples use obscure older servers because the trend in recent years has been away from using these tools. For instance, modern Linux installations are likely to use OpenSSH (described in Chapter 7) rather than Telnet, since SSH is much more secure than Telnet. SSH servers are also usually launched directly rather than via a super server.
If used in conjunction with a very restrictive /etc/hosts/deny file (say, one containing the line ALL : ALL), Listing 10.2 grants access to only four servers, and it allows only a few hosts to access those services:
Telnet The in.telnetd line tells the system to accept Telnet connections only from 172.24.45.2 and trex.pangaea.edu. Presumably, these are local hosts for which Telnet's risks are minor.
FTP The vsftpd line tells TCP Wrappers to accept FTP connections from every computer on the 172.24.45.0/24 network except for 172.24.45.1. Perhaps 172.24.45.1 is a router or some other host that should never need to use an FTP client.
IMAP The Internet Message Access Protocol (IMAP) is a mail retrieval protocol, and the imapd line restricts access to this protocol. All the computers in the pangaea.edu domain except for router.pangaea.edu may access this server.
POP The ipop3d line enables [email protected] to use the Post Office Protocol (POP) to retrieve email. Other users of that system and users of other systems (even sue on other systems) can't access the ipop3d server.
![]() Remember that TCP Wrappers protects only those servers that use its features. Many servers aren't launched through inetd and don't use TCP Wrappers.
Remember that TCP Wrappers protects only those servers that use its features. Many servers aren't launched through inetd and don't use TCP Wrappers.
TCP Wrappers provides more features than I can present here, and some of its features can have subtle effects. For this reason, you should thoroughly test any /etc/hosts.allow and /etc/hosts.deny files you create. If you have problems, type man 5 hosts_access to read the official documentation on the TCP Wrappers control file format.
Calling TCP Wrappers
Some programs use TCP Wrappers independently and usually automatically; however, in most cases it's called via the inetd super server. Most modern distributions, however, have switched to xinetd (see the upcoming section “Using Similar Functionality in Other Programs”), and you may not need a super server at all, since many modern servers work best when launched directly.
The inetd super server is configured via the /etc/inetd.conf file or by multiple files in the /etc/inetd.d directory. The configuration file format includes comment lines that begin with hash marks (#) and server definition lines that take the following form:
service-name socket-type protocol flags user server args
Each field is separated from its neighbors by spaces or tabs. The meanings of these fields are listed here:
service-name This field is the name of the protocol, as defined in /etc/services. For instance, ftp stands for an FTP server, and telnet is a Telnet server.
socket-type The socket type is normally either stream or dgram, although a few other options, such as raw, rdm, and seqpacket, are also possible. The appropriate value varies from one server to another, so consult the server's documentation to learn which you should use.
protocol Most servers use the tcp protocol, but a few servers use udp, and an even smaller number use other protocols. Servers that use the Remote Procedure Call (RPC) system to mediate connections specify a protocol of rpc/tcp or rpc/udp. In any event, the protocol must be listed in /etc/protocols. You should consult your server's documentation to learn which it uses.
flags You can pass a wait or nowait flag, which tells inetd whether the server is single-threaded or multithreaded, respectively. This option is relevant only for datagram (dgram socket type) servers; others use a nowait entry by convention. You can append a dot and a number to this entry to limit the number of instances of a server that inetd will allow to run at once. You can use this feature to limit the number of simultaneous connections your system will accept, thereby heading off potential CPU, memory, or network bandwidth use problems. If you omit the maximum connections number, it defaults to 40.
user This entry specifies the user under whose name the server is run. This value is frequently either root or nobody, but any user listed in /etc/passwd is valid. You can append a group name after a dot, as in ftp.servers to run the server as the ftp user in the servers group.
![]() Never run a server with higher privilege than is required. Doing so can pose a security risk in the event of a bug or sometimes even when a server is operating normally. The privileges a server requires vary from one server to another, so consult its documentation for details.
Never run a server with higher privilege than is required. Doing so can pose a security risk in the event of a bug or sometimes even when a server is operating normally. The privileges a server requires vary from one server to another, so consult its documentation for details.
server This field points to the server itself, such as /usr/sbin/vsftpd to launch vsftpd. The inetd server also supports a few protocols by itself. For these, the server field should read internal. If you use TCP Wrappers to launch a server, this field should read /usr/sbin/tcpd (of course, the path should be adjusted if tcpd resides somewhere else on your system).
args Many servers rely upon arguments passed to them on the command line. The final field is where you specify these arguments, separated by spaces, if necessary. If you launch a server via TCP Wrappers, the first argument is the name of the server you want to launch.
As an example, consider the following entry:
imap stream tcp nowait root /usr/sbin/tcpd imapd
This entry tells inetd to listen on the imap TCP port (143) and to launch imapd via TCP Wrappers whenever a connection appears. This server is run with root privileges because it's an Internet Message Access Protocol (IMAP) server, which requires root privileges to process logins from any user who wants to retrieve email via IMAP.
Many distributions that use inetd ship with many predefined entries for common servers; however, most of these entries are commented out by placing hash marks before each deactivated server. This practice ensures that a server won't be launched accidentally just because you've installed it; you must take active steps to activate the server by uncommenting the relevant line before it will work. Some protocols are represented by multiple entries, one for each server that can handle the protocol. If you want your system to use the protocol in question, you must decide which server to use and uncomment the correct inetd.conf entry. If you uncomment the wrong entry, the server won't respond. Some servers—particularly those that don't ship with a distribution—don't have default entries in inetd.conf. To use such a server, you must add the entry. The simplest way to do this is usually to copy a sample entry from the server's documentation. If the documentation doesn't provide such an entry, it may not have been designed to run from a super server, but you can try creating an entry by modifying another. You may have to guess at the socket-type, protocol, and flags fields, though.
Modern inetd installations typically use files in /etc/inetd.d instead of a single /etc/inetd.conf file. This configuration enables server packages to easily include a suitable configuration file. Other than the file location, the server configuration works the same in either case.
Changing the inetd.conf settings will not change the way your currently running inetd process responds to incoming requests. Restarting the computer will accomplish this change, but much simpler methods are to restart inetd or to pass the server a HUP signal. You can restart inetd by stopping it and starting it again via its own SysV or Upstart startup script or usually by passing the SysV script the restart option. For instance, you might type /etc/init.d/inetd restart. You can do this manually by using kill and then launching inetd manually, as well, but using the SysV startup scripts is better if your system uses them. This approach has a major drawback, though: It's likely to kill any open connections mediated by inetd. To avoid this problem, pass the HUP signal, as in killall -HUP inetd. Some distributions support a reload option to their inetd SysV startup scripts to accomplish this goal, as well. For instance, /etc/init.d/inetd reload will do the job on some systems.
If you implement changes to your inetd configuration and can't connect to the new server, check the system log files. You may find entries from inetd concerning an inability to find the program file, a socket already being open, or various other error conditions. Knowing what's causing a problem may suggest corrections, such as double-checking the filename in /etc/inetd.conf to correct a typo.
Using Similar Functionality in Other Programs
Although the LPIC-2 objectives mention inetd, most modern Linux distributions have abandoned this super server in favor of xinetd (pronounced “zi-net-dee”), which provides most of the features of inetd and TCP Wrappers in one program. The main xinetd configuration file is /etc/xinetd.conf. Most distributions use a minimal xinetd.conf file, though. This file sets only a few defaults and calls the files in /etc/xinetd.d to handle individual servers. A configuration that's equivalent to the one presented for an IMAP server in the previous “Calling TCP Wrappers” section is as follows:
service imap
{
    socket_type = stream
    protocol = tcp
    wait = no
    user = root
    server = /usr/sbin/imapd
    server_args =
    disable = no
}
This entry contains all the information present in the inetd configuration for the same server, except that it's split across multiple lines and each line is labeled. In practice, xinetd isn't very fussy about the order of these options, so you may see them in different orders. You may also see empty options, such as server_args in this example, omitted.
You can use assorted options to xinetd that aren't available in inetd. One of these options is disable, which takes a yes or no parameter. If this option is set to yes, xinetd ignores the server. You can use this feature to temporarily or permanently disable a server without uninstalling it. Many servers ship with a disable = yes entry so that you must explicitly enable the server before it will work.
![]() Some options, such as disable, can result in a “double negative” interpretation. For instance, disable = no means that the server is enabled; such settings can easily lead to confusion, so be alert!
Some options, such as disable, can result in a “double negative” interpretation. For instance, disable = no means that the server is enabled; such settings can easily lead to confusion, so be alert!
Many of the xinetd access control tools mirror those in TCP Wrappers, although xinetd uses different names. xinetd offers a few security options that TCP Wrappers doesn't offer. Broadly speaking, the xinetd options fall into several categories:
Host and Network Access Restrictions You can use the only_from and no_access options much as you would use entries in TCP Wrappers' /etc/hosts.allow and /etc/hosts.deny files, respectively. If you include an only_from line, though, all systems not explicitly listed are denied access. You can specify hosts by IP address, network address with or without netmask (as in 172.24.45.0 or 172.24.45.0/24), hostname, or a network name listed in /etc/networks. If you use a hostname, xinetd does a single hostname lookup whenever you start the server, so this option is likely to be unreliable if a client's IP address changes at all frequently. If a system matches both only_from and no_access lines, xinetd applies the rule associated with the more specific line. For instance, if only_from enables access from 172.24.45.0/24 and no_access denies access to 172.24.45.7, then 172.24.45.7 will not be able to access the system.
Interface Restrictions If your computer has multiple network interfaces, you can bind a server to just one of those interfaces with the bind or interface options, which are synonymous. These options take the IP address on the local computer associated with an interface as an option. For instance, bind = 172.24.45.7 ties the server to the interface with the 172.24.45.7 address. When you use this feature, xinetd doesn't even listen for connections on other interfaces, which can greatly enhance security; a miscreant can't take advantage of a bug, even in xinetd, if xinetd isn't listening on the interface the cracker is using.
Temporal Restrictions If you want a server to be available at some times of day but not others, you can configure temporal restrictions using the access_times feature. This keyword takes two times, separated by a dash (-), as an option. The times are specified in 24-hour format. For instance, access_times = 07:30-18:00 restricts the server's availability to between 7:30 A.M. and 6:00 P.M. This restriction applies to the original connection; users can continue using the server past the curfew period. For instance, if a user logs into a Telnet server that's restricted to 7:30 A.M. to 6:00 P.M. at 5:57 P.M., the person could remain connected well past 6:00 P.M.
Just as with inetd, you must tell xinetd to restart or reread its configuration file after making changes to that file. This is also necessary if you add a new configuration file to /etc/xinetd.d. You can use the same methods to restart xinetd or have it reread its configuration file that you can use with inetd. As with inetd, the method that's least likely to cause disruption is to pass the server a HUP signal, as in killall -HUP xinetd.
Dealing with Ports and Packets
Low-level network scanning and diagnostic tools can help you audit your own computers for potentially risky configurations and keep an eye on network traffic for suspicious patterns. Broadly speaking, two classes of tools are used for these tasks: port scanners and packet sniffers. Some tools, although not technically part of these categories, can fill a similar role and so are described here, as well.
![]() Port scanners and packet sniffers are both useful tools that can help you secure your network; however, in the wrong hands, they can also be tools used by crackers to help them break into computers. For this reason, many organizations have policies restricting their use. Before you use such tools, be sure to obtain written permission from a person who is authorized to do so. Performing port scans or monitoring packets without permission, even if your intentions are honorable, could result in your being fired or even dragged into court.
Port scanners and packet sniffers are both useful tools that can help you secure your network; however, in the wrong hands, they can also be tools used by crackers to help them break into computers. For this reason, many organizations have policies restricting their use. Before you use such tools, be sure to obtain written permission from a person who is authorized to do so. Performing port scans or monitoring packets without permission, even if your intentions are honorable, could result in your being fired or even dragged into court.
Scanning for and Dealing with Open Ports
It's easy to leave a server running unintentionally. This can happen because the server was installed automatically without your knowledge, accidentally, for temporary use and then forgotten, without authorization by a legitimate user or even by an intruder. Unknown servers can pose a serious security threat, since they can provide access to your computer that you don't know about. Using such a server, a cracker can break into your computer and wreak unknown degrees of havoc on the computer. Perhaps worse, the cracker may then be able to use your computer as a launch pad for attacks against other computers on your network or against other networks.
Chapter 5, “Networking Configuration,” describes several port scanning tools that you can use to audit individual computers or even an entire network. A few other programs are also useful in this regard. These programs are:
netstat This program enables you to scan your local computer for open ports. The --listening (-l) option performs this task and so is particularly useful in identifying open ports on your computer. You can also use netstat to identify the specific program that uses a port after an external port scan has located an open port on your computer.
Telnet The Linux Telnet protocol client, telnet, can be used for quick-and-dirty network analysis. Pass it a hostname and a port number, as in telnet web.example.com 80, and the program connects to the specified TCP port on the specified computer. You can use this functionality to verify that a server is running (it produces a connection refused error if there's no server available). If you understand the protocol in enough detail, you can even test it directly, rather than by using its usual client software. This feature can enable you to spot errors or security vulnerabilities that might be obfuscated by additional layers of code in typical client programs.
nc This program can send arbitrary data to other computers, monitor network ports, and more. It's a good tool if you want to write a custom script for performing specialized scans of your network on a regular basis.
Nmap You can use this program to scan arbitrary computers on the network for open ports. You can do the same with nc, but nc does very simple network tasks and is intended for use in scripts, whereas Nmap can perform a complete scan of one or more computers.
OpenVAS This program, based at http://www.openvas.org, is a network scanner that incorporates tests based on several open source tools. It includes both text-based and GUI front-ends, and it's designed as a way to quickly and efficiently scan an entire network of computers for vulnerabilities.
Chapter 5 describes the details of netstat, nc, and Nmap, and you can consult their man pages for more details. Broadly speaking, you may want to scan all the computers on your network for open ports from time to time. Scanning a new computer as soon as it's configured is also in order.
![]() Scan a computer using at least two tools. You may also want to perform scans from two locations, such as inside and outside of a firewall. Some configurations can leave ports open on some network interfaces or to some networks but not to others, so scans from different computers or using different tools can produce different results.
Scan a computer using at least two tools. You may also want to perform scans from two locations, such as inside and outside of a firewall. Some configurations can leave ports open on some network interfaces or to some networks but not to others, so scans from different computers or using different tools can produce different results.
If you find open ports, you can take one of several actions:
Leave It Open Some ports should be left open. This is true of the ports associated with server software, for instance. Sometimes a server should be available on some networks but not others, in which case some form of selective access should be implemented. Some settings for this in server programs leave the port open, but the server will deny access at a higher level.
Restrict Network Interface Access Some servers can be bound to one network interface but not another. This feature is particularly handy on routers and other computers with multiple network interfaces, but it can also be useful if a server must run for local access only—you can bind it to the localhost (127.0.0.1) address but not to your usual Ethernet or other network address.
Block the Port You can block access to the port in several different ways. If the server is launched via a super server (inetd or xinetd), you can use TCP Wrappers or xinetd access rules to do the job. In all cases, you can use iptables to block access to the port. This approach can be particularly helpful if the server must run for some clients but not for others—say, if it should be accessible to computers on your local network but not to systems on the Internet as a whole. Some port blocks can be implemented on the computer that runs the server, but others can be implemented on your network's router.
Redesign Your Network In some cases, you may want to redesign your network. You can put highly sensitive computers behind a dedicated router that includes specialized firewall rules to limit access to the sensitive computers. This approach can be effective, but implementing it can be a major undertaking.
Disable the Software If the port shouldn't be open on the computer at all, you may want to shut down the software that uses the port. You can do this by adjusting your SysV or Upstart startup script or by editing your inetd or xinetd configuration for the server. In many cases, if this approach makes sense, the next one makes even more sense.
Remove the Software You can use your computer's package management system to completely uninstall the software. This option makes sense if the server shouldn't be running on the computer at all and never should be.
Security is best implemented in layers. Thus, you may want to take two or more of these approaches when you locate an open port. For instance, you might remove the software, implement a local iptables rule to block access to the port, and implement a firewall rule on your router to restrict access to the port on the affected computer (and perhaps on other computers, depending on your needs). Creating several such restrictions makes it less likely that your computer will be compromised by a single configuration error. For instance, if you have a firewall in place blocking access to port 80, an accidental installation of a Web server that uses this port is unlikely to do any harm.
Monitoring Network Traffic
You can use a port scanner to check a network for vulnerability. Another road to improving security is to monitor your network for suspicious activity. A packet sniffer is one way to do this, and another is to use tools to monitor your log files for suspicious activity.
Using Snort
Chapter 5 described a couple of network packet monitoring programs, tcpdump and Wireshark. These programs enable you to examine network packets as they enter or leave your computer and sometimes as they pass between other computers on your network. Such monitoring tools can be useful for diagnosing network problems, and they can also be useful security tools—you can scan for suspicious packets and take appropriate action when such packets are detected.
Snort (http://www.snort.org) is another very powerful packet sniffer program. In addition to functioning as a generic packet sniffer, Snort can function in a more sophisticated role as an intrusion detection system (IDS). An IDS is a program that monitors network traffic for suspicious activity and alerts an appropriate administrator to warning signs. Put another way, an IDS is a packet sniffer with the ability to recognize activity patterns that indicate an attack is underway.
Installing Snort
The first step when it comes to installing Snort is deciding where to place it. Figure 10.1 shows a couple of possible locations. Snort System #1 in this figure is able to monitor traffic to or from the Internet at large, while Snort System #2 is able to monitor local traffic. Both have a chance of catching outside attacks against specific local computers, but System #1 will be sensitive to attacks that are blocked by the firewall, while System #2 will be sensitive to purely local attacks. Also, System #2 requires either a hub rather than a switch locally or a switch that's programmed to echo all traffic to Snort System #2; a switch without such configuration will hide most traffic between the local computers from the Snort system, rendering it useless.
FIGURE 10.1 A Snort system can be placed at any of several locations to monitor network activity

Most modern Linux distributions ship with Snort, so you should be able to install it in the usual way. Once installed, Snort is configured through the /etc/snort/snort.conf file. (Some distributions don't provide a file of this name but do provide a file called snort.conf.distrib or some other variant. You can copy or rename this file and use it as a template that you can modify.) A default snort.conf file may work acceptably, but you may want to customize several variables, such as $HOME_NET, $SMTP_SERVERS, and $HTTP_SERVERS. The first of these specifies the IP addresses to be monitored. Others define the IP addresses of particular types of servers. The default values tell Snort to monitor all IP addresses, which may be fine, since you may want Snort to watch all traffic on its local network, which is all it will ordinarily be able to see.
Some distributions place a series of supplementary Snort configuration files, with names that end in .rules, in the /etc/snort directory. These rule files define the sorts of packets that Snort should consider suspicious. Most protocols have a single .rules file, such as smtp.rules for SMTP packets. These .rules files are referenced via include directives in the main snort.conf file, so be sure your main snort.conf file loads the appropriate rules for your network. If you don't see a .rules file for a protocol you want to monitor, check http://www.snort.org/start/rules. This site can help you locate and install additional Snort .rules files.
Launching Snort
To launch Snort, type its command name: snort. The program runs and logs its output in files located in /var/log/snort. These log files record information on suspicious packets. You should be sure to monitor these log files on a regular basis. To launch Snort on a permanent basis, you can run it from a startup script. In fact, many distributions provide SysV or Upstart startup scripts to launch Snort.
![]() Snort doesn't need an IP address to monitor network traffic. Thus, you can configure a dedicated Snort system with network drivers but without an IP address and use it to monitor network traffic. This configuration makes the Snort monitor very resistant to external attacks, because an attacker can't directly address the system. On the downside, you must use the Snort system's own console or an RS-232 serial link to it to monitor its activities.
Snort doesn't need an IP address to monitor network traffic. Thus, you can configure a dedicated Snort system with network drivers but without an IP address and use it to monitor network traffic. This configuration makes the Snort monitor very resistant to external attacks, because an attacker can't directly address the system. On the downside, you must use the Snort system's own console or an RS-232 serial link to it to monitor its activities.
Checking for Intruders Using Fail2Ban
Sometimes a cracker will attempt to break into a computer by making repeated login attempts. The result will be a string of failure messages in the computer's log files. The Fail2Ban program (http://www.fail2ban.org) is a server that monitors your system's log files and, when it detects repeated failed login attempts from a particular IP address, modifies your computer's iptables firewall rules, TCP Wrappers rules, or other tool to block that IP address. This action denies the would-be intruder the opportunity to make more than a few guesses at your system's passwords.
Fail2Ban uses several configuration files in the /etc/fail2ban directory tree. The file you're most likely to modify is /etc/fail2ban/jail.conf. This file includes definitions for many common servers that the tool may monitor. Each definition begins with a name in square brackets, such as [ssh], which monitors for SSH login failures. (The section names are arbitrary and can vary from one distribution to another.) The jail.conf file begins with a section called [DEFAULT], which sets some global default values, such as the number of retries needed to trigger a ban (maxretry), the time period during which this number of retries must be attempted to trigger a ban (findtime), the number of seconds that a host is banned once the trigger condition is met (bantime), and the method used to ban the offending computer (banaction). You can override any of these defaults for specific servers.
You should peruse the jail.conf file to find configurations for the servers you want to monitor. For instance, suppose you want to block computers that attempt to crack your SSH server. You might want to modify the [ssh] section, which looks like this by default on an Ubuntu system:
Most of these lines are self-explanatory; this particular configuration is enabled, it monitors the ssh port (as defined in /etc/services), it monitors the /var/log/auth.log file for login failures, and up to six failures are tolerated before a ban is enacted. The filter line refers to a file in the /etc/fail2ban/filter.d directory with the specified name but with .conf appended (sshd.conf in this example). This file contains a series of regular expressions that describe login failures for the server in question.
Some distributions ship with Fail2Ban configurations that may require more adjustment. For instance, Gentoo's default jail.conf file includes an SSH configuration that's rougher than the Ubuntu configuration:
At a minimum, this configuration needs to be enabled, the email addresses need to be customized, and the log path needs to be updated (Gentoo logs SSH failures to /var/log/messages). This example also demonstrates one of Fail2Ban's features: It can send you an alerting email when a login failure occurs by using the sendmail-whois action. If you don't include an email notification action, you'll have to monitor the Fail2Ban log file (set in the /etc/fail2ban/fail2ban.conf file) if you want to know what IP addresses are being restricted by the software.
You may want to peruse the Fail2Ban Web site, particularly if you need to enable support for servers not included in the standard configuration. The site includes a wiki with user-submitted documentation and configurations, some of which might be helpful if you need to deviate from the configurations available in your standard installation.
Once everything is set up, you must launch Fail2Ban. If you installed it from a package provided by your distribution, chances are it comes with a SysV or Upstart startup script, so you can use that script in the usual way. If you installed the software from source code, you can start the program by typing fail2ban-client start at a shell prompt or by including that command in a local startup script. Be sure to check the Fail2Ban log file and test its operations to be sure it's working the way you expect.
Using Fail2Ban
This exercise demonstrates the use of Fail2Ban to quickly ban errant IP addresses from a computer. This exercise depends on the default configuration of your distribution's Fail2Ban package; you may need to make changes that go beyond those described here to make this exercise work. I've tested it on both Ubuntu and Fedora systems. You will need access to two computers to perform these steps; you'll configure one and use another as a stand-in for an attacker's computer.
To proceed, follow these steps:
- Log into the computer as root, use su to acquire root privileges, or be prepared to perform the following actions using sudo.
- If the computer does not already run an SSH server, install and configure it. (Chapter 7 describes SSH configuration.) Alternatively, you can use another protocol that requires authentication and that Fail2Ban can monitor, such as POP or IMAP (Chapter 9).
- Use your distribution's package management tools to install Fail2Ban. In most cases, the package name is fail2ban.
- Load the /etc/fail2ban/jail.conf file into a text editor.
- Search the jail.conf file for the string ssh. Your default file may include multiple SSH configurations that use different tools to ban SSH abusers. In Ubuntu, the [ssh] configuration is enabled by default; in Fedora, the [ssh-iptables] configuration is enabled by default. Both use iptables to block attackers. You can leave either configuration unchanged, although setting maxretry to a low value (such as 2) will simplify testing. On some distributions, you may need to adjust other values to make the configuration works as expected.
- Start or restart the Fail2Ban service. Typically, typing /etc/init.d/fail2ban restart will do this job.
- Log into your “attack” computer, which I'll refer to as attack. (I'll refer to your system running the SSH server as server.) The attack system can run Linux or any other OS, but it must have an SSH client installed on it.
- Using attack's SSH client, log into your regular account on server. Type your password correctly and verify that you can use the computer.
- Using another window or login session on attack, use its SSH client to attempt to log into your regular account on server, but this time deliberately mistype your password. On a typical configuration, the SSH server will give you three chances to type the password correctly. Depending on your SSH server's logging policies, these three chances may count as one or three of the Fail2Ban maxretry opportunities.
- Repeat step #9. Depending on the logging policies, you might or might not be able to connect to type your password. If you can connect, you should be banned once you complete the attempt, assuming you set maxretry to 2.
- Attempt to use the remote login you initiated in step #8. It should fail, since the login is from the same computer that initiated the failed login attempts; the iptables ban blocks all traffic from the attacking computer to the SSH port on server (and perhaps to other ports, as well).
- Using your console session on server, type iptables -L to view your iptables configuration. You should see a new chain named after your Fail2Ban SSH configuration. This chain should include a rule to restrict attack's access to the computer.
- Wait a while—to be precise, wait the number of seconds specified by the bantime option in jail.conf on server.
- Type iptables -L again. The rule banning attack should be missing, since Fail2Ban has removed it after the ban time is up.
- On attack, attempt once again to access server via SSH. You should be able to log in again.
At this point, you have the choice of leaving Fail2Ban running or uninstalling it. If you leave it running, you may want to adjust the maxretry setting if you changed it. You should also check the other protocols that are configured in the default jail.conf file; you might want to activate, deactivate, or adjust some of them. Remember to check whether the server runs automatically when you reboot; you may need to adjust its SysV startup script or Upstart configuration.
Keeping Up-to-Date with Security Issues
You should get into the habit of reviewing several security Web sites and other resources to learn about new threats:
CERT/CC The Computer Emergency Response Team Coordination Center (http://www.cert.org) hosts general security information, including information on the latest threats. Periodically reviewing this site will help you keep up-to-date with security developments.
US-CERT The United States Computer Emergency Readiness Team (http://www.us-cert.gov) has taken over some of the duties formerly held by CERT/CC. In practice, both sites are worth monitoring.
CIAC The Cyber Incident Advisory Capability (http://www.doecirc.energy.gov), run by the U.S. Department of Energy, is similar to CERT/CC and US-CERT in many respects, but its Web page gives greater emphasis to current threats and less coverage of general security practices.
CVE The Computer Vulnerabilities and Exposures (http://cve.mitre.org) site is dedicated to maintaining a dictionary of vulnerability names. This information can be useful in facilitating communication about problems. The CVE contains less in the way of descriptions of the vulnerabilities and exploits it names, though.
SecurityFocus and Bugtraq The SecurityFocus Web site (http://www.securityfocus.com) is yet another general security site. One of its important features is that it hosts the Bugtraq mailing list (http://www.securityfocus.com/archive/1), which can be a good way to keep informed—after you subscribe, alerts about new threats will be delivered to your email account soon after they're made public.
Linux Security The Linux Security site, http://www.linuxsecurity.com, is similar to CERT/CC, US-CERT, CIAC, and SecurityFocus in many ways. Linux Security, though, caters to Linux in particular and so may be more helpful in addressing Linux-specific issues or in pointing to Linux-specific fixes.
Distributions' Web Sites Most Linux distributions maintain security information on their Web sites. Go to your distribution's main page and look for links relating to security. These sites can provide specific upgrade instructions for your distribution in particular.
Product Web Pages and Mailing Lists Many programs have Web pages and mailing lists, which can be good resources for learning about security problems related to these programs. Of course, regularly perusing all of the pages related to the hundreds of programs that make up a Linux system can be a full-time job. You might want to keep an eye on the Web pages or mailing lists for any high-profile server programs that you run, such as the Apache Web server or the sendmail mail server.
Security Newsgroups Several Usenet newsgroups are devoted to security. Of particular interest are the groups in the comp.security hierarchy.
I recommend you investigate most or all of these resources and then keep up with a few of them. For instance, you might check the CERT/CC and Linux Security Web sites on a daily basis, subscribe to the Bugtraq mailing list, and check your distribution's security page on a weekly basis. Keeping up with security developments in this way will alert you to potential problems quickly—with any luck, quickly enough to avoid problems caused by crackers who might try to exploit weaknesses soon after they're discovered.
![]() Many of these resources offer RDF Site Summary (RSS) feeds of their content. This protocol enables you to use a news aggregator program, such as AmphetaDesk (http://www.disobey.com/amphetadesk/) or BlogBridge (http://www.blogbridge.com), to track security problems and learn about them as soon as possible.
Many of these resources offer RDF Site Summary (RSS) feeds of their content. This protocol enables you to use a news aggregator program, such as AmphetaDesk (http://www.disobey.com/amphetadesk/) or BlogBridge (http://www.blogbridge.com), to track security problems and learn about them as soon as possible.
If you learn of a security vulnerability, what should you do? As a general rule, you should patch any vulnerable software as soon as possible. Most Linux vendors release updated software quickly, so you should keep an eye on your distribution's Web site or use your package management system (Yum, APT, or anything else your distribution uses) to download and install an update. If you're not satisfied with the speed with which updates are made available, you can uninstall your distribution's package and install a patched version from the package's vendor, either by using a binary package (if one is available) or by installing from source (as described in Chapter 1, “System Startup and Advanced System Management”). In some cases, security problems can be worked around by making changes to configuration files, so you may want to do this, if possible, as a temporary measure (or even permanently, if the change isn't detrimental to your system's functioning).
In some cases, security problems don't directly affect you. They may relate to servers you don't run, server features you don't use, or configurations you don't use. For instance, one common class of security problem involves the ability of local users to acquire root privileges by feeding a local program bogus data. If you're the only local user of a computer, though, such vulnerability isn't likely to be a problem. Be sure you're the only local user, though; some servers give remote users the ability to run local programs (as in Web servers with dynamic content), so sometimes you're not quite as invulnerable as it might at first seem!
![]() Modern Linux distributions frequently include automatic or semi-automatic package update features. Although blindly accepting all updates can sometimes lead to problems if a new package introduces new bugs or breaks a configuration on your system, accepting updates will also fix known security vulnerabilities in the software you run. As a general rule, checking for and applying updates on a daily or weekly basis is a good idea. You should be alert to the possibility of breaking features on your computer, though. Note that some changes, particularly to the kernel, may cause problems that won't become apparent until you reboot the computer.
Modern Linux distributions frequently include automatic or semi-automatic package update features. Although blindly accepting all updates can sometimes lead to problems if a new package introduces new bugs or breaks a configuration on your system, accepting updates will also fix known security vulnerabilities in the software you run. As a general rule, checking for and applying updates on a daily or weekly basis is a good idea. You should be alert to the possibility of breaking features on your computer, though. Note that some changes, particularly to the kernel, may cause problems that won't become apparent until you reboot the computer.
Summary
Linux provides a flexible authentication and login system, PAM. A default configuration typically enables your computer to store account information, including usernames and passwords used for authentication, locally. You can modify your PAM configuration to add non-authentication features to a login process (such as restricting logins by time or location) or to add or change the default authentication mechanism (such as using an LDAP server to store account information). This ability can be used to create a more convenient network environment, to tweak login procedures, or to enhance security.
A computer that runs servers often needs to limit who may access those servers. This task is often done via iptables firewall rules, as described in Chapter 7; however, other tools can be employed to this end, as well. An example is TCP Wrappers, which can block access to specific servers based on the IP address, hostname, or similar features of the client. These blocks work at a higher level than do iptables blocks, which has both advantages and disadvantages—some blocks can work on features that are difficult or impossible to manage via iptables (such as restrictions based on the username on the client), but TCP Wrappers works only for programs that are designed to use it or that run via a super server, such as inetd.
You should think of security as an ongoing process, rather than as a feature to be configured and forgotten. Security tasks you should perform on a regular basis include scanning your computers for unnecessary servers, monitoring your network traffic for unauthorized access attempts, and keeping up-to-date with the latest security news. Those who want to break into your computers for the data they contain, to use them as bases for further attacks, or just to take a virtual “joyride,” are constantly updating their tools and methods. You must maintain constant vigilance to ensure that your computers remain uncompromised.
Exam Essentials
Describe how PAM enables a more flexible authentication system. Individual programs that must authenticate users use PAM to do so, which disentangles these programs from the details of authentication. Thus, if authentication details should be changed for a computer, you can alter the PAM configuration without making changes to individual programs. Depending on the PAM configuration, you may be able to change just one configuration file to alter the way many services authenticate users.
Summarize the important PAM configuration files. PAM uses a configuration file, /etc/pam.conf, or (more commonly) multiple files in the /etc/pam.d directory. In the latter case, most of the files configure servers or other login tools with similar names, such as gdm for the GDM GUI login server. Some files in /etc/pam.d, however, may be referred to by other files. These included files define stacks that are common to several services.
Distinguish between PAM and NSS. The Pluggable Authentication Modules (PAM) system is responsible for authenticating users, handling non-authentication access restrictions, managing login sessions, and changing passwords. The Name Service Switch (NSS), by contrast, manages the relationship between user IDs (UIDs) and usernames, keeps track of users' home directories, and performs other less security-related account tasks. Both systems must use the same account database in order for user accounts to work correctly.
Explain the purpose of TCP Wrappers. TCP Wrappers exists to protect servers from unauthorized or known bad sites and users. It can restrict access based on IP address, hostname, or related information (even including usernames in some cases). By placing these restrictions in the TCP Wrappers package, the code for simple servers can be kept simple; however, either the server must link to the TCP Wrappers library, libwrap, or the server must be run via a super server, such as inetd.
Describe why scans for open ports are important. Computers are dynamic systems; their configurations can change because of routine software updates, because of deliberate changes, or even because of accidental changes. Detecting changes that might pose security threats is therefore important. In the Linux world, one of the greatest security threats is a system that runs a server you don't know about, since it's hard to protect against threats posed by an unknown server. Thus, periodically scanning for open ports is an important system administration task.
Summarize some methods of detecting intrusion attempts. Intruders can be detected by monitoring network activity. One method of doing this is monitoring low-level network packets using a tool such as Snort, which can scan for suspicious network packets and alert you when it finds them. Another tool is Fail2Ban, which can check your log files for repeated login failures and then automatically block the offending IP address or notify you of the problem.
Summarize methods of keeping up-to-date with security matters. Several organizations, such as CERT/CC, CIAC, Security Focus, and Linux Security, run Web sites or mailing lists devoted to security issues. You can check these Web sites from time to time, subscribe to their mailing lists, or use RSS feeds to monitor the latest security developments. Distributions' and individual products' Web sites, as well as Usenet newsgroups, can also be valuable sources of security information.
Review Questions
- You're using an LDAP server for authentication, and you want to ensure that users have local home directories whenever they log into a computer. What line would you add to your PAM configuration to ensure that home directories are created, if necessary?
A account requisite pam_securetty.so umask=0022
B session required pam_unix.so skel=/etc/skel
C auth sufficient pam_deny.so skel=/etc/skel
D session required pam_mkhomedir.so skel=/etc/skel umask=0022
- What is the purpose of the pam_cracklib.so module?
A It identifies known crackers by their IP addresses as part of an account stack.
B It tests the strength of a password as part of a password stack.
C It presents humorous sayings to users as part of a session stack.
D It verifies that a user's account hasn't been cracked as part of an auth stack.
- The /etc/pam.d/login file includes the following auth stack. Which authentication system does the login tool use?
auth      required      pam_securetty.so
auth      include      system-login
A Standard Unix/Linux local accounts
B An LDAP server
C A Winbind server
D The correct answer cannot be determined from the provided information
- Where are user passwords normally stored on a Linux computer configured to use shadow passwords and pam_unix.so as the sole authentication method?
A /etc/shadow
B /var/shadow-pw
C /var/accounts/shadow/pass.db
D /etc/passwd
- What feature is present on each non-comment line of /etc/pam.conf that's not present in the files in the /etc/pam.d directory?
A A management group name
B A service name
C A control flag
D A module filename
- What file would you edit to ensure that Linux can map usernames to UID values when you reconfigure Linux to use a Windows domain controller for user authentication?
A /etc/nsswitch.conf
B /etc/passwd
C /etc/pam.d/winbind
D /etc/winbind/conf
- Your login server is using PAM and you want to limit users' access to system resources. Which configuration file will you need to edit?
A /etc/limits.conf
B /etc/pam/limits.conf
C /etc/security/limits.conf
D /etc/security/pam/limits.conf
- What is the purpose of the session PAM management group?
A It sets up the environment for a login session and cleans up when the user logs out.
B It performs authentication based on a username and password or perhaps some other criteria, such as a biometric scan.
C It validates or denies a login based on non-authentication data, such as an IP address.
D It changes the password when the user requests a password change.
- What can be said about how usernames are mapped to user IDs, based on the following lines from the NSS configuration file?
passwd:      compat ldap
shadow:      compat ldap
group:       compat ldap
A LDAP is called in compatibility mode.
B LDAP is used after local files.
C The computer uses LDAP accounts only.
D Nothing can be concluded from these lines alone.
- A server/computer combination appears in both hosts.allow and hosts.deny. What's the result of this configuration when TCP Wrappers runs?
A TCP Wrappers refuses to run and logs an error in /var/log/messages.
B The system's administrator is paged to decide whether to allow access.
C hosts.deny takes precedence; the client is denied access to the server.
D hosts.allow takes precedence; the client is granted access to the server.
- What utility do you call in /etc/inetd.conf to ensure that a server run via inetd uses TCP Wrappers?
A tcpd
B libwrap
C wrapd
D tcpwrap
- What is the best way to remain abreast of security developments?
A Read the CERT/CC website on a regular basis.
B Subscribe to and read the Bugtraq mailing list.
C Check your distribution's security Web page on a regular basis.
D All of the above.
- Which of the following tools is best suited for monitoring activity directed at multiple computers?
A netstat
B iptables
C Snort
D Fail2Ban
- How can the telnet program be a useful security tool? (Select all that apply.)
A You can use it to monitor network packets directed at a specific computer.
B You can use it to check for the presence of a server on a specific TCP port on a specific computer.
C You can issue protocol-specific commands to see how a server responds to them.
D You can use it to scan for TCP and UDP servers on a whole network's computers.
- A Snort IDS is located on a small network behind a network address translation (NAT) router, which is configured to pass no incoming connections to the protected network. This network uses a hub and has Samba, NFS, and SSH servers running on it. A Web server system is located outside the protected network, on the same exterior network as the NAT router. Which of the following describes the types of malicious attacks the Snort IDS might detect?
A It can detect attacks that originate on the local network and that are directed at the originating machines' loopback interfaces.
B It can detect attacks that originate from the Internet and that are directed at the Web server that runs alongside the NAT router.
C It can detect attacks that originate on the local network and that are directed to other computers on that network, to the Web server, or to the Internet at large.
D It can detect attacks that originate from the Internet and that are directed at the local Samba, NFS, or SSH servers.
- Which of the following programs uses local system calls to locate local ports that are currently open?
A netstat
B nmap
C nc
D nessus
- You've scanned your local network and discovered that your Web server computer has an open SSH port. This port is used only from the local network in order to update the Web server's files, but it's accessible to the Internet at large. Which of the following measures might you take to improve security while maintaining the utility of the SSH server on this computer? (Select all that apply.)
A Create iptables rules on the Web server computer to limit the IP addresses that can connect to the SSH port.
B Reconfigure the network to place the SSH server outside of a protective firewall, configuring that firewall to block all SSH traffic.
C Reconfigure the computer's SysV or Upstart startup scripts to keep the SSH server program from starting up unnecessarily on the Web server computer.
D Create iptables rules on the network's router to limit the IP addresses that can connect to the SSH port.
- Which of the following is a tool that's designed to monitor and restrict access to a single computer?
A Snort
B Fail2Ban
C Telnet
D BIND
- What is wrong with the following /etc/inetd.conf entry?
imap stream tcp nowait root /usr/sbin/tcpd
A It's missing a call to TCP Wrappers.
B It's missing a protocol name.
C It's missing the name of the server to be launched.
D Nothing is wrong with this entry.
- Which organization tracks known vulnerabilities in operating systems?
A FSF
B CERT
C OSI
D SourceForge
Answers to Review Questions
- D. The pam_mkhomedir.so module creates a home directory for the user if one doesn't already exist, and option D shows a valid configuration for its use, so this option is correct. The pam_securetty.so module is typically used to prevent direct root logins from anything but the console device, so option A is incorrect; pam_unix.so is the module for handling standard local Linux accounts, so option B is incorrect; and pam_deny.so always fails, giving a default-fail option for stacks that might otherwise produce ambiguous or successful results, so option C is incorrect.
- B. The pam_cracklib.so module does as option B specifies; it's intended to force users to enter good passwords when they change their passwords. Option A could be an imperfect description of the Fail2Ban program, but this program isn't part of PAM, much less the pam_cracklib.so module. Humorous sayings can be generated and displayed at login time by the fortune program, but not by the pam_cracklib.so module, so option C is incorrect. Although a tool to do as option D describes would be very useful, it would also be very difficult to write, and this option certainly does not describe pam_cracklib.so.
- D. The specified auth stack calls pam_securetty.so, which can restrict access based on the terminal used, and includes the contents of the system-login file. Thus, which authentication system (or systems) is used depends on the contents of that file, which the question does not present, making option D correct. Any, all, or none of options A, B, and C might be correct.
- A. The /etc/shadow file holds passwords on systems configured to use shadow passwords with pam_unix.so. Options B and C both describe fictitious files. The /etc/passwd file is real, and it holds account information but not actual passwords when shadow passwords are enabled (as they are by default with all modern Linux distributions).
- B. The /etc/pam.conf file can take the place of all the files in /etc/pam.d; but to do so, it needs a way to associate each stack with a particular service, so each /etc/pam.conf file entry begins with a service name, as option B specifies. Options A, C, and D all describe features that are present in entries for both /etc/pam.conf and the files in /etc/pam.d. (Options passed to the module may also appear in both file types.)
- A. The Name Service Switch (NSS) is responsible for mapping usernames to user ID (UID) values, and NSS's configuration file is /etc/nsswitch.conf. Thus, you would edit this file (making option A correct) to ensure that usernames and UID values are correctly linked when you change the authentication system. Ordinarily, this mapping appears in /etc/passwd, but since the question explicitly states that the computer has been reconfigured to use a Windows domain controller, option B is incorrect. The files in options C and D are both fictitious, although the name of the service that authenticates against Windows domain controllers is Winbind.
- C. The /etc/security/limits.conf file holds the configuration settings that will allow you to limit users' access, making option C correct. Options A, B, and D do not give the correct path to this file.
- A. Option A correctly describes the function of the session management group and so is correct. Options B, C, and D describe the functions of the auth, account, and password management groups, respectively, and so are incorrect answers.
- B. The order of entries in the NSS configuration file (/etc/nsswitch.conf) determines the order in which username/UID mappings are carried out. Since the compat entry typically refers to local account databases and ldap refers to an LDAP server, the effect is that the local account database will be consulted first, followed by an LDAP server, making option B correct. This configuration does not set a “compatibility mode” for LDAP access, contrary to option A. If option C were correct, there would be no compat entries on any of the lines; ldap would be used alone. Because option B is correct, option D cannot be correct.
- D. TCP Wrappers uses this feature to allow you to override broad denials by adding more specific explicit access permissions to hosts.allow, as when setting a default deny policy (ALL : ALL) in hosts.deny.
- A. You configure a super server to call tcpd, and you pass that program the name of the real server and its arguments to use TCP Wrappers via a super server. Thus, option A is correct. Some servers can use TCP Wrappers more directly, via the libwrap library; however, libwrap isn't referenced in /etc/inetd.conf, and you can't be sure that any given server uses it, making option B incorrect. Options C and D are both fictitious programs and so are incorrect.
- D. To obtain the best possible view of security developments, you should consult as many sources as possible. The CERT/CC website, the Bugtraq mailing list, and your distribution's security page are three good sources of information (but by no means the only three available). Consulting just one of these sources may not be adequate because an obscure issue that's important to you might escape notice on a single source.
- C. Snort is able to monitor network activity directed at multiple computers, given the appropriate network infrastructure, thus providing an early alert system for the network as a whole. The netstat utility can check for open ports on a single computer, but it can't monitor for attacks on multiple systems. The iptables utility implements Linux firewall rules, but it can't, by itself, monitor an entire network's activity. The Fail2Ban program monitors a server's log files for evidence of failed login attempts and can block the attacking system using iptables or other access restrictions, but this won't monitor an entire network for activity.
- B, C. Telnet was designed as a simple remote text-mode login protocol, but the telnet client can connect to any TCP port and so can be used to check for TCP servers, as option B suggests. If the protocol supports text-mode commands, you can also use telnet to issue these commands manually, as option C suggests. The telnet program can't monitor network packets in the way option A suggests; that task is better handled by a packet sniffer such as Snort. Because Telnet uses TCP rather than UDP, option D is incorrect. (Using telnet to scan more than a few ports would also be quite tedious.)
- C. Given the placement of the Snort system, it can monitor traffic on the local network. Since this network is well protected by the NAT router, outside attacks against the local Samba, NFS, and SSH servers are unlikely to reach the protected network, so such external attacks won't be detected. The types of local attacks described in option C could be detected, though. Local attacks against loopback interfaces will not reach the network wires and so will not be detected, either.
- A. Local open ports can be found with the netstat program, which uses local system calls to locate ports that are currently open. The nmap and nessus programs can locate open ports on the local computer or on other computers by sending network probes to all or a subset of the ports on the target computer. nc is a tool that can be used to create customized scripts for performing network security scans.
- A, D. The iptables rules described in options A and D can both limit who may access the SSH server. Properly implemented, either approach can be a useful security measure. (Ideally, you can implement both for added security.) Option B is the opposite of a useful security measure; placing the system inside a firewall can protect it from unwanted outside access, but option B will limit access to the computer from the legitimate users on the inside network. Option C will completely shut down the SSH server. Although this might be a useful security measure, it will make it difficult for legitimate users to update the server's Web site, which the question explicitly states must remain possible.
- B. Fail2Ban is a tool that's designed to monitor log files for evidence of intrusion attempts and restrict access to a single computer if such evidence is found, so option B is correct. Snort is able to monitor network activity directed at multiple computers; its purpose is broader than stated in the question, so option A is incorrect. Telnet is a remote login protocol, so option C is incorrect. BIND is used to provide name resolution, so option D is incorrect.
- C. The specified entry is missing the name of the server that should be launched; when tcpd is used, as in this example, the ultimate server name should appear after the call to tcpd. Thus, option C is correct. The tcpd binary is TCP Wrappers, so option A is incorrect. (TCP Wrappers use via inetd is also optional, so even if it had been missing, option A would be incorrect.) The protocol name appears in the first column of the entry, and it's present (imap), so option B is incorrect. Because option C was correct, option D cannot be correct.
- B. The Computer Emergency Response Team (CERT) tracks known vulnerabilities, so option B is correct. The Free Software Foundation (FSF), the Open Source Initiative (OSI), and the SourceForge Web site all contribute greatly to the Linux operating system but are not focused on vulnerabilities within the operating system, so options A, C, and D are all incorrect.