
Chapter 11
System Troubleshooting I: Boot and Kernel Problems
THE FOLLOWING LINUX PROFESSIONAL INSTITUTE OBJECTIVES ARE COVERED IN THIS CHAPTER:
- 213.1 Identifying boot stages and troubleshooting bootloaders (weight: 4)
- 213.2 General troubleshooting (weight: 5)
 Like all modern operating systems, Linux is complex, and complexity means that many things can go wrong. Therefore, it's imperative that you know how to track down the causes of problems and solve them. This chapter and the next one both cover troubleshooting. This chapter covers low-level issues relating to booting the system, the kernel, and hardware. The next chapter covers troubleshooting issues related to system resources and the user environment.
Your best tools when troubleshooting are attention to detail, the ability to reason about a problem, and a basic knowledge of the systems involved in the problem. It's often helpful to apply basic scientific principles to troubleshooting. Therefore, this chapter begins with a description of some general troubleshooting techniques that can work on a wide variety of problems. Because many problems require knowledge of specific systems, this chapter proceeds to cover some of them, beginning with problems relating to the boot loader and initial RAM disk. The latter part of this chapter describes a variety of miscellaneous problems, mostly related to the kernel and hardware.
Approaching a Problem
Troubleshooting is basically problem solving, and problem-solving skills you learn in contexts other than computers can be useful in locating and resolving computer difficulties. Several general-purpose strategies that are often helpful include:
Generate and Test Hypotheses It's often helpful to think about computer problems scientifically. Scientists generate hypotheses about the world and devise experiments to test them. Just so, you can generate a hypothesis about the cause of a problem and then test it. For instance, you might suspect that a server is running out of memory. If so, you can use tools such as free, ps, and top to monitor memory use or add swap space to the system. Sometimes a test also serves as a possible solution, such as replacing a bad cable or perhaps even increasing swap space. Other times, you might want to take some other step as a permanent solution, such as adding RAM to the computer.
Narrow the Problem Sometimes you can narrow the range of possible causes in a systematic way. Ideally, if you can eliminate half the possible causes, then half of those that remain, and so on, you'll find the solution quite quickly. In practice, of course, this approach might not work; it tends to work best when the possible causes have some clearly defined range, such as one unknown but misbehaving computer on a network—you can isolate groups of computers until you find the one computer that's causing problems.
Study the Documentation If you know the problem is with a particular piece of hardware or software, consult its documentation. Perhaps the problem is mentioned—or maybe you've misconfigured something and can learn that fact by reading the documentation.
Compare with Another System If possible, compare the problem behavior with a working system. This may not be possible if you're configuring a tool for the first time, but if you're having problems with one of several similar computers, comparing configuration files, log entries, and so on, can be a good way to identify the source of the problem.
Use Diagnostic Tools Many computer systems provide diagnostic tools, such as packet sniffers for network traffic and fsck for filesystem troubles. Using such tools can help you diagnose problems; however, you must be aware of the existence of these tools and know how to use them. Some programs have run-time options to increase the verbosity of their output or log file entries. Using such an option can be very helpful.
Use an Emergency System Even if your computer won't boot, you may be able to boot the computer with an emergency system. Linux distributions' installation discs often serve this purpose, or you can use a tool such as the System Rescue CD (http://www.sysresccd.org) or PartedMagic (http://partedmagic.com) to boot the computer enough to check filesystems, examine and change configuration files, and so on.
Consult Authorities If you know somebody with more skill than you in an area, consult that person. If you don't know such a person, you can try a book or an online search for information. Typing relevant keywords in a Web search engine is likely to produce useful results. Usenet newsgroups, Web forums, Internet Relay Chat (IRC) discussion groups, and other online resources can also be valuable sources of information.
These actions can help you solve many problems. As a general rule, thinking methodically and knowing as much as possible about the troubled subsystem are probably the best ways to fix the problem. Therefore, you should take a deep breath, restrain the urge to throw the recalcitrant computer off the roof of the nearest skyscraper, and read as much as you can. If necessary, set aside an hour or two just to read, thus expanding your knowledge base (and perhaps calming your nerves).
Troubleshooting Boot Problems
One of the most troubling classes of problems is boot problems. If your computer won't boot, you'll find it difficult to do anything with it. (This is where the advice to use an emergency disc can be so important.) Chapter 1, “System Startup and Advanced System Management,” describes the basics of boot loader configuration and use, so you may want to review that chapter before proceeding. Troubleshooting the boot process includes dealing with hardware initialization, identifying your boot loader, fixing boot loader problems, fixing problems with the initial RAM disk, and fixing problems that occur soon after the Linux kernel has taken over the computer.
Initializing Hardware
Before the boot loader begins its work, some hardware must be initialized. This process begins with the computer's firmware—the Basic Input/Output System (BIOS), the Extensible Firmware Interface (EFI), or other code that's built into the computer's motherboard. Typically, the firmware includes options to enable or disable hardware devices built into the motherboard. It may also include options that can affect how resources are allocated to specific devices—for instance, how interrupts are assigned to different devices.
If firmware options are set incorrectly, the result can be poor performance, unreliable operation, an inability to use some hardware devices, or a variety of other problems. If you suspect such problems, you may have to reboot and, at a critical point in the boot process (before the boot loader appears), press a special key, such as Delete or F10. An on-screen prompt may tell you what to press to enter the setup utility, but this prompt may appear and disappear so quickly you won't be able to read it. Consult your computer's or motherboard's documentation if you need help.
Once you're in the firmware's setup utility, you should be able to locate various performance options. Most utilities include an option to reset all the options to the default values. This can be a good place to start. You can also search for options relating to specific subsystems. If you're having disk problems, for instance, you can try changing options relating to the disk controller. General reliability problems can sometimes be fixed by adjusting CPU or memory features, but details are so system-specific that more precise advice is impossible to provide. Consulting online authorities, including Web forums and the manufacturer's help line, can be valuable if you have such problems.
Beyond the firmware, additional hardware initialization is performed by the kernel as it probes for specific devices. Some hardware drivers are built into the main kernel file, but others are loaded as modules. Sometimes it's necessary to pass options to the kernel or to modules to change the way the kernel probes for or initializes hardware. This topic is covered in Chapter 1 and Chapter 2, “Linux Kernel Configuration.”
Identifying Your Boot Loader
The first step to resolving boot loader problems is identifying your boot loader. Several boot loaders for the x86 and x86-64 platforms are common in the Linux world:
GRUB Legacy The Grand Unified Boot Loader (GRUB; http://www.gnu.org/software/grub/) was common from soon after 2000 through approximately 2010. It can directly boot Linux, FreeBSD, Solaris, and several other OS kernels on BIOS-based computers; and through the use of a chain loader, it can boot DOS, Windows, and most other OSs. The word Legacy has been added to its name to distinguish it from its successor.
GRUB 2 This boot loader is the successor to GRUB Legacy (http://www.gnu.org/software/grub/). Begun in 2008, some distributions began adopting it as the default boot loader in 2009 and 2010, so it's become fairly common, although it has not completely supplanted GRUB Legacy at press time. It can work with both BIOS and the EFI.
BURG The Brand-new Universal LoadeR from GRUB (BURG; https://launchpad.net/burg) is a variant of GRUB 2 that emphasizes graphical themes in the boot menu. It shares most of GRUB 2's features, including support for both BIOS and EFI systems.
LILO The Linux Loader (LILO; http://freshmeat.net/projects/lilo/) was the most common Linux boot loader prior to 2000. It's more primitive than GRUB Legacy, which can be both a plus and a minus. It can boot Linux kernels or, through a chain-loading mechanism, most other OSs, on BIOS-based computers.
ELILO This boot loader, based at http://sourceforge.net/projects/elilo/, is a LILO-like boot loader for EFI-based computers.
rEFIt This boot loader, based at http://refit.sourceforge.net, is a popular boot loader on computers that use EFI rather than the older BIOS firmware. In practice, rEFIt is usually paired with GRUB 2 or some other boot loader. It's most commonly used on computers that dual-boot Linux and Mac OS X.
loadlin You can boot Linux from DOS using this unusual boot loader, which you can obtain from http://youpibouh.thefreecat.org/loadlin/. In years past, loadlin was a popular way to launch Linux installers, but it has fallen into obscurity in recent years.
Syslinux This boot loader is actually a family of related boot loaders intended for specialized tasks, such as booting Linux from an optical disc (ISOLINUX), from certain Linux filesystems (EXTLINUX), from a network (PXELINUX), or from a FAT filesystem (SYSLINUX). It's most often used on Linux installation and emergency discs. You can read more at http://syslinux.zytor.com.
The DOS/Windows Boot Loader Out of the box, most computers use the standard DOS/Windows boot loader, which is very simple. This BIOS boot loader hands off control to a partition that's marked with a “boot” or “active” flag. This partition in turn must have its own boot loader installed in it. LILO and both versions of GRUB can install themselves in a Linux partition so that the DOS/Windows boot loader can chain-load to these Linux boot loaders.
EFI The EFI firmware includes its own boot loader; however, this boot loader, like the DOS/Windows boot loader, can't directly boot a Linux kernel. Thus, EFI systems still need a Linux-aware boot loader, such as GRUB 2 or ELILO, to boot Linux. The EFI boots the Linux-aware boot loader, which then boots Linux.
Third-Party Boot Loaders Many companies and individuals have released commercial and freeware boot loaders over the years. Most of these boot loaders can't boot Linux directly, but they can chain-load a Linux boot loader, such as LILO or GRUB.
![]() If your computer uses a CPU other than the popular x86 or x86-64 series, chances are it uses a boot loader not described here. (Some such computers use EFI, though, and so may use an EFI-capable boot loader from the preceding list.) Many Linux boot loaders for such platforms are modeled after LILO.
If your computer uses a CPU other than the popular x86 or x86-64 series, chances are it uses a boot loader not described here. (Some such computers use EFI, though, and so may use an EFI-capable boot loader from the preceding list.) Many Linux boot loaders for such platforms are modeled after LILO.
This list of boot loaders can be quite overwhelming if you're not familiar with the field. In practice, chances are your computer uses GRUB Legacy or GRUB 2, particularly if it's BIOS-based. If it uses the newer EFI, chances are your computer uses some combination of rEFIt, GRUB 2, and perhaps ELILO.
One way to identify your boot loader is to use the Boot Info Script (http://sourceforge.net/projects/bootinfoscript/). This script, which you can run from an emergency boot disc, scans your hard disk for boot loader signatures, partition information, and so on, and generates a report that it saves as RESULTS.txt. The boot loader is identified in the first few lines of this file:
========================== Boot Info Summary: ===========================
=> Grub 2 is installed in the MBR of /dev/sda and looks at sector 40 of the
   same hard drive for core.img, core.img is at this location on /dev/sda
   and looks for (UUID=1445adc8-3145-4fcb-86df-701f0f711943)/grub.
This example clearly identifies the boot loader as GRUB 2; it's installed in the Master Boot Record (MBR) of the first disk (/dev/sda), and subsequent lines of output identify where GRUB 2 looks for additional boot code (core.img, located at sector 40 in this example) and where the GRUB files are installed (the /grub directory on the partition that holds a filesystem with a Universally Unique ID [UUID] of 1445adc8-3145-4fcb-86df-701f0f711943).
![]() Although the Boot Info Script is not mentioned in the LPIC-2 objectives, this script is the single most useful diagnostic tool for identifying and resolving boot problems. In addition to locating the boot loader's main code locations and configuration files, the script identifies the filesystems in use on each of the computer's partitions, displays the partition tables on all the disks, summarizes the UUIDs of all the filesystems on the computer, displays the boot loader configuration file's contents, and displays the contents of /etc/fstab.
Although the Boot Info Script is not mentioned in the LPIC-2 objectives, this script is the single most useful diagnostic tool for identifying and resolving boot problems. In addition to locating the boot loader's main code locations and configuration files, the script identifies the filesystems in use on each of the computer's partitions, displays the partition tables on all the disks, summarizes the UUIDs of all the filesystems on the computer, displays the boot loader configuration file's contents, and displays the contents of /etc/fstab.
Locating Boot Loader Files and Code
On a properly functioning Linux system, the boot loader is installed in several different locations. Details vary depending on the boot loader, the partition table type, and even the boot loader options. Key locations on BIOS-based computers include the following:
MBR The MBR holds the first code executed from the hard disk in a normal disk-based boot of the computer. (It also holds the MBR partition table.) On most Linux systems, part of GRUB Legacy or GRUB 2 resides in the MBR; however, the MBR could contain LILO, a DOS/Windows boot loader, or some other boot loader. In most such cases, the boot loader will then load a Linux-capable boot loader from some other location.
Unallocated Post-MBR Sectors On most disks that are partitioned using the MBR system, the 62 sectors immediately following the MBR are officially unallocated. Boot loaders commonly make use of this space to hold extra code that won't fit in the MBR. This practice, however, can sometimes lead to problems, since some other utilities also try to use this space. If such a tool overwrites part of GRUB, your system will no longer boot. (The Boot Info Script can be very useful in identifying this problem; it will report that the boot loader is present in the MBR but that core.img isn't present where it should be.)
The BIOS Boot Partition This partition type is used by GRUB 2 on systems that use the new Globally Unique Identifier (GUID) Partition Table (GPT) system to hold extra boot code. Essentially, the BIOS Boot Partition replaces the unallocated post-MBR sectors just described. Because the BIOS Boot Partition is properly allocated in the partition table, this makes GPT safer from some types of damage than MBR—in theory. (In practice, other factors can level the playing field.) Although the presence of a BIOS Boot Partition on a GPT disk does not positively identify the disk as using GRUB 2, it's a good indication that somebody intended to use GRUB 2, or at least wanted to leave open the possibility of doing so. GNU Parted identifies this partition type with a bios_grub tag, whereas gdisk identifies it as having a type code of EF02. Consult http://grub.enbug.org/BIOS_Boot_Partition for more information on this partition type.
A Linux Partition's Boot Sector The first sector of a Linux partition can be used by a boot loader, much like the MBR of a disk. The boot loader in the MBR can then redirect the boot process to the Linux partition, even if the MBR-based boot loader is not capable of directly booting a Linux kernel.
Boot Support Files Boot code can reside in files that the boot loader reads at boot time. In some sense, the Linux kernel and initial RAM disk are examples of such files; however, the boot loader can store its own code in such files, as well. GRUB 2 is particularly dependent on such files, which it stores in /boot/grub (some distributions use /boot/grub2 instead).
Pre-installation Configuration Files LILO and GRUB 2 both rely on configuration files that are located in the /etc directory. For LILO, the relevant file is /etc/lilo.conf; for GRUB 2, the files reside in the /etc/grub.d directory. These files are not read when the boot loader boots the computer, but they are used to modify the boot loader installation by other utilities. The presence of these files can be a good clue that a computer uses a particular boot loader; however, it's possible for files to remain behind after a boot loader has been replaced by a new one.
Boot-Time Configuration Files Both GRUB Legacy and GRUB 2 rely on files in the Linux filesystem at boot time. For GRUB Legacy, these files are typically called /boot/grub/menu.lst or /boot/grub/grub.conf, depending on the distribution. For GRUB 2, the main file is usually called /boot/grub/grub.cfg, but some distributions place the file in /boot/grub2 rather than in /boot/grub. Additional files in /boot/grub support GRUB in both cases. As with the pre-installation configuration files, the presence of these files is indicative of the use of a particular boot loader, but this isn't certain.
Program Binaries Each boot loader includes binary program files that are used to install boot loader code to the MBR, the Linux boot partition, or other locations; or to adjust the ultimate boot configuration. For LILO, the key file is called lilo. For GRUB Legacy and GRUB 2, grub-install is the installation program file.
Thus, if you're not certain what boot loader your computer uses, you should search for the presence of certain files, as summarized in Table 11.1. Of course, the boot loader in operation is stored in the MBR, the Linux partition's boot sector, or some other partition on the disk. The most reliable way to identify actual boot code is to use the Boot Info Script.
TABLE 11.1 Boot loaders and their identifying configuration files
| Boot loader | Configuration files |
| LILO | /etc/lilo.conf |
| GRUB Legacy | /boot/grub/menu.lst or /boot/grub/grub.conf |
| GRUB 2 | /etc/grub.d directory; /boot/grub/grub.cfg or /boot/grub2/grub.cfg; possibly a BIOS Boot Partition on GPT disks |
If your computer uses EFI rather than a BIOS, details will vary from those described here. EFI-based computers that also use GRUB 2 use the same GRUB 2 configuration files as described for BIOS-based computers, but GRUB 2 places an EFI boot file on the EFI System Partition (ESP), which is a special partition used to store drivers, boot loader code, and similar low-level files. If you use rEFIt, ELILO, or some other EFI boot loader, you should consult its documentation to learn where it stores its files. The same advice applies if you use one of the less common or more specialized BIOS boot loaders.
The two most common Linux boot loaders today, GRUB Legacy and GRUB 2, both place files in /boot/grub. (For this reason, some distributions change GRUB 2's file location to /boot/grub2, so that both boot loaders can be installed simultaneously.) GRUB Legacy has relatively few files in that location, including its configuration file, a device.map file that maps Linux and GRUB device identifiers, and a variety of boot code files that include stage in their names. GRUB 2 places many more files in its version of /boot/grub. Most of these files have names that end in .mod; these are GRUB 2 modules—code that the boot loader can access only if required. Modules enable GRUB 2 to read filesystems, handle various types of video hardware, and so on.
The most common configuration involves a boot loader installed on a hard disk. Most removable disks, including Universal Serial Bus (USB) flash drives, work just like hard disks from a boot loader perspective. Floppy disks work slightly differently, but many boot loaders, including GRUB and LILO, can be installed on a floppy disk. Unlike hard disks, floppy disks aren't partitioned, so a floppy is more like a partition from a software perspective. Optical discs, as suggested earlier, are still more different. They typically use a software standard known as El Torito to define how they boot. ISOLINUX is the usual Linux boot loader for optical disks.
Interpreting Boot Loader Error Messages
Boot problems often create annoyingly cryptic error messages. This is because the boot loader, particularly in its early stages, must be unusually compact; there's just not much space in the code to store long error messages. Thus, interpreting boot loader error messages can be difficult. This task is different for LILO, GRUB Legacy, and GRUB 2.
![]() Sometimes you can work around boot loader problems by employing Super GRUB Disk (http://www.supergrubdisk.org), which is a bootable CD-R that looks for and uses an installation's GRUB configuration files. Versions are available for both GRUB Legacy and GRUB 2. Super GRUB Disk enables you to bypass problems with a damaged GRUB boot code installation, provided the system's GRUB configuration file is intact and correct. Once you've booted the system, you can re-install GRUB by using grub-install.
Sometimes you can work around boot loader problems by employing Super GRUB Disk (http://www.supergrubdisk.org), which is a bootable CD-R that looks for and uses an installation's GRUB configuration files. Versions are available for both GRUB Legacy and GRUB 2. Super GRUB Disk enables you to bypass problems with a damaged GRUB boot code installation, provided the system's GRUB configuration file is intact and correct. Once you've booted the system, you can re-install GRUB by using grub-install.
Interpreting LILO Error Messages
As it's starting up, LILO displays its name on the screen. If it encounters an error, it alters this display to include an error code of some type. The end result is part of the string LILO, sometimes with an error code appended. Table 11.2 summarizes the common LILO error codes.
LILO is fairly simple; although it enables you to launch an OS or Linux kernel by typing its name or selecting it from a list, it offers little in the way of interactive debugging facilities. If LILO won't boot your computer because of a misconfiguration in /etc/lilo.conf, you have little choice but to boot an emergency disc, edit the configuration file, and re-install LILO to the MBR or the Linux boot partition.
![]() If you need to change your /etc/lilo.conf file, be sure to type lilo as root after you're done. LILO can't read its configuration file at boot time; instead, it relies on the Linux lilo command to interpret the configuration file and store critical features in a more compact form inside the LILO code that's read at boot time. In fact, because typing lilo as root re-installs the LILO boot code, this command will overcome a variety of LILO problems.
If you need to change your /etc/lilo.conf file, be sure to type lilo as root after you're done. LILO can't read its configuration file at boot time; instead, it relies on the Linux lilo command to interpret the configuration file and store critical features in a more compact form inside the LILO code that's read at boot time. In fact, because typing lilo as root re-installs the LILO boot code, this command will overcome a variety of LILO problems.
Interpreting GRUB Legacy Error Messages
GRUB Legacy runs in three stages, known as Stage 1, Stage 1.5, and Stage 2. Stage 1 is the first part of the GRUB Legacy boot process (typically installed in the MBR), Stage 1.5 code resides after the MBR on the disk, and Stage 2 code is loaded from files on the boot partition. Each stage has its own error messages. Table 11.3 summarizes the Stage 1 error messages.
TABLE 11.3 GRUB Stage 1 error messages

Stage 1 errors tend to be very serious. If GRUB Legacy can't determine the disk's geometry, it could be that you need to adjust the BIOS settings for the hard disk. A read error could indicate a failing hard disk or a need to adjust BIOS settings for the hard disk. A geometry error is rare with modern hardware. With older hardware, you may need to adjust your partitions and re-install Linux. Create a separate /boot partition as early on the disk as you can; this will ensure that the kernel, the initial RAM disk, and all of GRUB's boot-time configuration files fall under whatever limit the old BIOS imposes. (BIOS limits on hard disk size have varied over the years, but 504 MiB and a bit under 8 GiB are two limits from years past.)
Stage 1.5 error messages take the form Error num, where num is a number that corresponds to a Stage 2 error. A total of 34 Stage 2 errors are documented in the GRUB Legacy documentation (http://www.gnu.org/software/grub/manual/legacy/Stage2-errors.html). Each includes a description, such as Invalid device requested. Consult the GRUB Legacy documentation if you need to interpret these errors, which are numerous.
Interpreting GRUB 2 Error Messages
If GRUB 2 is badly misconfigured, you're likely to end up seeing the GRUB rescue shell:
grub>
This happens when GRUB can't locate the /boot/grub/grub.cfg file on your hard disk. The usual cause is that GRUB's internal prefix environment variable, which holds the location of the directory in which that file is found, is set incorrectly. You can use the ls command to locate the correct location and set the prefix environment variable. To begin, you should probably use ls alone to view the available partitions and then look inside them until you find the Linux root (/) or /boot partition:
grub> ls
(hd0) (hd0,gpt5) (hd0,gpt4) (hd0,gpt3) (hd0,gpt2) (hd0,gpt1)
grub> ls (hd0,gpt5)/
abi-2.6.31-22-generic grub/ initrd.img-2.6.31-22-generic
memtest86+.bin System.map-2.6.31-22-generic vmcoreinfo-2.6.31-22-generic
vmlinuz-2.6.31-22-generic
![]() Under recent versions of GRUB 2, partitions may be identified by disk device and number alone, as in (hd0,5), or with a code for the partition table type prepended to the partition number, as in (hd0,gpt5) or (hd0,mbr5). The latter format removes ambiguity in case a disk has one partition table embedded within another or used side by side.
Under recent versions of GRUB 2, partitions may be identified by disk device and number alone, as in (hd0,5), or with a code for the partition table type prepended to the partition number, as in (hd0,gpt5) or (hd0,mbr5). The latter format removes ambiguity in case a disk has one partition table embedded within another or used side by side.
To see into a partition, you must pass a trailing slash (/) after its identifier, as in (hd0,gpt5)/; omitting the slash displays information on the filesystem used on the partition. This example shows a discovery of the contents of a separate /boot partition on the first try. (If the /boot directory is on the root partition, then you'd want to locate the root partition and include the path to GRUB 2's directory from there in the following commands.) With the /boot directory, and therefore /boot/grub, discovered, you can set the prefix and root variables to point to the GRUB directory and the partition on which it resides, respectively:
grub> set prefix=(hd0,gpt5)/grub
grub> set root=(hd0,gpt5)
To obtain a menu, you must then load the normal module and run it:
grub> insmod normal
grub> normal
With any luck, you'll now see a normal GRUB 2 menu. This effect will not be permanent, though; to get GRUB 2 working without such interventions in the future, you'll need to re-install it, typically by typing grub-install /dev/device as root (where /dev/device is the disk's Linux device filename) once the computer has booted normally.
Less serious problems typically involve the ability to boot a single kernel or OS. Typically, GRUB 2 presents an error message about the type of error it encounters, such as a missing file. If an error is simple enough, you may be able to overcome it by selecting the kernel or OS in the GRUB 2 menu and pressing the E key to edit the entry. You can then follow the on-screen prompts and use GRUB 2's built-in text editor to make temporary changes to the configuration. (Chapter 1 describes this process in detail.)
Dealing with Initial RAM Disk Issues
As described in Chapter 1 and Chapter 2, modern Linux systems frequently use an initial RAM disk (aka an initrd or initramfs). An initial RAM disk is used in conjunction with the kernel to provide a handful of critical system utilities and kernel modules, enabling the kernel to do things that it ordinarily can't do without access to the hard disk. For instance, the kernel can load modules to handle particular hard disks. If you compile your own kernel, as described in Chapter 2, you can include such modules in the kernel itself, so you may not need an initial RAM disk; however, sometimes you need an initial RAM disk to activate particular features, such as logical volume manager (LVM) support. Initial RAM disks are also used by most distributions so that a single kernel can support a wide variety of hardware.
One drawback to initial RAM disks is that they can sometimes complicate the boot process. As described in Chapter 1, your boot loader configuration must reference the initial RAM disk file. The boot loader then loads both the kernel and the initial RAM disk into memory and runs the kernel, giving it the location of the initial RAM disk in memory. This process can go wrong in many different ways—the boot loader might be unable to locate the initial RAM disk file, the file format might be incorrect, the file might be damaged, the file might be for the wrong kernel, the RAM disk file might be missing some critical feature, and so on.
Some of these problems will result in errors at the boot loader stage. For instance, you might see a “file not found” error, either stated plainly or in the form of a cryptic error number. If this happens, you should check your boot loader configuration to verify that the initial RAM disk's filename is entered correctly. (These filenames are often long and filled with numbers and codes, so they're easy to mistype!) Basically, such problems can be treated like other boot loader issues, as described earlier.
If the boot loader can load the kernel and the initial RAM disk, the boot process will proceed. In a conventional configuration, you'll see a series of messages, which you can later review with dmesg, relating to the kernel's detection of hardware and so on. You may think you're free and clear, but if the initial RAM disk is damaged or is for a different kernel or distribution than you're using, the process is likely to come to an abrupt halt with an error message. Frequently, the complaint will be that the kernel was unable to access the root device. If this happens after you've installed a new kernel, your best bet is to reboot using an older kernel, review the steps you used to create the initial RAM disk, and create a new one. You may need to add options to the mkinitrd or mkinitramfs utility to have it include modules that are being mistakenly omitted.
![]() Many modern Linux distributions switch to a graphical display very early in the boot process. This display is less intimidating to new users than is a traditional display filled with a stream of initialization messages, but it's less informative in case of errors. You can usually switch from the graphical display to a text-mode display by pressing a key or clicking a button with your mouse. Examine the graphical display for a prompt about this. Changing the kernel options in the boot loader can also disable this graphical splash screen, as it's called. Removing the splash option is one way to do this.
Many modern Linux distributions switch to a graphical display very early in the boot process. This display is less intimidating to new users than is a traditional display filled with a stream of initialization messages, but it's less informative in case of errors. You can usually switch from the graphical display to a text-mode display by pressing a key or clicking a button with your mouse. Examine the graphical display for a prompt about this. Changing the kernel options in the boot loader can also disable this graphical splash screen, as it's called. Removing the splash option is one way to do this.
If the problem is with an initial RAM disk provided with your distribution, you may have more difficulty. If you can boot using an older kernel, you may need to use it to build your own kernel. If not, you may be able to locate boot loader options or an alternative kernel built by a third party that will work.
Problems with initial RAM disks can sometimes result from using a kernel that's too old on very new hardware. The latest hardware may simply not be supported by older kernels. Thus, you may need to try a newer distribution if you're having problems with a very new computer.
Fixing Problems Early in the OS Boot Stage
If the boot loader correctly loads the kernel and initial RAM disk and if the kernel can use the initial RAM disk to locate the Linux root filesystem, the kernel will then begin the normal system initialization process, as described in Chapter 1. As described in that chapter, most Linux distributions use the SysV or Upstart startup system. The former is controlled through files in /etc/init.d or /etc/rc.d/init.d and links to those files in various runlevel-specific directories, such as /etc/rc?.d, where ? is a runlevel number. Upstart is controlled through boot configuration files in /etc/init.
Whatever the details, once the initialization scripts begin working, boot problems that completely derail the boot process are unlikely to occur. Instead, problems at this stage are more likely to involve specific programs, such as your Web server or GUI login program. Typically, when this happens, you'll see a message that a service is being started, along with a note on the right side of the screen, often in red, that this attempt failed, as follows:
Starting Apache… [ FAILED ]
Such problems are best dealt with by debugging the specific subsystem in question; problems with Apache will necessarily be handled very differently from problems with Samba, for example. Some of the general-purpose debugging advice in this chapter can apply to many of these problems, though. Checking log files is usually a good course of action, for instance.
Troubleshooting Miscellaneous Problems
The rest of this chapter is devoted to a variety of troubleshooting techniques: interpreting boot-time messages, checking kernel ring buffer information, identifying hardware, resolving kernel module issues, interpreting log files, and using utilities that help you trace software issues.
Interpreting Boot-Time Displays
If your computer isn't configured to display a graphic at boot time, it should display a series of messages as it boots. Most of these messages fall into two broad categories:
Kernel Messages Early in the boot process, the messages you see originate with the kernel; they relate information about the hardware the kernel detects, the partitions detected on the hard disk, and so on. These messages are stored in the kernel ring buffer, which you can study in more detail after the system has completely booted, as described in the upcoming section “Checking the Kernel Ring Buffer.”
Startup Script Messages Once the kernel has fully initialized the computer's hardware, SysV or Upstart startup scripts display messages about various non-kernel programs being started. As noted earlier, in “Fixing Problems Early in the OS Boot Stage,” these startup scripts typically specify whether each system has started or not by displaying a success or failure message on the right side of the screen. These messages are usually color coded—white or green for success, red for failure. Thus, you can keep an eye on the right side of the screen and watch for red during the boot process. If you spot a red status indicator, note the message associated with it, and investigate it once the computer has booted.
Boot-time messages typically scroll by so quickly that they're hard to read. You might luck out and notice something important; or in the case of startup script messages, you can watch for the failure indications and, with luck, read the name of the subsystem that didn't start correctly before it scrolls off the screen. Sometimes typing Shift+Page Up enables you to read a message that's scrolled off the screen. You can check the kernel ring buffer after the computer has booted, but startup script messages aren't normally logged in any one location. Individual servers and subsystems may log information, as described in “Checking Log Files,” but you may need to check many log files and wade through a great deal of irrelevant information if you want to verify that every server has started correctly.
Checking the Kernel Ring Buffer
You can display the entire contents of the kernel ring buffer by typing dmesg; however, this command's output is likely to be copious, so you may want to pipe it through less (dmesg | less) or redirect it to a file (dmesg > file.txt) and then read the file in a text editor. You should also be aware that the kernel ring buffer's size is limited. As the computer runs, the kernel generates new messages that are stored in the ring buffer, so the oldest messages will eventually be lost. Because the earliest messages from when the computer boots are often important, some distributions' startup scripts create a copy of the kernel ring buffer from just after the computer boots, typically in /var/log/dmesg or /var/log/boot.log.
Although messages in the kernel ring buffer all originate with the kernel, the wide variety of drivers and other kernel features that can generate these messages means that interpreting these messages often requires knowledge of the specific kernel features in question. The following pages describe some of the major types of information you can find in the kernel ring buffer.
Identifying the Kernel
If you read the kernel ring buffer early enough, it will begin with an identification of the kernel:
The number in brackets at the start of these lines is a time code. Not all kernels are configured to generate these timestamps, though, so you might find they're missing. The remaining information on the first line is similar to that produced by the uname command; it includes the kernel version number, the user and computer that compiled the kernel, the compiler that was used, important kernel options, and the date and time the kernel was compiled. The second line identifies the kernel filename and the options passed to the kernel by the boot loader. All of this information can be important in verifying that you're using the correct kernel and that the boot loader has passed it the correct options.
Describing the CPU
Following the kernel identification, you'll see a large number of lines that relate various technical details about how the kernel is using memory. Most of this information is useful only to kernel experts, but if you notice something suspicious, by all means investigate it. Eventually you'll reach a couple of lines that classify your CPU's speed:
The first of these lines identifies the clock speed of the CPU (2.8 GHz in this example). If this information is incorrect, then something very strange is happening—perhaps your CPU is so new or exotic that the kernel isn't handling it correctly, or maybe your motherboard is misconfigured to run the CPU at the wrong speed. The second line is sometimes misinterpreted or given too much weight. In computing, a common measure of computational speed is millions of instructions per second (MIPS), so some people try to measure hardware speed by the BogoMIPS measure found in the kernel ring buffer. The term BogoMIPS, however, means bogus MIPS—in other words, it's not a reliable measure of speed across CPUs. It's computed by the kernel for its own internal use and should not be used to compare different computers.
A bit further on, you'll find a few more CPU-related lines:
[ 0.018524] CPU0: AMD Athlon(tm) 64 X2 Dual Core Processor 5400+ stepping 02
[ 0.021004] MCE: In-kernel MCE   decoding enabled.
[ 0.024018] Booting Node   0,   Processors  #1
[ 0.095029] Brought up 2 CPUs
[ 0.095097] Total of 2 processors activated (11200.84 BogoMIPS).
These lines identify the brand and model of CPU. In this case, they indicate that the computer has two CPUs (in fact, as is more common today, it's a single dual-core CPU). If the kernel ring buffer indicates that fewer CPUs or cores are available than you believe are present in your computer, then you should investigate further. Perhaps your kernel lacks support for multiple cores (it's a compile-time feature, so you may need to recompile the kernel), or perhaps you're mistaken about your CPU's capabilities.
Identifying Computer Busses
Further on in the output, you'll see a great deal of technical information about the computer's busses—mostly the Peripheral Component Interconnect (PCI) bus for modern computers. These lines look like this:
[ 0.134046] pci 0000:03:05.0: reg 10: [mem 0xfd000000-0xfdffffff]
[ 0.134150] pci 0000:03:05.2: reg 10: [mem 0xfc110000-0xfcffffff]
[ 0.134254] pci 0000:03:06.0: reg 10: [mem 0xfebff000-0xfebfffff]
[ 0.134262] pci 0000:03:06.0: reg 14: [io 0xe800-0xe83f]
[ 0.134270] pci 0000:03:06.0: reg 18: [mem 0xfea00000-0xfeafffff]
[ 0.134297] pci 0000:03:06.0: reg 30: [mem 0xfe900000-0xfe9fffff pref]
[ 0.134321] pci 0000:03:06.0: supports D1 D2
[ 0.134323] pci 0000:03:06.0: PME# supported from D0 D1 D2 D3hot D3cold
[ 0.134328] pci 0000:03:06.0: PME# disabled
These lines can be useful in diagnosing certain types of hardware problems; however, much of the data can be obtained more conveniently using utilities such as lspci (described later in “Identifying Hardware”).
Identifying Hardware Subsystems
A bit later, you'll begin to see messages about certain subsystems and driver sets:
[ 0.143146] SCSI subsystem initialized
[ 0.143146] libata version 3.00 loaded.
[ 0.143146] Advanced Linux Sound Architecture Driver Version 1.0.23.
Small Computer Systems Interface (SCSI) is a disk interface method. SCSI is rare on modern computers, but as described in Chapter 4, “Advanced Disk Management,” Linux has been relying more and more upon its SCSI subsystem to handle other disk types, including the Serial Advanced Technology Interface (SATA) disks that are today's most common disk type. The libata subsystem helps with this coordination. The Advanced Linux Sound Architecture (ALSA) driver is the core of the modern Linux sound handling system. Chances are your computer will use the SCSI subsystem, and if this subsystem is absent and you have problems booting or using certain disks, this may be why. You may need to recompile your kernel or load suitable modules to get it to work. Sound functionality is usually much less critical, of course, but you can look for evidence of such drivers (or the lack of such evidence) if you have problems with particular subsystems.
Another important subsystem is networking, which is likely to generate its own messages:
Additional messages along these lines indicate that the kernel is initializing itself to use the Transmission Control Protocol (TCP). Similar messages are likely to be present for the User Datagram Protocol (UDP) and other network protocols. If such messages are absent, this indicates a lack of network support in your kernel; you may need to load a kernel module or recompile your kernel before networking will function.
Identifying Specific Hardware Devices
The kernel probes several critical hardware devices. These entries are likely to be scattered about, but I show several examples here as a group:
[ 3.443278]  floppy0: no  floppy controllers found
[ 3.445717]  PNP  :PS/2 Controller [PNP0303:PS2K,PNP0f03:PS2M]
at 0x60,0x64 irq 1,12
[ 3.446197]   serio: i8042 KBD port at 0x60,0x64 irq 1
[ 3.446236]   serio: i8042 AUX port at 0x60,0x64 irq 12
[ 3.446484]   mice: PS/2 mouse device common for all mice
[ 3.503526]   input: AT Translated Set 2 keyboard as
/devices/platform/i8042/serio0/input/input0
[ 3.654551] ata1: SATA max UDMA/133 abar m1024@0xfbcff800 port
0xfbcff900 irq 22
[ 4.269230] ata1.00: ATAPI: ASUS DRW-2014S1T, 1.01, max UDMA/66
[ 4.269559] ata1.00: configured for UDMA/66
These lines indicate that no floppy controller was found (which is correct in this case but might not be on some computers), that a PS/2 mouse and keyboard were found, and that an SATA controller was found. (In fact, several SATA controllers are usually present if even one is; I've shown only one of the relevant lines here.) This SATA controller interfaces to an ASUS DRW-2014S1T DVD drive. If you're having problems with any of your core hardware, you might find clues in messages such as these. For instance, you might find that a hard disk is not being correctly detected, or you might see messages about resets or timeouts relating to particular hardware devices.
One particularly important set of messages relates to the hard disk:
[ 4.282511] sd 1:0:0:0: [sda] 976773168 512-byte logical blocks: (500
                        GB/465 GiB)
[ 4.282544] sd 1:0:0:0: [sda] Write Protect is off
[ 4.282546] sd 1:0:0:0: [sda] Mode Sense: 00 3a 00 00
[ 4.282560] sd 1:0:0:0: [sda] Write cache: enabled, read cache: enabled,
                        doesn't support DPO or FUA
[ 4.282668] sda: sda1  sda2 sda3 < sda5 sda6 sda7 >
[ 4.327765] sd 1:0:0:0: [sda] Attached SCSI disk
These lines identify the first hard disk (/dev/sda) as being 465 GiB in size and provide several other technical details about it. The next-to-the-last line identifies the disk's partitions: three primary partitions from /dev/sda1 to /dev/sda3 and three logical partitions from /dev/sda5 to /dev/sda7 in this example. (In fact, /dev/sda3 is an extended partition.)
Modern computers often rely heavily on USB devices, so the lines that identify USB hardware may be of interest:
[ 4.545190] usbcore: registered new interface driver usbfs
[ 4.545338] usbcore: registered new interface driver hub
[ 4.545451] usbcore: registered new device driver usb
[ 4.548021] ehci_hcd: USB 2.0 ‘Enhanced’ Host Controller (EHCI) Driver
These lines continue, identifying USB details. Modern computers typically have several USB busses, so you're likely to see quite a few lines like these.
Identifying Filesystems
Sooner or later, the kernel ring buffer is likely to provide information on the filesystems the kernel mounts:
[ 18.854153]   REISERFS (device dm-9): found reiserfs format “3.6” with
 standard journal
[ 18.854167]   REISERFS (device dm-9): using ordered data mode
[ 18.889285]   REISERFS (device dm-9): journal params: device dm-9, size
 8192, journal first block 18, max trans len 1024, max batch 900, max
 commit age 30, max trans age 30
[ 18.890260]   REISERFS (device dm-9): checking transaction log (dm-9)
[ 18.924766]   REISERFS (device dm-9): Using r5 hash to sort names
The details will, of course, vary with your computer. If it reports problems, this could be the cause of an inability to access certain filesystems. Perhaps a disk check using fsck (as described in Chapter 3, “Basic Filesystem Management”) would overcome such difficulties.
Additions to the Kernel Ring Buffer
As the computer continues to run, you can see routine additions to the kernel ring buffer. For instance, if you insert a USB flash drive, you'll see messages about the detection of the USB device, the detection of its partitions, and perhaps the identification of a filesystem if you mount one. You might also see error messages of various types, such as this:
This message indicates that the program xscreensaver-gl created a segmentation fault—that is, it crashed because it attempted to access memory it shouldn't have. This message records some key details about the error; however, unless you're a programmer with access to the source code, chances are these details won't do you much good. Nonetheless, they are available should you need them.
Another type of error relates to input/output problems:
[238931.384129] Buffer I/O error on device sdb10, logical block 93016
[238931.384132] lost page write due to I/O error on sdb10
Such an error can occur because of a faulty disk, a cable that's been disconnected, or various other problems. If you're having difficulties with a disk (or any other device—a printer, a mouse, or anything else), you could check the kernel ring buffer for such messages. If you see such errors, they usually indicate a hardware fault, which can help you narrow the scope of your investigations.
Kernel ring buffer messages vary a great deal from one computer to another. I highly recommend that you check the kernel ring buffer messages on at least one computer. Chances are you won't understand most of the entries, but you should be able to interpret at least some of them. By familiarizing yourself with normal messages, you'll be better able to identify problem reports when you need to do so.
Identifying Hardware
If you can't use a particular hardware device, your first step in analysis is usually to identify the hardware. This task can be harder than it might at first seem, since the manufacturer's name on the box may not be important; instead, Linux drivers are generally written for a device's chipset, which is one or more chips that provide the device's core functionality. The chipset is often made by a company whose identity may not be readily apparent. Nonetheless, several diagnostic tools are useful in tracking down this information. I describe how to identify your CPU, the motherboard's built-in hardware, PCI devices, and USB devices.
Identifying the CPU
CPU identification can be critical in resolving certain problems. Two issues are particularly important:
CPU Architecture Most desktop and server computers that run Linux use an x86 or x86-64 CPU; however, some such computers run PowerPC or other CPUs. Matching the software you run to the CPU is critical; a Linux distribution for one CPU won't run on another one, with a couple of exceptions. One of these is if you run an emulator. Another is that x86-64 CPUs can run x86 software. If a Linux installation disc boots on your computer, you have the right architecture, with the caveat that an x86-64 distribution is usually preferable to an x86 distribution on x86-64 hardware. If an install disc won't boot, it's possible you're using the wrong architecture. If the computer has a working Linux distribution and you want to upgrade, you can use the procedures described here to identify your CPU.
Number of CPUs or Cores Most modern computers have at least two CPU cores—CPU components that act like independent CPUs. A dual-core CPU acts like two CPUs. Linux can use multiple cores to run two programs in a way that minimizes the interference between them, and programs written to take advantage of multiple cores can run faster using both cores than they could on a single-core CPU. To take advantage of these features, though, you must activate the Processor Type and Features ![]() Symmetric Multi-Processing Support option in the kernel, as described in Chapter 2. If this option is not present, Linux will use your multi-core CPU as if it were a single-core CPU, greatly reducing your computer's speed. If you think this has happened, you must ensure that your computer really has multiple cores (or multiple physical CPUs, as some have).
Symmetric Multi-Processing Support option in the kernel, as described in Chapter 2. If this option is not present, Linux will use your multi-core CPU as if it were a single-core CPU, greatly reducing your computer's speed. If you think this has happened, you must ensure that your computer really has multiple cores (or multiple physical CPUs, as some have).
The uname command, described in detail in Chapter 2, identifies the Linux kernel version and CPU model. The -m, -i, and -p options are particularly relevant; ideally, these options identify the architecture (such as x86 or x86-64), a manufacturer's identifying string (such as AuthenticAMD), and the complete CPU model (such as AMD Athlon(tm) 64 X2 Dual Core Processor 5400+). Unfortunately, sometimes the last two options return unknown or the same information as -m, so this information may not be as useful as it could be in tracking down problems.
The lscpu command provides more details about your CPU, including the number of cores it provides, its model number, its clock speed, and virtualization features it supports:
Architecture: x86_64
CPU op-mode(s):          64-bit
CPU(s):                  2
Thread(s) per core:      1
Core(s) per socket:      2
CPU socket(s):           1
Vendor ID:               AuthenticAMD
CPU family:              15
Model:                   107
Stepping:                2
CPU MHz:                 2800.153
Virtualization:          AMD-V
L1d cache:               64K
L1i cache:               64K
L2 cache:                512K
You can acquire still more information about your CPU by examining the /proc/cpuinfo pseudo-file. Typical contents resemble the following:
On a multi-core CPU, this information is repeated for each CPU core, except for the value on the first line (processor), which increments for each CPU. Some of this information is extremely technical, such as the cache_alignment value. The cpu cores item identifies the number of cores in the CPU. You can also go to your CPU manufacturer's Web site to verify the CPU's capabilities. The model name line provides you with the CPU's model name, and the cpu family, model, and stepping information can be helpful in detailing the precise CPU you have.
Using information from uname, lscpu, /proc/cpuinfo, or your CPU manufacturer, you can determine whether you need to make changes to the distribution you're using or to your kernel compilation options. If you have multiple cores (or multiple CPUs) but only one shows up in the /proc/cpuinfo output, you should verify that the Processor Type and Features ![]() Symmetric Multi-Processing Support option in the kernel is active. (Activating this option on single-core CPUs does little harm, so it's generally best to activate it as a standard procedure.)
Symmetric Multi-Processing Support option in the kernel is active. (Activating this option on single-core CPUs does little harm, so it's generally best to activate it as a standard procedure.)
Identifying Built-in Hardware
Modern motherboards invariably include a wide range of hardware devices and interfaces. These typically include PS/2 keyboard and mouse interfaces, floppy and hard disk controllers, an Ethernet port, USB interfaces, RS-232 serial ports, a parallel port, and sound hardware. Some computers include other interfaces, such as IEEE-1394 (aka FireWire) ports; and some computers drop some of the older interfaces, such as PS/2 and floppy interfaces.
In any event, most of these devices are controlled via the motherboard's chipset. The Linux kernel provides drivers for all major motherboard chipsets, but identifying which devices you need can be tricky. (Linux support for the very latest chipsets sometimes lags behind hardware introduction by a few weeks to months, though.) If you happen to have a manual for the computer's motherboard, you can use it to identify the chipset the computer uses. Most computers made in the last few years use chipsets from Intel, AMD, VIA, or nVidia. Unfortunately, the model numbers listed in chipset manuals often bear little resemblance to the model numbers used to identify chipsets in the Linux kernel configuration area. If in doubt, include all the drivers for your manufacturer; the extra drivers will take a few seconds to compile and consume a tiny amount of disk space and, if compiled into the kernel rather than as modules, memory. This is a small price to pay to ensure that your hardware is supported by your kernel.
If you can't identify your chipset by reading a manual, you may have to resort to software tools to do the job. Most motherboard devices show up as PCI devices from a software perspective, so the procedures described in the next section, “Identifying PCI Devices,” work for motherboard components.
Some motherboard devices are handled by secondary chipsets. This is particularly common on high-end hardware that includes extra devices, such as more than four SATA ports or two Ethernet ports. Your manual should identify the secondary chipset used for these extra functions. If you use software to identify your hardware, you should be sure to recognize the fact that you may have two different chipsets, and therefore need two different drivers, to handle all the ports of a given type.
![]() Sometimes you can work around problems by changing the port to which a device is connected. For instance, you might be unable to boot your computer with your hard disk connected to one SATA port, but moving it to another port will enable the computer to boot. This can happen because of BIOS or driver limitations regarding particular chipsets and therefore the ports that each chipset uses. If you're lucky, the problem port will work well enough to be useful once the computer has booted or for some other device (an optical disc rather than a hard disk, for instance).
Sometimes you can work around problems by changing the port to which a device is connected. For instance, you might be unable to boot your computer with your hard disk connected to one SATA port, but moving it to another port will enable the computer to boot. This can happen because of BIOS or driver limitations regarding particular chipsets and therefore the ports that each chipset uses. If you're lucky, the problem port will work well enough to be useful once the computer has booted or for some other device (an optical disc rather than a hard disk, for instance).
Identifying PCI Devices
The PCI standard defines a physical and logical set of parameters that enable plug-in cards to be used in any PCI-supporting computer. PCI devices plug into the computer's motherboard or are built into the motherboard directly. In Linux, the lspci command displays information on PCI devices. Table 11.4 summarizes the options to this command.
Used without any options, lspci produces summary information on each of the computer's PCI devices:
![]() This output has been edited for brevity; the lspci output on most computers is likely to exceed two dozen lines.
This output has been edited for brevity; the lspci output on most computers is likely to exceed two dozen lines.
You can use this output to identify your PCI devices, even if Linux drivers aren't correctly managing the hardware. For instance, the preceding output indicates that the motherboard uses an AMD RS780 host bridge and PCI-to-PCI bridge, an ATI SB700/SB800 SATA controller, an ATI Radeon HD 3200 graphics chipset, and an Intel 82559 Ethernet controller. You can use this information to search for suitable driver support in the Linux kernel configuration menus, as described in Chapter 2. (Some devices, such as the PCI-to-PCI bridge, may not require explicit configuration; PCI device identification is most useful if you already know that a particular component, such as an Ethernet adapter, isn't working correctly.)
In theory, PCI devices plug into a particular type of card on the motherboard. As noted earlier, however, many components that are integrated on the motherboard appear to be PCI devices to software, including the lspci command. In the preceding output, the host bridge, PCI-to-PCI bridge, SATA controller, and Radeon graphics chipset are all built into the motherboard. The Intel Ethernet adapter is a plug-in card. Some plug-in cards use standards other than PCI, but they still show up in lspci output. Common examples include the Accelerated Graphics Port (AGP) and PCI Express (PCIe or PCI-E) standards, which are most often used for video cards. (PCIe is increasingly being used for other purposes, too.) Older plug-in card technologies, such as the Industry Standard Architecture (ISA) and Video Standards Electronics Association (VESA) Local Bus (VL-Bus), are not detected by lspci; however, such busses began to disappear around 2000, so you're unlikely to encounter them today.
Identifying USB Devices
USB devices normally attach externally to the computer. You can check to see what USB devices are connected using the lsusb command, which is similar in many ways to lspci. Table 11.5 summarizes lsusb options.
| Option | Effect |
| -v | Increases verbosity of output |
| -t | Displays a tree view depicting the relationship between devices |
| -s [[bus]:][devnum] | Displays only devices that match the listed specification |
| -d [vendor]:[device] | Shows data on the specified device |
| -D device | Displays information on the specified device, which is a device file in the /dev directory tree |
| --version or -V | Displays version information |
Note that lsusb displays information on both the devices that are attached to your computer and on the USB controller in the computer itself. Used without any options, lsusb produces output like the following:
$ lsusb
Bus 001 Device 001: ID 1d6b:0001 Linux Foundation 1.1 root hub
Bus 002 Device 001: ID 1d6b:0002 Linux Foundation 2.0 root hub
Bus 002 Device 002: ID 04b8:0119 Seiko Epson Corp. Perfection 4490 Photo
Bus 002 Device 008: ID 04e8:681d Samsung Electronics Co., Ltd
This example shows four devices. The first two, identified as root hubs, represent the USB controllers in the computer itself. These controllers handle USB 1.1 and 2.0 devices, respectively. The next two entries are for two USB devices that are plugged into the computer: an Epson Perfection 4490 scanner and a Samsung cell phone. You can obtain additional information by using the -v option (note that's a lowercase -v; the uppercase -V has a different effect, as Table 11.5 describes). Use -s, -d, or -D to restrict this output to a specific device.
The ID number, such as 04b8:0119 for the Epson scanner, can be useful in crafting udev rules, as described in Chapter 3. You can use these numbers with the idVendor and idProduct attributes, as follows:
ATTR{idVendor}==“04b8”, ATTR{idProduct}==“0119”, SYMLINK+=“scanner”
 MODE=“0660”, OWNER=“lisa”, GROUP=“scanner”
This example creates a symbolic link, /dev/scanner, that points to the Epson scanner. This example also sets the device's permissions (mode), owner, and group.
![]() If you can access a hardware device as root but not as an ordinary user, chances are the problem is one of permissions on its device node. You can overcome such problems temporarily by using chown or chmod on the device node; however, to permanently fix the problem, you should create a udev rule that sets the ownership or mode of the device file to something appropriate. This advice is true of USB, PCI, and other types of hardware.
If you can access a hardware device as root but not as an ordinary user, chances are the problem is one of permissions on its device node. You can overcome such problems temporarily by using chown or chmod on the device node; however, to permanently fix the problem, you should create a udev rule that sets the ownership or mode of the device file to something appropriate. This advice is true of USB, PCI, and other types of hardware.
Identifying Hardware's Resource Use
Chapter 4 describes how disk hardware uses certain hardware resources, interrupts, and direct memory access (DMA) lines. Disks aren't the only hardware devices that use these resources, though. You can obtain an overview of how your resources are being used by the lsdev command, which takes no arguments. Its output resembles the following (edited for brevity):
$ lsdev
Device DMA IRQ I/O Ports
------------------------------------------------
0000:00:11.0     7000-700f 8000-8003 9000-9007 a000-a003
   b000-b007
0000:03:06.0                e800-e83f
acpi             9
ACPI                        0800-0803 0804-0805 0808-080b
      0810-0815 0820-0827 08ff-08ff
dma                  0080-008f
dma1                 0000-001f
dma2                 00c0-00df
e100                     e800-e83f
eth0              21
eth1              40
![]() The lsdev utility is often not installed by default. You may need to install a package called procinfo to obtain this utility.
The lsdev utility is often not installed by default. You may need to install a package called procinfo to obtain this utility.
This output summarizes the DMA lines, interrupts (IRQ), and I/O ports used by each device. Devices may be identified in various ways, such as by a PCI device (such as 0000:00:11.0 in this example), as shown in lspci output; by a component name (such as acpi or eth0 in this example); or by a driver name (such as e100 in this example). You may need to know enough about your hardware to link various identifiers yourself. For instance, in this example, e100 is an Ethernet device driver, it handles the eth0 device, and it is the PCI 03:06.0 device. Thus, three lines from the preceding output apply to this device. Two of these lines, 0000:03:06.0 and e100, identify the same resource use (I/O ports e800–e83f), but the third, eth0, identifies another type of resource use (IRQ 21).
Used as a debugging tool, lsdev can help you track down hardware that competes for use of the same resources. Such competition can result in sluggish performance, system crashes, or inaccessible hardware. If you find such competition, you can try disabling an unused device by unloading its kernel module or disabling it in the BIOS, or you can use boot loader or kernel module options to change the device's resource use. (You'll have to consult the driver's documentation to learn about the relevant options.) Competition over IRQs is unlikely to be a problem on modern hardware.
Identifying Your Own Hardware
In this exercise, you will use the methods just described to identify some of the key hardware components on your own computer. You should begin by logging in and, if you use a GUI environment, opening a text-mode console such as an xterm or Terminal program. In this shell, follow these steps:
- Type uname -mip. The result should be basic information on your CPU: the machine hardware type (-m), the hardware platform (-i), and the processor's identifying type (-p). Note that some computers produce more complete information than others.
- Type cat /proc/cpuinfo. You'll see more detailed information on your CPU, including more reliable reporting of the items that uname also produces.
- Type lspci. The result will be a list of the computer's PCI devices, including many devices that are built into the motherboard. Study this list and attempt to parse it for useful information, such as the manufacturer and model number of the video chipset, the disk controller chipset, the Ethernet chipset, the USB chipsets, the audio chipset, and any other interesting devices you might have installed.
- If you have a manual for your computer or motherboard, check its specifications (usually printed in the first few pages) to try to match up the devices you identified in step 3 with what the manufacturer specifies. Note that the model numbers may differ because the same devices often go by multiple names.
- Type lsusb. The result should be a list of USB devices. If no USB devices are plugged into the computer, this list may contain nothing but the motherboard's USB controller. If you have more devices, try to match each to the physical hardware you see in front of you.
- Plug in or power on a new USB device; or if a device that's non-critical, such as a printer or scanner, is already plugged in, turn it off or unplug it.
- Type lsusb again. Note how the device list has changed.
- Type lsdev. Study this output, looking for devices that share DMA channels, IRQs, or I/O ports. If you find such shared resources, use lspci or other means to try to determine whether this is really a conflict or just the same device being identified using multiple names.
Having performed this exercise, you should have a better idea of what hardware your computer is using. Actually making decisions and solving problems based on such information requires more knowledge and experience, though. For instance, you can't know whether your CPU is an ancient hulk, a ho-hum modern CPU, or the latest blazing technology without knowing where that model fits into the constellation of CPUs available today (and perhaps in the past). You can perform additional research on any or all of the components you've identified by doing Web searches, reading manuals, and checking manufacturers' Web sites.
Identifying Loaded Kernel Modules
Chapter 2 describes three tools that can be useful in tracking down and fixing problems related to kernel modules: lsmod, insmod, and modprobe. The lsmod utility lists the modules that are loaded, insmod loads a single module, and modprobe loads a module and all those upon which it depends. Ideally, you won't need to use these utilities, since Linux normally loads the correct modules automatically; however, sometimes this automatic function fails, in which case these tools are useful.
If some of your hardware isn't working, you can try to ascertain whether the appropriate kernel module is loaded by using lsmod. If you don't see the appropriate entry, it's possible that using insmod or modprobe to load the module will overcome the problem. You should remember, though, that drivers are sometimes built into the main kernel file rather than existing as loadable modules. The lsmod utility ignores drivers built into the kernel; you'll need to use dmesg or review your kernel configuration to identify drivers and other features that are built directly into the kernel.
![]() Kernel module files are stored in the /lib/modules directory tree, typically in a subdirectory named after the kernel version to which the modules belong. The insmod utility requires a complete path to the module to be loaded, but modprobe does not.
Kernel module files are stored in the /lib/modules directory tree, typically in a subdirectory named after the kernel version to which the modules belong. The insmod utility requires a complete path to the module to be loaded, but modprobe does not.
Part of the problem with using lsmod to determine whether a driver is loading correctly is figuring out which driver is appropriate for your hardware. The first step in answering this question is to correctly identify your hardware, as described earlier in “Identifying Hardware.” That done, you can use several techniques to identify the correct driver:
Searching the Web A Web search can often turn up the answer; search on the hardware's manufacturer and model along with strings such as Linux or Linux kernel.
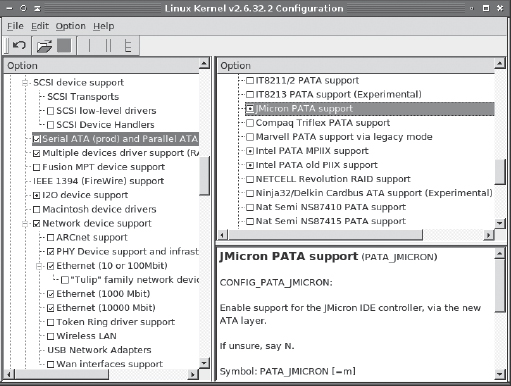
Perusing Kernel Options You can launch a kernel configuration tool and manually scan for the name of the hardware. The name of the kernel module appears in uppercase in the description area. For instance, Figure 11.1 shows the configuration option for JMicron PATA disk controllers; the kernel driver is listed as PATA_JMICRON. The module name will be the same as this value but converted to lowercase—pata_jmicron in this example.
FIGURE 11.1 The Linux kernel configuration tool provides the name of each kernel option in the description pane.
Scanning the Kernel Configuration File The .config file in the kernel source tree provides driver names but with the string CONFIG_ appended, as in CONFIG_PATA_JMICRON for the pata_jmicron driver. If the driver is set to be compiled, this value will be set to y (for compilation into the kernel) or m (for compilation as a module), as in CONFIG_PATA_JMICRON=m. Try using grep or a text editor's search function to locate lines that contain the manufacturer's name or the device's model number. Be aware, however, that names and model numbers may sometimes be truncated or altered, and drivers for one model may in fact work for a whole family of devices. Occasionally device manufacturers merge or change their names, which can make searching for such names complicated or confusing.
Consulting Kernel Documentation Kernel documentation files in the Documentation directory tree of the Linux kernel source directory can provide names for drivers. You can use grep, perhaps with its -r option to perform a recursive search, to search on the manufacturer's name or the device's model number.

Using Manufacturer Drivers
If you're familiar with the Windows world, you may be accustomed to searching for device drivers on manufacturers' Web sites. This practice can sometimes work in Linux; however, the level of Linux support from hardware manufacturers is quite variable. You might not find any Linux drivers at all, or you might find something that will solve whatever problem you're experiencing.
Some manufacturers either contribute open source drivers to the Linux kernel as well as making them available on their Web sites or take the standard Linux drivers and make them available on their Web site. In such cases, the drivers provided by the manufacturer are unlikely to work any better than the drivers from the latest Linux kernel.
Other manufacturers provide proprietary drivers on their Web sites, or they release drivers on their Web sites well before they make their way into the Linux kernel. In such cases, using manufacturer-provided drivers can help you get your device working.
Determining into which of these categories a given driver falls can be tricky. Your best bet is often to download the driver and try it. When you do so, follow the directions provided with the driver. You may need to have your own Linux kernel source code available, and in some cases you may need to patch and recompile your own kernel. (Chapter 2 describes how to do these things.)
If a device is working correctly and you stumble across a manufacturer's driver, my advice is to follow the old adage “If it ain't broke, don't fix it.” Replacing a working driver with one of unknown quality might work, but at best you'll waste some of your time. Of course, if the driver's documentation promises superior performance or offers security or other bug fixes, you might want to give it a try even if your current driver seems to be working well. Pay attention to dates, though; if the file is five years old and warns of serious bugs in the “current” standard kernel driver, chances are the fixes have long since been incorporated in the driver you're already using!
Checking Log Files
Log files are very useful tools in problem solving—debugging servers that don't behave as you expect, locating evidence of system intrusions, and so on. You should first know what log files to examine in any given situation. Understanding the problem-identification abilities of log files will help you use them effectively. Some tools can help in this task, too; these tools can help you scan log files for information, summarize the (sometimes overly verbose) log file information, and so on.
Which Log Files Are Important?
In using log files, you must first decide which ones are important. Unfortunately, the names of log files aren't completely standardized across distributions, so you may need to poke around in your syslog configuration files, and perhaps in the log files themselves, to discover which files are important. Table 11.6 summarizes some common log files (all filenames are relative to /var/log).
The /etc/syslog.conf file configures the system's logging features, so you can consult this file to learn where your system places various types of logged data. Some servers log data without the help of syslogd, so you may need to consult the configuration files and documentation for any programs you want to monitor. For instance, Samba frequently logs data independently of syslogd, storing files in /var/log/samba or a similar directory.
If you're uncertain of the purpose or importance of a log file, feel free to examine it. The tools described shortly, in “Using Tools to Help Scan Log Files,” can be useful in this task. For basic identification, less is likely to be very helpful, as in less /var/log/messages. This command displays the file screen by screen, which should give you some clue about the file's contents.
Using Log Files to Identify Problems
You can use log files to monitor system loads (for instance, to determine how many documents a Web server has delivered), to check for intrusion attempts, to verify the correct functioning of a system, and to note errors generated by certain types of programs. To one extent or another, all of these functions can be used to identify problems. Examples of information that can be useful when you are troubleshooting include the following:
Verifying Heavy Loads If a server is running sluggishly, log files may contain clues in the form of a large number of entries from the server. If a server has experienced a massive increase in the number of clients it handles or the size of the files it transfers, you may need to increase the server computer's capacity to restore good performance. Most non-server programs don't log their activities, though, so you probably won't be able to diagnose similar load problems caused by increasing workstation demands in this way. You'll likely have an idea that workstation load has increased in a more direct way, though, because the workstation users should know that they're running more programs or more resource-intensive programs.
![]() Sometimes the logging action itself can contribute substantially to a server's CPU and disk input/output requirements. If a server is behaving sluggishly, try reducing its logging level (so that it records less information).
Sometimes the logging action itself can contribute substantially to a server's CPU and disk input/output requirements. If a server is behaving sluggishly, try reducing its logging level (so that it records less information).
Intrusion Detection Some system problems are related to the presence of an intruder. Interlopers frequently modify your system files or utilities, thus affecting your system's performance or reliability. Their actions are sometimes reflected in log files. Even the absence of entries can sometimes be a clue—intruders often delete log files, or at least remove entries for a period. You might not notice such log file discrepancies unless you examine the log files soon after a break-in occurs, however.
Normal System Functioning If a system is misbehaving, the presence of and information in routine log file entries can sometimes help you pin down the problem, or at least eliminate possibilities. For instance, suppose your system is working as a Dynamic Host Configuration Protocol (DHCP) server for your network, dishing out IP addresses to other systems, as described in Chapter 7, “Advanced Network Configuration.” If your clients aren't receiving IP addresses, you can check the log file on the server. If that file indicates that the DHCP server has received requests and given leases in response, you can focus your problem-solving efforts on the clients.
Missing Entries If you know that a program should be logging information but you can't locate it, this may be evidence that the program is misconfigured or is not starting properly. In some cases, missing entries may indicate problems outside the computer you're examining. For instance, suppose you configure Samba to log access attempts. If you can't access the Samba server from another system, you can check for Samba log file entries. If those entries aren't present, it could mean that Samba isn't running, that it's misconfigured, or that a network problem (such as a misconfigured router or firewall) is blocking access.
Error Messages The most direct evidence of a problem in a log file is usually an error message. A log file entry that reads authentication failure or FAILED LOGIN indicates an authentication failure, for instance, that should help you focus your troubleshooting efforts. (Users often see different messages than those that appear in log files, or even none at all.) To improve this capacity, you can configure many servers and utilities to log more information than usual; consult the program's documentation for details. Be aware that different subsystems produce error messages that vary greatly in form, so one program's error messages will look quite different from another's.
Log files are most useful when you are diagnosing software problems with the kernel, servers, user login tools, and miscellaneous other low-level utilities. Information routinely recorded in log files includes kernel startup messages, kernel module operations, user logins, cron actions, filesystem mounting and unmounting, and actions performed by many servers. This information can reflect hardware, kernel, application, configuration, and even user problems.
Using Tools to Help Scan Log Files
Log files can sometimes be tricky to use because they often accumulate data at a rapid rate. This is particularly true when many programs' logs are sent to a single file or when you've increased the logging level in a program in an effort to help identify problems. Therefore, tools to help scan log files for important information are very helpful. You can think of these tools as falling into one of three categories: those that examine the starts of files, those that examine the ends of files, and those that can be used to search files. Some tools can be used for two or even all three of these tasks.
![]() Most log files are owned by root, and many can be read only by root. Thus, you may need to acquire root privileges before using any of these tools, although the tools themselves can be used by other users on non-log files.
Most log files are owned by root, and many can be read only by root. Thus, you may need to acquire root privileges before using any of these tools, although the tools themselves can be used by other users on non-log files.
Checking the Beginnings of Log Files
Sometimes you know that information you need appears at the start of a log file. For instance, you might want to study the early stages of the boot process, as recorded in /var/log/dmesg or a similar file. You can go about obtaining such information in any of several ways. One tool that's aimed specifically at displaying the beginning of a file is head. Used with only a filename as an argument, head displays the first ten lines of that file. You can change the number of lines with the -n argument, as in head -n 20 file.txt to display the first 20 lines of file.txt.
If you know the information you want to review is near the beginning of a log file but you're not sure of its exact location, you might prefer to use a pager program, such as more or less. The more program displays a file one screen at a time, whatever your screen size is. You can press the spacebar to move forward in the file a screen at a time. The less program's name is a bit of a joke, because less is intended to be a better more; it does basically the same thing but supports more options within the program, such as searching (described shortly in “Searching Log Files”). Both programs enable you to quickly check the first few lines of a file, though.
Text editors can also be good ways to check the first few lines in a file. Most text editors open the file and display its first few lines when you pass a filename on the command line. Text editors do have some drawbacks, however. One is that you might accidentally alter the log file, which is undesirable. Another drawback is that opening a log file in a text editor is likely to take longer than using head or less to display the first few lines. This is particularly true if either the text editor or the log file is unusually large.
Checking the Ends of Log Files
Information is added to the ends of log files. Thus, when you're performing some operation on a computer and you want to see whether it happened as you intended, that information is likely to appear at the end of a log file, rather than at its start or somewhere in the middle. For instance, when you launch a new server, entries confirming the server's successful startup (or error messages relating to its failure to start) are likely to appear at the end of the file. The ability to check the end of a log file is therefore very helpful.
The tail program is noteworthy in this respect because it's designed to display the last few lines (10 by default) of a file. This program is very similar to head in most ways, except of course that it displays the end of a file rather than the beginning. The default action is sufficient for many purposes if you run the program on a log file immediately after some information has been logged. Sometimes, though, you might need to display a number of lines other than the default of 10. To do this, you use the -n option, as in tail -n 15 /var/log/messages to display the last 15 lines of /var/log/messages.
Another feature of tail is real-time monitoring—you can use the program to keep an eye on additions to log files as they occur. You might want to do this just before performing some action that you want to monitor; you'll be able to see the relevant log entries as they're added to the log file. To do so, pass the -f or --follow option to tail, as in tail -f /var/log/messages. The result is an initial display of the last few log entries, as usual; however, tail doesn't immediately terminate. Instead, it keeps monitoring the log file and echoes new entries to the screen. When you're done, press Ctrl+C to kill tail and regain control of your shell.
Although it's not quite as convenient as tail for displaying a fixed number of lines, the less pager can be useful for checking the end of a log file. Type less filename to display filename; then type G or press the Esc key followed by the greater-than symbol (>). This will bring you to the end of the file. If you want to scroll upward in the file, type b or press Esc followed by V. You can scroll back down by typing f, pressing the spacebar, or pressing Ctrl+V. Using these commands, you can quickly examine the final lines of any file, including log files.
![]() The less command can take a while to process a large or rapidly changing log file. If it seems to become unresponsive, wait a bit. If the size of a log file is causing problems, you might look into your log file rotation settings, as described in Chapter 12, “System Troubleshooting II: System Resources and the User Environment.”
The less command can take a while to process a large or rapidly changing log file. If it seems to become unresponsive, wait a bit. If the size of a log file is causing problems, you might look into your log file rotation settings, as described in Chapter 12, “System Troubleshooting II: System Resources and the User Environment.”
As with examining the start of a file, a text editor can be used to examine its end. Load a log file into a text editor, and scroll to the end of the file in whatever way is appropriate. As with examining the start of a file, though, this approach has the drawback that it might result in accidental changes to the file being saved. It might also be slow, particularly on large log files or with large editors. On the other hand, some editors notice when the log file changes and enable you to quickly load the changes. This feature can be handy if you want to monitor changes as they occur.
Searching Log Files
Sometimes you need to search log files for information. For instance, you might want to see all entries created by Postfix or entries in which you know the string eth0 appears. You can use any of several text-searching tools to help out with such tasks. These tools can search one or more text files and display matching lines, or they can take you to matching lines in these files so that you can examine them in context.
The grep command is the most basic of the text-search tools. Type the command, a series of options (including the search string), and a file specification (which typically includes a wildcard) to have it search those files for the specified string. For instance, to find all log entries created by the Postfix mail server, you might type grep postfix /var/log/*. The result is a series of output lines, each of which begins with the name of the file from which it's taken and concludes with the line in question. (If the string was found in a binary file, grep tells you so but doesn't attempt to display the string in context.)
The grep command is most useful when searching for entries in multiple log files simultaneously—say, if you don't know to which file a server is logging information. It can also be useful if you want to display the log entries from a particular server or those that involve a single user or by some other criterion you can easily express as a searchable string.
![]() If you use grep to search for a string that's very common, the output is likely to scroll off the top of your screen and possibly exceed the buffer of a scrollable GUI terminal window. This may prevent you from taking a complete census of files in which the string occurs. You can pipe the output through less, as in grep postfix /var/log/* | less, to enable you to scan through the grep output in a more controlled way.
If you use grep to search for a string that's very common, the output is likely to scroll off the top of your screen and possibly exceed the buffer of a scrollable GUI terminal window. This may prevent you from taking a complete census of files in which the string occurs. You can pipe the output through less, as in grep postfix /var/log/* | less, to enable you to scan through the grep output in a more controlled way.
Another way to search log files is by using less. You can use this utility to view a single log file. Once you're viewing a file, press the slash key (/) followed by a search string, as in /postfix to locate the first occurrence of the string postfix in the log file. If that string is present in the file, less takes you to that point and highlights the string. Pressing the slash key again moves to the next line that contains the search string. This feature can be handy if you need to see the full context of the line in question. If you want to locate the last occurrence of a string, press Esc followed by the greater-than symbol (>) to move to the end of the buffer, and then search backward using a question mark (?; that is, the slash key with a Shift modifier), as in ?postfix. You can use a text editor to perform similar searches but with the same caveats described earlier in “Checking the Beginnings of Log Files”—text editors can be slower than tools such as less, and you might accidentally alter the log file.
Using Additional Log File Analysis Tools
Manually examining log files with tail, less, and similar tools can be informative, but other tools exist to help you analyze your log files. One of these is Logcheck, which is part of the Sentry Tools package (http://sourceforge.net/projects/sentrytools/). This package comes with some distributions, such as Debian. Unfortunately, it requires a fair amount of customization for your own system, so it's most easily implemented if it comes with your distribution, preconfigured for its log file format. If you want to use it on another distribution, you must edit the logcheck.sh file that's at the heart of the package. This file calls the logtail utility that checks log file contents, so you must configure the script to check the log files you want monitored. You can also adjust features such as the user who's to receive violation reports and the locations of files that contain strings for which the utility should look in log files. Once it's configured, you call logcheck.sh in a cron job. Logcheck then emails a report concerning any suspicious system logs to the user defined in logcheck.sh (root, by default).
Tracing Software Problems
Potential problems are not limited to hardware and driver issues. Software can also create headaches for a system administrator. Of course, many software problems are specific to the particular packages that create them; however, some tools and techniques can be used to help resolve problems that can occur with a variety of software packages. These include tools that can help trace a working program's activities, identifying the modules required by a program, finding open files, and locating strings in binary files.
Tracing a Program's Activities
You launch a program, and it annoys you by crashing, without presenting a single error message that helps in diagnosis—just segmentation fault or some similarly unhelpful message. This scenario is, sadly, common.
If you're running a GUI program from a GUI menu item, the first step to take is to run a terminal program and run the misbehaving program from the text-mode shell. Even GUI programs sometimes display error messages to standard output (aka stdout) or standard error (stderr), which displays on a console program if you launch the GUI program in that way. The stdout and stderr messages are lost if you launch the program from an icon or menu item, though. You may find some useful clue if you launch the program by typing its name.
If that fails, one way to obtain some clues about what's going wrong is to trace the program's operations using the strace program, which monitors the system calls a program makes. To use it, run strace and pass it the name of the program you're trying to use, along with any options you would normally pass it. The result will be a copious amount of output concerning the program's activities:
The output will continue for quite a while; I've shown only the first few lines in this example. When the program crashes, the output will of course cease. You can examine the output for clues to what went wrong. The problem is likely to manifest itself a dozen or more lines from the end, so you may need to scroll backward before you find anything. It could be that a file was not found (several such examples appear in this sample output, although they weren't real problems in this case, since the program eventually found the files elsewhere), that the program attempted an illegal operation (such as an attempt to divide a number by 0), or something else.
With the cause of the failure in hand, you may be able to work around it or correct it outright. For instance, if the program was looking for a file that it couldn't find, perhaps you can locate and install the missing file—perhaps it's a configuration file, a library, or a font file. If the program is attempting to divide by 0, perhaps you can determine why it's doing so—it might be an illegal value in a configuration file or user input, for instance.
The ltrace command is similar to strace, but instead of monitoring system calls, ltrace monitors dynamic library calls. If the program is failing because of a problem with the support libraries installed on the computer, ltrace might help you locate the offending library so that you can replace it. Alternatively, you might upgrade or recompile the program so that it uses the libraries you have installed on your computer. As an example, compare the first few lines of ltrace output on the nedit program to those from strace, shown earlier:
$ ltrace nedit file.txt
__libc_start_main(0x409d70, 2, 0x7fffd00baaf8, 0x4a2340, 0x4a2330 <unfinished
…>
XtSetLanguageProc(0, 0x40b210, 0, 0, 0x7fc364fa9300) = 0x7fc3659bb980
XtToolkitInitialize(0, 0x40b210, 0, 0, 0x7fc364fa9300) = 0x7fc365bf71ac
XtCreateApplicationContext(16, 0xffffffff, 256, 0, 0x7fc3659e58b0) = 0x83b0c0
XtSetWarningHandler(0x49cc60, 32, 0, 0x83c350, 0x7fc364fa9ed8) = 0
XtAppSetFallbackResources(0x83b0c0, 0x720cc0, 0, 0x83c350, 0x7fc364fa9ed8) = 0
XmRepTypeInstallTearOffModelConverter(0x83b0c0, 0x720cc0, 0, 0x83c350,
0x7fc364fa9ed8) = 0
getenv(“NEDIT_HOME”)                             = NULL
getenv(“HOME”)                                   = “/home/rodsmith”
strncpy(0x7398a0, “/home/rodsmith”, 4095)        = 0x7398a0
Identifying Required Libraries
In theory, Linux package management tools, such as the RPM Package Manager (RPM) and the Debian package tools, guarantee that all the software upon which a given program relies is installed. In practice, this guarantee is sometimes violated—you can install software outside of the package system, dependencies can be listed incorrectly in package files, files can be accidentally deleted without the aid of the package system, and so on. The ldd program can sometimes be useful in identifying missing library files—that is, supplemental program code that a program binary relies upon to do its job. To use ldd, pass it the complete path to a program executable:
$ ldd /usr/bin/zip
         linux-vdso.so.1 => (0x00007fffbd5c5000)
         libbz2.so.1 => /lib/libbz2.so.1 (0x00007f5fe625c000)
         libc.so.6 => /lib/libc.so.6 (0x00007f5fe5f03000)
         /lib64/ld-linux-x86-64.so.2 (0x00007f5fe646d000)
This example binary has just four dependencies. The first of these, linux-vdso.so.1, is the virtual dynamic shared object (VDSO), which is part of the program itself and need not further concern you. The remaining three libraries have all been found on this system. The first two, libbz2.so.1 and libc.so.6, are referred to by name without a complete path in the binary, and the system has located them on the library path. The third, /lib64/ld-linux-x86-64.so.2, is referred to by complete path in the program's binary file; it must exist in that exact location to work.
If a library that a program requires is not present, the string not found replaces the complete program path to the right of the => string. Such a program won't run correctly; you're likely to see an error message about the missing library, and then the program will terminate.
Sometimes you can correct library problems by creating symbolic links. For instance, if a binary refers to libfoo.so.1 and this file doesn't exist, but if you do find a file called libfoo.so.1.0 or libfoo.so.1.2, creating a symbolic link to this file under the required name may satisfy the program. Don't create a link with a different version number, though—for instance, if you have libfoo.so.2, don't create a link from that to libfoo.so.1. In such cases, you should either track down the library of the correct version or replace the program so that it uses the library you have. Chapter 12 covers library management in more detail.
![]() Libraries can themselves rely upon other libraries. Thus, a program whose immediate library dependencies are all met can still fail to run if one of its libraries' dependencies are not met. You can run ldd on the library files themselves in a recursive manner to verify that all the required libraries are present.
Libraries can themselves rely upon other libraries. Thus, a program whose immediate library dependencies are all met can still fail to run if one of its libraries' dependencies are not met. You can run ldd on the library files themselves in a recursive manner to verify that all the required libraries are present.
Finding Open Files
Some problems can be caused by inconveniently open files. Open files can prevent you from unmounting a filesystem, for instance. You can identify all your open files with the lsof command, which was described with reference to its network features in Chapter 5, “Networking Configuration.” Used by itself, this command generates a list of all the open files on the computer, along with the users who opened the files and other information. You're likely to want to pipe the results through grep to search for output that includes the specified string or use the -u user1[,user2…] option to limit output to those files opened by the specified user or users. For instance, suppose you can't unmount /mnt/cdrom because a file is in use on that device. You might then type this:
$ lsof | grep cdrom
bash 20139 paul cwd DIR 11,0 6144 1728 /mnt/cdrom
This output reveals that the user paul has a bash shell open that's using the /mnt/cdrom directory. If you're paul, you can search for this shell and change to another directory to enable unmounting the disc. If not, you can either contact this user to do so or, using root privileges, kill the offending process using its process ID (PID) number (the second column of output—20139 in this example). Of course, killing such processes can annoy the user who owns them, but sometimes such actions are necessary.
Locating Strings in Binary Files
Sometimes it's helpful to be able to locate strings in binary files. You might need to identify which of several program files generated a particular message, for instance; or maybe you need to scan a word processor file but don't have a program that can read that program's format. The strings utility can often help in such situations. This program searches through a binary file for ASCII text, or text in other known encodings, and displays the resulting strings on the screen. The output looks something like this:
$ strings chapter11.doc
bjbjU
Chapter 11: System Troubleshooting I: Boot and Kernel Problems
The following Linux Professional Institute objectives are covered in this
 chapter:
213.1 Identifying boot stages and troubleshooting bootloaders (weight: 4)
213.2 General troubleshooting (weight: 5)
Of course, this example's text continues for quite a way! In practice, you might need to pipe the results through less or redirect them to a file. Some of the strings are false alarms—the first output line in this example, for instance (bjbjU), isn't part of the document. You'll find many such false alarms if you apply strings to a Linux program file. Other output lines may be of interest, depending on your need.
![]() Some binary file formats transform the data in such a way that strings won't help. The OpenOffice.org office suite, for instance, compresses its files with the ZIP format, which means that strings can't be extracted from it without first unzipping the file. Encrypted files' contents will also contain no useful strings.
Some binary file formats transform the data in such a way that strings won't help. The OpenOffice.org office suite, for instance, compresses its files with the ZIP format, which means that strings can't be extracted from it without first unzipping the file. Encrypted files' contents will also contain no useful strings.
Table 11.7 summarizes some of the common options for the strings program. Additional options exist but are relatively exotic; consult the man page for strings for details.
TABLE 11.7 Common strings options
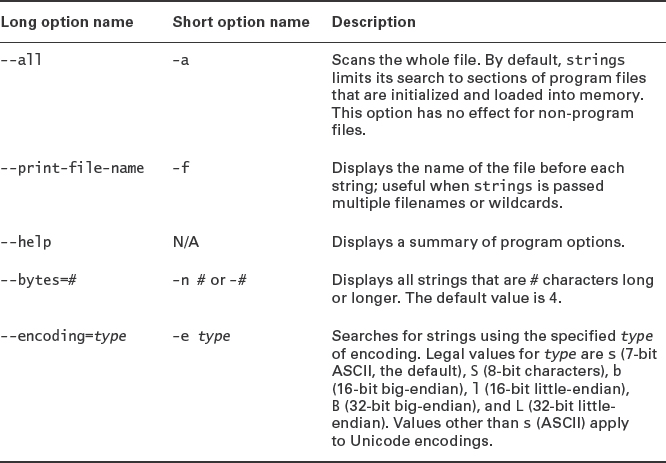
Summary
Troubleshooting is a skill that's learned over time and from direct experience. Nonetheless, you can get a leg up on this important skill by understanding some basic principles and by knowing some of the utilities that are most often used in troubleshooting. This chapter presented some of this information, beginning with troubleshooting boot problems. Boot loaders present error messages that can be cryptic and that require specific actions to correct. Boot problems can also be the result of an incorrect or damaged initial RAM disk or difficulties in the SysV or Upstart startup scripts. The later in the process a boot problem lies, the more likely it is that you'll be able to boot the computer enough to correct the problem using your regular tools. If a problem is very early in the boot process, you may need to rely on an emergency recovery disc or other specialized tool to correct the problem.
Many classes of hardware and general software problems can cause difficulties. Diagnosing hardware problems requires you to be able to correctly identify your hardware, locate the relevant kernel driver or module, and recompile or reconfigure the software to fix the problem. You may need to examine the kernel ring buffer or log files. Log files can also be critical in resolving software problems and particularly problems with server software. Other software problems can be resolved with the help of tools that trace the software's operation or that enable you to view the contents of software binary files or the binary data files that the software produces.
Exam Essentials
Summarize where boot loader code resides. Boot loader code may reside in the Master Boot Record (MBR) of the hard disk, in the officially unallocated sectors immediately following the MBR, in a BIOS Boot Partition on a GPT disk, in the boot sector of a partition or floppy disk, in files on an EFI System Partition on an EFI-based computer, and in files in the Linux /boot directory tree. In addition, utilities to manipulate the boot loader may exist in the normal locations for executable files on a Linux system. Non-Linux boot loaders may store code in other locations, as well.
Explain how the boot loader, the kernel, and the initial RAM disk interact. The boot loader reads the kernel and initial RAM disk files from the hard disk and stores both of them in memory. The boot loader then executes the kernel, passing it the location of the initial RAM disk in memory as well as any other options specified in the boot loader's configuration file. Thereafter, the kernel uses the initial RAM disk to load modules and run utilities that are required to mount the regular Linux root (/) filesystem.
Summarize the features of the three major Linux disk-based boot loaders on BIOS-based computers. LILO is the oldest of the popular BIOS boot loaders. It is a simple boot loader that can load a Linux kernel or chain-load a boot loader for other OSs. Although LILO is still a viable boot loader, is has been largely supplanted by GRUB Legacy, which can directly load a wider range of OS kernels. GRUB Legacy can also load its configuration file at boot time, simplifying reconfiguration. GRUB Legacy is being supplanted by GRUB 2, which is more sophisticated and supports loadable modules for filesystem support and other features.
Describe how Linux system services are started. Most services are launched via SysV scripts or by Upstart. SysV scripts are located in /etc/init.d or /etc/rc.d/init.d; Upstart configuration files are stored in /etc/init. The relevant startup system runs the relevant scripts or starts the services under direction of the configuration file, thus starting each subsystem in turn.
Contrast the kernel ring buffer and system log files. The kernel ring buffer keeps a temporary log of messages generated by the kernel. These messages relate to hardware and low-level kernel actions. System log files can sometimes contain similar messages, but they also hold messages from servers and other daemons. Such system log messages could provide information on server crashes, normal user logins, failed login attempts, and so on. Both the kernel ring buffer and system log files can record information on both normal and abnormal operations.
Summarize tools to learn about hardware. The uname utility provides basic information about the CPU, while the /proc/cpuinfo file provides more detailed information about the CPU. The lspci and lsusb utilities provide information about PCI and USB devices, respectively. This information enables you to verify that the device is visible to the system, but not that any driver exists to access it. The lsdev utility summarizes information about how devices are using hardware resources (interrupts, DMA channels, and I/O ports).
Explain how kernel modules are managed in Linux. Kernel modules are drivers and other kernel features that can be loaded and unloaded after the kernel has booted. The insmod utility loads a single kernel module, whereas modprobe loads a module and all those upon which it depends. You can learn what modules are loaded with the lsmod program. Ordinarily, Linux loads kernel modules when they're required, but you may need to manually intervene if these automatic mechanisms break down.
Summarize tools that can help trace a program's activities. You can use the strace program to trace a program's system calls, which can help you identify the cause of certain crashes. Similarly, ltrace will trace a program's library calls. The ldd program identifies all the libraries that a program relies upon.
Review Questions
- Where might the BIOS find a boot loader?
A. RAM
B. /dev/boot
C. MBR
D. /dev/kmem
- Which of the following files might you edit to configure GRUB Legacy? (Choose all that apply.)
A. /boot/grub/menu.lst
B. /etc/boot.conf
C. /boot/grub/grub.conf
D. /boot/menu.conf
- What action must you take after editing the /etc/lilo.conf file, assuming this file is relevant to your installation?
A. Type lilo-install as root.
B. Edit /boot/grub/grub.cfg as root.
C. Edit /boot/lilo/lilo.cfg as root.
D. Type lilo as root.
- What tool can you use to completely disable hardware that's built into a computer's motherboard?
A. The insmod utility
B. The firmware's setup utility
C. GRUB 2's hwdel command
D. The initrd command
- Which two software components is GRUB 2 likely to load on an EFI-based system? (Select two.)
A. EFI driver modules
B. A Linux kernel
C. The contents of /etc/passwd
D. An initial RAM disk
- You attempt to boot your computer but get only a grub> prompt. You then type the following command and receive the response shown:
grub> ls
(hd0) (hd0,1)
Where is your Linux kernel most likely to be found?
A. On /dev/hda0
B. On /dev/hd0
C. On /dev/sd0
D. On (hd0,1)
- What normally resides in /etc/init.d, if it's present on the Linux computer?
A. Upstart configuration files
B. Boot loader configuration files
C. SysV startup scripts
D. The BIOS configuration utility
- You've compiled a new kernel and created a new GRUB 2 configuration for it. Just after you reboot, however, you realize that you mistyped the filename of the new kernel in the GRUB configuration file. How can you boot the new kernel despite this error?
A. Select the almost-correct entry from the GRUB menu, and type E to edit it.
B. Select the Create Entry option from the GRUB menu to create a new entry.
C. Select the Auto-Detect OSs entry from the GRUB menu to detect your new kernel.
D. You can't.
- You install Linux on a computer with a single SATA disk and used GRUB 2 to boot it. In experimenting with disk utilities, you accidentally overwrite GRUB's MBR entry. You use Super GRUB Disk to boot into your normal Linux installation. How can you re-install GRUB to the MBR so that you can boot normally without using Super GRUB Disk in the future?
A. Edit /boot/mbr/contents as root.
B. Type mbr-restore /dev/sda as root.
C. Type grub-install /dev/sda as root.
D. Edit /boot/grub/grub.cfg as root.
- You want to examine the kernel ring buffer to debug a hardware problem. How would you do this?
A. Type ringbuffer at a command prompt.
B. Type dmesg at a command prompt.
C. Reboot and add the string ring to the kernel line in GRUB.
D. Install a Token Ring device and examine its output.
- You've installed a new PCI Ethernet card, but it doesn't seem to be working. What can you do to verify that the hardware is visible to Linux?
A. Type ping 127.0.0.1 to check connectivity.
B. Check that the Ethernet cable is firmly plugged in.
C. Type cat /proc/ethernet at a command prompt.
D. Type lspci at a command prompt.
- An administrator types lsusb at a Linux command prompt. What type of information will appear?
A. Basic identifying information on USB devices, including the USB controllers and all attached devices
B. Information on the drivers and detailed capabilities of all USB devices attached to the computer
C. A report on the success or failure to load the USB driver stack
D. A summary of the amount of data that's been transferred to and from USB devices since the computer was booted
- Which of the following commands loads a kernel module? (Choose all that apply.)
A. rmmod
B. modprobe
C. lsmod
D. insmod
- You use a USB flash drive and, while the drive is still mounted, type lsmod, but you see no entries for kernel modules that you know are required to access a USB flash drive. Why might this be?
A. The lsmod command displays information only on drivers that are in use by the user who typed the command.
B. The lsmod command displays information only on drivers that are doing work at the moment the command is typed.
C. The lsmod command displays information only on drivers that are built as modules, not those that are built directly into the kernel.
D. The lsmod command displays information only on drivers that are used by hardware devices internal to the computer.
- A computer has been running continuously for six months, and you want to examine its kernel ring buffer to determine how it initially detected its Ethernet cards. You find that this information is not present, however, because of numerous kernel messages made since then. Where might you look for this information at this time?
A. /proc/dmesg
B. /var/log/ethn, where n is the Ethernet device number
C. /var/log/dmesg
D. /tmp/ringbuffer
- How can you find technical details about your computer's CPU, such as its clock speed and number of cores?
A. cat /proc/cpuinfo
B. less /var/log/cpu
C. uname -i
D. lspci --cpu
- You suspect that two devices might be mistakenly sharing the same I/O space. How can you test this hypothesis?
A. Type cat /proc/interrupts
B. Type cat /proc/dma
C. Type lsmod
D. Type lsdev
- A program is crashing mysteriously and leaving no helpful error messages. Which of the following utilities might provide some clues about the source of the problem? (Select two.)
A. strace
B. strings
C. uname
D. ltrace
- An NFS server, smallserver, has just one client computer, smallclient. You want to shut down smallserver for maintenance, but before you do so, you want to ensure that nobody is accessing its files at the moment. What command can you type on smallclient to do this? (The smallserver shares are all mounted under /sharedfiles on the client.)
A. top | grep sharedfiles
B. lsof | grep sharedfiles
C. lsdev | grep sharedfiles
D. lsmod | grep sharedfiles
- For which of the following file types will strings not return data that might be meaningful?
A. A system log file (/var/log/messages) compressed with gzip
B. A set of plain-text files archived (but not compressed) with tar
C. A binary program file (for a PowerPC executable), when strings is run on an x86 computer
D. A PostScript file (for printing) created in 1989
Answers to Review Questions
- C. The Master Boot Record (MBR) can contain a small boot loader, making option C correct. If more space is required, the boot loader must load a secondary boot loader. Although the boot loader is loaded into RAM, it's not stored there permanently because RAM is volatile storage, so option A is incorrect. Both /dev/boot and /dev/kmem are references to files on Linux filesystems; they're meaningful only after the BIOS has found a boot loader and run it and lots of other boot processes have occurred, so options B and D are both incorrect.
- A, C. The official GRUB Legacy configuration filename is /boot/grub/menu.lst; however, some distributions use /boot/grub/grub.conf instead. Thus, options A and C are both correct. Options B and C are fictitious.
- D. LILO relies upon the lilo utility to read /etc/lilo.conf and write binary code that reflects the configuration file into locations that the boot loader can read. Thus, after editing /etc/lilo.conf, you must type lilo to re-install the boot loader, as option D specifies. Option A's lilo-install command is fictitious (although there is a grub-install command to install GRUB). The /boot/grub/grub.cfg file is a GRUB 2 configuration file, so it's irrelevant to LILO configuration, and option B is incorrect. There is no /boot/lilo/lilo.cfg file, so option C is incorrect.
- B. Computers come with firmware configuration tools that can, among other things, completely disable some of the hardware devices that are built into the computer. Thus, option B is correct. The Linux insmod utility can load a kernel module. This action won't disable hardware, but could make it available under Linux, so option A has, if anything, the opposite of the specified effect. Option C describes a fictitious command. There is no standard initrd command, although this is a term that refers to an initial RAM disk, which is used to hold kernel modules and setup utilities that the Linux kernel can use before it has mounted its ultimate root (/) filesystem.
- B, D. Whether it runs on a BIOS-based computer or an EFI-based computer, when it boots Linux, GRUB 2 loads a Linux kernel and (usually) an initial RAM disk, so options B and D are correct. EFI driver modules may be loaded by the EFI prior to launching GRUB 2, but they aren't loaded by GRUB 2 itself, so option A is incorrect. Linux reads the contents of /etc/passwd well after GRUB 2 has finished its work, so option C is incorrect.
- D. The output of the GRUB ls command reveals that GRUB can see one whole hard disk, which it identifies as (hd0), and that this disk has one partition, which GRUB identifies as (hd0,1). Thus, there's one possible location for the Linux kernel: (hd0,1). This partition probably corresponds to Linux's /dev/sda1, but it could be /dev/hda1 or some other device. Options A, B, and C all describe non-standard Linux device descriptors, so none of them is a likely location for the kernel. The problem that caused GRUB to display its grub> prompt could be serious enough that GRUB is failing to detect a hard disk; thus, the kernel could reside elsewhere. Given the provided information, though, option D is the single most likely location and is the only possible location among those specified.
- C. Most Linux distributions place SysV startup scripts in /etc/init.d or /etc/rc.d/init.d, so option C is correct. Upstart configuration files normally reside in /etc/init, so option A is incorrect. Linux boot loader configuration files normally reside in /etc/lilo.conf, /boot/grub, or /boot/grub2, depending on the boot loader in use, so option B is incorrect. The BIOS configuration utility is built into the computer's hardware, so it's not accessible from the Linux filesystem at all, making option D incorrect.
- A. You can edit a GRUB 2 menu entry by selecting it and typing E, as described in option A. You will, however, have to know exactly what your error was or be able to use the GRUB shell to locate the exact filename. The GRUB interactive menu doesn't have a Create Entry or Auto-Detect OSs option, making options B and C incorrect. Since option A is correct, option D can't be correct.
- C. The grub-install utility installs GRUB to the MBR or to other locations specified in the GRUB configuration file or on the command line, so option C is correct. There is no /boot/mbr/contents file or mbr-restore utility, so options A and B are both incorrect. Although /boot/grub/grub.cfg is GRUB 2's configuration file, the fact that Super GRUB Disk was able to boot the computer means that this file is intact enough to boot Linux, so it doesn't need to be edited. Furthermore, editing this file would not correct the damage to the MBR, so option D is incorrect.
- B. The dmesg command displays the contents of the kernel ring buffer, which holds kernel messages, so option B is correct. There is no standard ringbuffer command, so option A is incorrect. Adding ring to the kernel options when booting will not have the desired effect, so option C is incorrect. Token Ring is a network hardware standard, not a way to examine the kernel ring buffer, so option D is incorrect.
- D. The lspci command lists all the detected PCI devices, so if the card is installed correctly and working, it should show up in the lspci output. Thus, option D is correct. Although ping can be a useful network diagnostic tool, option A's use of it doesn't test Ethernet cards, so that option is incorrect. Option B provides sound basic network debugging advice, but it won't help to verify that the card is visible to Linux. There is no /proc/ethernet file, so option C won't help.
- A. The lsusb command summarizes the USB devices that are available to the computer, as option A says. Options B, C, and D are all fictitious.
- B, D. The modprobe command loads a module and, if necessary, all those upon which it depends. The insmod command loads a module, but only if all its dependencies are met. Thus, options B and D are correct. The rmmod command removes a module, and lsmod lists the loaded modules, so options A and C are incorrect.
- C. If a driver is built into the main kernel file, lsmod won't display information on it. Thus, if the relevant drivers are built into the kernel, the observed behavior would occur because option C is a correct statement. The lsmod command does display information on drivers that are used to service other users' needs, on drivers that are loaded but not actively working, and on some types of external hardware devices, contrary to options A, B, and D, respectively.
- C. Many distributions store a copy of the kernel ring buffer output in /var/log/dmesg just after the system boots, so option C is a likely location. Sometimes the file is called /var/log/boot.log, and some distributions don't store this data at all, so finding the information is not certain. Options A, B, and D all describe fictitious files.
- A. The /proc/cpuinfo pseudo-file holds the requested information, so viewing this file with cat (or less or various other tools) will retrieve the requested information, making option A correct. There is no standard /var/log/cpu file, so option B is incorrect. Although the uname utility will return some technical information about the CPU, the -i option restricts output to the hardware platform (normally a manufacturer identification), so option C is incorrect. The lspci utility returns information on PCI devices, not the CPU, and it has no --cpu option, so option D is incorrect. (The lscpu command is valid, but this command is distinct from lspci.)
- D. The ldev utility summarizes resources used by various devices, including their I/O port addresses. Thus, option D will test the hypothesis. (You must be alert to the fact that the same device may be identified more than once in the output, though.) The /proc/interrupts and /proc/dma pseudo-files report in interrupts and DMA channels used by various devices, not I/O ports; thus, these options won't work. (You could type cat /proc/ioports, though; this would work as well as option D.) Option C's lsmod utility displays information on loaded kernel modules, not I/O space, so it's incorrect.
- A, D. The strace utility runs a program and traces its system calls, which can be a useful diagnostic in this example. Similarly, the ltrace utility runs a program and traces its library calls, which can also be a useful diagnostic. Thus, options A and D are correct. The strings program scans a binary file for strings and displays them. This can be useful for some tasks, but it's unlikely to yield any helpful information about why a program is crashing. The uname utility displays information about the kernel and CPU, but unless you know that the program is incompatible with certain kernels or CPUs, this information is likely to be unhelpful.
- B. Option B uses the lsof utility to list all open files and search the list for any output that includes the string sharedfiles. This will accomplish the specified goal. Option A's top command displays a list of processes ordered according to their CPU use (or various other parameters that can be set). Option C's lsdev displays information on hardware use. Option D's lsmod displays information on modules that are currently loaded.
- A. Most compression techniques replace plain-text strings with more compact forms that can't be usefully extracted by strings, so option A is correct: strings will return, at best, short strings that won't be meaningful or useful. The tar utility archives files together and doesn't compress them unless explicitly told to do so, so strings will extract the original plain-text files described in option B. No matter what the original executable format, strings will extract strings associated with program prompts, and perhaps variable names and other data, from binary program files, so option C is incorrect. Although a PostScript file could represent a graphics file, it will contain plain-text PostScript commands, which strings will extract, so option D is incorrect. (The date the file was created is irrelevant.)