
Chapter 12
System Troubleshooting II: System Resources and the User Environment
THE FOLLOWING LINUX PROFESSIONAL INSTITUTE OBJECTIVES ARE COVERED IN THIS CHAPTER:
- 213.3 Troubleshooting system resources (weight: 5)
- 213.4 Troubleshooting environment configurations (weight: 5)
 This chapter continues the examination of troubleshooting tools and techniques begun in Chapter 11, “System Troubleshooting I: Boot and Kernel Problems.” This chapter covers higher-level problems, including system initialization issues, kernel run-time problems, difficulties with accounts, bash and other shell issues, problems with processes that are currently running (or that aren't but should be), and problems relating to regularly scheduled processes.
The general troubleshooting techniques described at the beginning of Chapter 11 apply equally well to these problems as to those described in Chapter 11. The problems covered in this chapter simply apply to a different set of symptoms and causes.
Troubleshooting System Initialization
Chapter 11 included information on troubleshooting the early steps of the boot process, including the boot loader and parts of the Linux startup system. This chapter covers additional system initialization issues, including the init process, local startup scripts, and login process difficulties.
Managing the Initialization Process
If Linux isn't initializing correctly, the first thing to check is what initialization system it uses. As described in Chapter 1, “System Startup and Advanced System Management,” two startup systems are common on Linux today: System V (SysV) startup scripts and Upstart. Upstart includes a SysV compatibility layer, so some SysV issues apply to Upstart. Variants on these systems, and particularly on SysV scripts, are common, so you can run into distribution-specific issues.
Managing SysV Issues
SysV issues can exist because of problems in /etc/inittab, which sets the runlevel and starts a few very basic processes, or in the SysV startup scripts, which launch most system services.
Fixing /etc/inittab Problems
One common problem with /etc/inittab is an incorrect runlevel setting. This is set via the id line, which normally resides near the start of the file:
id:3:initdefault:
This example sets the runlevel to 3. On Red Hat, Fedora, Mandriva, OpenSUSE, and several other distributions, runlevel 3 starts a text-mode multi-user mode, so X won't run in runlevel 3. If X isn't running when you want it to, an incorrect default runlevel may be the problem. (Debian, Ubuntu, Gentoo, and several other distributions start X by using SysV or Upstart startup scripts, so if X is failing to start, the runlevel may not be an issue for them.)
![]() Computers that use Upstart frequently lack an /etc/inittab file; however, you can add one to set the default runlevel. Configure it with an id line, but set the default runlevel you want to use.
Computers that use Upstart frequently lack an /etc/inittab file; however, you can add one to set the default runlevel. Configure it with an id line, but set the default runlevel you want to use.
Chapter 1's Table 1.1 describes the conventional function of all the runlevels. If the computer is shutting down or rebooting as soon as it starts up, you might have incorrectly set the runlevel to runlevel 0 or 6. A default runlevel of 1 will boot the system into single-user mode, which is normally undesirable.
You can check your current runlevel by using the runlevel command, which returns the previous and current runlevels:
$ runlevel
N 5
This example shows that the computer is currently in runlevel 5. The N means that it has not been in another runlevel since booting. If the system had changed runlevels, N would be replaced by another runlevel number, such as 3. As described in Chapter 1, you can change runlevels by using the telinit command, as in telinit 3 to change to runlevel 3.
Subsequent lines of /etc/inittab start various processes, including the rc script that launches SysV startup scripts, getty processes that handle console and RS-232 serial port logins, and more. Some distributions use /etc/inittab to launch X, either by itself or in conjunction with a SysV startup script:
x:5:respawn:/etc/X11/prefdm -nodaemon
This example, taken from a CentOS system, begins with the character x alone in the first field, and in this example, it works only in runlevel 5 and uses the /etc/X11/prefdm script to start X and an X Display Manager (XDM) program. If X isn't starting, a misconfiguration of this line could be the culprit; however, systems based upon Upstart and even some SysV systems use SysV startup scripts to launch X. Thus, you will have to check distribution-specific documentation or a backup of /etc/inittab from a time when X was starting to determine whether you need to change this line.
Fixing Startup Script Problems
As the computer boots, it displays startup messages relating to the success or failure to start SysV services:
Starting Apache… [ FAILED ]
This example indicates that the Apache Web server failed to start. Most such problems must be dealt with in ways specific to the service that failed to start, so you should consult relevant chapters of this book, any log files that might be relevant, online documentation, or books specific to the server or subsystem in question in order to help resolve the problem.
If a server isn't starting and you see no startup messages about it, it could be configured to not start in the current runlevel. You should first check your current runlevel and verify that it's correct. If not, change runlevels, and perhaps change /etc/inittab to ensure that your system boots into the correct runlevel in the future.
Once you've determined that you're in the correct runlevel and that the service isn't running, you should check the startup script's symbolic link in the appropriate SysV startup directory. These directories are typically called /etc/rc?.d, /etc/rc.d/rc?.d, or /etc/init.d/rc?.d, where ? is the runlevel number. (Gentoo uses an unusual named runlevel system and places its startup script links in /etc/runlevels/name, where name is the runlevel name.)
Runlevel startup scripts are named S##name or K##name, where ## is a two-digit number and name is the name of the linked-to script. Links with names that begin with S denote scripts that are run with the start parameter, and those with names that begin with K denote scripts that are run with the stop parameter. Thus, if a script in the runlevel directory has a name that starts with K, it won't start. If it should start, change its name so that it begins with S instead. (Gentoo uses names alone; scripts in a runlevel directory are always started in that directory.) One important caveat is that you must set the two-digit sequence number correctly. Some distributions' scripts include comments that specify suitable numbers. With others, the start and stop sequence numbers should sum to 99, so you can subtract the stop number from 99 to obtain the start number. For instance, if the current link is K37someserver, the correct start value would be 99 – 37 = 62, and you should rename the link to S62someserver.
If a service is starting and you don't want it to start, you can reverse this process, renaming the symbolic link so that it starts with K rather than with S. Removing the symbolic link (say, with rm) will prevent the service from starting if you boot directly into the runlevel, but this will not guarantee that the service will shut down if you enter the runlevel from another runlevel in which the service was started. Thus, you should rename SysV symbolic links rather than delete them if you want their corresponding services to be reliably shut down.
If a SysV startup script exists in /etc/init.d or /etc/rc.d but there's no corresponding script in the runlevel-specific directory, you can create a symbolic link with ln:
# ln -s /etc/rc.d/init.d/someserver /etc/rc.d/rc3.d/S20someserver
This example creates a link to start the server in runlevel 3, giving it a sequence number of 20. Of course, you should check the script for comments or otherwise determine what an appropriate sequence number is.
Another way to handle SysV startup scripts is to use tools such as chkconfig, ntsysv, update-rc.d, and rc-update. Chapter 1 describes some of these tools in detail, and of course you can check their man pages for more information.
Managing Upstart Issues
Upstart is a newer startup system than SysV scripts, so it's not as well documented, and there are fewer utilities that can help you manage Upstart scripts. Major distributions that use Upstart employ a SysV compatibility layer, so you can use SysV methods for managing at least some services. As described earlier, this includes setting the default runlevel via /etc/inittab.
As distributions migrate to Upstart-native startup methods, though, you'll need to begin managing the Upstart configuration files in the /etc/init or /etc/event.d directory in order to adjust the services that start in specific runlevels or in response to other system events. Chapter 1 describes the Upstart configuration file's basic features, so you should consult it to learn how to manage Upstart services. In particular, if a service is not starting and you want it to or if it's starting and you don't want it to, you may need to search for the string runlevel and adjust the list of runlevels. For instance, a configuration file might include the following lines:
start on runlevel [2345]
stop on runlevel [!2345]
These lines tell Upstart to start the service in runlevels 2 through 5 and to stop it in all runlevels except 2 through 5. (The exclamation mark, !, is a common negation character that can be read as “not”; the second line therefore refers to runlevels that are “not 2, 3, 4, or 5.”) If you don't want the service to start in runlevel 5, you should remove 5 from both lists.
![]() If you're used to dealing with SysV startup scripts, you may become confused or frustrated when the usual techniques for enabling, disabling, or otherwise altering a service don't work on an Upstart-based system. If you have such problems, be sure to check for an Upstart configuration file. Study it and try to determine how to achieve your desired goals with that file.
If you're used to dealing with SysV startup scripts, you may become confused or frustrated when the usual techniques for enabling, disabling, or otherwise altering a service don't work on an Upstart-based system. If you have such problems, be sure to check for an Upstart configuration file. Study it and try to determine how to achieve your desired goals with that file.
Dealing with Local Startup Scripts
Occasionally it's desirable to start a service through some means other than a SysV script or the Upstart system. This is most frequently the case when you've compiled a server yourself or installed it from a package file intended for a distribution other than the one you're using. In such cases, the program may not come with a SysV startup script or Upstart configuration file, or the provided script or file may not work correctly on your system.
Many Linux distributions include a startup script that runs after the other SysV startup scripts. This script is generally called /etc/rc.local, /etc/rc.d/rc.local, /etc/rc.d/boot.local, or something similar. (Old versions of Debian used files in a directory called /etc/rc.local, but this usage has been deprecated.) The first challenge with such scripts is determining the correct script name, which is highly distribution-specific. Try typing find /etc -name “*local*” to locate candidate files, or consult your distribution's documentation.
Whatever its name, you can launch a server or other program from a local startup script by entering the command you would use to launch the program manually, as described in the program's documentation. For instance, you might include the following line to launch an FTP server:
/usr/sbin/vsftpd &
One common problem with local startup scripts relates to the presence (or lack thereof) of a trailing ampersand (&). If this symbol is not present and if the program does not return control to the calling program until it terminates, then the script will stop execution until the program terminates. In the case of a server or other daemon, this could be a very long time, so subsequent lines in the script might not execute unless the daemon is launched in the background by using an ampersand, as in the preceding example. Some daemons are designed to always run in the background, though, so an ampersand is unnecessary. Other programs should run and immediately terminate. For instance, the iptables program (described in Chapter 7, “Advanced Network Configuration”) executes quickly and terminates, so it normally isn't called with an ampersand. The bottom line is that you must check your programs' documentation to learn how to call them. If in doubt, experiment.
One thing to keep in mind when running a server via the local startup script is that this method provides no means to shut down a server, as you can do by passing the stop parameter to a SysV startup script. If you want to stop such a server, you'll need to use the Linux kill or killall command, possibly after locating the server's process ID number via ps. For instance, the following sequence can stop the vsftpd server:
# ps ax | grep ftp
 6382 ?        S      0:00 vsftpd
# kill 6382
Managing Login Processes
Login processes come in three main types, although some login methods span categories: local text-mode logins, GUI logins, and network logins. Each method has its own challenges, although certain commonalities exist, as well.
Managing Text-Mode Logins
When you log into a text-mode console, you're using a virtual terminal. To understand virtual terminals, remember that Linux was designed as a clone of Unix, which is a multiuser OS. Traditionally, Unix systems have supported many simultaneous users, each working from a physical terminal—a device consisting of a keyboard, a monitor, and perhaps a mouse—that enables a user to access a computer remotely. You can use terminals with Linux, but a standard PC has one primary keyboard and monitor. To improve usability, Linux supports configuring the system so that these devices can act like several physical terminals—that is, they're virtual. Each virtual terminal can run a separate program or even support logins under different usernames. This feature enables you to run many programs and easily switch between them.
Most standard installations define six virtual text-mode terminals, reached by pressing Alt+F1 through Alt+F6. On a SysV-based system, these terminals are defined in the /etc/inittab configuration file, using lines like the following:
1:2345:respawn:/sbin/mingetty tty1
2:2345:respawn:/sbin/mingetty tty2
3:2345:respawn:/sbin/mingetty tty3
4:2345:respawn:/sbin/mingetty tty4
5:2345:respawn:/sbin/mingetty tty5
6:2345:respawn:/sbin/mingetty tty6
These lines tell the system to run mingetty on tty1 through tty6—that is, the first six virtual terminals. An Upstart-based system typically includes equivalent configurations in the ttyn.conf files, where n is the terminal number, in /etc/init or /etc/event.d; however, the configuration for a single terminal is likely to be broken across several lines:
start on stopped rc2
start on stopped rc3
start on stopped rc4

stop on runlevel 0
stop on runlevel 1
stop on runlevel 6

respawn
exec /sbin/mingetty tty1
The mingetty program is one of several programs known collectively as getty programs. These programs manage the interactions between a terminal (either real or virtual) and the login program, which accepts user logins. Several getty programs are available, and different distributions favor different gettys.
Serious problems with text-mode login processes are rare; however, if the relevant configuration file becomes damaged, you may need to re-create it from a backup or a sample. Be sure to use a sample for your distribution! This configuration detail varies a great deal between distributions, so using the wrong sample will most likely fail.
You may want to adjust the number of virtual terminals supported by your system. If so, you can add or remove lines from /etc/inittab or add or remove files from /etc/init or /etc/event.d. Be sure to edit the lines or files to refer to the correct terminal number (tty1, tty2, and so on). If you make such a change, you may need to alter your X configuration, too; X occupies a virtual terminal just like text-mode logins!
A variant of this configuration applies to logins via RS-232 serial ports or modems. These configurations look much like the virtual terminal login configurations, but they use different device references—typically ttySn rather than ttyn. They may also use different getty programs. In particular, mingetty supports only local virtual terminals, not RS-232 serial ports or modems. If you need to configure your computer to support such logins, you should consult the documentation for the getty program you intend to use.
![]() Logins via RS-232 serial ports and modems used to be very common as a means of supporting rooms of users at “dumb terminals” or via dial-up modems. Today such users are more likely to use network login methods.
Logins via RS-232 serial ports and modems used to be very common as a means of supporting rooms of users at “dumb terminals” or via dial-up modems. Today such users are more likely to use network login methods.
Local logins can sometimes go wrong because of authentication issues. Ordinarily, the getty program relies on the login program to present the login: prompt, to prompt for the password, and to authenticate the user. Sometimes this doesn't work correctly, typically because of damage to the Pluggable Authentication Modules (PAM) configuration. Chapter 10, “Security,” describes PAM configuration in more detail. If you suspect damage to your PAM configuration, your best bet is to restore the PAM configuration files, particularly the ones for login and any files it references, to their default settings. If necessary, you can use your package manager to search for the package to which /etc/pam.d/login belongs and reinstall it—if you can log in! If not, you may need to copy the file from a working installation with the help of an emergency recovery disc. Be sure to use the file from the same distribution as the problem system runs, though; as noted in Chapter 10, PAM configurations vary a great deal from one distribution to another.
Managing GUI Logins
Linux GUI logins are handled by a program that uses the X Display Manager Control Protocol (XDMCP). Three XDMCP programs are common: the original XDM, the GNOME Display Manager (GDM), and the KDE Display Manager (KDM). GDM and KDM are the most common XDMCP programs for Linux. These programs enable users to select their desktop environment, to shut down the computer, and to set various other options. XDM, by contrast, is fairly bare-bones; it just accepts a username and password.
Some GUI login problems relate to PAM configuration, and these problems require fixing the PAM login files, as described for PAM problems with login. The main difference is that the PAM configuration file is different—typically gdm or kdm in /etc/pam.d.
Some GUI login problems relate to GUI login scripts, such as ~/.xinitrc. Such problems are similar to those that can occur with bash login scripts, as described later in “Investigating bash Login Scripts.”
Managing Network Logins
Network-enabled logins pose their own challenges. Several protocols are commonly used for this purpose, including the following:
Telnet The Telnet protocol is an old text-mode login protocol. As a general rule, it shouldn't be used today, since it passes data, including passwords, over the network in an unencrypted form. The telnet client program, however, can still be useful in diagnosing network problems; you can use it to connect to many other servers and issue server-specific commands. This use requires that you understand the network protocol in question, though.
SSH The Secure Shell (SSH) protocol is a replacement for Telnet. SSH encrypts all data, so it's relatively safe to use even on an untrusted network such as the Internet. SSH also supports options such as tunneling and file transfers, which extends its utility. Chapter 7 describes SSH in more detail.
XDMCP Although XDMCP is often used only on local computers, it can be configured to accept remote logins. This protocol doesn't encrypt login data, though, so it's generally used only on well-protected local networks. XDMCP is only part of a network login solution; it handles network logins but not subsequent data transfers. For that, X is used.
X The X Window System, or X for short, is a network-enabled GUI. Used in conjunction with XDMCP, Telnet, SSH, or some other network login method, X enables users sitting at one computer to use applications on another computer. By itself, X doesn't encrypt data; you must tunnel it through SSH or use some other tool to secure its data transfers.
VNC Virtual Network Computing (VNC) is a cross-platform GUI remote login tool. It can be used in Linux to provide access to an X session that's already being displayed or to provide a remote login to a unique session, more like what XDMCP and X provide. Like most of the other remote login protocol, VNC doesn't encrypt most data, although it can encrypt passwords.
Some network login protocol problems relate to authentication and should be addressed much like the PAM problems described earlier in “Managing Text-Mode Logins.” Other problems relate to startup of the relevant servers; you may need to delve into SysV, Upstart, or other startup scripts. Firewalls, either on the computer that runs the server or on a network's router, can sometimes block access, so you should check your firewall configuration if you can't connect. Other problems are highly server-specific.
Adjusting Kernel Options
Chapter 2, “Linux Kernel Configuration,” describes how to set compile-time kernel options and compile the kernel. Some kernel options, however, may be adjusted as the computer runs. The /proc filesystem and sysctl utility both do this job. The /proc filesystem is a pseudo-filesystem that enables you to view and modify various kernel parameters as if they were files. For instance, /proc/scsi holds data on the Small Computer System Interface (SCSI) disk subsystem. You can type cat /proc/scsi/scsi to see information on all the SCSI devices on your system.
![]() From a software perspective, including the contents of /proc/scsi, any device that's handled by the SCSI subsystem is SCSI, even if the hardware itself is not SCSI hardware. Most Serial Advanced Technology Attachment (SATA) disks are handled by Linux's SCSI subsystem, even though they aren't technically SCSI devices.
From a software perspective, including the contents of /proc/scsi, any device that's handled by the SCSI subsystem is SCSI, even if the hardware itself is not SCSI hardware. Most Serial Advanced Technology Attachment (SATA) disks are handled by Linux's SCSI subsystem, even though they aren't technically SCSI devices.
Various chapters of this book have referred to specific files in the /proc directory tree. You may want to take some time to peruse this directory tree to learn what it contains. Viewing files in this tree can't do any harm, but you should be cautious about writing values to these files. Although writing to files in /proc will often accomplish nothing, some of these files control features such as Linux's ability to function as a router, so modifying /proc files can have undesirable consequences. If you believe you've accidentally made such a change but don't know how to undo it, reboot; the /proc directory tree, being virtual, is re-created each time the computer boots, so rebooting will reset it.
The sysctl program enables you to view and set options in the /proc/sys directory tree using a key, which is a named variable, and a value, which is the setting associated with the key. Keys come in multiple parts, separated by dots (.) or slashes (/). These parts correspond to the subdirectories and files in the /proc/sys directory tree. For instance, the kernel.ostype (or kernel/ostype) key refers to the /proc/sys/kernel/ostype file. This key (or file) normally contains the value Linux on a Linux system.
The syntax for sysctl is as follows:
sysctl [ options ] [ key | key=value | filename ]
Table 12.1 summarizes the options available for sysctl.
TABLE 12.1 Common sysctl options
Most of the options in Table 12.1 refer to read activity. If you pass -a as the first parameter, you can view all of the keys, values, or both. If you don't use -a, you'll normally pass a key name to see the associated value or use the -w or -p option to change one or a set of values. For instance, suppose you want to verify and then reset the computer's hostname and reset various options to their startup values. You might type this:
# sysctl kernel.hostname
kernel.hostname = diana.luna.edu
# sysctl -w kernel.hostname=artemis.luna.edu
kernel.hostname = artemis.luna.edu
# sysctl -p /etc/sysctl.conf
The final command in this example will be followed by lines that echo the keys and values that are being set from the specified file. In fact, the /etc/sysctl.conf file is the name of a file that holds the computer's startup kernel options. You can peruse and edit this file if you want to make permanent changes to your computer's configuration.
![]() Most of the options that can be set with sysctl can also be set with more specialized tools. The main advantage of sysctl or the /etc/sysctl.conf file is that you can set a variety of options using one tool or from one location.
Most of the options that can be set with sysctl can also be set with more specialized tools. The main advantage of sysctl or the /etc/sysctl.conf file is that you can set a variety of options using one tool or from one location.
Fixing Account Problems
Many problems can plague Linux accounts. Users can lose their passwords, passwords and other data can become corrupt, shells can be set incorrectly, the associations between users and groups can become confused, user ID (UID) and group ID (GID) values can need changing, and so on. Chances are you'll need to deal with such problems from time to time, so the next few pages cover them.
![]() This section assumes you understand the basics of local account management using utilities such as useradd, userdel, usermod, and passwd. These utilities are covered in the LPIC-1 certification.
This section assumes you understand the basics of local account management using utilities such as useradd, userdel, usermod, and passwd. These utilities are covered in the LPIC-1 certification.
Dealing with Password Problems
Some password problems are really problems with PAM configuration, as described earlier in “Managing Text-Mode Logins.” Symptoms typically include an inability of any user to log in, or problems with all users who use a particular authentication method, such as Lightweight Directory Access Protocol (LDAP). Likewise, if problems affect only one server or login method (such as text-mode logins but not GUI logins), the problem is not likely to be with the account configuration but with PAM or the server that has problems.
The problems described here relate to the storage of account and password information. In a standard Linux installation, you can find account data in three files, as outlined in Table 12.2. Some installations rely on data in other locations, such as in an LDAP server. If problems arise with such alternate locations, you may need to use methods not described here to fix the difficulties.
TABLE 12.2 Linux account database files
| File | Purpose |
| /etc/passwd | Holds basic account information: username, password or (more commonly) x value, UID number, GID number of the default group, free-form user information, home directory, and default shell. |
| /etc/shadow | Holds the user's hashed (one-way encrypted) password and extended account information, mostly relating to password aging—when the password expires and related information. |
| /etc/group | Holds group data, including group names, GID values, and the users who belong to each group. |
Each of the files described in Table 12.2 consists of colon-delimited fields:
maryann:x:1010:100::/home/maryann:/bin/bash
This example is taken from an /etc/passwd file. It consists of seven fields, one of which (user information) is empty in this example. With respect to password problems specifically, the second field (x in this example) is relevant. In the early days of Unix, passwords were stored in the second field of /etc/passwd; but this practice led to security problems because /etc/passwd had to be world-readable, so crackers could download the /etc/passwd file and try to crack user passwords at their leisure. To work around this problem, today's systems use shadow passwords, in which passwords are stored in /etc/shadow, which can (and should) be given permissions to keep anybody but root from reading it. This makes crackers' jobs harder, since they can't access users' passwords, even in hashed form.
If an account uses shadow passwords, the second field of the account's entry in /etc/passwd will contain an x. If it doesn't, that's most likely an error. (Even accounts that forbid logins typically use an x in this field.) You can correct this problem for a single account by replacing the errant value in /etc/passwd with x and then using the passwd utility as root to set a new password for the account.
More common password problems show up in /etc/shadow, which has entries that look like this:
maryann:$6$.6BBM.3h$vvkpItHgUAC/KWfrT:14976:0:99999:7:::
The second field, which in this example begins with $6$, contains the hashed password. (In this example, the hashed password has been truncated to fit on one line; it's too short, and so it won't work as expected.) If you find that a password has been damaged, changed, or forgotten by a user, the easiest solution is usually to use passwd as root to correct the problem:
# passwd maryann
New password:
Retype new password:
passwd: password updated successfully
When you run passwd as root, you don't need to type the old password, so the fact that it's been damaged or forgotten is irrelevant. You'll need to communicate the new password to the user or let the user type the password directly, if that's practical. (Be careful not to reveal the root password, of course!)
![]() If an encrypted password field begins with an exclamation mark (!), the account has been locked. You can unlock the account by using the -U option to usermod, as in usermod -U houdini to unlock the houdini account, or by deleting the exclamation mark in a text editor.
If an encrypted password field begins with an exclamation mark (!), the account has been locked. You can unlock the account by using the -U option to usermod, as in usermod -U houdini to unlock the houdini account, or by deleting the exclamation mark in a text editor.
Adjusting User Shells
User shell information appears in the final field of /etc/passwd. On Linux, the default shell is usually /bin/bash; however, this can be set to any value using usermod:
$ usermod -s /bin/false maryann
This command sets maryann's default shell to /bin/false. This is a useful configuration for non-login accounts used by servers, but it's inappropriate if the user should be able to log in, since the result will be that the login process or other text-mode login tool or window will run /bin/false, which will immediately return a failure code. The result will be that the user will be unable to log in.
Problems can also occur if a shell was set to a reasonable value that's suddenly become unreasonable because the software was removed. A user might want to use a non-standard shell, such as tcsh or zsh; but if this shell is subsequently removed, the user will suddenly be unable to log in using text-mode tools.
You can, of course, correct the problem using usermod to change the shell to something valid; use the -s option, as in the preceding example, but pass it /bin/bash or some other valid shell on your computer. Alternatively, if a formerly valid shell was removed, you can re-install it. This change can also be made by using your favorite text editor on the /etc/passwd file itself—but be very careful, lest you accidentally make changes that will cause more problems, such as damaging another account's entry!
Fixing User/Group Association Issues
Users can be assigned to groups in either or both of two ways:
A Default Group Set in the User Configuration File As noted earlier, /etc/passwd includes a GID value for the user's default group. The user belongs to this group no matter what the /etc/group file indicates, and when the user logs in, files that the user creates will belong to the group whose GID appears in /etc/passwd unless and until the user uses the newgrp command to change the current group association.
Additional Associations in the Group Configuration File The /etc/group file includes a list of users who belong to each group, in a comma-delimited list at the end of each group's entry. This list, however, is incomplete; it need not include users whose primary group association is the group. In other words, if maryann's /etc/passwd entry specifies that her primary group is GID 100 (users), then the users entry in /etc/group doesn't need to include maryann in its list of users.
Group associations can become broken in any number of ways, particularly if groups are regularly added to and deleted from a computer. If a group is deleted and its number is not re-used, users can end up “orphaned,” with default GID numbers that refer to no group. If a group is deleted and its number is re-used, users' default GIDs may end up pointing to inappropriate groups.
You can use the usermod command and its -g option to change a user's group association:
# usermod -g 100 maryann
![]() GID 100 is usually associated with the users group, which many administrators use as a general-purpose group. Some distributions use this as a default group assignment. Other distributions automatically create a new group for each user, assigning users to their own unique groups.
GID 100 is usually associated with the users group, which many administrators use as a general-purpose group. Some distributions use this as a default group assignment. Other distributions automatically create a new group for each user, assigning users to their own unique groups.
Adjusting UIDs and GIDs
UID and GID values can sometimes become confused or scrambled. This can happen as accounts are created and destroyed. You can end up with a configuration in which two users share a UID or in which two groups share a GID. You may also need to adjust UID and GID values to keep them synchronized across multiple computers—say, because you're using the Network File System (NFS) file sharing protocol, which works best when UID and GID values are equivalent across computers.
You can change UID and GID values using usermod's -u and -g options, respectively. The preceding section showed an example of using -g; -u is similar:
# usermod -u 1010 maryann
This example sets maryann's UID value to 1010. Unfortunately, this isn't likely to be the end of the job, particularly when adjusting UID values. The problem is that the user's files will not be adjusted by this command; you must change them manually, using chown. In some cases, you can change the vast majority of the user's files by applying chown recursively to the user's home directory. If your system maintains an incoming mail spool, you may need to modify ownership of the user's mail file. You may also need to use find to locate the user's remaining files in locations such as /tmp or any other world-writable directories your system maintains. Exercise 12.1 guides you through this process.
Changing an Account's UID Value
Changing an account's UID value entails using several different utilities. Note that in a real-world situation, the user should be logged out while you perform these steps. This exercise guides you through the process in two stages. The first stage is setup; you must create a test account to use for the second stage of the exercise:
- Log in as root, or acquire root privileges via su.
- Type useradd -m maryann. (Change maryann to another username if your system already has an account with this name.) This command creates the maryann account, including a home directory (typically /home/maryann).
- Type touch /home/maryann/afile to create a file in maryann's home directory.
- Type chown maryann: /home/maryann/afile to give ownership of the file created in step 3 to maryann.
- Repeat steps 3 and 4, but use /tmp/maryannfile rather than /home/maryann/afile.
- If your system keeps incoming mail files in /var/spool/mail or /var/mail, check to see whether one was created. If not, repeat steps 3 and 4 to do so, but use /var/spool/mail/maryann or /var/mail/maryann as the filename.
With the maryann account configured, it's now time to change its UID value. You can do so as follows:
- Determine the account's current UID value. You can do this by typing grep maryann /etc/passwd and noting the value in the third colon-delimited field. This exercise will assume the old UID value is 1009.
- Determine a new UID value for the account. Pick one that's not in use and verify it by searching /etc/passwd for the value. This exercise uses a UID of 1010 for this purpose. Typing grep 1010 /etc/passwd returns nothing, which verifies that this value is not in use.
- Type usermod -u 1010 maryann to change maryann's UID to 1010.
- Check the ownership of the user's home directory by typing ls -ld /home/maryann. Type ls -l /home/maryann to check the ownership of the file you created in maryann's home directory. The usermod command may change the ownership of these files in which case it will appear as owned by maryann. If the home directory or its files appear to be owned by a numeric value, type chown -R maryann: /home/maryann to return ownership to maryann using the account's new UID value.
- Check the ownership of the user's mail spool file by typing ls -l /var/spool/mail/maryann (changing the path, if necessary). If it's owned by the account's old UID value, type chown maryann: /var/spool/mail/maryann to correct it.
- Use find to locate additional files owned by the user in question by typing find / -uid 1009. (Change 1009 to whatever value is appropriate for your system, of course.) This command will take a long time to complete, but it should return precisely one file: /tmp/maryannfile, which you created in step 5 of the preceding procedure. If you were performing this procedure in a real-world environment, you might find any number of files.
- For each file found in step 6, type chown maryann: filename.
At this point, the change in UID value for maryann is complete. The user may log in and use the account normally. If the user wasn't experiencing any obvious difficulties, there should be no obvious changes to the account from the user's perspective. Of course, chances are you made this change because there were difficulties!
Adjusting Login Variables
Many tools that deal with user accounts, including login programs, the useradd program, and others, need to know certain key things about how accounts and the login process work. For instance, Linux systems typically reserve the lowest-numbered UID numbers for system accounts, but what is the lowest UID number that may be used for user accounts? What encryption method should be used to encrypt passwords in /etc/shadow? How many times should login prompt the user for a password if the user enters an incorrect password? These and other system-wide account features are set in the /etc/login.defs file.
The values in this file sometimes vary from one distribution or installation to another. For instance, some distributions set the minimum UID value for ordinary users (UID_MIN) at 500, but others use 1000. You might have cause to change this value if you're working in an environment that uses multiple Linux distributions and you need to keep UID values synchronized across different computers. For the most part, though, you shouldn't need to adjust this file's values, since the defaults are usually sensible. You may want to peruse the file, though. Most of the options' names are descriptive, and most distributions include comments that further explain the options, so you should be able to figure out what each option does.
The effect of setting an /etc/login.defs value incorrectly varies depending on the option, of course. Some options can affect the ability to log in or at least delay logins under some circumstances. For instance, FAIL_DELAY affects the delay imposed after a failed login attempt; setting this value too high can make the system appear unresponsive after a failed login attempt.
Troubleshooting Shells
Text-mode logins rely heavily on shells, which are programs that accept typed commands and, in response, execute programs or perform commands. As noted earlier, bash is the most common shell in Linux. Like many programs, shells rely on configuration files, so many problems related to text-mode operation are caused by problems with these configuration files. You should therefore be familiar with bash configuration files, which in fact are scripts that run at login time. You should also know a bit about non-bash shells.
Investigating bash Login Scripts
When it starts, bash runs a series of scripts. These scripts set environment variables, create command aliases, run programs, and otherwise prepare the shell to accept your commands. The confusing part of this is understanding precisely which of several files runs in which situations. Broadly speaking, bash login scripts can be categorized in two ways: as global vs. user scripts and as login vs. non-login scripts. Table 12.3 identifies the most common scripts in each category. Chances are you won't find all of these scripts on your computer; and in fact, with the exception of /etc/profile and separate scripts in the /etc/profile.d directory, chances are you'll find at most one per category.
TABLE 12.3 A classification of shell startup scripts

The rules for when each script executes are complex. They're described in the man page for bash under the “Invocation” section. In brief, though, when bash is launched as a login process (by the login program or by a remote login server such as SSH), it first runs /etc/profile. Most Linux distributions include within this file calls to run additional scripts in the /etc/profile.d directory and one of the global non-login files, the name of which varies from one distribution to another. After running /etc/profile, bash looks for the user login files (~/.bash_profile, ~/.bash_login, and ~/.profile) and runs the first one it finds (if any of them exists).
When bash is launched as a non-login shell (for instance, inside an X-based terminal window), it looks for and executes the ~/.bashrc file. This file is normally created as part of the account-creation process, and it usually executes the same global non-login file that the distribution's /etc/profile script executes.
When a login shell terminates, bash executes the ~/.bash_logout script. There is no equivalent logout script for non-login shells.
The files that bash uses can be modified by executing it with particular command-line options, such as --login (to force login behavior), --norc (to inhibit reading the user non-login file), or --rcfile filename (to read filename rather than ~/.bashrc).
This confusing set of login scripts, particularly when coupled with the fact that the precise filenames can vary from one distribution or even account to another, creates opportunities for problems to arise. You may want to trace the order in which various startup scripts are executing to ensure that the desired scripts actually execute for all the desired conditions.
![]() Creating a symbolic link between ~/.bashrc and ~/.bash_profile can resolve many problems that users might have. This will ensure that the same user startup scripts run for both login and non-login sessions.
Creating a symbolic link between ~/.bashrc and ~/.bash_profile can resolve many problems that users might have. This will ensure that the same user startup scripts run for both login and non-login sessions.
One common problem with startup scripts arises because of improper setting of the PATH environment variable, which should consist of a colon-delimited set of directories in which the shell looks for commands. This environment variable is often built up across multiple startup scripts. To do so, though, all but the first script that sets this variable must include a reference to PATH in its PATH-setting line:
PATH=“${PATH}:/usr/local/bin:/opt/bin:/bin”
This example sets the value of PATH to its old value but adds two new directories. If the initial reference to PATH is omitted, the result will be that the PATH will omit its original directories. Similar problems can occur with some other environment variables, such as LIBPATH.
Using Unusual Shells
Although bash is the default shell in Linux, it's possible that you or some of your users will want to use another shell. If so, you will have to investigate that shell's startup scripts. It's likely to support the same distinctions between user vs. global files and login vs. non-login sessions, so you may end up having to investigate multiple startup scripts, just as with bash. Some of the many shells available in Linux include
bash The Bourne Again Shell (bash) is the default shell for most installations and accounts. It's an open source extension to the original Bourne shell (sh), which is popular on many Unix-like platforms. Linux distributions make sh a link to bash so that scripts intended for sh run on bash.
tcsh This shell is an enhanced variant of a “classic” Unix shell, the C Shell (csh). Both csh and tcsh use a scripting language that resembles the C programming language, although csh/tcsh scripts are by no means C programs.
pdksh The Public Domain Korn Shell (pdksh) is an implementation of the Korn shell. It's similar to the Bourne shell, but it borrows some features from the C shell, as well.
zsh The Z Shell (zsh) is modeled after the Korn shell, but it adds some extra features.
sash The Stand Alone Shell (sash) is a small shell that incorporates many programs, such as ls, that are normally external, into the main sash executable. The goal is to have a shell that functions even on a system that's otherwise badly corrupted.
Most shells' startup scripts have names that are at least loosely related to the shell's name, such as ~/.tcshrc and /etc/csh.cshrc for tcsh. Consult the shell's man page if you need assistance.
Because most shells' configuration files are scripts written in the shells' own language, details can vary between shells. For instance, tcsh sets variables differently from bash. If you just need to make a minor modification to an existing configuration, such changes probably won't cause problems. If you need to make extensive changes, though, you may need to consult shell-specific documentation.
Investigating Running Processes
Running processes sometimes cause problems: They can fail to start, crash once started, fail to stop when they should, or consume inordinate system resources. A few skills and tools will help you deal with such issues. First, you must know how to identify running processes, particularly for daemons, which don't normally interact with users at the console or with a GUI. Second, you should understand how to modify logging options, thus enabling you to tell certain programs (again, particularly daemons) how to communicate with you about their problems. Finally, you should know how to identify the libraries that programs use and correct some common library problems.
Finding Running Processes
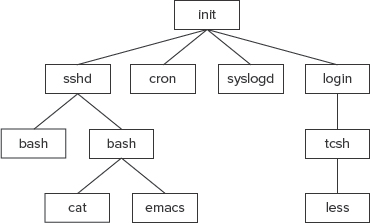
The first challenge in dealing with an errant daemon is identifying its process. In Linux, processes are identified by process ID (PID) numbers. Each process also has a parent PID (PPID) number, which identifies the process that created (or spawned) it. Ultimately, every process can trace its ancestry back to init, which in turn was launched by the kernel during the boot process. If a process terminates and leaves child processes, those children are “adopted” by init. Figure 12.1 illustrates this arrangement.
FIGURE 12.1 Linux processes are arranged in a hierarchy that leads back to init
Using the ps Program
You can determine what processes are running by using the ps program, which takes a huge number of options. (The LPIC-1 objectives include ps, so you should already be familiar with its basic operation.) You can use ps to locate running processes by using a ps option that displays all processes, rather than just the ones associated with your own account, and then searching the output for the process that interests you. Options that display all processes include -A, -e, and the combination of a and x (ax). The details of what these options display in terms of ancillary information varies, but any of them will show you all the processes running on the system.
If you're interested in a particular process, you can pipe the output of ps through grep to locate it:
$ ps ax | grep apache
3053 ?         Ss    0:00 /usr/sbin/apache2 -k start
4753 ?         S     0:00 /usr/sbin/apache2 -k start
4754 ?         S     0:00 /usr/sbin/apache2 -k start
4755 ?         S     0:00 /usr/sbin/apache2 -k start
4756 ?         S     0:00 /usr/sbin/apache2 -k start
4757 ?         S     0:00 /usr/sbin/apache2 -k start
5044 pts/1     R+    0:00 grep apache
This example shows six instances of the apache2 server running, plus the grep command that located the server. If you suspected Apache was not running, this output would put those suspicions to rest; however, if the output was empty or contained just the grep command or other commands that happened to contain the string apache, you'd know that Apache was not running—perhaps it had never been started, or maybe it started running but crashed.
![]() This example illustrates a feature of some daemons and other processes: They can spawn multiple copies of themselves. Apache does this to better serve clients; each copy can handle a single client, rather than have a single process try to handle multiple clients. Sometimes you'll see multiple copies of a program because one or more users are running independent copies. Be cautious about terminating such processes with kill; you don't want to kill the wrong instance of a program!
This example illustrates a feature of some daemons and other processes: They can spawn multiple copies of themselves. Apache does this to better serve clients; each copy can handle a single client, rather than have a single process try to handle multiple clients. Sometimes you'll see multiple copies of a program because one or more users are running independent copies. Be cautious about terminating such processes with kill; you don't want to kill the wrong instance of a program!
In some cases, you can use ps repeatedly to monitor a process. You can check back every once in a while to verify that a process is running, or look for changes in the PID value (the first column in the preceding output) if you suspect the process may be crashing and restarting. Be aware, however, that some programs terminate and then restart as part of their normal operation, so a changing PID value may not be a sign of trouble.
Using the top Program
A variant of ps that's very helpful in diagnosing some problems is top. This program generates a display of processes, ordered by CPU use, and updates the list every few seconds. The result is a display similar to that in Figure 12.2, which you can use to identify which processes are consuming large amounts of CPU time. In Figure 12.2, the FahCore_78.exe process is chewing up 98 percent of CPU time, glxgears is consuming 91 percent, X is using 8 percent, and all the remaining processes are using substantially less CPU time. (The total amount of CPU time consumed can exceed 100 percent because the computer used for this example has a dual-core CPU, which top interprets as having a maximum of 200 percent CPU time available.)
FIGURE 12.2 The top utility provides a dynamic display of running processes
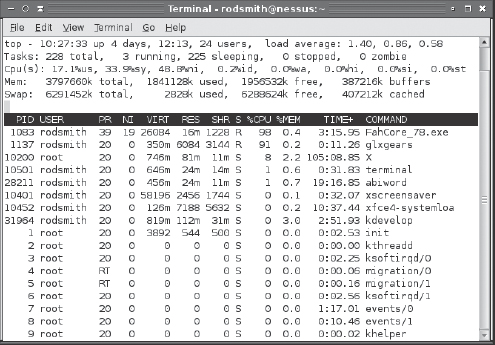
In addition to monitoring CPU use, top can display the top users of memory. Type M while it's running to do this, and type P to switch back to a display sorted by CPU time. (Typing T sorts by cumulative CPU time.) Note that you must type uppercase letters; the lowercase versions have different effects.
One difficulty with using top to identify programs that are consuming too much CPU time or memory is that you can't tell from the top output alone what constitutes excessive resource consumption. Take the output in Figure 12.2 as an example. It's true that FahCore_78.exe is consuming a great deal of CPU time; however, this program is a Folding@home (http://folding.stanford.edu) client, which is a way to donate your unused CPU time to a scientific research project. In other words, the process should be consuming a lot of CPU time, but the consumed CPU time would otherwise be unused. The glxgears program is a graphics demonstration tool. It also normally consumes lots of CPU time, but you probably wouldn't want to leave it running for long. Making these determinations requires understanding the purpose and normal operating characteristics of your programs, particularly of those that float to the top of top's output.
Checking Logging Options
Linux maintains log files that record various key details about system operation. You may be able to begin using log files immediately, but knowing how to change the log file configuration can also be important. You do this by configuring the syslogd daemon. Some servers and other programs perform their own logging and so must be configured independently of syslogd. You may even want to configure one computer to send its log files to another system as a security measure. You should also be aware of issues surrounding log file rotation; if your computer doesn't properly manage existing log files, they can grow to consume all your available disk space, at least on the partition on which they're stored. In addition to configuring logging, you must be able to use the log files that the system generates.
Understanding syslogd
Most Linux systems employ a special daemon to handle log maintenance in a unified way. The traditional Linux system logger is syslogd, which is often installed from a package called sysklogd. The syslogd daemon handles messages from servers and other user-mode programs. It's usually paired with a daemon called klogd, which is generally installed from the same sysklogd package as syslogd. The klogd daemon manages logging of kernel messages.
![]() Other choices for system loggers exist. For instance, syslog-ng is a replacement that supports advanced filtering options, and metalog is another option. Recent versions of Fedora and Ubuntu use rsyslogd. This chapter describes the traditional syslogd logger. Others are similar in principle, and even in some specific features, but differ in many details.
Other choices for system loggers exist. For instance, syslog-ng is a replacement that supports advanced filtering options, and metalog is another option. Recent versions of Fedora and Ubuntu use rsyslogd. This chapter describes the traditional syslogd logger. Others are similar in principle, and even in some specific features, but differ in many details.
The basic idea behind a system logger is to provide a unified means of handling log files. The daemon runs in the background and accepts data delivered from servers and other programs that are configured to use the log daemon. The daemon can then use information provided by the server to classify the message and direct it to an appropriate log file. This configuration enables you to consolidate messages from various servers in a handful of standard log files, which can be much easier to use and manage than potentially dozens of log files from the various servers running on the system.
In order to work, of course, the log daemon must be configured. In the case of syslogd, this is done through the /etc/syslog.conf file. (The rsyslogd configuration file is /etc/rsyslog.conf and is similar to syslog.conf.) The next section describes the syslog.conf file's format in more detail.
Setting Logging Options
The format of the /etc/syslog.conf file is conceptually simple but provides a great deal of power. Comment lines, as in many Linux configuration files, are denoted by a hash mark (#). Non-comment lines take the following form:
facility.priority action
In this line, the facility is a code word for the type of program or tool that generated the message to be logged; the priority is a code word for the importance of this message; and the action is a file, remote computer, or other location that's to accept the message. The facility and priority are often referred to collectively as the selector.
Valid codes for the facility are auth, authpriv, cron, daemon, kern, lpr, mail, mark, news, security, syslog, user, uucp, and local0 through local7. Many of these names refer to specific servers or program classes. For instance, mail servers and other mail-processing tools typically log using the mail facility. Most servers that aren't covered by more specific codes use the daemon facility. The security facility is identical to auth, but auth is the preferred name. The mark facility is reserved for internal use. An asterisk (*) refers to all facilities. You can specify multiple facilities in one selector by separating the facilities with commas (,).
Valid codes for the priority are debug, info, notice, warning, warn, error, err, crit, alert, emerg, and panic. The warning priority is identical to warn, error is identical to err, and emerg is identical to panic. The error, warn, and panic priority names are deprecated; you should use their equivalents instead. Other than these identical pairs, these priorities represent ascending levels of importance. The debug level logs the most information; it's intended, as the name implies, for debugging programs that are misbehaving. The emerg priority logs the most important messages, which indicate very serious problems. When a program sends a message to the system logger, it includes a priority code; the logger logs the message to a file if you've configured it to log messages of that level or higher. Thus, if you specify a priority code of alert, the system will log messages that are classified as alert or emerg but not messages of crit or below. An exception to this rule is if you precede the priority code by an equal sign (=), as in =crit, which describes what to do with messages of crit priority only. An exclamation mark (!) reverses the meaning of a match. For instance, !crit causes messages below crit priority to be logged. A priority of * refers to all priorities.
You can specify multiple selectors for a single action by separating the selectors by a semicolon (;). Note that commas are used to separate multiple facilities within a single selector, whereas semicolons are used to separate multiple selectors as a whole. Examples of complete selectors appear shortly.
Most commonly, the action is a filename, typically in the /var/log directory tree. The messages, syslog, and secure files in this directory are three common and important log files, although not all distributions use all of these files. Other possible logging locations include a device filename for a console (such as /dev/console) to display data on the screen, a remote machine name preceded by an at sign (@) to log data to the specified system, and a list of usernames of individuals who should see the message if they're logged in. For the last of these options, an asterisk (*) means all logged-in users.
Some examples should help clarify these rules. First is a fairly ordinary and simple entry:
mail.* /var/log/mail
This line sends all log entries identified by the originating program as related to mail to the /var/log/mail file. Most of the entries in a default /etc/syslog.conf file resemble this one. Together, they typically cover all of the facilities mentioned earlier. Some messages may be handled by multiple rules. For instance, another rule might look like this one:
*.emerg *
This line sends all emerg-level messages to the consoles of all users who are logged into the computer using text-mode tools. If this line and the earlier mail.* selector are both present, emerg-level messages related to mail will be logged to /var/log/mail and displayed on users' consoles.
A more complex example logs kernel messages in various ways, depending on their priorities:
kern.*                /var/log/kernel
kern.crit             @logger.pangaea.edu
kern.crit             /dev/console
kern.info;kern.!err   /var/log/kernel-info
The first of these rules logs all kernel messages to /var/log/kernel. The second line sends critical messages to logger.pangaea.edu. (This system must be configured to accept remote logs, which is a topic not covered in this book.) The third line sends a copy of critical messages to /dev/console, which causes them to be displayed on the computer's main text-mode console display. Finally, the last line sends messages that are between info and err in priority to /var/log/kernel-info. Because err is the priority immediately above crit and because info is the lowest priority, these four lines cause all kernel messages to be logged two or three times: once to /var/log/kernel as well as either to the remote system and the console or to /var/log/kernel-info.
Most distributions ship with reasonable system logger settings, but you may want to examine these settings and perhaps adjust them. If you change them, be aware that you may need to change some other tools. For instance, all major distributions ship with tools that help rotate log files. If you change the files to which syslogd logs messages, you may need to change your log file rotation scripts as well. This topic is covered in the next section.
In addition to the system logger's options, you may be able to set logging options in individual programs. For instance, you may tell programs to record more or less information or to log routine information at varying priorities. Some programs also provide the means to log with the system log daemon or with their own mechanisms. Details vary greatly from one program to another, so you should consult the program's documentation for details.
![]() Most programs that use the system log daemons are servers and other system tools. Programs that individuals run locally seldom log data with the system log daemon, although there are some exceptions to this rule, such as the Fetchmail program for retrieving email from remote servers.
Most programs that use the system log daemons are servers and other system tools. Programs that individuals run locally seldom log data with the system log daemon, although there are some exceptions to this rule, such as the Fetchmail program for retrieving email from remote servers.
Rotating Log Files
Log files are intended to retain information about system activities for a reasonable period of time, but system logging daemons provide no means to control the size of log files. Left unchecked, log files can therefore grow to consume all the available space on the partition on which they reside. To avoid this problem, Linux systems employ log file rotation tools. These tools rename and optionally compress the current log files, delete old log files, and force the logging system to begin using new log files.
The most common log rotation tool is a package called logrotate. This program is typically called on a regular basis via a cron job. The logrotate program consults a configuration file called /etc/logrotate.conf, which includes several default settings and typically refers to files in /etc/logrotate.d to handle specific log files. A typical /etc/logrotate.conf file includes several comment lines, denoted by hash marks (#), as well as lines to set various options, as illustrated by Listing 12.1.
Listing 12.1: Sample /etc/logrotate.conf file
# Rotate logs weekly
weekly

# Keep 4 weeks of old logs
rotate 4

# Create new log files after rotation
create

# Compress old log files
compress

# Refer to files for individual packages
include /etc/logrotate.d

# Set miscellaneous options
notifempty
nomail
noolddir

# Rotate wtmp, which isn't handled by a specific program
/var/log/wtmp {
   monthly
   create 0664 root utmp
   rotate 1
}
Most of the lines in Listing 12.1 set options that are fairly self-explanatory or that are well explained by the comments that immediately precede them—for instance, the weekly line sets the default log rotation interval to once a week. If you see an option in your file that you don't understand, consult the man page for logrotate.
![]() Because log file rotation is handled by cron jobs that typically run late at night, it won't happen if a computer is routinely turned off at the end of the day. This practice is common with Windows workstations but is uncommon with servers. Either Linux workstations should be left running overnight as a general practice or some explicit steps should be taken to ensure that log rotation occurs despite routine shutdowns. The anacron utility is particularly well suited to this task.
Because log file rotation is handled by cron jobs that typically run late at night, it won't happen if a computer is routinely turned off at the end of the day. This practice is common with Windows workstations but is uncommon with servers. Either Linux workstations should be left running overnight as a general practice or some explicit steps should be taken to ensure that log rotation occurs despite routine shutdowns. The anacron utility is particularly well suited to this task.
The last few lines of Listing 12.1 demonstrate the format for the definition of a specific log file. These definitions begin with the filename for the file (multiple filenames may be listed, separated by spaces), followed by an open curly brace ({). They end in a close curly brace (}). Intervening lines set options that may override the defaults. For instance, the /var/log/wtmp definition in Listing 12.1 sets the monthly option, which tells the system to rotate this log file once a month, overriding the default weekly option. Such definitions are common in the individual files in /etc/logrotate.d, which are typically owned by the packages whose log files they rotate.
In most cases, servers and other programs that log data either do so via the system logging daemon or ship with a configuration file that goes in /etc/logrotate.d to handle the server's log files. These files usually do a reasonable job, but you may want to double-check them. For instance, you might discover that your system is configured to keep too many or too few old log files for your taste, in which case adjusting the rotate option is in order. You should also check the /var/log directory and its subdirectories every now and then. If you see huge numbers of files accumulating or if files are growing to unacceptable size, you may want to check the corresponding logrotate configuration files. If an appropriate file doesn't exist, create one. Use a working file as a template, modifying it for the new file. Pay particular attention to the prerotate and postrotate scripts; you may need to consult the documentation for the program that's creating the log file to learn how to force that program to begin using a new log file.
In most cases, log files remain on the computer that recorded them. Sometimes, though, you may want to copy such files off-site. The easiest way to do this may be to reconfigure the log daemon to send the messages you want to archive to another system, as described previously in “Setting Logging Options.” Another possibility is to create a cron job (as described later, in “Dealing with Scheduled Processes”) to copy files to another system using a network share, ssh, or some other network tool. You can also manually copy log files onto removable disks, if you like. There are few technical reasons to archive log files for more than a few weeks—only if a problem escapes your notice for a long time will they be useful. Managers or lawyers may want to keep them around for the long term for business or legal reasons, though. Thus, you should ask about policies concerning log file retention when administering an employer's or client's computer.
Dealing with Library Issues
In computer terms, a library is a set of functions that are likely to be useful to multiple programs and that are therefore designed to enable many programs to use them. For instance, many different programs need functions to help position text on a text-mode console or terminal—text editors, the less pager, and various other programs all have similar needs. Rather than force each program to re-invent this particular wheel, libraries to handle the placement of text on the screen, such as libncurses, exist. Many programs can use libncurses, which simplifies life for the users of such libraries.
Many libraries can be used in either static or dynamic form. A static library's code is built into the final program's main executable file, whereas a dynamic library exists as a separate file that's referenced by the final program's main executable file. Dynamic libraries have the advantage of reducing resource use, both in terms of disk space requirements and memory use. (These advantages apply only if multiple programs use the library, though.) The drawback to dynamic libraries is that they invite problems—if the library's interfaces change or if a bug is introduced in a new version, upgrading the library can introduce bugs into the programs that use it. If a library is uninstalled, programs that depend upon it will break. Diagnosing and correcting such problems requires understanding the tools used to manage libraries.
You can identify some library problems with the help of the ldd utility, as described in Chapter 11. This program identifies the libraries used by any given program binary:
$ ldd /usr/bin/zip
        linux-vdso.so.1 => (0x00007fffbd5c5000)
        libbz2.so.1 => not found
        libc.so.6 => /lib/libc.so.6 (0x00007f5fe5f03000)
        /lib64/ld-linux-x86-64.so.2 (0x00007f5fe646d000)
If a library can't be found, it won't be listed to the right of the => symbol; instead, ldd reports not found, as it does for libbz2.so.1 in this example. If you try to launch such a program, you receive an error message:
The solution to the problem depends on the nature of the problem. Sometimes the correct library is installed, but the program binary is looking for it under the wrong name or location. In such a case, creating a symbolic link can fix the problem:
# ln -s /lib/libbz2.so.1.2 /lib/libbz2.so.1
Other times, you may need to update the computer's library path—the set of directories in which the computer searches for libraries. The library path is stored in the /etc/ld.so.conf file, which contains one directory per line. If you know that a library exists in an unusual directory, you can add that directory to /etc/ld.so.conf. After you do this, though, you must type ldconfig as root to make the system's linker (the software that ties programs together with their libraries) recognize the libraries in the new path. You may also need to type ldconfig after installing new libraries, although post-installation scripts in binary package files usually do this when you install a library in a package.
Some distributions build /etc/ld.so.conf from files in the /etc/ld.so.conf.d directory, either dynamically via an include statement in ld.so.conf or via a separate command. Therefore, if you want to add directories to this file, it's often better to add a new file to /etc/ld.so.conf.d. If the main file includes a comment stating that it must be regenerated by typing some command, such as env-update, you should do so after making changes to /etc/ld.so.conf.d.
Another way to adjust the library path is to use the LD_LIBRARY_PATH environment variable. Set this variable to a colon-delimited list of directories that hold libraries that aren't on the system's library path:
$ export LD_LIBRARY_PATH=/opt/someprog/lib:/opt/another/lib
This example adds two directories to the library path. This feature can be handy if you need to temporarily add to the library path for testing purposes or if an individual needs to make a permanent change that's not needed by other users. If a change should be made system-wide, though, editing /etc/ld.so.conf or the files in /etc/ld.so.conf.d is more appropriate.

Using 32- and 64-Bit Binaries
If you run a 64-bit x86-64 (aka AMD64 or EM64T) version of Linux, you probably have the ability to run 32-bit (x86) binaries, as well as 64-bit binaries. This ability can be handy if you need to run old binary-only programs or programs that don't compile and run properly in 64-bit mode. Unfortunately, one problem with this feature is that it requires you to maintain both 64- and 32-bit versions of at least some libraries.
Different approaches to managing both 64- and 32-bit libraries exist. In most cases, you'll find separate library directories for 64- and 32-bit libraries, such as /lib64 and /lib32. There's also likely to be a /lib directory; either /lib is a symbolic link to /lib64 or /lib64 is a symbolic link to /lib. (These arrangements are mirrored in /usr, as in /usr/lib32 and so on.) This method of arranging libraries emphasizes the native (64-bit) libraries, since libraries are normally found in /lib, /usr/lib, and similarly named directories.
Some distributions do things a bit differently; they have separate /lib and /lib64 directories but no /lib32 directory. This configuration is peculiar from a Linux standards point of view, but it has the advantage that packages intended for x86 systems can install without modification; on the first type of system, such packages, if they include libraries, would drop the 32-bit libraries in the 64-bit library directory, potentially overwriting 64-bit libraries and causing chaos.
With any of these systems, you must be aware of the presence of and need for both 64- and 32-bit libraries. It's easy to overlook this distinction and become confused or frustrated when a program fails to work because it reports that it can't find a library when one of the exact name being requested clearly exists on your hard disk. You can identify the type of the library (and of a program that needs it) using file:
This example indicates that /bin/cp is a 64-bit executable, that /lib/libacl.so.1.1.0 is a 64-bit library, and that /lib32/libacl.so.1.1.0 is a 32-bit library. If a program indicates that it can't load a library that you see is present, checking both the program and the library with file may help you determine whether they're mismatched.
Dealing with Scheduled Processes
Linux provides several mechanisms to run processes in the future. This facility is useful for scheduling automatic routine maintenance (such as log file rotation), for performing repetitive tasks (such as retrieving email on a regular basis), or for performing one-off tasks (such as displaying a reminder about an appointment on your screen). The main tool for performing such tasks is cron, so understanding a bit of how it works—and where it can go wrong—can help you diagnose problems related to this tool.
![]() Although this section emphasizes cron, two other related tools deserve mention. The first of these is at, which runs jobs in a one-off fashion, as opposed to the repeated scheduling that cron handles. The second tool is anacron, which sometimes supplements cron on systems that don't run continuously; anacron can be used to ensure that jobs such as log rotation occur even if the computer is frequently shut down at the times when these jobs would normally occur.
Although this section emphasizes cron, two other related tools deserve mention. The first of these is at, which runs jobs in a one-off fashion, as opposed to the repeated scheduling that cron handles. The second tool is anacron, which sometimes supplements cron on systems that don't run continuously; anacron can be used to ensure that jobs such as log rotation occur even if the computer is frequently shut down at the times when these jobs would normally occur.
Managing Scheduled Processes
Two types of cron jobs exist: system cron jobs, which handle tasks for the OS as a whole, such as log file rotation; and user cron jobs, which individuals can use to run their own jobs at scheduled times. The two are created and managed in similar ways, although there are some critical differences.
Creating System cron Jobs
The /etc/crontab file controls system cron jobs. This file normally begins with several lines that set environment variables, such as $PATH and $MAILTO (the former sets the path, and the latter is the address to which programs' output is mailed). The file then contains several lines that resemble the following:
02 4 * * * root run-parts /etc/cron.daily
This line begins with five fields that specify the time. The fields are, in order, the minute (0–59), the hour (0–23), the day of the month (1–31), the month (1–12), and the day of the week (0–7; both 0 and 7 correspond to Sunday). For the month and day of the week values, you can use the first three letters of the name rather than a number, if you like.
In all cases, you can specify multiple values in several ways:
- An asterisk (*) matches all possible values.
- A list separated by commas (such as 0,6,12,18) matches any of the specified values.
- Two values separated by a dash (-) indicate a range, inclusive of the end points. For instance, 9-17 in the hour field specifies a time of from 9 a.m. to 5 p.m. (Note that, depending on the value of the minute field, jobs could run as late as 5:59 p.m. in this example.)
- A slash, when used in conjunction with some other multi-value option, specifies stepped values—a range in which some members are skipped. For instance, */10 in the minute field indicates a job that's run every 10 minutes.
After the first five fields, /etc/crontab entries continue with the account name to be used when executing the program (root in the preceding example) and the command to be run (run-parts /etc/cron.daily in this example). The default /etc/crontab entries generally use run-parts, cronloop, or a similar utility that runs any executable scripts within a directory. Thus, the preceding example runs all the scripts in /etc/cron.daily at 4:02 a.m. every day. Most distributions include monthly, daily, weekly, and hourly system cron jobs, each corresponding to scripts in a directory called /etc/cron.interval, where interval is a word associated with the run frequency. Others place these scripts in /etc/cron.d/interval directories.
![]() The exact times chosen for system cron jobs to execute vary from one distribution to another. Normally, though, daily and longer-interval cron jobs run early in the morning—between midnight and 6 a.m. Check your /etc/crontab file to determine when your system cron jobs run.
The exact times chosen for system cron jobs to execute vary from one distribution to another. Normally, though, daily and longer-interval cron jobs run early in the morning—between midnight and 6 a.m. Check your /etc/crontab file to determine when your system cron jobs run.
To create a new system cron job, you may create a script to perform the task you want performed and copy that script to the appropriate /etc/cron.interval directory. When the runtime next rolls around, cron will run the script.
![]() Before submitting a script as a cron job, test it thoroughly. This is particularly important if the cron job will run when you're not around. You don't want a bug in your cron job script to cause problems by filling the hard disk with useless files or producing thousands of email messages when you're not present to quickly correct the problem.
Before submitting a script as a cron job, test it thoroughly. This is particularly important if the cron job will run when you're not around. You don't want a bug in your cron job script to cause problems by filling the hard disk with useless files or producing thousands of email messages when you're not present to quickly correct the problem.
If you need to run a cron job at a time or interval that's not supported by the standard /etc/crontab, you can either modify that file to change or add the cron job runtime or create a user cron job, as described shortly. If you choose to modify the system cron job facility, model your changes after an existing entry, changing the times and script storage directory as required.
![]() System cron job storage directories should be owned by root, and only root should be able to write to them. If ordinary users can write to a system cron directory, unscrupulous users can write scripts to give themselves superuser privileges and place them in the system cron directory. The next time cron runs those scripts, the users will have full administrative access to the system.
System cron job storage directories should be owned by root, and only root should be able to write to them. If ordinary users can write to a system cron directory, unscrupulous users can write scripts to give themselves superuser privileges and place them in the system cron directory. The next time cron runs those scripts, the users will have full administrative access to the system.
Creating User cron Jobs
To create a user cron job, you use the crontab utility, not to be confused with the /etc/crontab configuration file. The syntax for crontab is as follows:
crontab [-u user] [-l | -e | -r] [file]
If given without the -u user parameter, crontab modifies the cron job associated with the current user. (User cron jobs are often called crontabs; but because the word is already used in reference to the system-wide configuration file and the utility itself, this usage can be perplexing.) The crontab utility can become confused by the use of su to change the current user identity, so if you use this command, it's safest to also use -u user, even when you're modifying your own cron job.
If you want to work directly on a cron job, use the -l, -r, or -e option. The -l option causes crontab to display the current cron job; -r removes the current cron job; and -e opens an editor so that you can edit the current cron job. (Vi is the default editor, but you can change this by setting the VISUAL or EDITOR environment variable, as described in Chapter 1.)
Alternatively, you can create a cron job configuration file and pass the filename to crontab using the file parameter. For instance, crontab -u tbaker my-cron causes crontab to use my-cron for tbaker's cron jobs.
Whether you create the cron job and submit it via the file parameter or edit it via -e, the format of the cron file is similar to that described earlier. You can set environment variables by using the form VARIABLE=value, or you can specify a command preceded by five numbers or wildcards to indicate when the job is to run. In a user cron job, you do not specify the username used to execute the job, as you do with system cron jobs. That information is derived from the owner of the cron job. Listing 12.2 shows a sample cron job file. This file runs two programs at different intervals: The fetchmail program runs every 30 minutes (on the hour and half hour), and clean-adouble runs on Mondays at 2:00 a.m. Both programs are specified via complete paths, but you can include a PATH environment variable and omit the complete path specifications.
Listing 12.2: A sample user cron job file
SHELL=/bin/bash
MAILTO=tbaker
HOME=/home/tbaker
0,30 * * * * /usr/bin/fetchmail -s
0 2 * * mon /usr/local/bin/clean-adouble $HOME
Ultimately, user cron job files are stored in the /var/spool/cron, /var/spool/cron/tabs, or /var/spool/cron/crontabs directory. Each file in this directory is named after the user under whose name it runs; for example, tbaker's file might be called /var/spool/cron/tabs/tbaker. You shouldn't directly edit the files in this directory; instead, use crontab to make changes.
Access to the cron facility may be restricted in several ways:
Executable Permissions The permissions on the cron and crontab programs may be restricted using standard Linux permissions mechanisms. Not all distributions configure themselves in this way, but for those that do, users who should be able to schedule jobs using cron should be added to the appropriate group. This group is often called cron, but you should check the group owner and permissions on the /usr/sbin/cron and /usr/bin/crontab program files to be sure.
Allowed Users List The /etc/cron.allow file contains a list of users who should be permitted access to cron. If this file is present, only users whose names appear in the file may use cron; all others are denied access. If this file isn't present, anybody may use cron, assuming access isn't restricted by executable permissions or a disallowed users list.
Disallowed Users List The /etc/cron.deny file contains a list of users who should be denied access to cron. If this file is present, any user whose name appears in the file is denied access to cron, but all others may use it, assuming executable permissions and the allowed users list don't restrict access.
Investigating Problems
One type of cron problem relates to the access restrictions that were just described: If a user can't create cron jobs, you should check executable permissions and the contents of the /etc/cron.allow and /etc/cron.deny files (if they're present). Be cautious when modifying these features, though; you don't want to tear down security measures that might have been put in place for a reason. If necessary, consult with other administrators to learn why a restriction exists.
If system cron jobs aren't running, check your log files for indications that the relevant file was executed. Ideally, you should see lines that indicate what was run:
Details vary from one distribution to another (this example is taken from an Ubuntu installation), but the entries should indicate the command run—cd / && run-parts --report /etc/cron.hourly in this example. If you can't find evidence that cron is running its jobs, perhaps the daemon isn't starting or is crashing. Use ps to see whether it's running, as described earlier in “Finding Running Processes.” You may also want to review your SysV or Upstart configuration, since cron is normally started in this way.
Sometimes creating a “dummy”cron job can be a good way to investigate problems. A command such as date > /tmp/date.txt, used as a cron job, can tell you whether a job is executing; just check for /tmp/date.txt, and verify that it contains the time that it should if the job is executing correctly.
![]() You can create cron jobs that run when you want them to run to help diagnose problems. Be careful when you do this, though. If you're having problems with, say, the regular cron monthly run, you can schedule it to run right away; but if this run normally does some time-consuming or time-sensitive task like, say, a monthly system backup, you might want to remove or disable the script that does this while you test (unless of course that's the monthly process that's not working).
You can create cron jobs that run when you want them to run to help diagnose problems. Be careful when you do this, though. If you're having problems with, say, the regular cron monthly run, you can schedule it to run right away; but if this run normally does some time-consuming or time-sensitive task like, say, a monthly system backup, you might want to remove or disable the script that does this while you test (unless of course that's the monthly process that's not working).
You should always be mindful of permissions when dealing with cron. Sometimes a job won't work because it's being executed as the wrong user. A job that's executed inappropriately as root can be just as much of a problem. Not only does this create a security risk, but if the job creates files, they'll probably be owned by root, which could cause problems if ordinary users or non-root processes should be able to manipulate (or sometimes even read) these files.
Summary
This chapter covers a variety of miscellaneous system and environmental troubleshooting topics. The first of these was system initialization: ensuring that the correct runlevel is reached, that startup scripts run correctly, and that a suitable login process is available for users (or administrators). You should also be able to check and change kernel configurations using sysctl; such settings can sometimes be critically important to normal system operation.
User accounts pose unique troubleshooting challenges. Accounts can be damaged or need attention because of a changing account environment or because users simply forget their passwords. Fortunately, ordinary account maintenance tools (passwd, usermod, and so on) can correct most of these problems. Some user problems relate to their shells. Depending on how it's launched, bash may use any of several different configuration files, which are in fact scripts. If critical user files such as ~/.bashrc are missing or damaged, critical bash environment variables and other features may not be set. Likewise, global configuration files can become damaged and may need repair or replacement.
Running programs pose generic issues. You must be able to identify specific processes by using ps. With information from ps in hand, you may be able to kill an errant process or begin to learn why a process that should be running isn't. Most Linux programs rely on libraries, so being able to identify those libraries and fix library problems is important.
Sometimes you want to run programs in the future. The cron utility provides this ability in Linux, so understanding how to use cron is important. Troubleshooting cron can sometimes be tricky because it's designed to run jobs at specific times. Rescheduling cron jobs, checking log files, and paying attention to cron-specific details can help you diagnose cron problems.
Exam Essentials
Explain how to change the default runlevel. The /etc/inittab file contains a line that begins with id that sets the default runlevel. Change the number on this line to reflect your desired default runlevel. For instance, editing this line to read id:3:initdefault: sets the default runlevel to 3.
Summarize some common login tools and methods. Login methods can be text-mode or GUI and local or network-enabled. The traditional text-mode local login method is the login program, which is run on a local console via a getty program. Network-enabled text-mode tools include the now largely obsolete Telnet and the newer SSH. The XDMCP protocol mediates both local and network GUI logins. Network GUI logins can also be handled by VNC or tunneled through SSH.
Describe tools for adjusting kernel options once the computer has booted. Some kernel options can be set by modifying files in the /proc directory tree. Another way of doing this is to use the sysctl program. You can edit such options so that they're set when the system boots by editing /etc/sysctl.conf.
Summarize the files in which user account information is stored. The /etc/passwd file holds usernames, UID values, default GID values, free-form user information, the location of users' home directories, and the names of users' default shells. In the past, it also held hashed passwords, but this information is now held in the /etc/shadow file, which also holds password aging information. The /etc/group file holds information on groups, including group names, GID values, and the users who belong to groups.
Summarize some of the tools used to adjust account information. The usermod utility modifies many of the key account features, such as the UID value, home directory, and default shell. You can use passwd to reset a forgotten or corrupted password. You can use your favorite text editor to directly edit any of the key account files.
Describe key bash startup scripts. The startup scripts for bash can be categorized as either login or non-login and as either global or user. The key global login file is /etc/profile, but it often includes files in /etc/profile.d, as well. The ~/.bash_profile, ~/.bash_login, and ~/.profile files are user login files. Officially, the only non-login bash startup script is ~/.bashrc (a user file); however, both this file and /etc/profile usually call /etc/bashrc, /etc/bash/bashrc, or /etc/bash.bashrc, so these files are generally considered global non-login files.
Explain how to ensure that dynamic libraries stored in an unusual location will be used. The /etc/ld.so.conf file holds the names of directories that will be searched for dynamic libraries. You can edit this file, either directly or by creating a custom file in /etc/ld.so.conf.d, and then type ldconfig as root to have the system scan the libraries so that it can quickly locate specific library files.
Describe how to adjust syslogd options. You can control the files to which log messages are sent by editing /etc/syslog.conf. (Some systems use other system loggers, so you may need to adjust a different file, such as /etc/rsyslogd.conf.) You use various codes to assign files or other targets to specific facilities (such as kern, mail, and security) and priorities (such as info, err, and emerg). Servers and some other programs generate messages with particular facilities and priorities according to their own rules; the system logger sorts and logs these according to the rules you specify.
Explain the difference between user and system cron jobs. User cron jobs are created by ordinary users (potentially including root) to handle their own tasks on a regularly scheduled basis. Users create files specifying these jobs, which are then stored by the system in /var/spool/cron or a similar location. System cron jobs handle system tasks. They're defined in /etc/crontab, which typically runs scripts stored in various other subdirectories called /etc/cron.interval, where interval is some time unit.
Summarize some methods you can use to resolve cron problems. You can check for user restrictions to be sure that users have the right to run cron jobs. You can check log files to see whether cron is trying to execute a process at an appropriate time. You can use ps to verify that the cron daemon is running. You can create a “dummy”cron job that runs along with whatever is causing problems but that creates a useful trace of its operations to help diagnose the problem.
Review Questions
- What is the purpose of the /etc/sysctl.conf file?
A. It holds miscellaneous system configuration options that are set via the sysctl utility when the system boots.
B. It specifies the order in which system services are started when the computer boots.
C. It specifies the filesystems that are mounted at boot time or that may be mounted manually by ordinary users.
D. It identifies system services that are started directly by the init process when the computer boots.
- How do /etc/profile and /etc/bashrc differ?
A. /etc/profile is a tcsh logout script; /etc/bashrc holds bash environment variables.
B. /etc/profile holds user login statistics; /etc/bashrc holds user shell preferences.
C. /etc/profile is a login script; /etc/bashrc is a non-login script.
D. /etc/profile holds user account data; /etc/bashrc is a bash startup script.
- What are the important (non-comment) contents of /etc/ld.so.conf?
A. Environment variables
B. A shell script program
C. Usernames
D. Directory names
- A symbolic link is called /etc/rc.d/rc3.d/S80sendmail. Assuming this symbolic link is correctly placed and functions in the expected way, what will it do?
A. Start the sendmail server in runlevel 3.
B. Point the sendmail server to its configuration file.
C. Initialize sendmail to run via inetd.
D. Stop the sendmail server when launched manually without options.
- Which of the following is a global non-login bash startup script?
A. /etc/profile
B. /etc/bashrc
C. /root/.profile
D. /root/.bashrc
- What command must you type as root to have the system re-scan the directories on the library path to enable programs to find dynamic libraries in these directories?
A. sysctl
B. ldconfig
C. shadow
D. init -libs
- You've determined that the SSH server is being started by the /etc/rc2.d/S16ssh startup script (or a link of that name). You want to prevent this server from running in runlevel 2. What is the most reliable way to do this?
A. Rename the script or link so that its name begins with K rather than S.
B. Delete the /etc/rc2.d directory.
C. Delete the /etc/rc2.d/S16ssh file or link.
D. Locate the corresponding Upstart configuration file and delete it.
- Which of the following is not a common bash startup script file?
A. ~/.bash_logout
B. /etc/bash.bashrc
C. /etc/bashrc
D. ~/.profile
- You type sysctl -a as root. What can you expect to have happen?
A. The computer will reboot immediately.
B. All processes with invalid PPID values will be terminated.
C. You will see a list of kernel keys and their values.
D. You will see an error message describing the correct use of sysctl.
- What directory is commonly used as a supplemental location for additional scripts called by the global bash login script?
A. /etc/bashrc.d
B. /etc/bash.extras
C. /etc/profile.d
D. /etc/scripts
- Which of the following lines, if used in a user cron job, will run /usr/local/bin/cleanup twice a day?
A. 15 7,19 * * * tbaker /usr/local/bin/cleanup
B. 15 7,19 * * * /usr/local/bin/cleanup
C. 15 */2 * * * tbaker /usr/local/bin/cleanup
D. 15 */2 * * * /usr/local/bin/cleanup
- To alter a Linux system's default runlevel, what would you do?
A. Issue the telinit x command, where x is the desired runlevel.
B. Edit /etc/modules.conf, and enter the runlevel as an option to the runlevel module.
C. Issue the telinit Q command to have the system query you for a new runlevel.
D. Edit /etc/inittab and enter the correct runlevel in the id line.
- You use top to examine the CPU time being consumed by various processes on your system. You discover that one process, dfcomp, is consuming more than 90 percent of your system's CPU time. What can you conclude?
A. Very little; dfcomp could be legitimately consuming that much CPU time, or it could be an unauthorized or malfunctioning program.
B. No program should consume 90 percent of available CPU time; dfcomp is clearly malfunctioning and should be terminated.
C. This is normal; dfcomp is the kernel's main scheduling process, and it consumes any unused CPU time.
D. This behavior is normal if your CPU is less powerful than a 2.5GHz EM64T Pentium; but on newer systems, no program should consume 90 percent of CPU time.
- What is wrong with the following system cron job entry (in /etc/crontab)?
17 * * * * run-parts /etc/cron.hourly
A. This command should run hourly but will run only at 5:00 p.m.
B. There is no run-parts command in Linux.
C. The time specification is incomplete.
D. It's missing a user specification.
- The user fred creates a cron job to retrieve email from a remote server using the fetchmail program. What is true of this cron job, if it's properly configured?
A. The fetchmail process runs with the fred UID.
B. The fetchmail process runs with the root UID
C. The fetchmail process runs with the crontab UID.
D. The fetchmail process runs with the nobody UID.
- You log into a Linux system using a text-mode virtual terminal at the computer's console. What program is likely to handle the login procedure?
A. bash
B. SSH
C. GDM
D. login
- Which of the following account features can you change by editing a user's entry in /etc/passwd? (Select all that apply.)
A. The account's expiration date
B. The account's home directory
C. The account's default shell
D. The account's default GUI desktop environment
- In what file are GIDs associated with their assigned names?
A. /etc/passwd
B. /etc/shadow
C. /etc/group
D. /etc/grub.d
- In what configuration file can you find system-wide features such as the minimum UID value that should be used for user accounts and the period that login should wait after a login failure before permitting another attempt?
A. /etc/user.set
B. /etc/system.conf
C. /etc/account.conf
D. /etc/login.defs
- What permissions are most appropriate for the /etc/shadow file?
A. 0666 (-rw-rw-rw-)
B. 0644 (-rw-r--r--)
C. 0640 (-rw-r-----)
D. 0600 (-rw-------)
Answers to Review Questions
- A. Option A correctly describes the purpose of /etc/sysctl.conf. Option B is a partial description of the purpose of SysV init scripts. Option C describes the function of the /etc/fstab file. Option D describes the purpose of the /etc/inittab file.
- C. Option C provides brief but correct descriptions of both of these files and so is correct. Option A's description of /etc/profile is completely fictitious, although its description of /etc/bashrc is at least potentially and partially correct, since login scripts can set environment variables. Option B's descriptions of both files are both completely fictitious. Option D's description of /etc/profile is fictitious (it applies to /etc/passwd), but its description of /etc/bashrc is correct.
- D. The /etc/ld.so.conf file holds the names of directories that the system searches for dynamic libraries, so option D is correct. This file does not hold environment variables, shell script programs, or usernames, so options A, B, and C are all wrong.
- A. The /etc/rc.d/rc3.d is one of several possible locations for links to SysV startup scripts that are to be run when entering runlevel 3. Because this link name begins with S, this link causes the service to be started when entering runlevel 3, so option A is correct. This location is not used to point servers to configuration files or to run servers via the inetd super server, so options B and C are incorrect. When a SysV startup script is launched without options, it displays an error message, so option D is incorrect.
- B. /etc/bashrc is a common name for a global non-login bash startup script, so option B is correct. /etc/profile is a common name for a global login bash startup script, so option A is incorrect. /root/.profile is the root user's login bash startup script, so option C is incorrect. /root/.bashrc is the root user's non-login bash startup script, so option D is incorrect.
- B. The ldconfig utility reads /etc/ld.so.conf and caches information on the libraries in the referenced directories, so option B is correct. The sysctl program is used to adjust run-time kernel features, but it doesn't manage libraries, so option A is incorrect. There is no standard shadow program, although /etc/shadow holds account passwords and aging information, so option C is incorrect. The init process is the first process run by the kernel; it's not used (even with options) as described in the question, so option D is incorrect.
- A. Startup scripts (or, more commonly, symbolic links that point to them) that begin with the letter S are called in such a way that they start the service in question; those that begin with the letter K are called in such a way that they stop the service in question. Thus, option A will have the desired effect. Options B and C will both prevent the server from starting, but the server may continue running if you switch from another runlevel. More importantly, option B will stop the computer from starting many other potentially vital services in runlevel 2. The question clearly states that the server is being started by a SysV startup script, so there's no need to look for a competing Upstart configuration file.
- A. The ~/.bash_logout file is a common bash logout file; it doesn't run when bash starts, so it's not a bash startup script file, and option A is correct. Options B and C are two common names for global bash non-login startup scripts, and option D is a standard name for a user login startup script for bash.
- C. The sysctl utility enables you to set or view run-time kernel variables (keys), and its -a option displays them all; thus, option C is correct. Option A describes the effect of typing shutdown -r now or reboot as root. Option B doesn't describe the effect of any command. Since the specified command is legal, sysctl won't display an error message, and option D is incorrect.
- C. The standard /etc/profile script provided with most Linux distributions searches /etc/profile.d and runs any scripts it finds there; therefore, option C is correct. Options A, B, and D all describe fictitious locations.
- B. User cron jobs don't include a username specification (tbaker in options A and C). The */2 specification for the hour in options C and D causes the job to execute every other hour; the 7,19 specification in options A and B causes it to execute twice a day, on the 7th and 19th hours (in conjunction with the 15 minute specification, that means at 7:15 a.m. and 7:15 p.m.).
- D. The /etc/inittab file controls the default runlevel, and the line beginning with id sets the default runlevel, so option D is correct. Although telinit can be used to temporarily change the runlevel, this change will not be permanent, so option A is incorrect. The /etc/modules.conf file has nothing to do with runlevels, and there is no standard runlevel module, so option B is incorrect. The command telinit Q tells the system to reread /etc/inittab, so it could be used to implement a changed default after you've edited the file, but it will have no effect before editing this file, so option C is incorrect.
- A. CPU-intensive programs routinely consume 90 percent or more of available CPU time, but not all systems run such programs. Furthermore, some types of program bugs can create such CPU loads. Thus, you must investigate the matter more. What is dfcomp? Is it designed as a CPU-intensive program? Is it consuming this much CPU time consistently, or was this a brief burst of activity? Because there are so many questions left unanswered, option A is correct. Depending on the system, it might or might not be reasonable for a single process to consume 90 percent of CPU time, so option B is incorrect. Option C's description of dfcomp is entirely fictitious. Option D's summary of CPU loads on different types of CPUs is entirely fictitious.
- D. System cron jobs require a user specification after the time specification and before the command to be executed, and this entry is missing in this specification, so option D is correct. (This entry would be legal for a user cron job, though, assuming the user could run the command.) Option A is incorrect because the time specification runs the job at 17 minutes past the hour, every hour; and even if it did run at 5:00 p.m., the entry would be legal, if confusingly named. Option B is incorrect because run-parts, although not present on all Linux distributions, is used on several distributions. cron is also capable of running user-written scripts and programs, so even if run-parts weren't a standard Linux utility, the entry would still work if you'd written your own run-parts script. Option C is incorrect because the time specification is complete; it includes a minute value (17) and asterisks (*) denoting a run at every hour, day of the month, month, and day of the week.
- A. User cron jobs run as the user who created them, so option A is correct, and options B, C, and D are necessarily incorrect.
- D. The login program is launched by the getty that handles a virtual terminal in order to handle the login procedure at text-mode consoles; thus, option D is correct. Although the effect of the login may well be the launching of bash, this program doesn't handle the login procedure itself, so option A is incorrect. The Secure Shell (SSH) is a network-oriented login protocol; it doesn't handle local logins, so option B is incorrect. The GNOME Display Manager (GDM) is one of several GUI login programs; since the question specified a text-mode login, option C is incorrect.
- B, C. The /etc/passwd file contains the username, a password field (unused today), the user ID (UID) value, the group ID (GID) value for the default group, a free-form description, the home directory, and the default shell. Options B and C are in this list and so are correct. The account's expiration date is stored in the /etc/shadow file, not in /etc/passwd, so option A is incorrect. The account's default GUI desktop environment (GNOME, KDE, Xfce, and so forth) is managed by the XDMCP server in a way specific for each XDMCP login server, so option D is incorrect.
- C. Group ID (GID) values are associated with group names in /etc/group, so option C is correct. The /etc/passwd and /etc/shadow files define user information, not group information, so options A and B are both incorrect. (Each user's default GID value appears in /etc/passwd, but this associates users to groups, not GIDs to their own names.) The /etc/grub.d directory holds scripts that help configure the Grand Unified Bootloader (GRUB) 2; it doesn't link GIDs to their names—and it's a directory, not a file. Thus, option D is incorrect.
- D. The /etc/login.defs file holds the specified information, so option D is correct. The remaining options are all fictitious files.
- D. The /etc/shadow file holds hashed user passwords, which are sensitive and so should not be readable by ordinary users. Thus, all world permissions should definitely be denied on this file, making options A and B incorrect. Although this file is ordinarily given to the root group, allowing group read access to it is generally considered a bad idea, so option C is incorrect. Option D is the most restrictive set of permissions among all the options, and in fact the root user, who owns this file, must have read and write access to it, so option D is correct.